Hub documentation
ZenML on Spaces
ZenML on Spaces
ZenML is an extensible, open-source MLOps framework for creating portable, production-ready MLOps pipelines. It’s built for Data Scientists, ML Engineers, and MLOps Developers to collaborate as they develop to production.
ZenML offers a simple and flexible syntax, is cloud- and tool-agnostic, and has interfaces/abstractions catered toward ML workflows. With ZenML you’ll have all your favorite tools in one place, so you can tailor a workflow that caters to your specific needs.
The ZenML Huggingface Space allows you to get up and running with a deployed version of ZenML with just a few clicks. Within a few minutes, you’ll have this default ZenML dashboard deployed and ready for you to connect to from your local machine.
In the sections that follow, you’ll learn to deploy your own instance of ZenML and use it to view and manage your machine learning pipelines right from the Hub. ZenML on Huggingface Spaces is a self-contained application completely hosted on the Hub using Docker. The diagram below illustrates the complete process.
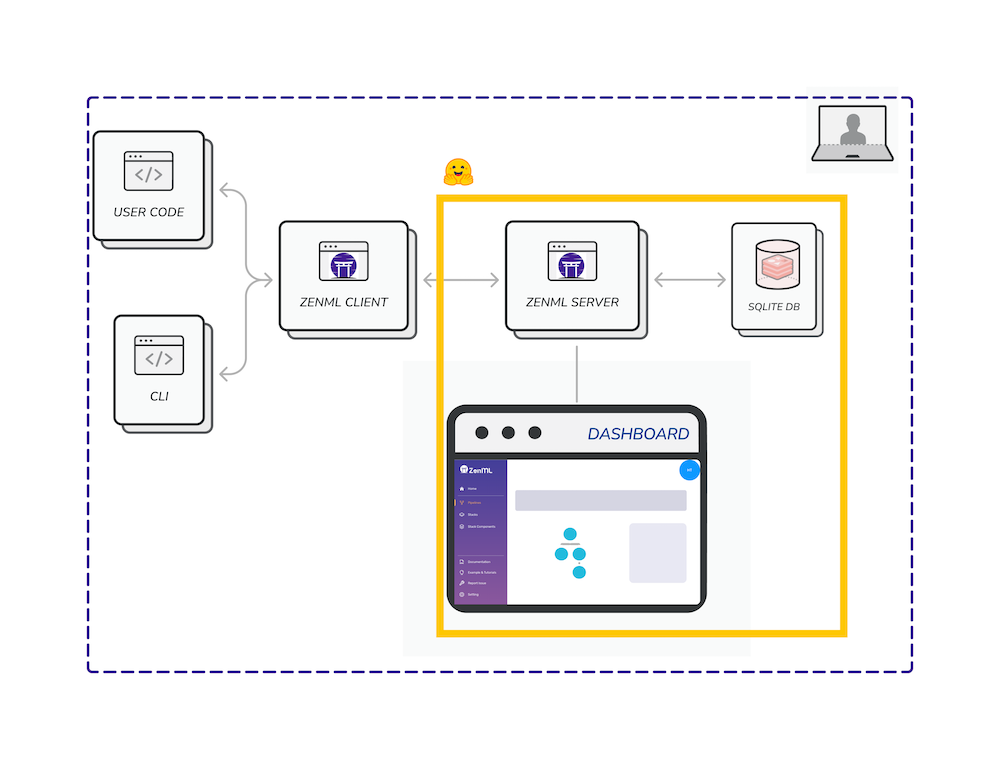
Visit the ZenML documentation to learn more about its features and how to get started with running your machine learning pipelines through your Huggingface Spaces deployment. You can check out some small sample examples of ZenML pipelines to get started or take your pick of some more complex production-grade projects at the ZenML Projects repository. ZenML integrates with many of your favorite tools out of the box, including Huggingface of course! If there’s something else you want to use, we’re built to be extensible and you can easily make it work with whatever your custom tool or workflow is.
⚡️ Deploy ZenML on Spaces
You can deploy ZenML on Spaces with just a few clicks:

To set up your ZenML app, you need to specify three main components: the Owner (either your personal account or an organization), a Space name, and the Visibility (a bit lower down the page). Note that the space visibility needs to be set to ‘Public’ if you wish to connect to the ZenML server from your local machine.

You have the option here to select a higher tier machine to use for your server. The advantage of selecting a paid CPU instance is that it is not subject to auto-shutdown policies and thus will stay up as long as you leave it up. In order to make use of a persistent CPU, you’ll likely want to create and set up a MySQL database to connect to (see below).
To personalize your Space’s appearance, such as the title, emojis, and colors, navigate to “Files and Versions” and modify the metadata in your README.md file. Full information on Spaces configuration parameters can be found on the HuggingFace documentation reference guide.
After creating your Space, you’ll notice a ‘Building’ status along with logs displayed on the screen. When this switches to ‘Running’, your Space is ready for use. If the ZenML login UI isn’t visible, try refreshing the page.
In the upper-right hand corner of your space you’ll see a button with three dots
which, when you click on it, will offer you a menu option to “Embed this Space”.
(See the HuggingFace
documentation for more details on
this feature.) Copy the “Direct URL” shown in the box that you can now see on
the screen. This should look something like this:
https://<YOUR_USERNAME>-<SPACE_NAME>.hf.space. Open that URL and use our default
login to access the dashboard (username: ‘default’, password: (leave it empty)).
Connecting to your ZenML Server from your Local Machine
Once you have your ZenML server up and running, you can connect to it from your local machine. To do this, you’ll need to get your Space’s ‘Direct URL’ (see above).
Your Space’s URL will only be available and usable for connecting from your local machine if the visibility of the space is set to ‘Public’.
You can use the ‘Direct URL’ to connect to your ZenML server from your local machine with the following CLI command (after installing ZenML, and using your custom URL instead of the placeholder):
zenml connect --url '<YOUR_HF_SPACES_DIRECT_URL>' --username='default' --password=''
You can also use the Direct URL in your browser to use the ZenML dashboard as a fullscreen application (i.e. without the HuggingFace Spaces wrapper around it).
The ZenML dashboard will currently not work when viewed from within the Huggingface webpage (i.e. wrapped in the main
https://huggingface.co/...website). This is on account of a limitation in how cookies are handled between ZenML and Huggingface. You must view the dashboard from the ‘Direct URL’ (see above).
Extra Configuration Options
By default the ZenML application will be configured to use a SQLite
non-persistent database. If you want to use a persistent database, you can
configure this by amending the Dockerfile in your Space’s root directory. For
full details on the various parameters you can change, see our reference
documentation on configuring
ZenML when deployed with Docker.
If you are using the space just for testing and experimentation, you don’t need to make any changes to the configuration. Everything will work out of the box.
You can also use an external secrets backend together with your HuggingFace
Spaces as described in our
documentation. You should be
sure to use HuggingFace’s inbuilt ‘Repository secrets’ functionality to
configure any secrets you need to use in yourDockerfile configuration. See the
documentation
for more details how to set this up.
If you wish to use a cloud secrets backend together with ZenML for secrets management, you must take the following minimal security precautions on your ZenML Server on the Dashboard:
- change your password on the
defaultaccount that you get when you start. You can do this from the Dashboard or via the CLI.- create a new user account with a password and assign it the
adminrole. This can also be done from the Dashboard (by ‘inviting’ a new user) or via the CLI.- reconnect to the server using the new user account and password as described above, and use this new user account as your working account.
This is because the default user created by the HuggingFace Spaces deployment process has no password assigned to it and as the Space is publicly accessible (since the Space is public) potentially anyone could access your secrets without this extra step. To change your password navigate to the Settings page by clicking the button in the upper right hand corner of the Dashboard and then click ‘Update Password’.
Upgrading your ZenML Server on HF Spaces
The default space will use the latest version of ZenML automatically. If you
want to update your version, you can simply select the ‘Factory reboot’ option
within the ‘Settings’ tab of the space. Note that this will wipe any data
contained within the space and so if you are not using a MySQL persistent
database (as described above) you will lose any data contained within your ZenML
deployment on the space. You can also configure the space to use an earlier
version by updating the Dockerfile’s FROM import statement at the very top.
Next Steps
As a next step, check out our Starter Guide to MLOps with
ZenML which is a series of short
practical pages on how to get going quickly. Alternatively, check out our
quickstart
example which
is a full end-to-end example of many of the features of ZenML.
🤗 Feedback and support
If you are having trouble with your ZenML server on HuggingFace Spaces, you can view the logs by clicking on the “Open Logs” button at the top of the space. This will give you more context of what’s happening with your server.
If you have suggestions or need specific support for anything else which isn’t working, please join the ZenML Slack community and we’ll be happy to help you out!
Update on GitHub