Transformers documentation
量化 🤗 Transformers 模型
量化 🤗 Transformers 模型
AWQ集成
AWQ方法已经在AWQ: Activation-aware Weight Quantization for LLM Compression and Acceleration论文中引入。通过AWQ,您可以以4位精度运行模型,同时保留其原始性能(即没有性能降级),并具有比下面介绍的其他量化方法更出色的吞吐量 - 达到与纯float16推理相似的吞吐量。
我们现在支持使用任何AWQ模型进行推理,这意味着任何人都可以加载和使用在Hub上推送或本地保存的AWQ权重。请注意,使用AWQ需要访问NVIDIA GPU。目前不支持CPU推理。
量化一个模型
我们建议用户查看生态系统中不同的现有工具,以使用AWQ算法对其模型进行量化,例如:
llm-awq,来自MIT Han Labautoawq,来自casper-hansen- Intel neural compressor,来自Intel - 通过
optimum-intel使用
生态系统中可能存在许多其他工具,请随时提出PR将它们添加到列表中。
目前与🤗 Transformers的集成仅适用于使用autoawq和llm-awq量化后的模型。大多数使用auto-awq量化的模型可以在🤗 Hub的TheBloke命名空间下找到,要使用llm-awq对模型进行量化,请参阅llm-awq的示例文件夹中的convert_to_hf.py脚本。
加载一个量化的模型
您可以使用from_pretrained方法从Hub加载一个量化模型。通过检查模型配置文件(configuration.json)中是否存在quantization_config属性,来进行确认推送的权重是量化的。您可以通过检查字段quantization_config.quant_method来确认模型是否以AWQ格式进行量化,该字段应该设置为"awq"。请注意,为了性能原因,默认情况下加载模型将设置其他权重为float16。如果您想更改这种设置,可以通过将dtype参数设置为torch.float32或torch.bfloat16。在下面的部分中,您可以找到一些示例片段和notebook。
示例使用
首先,您需要安装autoawq库
pip install autoawq
from transformers import AutoModelForCausalLM, AutoTokenizer

model_id = "TheBloke/zephyr-7B-alpha-AWQ"
model = AutoModelForCausalLM.from_pretrained(model_id, device_map="cuda:0")
如果您首先将模型加载到CPU上,请确保在使用之前将其移动到GPU设备上。
from transformers import AutoModelForCausalLM, AutoTokenizer

model_id = "TheBloke/zephyr-7B-alpha-AWQ"
model = AutoModelForCausalLM.from_pretrained(model_id).to("cuda:0")
结合 AWQ 和 Flash Attention
您可以将AWQ量化与Flash Attention结合起来,得到一个既被量化又更快速的模型。只需使用from_pretrained加载模型,并传递attn_implementation="flash_attention_2"参数。
from transformers import AutoModelForCausalLM, AutoTokenizer

model = AutoModelForCausalLM.from_pretrained("TheBloke/zephyr-7B-alpha-AWQ", attn_implementation="flash_attention_2", device_map="cuda:0")
基准测试
我们使用optimum-benchmark库进行了一些速度、吞吐量和延迟基准测试。
请注意,在编写本文档部分时,可用的量化方法包括:awq、gptq和bitsandbytes。
基准测试在一台NVIDIA-A100实例上运行,使用TheBloke/Mistral-7B-v0.1-AWQ作为AWQ模型,TheBloke/Mistral-7B-v0.1-GPTQ作为GPTQ模型。我们还将其与bitsandbytes量化模型和float16模型进行了对比。以下是一些结果示例:
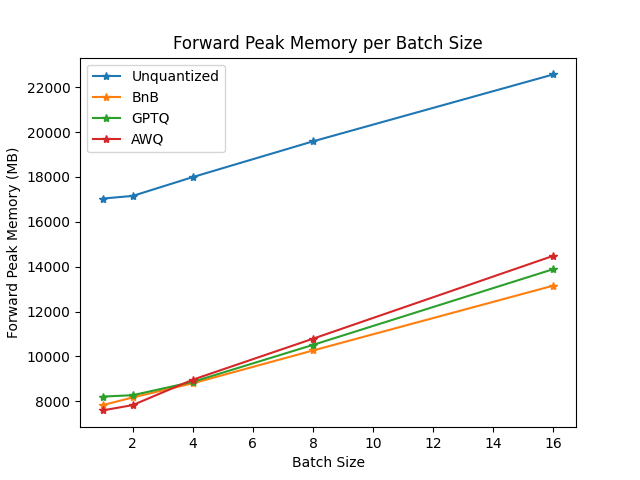
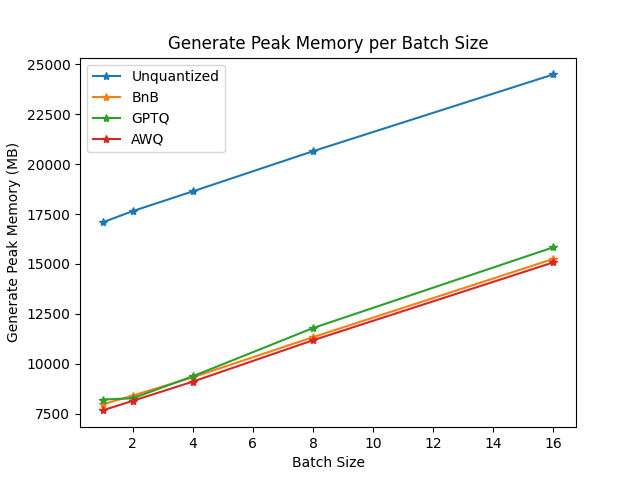
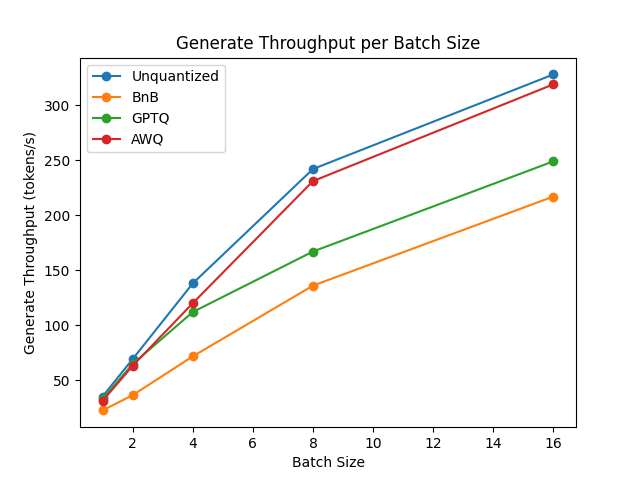
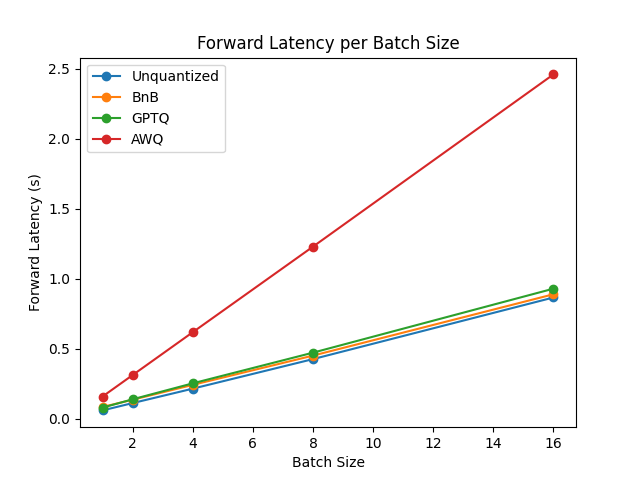
你可以在此链接中找到完整的结果以及包版本。
从结果来看,AWQ量化方法是推理、文本生成中最快的量化方法,并且在文本生成的峰值内存方面属于最低。然而,对于每批数据,AWQ似乎有最大的前向延迟。
Google colab 演示
查看如何在Google Colab演示中使用此集成!
AwqConfig
class transformers.AwqConfig
< source >( bits: int = 4 group_size: int = 128 zero_point: bool = True version: AWQLinearVersion = <AWQLinearVersion.GEMM: 'gemm'> backend: AwqBackendPackingMethod = <AwqBackendPackingMethod.AUTOAWQ: 'autoawq'> do_fuse: typing.Optional[bool] = None fuse_max_seq_len: typing.Optional[int] = None modules_to_fuse: typing.Optional[dict] = None modules_to_not_convert: typing.Optional[list] = None exllama_config: typing.Optional[dict[str, int]] = None **kwargs )
Parameters
- bits (
int, optional, defaults to 4) — The number of bits to quantize to. - group_size (
int, optional, defaults to 128) — The group size to use for quantization. Recommended value is 128 and -1 uses per-column quantization. - zero_point (
bool, optional, defaults toTrue) — Whether to use zero point quantization. - version (
AWQLinearVersion, optional, defaults toAWQLinearVersion.GEMM) — The version of the quantization algorithm to use. GEMM is better for big batch_size (e.g. >= 8) otherwise, GEMV is better (e.g. < 8 ). GEMM models are compatible with Exllama kernels. - backend (
AwqBackendPackingMethod, optional, defaults toAwqBackendPackingMethod.AUTOAWQ) — The quantization backend. Some models might be quantized usingllm-awqbackend. This is useful for users that quantize their own models usingllm-awqlibrary. - do_fuse (
bool, optional, defaults toFalse) — Whether to fuse attention and mlp layers together for faster inference - fuse_max_seq_len (
int, optional) — The Maximum sequence length to generate when using fusing. - modules_to_fuse (
dict, optional, default toNone) — Overwrite the natively supported fusing scheme with the one specified by the users. - modules_to_not_convert (
list, optional, default toNone) — The list of modules to not quantize, useful for quantizing models that explicitly require to have some modules left in their original precision (e.g. Whisper encoder, Llava encoder, Mixtral gate layers). Note you cannot quantize directly with transformers, please refer toAutoAWQdocumentation for quantizing HF models. - exllama_config (
dict[str, Any], optional) — You can specify the version of the exllama kernel through theversionkey, the maximum sequence length through themax_input_lenkey, and the maximum batch size through themax_batch_sizekey. Defaults to{"version": 2, "max_input_len": 2048, "max_batch_size": 8}if unset.
This is a wrapper class about all possible attributes and features that you can play with a model that has been
loaded using auto-awq library awq quantization relying on auto_awq backend.
Safety checker that arguments are correct
AutoGPTQ 集成
🤗 Transformers已经整合了optimum API,用于对语言模型执行GPTQ量化。您可以以8、4、3甚至2位加载和量化您的模型,而性能无明显下降,并且推理速度更快!这受到大多数GPU硬件的支持。
要了解更多关于量化模型的信息,请查看:
要求
为了运行下面的代码,您需要安装:
安装最新版本的
AutoGPTQ库pip install auto-gptq从源代码安装最新版本的
optimumpip install git+https://github.com/huggingface/optimum.git从源代码安装最新版本的
transformerspip install git+https://github.com/huggingface/transformers.git安装最新版本的
accelerate库:pip install --upgrade accelerate
请注意,目前GPTQ集成仅支持文本模型,对于视觉、语音或多模态模型可能会遇到预期以外结果。
加载和量化模型
GPTQ是一种在使用量化模型之前需要进行权重校准的量化方法。如果您想从头开始对transformers模型进行量化,生成量化模型可能需要一些时间(在Google Colab上对facebook/opt-350m模型量化约为5分钟)。
因此,有两种不同的情况下您可能想使用GPTQ量化模型。第一种情况是加载已经由其他用户在Hub上量化的模型,第二种情况是从头开始对您的模型进行量化并保存或推送到Hub,以便其他用户也可以使用它。
GPTQ 配置
为了加载和量化一个模型,您需要创建一个GPTQConfig。您需要传递bits的数量,一个用于校准量化的dataset,以及模型的tokenizer以准备数据集。
model_id = "facebook/opt-125m"
tokenizer = AutoTokenizer.from_pretrained(model_id)
gptq_config = GPTQConfig(bits=4, dataset = "c4", tokenizer=tokenizer)
请注意,您可以将自己的数据集以字符串列表形式传递到模型。然而,强烈建议您使用GPTQ论文中提供的数据集。
dataset = ["auto-gptq is an easy-to-use model quantization library with user-friendly apis, based on GPTQ algorithm."]
quantization = GPTQConfig(bits=4, dataset = dataset, tokenizer=tokenizer)
量化
您可以通过使用from_pretrained并设置quantization_config来对模型进行量化。
from transformers import AutoModelForCausalLM
model = AutoModelForCausalLM.from_pretrained(model_id, quantization_config=gptq_config)
请注意,您需要一个GPU来量化模型。我们将模型放在cpu中,并将模块来回移动到gpu中,以便对其进行量化。
如果您想在使用 CPU 卸载的同时最大化 GPU 使用率,您可以设置 device_map = "auto"。
from transformers import AutoModelForCausalLM
model = AutoModelForCausalLM.from_pretrained(model_id, device_map="auto", quantization_config=gptq_config)请注意,不支持磁盘卸载。此外,如果由于数据集而内存不足,您可能需要在from_pretrained中设置max_memory。查看这个指南以了解有关device_map和max_memory的更多信息。
推送量化模型到 🤗 Hub
您可以使用push_to_hub将量化模型像任何模型一样推送到Hub。量化配置将与模型一起保存和推送。
quantized_model.push_to_hub("opt-125m-gptq")
tokenizer.push_to_hub("opt-125m-gptq")如果您想在本地计算机上保存量化模型,您也可以使用save_pretrained来完成:
quantized_model.save_pretrained("opt-125m-gptq")
tokenizer.save_pretrained("opt-125m-gptq")请注意,如果您量化模型时想使用device_map,请确保在保存之前将整个模型移动到您的GPU或CPU之一。
quantized_model.to("cpu")
quantized_model.save_pretrained("opt-125m-gptq")
从 🤗 Hub 加载一个量化模型
您可以使用from_pretrained从Hub加载量化模型。
请确保推送权重是量化的,检查模型配置对象中是否存在quantization_config属性。
from transformers import AutoModelForCausalLM
model = AutoModelForCausalLM.from_pretrained("{your_username}/opt-125m-gptq")如果您想更快地加载模型,并且不需要分配比实际需要内存更多的内存,量化模型也使用device_map参数。确保您已安装accelerate库。
from transformers import AutoModelForCausalLM
model = AutoModelForCausalLM.from_pretrained("{your_username}/opt-125m-gptq", device_map="auto")
Exllama内核加快推理速度
保留格式:对于 4 位模型,您可以使用 exllama 内核来提高推理速度。默认情况下,它处于启用状态。您可以通过在 GPTQConfig 中传递 use_exllama 来更改此配置。这将覆盖存储在配置中的量化配置。请注意,您只能覆盖与内核相关的属性。此外,如果您想使用 exllama 内核,整个模型需要全部部署在 gpus 上。此外,您可以使用 版本 > 0.4.2 的 Auto-GPTQ 并传递 device_map = “cpu” 来执行 CPU 推理。对于 CPU 推理,您必须在 GPTQConfig 中传递 use_exllama = False。
import torch
gptq_config = GPTQConfig(bits=4)
model = AutoModelForCausalLM.from_pretrained("{your_username}/opt-125m-gptq", device_map="auto", quantization_config=gptq_config)
随着 exllamav2 内核的发布,与 exllama 内核相比,您可以获得更快的推理速度。您只需在 GPTQConfig 中传递 exllama_config={"version": 2}:
import torch
gptq_config = GPTQConfig(bits=4, exllama_config={"version":2})
model = AutoModelForCausalLM.from_pretrained("{your_username}/opt-125m-gptq", device_map="auto", quantization_config = gptq_config)
请注意,目前仅支持 4 位模型。此外,如果您正在使用 peft 对量化模型进行微调,建议禁用 exllama 内核。
您可以在此找到这些内核的基准测试 这里
微调一个量化模型
在Hugging Face生态系统的官方支持下,您可以使用GPTQ进行量化后的模型进行微调。
请查看peft库了解更多详情。
示例演示
请查看 Google Colab notebook,了解如何使用GPTQ量化您的模型以及如何使用peft微调量化模型。
GPTQConfig
class transformers.GPTQConfig
< source >( bits: int tokenizer: typing.Any = None dataset: typing.Union[list[str], str, NoneType] = None group_size: int = 128 damp_percent: float = 0.1 desc_act: bool = False sym: bool = True true_sequential: bool = True checkpoint_format: str = 'gptq' meta: typing.Optional[dict[str, typing.Any]] = None backend: typing.Optional[str] = None use_cuda_fp16: bool = False model_seqlen: typing.Optional[int] = None block_name_to_quantize: typing.Optional[str] = None module_name_preceding_first_block: typing.Optional[list[str]] = None batch_size: int = 1 pad_token_id: typing.Optional[int] = None use_exllama: typing.Optional[bool] = None max_input_length: typing.Optional[int] = None exllama_config: typing.Optional[dict[str, typing.Any]] = None cache_block_outputs: bool = True modules_in_block_to_quantize: typing.Optional[list[list[str]]] = None **kwargs )
Parameters
- bits (
int) — The number of bits to quantize to, supported numbers are (2, 3, 4, 8). - tokenizer (
strorPreTrainedTokenizerBase, optional) — The tokenizer used to process the dataset. You can pass either:- A custom tokenizer object.
- A string, the model id of a predefined tokenizer hosted inside a model repo on huggingface.co.
- A path to a directory containing vocabulary files required by the tokenizer, for instance saved
using the save_pretrained() method, e.g.,
./my_model_directory/.
- dataset (
Union[list[str]], optional) — The dataset used for quantization. You can provide your own dataset in a list of string or just use the original datasets used in GPTQ paper [‘wikitext2’,‘c4’,‘c4-new’] - group_size (
int, optional, defaults to 128) — The group size to use for quantization. Recommended value is 128 and -1 uses per-column quantization. - damp_percent (
float, optional, defaults to 0.1) — The percent of the average Hessian diagonal to use for dampening. Recommended value is 0.1. - desc_act (
bool, optional, defaults toFalse) — Whether to quantize columns in order of decreasing activation size. Setting it to False can significantly speed up inference but the perplexity may become slightly worse. Also known as act-order. - sym (
bool, optional, defaults toTrue) — Whether to use symmetric quantization. - true_sequential (
bool, optional, defaults toTrue) — Whether to perform sequential quantization even within a single Transformer block. Instead of quantizing the entire block at once, we perform layer-wise quantization. As a result, each layer undergoes quantization using inputs that have passed through the previously quantized layers. - checkpoint_format (
str, optional, defaults to"gptq") — GPTQ weight format.gptq(v1) is supported by both gptqmodel and auto-gptq.gptq_v2is gptqmodel only. - meta (
dict[str, any], optional) — Properties, such as tooling:version, that do not directly contributes to quantization or quant inference are stored in meta. i.e.meta.quantizer: [“optimum:version”, “gptqmodel:version”] - backend (
str, optional) — Controls which gptq kernel to be used. Valid values for gptqmodel areauto,auto_trainableand more. For auto-gptq, only valid value is None andauto_trainable. Ref gptqmodel backends: https://github.com/ModelCloud/GPTQModel/blob/main/gptqmodel/utils/backend.py - use_cuda_fp16 (
bool, optional, defaults toFalse) — Whether or not to use optimized cuda kernel for fp16 model. Need to have model in fp16. Auto-gptq only. - model_seqlen (
int, optional) — The maximum sequence length that the model can take. - block_name_to_quantize (
str, optional) — The transformers block name to quantize. If None, we will infer the block name using common patterns (e.g. model.layers) - module_name_preceding_first_block (
list[str], optional) — The layers that are preceding the first Transformer block. - batch_size (
int, optional, defaults to 1) — The batch size used when processing the dataset - pad_token_id (
int, optional) — The pad token id. Needed to prepare the dataset whenbatch_size> 1. - use_exllama (
bool, optional) — Whether to use exllama backend. Defaults toTrueif unset. Only works withbits= 4. - max_input_length (
int, optional) — The maximum input length. This is needed to initialize a buffer that depends on the maximum expected input length. It is specific to the exllama backend with act-order. - exllama_config (
dict[str, Any], optional) — The exllama config. You can specify the version of the exllama kernel through theversionkey. Defaults to{"version": 1}if unset. - cache_block_outputs (
bool, optional, defaults toTrue) — Whether to cache block outputs to reuse as inputs for the succeeding block. - modules_in_block_to_quantize (
list[list[str]], optional) — List of list of module names to quantize in the specified block. This argument is useful to exclude certain linear modules from being quantized. The block to quantize can be specified by settingblock_name_to_quantize. We will quantize each list sequentially. If not set, we will quantize all linear layers. Example:modules_in_block_to_quantize =[["self_attn.k_proj", "self_attn.v_proj", "self_attn.q_proj"], ["self_attn.o_proj"]]. In this example, we will first quantize the q,k,v layers simultaneously since they are independent. Then, we will quantizeself_attn.o_projlayer with the q,k,v layers quantized. This way, we will get better results since it reflects the real inputself_attn.o_projwill get when the model is quantized.
This is a wrapper class about all possible attributes and features that you can play with a model that has been
loaded using optimum api for gptq quantization relying on auto_gptq backend.
Get compatible class with optimum gptq config dict
Safety checker that arguments are correct
Get compatible dict for optimum gptq config
bitsandbytes 集成
🤗 Transformers 与 bitsandbytes 上最常用的模块紧密集成。您可以使用几行代码以 8 位精度加载您的模型。
自bitsandbytes的0.37.0版本发布以来,大多数GPU硬件都支持这一点。
在LLM.int8()论文中了解更多关于量化方法的信息,或者在博客文章中了解关于合作的更多信息。
自其“0.39.0”版本发布以来,您可以使用FP4数据类型,通过4位量化加载任何支持“device_map”的模型。
如果您想量化自己的 pytorch 模型,请查看 🤗 Accelerate 的文档。
以下是您可以使用“bitsandbytes”集成完成的事情
通用用法
只要您的模型支持使用 🤗 Accelerate 进行加载并包含 torch.nn.Linear 层,您可以在调用 from_pretrained() 方法时使用 load_in_8bit 或 load_in_4bit 参数来量化模型。这也应该适用于任何模态。
from transformers import AutoModelForCausalLM

model_8bit = AutoModelForCausalLM.from_pretrained("facebook/opt-350m", load_in_8bit=True)
model_4bit = AutoModelForCausalLM.from_pretrained("facebook/opt-350m", load_in_4bit=True)
默认情况下,所有其他模块(例如 torch.nn.LayerNorm)将被转换为 torch.float16 类型。但如果您想更改它们的 dtype,可以重载 dtype 参数:
>>> import torch
>>> from transformers import AutoModelForCausalLM

>>> model_8bit = AutoModelForCausalLM.from_pretrained("facebook/opt-350m", load_in_8bit=True, dtype=torch.float32)
>>> model_8bit.model.decoder.layers[-1].final_layer_norm.weight.dtype
torch.float32
FP4 量化
要求
确保在运行以下代码段之前已完成以下要求:
最新版本
bitsandbytes库pip install bitsandbytes>=0.39.0安装最新版本
acceleratepip install --upgrade accelerate安装最新版本
transformerspip install --upgrade transformers
提示和最佳实践
高级用法: 请参考 此 Google Colab notebook 以获取 4 位量化高级用法和所有可选选项。
使用
batch_size=1实现更快的推理: 自bitsandbytes的0.40.0版本以来,设置batch_size=1,您可以从快速推理中受益。请查看 这些发布说明 ,并确保使用大于0.40.0的版本以直接利用此功能。训练: 根据 QLoRA 论文,对于4位基模型训练(使用 LoRA 适配器),应使用
bnb_4bit_quant_type='nf4'。推理: 对于推理,
bnb_4bit_quant_type对性能影响不大。但是为了与模型的权重保持一致,请确保使用相同的bnb_4bit_compute_dtype和dtype参数。
加载 4 位量化的大模型
在调用 .from_pretrained 方法时使用 load_in_4bit=True,可以将您的内存使用量减少到大约原来的 1/4。
# pip install transformers accelerate bitsandbytes
from transformers import AutoModelForCausalLM, AutoTokenizer

model_id = "bigscience/bloom-1b7"

tokenizer = AutoTokenizer.from_pretrained(model_id)
model = AutoModelForCausalLM.from_pretrained(model_id, device_map="auto", load_in_4bit=True)
需要注意的是,一旦模型以 4 位量化方式加载,就无法将量化后的权重推送到 Hub 上。此外,您不能训练 4 位量化权重,因为目前尚不支持此功能。但是,您可以使用 4 位量化模型来训练额外参数,这将在下一部分中介绍。
加载 8 位量化的大模型
您可以通过在调用 .from_pretrained 方法时使用 load_in_8bit=True 参数,将内存需求大致减半来加载模型
# pip install transformers accelerate bitsandbytes
from transformers import AutoModelForCausalLM, AutoTokenizer, BitsAndBytesConfig

model_id = "bigscience/bloom-1b7"

tokenizer = AutoTokenizer.from_pretrained(model_id)
model = AutoModelForCausalLM.from_pretrained(model_id, quantization_config=BitsAndBytesConfig(load_in_8bit=True))
然后,像通常使用 PreTrainedModel 一样使用您的模型。
您可以使用 get_memory_footprint 方法检查模型的内存占用。
print(model.get_memory_footprint())通过这种集成,我们能够在较小的设备上加载大模型并运行它们而没有任何问题。
需要注意的是,一旦模型以 8 位量化方式加载,除了使用最新的 transformers 和 bitsandbytes 之外,目前尚无法将量化后的权重推送到 Hub 上。此外,您不能训练 8 位量化权重,因为目前尚不支持此功能。但是,您可以使用 8 位量化模型来训练额外参数,这将在下一部分中介绍。
注意,device_map 是可选的,但设置 device_map = 'auto' 更适合用于推理,因为它将更有效地调度可用资源上的模型。
高级用例
在这里,我们将介绍使用 FP4 量化的一些高级用例。
更改计算数据类型
计算数据类型用于改变在进行计算时使用的数据类型。例如,hidden states可以是 float32,但为了加速,计算时可以被设置为 bf16。默认情况下,计算数据类型被设置为 float32。
import torch
from transformers import BitsAndBytesConfig

quantization_config = BitsAndBytesConfig(load_in_4bit=True, bnb_4bit_compute_dtype=torch.bfloat16)
使用 NF4(普通浮点数 4)数据类型
您还可以使用 NF4 数据类型,这是一种针对使用正态分布初始化的权重而适应的新型 4 位数据类型。要运行:
from transformers import BitsAndBytesConfig

nf4_config = BitsAndBytesConfig(
    load_in_4bit=True,
    bnb_4bit_quant_type="nf4",
)

model_nf4 = AutoModelForCausalLM.from_pretrained(model_id, quantization_config=nf4_config)
使用嵌套量化进行更高效的内存推理
我们还建议用户使用嵌套量化技术。从我们的经验观察来看,这种方法在不增加额外性能的情况下节省更多内存。这使得 llama-13b 模型能够在具有 1024 个序列长度、1 个批次大小和 4 个梯度累积步骤的 NVIDIA-T4 16GB 上进行 fine-tuning。
from transformers import BitsAndBytesConfig

double_quant_config = BitsAndBytesConfig(
    load_in_4bit=True,
    bnb_4bit_use_double_quant=True,
)

model_double_quant = AutoModelForCausalLM.from_pretrained(model_id, quantization_config=double_quant_config)
将量化模型推送到🤗 Hub
您可以使用 push_to_hub 方法将量化模型推送到 Hub 上。这将首先推送量化配置文件,然后推送量化模型权重。
请确保使用 bitsandbytes>0.37.2(在撰写本文时,我们使用的是 bitsandbytes==0.38.0.post1)才能使用此功能。
from transformers import AutoModelForCausalLM, AutoTokenizer, BitsAndBytesConfig

model = AutoModelForCausalLM.from_pretrained("bigscience/bloom-560m", quantization_config=BitsAndBytesConfig(load_in_8bit=True))
tokenizer = AutoTokenizer.from_pretrained("bigscience/bloom-560m")

model.push_to_hub("bloom-560m-8bit")
对大模型,强烈鼓励将 8 位量化模型推送到 Hub 上,以便让社区能够从内存占用减少和加载中受益,例如在 Google Colab 上加载大模型。
从🤗 Hub加载量化模型
您可以使用 from_pretrained 方法从 Hub 加载量化模型。请确保推送的权重是量化的,检查模型配置对象中是否存在 quantization_config 属性。
from transformers import AutoModelForCausalLM, AutoTokenizer

model = AutoModelForCausalLM.from_pretrained("{your_username}/bloom-560m-8bit", device_map="auto")
请注意,在这种情况下,您不需要指定 load_in_8bit=True 参数,但需要确保 bitsandbytes 和 accelerate 已安装。
情注意,device_map 是可选的,但设置 device_map = 'auto' 更适合用于推理,因为它将更有效地调度可用资源上的模型。
高级用例
本节面向希望探索除了加载和运行 8 位模型之外还能做什么的进阶用户。
在 cpu 和 gpu 之间卸载
此高级用例之一是能够加载模型并将权重分派到 CPU 和 GPU 之间。请注意,将在 CPU 上分派的权重 不会 转换为 8 位,因此会保留为 float32。此功能适用于想要适应非常大的模型并将模型分派到 GPU 和 CPU 之间的用户。
首先,从 transformers 中加载一个 BitsAndBytesConfig,并将属性 llm_int8_enable_fp32_cpu_offload 设置为 True:
from transformers import AutoModelForCausalLM, AutoTokenizer, BitsAndBytesConfig

quantization_config = BitsAndBytesConfig(llm_int8_enable_fp32_cpu_offload=True)
假设您想加载 bigscience/bloom-1b7 模型,您的 GPU显存仅足够容纳除了lm_head外的整个模型。因此,您可以按照以下方式编写自定义的 device_map:
device_map = {
    "transformer.word_embeddings": 0,
    "transformer.word_embeddings_layernorm": 0,
    "lm_head": "cpu",
    "transformer.h": 0,
    "transformer.ln_f": 0,
}
然后如下加载模型:
model_8bit = AutoModelForCausalLM.from_pretrained(
    "bigscience/bloom-1b7",
    device_map=device_map,
    quantization_config=quantization_config,
)
这就是全部内容!享受您的模型吧!
使用 llm_int8_threshold
您可以使用 llm_int8_threshold 参数来更改异常值的阈值。“异常值”是一个大于特定阈值的hidden state值。
这对应于LLM.int8()论文中描述的异常检测的异常阈值。任何高于此阈值的hidden state值都将被视为异常值,对这些值的操作将在 fp16 中完成。值通常是正态分布的,也就是说,大多数值在 [-3.5, 3.5] 范围内,但有一些额外的系统异常值,对于大模型来说,它们的分布非常不同。这些异常值通常在区间 [-60, -6] 或 [6, 60] 内。Int8 量化对于幅度为 ~5 的值效果很好,但超出这个范围,性能就会明显下降。一个好的默认阈值是 6,但对于更不稳定的模型(小模型、微调)可能需要更低的阈值。
这个参数会影响模型的推理速度。我们建议尝试这个参数,以找到最适合您的用例的参数。
from transformers import AutoModelForCausalLM, AutoTokenizer, BitsAndBytesConfig

model_id = "bigscience/bloom-1b7"

quantization_config = BitsAndBytesConfig(
    llm_int8_threshold=10,
)

model_8bit = AutoModelForCausalLM.from_pretrained(
    model_id,
    device_map=device_map,
    quantization_config=quantization_config,
)
tokenizer = AutoTokenizer.from_pretrained(model_id)
跳过某些模块的转换
一些模型有几个需要保持未转换状态以确保稳定性的模块。例如,Jukebox 模型有几个 lm_head 模块需要跳过。使用 llm_int8_skip_modules 参数进行相应操作。
from transformers import AutoModelForCausalLM, AutoTokenizer, BitsAndBytesConfig

model_id = "bigscience/bloom-1b7"

quantization_config = BitsAndBytesConfig(
    llm_int8_skip_modules=["lm_head"],
)

model_8bit = AutoModelForCausalLM.from_pretrained(
    model_id,
    device_map=device_map,
    quantization_config=quantization_config,
)
tokenizer = AutoTokenizer.from_pretrained(model_id)
微调已加载为8位精度的模型
借助Hugging Face生态系统中适配器(adapters)的官方支持,您可以在8位精度下微调模型。这使得可以在单个Google Colab中微调大模型,例如flan-t5-large或facebook/opt-6.7b。请查看peft库了解更多详情。
注意,加载模型进行训练时无需传递device_map。它将自动将您的模型加载到GPU上。如果需要,您可以将设备映射为特定设备(例如cuda:0、0、torch.device('cuda:0'))。请注意,device_map=auto仅应用于推理。
BitsAndBytesConfig
class transformers.BitsAndBytesConfig
< source >( load_in_8bit = False load_in_4bit = False llm_int8_threshold = 6.0 llm_int8_skip_modules = None llm_int8_enable_fp32_cpu_offload = False llm_int8_has_fp16_weight = False bnb_4bit_compute_dtype = None bnb_4bit_quant_type = 'fp4' bnb_4bit_use_double_quant = False bnb_4bit_quant_storage = None **kwargs )
Parameters
- load_in_8bit (
bool, optional, defaults toFalse) — This flag is used to enable 8-bit quantization with LLM.int8(). - load_in_4bit (
bool, optional, defaults toFalse) — This flag is used to enable 4-bit quantization by replacing the Linear layers with FP4/NF4 layers frombitsandbytes. - llm_int8_threshold (
float, optional, defaults to 6.0) — This corresponds to the outlier threshold for outlier detection as described inLLM.int8() : 8-bit Matrix Multiplication for Transformers at Scalepaper: https://huggingface.co/papers/2208.07339 Any hidden states value that is above this threshold will be considered an outlier and the operation on those values will be done in fp16. Values are usually normally distributed, that is, most values are in the range [-3.5, 3.5], but there are some exceptional systematic outliers that are very differently distributed for large models. These outliers are often in the interval [-60, -6] or [6, 60]. Int8 quantization works well for values of magnitude ~5, but beyond that, there is a significant performance penalty. A good default threshold is 6, but a lower threshold might be needed for more unstable models (small models, fine-tuning). - llm_int8_skip_modules (
list[str], optional) — An explicit list of the modules that we do not want to convert in 8-bit. This is useful for models such as Jukebox that has several heads in different places and not necessarily at the last position. For example forCausalLMmodels, the lastlm_headis kept in its originaldtype. - llm_int8_enable_fp32_cpu_offload (
bool, optional, defaults toFalse) — This flag is used for advanced use cases and users that are aware of this feature. If you want to split your model in different parts and run some parts in int8 on GPU and some parts in fp32 on CPU, you can use this flag. This is useful for offloading large models such asgoogle/flan-t5-xxl. Note that the int8 operations will not be run on CPU. - llm_int8_has_fp16_weight (
bool, optional, defaults toFalse) — This flag runs LLM.int8() with 16-bit main weights. This is useful for fine-tuning as the weights do not have to be converted back and forth for the backward pass. - bnb_4bit_compute_dtype (
torch.dtypeor str, optional, defaults totorch.float32) — This sets the computational type which might be different than the input type. For example, inputs might be fp32, but computation can be set to bf16 for speedups. - bnb_4bit_quant_type (
str, optional, defaults to"fp4") — This sets the quantization data type in the bnb.nn.Linear4Bit layers. Options are FP4 and NF4 data types which are specified byfp4ornf4. - bnb_4bit_use_double_quant (
bool, optional, defaults toFalse) — This flag is used for nested quantization where the quantization constants from the first quantization are quantized again. - bnb_4bit_quant_storage (
torch.dtypeor str, optional, defaults totorch.uint8) — This sets the storage type to pack the quantized 4-bit params. - kwargs (
dict[str, Any], optional) — Additional parameters from which to initialize the configuration object.
This is a wrapper class about all possible attributes and features that you can play with a model that has been
loaded using bitsandbytes.
This replaces load_in_8bit or load_in_4bittherefore both options are mutually exclusive.
Currently only supports LLM.int8(), FP4, and NF4 quantization. If more methods are added to bitsandbytes,
then more arguments will be added to this class.
Returns True if the model is quantizable, False otherwise.
Safety checker that arguments are correct - also replaces some NoneType arguments with their default values.
This method returns the quantization method used for the model. If the model is not quantizable, it returns
None.
to_diff_dict
< source >( ) → dict[str, Any]
Returns
dict[str, Any]
Dictionary of all the attributes that make up this configuration instance,
Removes all attributes from config which correspond to the default config attributes for better readability and serializes to a Python dictionary.
使用 🤗 optimum 进行量化
请查看Optimum 文档以了解更多关于optimum支持的量化方法,并查看这些方法是否适用于您的用例。