


BEN: Using Confidence-Guided Matting for Dichotomous Image Segmentation
Paper • 2501.06230 • Published • 3
ONNX builds of BEN2 Base, made by Moonbox for on-device use with ONNX Runtime (CUDA, DirectML, CPU). The
model is a single graph: each precision is one folder holding model.onnx.
The last column is the benchmark: each precision's output against the fp32 graph's on the same eval pictures, and its own score on the eval set (details under How to run).
| Precision | File | Size | sha256 | Benchmark |
|---|---|---|---|---|
| fp16 | fp16/model.onnx |
0.22 GB | 22cea62108ff |
MAE 0.0244, S 0.937, max F 0.943 |
| int8 | int8/model.onnx |
0.13 GB | dc60def496e0 |
vs fp16: IoU 0.9965, MAE 0.0005; DIS5K MAE 0.0244, S 0.937 |
| int4 | int4/model.onnx |
0.09 GB | b98f199bde18 |
vs fp16: IoU 0.9769, MAE 0.0037; DIS5K MAE 0.0248, S 0.936 |
BEN2 Base is the open (MIT) BEN2 model; PramaLLC's full BEN2 model is a separate commercial product and is not here. Made from the official BEN2_Base.onnx in this model's repository, which is fp16 (inputs and outputs fp32); we found no fp32 graph and BEN2's code does not export with torch.onnx as is, so fp16 is the reference here; output 0 is the matte.
ONNX Runtime (1024 x 1024 input, RGB in 0-1):
import numpy as np, onnxruntime as ort
from PIL import Image

sess = ort.InferenceSession("int8/model.onnx", providers=["CUDAExecutionProvider", "CPUExecutionProvider"])
img = Image.open("photo.jpg").convert("RGB")
x = np.asarray(img.resize((1024, 1024), Image.BILINEAR), np.float32) / 255
x = x.transpose(2, 0, 1)[None]
matte = sess.run(None, {sess.get_inputs()[0].name: x})[0][0, 0]
matte = (matte - matte.min()) / (matte.max() - matte.min())   # as the original inference does
alpha = Image.fromarray((np.clip(matte, 0, 1) * 255).astype(np.uint8)).resize(img.size, Image.BILINEAR)
img.putalpha(alpha); img.save("cutout.png")
Precisions. fp16: weights and math in fp16, inputs and outputs fp32. int8: weights int8 per output channel behind DequantizeLinear, activations in float (weight-only: no calibration). int4: MatMul weights 4-bit (MatMulNBits, block 32), the remaining convolution weights int8 weight-only. bf16 is not made: ONNX Runtime's CUDA provider has no bf16 convolution.
Benchmark. DIS5K test sets, 250 pictures (DIS-TE1..4 and DIS-VD, 50 each), ONNX Runtime 1.30 CUDA provider on an RTX 3080 Laptop GPU. The table's last column gives the precision's agreement with the fp16 graph (IoU of the masks at 0.5, mean absolute difference) and its own MAE against the ground truth. Scored with PySODMetrics on masks shrunk to at most 2048 px on the long side (DIS5K's largest are about 6000 x 4000); HCE (human correction effort) is given for the reference precision.
| Precision | Size | vs fp16 (mask IoU, MAE) | MAE | S-measure | max F | Time / picture | Peak VRAM |
|---|---|---|---|---|---|---|---|
| fp16 | 223 MB | - | 0.0244 | 0.937 | 0.943 | 445 ms | 4.4 GB |
| int8 | 131 MB | IoU 0.9965, MAE 0.0005 | 0.0244 | 0.937 | 0.943 | 427 ms | 4.2 GB |
| int4 | 93 MB | IoU 0.9769, MAE 0.0037 | 0.0248 | 0.936 | 0.942 | 428 ms | 4.2 GB |
From BEN2 Base at revision e48a20765f, starting from an fp32 ONNX graph (where it came from is said above):
fp16 with onnxconverter-common (inputs and outputs kept fp32), int8 with ONNX Runtime static QDQ quantization
(per-channel int8 weights, uint8 activations, MinMax calibration on pictures outside the eval set), int4 with ONNX
Runtime's MatMulNBits (weight-only, block 32) where the graph is mostly matrix multiplications. bf16 is left out for
convolutional graphs: ONNX Runtime's CUDA provider has no bf16 convolution. Every graph was benchmarked before
upload; the sha256 column above is what the files must hash to.
MIT. These files are a derivative of the original model and carry its license: it is copied in this repository, and it governs your use of these files. The original model card follows unchanged.


BEN2 (Background Erase Network) introduces a novel approach to foreground segmentation through its innovative Confidence Guided Matting (CGM) pipeline. The architecture employs a refiner network that targets and processes pixels where the base model exhibits lower confidence levels, resulting in more precise and reliable matting results. This model is built on BEN:

BEN2 was trained on the DIS5k and our 22K proprietary segmentation dataset. Our enhanced model delivers superior performance in hair matting, 4K processing, object segmentation, and edge refinement. Our Base model is open source. To try the full model through our free web demo or integrate BEN2 into your project with our API:
pip install -e "git+https://github.com/PramaLLC/BEN2.git#egg=ben2"
from ben2 import BEN_Base
from PIL import Image
import torch


device = torch.device('cuda' if torch.cuda.is_available() else 'cpu')

file = "./image.png" # input image

model = BEN_Base.from_pretrained("PramaLLC/BEN2")
model.to(device).eval()

image = Image.open(file)
foreground = model.inference(image, refine_foreground=False,) #Refine foreground is an extract postprocessing step that increases inference time but can improve matting edges. The default value is False.

foreground.save("./foreground.png")
from ben2 import BEN_Base
from PIL import Image
import torch


device = torch.device('cuda' if torch.cuda.is_available() else 'cpu')


model = BEN_Base.from_pretrained("PramaLLC/BEN2")
model.to(device).eval()


file1 = "./image1.png" # input image1
file2 = "./image2.png" # input image2
image1 = Image.open(file1)
image2 = Image.open(file2)


foregrounds = model.inference([image1, image2]) #  We recommend that the batch size not exceed 3 for consumer GPUs as there are minimal inference gains due to our custom batch processing for the MVANet decoding steps.
foregrounds[0].save("./foreground1.png")
foregrounds[1].save("./foreground2.png")
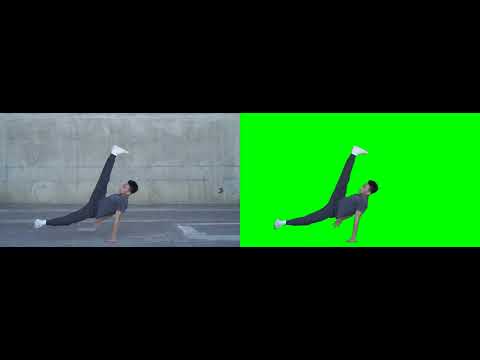
sudo apt update
sudo apt install ffmpeg
from ben2 import BEN_Base
from PIL import Image
import torch


device = torch.device('cuda' if torch.cuda.is_available() else 'cpu')

video_path = "/path_to_your_video.mp4"# input video

model = BEN_Base.from_pretrained("PramaLLC/BEN2")
model.to(device).eval()


model.segment_video(
    video_path= video_path,
    output_path="./", # Outputs will be saved as foreground.webm or foreground.mp4. The default value is "./"
    fps=0, # If this is set to 0 CV2 will detect the fps in the original video. The default value is 0.
    refine_foreground=False,  #refine foreground is an extract postprocessing step that increases inference time but can improve matting edges. The default value is False.
    batch=1,  # We recommended that batch size not exceed 3 for consumer GPUs as there are minimal inference gains. The default value is 1.
    print_frames_processed=True,  #Informs you what frame is being processed. The default value is True.
    webm = False, # This will output an alpha layer video but this defaults to mp4 when webm is false. The default value is False.
    rgb_value= (0, 255, 0) # If you do not use webm this will be the RGB value of the resulting background only when webm is False. The default value is a green background (0,255,0).
 )
# BEN2 evaluation

RMBG 2.0 did not preserve the DIS 5k validation dataset


Base model
PramaLLC/BEN2