Open-Source AI Cookbook documentation
Advanced RAG on Hugging Face documentation using LangChain
Advanced RAG on Hugging Face documentation using LangChain
Authored by: Aymeric Roucher
This notebook demonstrates how you can build an advanced RAG (Retrieval Augmented Generation) for answering a user’s question about a specific knowledge base (here, the HuggingFace documentation), using LangChain.
For an introduction to RAG, you can check this other cookbook!
RAG systems are complex, with many moving parts: here is a RAG diagram, where we noted in blue all possibilities for system enhancement:
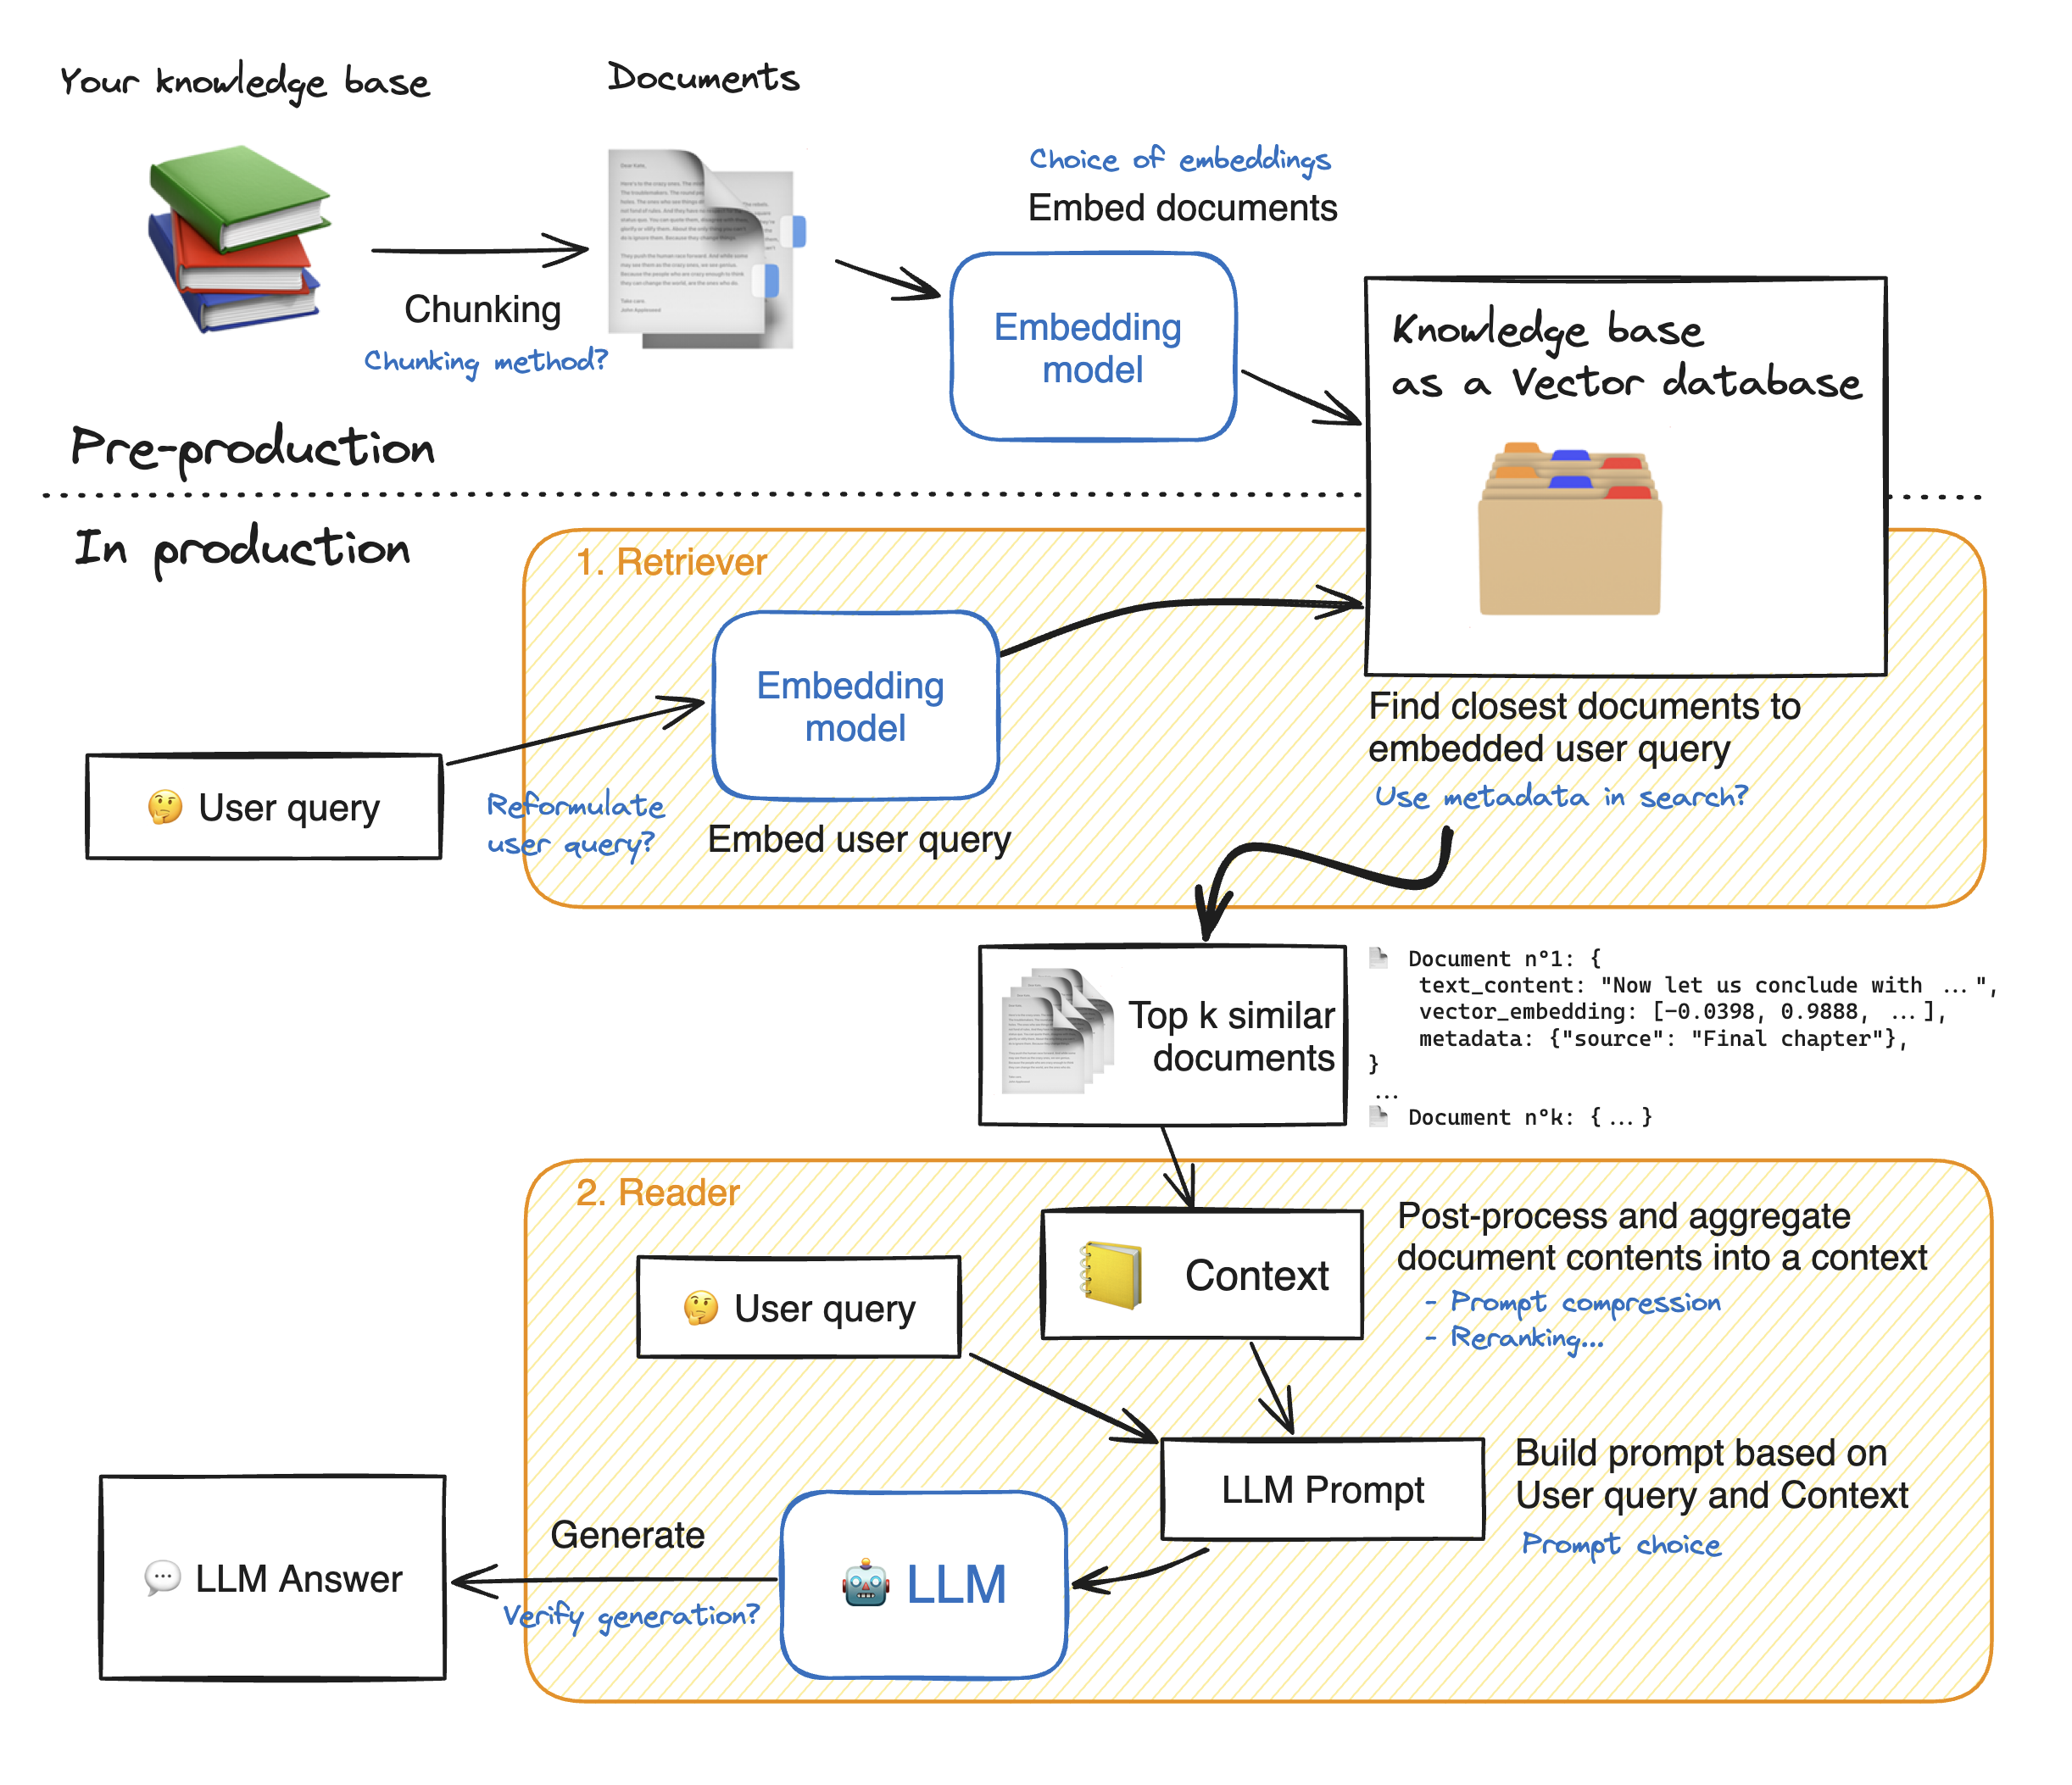
💡 As you can see, there are many steps to tune in this architecture: tuning the system properly will yield significant performance gains.
In this notebook, we will take a look into many of these blue notes to see how to tune your RAG system and get the best performance.
Let’s dig into the model building! First, we install the required model dependencies.
!pip install -q torch transformers accelerate bitsandbytes langchain sentence-transformers faiss-cpu openpyxl pacmap datasets langchain-community ragatouille
from tqdm.notebook import tqdm
import pandas as pd
from typing import Optional, List, Tuple
from datasets import Dataset
import matplotlib.pyplot as plt

pd.set_option(
    "display.max_colwidth", None
)  # This will be helpful when visualizing retriever outputs
Load your knowledge base
import datasets

ds = datasets.load_dataset("m-ric/huggingface_doc", split="train")from langchain.docstore.document import Document as LangchainDocument
RAW_KNOWLEDGE_BASE = [
LangchainDocument(page_content=doc["text"], metadata={"source": doc["source"]})
for doc in tqdm(ds)
]1. Retriever - embeddings 🗂️
The retriever acts like an internal search engine: given the user query, it returns a few relevant snippets from your knowledge base.
These snippets will then be fed to the Reader Model to help it generate its answer.
So our objective here is, given a user question, to find the most relevant snippets from our knowledge base to answer that question.
This is a wide objective, it leaves open some questions. How many snippets should we retrieve? This parameter will be named top_k.
How long should these snippets be? This is called the chunk size. There’s no one-size-fits-all answers, but here are a few elements:
- 🔀 Your
chunk sizeis allowed to vary from one snippet to the other. - Since there will always be some noise in your retrieval, increasing the
top_kincreases the chance to get relevant elements in your retrieved snippets. 🎯 Shooting more arrows increases your probability of hitting your target. - Meanwhile, the summed length of your retrieved documents should not be too high: for instance, for most current models 16k tokens will probably drown your Reader model in information due to Lost-in-the-middle phenomenon. 🎯 Give your reader model only the most relevant insights, not a huge pile of books!
In this notebook, we use Langchain library since it offers a huge variety of options for vector databases and allows us to keep document metadata throughout the processing.
1.1 Split the documents into chunks
- In this part, we split the documents from our knowledge base into smaller chunks which will be the snippets on which the reader LLM will base its answer.
- The goal is to prepare a collection of semantically relevant snippets. So their size should be adapted to precise ideas: too small will truncate ideas, and too large will dilute them.
💡 Many options exist for text splitting: splitting on words, on sentence boundaries, recursive chunking that processes documents in a tree-like way to preserve structure information… To learn more about chunking, I recommend you read this great notebook by Greg Kamradt.
Recursive chunking breaks down the text into smaller parts step by step using a given list of separators sorted from the most important to the least important separator. If the first split doesn’t give the right size or shape of chunks, the method repeats itself on the new chunks using a different separator. For instance with the list of separators
["\n\n", "\n", ".", ""]:- The method will first break down the document wherever there is a double line break
"\n\n". - Resulting documents will be split again on simple line breaks
"\n", then on sentence ends".". - Finally, if some chunks are still too big, they will be split whenever they overflow the maximum size.
- The method will first break down the document wherever there is a double line break
With this method, the global structure is well preserved, at the expense of getting slight variations in chunk size.
This space lets you visualize how different splitting options affect the chunks you get.
🔬 Let’s experiment a bit with chunk sizes, beginning with an arbitrary size, and see how splits work. We use Langchain’s implementation of recursive chunking with RecursiveCharacterTextSplitter.
- Parameter
chunk_sizecontrols the length of individual chunks: this length is counted by default as the number of characters in the chunk. - Parameter
chunk_overlaplets adjacent chunks get a bit of overlap on each other. This reduces the probability that an idea could be cut in half by the split between two adjacent chunks. We ~arbitrarily set this to 1/10th of the chunk size, you could try different values!
from langchain.text_splitter import RecursiveCharacterTextSplitter

# We use a hierarchical list of separators specifically tailored for splitting Markdown documents
# This list is taken from LangChain's MarkdownTextSplitter class
MARKDOWN_SEPARATORS = [
    "\n#{1,6} ",
    "```\n",
    "\n\\*\\*\\*+\n",
    "\n---+\n",
    "\n___+\n",
    "\n\n",
    "\n",
    " ",
    "",
]

text_splitter = RecursiveCharacterTextSplitter(
    chunk_size=1000,  # The maximum number of characters in a chunk: we selected this value arbitrarily
    chunk_overlap=100,  # The number of characters to overlap between chunks
    add_start_index=True,  # If `True`, includes chunk's start index in metadata
    strip_whitespace=True,  # If `True`, strips whitespace from the start and end of every document
    separators=MARKDOWN_SEPARATORS,
)

docs_processed = []
for doc in RAW_KNOWLEDGE_BASE:
    docs_processed += text_splitter.split_documents([doc])
We also have to keep in mind that when embedding documents, we will use an embedding model that accepts a certain maximum sequence length max_seq_length.
So we should make sure that our chunk sizes are below this limit because any longer chunk will be truncated before processing, thus losing relevancy.
>>> from sentence_transformers import SentenceTransformer

>>> # To get the value of the max sequence_length, we will query the underlying `SentenceTransformer` object used in the RecursiveCharacterTextSplitter
>>> print(
...     f"Model's maximum sequence length: {SentenceTransformer('thenlper/gte-small').max_seq_length}"
... )

>>> from transformers import AutoTokenizer

>>> tokenizer = AutoTokenizer.from_pretrained("thenlper/gte-small")
>>> lengths = [len(tokenizer.encode(doc.page_content)) for doc in tqdm(docs_processed)]

>>> # Plot the distribution of document lengths, counted as the number of tokens
>>> fig = pd.Series(lengths).hist()
>>> plt.title("Distribution of document lengths in the knowledge base (in count of tokens)")
>>> plt.show()
Model's maximum sequence length: 512
👀 As you can see, the chunk lengths are not aligned with our limit of 512 tokens, and some documents are above the limit, thus some part of them will be lost in truncation!
- So we should change the
RecursiveCharacterTextSplitterclass to count length in number of tokens instead of number of characters. - Then we can choose a specific chunk size, here we would choose a lower threshold than 512:
- Smaller documents could allow the split to focus more on specific ideas.
- But too small chunks would split sentences in half, thus losing meaning again: the proper tuning is a matter of balance.
>>> from langchain.text_splitter import RecursiveCharacterTextSplitter
>>> from transformers import AutoTokenizer

>>> EMBEDDING_MODEL_NAME = "thenlper/gte-small"


>>> def split_documents(
...     chunk_size: int,
...     knowledge_base: List[LangchainDocument],
...     tokenizer_name: Optional[str] = EMBEDDING_MODEL_NAME,
... ) -> List[LangchainDocument]:
...     """
...     Split documents into chunks of maximum size `chunk_size` tokens and return a list of documents.
...     """
...     text_splitter = RecursiveCharacterTextSplitter.from_huggingface_tokenizer(
...         AutoTokenizer.from_pretrained(tokenizer_name),
...         chunk_size=chunk_size,
...         chunk_overlap=int(chunk_size / 10),
...         add_start_index=True,
...         strip_whitespace=True,
...         separators=MARKDOWN_SEPARATORS,
...     )

...     docs_processed = []
...     for doc in knowledge_base:
...         docs_processed += text_splitter.split_documents([doc])

...     # Remove duplicates
...     unique_texts = {}
...     docs_processed_unique = []
...     for doc in docs_processed:
...         if doc.page_content not in unique_texts:
...             unique_texts[doc.page_content] = True
...             docs_processed_unique.append(doc)

...     return docs_processed_unique


>>> docs_processed = split_documents(
...     512,  # We choose a chunk size adapted to our model
...     RAW_KNOWLEDGE_BASE,
...     tokenizer_name=EMBEDDING_MODEL_NAME,
... )

>>> # Let's visualize the chunk sizes we would have in tokens from a common model
>>> from transformers import AutoTokenizer

>>> tokenizer = AutoTokenizer.from_pretrained(EMBEDDING_MODEL_NAME)
>>> lengths = [len(tokenizer.encode(doc.page_content)) for doc in tqdm(docs_processed)]
>>> fig = pd.Series(lengths).hist()
>>> plt.title("Distribution of document lengths in the knowledge base (in count of tokens)")
>>> plt.show()
➡️ Now the chunk length distribution looks better!
1.2 Building the vector database
We want to compute the embeddings for all the chunks of our knowledge base: to learn more about sentence embeddings, we recommend reading this guide.
How does retrieval work?
Once the chunks are all embedded, we store them in a vector database. When the user types in a query, it gets embedded by the same model previously used, and a similarity search returns the closest documents from the vector database.
The technical challenge is thus, given a query vector, to quickly find the nearest neighbors of this vector in the vector database. To do this, we need to choose two things: a distance, and a search algorithm to find the nearest neighbors quickly within a database of thousands of records.
Nearest Neighbor search algorithm
There are plentiful choices for the nearest neighbor search algorithm: we go with Facebook’s FAISS since FAISS is performant enough for most use cases, and it is well known and thus widely implemented.
Distances
Regarding distances, you can find a good guide here. In short:
- Cosine similarity computes the similarity between two vectors as the cosinus of their relative angle: it allows us to compare vector directions regardless of their magnitude. Using it requires normalizing all vectors, to rescale them into unit norm.
- Dot product takes into account magnitude, with the sometimes undesirable effect that increasing a vector’s length will make it more similar to all others.
- Euclidean distance is the distance between the ends of vectors.
You can try this small exercise to check your understanding of these concepts. But once vectors are normalized, the choice of a specific distance does not matter much.
Our particular model works well with cosine similarity, so choose this distance, and we set it up both in the Embedding model, and in the distance_strategy argument of our FAISS index. With cosine similarity, we have to normalize our embeddings.
🚨👇 The cell below takes a few minutes to run on A10G!
from langchain.vectorstores import FAISS
from langchain_community.embeddings import HuggingFaceEmbeddings
from langchain_community.vectorstores.utils import DistanceStrategy

embedding_model = HuggingFaceEmbeddings(
    model_name=EMBEDDING_MODEL_NAME,
    multi_process=True,
    model_kwargs={"device": "cuda"},
    encode_kwargs={"normalize_embeddings": True},  # Set `True` for cosine similarity
)

KNOWLEDGE_VECTOR_DATABASE = FAISS.from_documents(
    docs_processed, embedding_model, distance_strategy=DistanceStrategy.COSINE
)
👀 To visualize the search for the closest documents, let’s project our embeddings from 384 dimensions down to 2 dimensions using PaCMAP.
💡 We chose PaCMAP rather than other techniques such as t-SNE or UMAP, since it is efficient (preserves local and global structure), robust to initialization parameters and fast.
# Embed a user query in the same space
user_query = "How to create a pipeline object?"
query_vector = embedding_model.embed_query(user_query)import pacmap
import numpy as np
import plotly.express as px
embedding_projector = pacmap.PaCMAP(
n_components=2, n_neighbors=None, MN_ratio=0.5, FP_ratio=2.0, random_state=1
)
embeddings_2d = [
list(KNOWLEDGE_VECTOR_DATABASE.index.reconstruct_n(idx, 1)[0])
for idx in range(len(docs_processed))
] + [query_vector]
# Fit the data (the index of transformed data corresponds to the index of the original data)
documents_projected = embedding_projector.fit_transform(
np.array(embeddings_2d), init="pca"
)df = pd.DataFrame.from_dict(
[
{
"x": documents_projected[i, 0],
"y": documents_projected[i, 1],
"source": docs_processed[i].metadata["source"].split("/")[1],
"extract": docs_processed[i].page_content[:100] + "...",
"symbol": "circle",
"size_col": 4,
}
for i in range(len(docs_processed))
]
+ [
{
"x": documents_projected[-1, 0],
"y": documents_projected[-1, 1],
"source": "User query",
"extract": user_query,
"size_col": 100,
"symbol": "star",
}
]
)
# Visualize the embedding
fig = px.scatter(
df,
x="x",
y="y",
color="source",
hover_data="extract",
size="size_col",
symbol="symbol",
color_discrete_map={"User query": "black"},
width=1000,
height=700,
)
fig.update_traces(
marker=dict(opacity=1, line=dict(width=0, color="DarkSlateGrey")),
selector=dict(mode="markers"),
)
fig.update_layout(
legend_title_text="<b>Chunk source</b>",
title="<b>2D Projection of Chunk Embeddings via PaCMAP</b>",
)
fig.show()
➡️ On the graph above, you can see a spatial representation of the knowledge base documents. As the vector embeddings represent the document’s meaning, their closeness in meaning should be reflected in their embedding’s closeness.
The user query’s embedding is also shown: we want to find the k documents that have the closest meaning, thus we pick the k closest vectors.
In the LangChain vector database implementation, this search operation is performed by the method vector_database.similarity_search(query).
Here is the result:
>>> print(f"\nStarting retrieval for {user_query=}...")
>>> retrieved_docs = KNOWLEDGE_VECTOR_DATABASE.similarity_search(query=user_query, k=5)
>>> print(
...     "\n==================================Top document=================================="
... )
>>> print(retrieved_docs[0].page_content)
>>> print("==================================Metadata==================================")
>>> print(retrieved_docs[0].metadata)
Starting retrieval for user_query='How to create a pipeline object?'... ==================================Top document================================== ``` ## Available Pipelines: ==================================Metadata================================== {'source': 'huggingface/diffusers/blob/main/docs/source/en/api/pipelines/deepfloyd_if.md', 'start_index': 16887}
2. Reader - LLM 💬
In this part, the LLM Reader reads the retrieved context to formulate its answer.
There are substeps that can all be tuned:
- The content of the retrieved documents is aggregated together into the “context”, with many processing options like prompt compression.
- The context and the user query are aggregated into a prompt and then given to the LLM to generate its answer.
2.1. Reader model
The choice of a reader model is important in a few aspects:
- the reader model’s
max_seq_lengthmust accommodate our prompt, which includes the context output by the retriever call: the context consists of 5 documents of 512 tokens each, so we aim for a context length of 4k tokens at least. - the reader model
For this example, we chose HuggingFaceH4/zephyr-7b-beta, a small but powerful model.
With many models being released every week, you may want to substitute this model to the latest and greatest. The best way to keep track of open source LLMs is to check the Open-source LLM leaderboard.
To make inference faster, we will load the quantized version of the model:
from transformers import pipeline
import torch
from transformers import AutoTokenizer, AutoModelForCausalLM, BitsAndBytesConfig

READER_MODEL_NAME = "HuggingFaceH4/zephyr-7b-beta"

bnb_config = BitsAndBytesConfig(
    load_in_4bit=True,
    bnb_4bit_use_double_quant=True,
    bnb_4bit_quant_type="nf4",
    bnb_4bit_compute_dtype=torch.bfloat16,
)
model = AutoModelForCausalLM.from_pretrained(
    READER_MODEL_NAME, quantization_config=bnb_config
)
tokenizer = AutoTokenizer.from_pretrained(READER_MODEL_NAME)

READER_LLM = pipeline(
    model=model,
    tokenizer=tokenizer,
    task="text-generation",
    do_sample=True,
    temperature=0.2,
    repetition_penalty=1.1,
    return_full_text=False,
    max_new_tokens=500,
)READER_LLM("What is 4+4? Answer:")2.2. Prompt
The RAG prompt template below is what we will feed to the Reader LLM: it is important to have it formatted in the Reader LLM’s chat template.
We give it our context and the user’s question.
>>> prompt_in_chat_format = [
...     {
...         "role": "system",
...         "content": """Using the information contained in the context,
... give a comprehensive answer to the question.
... Respond only to the question asked, response should be concise and relevant to the question.
... Provide the number of the source document when relevant.
... If the answer cannot be deduced from the context, do not give an answer.""",
...     },
...     {
...         "role": "user",
...         "content": """Context:
... {context}
... ---
... Now here is the question you need to answer.

... Question: {question}""",
...     },
... ]
>>> RAG_PROMPT_TEMPLATE = tokenizer.apply_chat_template(
...     prompt_in_chat_format, tokenize=False, add_generation_prompt=True
... )
>>> print(RAG_PROMPT_TEMPLATE)
<|system|> Using the information contained in the context, give a comprehensive answer to the question. Respond only to the question asked, response should be concise and relevant to the question. Provide the number of the source document when relevant. If the answer cannot be deduced from the context, do not give an answer. <|user|> Context: {context} --- Now here is the question you need to answer. Question: {question} <|assistant|>
Let’s test our Reader on our previously retrieved documents!
>>> retrieved_docs_text = [
...     doc.page_content for doc in retrieved_docs
... ]  # We only need the text of the documents
>>> context = "\nExtracted documents:\n"
>>> context += "".join(
...     [f"Document {str(i)}:::\n" + doc for i, doc in enumerate(retrieved_docs_text)]
... )

>>> final_prompt = RAG_PROMPT_TEMPLATE.format(
...     question="How to create a pipeline object?", context=context
... )

>>> # Redact an answer
>>> answer = READER_LLM(final_prompt)[0]["generated_text"]
>>> print(answer)
To create a pipeline object, follow these steps:
1. Define the inputs and outputs of your pipeline. These could be strings, dictionaries, or any other format that best suits your use case.
2. Inherit the `Pipeline` class from the `transformers` module and implement the following methods:
- `preprocess`: This method takes the raw inputs and returns a preprocessed dictionary that can be passed to the model.
- `_forward`: This method performs the actual inference using the model and returns the output tensor.
- `postprocess`: This method takes the output tensor and returns the final output in the desired format.
- `_sanitize_parameters`: This method is used to sanitize the input parameters before passing them to the model.
3. Load the necessary components, such as the model and scheduler, into the pipeline object.
4. Instantiate the pipeline object and return it.
Here's an example implementation based on the given context:
```python
from transformers import Pipeline
import torch
from diffusers import StableDiffusionPipeline
class MyPipeline(Pipeline):
def __init__(self, *args, **kwargs):
super().__init__(*args, **kwargs)
self.pipe = StableDiffusionPipeline.from_pretrained("my_model")
def preprocess(self, inputs):
# Preprocess the inputs as needed
return {"input_ids":...}
def _forward(self, inputs):
# Run the forward pass of the model
return self.pipe(**inputs).images[0]
def postprocess(self, outputs):
# Postprocess the outputs as needed
return outputs["sample"]
def _sanitize_parameters(self, params):
# Sanitize the input parameters
return params
my_pipeline = MyPipeline()
result = my_pipeline("My input string")
print(result)
```
Note that this implementation assumes that the model and scheduler are already loaded into memory. If they need to be loaded dynamically, you can modify the `__init__` method accordingly.
2.3. Reranking
A good option for RAG is to retrieve more documents than you want in the end, then rerank the results with a more powerful retrieval model before keeping only the top_k.
For this, Colbertv2 is a great choice: instead of a bi-encoder like our classical embedding models, it is a cross-encoder that computes more fine-grained interactions between the query tokens and each document’s tokens.
It is easily usable thanks to the RAGatouille library.
from ragatouille import RAGPretrainedModel

RERANKER = RAGPretrainedModel.from_pretrained("colbert-ir/colbertv2.0")
3. Assembling it all!
from transformers import Pipeline


def answer_with_rag(
    question: str,
    llm: Pipeline,
    knowledge_index: FAISS,
    reranker: Optional[RAGPretrainedModel] = None,
    num_retrieved_docs: int = 30,
    num_docs_final: int = 5,
) -> Tuple[str, List[LangchainDocument]]:
    # Gather documents with retriever
    print("=> Retrieving documents...")
    relevant_docs = knowledge_index.similarity_search(
        query=question, k=num_retrieved_docs
    )
    relevant_docs = [doc.page_content for doc in relevant_docs]  # Keep only the text

    # Optionally rerank results
    if reranker:
        print("=> Reranking documents...")
        relevant_docs = reranker.rerank(question, relevant_docs, k=num_docs_final)
        relevant_docs = [doc["content"] for doc in relevant_docs]

    relevant_docs = relevant_docs[:num_docs_final]

    # Build the final prompt
    context = "\nExtracted documents:\n"
    context += "".join(
        [f"Document {str(i)}:::\n" + doc for i, doc in enumerate(relevant_docs)]
    )

    final_prompt = RAG_PROMPT_TEMPLATE.format(question=question, context=context)

    # Redact an answer
    print("=> Generating answer...")
    answer = llm(final_prompt)[0]["generated_text"]

    return answer, relevant_docs
Let’s see how our RAG pipeline answers a user query.
>>> question = "how to create a pipeline object?"

>>> answer, relevant_docs = answer_with_rag(
...     question, READER_LLM, KNOWLEDGE_VECTOR_DATABASE, reranker=RERANKER
... )
=> Retrieving documents...
>>> print("==================================Answer==================================")
>>> print(f"{answer}")
>>> print("==================================Source docs==================================")
>>> for i, doc in enumerate(relevant_docs):
...     print(f"Document {i}------------------------------------------------------------")
...     print(doc)
==================================Answer==================================
To create a pipeline object, follow these steps:
1. Import the `pipeline` function from the `transformers` module:
```python
from transformers import pipeline
```
2. Choose the task you want to perform, such as object detection, sentiment analysis, or image generation, and pass it as an argument to the `pipeline` function:
- For object detection:
```python
>>> object_detector = pipeline('object-detection')
>>> object_detector(image)
[{'score': 0.9982201457023621,
'label':'remote',
'box': {'xmin': 40, 'ymin': 70, 'xmax': 175, 'ymax': 117}},
...]
```
- For sentiment analysis:
```python
>>> classifier = pipeline("sentiment-analysis")
>>> classifier("This is a great product!")
{'labels': ['POSITIVE'],'scores': tensor([0.9999], device='cpu', dtype=torch.float32)}
```
- For image generation:
```python
>>> image = pipeline(
... "stained glass of darth vader, backlight, centered composition, masterpiece, photorealistic, 8k"
... ).images[0]
>>> image
PILImage mode RGB size 7680x4320 at 0 DPI
```
Note that the exact syntax may vary depending on the specific pipeline being used. Refer to the documentation for more details on how to use each pipeline.
In general, the process involves importing the necessary modules, selecting the desired pipeline task, and passing it to the `pipeline` function along with any required arguments. The resulting pipeline object can then be used to perform the selected task on input data.
==================================Source docs==================================
Document 0------------------------------------------------------------
# Allocate a pipeline for object detection
>>> object_detector = pipeline('object-detection')
>>> object_detector(image)
[{'score': 0.9982201457023621,
'label': 'remote',
'box': {'xmin': 40, 'ymin': 70, 'xmax': 175, 'ymax': 117}},
{'score': 0.9960021376609802,
'label': 'remote',
'box': {'xmin': 333, 'ymin': 72, 'xmax': 368, 'ymax': 187}},
{'score': 0.9954745173454285,
'label': 'couch',
'box': {'xmin': 0, 'ymin': 1, 'xmax': 639, 'ymax': 473}},
{'score': 0.9988006353378296,
'label': 'cat',
'box': {'xmin': 13, 'ymin': 52, 'xmax': 314, 'ymax': 470}},
{'score': 0.9986783862113953,
'label': 'cat',
'box': {'xmin': 345, 'ymin': 23, 'xmax': 640, 'ymax': 368}}]
Document 1------------------------------------------------------------
# Allocate a pipeline for object detection
>>> object_detector = pipeline('object_detection')
>>> object_detector(image)
[{'score': 0.9982201457023621,
'label': 'remote',
'box': {'xmin': 40, 'ymin': 70, 'xmax': 175, 'ymax': 117}},
{'score': 0.9960021376609802,
'label': 'remote',
'box': {'xmin': 333, 'ymin': 72, 'xmax': 368, 'ymax': 187}},
{'score': 0.9954745173454285,
'label': 'couch',
'box': {'xmin': 0, 'ymin': 1, 'xmax': 639, 'ymax': 473}},
{'score': 0.9988006353378296,
'label': 'cat',
'box': {'xmin': 13, 'ymin': 52, 'xmax': 314, 'ymax': 470}},
{'score': 0.9986783862113953,
'label': 'cat',
'box': {'xmin': 345, 'ymin': 23, 'xmax': 640, 'ymax': 368}}]
Document 2------------------------------------------------------------
Start by creating an instance of [`pipeline`] and specifying a task you want to use it for. In this guide, you'll use the [`pipeline`] for sentiment analysis as an example:
```py
>>> from transformers import pipeline
>>> classifier = pipeline("sentiment-analysis")
Document 3------------------------------------------------------------
```
## Add the pipeline to 🤗 Transformers
If you want to contribute your pipeline to 🤗 Transformers, you will need to add a new module in the `pipelines` submodule
with the code of your pipeline, then add it to the list of tasks defined in `pipelines/__init__.py`.
Then you will need to add tests. Create a new file `tests/test_pipelines_MY_PIPELINE.py` with examples of the other tests.
The `run_pipeline_test` function will be very generic and run on small random models on every possible
architecture as defined by `model_mapping` and `tf_model_mapping`.
This is very important to test future compatibility, meaning if someone adds a new model for
`XXXForQuestionAnswering` then the pipeline test will attempt to run on it. Because the models are random it's
impossible to check for actual values, that's why there is a helper `ANY` that will simply attempt to match the
output of the pipeline TYPE.
You also *need* to implement 2 (ideally 4) tests.
- `test_small_model_pt` : Define 1 small model for this pipeline (doesn't matter if the results don't make sense)
and test the pipeline outputs. The results should be the same as `test_small_model_tf`.
- `test_small_model_tf` : Define 1 small model for this pipeline (doesn't matter if the results don't make sense)
and test the pipeline outputs. The results should be the same as `test_small_model_pt`.
- `test_large_model_pt` (`optional`): Tests the pipeline on a real pipeline where the results are supposed to
make sense. These tests are slow and should be marked as such. Here the goal is to showcase the pipeline and to make
sure there is no drift in future releases.
- `test_large_model_tf` (`optional`): Tests the pipeline on a real pipeline where the results are supposed to
make sense. These tests are slow and should be marked as such. Here the goal is to showcase the pipeline and to make
sure there is no drift in future releases.
Document 4------------------------------------------------------------
```
2. Pass a prompt to the pipeline to generate an image:
```py
image = pipeline(
"stained glass of darth vader, backlight, centered composition, masterpiece, photorealistic, 8k"
).images[0]
image
✅ We now have a fully functional, performant RAG system. That’s it for today! Congratulations for making it to the end 🥳
To go further 🗺️
This is not the end of the journey! You can try many steps to improve your RAG system. We recommend doing so in an iterative way: bring small changes to the system and see what improves performance.
Setting up an evaluation pipeline
- 💬 “You cannot improve the model performance that you do not measure”, said Gandhi… or at least Llama2 told me he said it. Anyway, you should absolutely start by measuring performance: this means building a small evaluation dataset, and then monitor the performance of your RAG system on this evaluation dataset.
Improving the retriever
🛠️ You can use these options to tune the results:
- Tune the chunking method:
- Size of the chunks
- Method: split on different separators, use semantic chunking…
- Change the embedding model
👷♀️ More could be considered:
- Try another chunking method, like semantic chunking
- Change the index used (here, FAISS)
- Query expansion: reformulate the user query in slightly different ways to retrieve more documents.
Improving the reader
🛠️ Here you can try the following options to improve results:
- Tune the prompt
- Switch reranking on/off
- Choose a more powerful reader model
💡 Many options could be considered here to further improve the results:
- Compress the retrieved context to keep only the most relevant parts to answer the query.
- Extend the RAG system to make it more user-friendly:
- cite source
- make conversational