Transformers documentation
Preprocess
Preprocess
Before you can use your data in a model, the data needs to be processed into an acceptable format for the model. A model does not understand raw text, images or audio. These inputs need to be converted into numbers and assembled into tensors. In this tutorial, you will:
- Preprocess textual data with a tokenizer.
- Preprocess image or audio data with a feature extractor.
- Preprocess data for a multimodal task with a processor.
NLP
The main tool for processing textual data is a tokenizer. A tokenizer starts by splitting text into tokens according to a set of rules. The tokens are converted into numbers, which are used to build tensors as input to a model. Any additional inputs required by a model are also added by the tokenizer.
If you plan on using a pretrained model, it’s important to use the associated pretrained tokenizer. This ensures the text is split the same way as the pretraining corpus, and uses the same corresponding tokens-to-index (usually referrred to as the vocab) during pretraining.
Get started quickly by loading a pretrained tokenizer with the AutoTokenizer class. This downloads the vocab used when a model is pretrained.
Tokenize
Load a pretrained tokenizer with AutoTokenizer.from_pretrained():
>>> from transformers import AutoTokenizer

>>> tokenizer = AutoTokenizer.from_pretrained("bert-base-cased")
Then pass your sentence to the tokenizer:
>>> encoded_input = tokenizer("Do not meddle in the affairs of wizards, for they are subtle and quick to anger.")
>>> print(encoded_input)
{'input_ids': [101, 2079, 2025, 19960, 10362, 1999, 1996, 3821, 1997, 16657, 1010, 2005, 2027, 2024, 11259, 1998, 4248, 2000, 4963, 1012, 102],
 'token_type_ids': [0, 0, 0, 0, 0, 0, 0, 0, 0, 0, 0, 0, 0, 0, 0, 0, 0, 0, 0, 0, 0],
 'attention_mask': [1, 1, 1, 1, 1, 1, 1, 1, 1, 1, 1, 1, 1, 1, 1, 1, 1, 1, 1, 1, 1]}
The tokenizer returns a dictionary with three important items:
- input_ids are the indices corresponding to each token in the sentence.
- attention_mask indicates whether a token should be attended to or not.
- token_type_ids identifies which sequence a token belongs to when there is more than one sequence.
You can decode the input_ids to return the original input:
>>> tokenizer.decode(encoded_input["input_ids"])
'[CLS] Do not meddle in the affairs of wizards, for they are subtle and quick to anger. [SEP]'
As you can see, the tokenizer added two special tokens - CLS and SEP (classifier and separator) - to the sentence. Not all models need
special tokens, but if they do, the tokenizer will automatically add them for you.
If there are several sentences you want to process, pass the sentences as a list to the tokenizer:
>>> batch_sentences = [
...     "But what about second breakfast?",
...     "Don't think he knows about second breakfast, Pip.",
...     "What about elevensies?",
... ]
>>> encoded_inputs = tokenizer(batch_sentences)
>>> print(encoded_inputs)
{'input_ids': [[101, 1252, 1184, 1164, 1248, 6462, 136, 102],
               [101, 1790, 112, 189, 1341, 1119, 3520, 1164, 1248, 6462, 117, 21902, 1643, 119, 102],
               [101, 1327, 1164, 5450, 23434, 136, 102]],
 'token_type_ids': [[0, 0, 0, 0, 0, 0, 0, 0],
                    [0, 0, 0, 0, 0, 0, 0, 0, 0, 0, 0, 0, 0, 0, 0],
                    [0, 0, 0, 0, 0, 0, 0]],
 'attention_mask': [[1, 1, 1, 1, 1, 1, 1, 1],
                    [1, 1, 1, 1, 1, 1, 1, 1, 1, 1, 1, 1, 1, 1, 1],
                    [1, 1, 1, 1, 1, 1, 1]]}
Pad
This brings us to an important topic. When you process a batch of sentences, they aren’t always the same length. This is a problem because tensors, the input to the model, need to have a uniform shape. Padding is a strategy for ensuring tensors are rectangular by adding a special padding token to sentences with fewer tokens.
Set the padding parameter to True to pad the shorter sequences in the batch to match the longest sequence:
>>> batch_sentences = [
...     "But what about second breakfast?",
...     "Don't think he knows about second breakfast, Pip.",
...     "What about elevensies?",
... ]
>>> encoded_input = tokenizer(batch_sentences, padding=True)
>>> print(encoded_input)
{'input_ids': [[101, 1252, 1184, 1164, 1248, 6462, 136, 102, 0, 0, 0, 0, 0, 0, 0],
               [101, 1790, 112, 189, 1341, 1119, 3520, 1164, 1248, 6462, 117, 21902, 1643, 119, 102],
               [101, 1327, 1164, 5450, 23434, 136, 102, 0, 0, 0, 0, 0, 0, 0, 0]],
 'token_type_ids': [[0, 0, 0, 0, 0, 0, 0, 0, 0, 0, 0, 0, 0, 0, 0],
                    [0, 0, 0, 0, 0, 0, 0, 0, 0, 0, 0, 0, 0, 0, 0],
                    [0, 0, 0, 0, 0, 0, 0, 0, 0, 0, 0, 0, 0, 0, 0]],
 'attention_mask': [[1, 1, 1, 1, 1, 1, 1, 1, 0, 0, 0, 0, 0, 0, 0],
                    [1, 1, 1, 1, 1, 1, 1, 1, 1, 1, 1, 1, 1, 1, 1],
                    [1, 1, 1, 1, 1, 1, 1, 0, 0, 0, 0, 0, 0, 0, 0]]}
Notice the tokenizer padded the first and third sentences with a 0 because they are shorter!
Truncation
On the other end of the spectrum, sometimes a sequence may be too long for a model to handle. In this case, you will need to truncate the sequence to a shorter length.
Set the truncation parameter to True to truncate a sequence to the maximum length accepted by the model:
>>> batch_sentences = [
...     "But what about second breakfast?",
...     "Don't think he knows about second breakfast, Pip.",
...     "What about elevensies?",
... ]
>>> encoded_input = tokenizer(batch_sentences, padding=True, truncation=True)
>>> print(encoded_input)
{'input_ids': [[101, 1252, 1184, 1164, 1248, 6462, 136, 102, 0, 0, 0, 0, 0, 0, 0],
               [101, 1790, 112, 189, 1341, 1119, 3520, 1164, 1248, 6462, 117, 21902, 1643, 119, 102],
               [101, 1327, 1164, 5450, 23434, 136, 102, 0, 0, 0, 0, 0, 0, 0, 0]],
 'token_type_ids': [[0, 0, 0, 0, 0, 0, 0, 0, 0, 0, 0, 0, 0, 0, 0],
                    [0, 0, 0, 0, 0, 0, 0, 0, 0, 0, 0, 0, 0, 0, 0],
                    [0, 0, 0, 0, 0, 0, 0, 0, 0, 0, 0, 0, 0, 0, 0]],
 'attention_mask': [[1, 1, 1, 1, 1, 1, 1, 1, 0, 0, 0, 0, 0, 0, 0],
                    [1, 1, 1, 1, 1, 1, 1, 1, 1, 1, 1, 1, 1, 1, 1],
                    [1, 1, 1, 1, 1, 1, 1, 0, 0, 0, 0, 0, 0, 0, 0]]}
Build tensors
Finally, you want the tokenizer to return the actual tensors that are fed to the model.
Set the return_tensors parameter to either pt for PyTorch, or tf for TensorFlow:
>>> batch_sentences = [
...     "But what about second breakfast?",
...     "Don't think he knows about second breakfast, Pip.",
...     "What about elevensies?",
... ]
>>> encoded_input = tokenizer(batch_sentences, padding=True, truncation=True, return_tensors="pt")
>>> print(encoded_input)
{'input_ids': tensor([[101, 1252, 1184, 1164, 1248, 6462, 136, 102, 0, 0, 0, 0, 0, 0, 0],
                      [101, 1790, 112, 189, 1341, 1119, 3520, 1164, 1248, 6462, 117, 21902, 1643, 119, 102],
                      [101, 1327, 1164, 5450, 23434, 136, 102, 0, 0, 0, 0, 0, 0, 0, 0]]),
 'token_type_ids': tensor([[0, 0, 0, 0, 0, 0, 0, 0, 0, 0, 0, 0, 0, 0, 0],
                           [0, 0, 0, 0, 0, 0, 0, 0, 0, 0, 0, 0, 0, 0, 0],
                           [0, 0, 0, 0, 0, 0, 0, 0, 0, 0, 0, 0, 0, 0, 0]]),
 'attention_mask': tensor([[1, 1, 1, 1, 1, 1, 1, 1, 0, 0, 0, 0, 0, 0, 0],
                           [1, 1, 1, 1, 1, 1, 1, 1, 1, 1, 1, 1, 1, 1, 1],
[1, 1, 1, 1, 1, 1, 1, 0, 0, 0, 0, 0, 0, 0, 0]])}>>> batch_sentences = [
... "But what about second breakfast?",
... "Don't think he knows about second breakfast, Pip.",
... "What about elevensies?",
... ]
>>> encoded_input = tokenizer(batch_sentences, padding=True, truncation=True, return_tensors="tf")
>>> print(encoded_input)
{'input_ids': <tf.Tensor: shape=(2, 9), dtype=int32, numpy=
array([[101, 1252, 1184, 1164, 1248, 6462, 136, 102, 0, 0, 0, 0, 0, 0, 0],
[101, 1790, 112, 189, 1341, 1119, 3520, 1164, 1248, 6462, 117, 21902, 1643, 119, 102],
[101, 1327, 1164, 5450, 23434, 136, 102, 0, 0, 0, 0, 0, 0, 0, 0]],
dtype=int32)>,
'token_type_ids': <tf.Tensor: shape=(2, 9), dtype=int32, numpy=
array([[0, 0, 0, 0, 0, 0, 0, 0, 0, 0, 0, 0, 0, 0, 0],
[0, 0, 0, 0, 0, 0, 0, 0, 0, 0, 0, 0, 0, 0, 0],
[0, 0, 0, 0, 0, 0, 0, 0, 0, 0, 0, 0, 0, 0, 0]], dtype=int32)>,
'attention_mask': <tf.Tensor: shape=(2, 9), dtype=int32, numpy=
array([[1, 1, 1, 1, 1, 1, 1, 1, 0, 0, 0, 0, 0, 0, 0],
[1, 1, 1, 1, 1, 1, 1, 1, 1, 1, 1, 1, 1, 1, 1],
[1, 1, 1, 1, 1, 1, 1, 0, 0, 0, 0, 0, 0, 0, 0]], dtype=int32)>}Audio
Audio inputs are preprocessed differently than textual inputs, but the end goal remains the same: create numerical sequences the model can understand. A feature extractor is designed for the express purpose of extracting features from raw image or audio data and converting them into tensors. Before you begin, install 🤗 Datasets to load an audio dataset to experiment with:
pip install datasets
Load the MInDS-14 dataset (see the 🤗 Datasets tutorial for more details on how to load a dataset):
>>> from datasets import load_dataset, Audio

>>> dataset = load_dataset("PolyAI/minds14", name="en-US", split="train")
Access the first element of the audio column to take a look at the input. Calling the audio column will automatically load and resample the audio file:
>>> dataset[0]["audio"]
{'array': array([ 0.        ,  0.00024414, -0.00024414, ..., -0.00024414,
         0.        ,  0.        ], dtype=float32),
 'path': '/root/.cache/huggingface/datasets/downloads/extracted/f14948e0e84be638dd7943ac36518a4cf3324e8b7aa331c5ab11541518e9368c/en-US~JOINT_ACCOUNT/602ba55abb1e6d0fbce92065.wav',
 'sampling_rate': 8000}
This returns three items:
arrayis the speech signal loaded - and potentially resampled - as a 1D array.pathpoints to the location of the audio file.sampling_raterefers to how many data points in the speech signal are measured per second.
Resample
For this tutorial, you will use the Wav2Vec2 model. As you can see from the model card, the Wav2Vec2 model is pretrained on 16kHz sampled speech audio. It is important your audio data’s sampling rate matches the sampling rate of the dataset used to pretrain the model. If your data’s sampling rate isn’t the same, then you need to resample your audio data.
For example, the MInDS-14 dataset has a sampling rate of 8000kHz. In order to use the Wav2Vec2 model with this dataset, upsample the sampling rate to 16kHz:
>>> dataset = load_dataset("PolyAI/minds14", name="en-US", split="train")
>>> dataset[0]["audio"]
{'array': array([ 0.        ,  0.00024414, -0.00024414, ..., -0.00024414,
         0.        ,  0.        ], dtype=float32),
 'path': '/root/.cache/huggingface/datasets/downloads/extracted/f14948e0e84be638dd7943ac36518a4cf3324e8b7aa331c5ab11541518e9368c/en-US~JOINT_ACCOUNT/602ba55abb1e6d0fbce92065.wav',
'sampling_rate': 8000}- Use 🤗 Datasets’ cast_column method to upsample the sampling rate to 16kHz:
>>> dataset = dataset.cast_column("audio", Audio(sampling_rate=16_000))- Load the audio file:
>>> dataset[0]["audio"]
{'array': array([ 2.3443763e-05,  2.1729663e-04,  2.2145823e-04, ...,
         3.8356509e-05, -7.3497440e-06, -2.1754686e-05], dtype=float32),
 'path': '/root/.cache/huggingface/datasets/downloads/extracted/f14948e0e84be638dd7943ac36518a4cf3324e8b7aa331c5ab11541518e9368c/en-US~JOINT_ACCOUNT/602ba55abb1e6d0fbce92065.wav',
 'sampling_rate': 16000}
As you can see, the sampling_rate is now 16kHz!
Feature extractor
The next step is to load a feature extractor to normalize and pad the input. When padding textual data, a 0 is added for shorter sequences. The same idea applies to audio data, and the audio feature extractor will add a 0 - interpreted as silence - to array.
Load the feature extractor with AutoFeatureExtractor.from_pretrained():
>>> from transformers import AutoFeatureExtractor

>>> feature_extractor = AutoFeatureExtractor.from_pretrained("facebook/wav2vec2-base")
Pass the audio array to the feature extractor. We also recommend adding the sampling_rate argument in the feature extractor in order to better debug any silent errors that may occur.
>>> audio_input = [dataset[0]["audio"]["array"]]
>>> feature_extractor(audio_input, sampling_rate=16000)
{'input_values': [array([ 3.8106556e-04,  2.7506407e-03,  2.8015103e-03, ...,
        5.6335266e-04,  4.6588284e-06, -1.7142107e-04], dtype=float32)]}
Pad and truncate
Just like the tokenizer, you can apply padding or truncation to handle variable sequences in a batch. Take a look at the sequence length of these two audio samples:
>>> dataset[0]["audio"]["array"].shape
(173398,)

>>> dataset[1]["audio"]["array"].shape
(106496,)
As you can see, the first sample has a longer sequence than the second sample. Let’s create a function that will preprocess the dataset. Specify a maximum sample length, and the feature extractor will either pad or truncate the sequences to match it:
>>> def preprocess_function(examples):
...     audio_arrays = [x["array"] for x in examples["audio"]]
...     inputs = feature_extractor(
...         audio_arrays,
...         sampling_rate=16000,
...         padding=True,
...         max_length=100000,
...         truncation=True,
...     )
...     return inputs
Apply the function to the the first few examples in the dataset:
>>> processed_dataset = preprocess_function(dataset[:5])Now take another look at the processed sample lengths:
>>> processed_dataset["input_values"][0].shape
(100000,)

>>> processed_dataset["input_values"][1].shape
(100000,)
The lengths of the first two samples now match the maximum length you specified.
Vision
A feature extractor is also used to process images for vision tasks. Once again, the goal is to convert the raw image into a batch of tensors as input.
Let’s load the food101 dataset for this tutorial. Use 🤗 Datasets split parameter to only load a small sample from the training split since the dataset is quite large:
>>> from datasets import load_dataset

>>> dataset = load_dataset("food101", split="train[:100]")
Next, take a look at the image with 🤗 Datasets Image feature:
>>> dataset[0]["image"]
Feature extractor
Load the feature extractor with AutoFeatureExtractor.from_pretrained():
>>> from transformers import AutoFeatureExtractor

>>> feature_extractor = AutoFeatureExtractor.from_pretrained("google/vit-base-patch16-224")
Data augmentation
For vision tasks, it is common to add some type of data augmentation to the images as a part of preprocessing. You can add augmentations with any library you’d like, but in this tutorial, you will use torchvision’s transforms module.
- Normalize the image and use
Composeto chain some transforms -RandomResizedCropandColorJitter- together:
>>> from torchvision.transforms import Compose, Normalize, RandomResizedCrop, ColorJitter, ToTensor

>>> normalize = Normalize(mean=feature_extractor.image_mean, std=feature_extractor.image_std)
>>> _transforms = Compose(
...     [RandomResizedCrop(feature_extractor.size), ColorJitter(brightness=0.5, hue=0.5), ToTensor(), normalize]
... )- The model accepts
pixel_valuesas it’s input. This value is generated by the feature extractor. Create a function that generatespixel_valuesfrom the transforms:
>>> def transforms(examples):
...     examples["pixel_values"] = [_transforms(image.convert("RGB")) for image in examples["image"]]
... return examples- Then use 🤗 Datasets
set_transformto apply the transforms on-the-fly:
>>> dataset.set_transform(transforms)- Now when you access the image, you will notice the feature extractor has added the model input
pixel_values:
>>> dataset[0]["image"]
{'image': <PIL.JpegImagePlugin.JpegImageFile image mode=RGB size=384x512 at 0x7F1A7B0630D0>,
 'label': 6,
 'pixel_values': tensor([[[ 0.0353,  0.0745,  0.1216,  ..., -0.9922, -0.9922, -0.9922],
          [-0.0196,  0.0667,  0.1294,  ..., -0.9765, -0.9843, -0.9922],
          [ 0.0196,  0.0824,  0.1137,  ..., -0.9765, -0.9686, -0.8667],
          ...,
          [ 0.0275,  0.0745,  0.0510,  ..., -0.1137, -0.1216, -0.0824],
          [ 0.0667,  0.0824,  0.0667,  ..., -0.0588, -0.0745, -0.0980],
          [ 0.0353,  0.0353,  0.0431,  ..., -0.0039, -0.0039, -0.0588]],

         [[ 0.2078,  0.2471,  0.2863,  ..., -0.9451, -0.9373, -0.9451],
          [ 0.1608,  0.2471,  0.3098,  ..., -0.9373, -0.9451, -0.9373],
          [ 0.2078,  0.2706,  0.3020,  ..., -0.9608, -0.9373, -0.8275],
          ...,
          [-0.0353,  0.0118, -0.0039,  ..., -0.2392, -0.2471, -0.2078],
          [ 0.0196,  0.0353,  0.0196,  ..., -0.1843, -0.2000, -0.2235],
          [-0.0118, -0.0039, -0.0039,  ..., -0.0980, -0.0980, -0.1529]],

         [[ 0.3961,  0.4431,  0.4980,  ..., -0.9216, -0.9137, -0.9216],
          [ 0.3569,  0.4510,  0.5216,  ..., -0.9059, -0.9137, -0.9137],
          [ 0.4118,  0.4745,  0.5216,  ..., -0.9137, -0.8902, -0.7804],
          ...,
          [-0.2314, -0.1922, -0.2078,  ..., -0.4196, -0.4275, -0.3882],
          [-0.1843, -0.1686, -0.2000,  ..., -0.3647, -0.3804, -0.4039],
          [-0.1922, -0.1922, -0.1922,  ..., -0.2941, -0.2863, -0.3412]]])}
Here is what the image looks like after you preprocess it. Just as you’d expect from the applied transforms, the image has been randomly cropped and it’s color properties are different.
>>> import numpy as np
>>> import matplotlib.pyplot as plt

>>> img = dataset[0]["pixel_values"]
>>> plt.imshow(img.permute(1, 2, 0))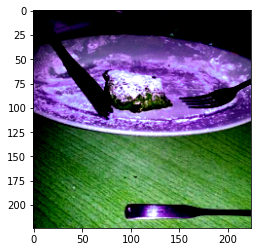
Multimodal
For multimodal tasks. you will use a combination of everything you’ve learned so far and apply your skills to a automatic speech recognition (ASR) task. This means you will need a:
- Feature extractor to preprocess the audio data.
- Tokenizer to process the text.
Let’s return to the LJ Speech dataset:
>>> from datasets import load_dataset

>>> lj_speech = load_dataset("lj_speech", split="train")
Since you are mainly interested in the audio and text column, remove the other columns:
>>> lj_speech = lj_speech.map(remove_columns=["file", "id", "normalized_text"])Now take a look at the audio and text columns:
>>> lj_speech[0]["audio"]
{'array': array([-7.3242188e-04, -7.6293945e-04, -6.4086914e-04, ...,
         7.3242188e-04,  2.1362305e-04,  6.1035156e-05], dtype=float32),
 'path': '/root/.cache/huggingface/datasets/downloads/extracted/917ece08c95cf0c4115e45294e3cd0dee724a1165b7fc11798369308a465bd26/LJSpeech-1.1/wavs/LJ001-0001.wav',
 'sampling_rate': 22050}

>>> lj_speech[0]["text"]
'Printing, in the only sense with which we are at present concerned, differs from most if not from all the arts and crafts represented in the Exhibition'
Remember from the earlier section on processing audio data, you should always resample your audio data’s sampling rate to match the sampling rate of the dataset used to pretrain a model:
>>> lj_speech = lj_speech.cast_column("audio", Audio(sampling_rate=16_000))Processor
A processor combines a feature extractor and tokenizer. Load a processor with [`AutoProcessor.from_pretrained]:
>>> from transformers import AutoProcessor

>>> processor = AutoProcessor.from_pretrained("facebook/wav2vec2-base-960h")- Create a function to process the audio data to
input_values, and tokenizes the text tolabels. These are your inputs to the model:
>>> def prepare_dataset(example):
...     audio = example["audio"]

...     example.update(processor(audio=audio["array"], text=example["text"], sampling_rate=16000))

... return example- Apply the
prepare_datasetfunction to a sample:
>>> prepare_dataset(lj_speech[0])Notice the processor has added input_values and labels. The sampling rate has also been correctly downsampled to 16kHz.
Awesome, you should now be able to preprocess data for any modality and even combine different modalities! In the next tutorial, learn how to fine-tune a model on your newly preprocessed data.