Diffusers documentation
ControlNet
ControlNet
Adding Conditional Control to Text-to-Image Diffusion Models (ControlNet) by Lvmin Zhang and Maneesh Agrawala.
This example is based on the training example in the original ControlNet repository. It trains a ControlNet to fill circles using a small synthetic dataset.
Installing the dependencies
Before running the scripts, make sure to install the library’s training dependencies.
To successfully run the latest versions of the example scripts, we highly recommend installing from source and keeping the installation up to date. We update the example scripts frequently and install example-specific requirements.
To do this, execute the following steps in a new virtual environment:
git clone https://github.com/huggingface/diffusers
cd diffusers
pip install -e .
Then navigate into the example folder and run:
pip install -r requirements.txt
And initialize an 🤗Accelerate environment with:
accelerate config
Or for a default 🤗Accelerate configuration without answering questions about your environment:
accelerate config default
Or if your environment doesn’t support an interactive shell like a notebook:
from accelerate.utils import write_basic_config

write_basic_config()
Circle filling dataset
The original dataset is hosted in the ControlNet repo, but we re-uploaded it here to be compatible with 🤗 Datasets so that it can handle the data loading within the training script.
Our training examples use runwayml/stable-diffusion-v1-5 because that is what the original set of ControlNet models was trained on. However, ControlNet can be trained to augment any compatible Stable Diffusion model (such as CompVis/stable-diffusion-v1-4) or stabilityai/stable-diffusion-2-1.
Training
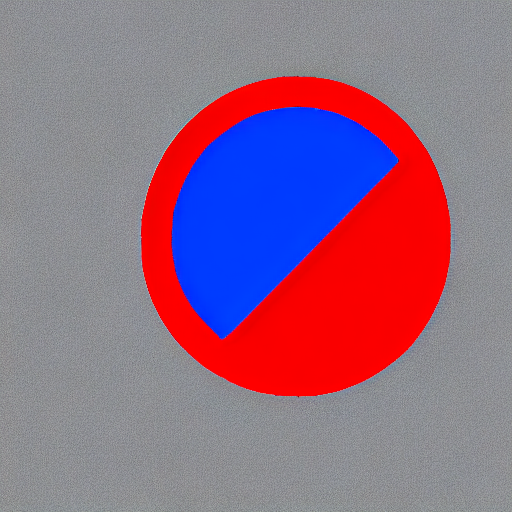
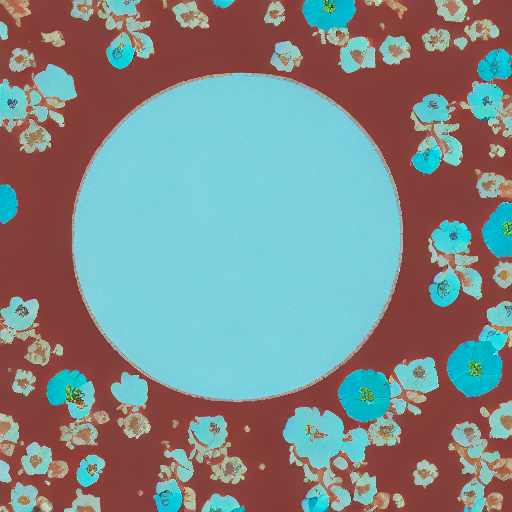
Download the following images to condition our training with:
wget https://huggingface.co/datasets/huggingface/documentation-images/resolve/main/diffusers/controlnet_training/conditioning_image_1.png

wget https://huggingface.co/datasets/huggingface/documentation-images/resolve/main/diffusers/controlnet_training/conditioning_image_2.png
Specify the MODEL_NAME environment variable (either a Hub model repository id or a path to the directory containing the model weights) and pass it to the ~diffusers.DiffusionPipeline.from_pretrained.pretrained_model_name_or_path argument.
export MODEL_DIR="runwayml/stable-diffusion-v1-5"
export OUTPUT_DIR="path to save model"

accelerate launch train_controlnet.py \
 --pretrained_model_name_or_path=$MODEL_DIR \
 --output_dir=$OUTPUT_DIR \
 --dataset_name=fusing/fill50k \
 --resolution=512 \
 --learning_rate=1e-5 \
 --validation_image "./conditioning_image_1.png" "./conditioning_image_2.png" \
 --validation_prompt "red circle with blue background" "cyan circle with brown floral background" \
 --train_batch_size=4
This default configuration requires ~38GB VRAM.
By default, the training script logs outputs to tensorboard. Pass --report_to wandb to use Weights &
Biases.
Gradient accumulation with a smaller batch size can be used to reduce training requirements to ~20 GB VRAM.
export MODEL_DIR="runwayml/stable-diffusion-v1-5"
export OUTPUT_DIR="path to save model"

accelerate launch train_controlnet.py \
 --pretrained_model_name_or_path=$MODEL_DIR \
 --output_dir=$OUTPUT_DIR \
 --dataset_name=fusing/fill50k \
 --resolution=512 \
 --learning_rate=1e-5 \
 --validation_image "./conditioning_image_1.png" "./conditioning_image_2.png" \
 --validation_prompt "red circle with blue background" "cyan circle with brown floral background" \
 --train_batch_size=1 \
 --gradient_accumulation_steps=4
Training with multiple GPUs
accelerate allows for seamless multi-GPU training. Follow the instructions here
for running distributed training with accelerate. Here is an example command:
export MODEL_DIR="runwayml/stable-diffusion-v1-5"
export OUTPUT_DIR="path to save model"

accelerate launch --mixed_precision="fp16" --multi_gpu train_controlnet.py \
 --pretrained_model_name_or_path=$MODEL_DIR \
 --output_dir=$OUTPUT_DIR \
 --dataset_name=fusing/fill50k \
 --resolution=512 \
 --learning_rate=1e-5 \
 --validation_image "./conditioning_image_1.png" "./conditioning_image_2.png" \
 --validation_prompt "red circle with blue background" "cyan circle with brown floral background" \
 --train_batch_size=4 \
 --mixed_precision="fp16" \
 --tracker_project_name="controlnet-demo" \
 --report_to=wandb
Example results
After 300 steps with batch size 8
| red circle with blue background | |
 |
 |
| cyan circle with brown floral background | |
 |
 |
After 6000 steps with batch size 8:
| red circle with blue background | |
|
 |
| cyan circle with brown floral background | |
|
 |
Training on a 16 GB GPU
Enable the following optimizations to train on a 16GB GPU:
- Gradient checkpointing
- bitsandbyte’s 8-bit optimizer (take a look at the [installation]((https://github.com/TimDettmers/bitsandbytes#requirements—installation) instructions if you don’t already have it installed)
Now you can launch the training script:
export MODEL_DIR="runwayml/stable-diffusion-v1-5"
export OUTPUT_DIR="path to save model"

accelerate launch train_controlnet.py \
 --pretrained_model_name_or_path=$MODEL_DIR \
 --output_dir=$OUTPUT_DIR \
 --dataset_name=fusing/fill50k \
 --resolution=512 \
 --learning_rate=1e-5 \
 --validation_image "./conditioning_image_1.png" "./conditioning_image_2.png" \
 --validation_prompt "red circle with blue background" "cyan circle with brown floral background" \
 --train_batch_size=1 \
 --gradient_accumulation_steps=4 \
 --gradient_checkpointing \
 --use_8bit_adam
Training on a 12 GB GPU
Enable the following optimizations to train on a 12GB GPU:
- Gradient checkpointing
- bitsandbyte’s 8-bit optimizer (take a look at the [installation]((https://github.com/TimDettmers/bitsandbytes#requirements—installation) instructions if you don’t already have it installed)
- xFormers (take a look at the installation instructions if you don’t already have it installed)
- set gradients to
None
export MODEL_DIR="runwayml/stable-diffusion-v1-5"
export OUTPUT_DIR="path to save model"

accelerate launch train_controlnet.py \
 --pretrained_model_name_or_path=$MODEL_DIR \
 --output_dir=$OUTPUT_DIR \
 --dataset_name=fusing/fill50k \
 --resolution=512 \
 --learning_rate=1e-5 \
 --validation_image "./conditioning_image_1.png" "./conditioning_image_2.png" \
 --validation_prompt "red circle with blue background" "cyan circle with brown floral background" \
 --train_batch_size=1 \
 --gradient_accumulation_steps=4 \
 --gradient_checkpointing \
 --use_8bit_adam \
 --enable_xformers_memory_efficient_attention \
 --set_grads_to_none
When using enable_xformers_memory_efficient_attention, please make sure to install xformers by pip install xformers.
Training on an 8 GB GPU
We have not exhaustively tested DeepSpeed support for ControlNet. While the configuration does save memory, we have not confirmed whether the configuration trains successfully. You will very likely have to make changes to the config to have a successful training run.
Enable the following optimizations to train on a 8GB GPU:
- Gradient checkpointing
- bitsandbyte’s 8-bit optimizer (take a look at the [installation]((https://github.com/TimDettmers/bitsandbytes#requirements—installation) instructions if you don’t already have it installed)
- xFormers (take a look at the installation instructions if you don’t already have it installed)
- set gradients to
None - DeepSpeed stage 2 with parameter and optimizer offloading
- fp16 mixed precision
DeepSpeed can offload tensors from VRAM to either CPU or NVME. This requires significantly more RAM (about 25 GB).
You’ll have to configure your environment with accelerate config to enable DeepSpeed stage 2.
The configuration file should look like this:
compute_environment: LOCAL_MACHINE
deepspeed_config:
  gradient_accumulation_steps: 4
  offload_optimizer_device: cpu
  offload_param_device: cpu
  zero3_init_flag: false
  zero_stage: 2
distributed_type: DEEPSPEED
<Tip>
See documentation for more DeepSpeed configuration options.
<Tip>
Changing the default Adam optimizer to DeepSpeed’s Adam
deepspeed.ops.adam.DeepSpeedCPUAdam gives a substantial speedup but
it requires a CUDA toolchain with the same version as PyTorch. 8-bit optimizer
does not seem to be compatible with DeepSpeed at the moment.
export MODEL_DIR="runwayml/stable-diffusion-v1-5"
export OUTPUT_DIR="path to save model"

accelerate launch train_controlnet.py \
 --pretrained_model_name_or_path=$MODEL_DIR \
 --output_dir=$OUTPUT_DIR \
 --dataset_name=fusing/fill50k \
 --resolution=512 \
 --validation_image "./conditioning_image_1.png" "./conditioning_image_2.png" \
 --validation_prompt "red circle with blue background" "cyan circle with brown floral background" \
 --train_batch_size=1 \
 --gradient_accumulation_steps=4 \
 --gradient_checkpointing \
 --enable_xformers_memory_efficient_attention \
 --set_grads_to_none \
 --mixed_precision fp16
Inference
The trained model can be run with the StableDiffusionControlNetPipeline.
Set base_model_path and controlnet_path to the values --pretrained_model_name_or_path and
--output_dir were respectively set to in the training script.
from diffusers import StableDiffusionControlNetPipeline, ControlNetModel, UniPCMultistepScheduler
from diffusers.utils import load_image
import torch

base_model_path = "path to model"
controlnet_path = "path to controlnet"

controlnet = ControlNetModel.from_pretrained(controlnet_path, torch_dtype=torch.float16)
pipe = StableDiffusionControlNetPipeline.from_pretrained(
    base_model_path, controlnet=controlnet, torch_dtype=torch.float16
)

# speed up diffusion process with faster scheduler and memory optimization
pipe.scheduler = UniPCMultistepScheduler.from_config(pipe.scheduler.config)
# remove following line if xformers is not installed
pipe.enable_xformers_memory_efficient_attention()

pipe.enable_model_cpu_offload()

control_image = load_image("./conditioning_image_1.png")
prompt = "pale golden rod circle with old lace background"

# generate image
generator = torch.manual_seed(0)
image = pipe(prompt, num_inference_steps=20, generator=generator, image=control_image).images[0]

image.save("./output.png")