Diffusers documentation
Textual Inversion
Textual Inversion
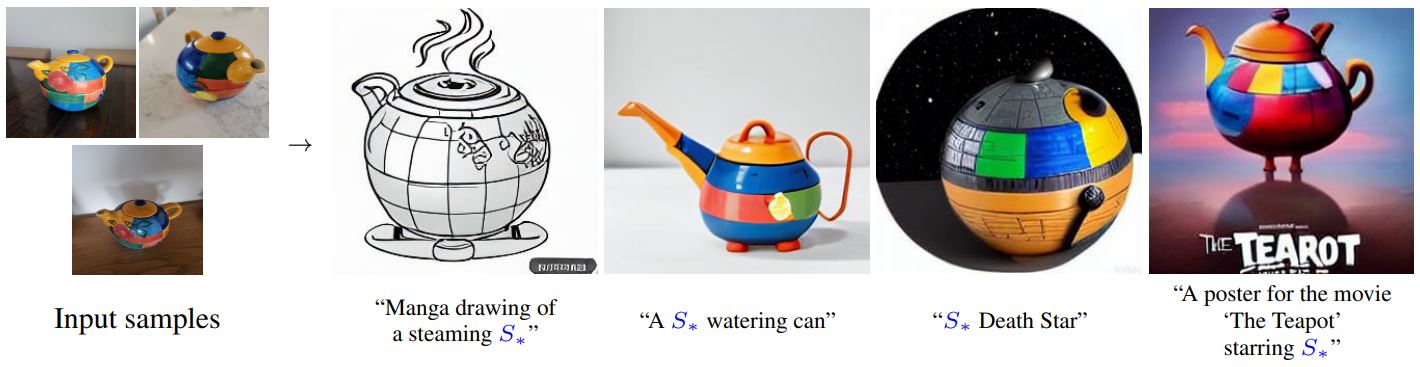
Textual Inversion is a technique for capturing novel concepts from a small number of example images. While the technique was originally demonstrated with a latent diffusion model, it has since been applied to other model variants like Stable Diffusion. The learned concepts can be used to better control the images generated from text-to-image pipelines. It learns new “words” in the text encoder’s embedding space, which are used within text prompts for personalized image generation.
This guide will show you how to train a runwayml/stable-diffusion-v1-5 model with Textual Inversion. All the training scripts for Textual Inversion used in this guide can be found here if you’re interested in taking a closer look at how things work under the hood.
There is a community-created collection of trained Textual Inversion models in the Stable Diffusion Textual Inversion Concepts Library which are readily available for inference. Over time, this’ll hopefully grow into a useful resource as more concepts are added!
Before you begin, make sure you install the library’s training dependencies:
pip install diffusers accelerate transformers
After all the dependencies have been set up, initialize a 🤗Accelerate environment with:
accelerate config
To setup a default 🤗 Accelerate environment without choosing any configurations:
accelerate config default
Or if your environment doesn’t support an interactive shell like a notebook, you can use:
from accelerate.utils import write_basic_config

write_basic_config()
Finally, you try and install xFormers to reduce your memory footprint with xFormers memory-efficient attention. Once you have xFormers installed, add the --enable_xformers_memory_efficient_attention argument to the training script. xFormers is not supported for Flax.
Upload model to Hub
If you want to store your model on the Hub, add the following argument to the training script:
--push_to_hub
Save and load checkpoints
It is often a good idea to regularly save checkpoints of your model during training. This way, you can resume training from a saved checkpoint if your training is interrupted for any reason. To save a checkpoint, pass the following argument to the training script to save the full training state in a subfolder in output_dir every 500 steps:
--checkpointing_steps=500
To resume training from a saved checkpoint, pass the following argument to the training script and the specific checkpoint you’d like to resume from:
--resume_from_checkpoint="checkpoint-1500"Finetuning
For your training dataset, download these images of a cat toy and store them in a directory:
from huggingface_hub import snapshot_download

local_dir = "./cat"
snapshot_download(
    "diffusers/cat_toy_example", local_dir=local_dir, repo_type="dataset", ignore_patterns=".gitattributes"
)
Specify the MODEL_NAME environment variable (either a Hub model repository id or a path to the directory containing the model weights) and pass it to the ~diffusers.DiffusionPipeline.from_pretrained.pretrained_model_name_or_path argument, and the DATA_DIR environment variable to the path of the directory containing the images.
Now you can launch the training script:
💡 A full training run takes ~1 hour on one V100 GPU. While you’re waiting for the training to complete, feel free to check out how Textual Inversion works in the section below if you’re curious!
export MODEL_NAME="runwayml/stable-diffusion-v1-5"
export DATA_DIR="./cat"

accelerate launch textual_inversion.py \
  --pretrained_model_name_or_path=$MODEL_NAME \
  --train_data_dir=$DATA_DIR \
  --learnable_property="object" \
  --placeholder_token="<cat-toy>" --initializer_token="toy" \
  --resolution=512 \
  --train_batch_size=1 \
  --gradient_accumulation_steps=4 \
  --max_train_steps=3000 \
  --learning_rate=5.0e-04 --scale_lr \
  --lr_scheduler="constant" \
  --lr_warmup_steps=0 \
  --output_dir="textual_inversion_cat"
💡 If you want to increase the trainable capacity, you can associate your placeholder token, e.g. <cat-toy> to
multiple embedding vectors. This can help the model to better capture the style of more (complex) images.
To enable training multiple embedding vectors, simply pass:
--num_vectors=5
If you have access to TPUs, try out the Flax training script to train even faster (this’ll also work for GPUs). With the same configuration settings, the Flax training script should be at least 70% faster than the PyTorch training script! ⚡️
Before you begin, make sure you install the Flax specific dependencies:
pip install -U -r requirements_flax.txt
Specify the MODEL_NAME environment variable (either a Hub model repository id or a path to the directory containing the model weights) and pass it to the ~diffusers.DiffusionPipeline.from_pretrained.pretrained_model_name_or_path argument.
Then you can launch the training script:
export MODEL_NAME="duongna/stable-diffusion-v1-4-flax"
export DATA_DIR="./cat"

python textual_inversion_flax.py \
  --pretrained_model_name_or_path=$MODEL_NAME \
  --train_data_dir=$DATA_DIR \
  --learnable_property="object" \
  --placeholder_token="<cat-toy>" --initializer_token="toy" \
  --resolution=512 \
  --train_batch_size=1 \
  --max_train_steps=3000 \
  --learning_rate=5.0e-04 --scale_lr \
  --output_dir="textual_inversion_cat"
Intermediate logging
If you’re interested in following along with your model training progress, you can save the generated images from the training process. Add the following arguments to the training script to enable intermediate logging:
validation_prompt, the prompt used to generate samples (this is set toNoneby default and intermediate logging is disabled)num_validation_images, the number of sample images to generatevalidation_steps, the number of steps before generatingnum_validation_imagesfrom thevalidation_prompt
--validation_prompt="A <cat-toy> backpack"
--num_validation_images=4
--validation_steps=100
Inference
Once you have trained a model, you can use it for inference with the StableDiffusionPipeline.
The textual inversion script will by default only save the textual inversion embedding vector(s) that have been added to the text encoder embedding matrix and consequently been trained.
💡 The community has created a large library of different textual inversion embedding vectors, called sd-concepts-library. Instead of training textual inversion embeddings from scratch you can also see whether a fitting textual inversion embedding has already been added to the libary.
To load the textual inversion embeddings you first need to load the base model that was used when training
your textual inversion embedding vectors. Here we assume that runwayml/stable-diffusion-v1-5
was used as a base model so we load it first:
from diffusers import StableDiffusionPipeline
import torch

model_id = "runwayml/stable-diffusion-v1-5"
pipe = StableDiffusionPipeline.from_pretrained(model_id, torch_dtype=torch.float16).to("cuda")
Next, we need to load the textual inversion embedding vector which can be done via the TextualInversionLoaderMixin.load_textual_inversion
function. Here we’ll load the embeddings of the ”<cat-toy>” example from before.
pipe.load_textual_inversion("sd-concepts-library/cat-toy")Now we can run the pipeline making sure that the placeholder token <cat-toy> is used in our prompt.
prompt = "A <cat-toy> backpack"

image = pipe(prompt, num_inference_steps=50).images[0]
image.save("cat-backpack.png")
The function TextualInversionLoaderMixin.load_textual_inversion can not only
load textual embedding vectors saved in Diffusers’ format, but also embedding vectors
saved in Automatic1111 format.
To do so, you can first download an embedding vector from civitAI
and then load it locally:
pipe.load_textual_inversion("./charturnerv2.pt")Currently there is no load_textual_inversion function for Flax so one has to make sure the textual inversion
embedding vector is saved as part of the model after training.
The model can then be run just like any other Flax model:
import jax
import numpy as np
from flax.jax_utils import replicate
from flax.training.common_utils import shard
from diffusers import FlaxStableDiffusionPipeline

model_path = "path-to-your-trained-model"
pipe, params = FlaxStableDiffusionPipeline.from_pretrained(model_path, dtype=jax.numpy.bfloat16)

prompt = "A <cat-toy> backpack"
prng_seed = jax.random.PRNGKey(0)
num_inference_steps = 50

num_samples = jax.device_count()
prompt = num_samples * [prompt]
prompt_ids = pipeline.prepare_inputs(prompt)

# shard inputs and rng
params = replicate(params)
prng_seed = jax.random.split(prng_seed, jax.device_count())
prompt_ids = shard(prompt_ids)

images = pipeline(prompt_ids, params, prng_seed, num_inference_steps, jit=True).images
images = pipeline.numpy_to_pil(np.asarray(images.reshape((num_samples,) + images.shape[-3:])))
image.save("cat-backpack.png")
How it works
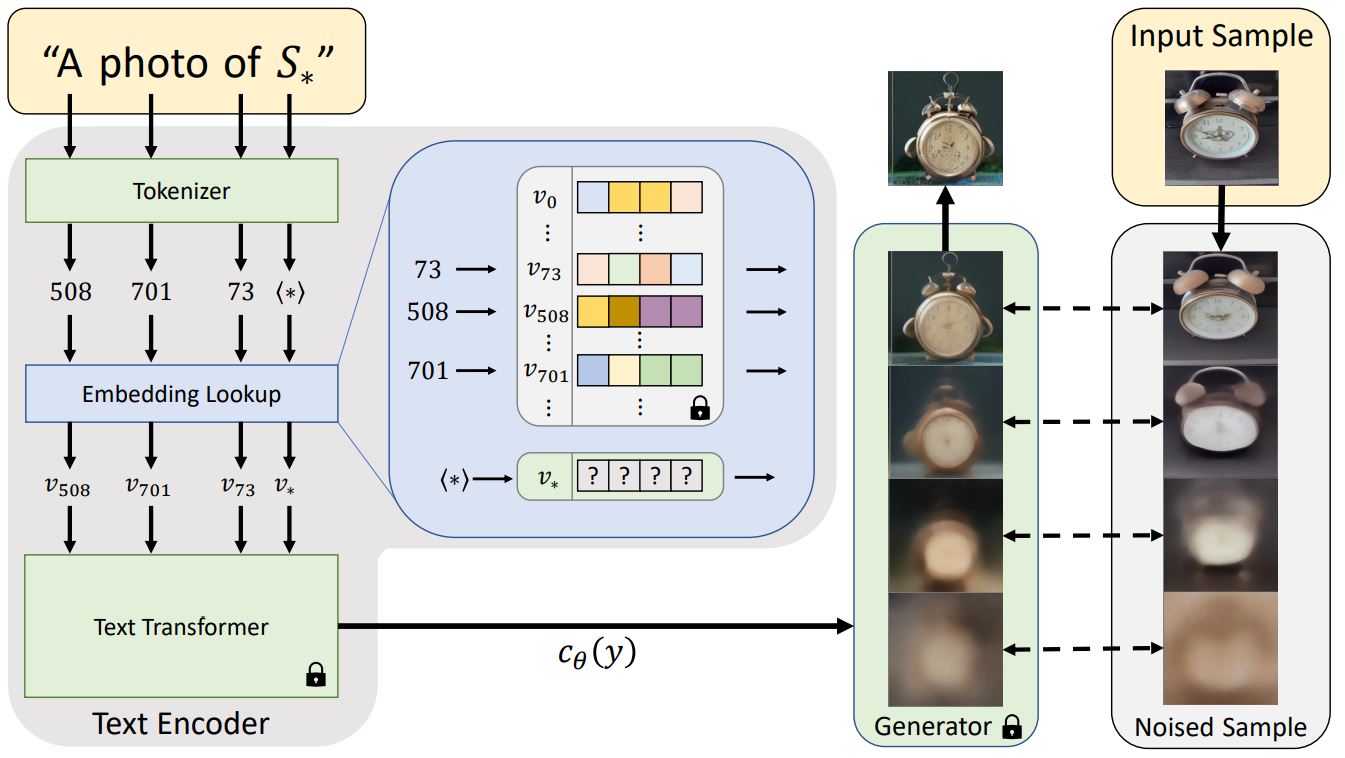
Usually, text prompts are tokenized into an embedding before being passed to a model, which is often a transformer. Textual Inversion does something similar, but it learns a new token embedding, v*, from a special token S* in the diagram above. The model output is used to condition the diffusion model, which helps the diffusion model understand the prompt and new concepts from just a few example images.
To do this, Textual Inversion uses a generator model and noisy versions of the training images. The generator tries to predict less noisy versions of the images, and the token embedding v* is optimized based on how well the generator does. If the token embedding successfully captures the new concept, it gives more useful information to the diffusion model and helps create clearer images with less noise. This optimization process typically occurs after several thousand steps of exposure to a variety of prompt and image variants.