Diffusers documentation
IP-Adapter
IP-Adapter
IP-Adapter is a lightweight adapter designed to integrate image-based guidance with text-to-image diffusion models. The adapter uses an image encoder to extract image features that are passed to the newly added cross-attention layers in the UNet and fine-tuned. The original UNet model and the existing cross-attention layers corresponding to text features is frozen. Decoupling the cross-attention for image and text features enables more fine-grained and controllable generation.
IP-Adapter files are typically ~100MBs because they only contain the image embeddings. This means you need to load a model first, and then load the IP-Adapter with load_ip_adapter().
IP-Adapters are available to many models such as Flux and Stable Diffusion 3, and more. The examples in this guide use Stable Diffusion and Stable Diffusion XL.
Use the set_ip_adapter_scale() parameter to scale the influence of the IP-Adapter during generation. A value of 1.0 means the model is only conditioned on the image prompt, and 0.5 typically produces balanced results between the text and image prompt.
import torch
from diffusers import AutoPipelineForText2Image
from diffusers.utils import load_image

pipeline = AutoPipelineForText2Image.from_pretrained(
  "stabilityai/stable-diffusion-xl-base-1.0",
  torch_dtype=torch.float16
).to("cuda")
pipeline.load_ip_adapter(
  "h94/IP-Adapter",
  subfolder="sdxl_models",
  weight_name="ip-adapter_sdxl.bin"
)
pipeline.set_ip_adapter_scale(0.8)
Pass an image to ip_adapter_image along with a text prompt to generate an image.
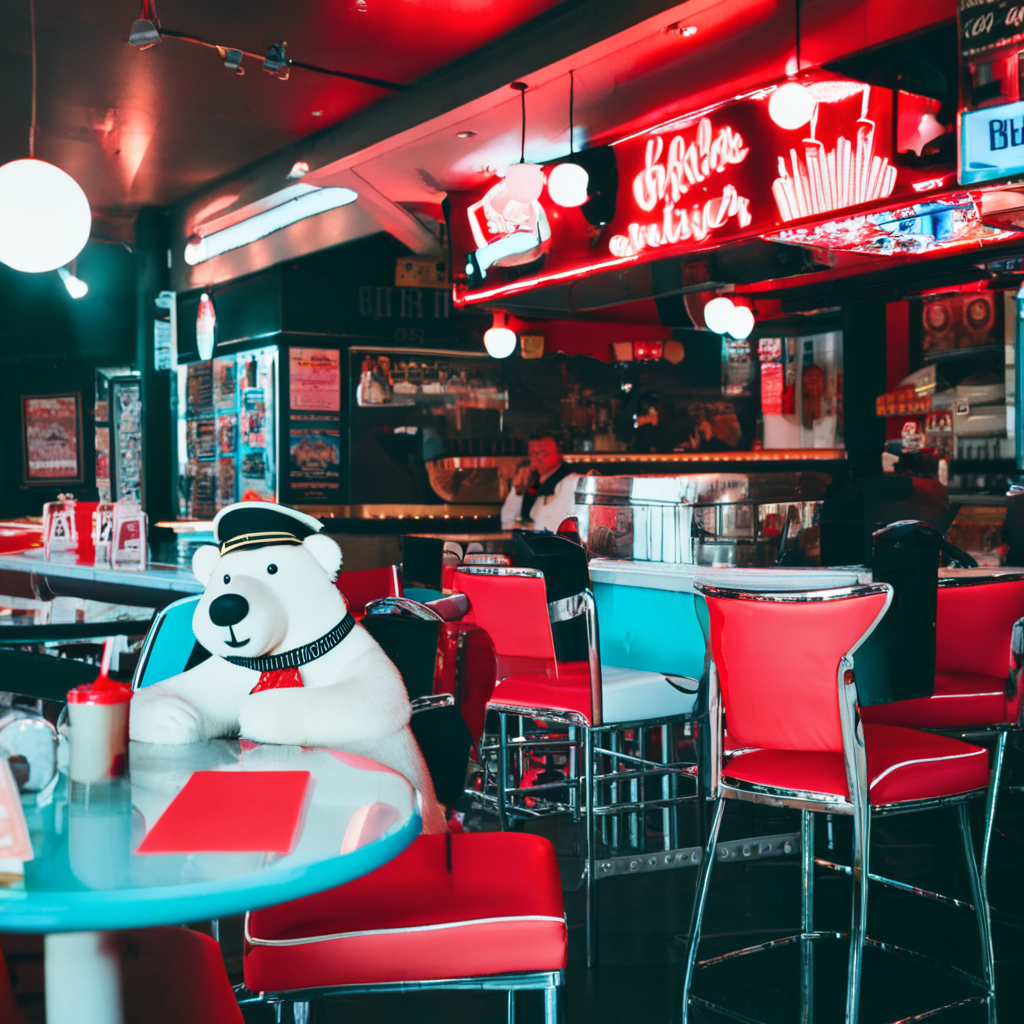
image = load_image("https://huggingface.co/datasets/huggingface/documentation-images/resolve/main/diffusers/ip_adapter_diner.png")
pipeline(
    prompt="a polar bear sitting in a chair drinking a milkshake",
    ip_adapter_image=image,
    negative_prompt="deformed, ugly, wrong proportion, low res, bad anatomy, worst quality, low quality",
).images[0]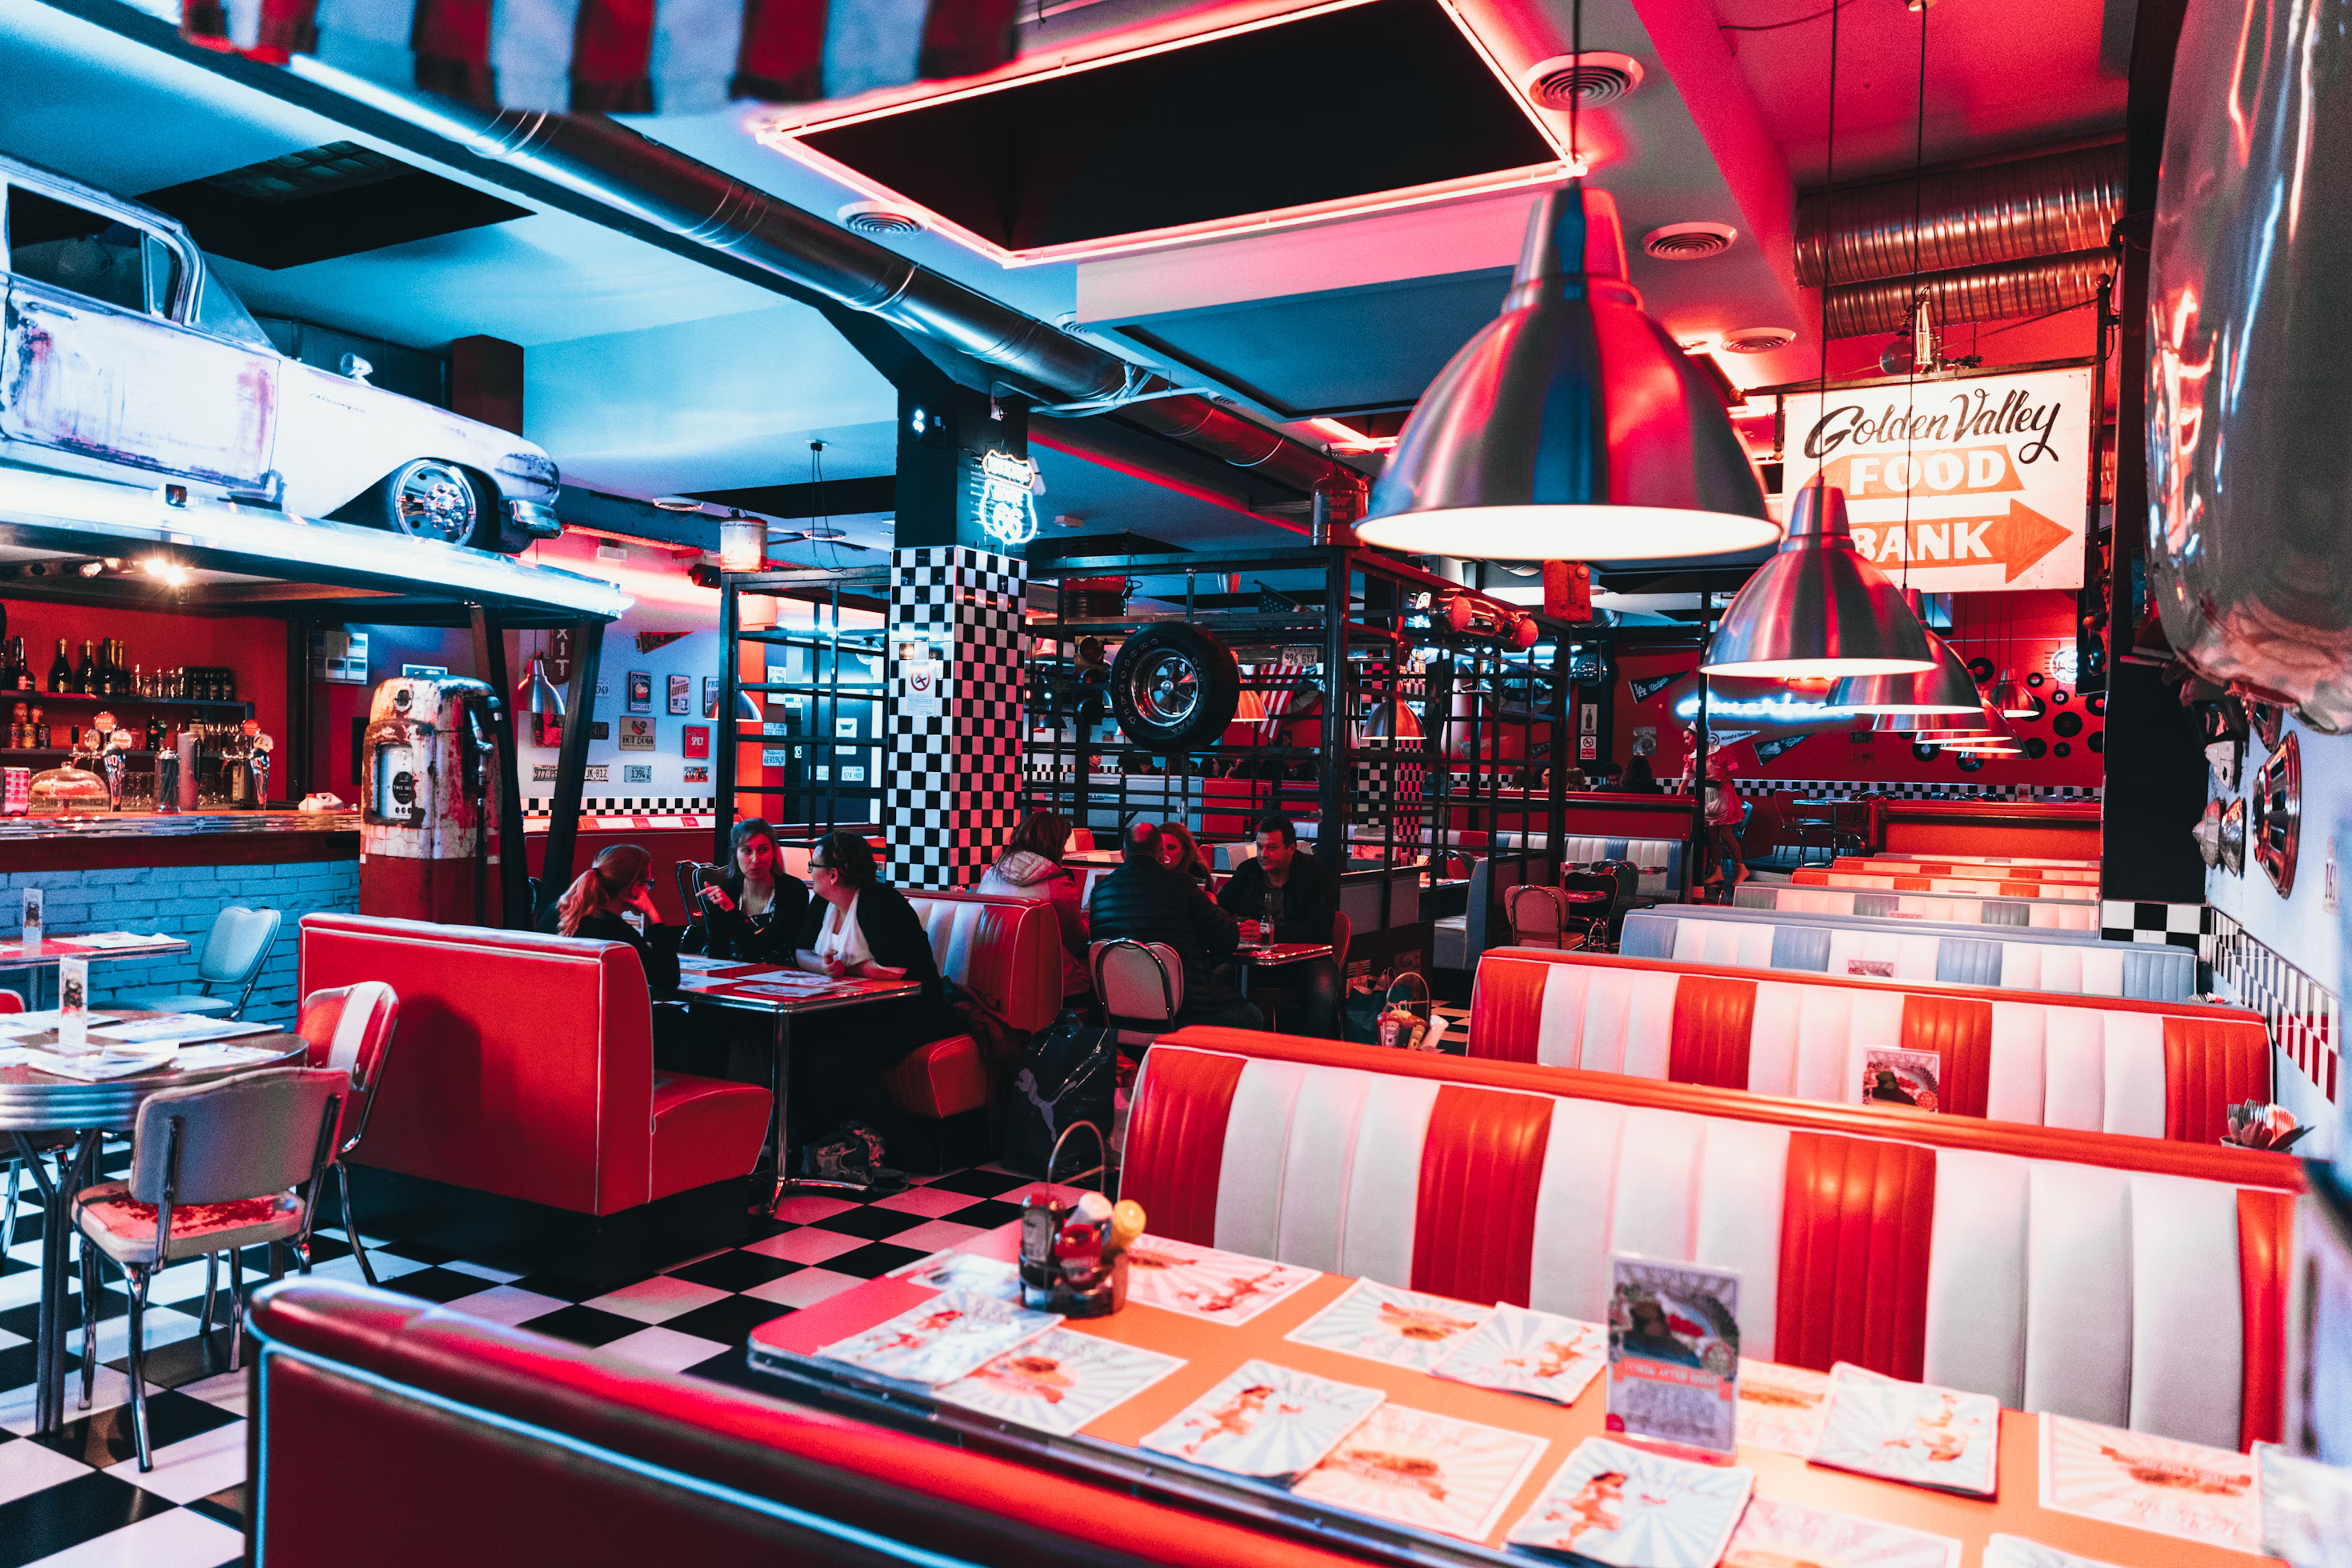
Take a look at the examples below to learn how to use IP-Adapter for other tasks.
import torch
from diffusers import AutoPipelineForImage2Image
from diffusers.utils import load_image
pipeline = AutoPipelineForImage2Image.from_pretrained(
"stabilityai/stable-diffusion-xl-base-1.0",
torch_dtype=torch.float16
).to("cuda")
pipeline.load_ip_adapter(
"h94/IP-Adapter",
subfolder="sdxl_models",
weight_name="ip-adapter_sdxl.bin"
)
pipeline.set_ip_adapter_scale(0.8)
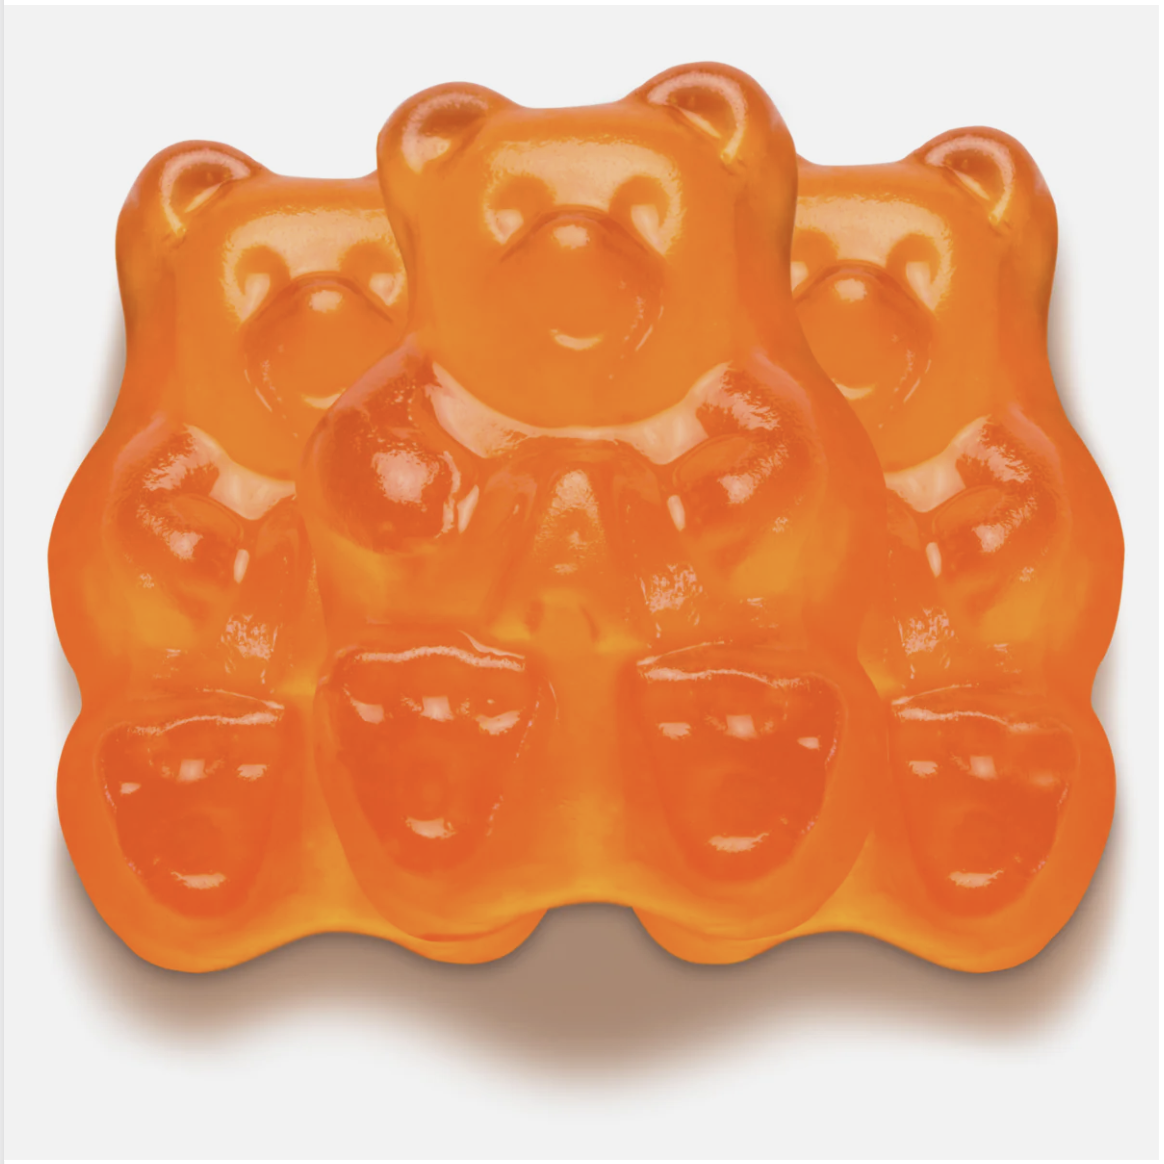
image = load_image("https://huggingface.co/datasets/huggingface/documentation-images/resolve/main/diffusers/ip_adapter_bear_1.png")
ip_image = load_image("https://huggingface.co/datasets/huggingface/documentation-images/resolve/main/diffusers/ip_adapter_gummy.png")
pipeline(
prompt="best quality, high quality",
image=image,
ip_adapter_image=ip_image,
strength=0.5,
).images[0]
Model variants
There are two variants of IP-Adapter, Plus and FaceID. The Plus variant uses patch embeddings and the ViT-H image encoder. FaceID variant uses face embeddings generated from InsightFace.
import torch
from transformers import CLIPVisionModelWithProjection, AutoPipelineForText2Image

image_encoder = CLIPVisionModelWithProjection.from_pretrained(
    "h94/IP-Adapter",
    subfolder="models/image_encoder",
    torch_dtype=torch.float16
)

pipeline = AutoPipelineForText2Image.from_pretrained(
    "stabilityai/stable-diffusion-xl-base-1.0",
    image_encoder=image_encoder,
    torch_dtype=torch.float16
).to("cuda")

pipeline.load_ip_adapter(
  "h94/IP-Adapter",
  subfolder="sdxl_models",
  weight_name="ip-adapter-plus_sdxl_vit-h.safetensors"
)
Image embeddings
The prepare_ip_adapter_image_embeds generates image embeddings you can reuse if you’re running the pipeline multiple times because you have more than one image. Loading and encoding multiple images each time you use the pipeline can be inefficient. Precomputing the image embeddings ahead of time, saving them to disk, and loading them when you need them is more efficient.
import torch
from diffusers import AutoPipelineForText2Image

pipeline = AutoPipelineForImage2Image.from_pretrained(
  "stabilityai/stable-diffusion-xl-base-1.0",
  torch_dtype=torch.float16
).to("cuda")

image_embeds = pipeline.prepare_ip_adapter_image_embeds(
    ip_adapter_image=image,
    ip_adapter_image_embeds=None,
    device="cuda",
    num_images_per_prompt=1,
    do_classifier_free_guidance=True,
)

torch.save(image_embeds, "image_embeds.ipadpt")
Reload the image embeddings by passing them to the ip_adapter_image_embeds parameter. Set image_encoder_folder to None because you don’t need the image encoder anymore to generate the image embeddings.
You can also load image embeddings from other sources such as ComfyUI.
pipeline.load_ip_adapter(
  "h94/IP-Adapter",
  subfolder="sdxl_models",
  image_encoder_folder=None,
  weight_name="ip-adapter_sdxl.bin"
)
pipeline.set_ip_adapter_scale(0.8)
image_embeds = torch.load("image_embeds.ipadpt")
pipeline(
    prompt="a polar bear sitting in a chair drinking a milkshake",
    ip_adapter_image_embeds=image_embeds,
    negative_prompt="deformed, ugly, wrong proportion, low res, bad anatomy, worst quality, low quality",
    num_inference_steps=100,
    generator=generator,
).images[0]
Masking
Binary masking enables assigning an IP-Adapter image to a specific area of the output image, making it useful for composing multiple IP-Adapter images. Each IP-Adapter image requires a binary mask.
Load the IPAdapterMaskProcessor to preprocess the image masks. For the best results, provide the output height and width to ensure masks with different aspect ratios are appropriately sized. If the input masks already match the aspect ratio of the generated image, you don’t need to set the height and width.
import torch
from diffusers import AutoPipelineForText2Image
from diffusers.image_processor import IPAdapterMaskProcessor
from diffusers.utils import load_image

pipeline = AutoPipelineForImage2Image.from_pretrained(
  "stabilityai/stable-diffusion-xl-base-1.0",
  torch_dtype=torch.float16
).to("cuda")

mask1 = load_image("https://huggingface.co/datasets/huggingface/documentation-images/resolve/main/diffusers/ip_mask_mask1.png")
mask2 = load_image("https://huggingface.co/datasets/huggingface/documentation-images/resolve/main/diffusers/ip_mask_mask2.png")

processor = IPAdapterMaskProcessor()
masks = processor.preprocess([mask1, mask2], height=1024, width=1024)
Provide both the IP-Adapter images and their scales as a list. Pass the preprocessed masks to cross_attention_kwargs in the pipeline.
face_image1 = load_image("https://huggingface.co/datasets/huggingface/documentation-images/resolve/main/diffusers/ip_mask_girl1.png")
face_image2 = load_image("https://huggingface.co/datasets/huggingface/documentation-images/resolve/main/diffusers/ip_mask_girl2.png")

pipeline.load_ip_adapter(
  "h94/IP-Adapter",
  subfolder="sdxl_models",
  weight_name=["ip-adapter-plus-face_sdxl_vit-h.safetensors"]
)
pipeline.set_ip_adapter_scale([[0.7, 0.7]])

ip_images = [[face_image1, face_image2]]
masks = [masks.reshape(1, masks.shape[0], masks.shape[2], masks.shape[3])]

pipeline(
  prompt="2 girls",
  ip_adapter_image=ip_images,
  negative_prompt="monochrome, lowres, bad anatomy, worst quality, low quality",
  cross_attention_kwargs={"ip_adapter_masks": masks}
).images[0]
Applications
The section below covers some popular applications of IP-Adapter.
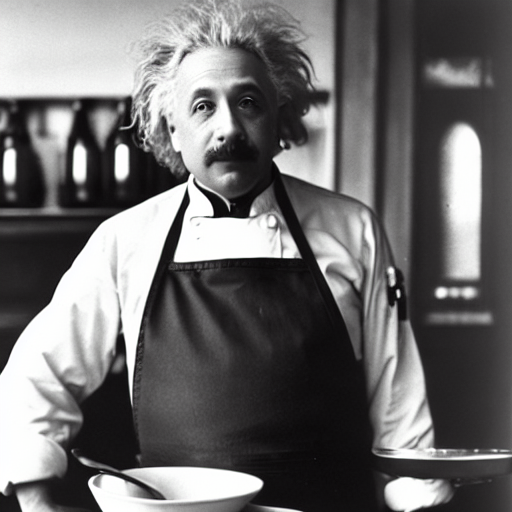
Face models
Face generation and preserving its details can be challenging. To help generate more accurate faces, there are checkpoints specifically conditioned on images of cropped faces. You can find the face models in the h94/IP-Adapter repository or the h94/IP-Adapter-FaceID repository. The FaceID checkpoints use the FaceID embeddings from InsightFace instead of CLIP image embeddings.
We recommend using the DDIMScheduler or EulerDiscreteScheduler for face models.
import torch
from diffusers import StableDiffusionPipeline, DDIMScheduler
from diffusers.utils import load_image
pipeline = StableDiffusionPipeline.from_pretrained(
"stable-diffusion-v1-5/stable-diffusion-v1-5",
torch_dtype=torch.float16,
).to("cuda")
pipeline.scheduler = DDIMScheduler.from_config(pipeline.scheduler.config)
pipeline.load_ip_adapter(
"h94/IP-Adapter",
subfolder="models",
weight_name="ip-adapter-full-face_sd15.bin"
)
pipeline.set_ip_adapter_scale(0.5)
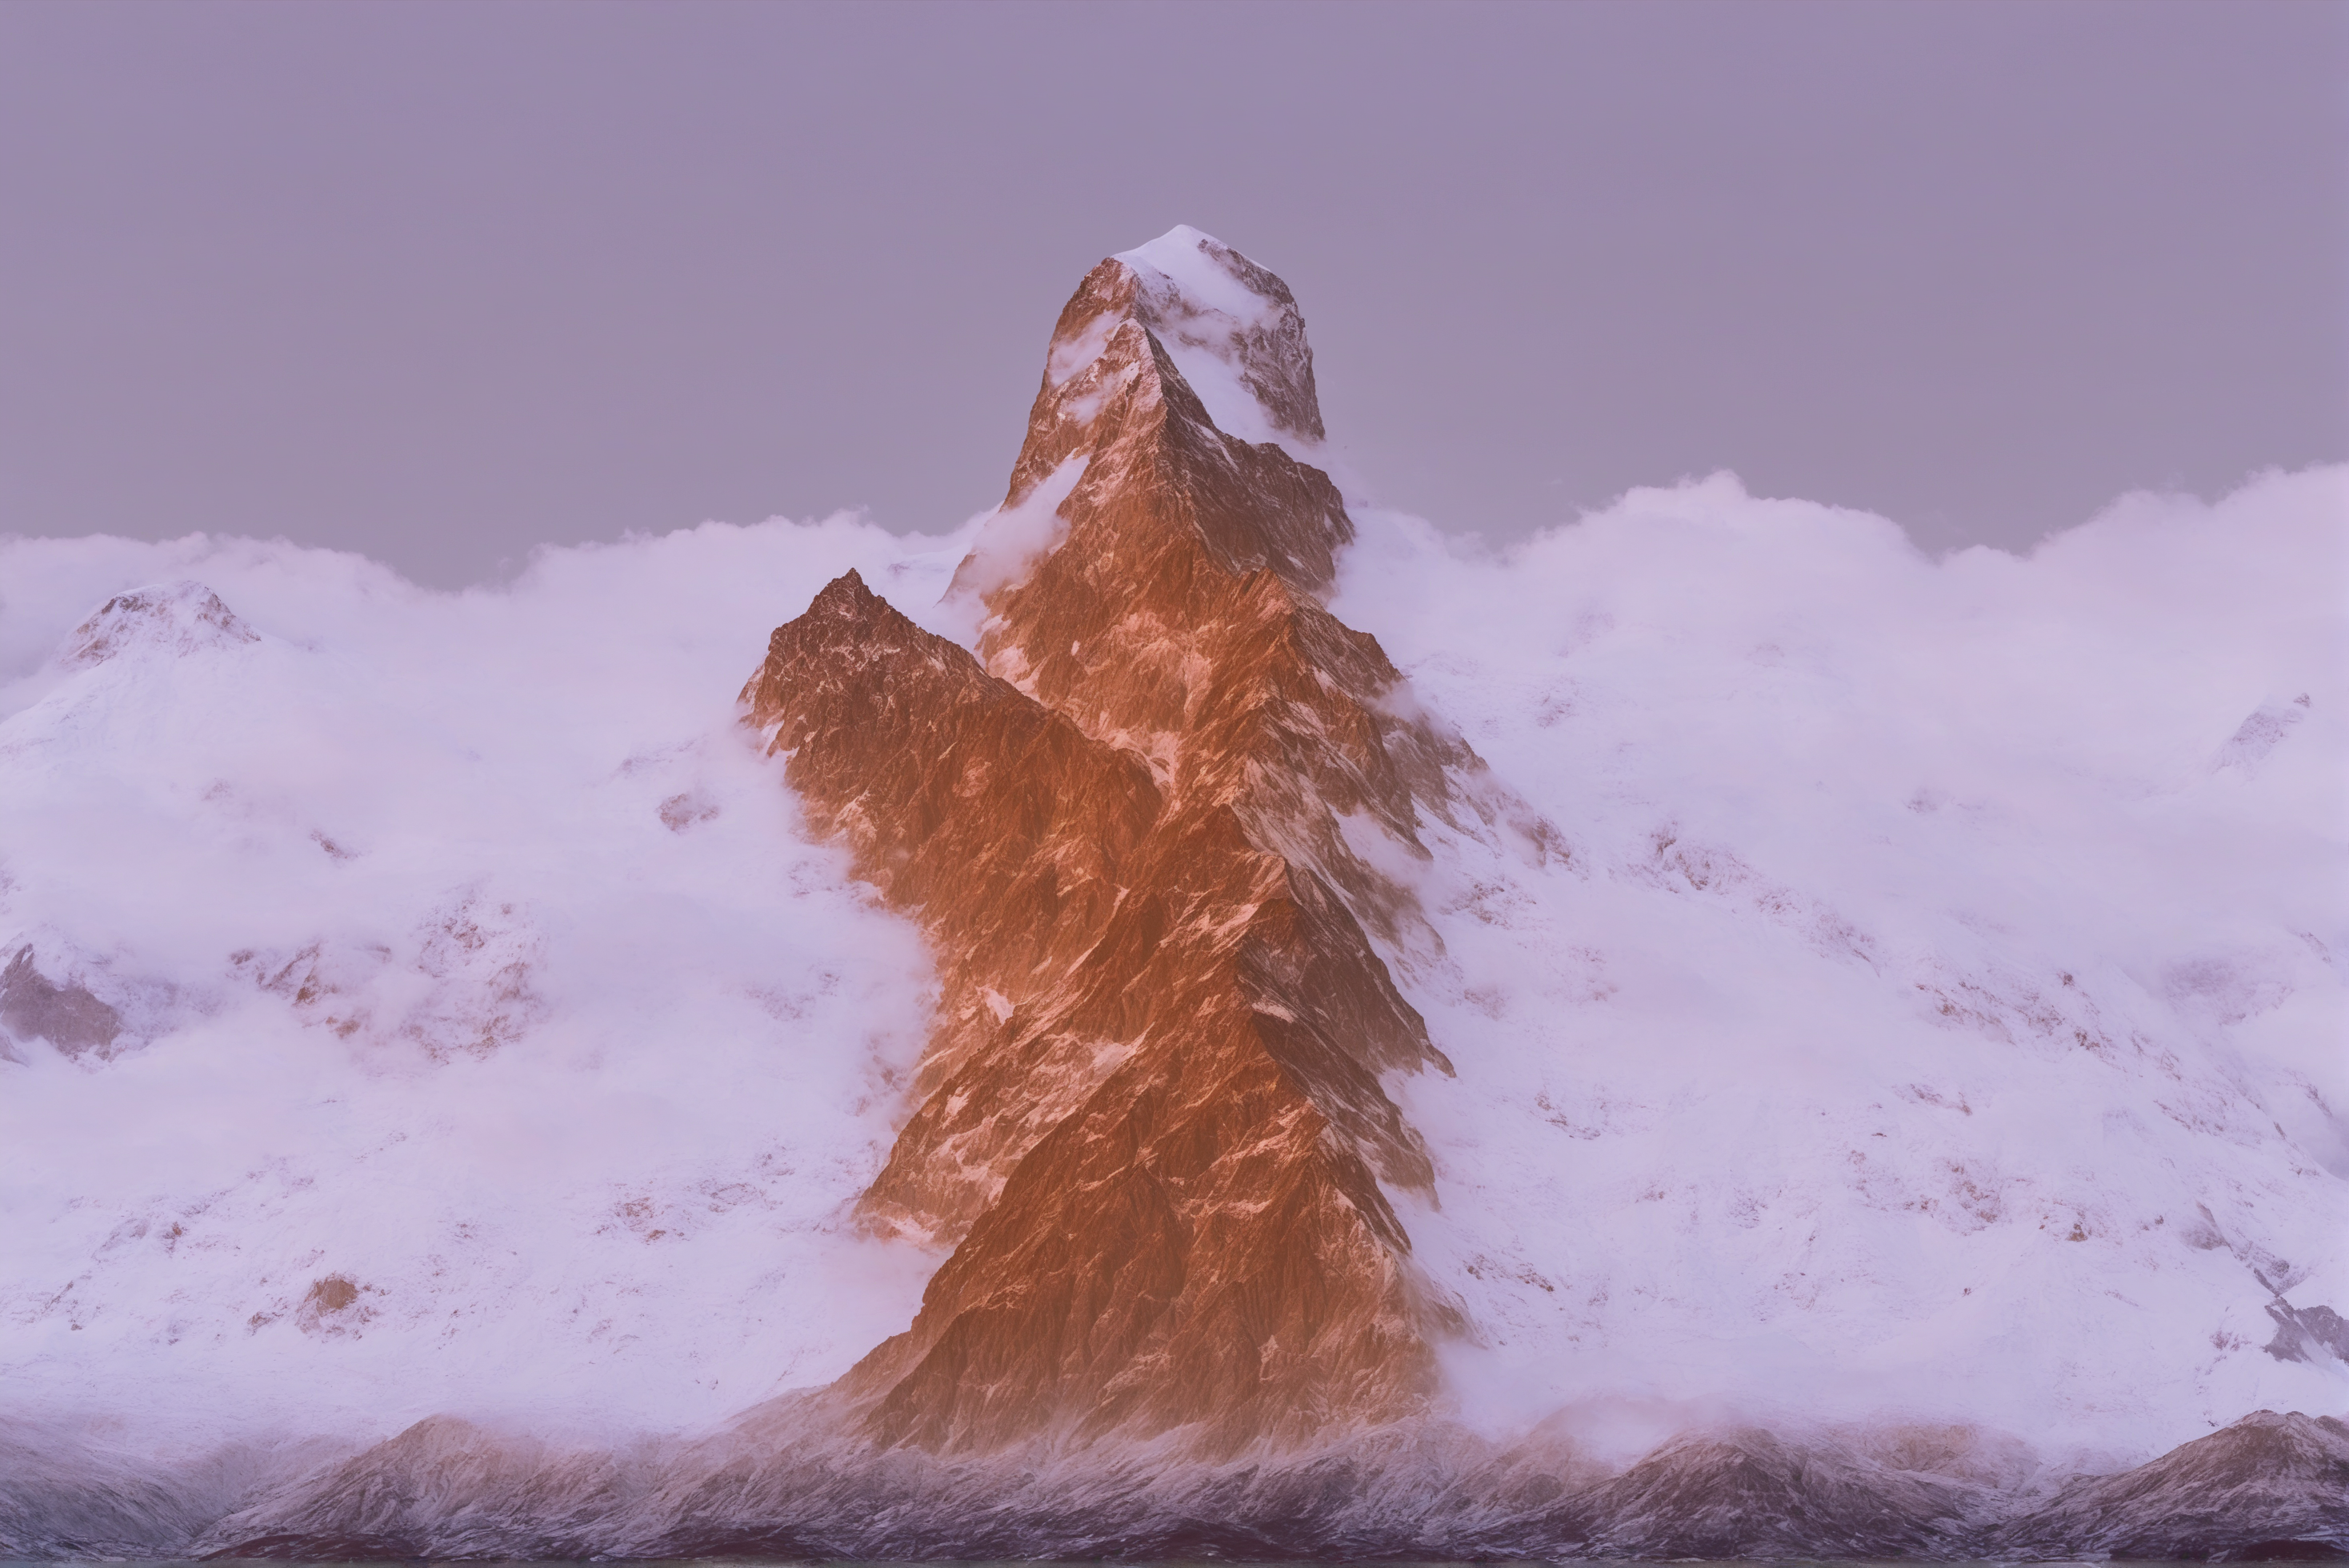
image = load_image("https://huggingface.co/datasets/huggingface/documentation-images/resolve/main/diffusers/ip_adapter_einstein_base.png")
pipeline(
prompt="A photo of Einstein as a chef, wearing an apron, cooking in a French restaurant",
ip_adapter_image=image,
negative_prompt="lowres, bad anatomy, worst quality, low quality",
num_inference_steps=100,
).images[0]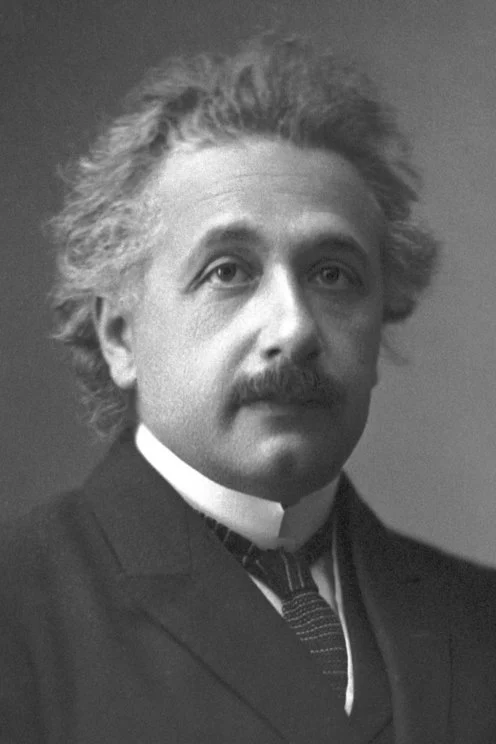
Multiple IP-Adapters
Combine multiple IP-Adapters to generate images in more diverse styles. For example, you can use IP-Adapter Face to generate consistent faces and characters and IP-Adapter Plus to generate those faces in specific styles.
Load an image encoder with CLIPVisionModelWithProjection.
import torch
from diffusers import AutoPipelineForText2Image, DDIMScheduler
from transformers import CLIPVisionModelWithProjection
from diffusers.utils import load_image

image_encoder = CLIPVisionModelWithProjection.from_pretrained(
    "h94/IP-Adapter",
    subfolder="models/image_encoder",
    torch_dtype=torch.float16,
)
Load a base model, scheduler and the following IP-Adapters.
- ip-adapter-plus_sdxl_vit-h uses patch embeddings and a ViT-H image encoder
- ip-adapter-plus-face_sdxl_vit-h uses patch embeddings and a ViT-H image encoder but it is conditioned on images of cropped faces
pipeline = AutoPipelineForText2Image.from_pretrained(
    "stabilityai/stable-diffusion-xl-base-1.0",
    torch_dtype=torch.float16,
    image_encoder=image_encoder,
)
pipeline.scheduler = DDIMScheduler.from_config(pipeline.scheduler.config)
pipeline.load_ip_adapter(
  "h94/IP-Adapter",
  subfolder="sdxl_models",
  weight_name=["ip-adapter-plus_sdxl_vit-h.safetensors", "ip-adapter-plus-face_sdxl_vit-h.safetensors"]
)
pipeline.set_ip_adapter_scale([0.7, 0.3])
# enable_model_cpu_offload to reduce memory usage
pipeline.enable_model_cpu_offload()
Load an image and a folder containing images of a certain style to apply.
face_image = load_image("https://huggingface.co/datasets/YiYiXu/testing-images/resolve/main/women_input.png")
style_folder = "https://huggingface.co/datasets/YiYiXu/testing-images/resolve/main/style_ziggy"
style_images = [load_image(f"{style_folder}/img{i}.png") for i in range(10)]
Pass style and face images as a list to ip_adapter_image.
generator = torch.Generator(device="cpu").manual_seed(0)

pipeline(
    prompt="wonderwoman",
    ip_adapter_image=[style_images, face_image],
    negative_prompt="monochrome, lowres, bad anatomy, worst quality, low quality",
).images[0]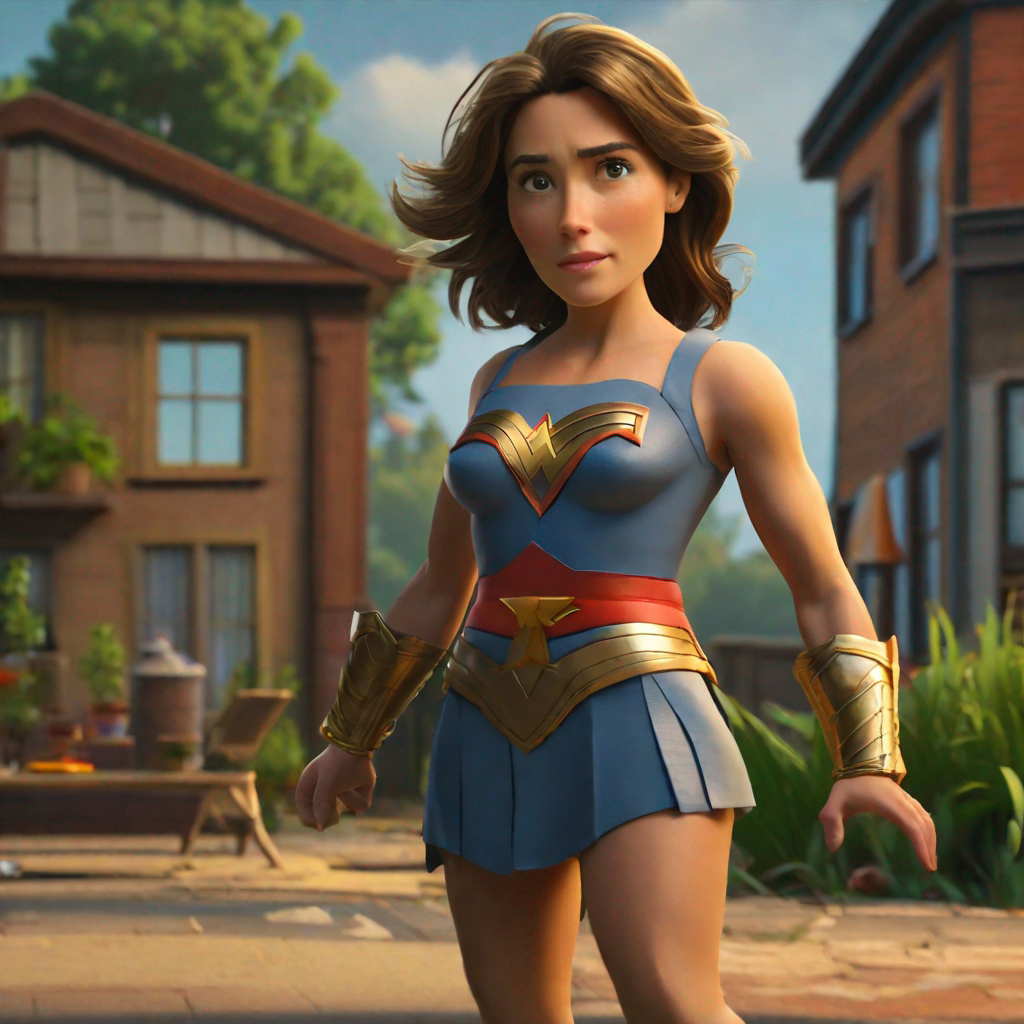
Instant generation
Latent Consistency Models (LCM) can generate images 4 steps or less, unlike other diffusion models which require a lot more steps, making it feel “instantaneous”. IP-Adapters are compatible with LCM models to instantly generate images.
Load the IP-Adapter weights and load the LoRA weights with load_lora_weights().
import torch
from diffusers import DiffusionPipeline, LCMScheduler
from diffusers.utils import load_image

pipeline = DiffusionPipeline.from_pretrained(
  "sd-dreambooth-library/herge-style",
  torch_dtype=torch.float16
)

pipeline.load_ip_adapter(
  "h94/IP-Adapter",
  subfolder="models",
  weight_name="ip-adapter_sd15.bin"
)
pipeline.load_lora_weights("latent-consistency/lcm-lora-sdv1-5")
pipeline.scheduler = LCMScheduler.from_config(pipeline.scheduler.config)
# enable_model_cpu_offload to reduce memory usage
pipeline.enable_model_cpu_offload()
Try using a lower IP-Adapter scale to condition generation more on the style you want to apply and remember to use the special token in your prompt to trigger its generation.
pipeline.set_ip_adapter_scale(0.4)

prompt = "herge_style woman in armor, best quality, high quality"

ip_adapter_image = load_image("https://user-images.githubusercontent.com/24734142/266492875-2d50d223-8475-44f0-a7c6-08b51cb53572.png")
pipeline(
    prompt=prompt,
    ip_adapter_image=ip_adapter_image,
    num_inference_steps=4,
    guidance_scale=1,
).images[0]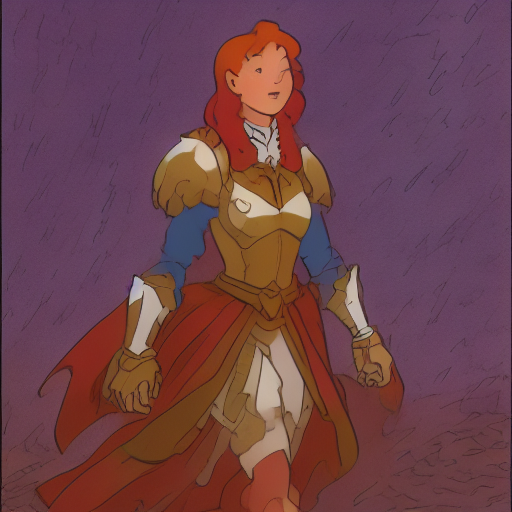
Structural control
For structural control, combine IP-Adapter with ControlNet conditioned on depth maps, edge maps, pose estimations, and more.
The example below loads a ControlNetModel checkpoint conditioned on depth maps and combines it with a IP-Adapter.
import torch
from diffusers.utils import load_image
from diffusers import StableDiffusionControlNetPipeline, ControlNetModel

controlnet = ControlNetModel.from_pretrained(
  "lllyasviel/control_v11f1p_sd15_depth",
  torch_dtype=torch.float16
)

pipeline = StableDiffusionControlNetPipeline.from_pretrained(
    "stable-diffusion-v1-5/stable-diffusion-v1-5",
    controlnet=controlnet,
    torch_dtype=torch.float16
).to("cuda")
pipeline.load_ip_adapter(
  "h94/IP-Adapter",
  subfolder="models",
  weight_name="ip-adapter_sd15.bin"
)
Pass the depth map and IP-Adapter image to the pipeline.
pipeline(
  prompt="best quality, high quality",
  image=depth_map,
  ip_adapter_image=ip_adapter_image,
  negative_prompt="monochrome, lowres, bad anatomy, worst quality, low quality",
).images[0]
Style and layout control
For style and layout control, combine IP-Adapter with InstantStyle. InstantStyle separates style (color, texture, overall feel) and content from each other. It only applies the style in style-specific blocks of the model to prevent it from distorting other areas of an image. This generates images with stronger and more consistent styles and better control over the layout.
The IP-Adapter is only activated for specific parts of the model. Use the set_ip_adapter_scale() method to scale the influence of the IP-Adapter in different layers. The example below activates the IP-Adapter in the second layer of the models down block_2 and up block_0. Down block_2 is where the IP-Adapter injects layout information and up block_0 is where style is injected.
import torch
from diffusers import AutoPipelineForText2Image
from diffusers.utils import load_image

pipeline = AutoPipelineForText2Image.from_pretrained(
  "stabilityai/stable-diffusion-xl-base-1.0",
  torch_dtype=torch.float16
).to("cuda")
pipeline.load_ip_adapter(
  "h94/IP-Adapter",
  subfolder="sdxl_models",
  weight_name="ip-adapter_sdxl.bin"
)

scale = {
    "down": {"block_2": [0.0, 1.0]},
    "up": {"block_0": [0.0, 1.0, 0.0]},
}
pipeline.set_ip_adapter_scale(scale)
Load the style image and generate an image.
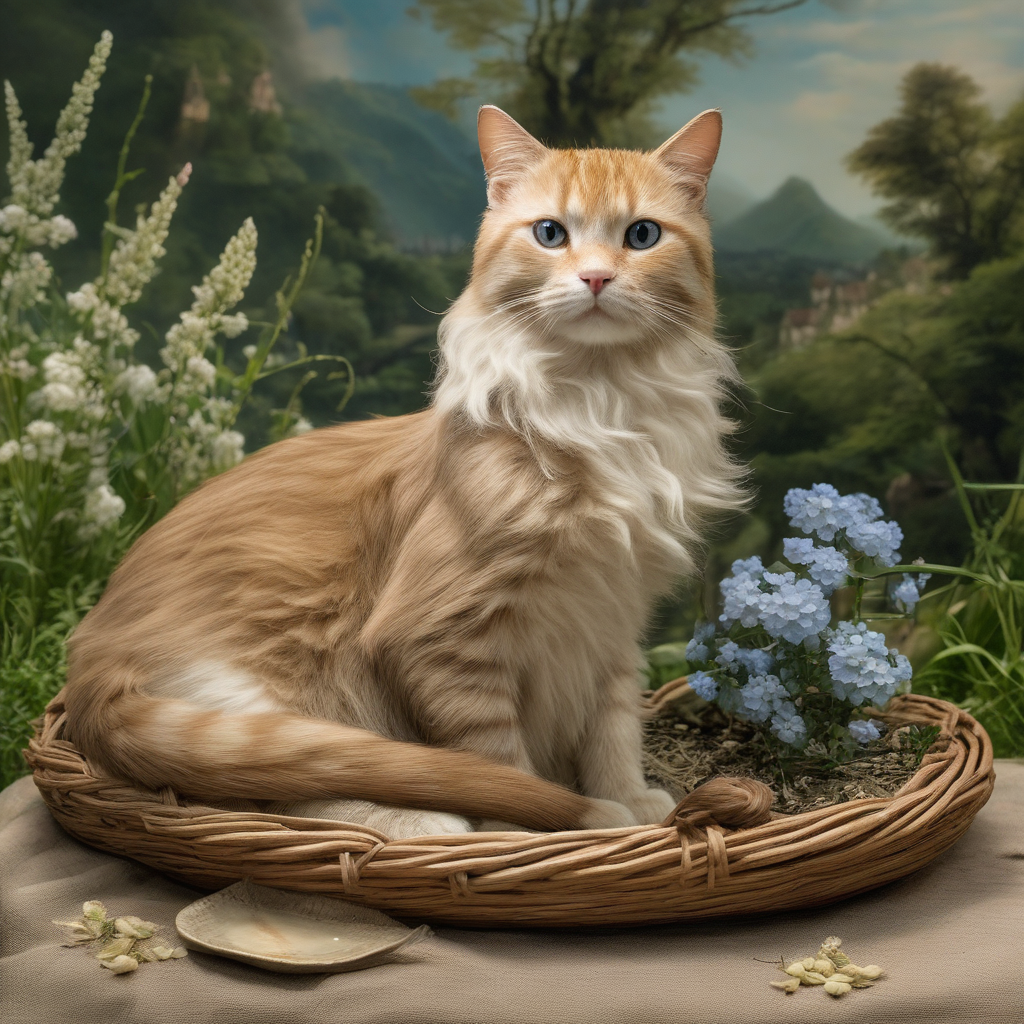
style_image = load_image("https://huggingface.co/datasets/huggingface/documentation-images/resolve/0052a70beed5bf71b92610a43a52df6d286cd5f3/diffusers/rabbit.jpg")

pipeline(
    prompt="a cat, masterpiece, best quality, high quality",
    ip_adapter_image=style_image,
    negative_prompt="text, watermark, lowres, low quality, worst quality, deformed, glitch, low contrast, noisy, saturation, blurry",
    guidance_scale=5,
).images[0]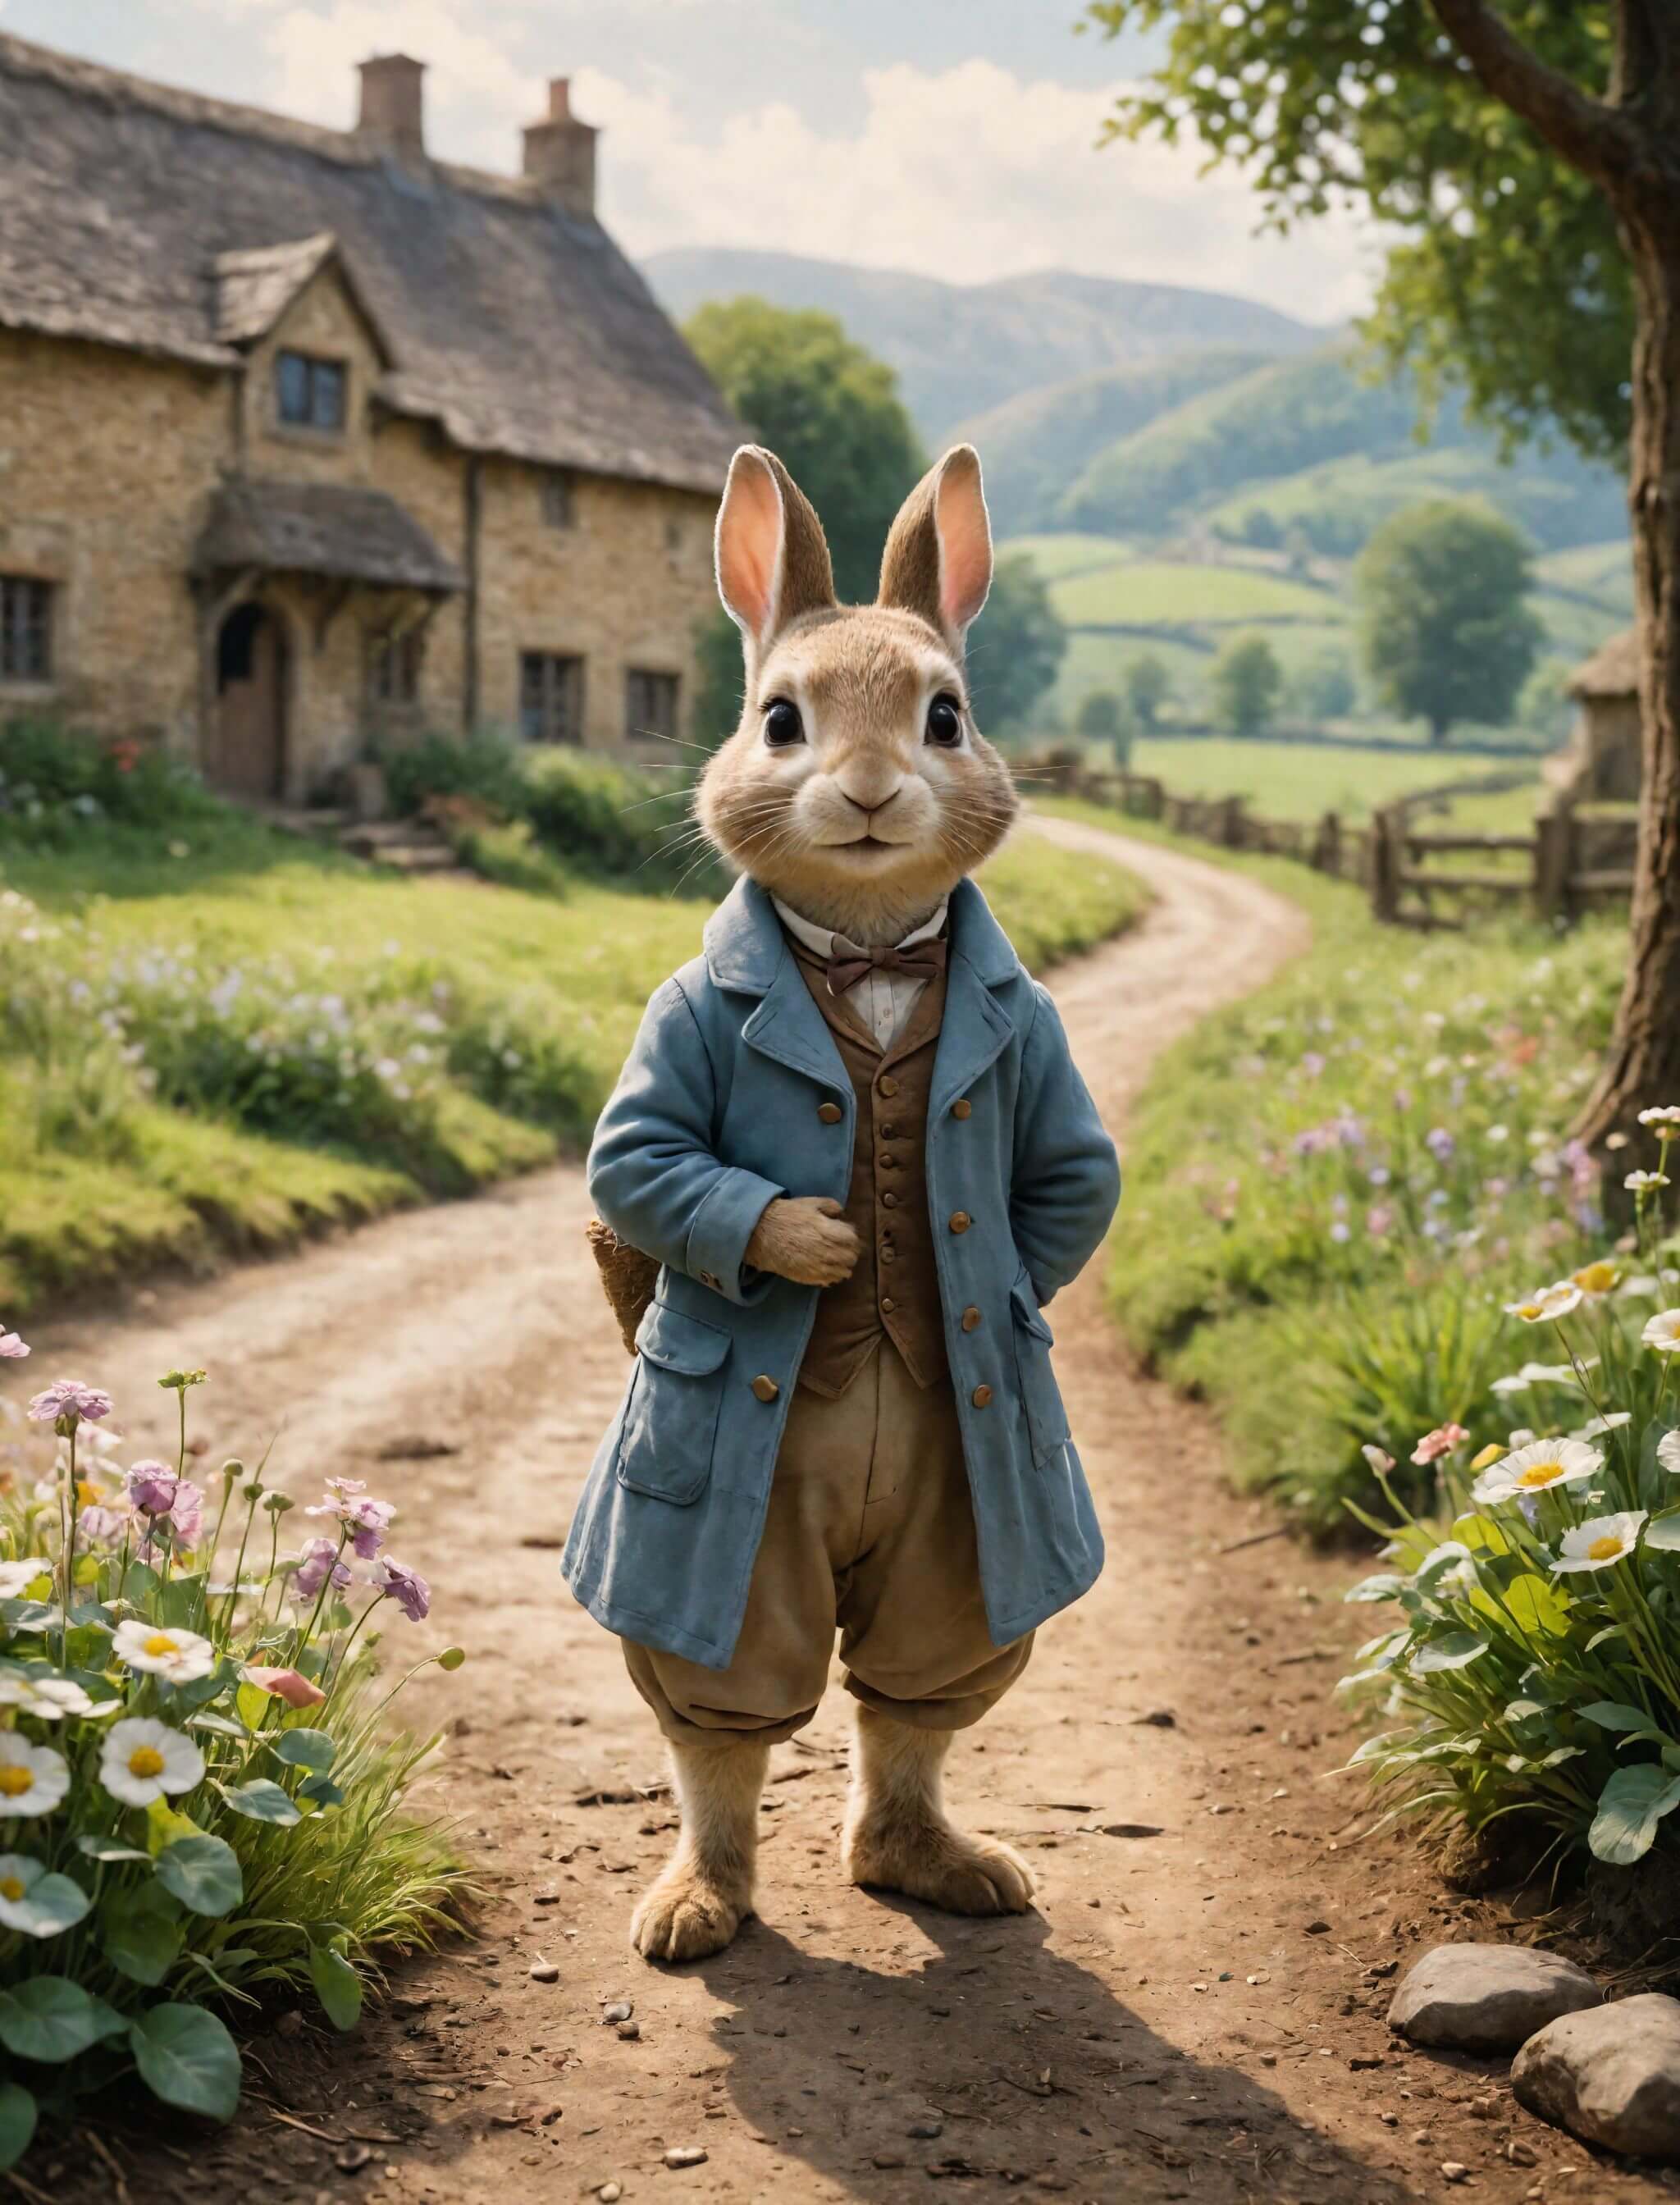

You can also insert the IP-Adapter in all the model layers. This tends to generate images that focus more on the image prompt and may reduce the diversity of generated images. Only activate the IP-Adapter in up block_0 or the style layer.
You don’t need to specify all the layers in the
scaledictionary. Layers not included are set to 0, which means the IP-Adapter is disabled.
scale = {
    "up": {"block_0": [0.0, 1.0, 0.0]},
}
pipeline.set_ip_adapter_scale(scale)

pipeline(
    prompt="a cat, masterpiece, best quality, high quality",
    ip_adapter_image=style_image,
    negative_prompt="text, watermark, lowres, low quality, worst quality, deformed, glitch, low contrast, noisy, saturation, blurry",
    guidance_scale=5,
).images[0]