Diffusers documentation
Inpainting
Inpainting
Inpainting replaces or edits specific areas of an image. This makes it a useful tool for image restoration like removing defects and artifacts, or even replacing an image area with something entirely new. Inpainting relies on a mask to determine which regions of an image to fill in; the area to inpaint is represented by white pixels and the area to keep is represented by black pixels. The white pixels are filled in by the prompt.
With 🤗 Diffusers, here is how you can do inpainting:
- Load an inpainting checkpoint with the AutoPipelineForInpainting class. This’ll automatically detect the appropriate pipeline class to load based on the checkpoint:
import torch
from diffusers import AutoPipelineForInpainting
from diffusers.utils import load_image, make_image_grid

pipeline = AutoPipelineForInpainting.from_pretrained(
    "kandinsky-community/kandinsky-2-2-decoder-inpaint", torch_dtype=torch.float16
)
pipeline.enable_model_cpu_offload()
# remove following line if xFormers is not installed or you have PyTorch 2.0 or higher installed
pipeline.enable_xformers_memory_efficient_attention()
You’ll notice throughout the guide, we use enable_model_cpu_offload() and enable_xformers_memory_efficient_attention(), to save memory and increase inference speed. If you’re using PyTorch 2.0, it’s not necessary to call enable_xformers_memory_efficient_attention() on your pipeline because it’ll already be using PyTorch 2.0’s native scaled-dot product attention.
- Load the base and mask images:
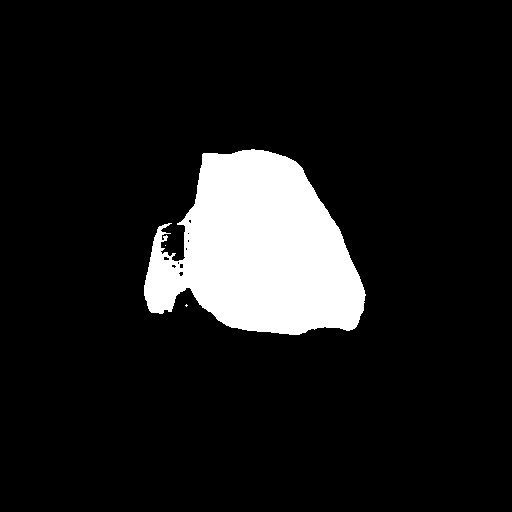
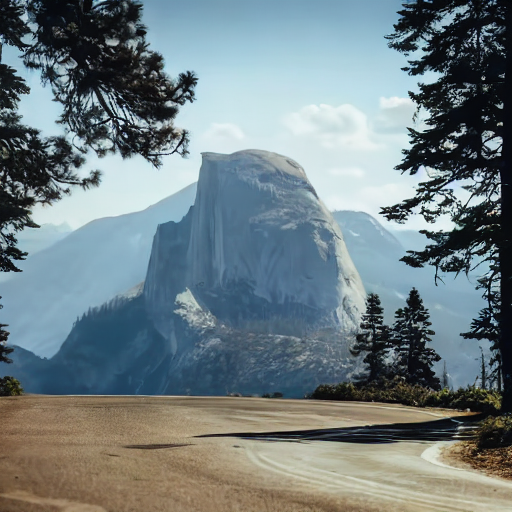
init_image = load_image("https://huggingface.co/datasets/huggingface/documentation-images/resolve/main/diffusers/inpaint.png")
mask_image = load_image("https://huggingface.co/datasets/huggingface/documentation-images/resolve/main/diffusers/inpaint_mask.png")- Create a prompt to inpaint the image with and pass it to the pipeline with the base and mask images:
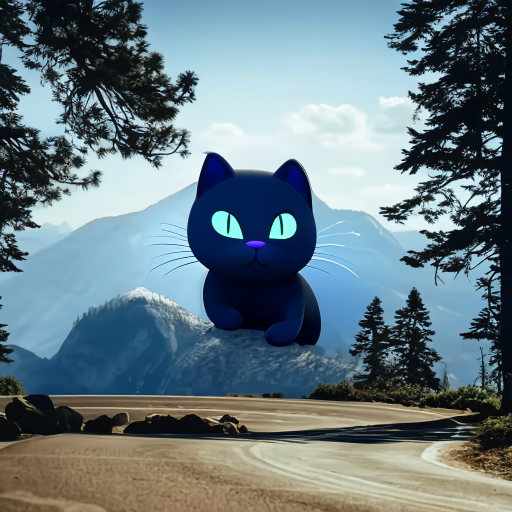
prompt = "a black cat with glowing eyes, cute, adorable, disney, pixar, highly detailed, 8k"
negative_prompt = "bad anatomy, deformed, ugly, disfigured"
image = pipeline(prompt=prompt, negative_prompt=negative_prompt, image=init_image, mask_image=mask_image).images[0]
make_image_grid([init_image, mask_image, image], rows=1, cols=3)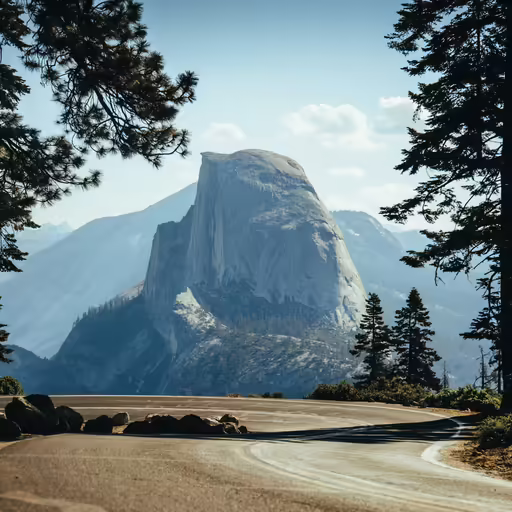
Create a mask image
Throughout this guide, the mask image is provided in all of the code examples for convenience. You can inpaint on your own images, but you’ll need to create a mask image for it. Use the Space below to easily create a mask image.
Upload a base image to inpaint on and use the sketch tool to draw a mask. Once you’re done, click Run to generate and download the mask image.
Mask blur
The ~VaeImageProcessor.blur method provides an option for how to blend the original image and inpaint area. The amount of blur is determined by the blur_factor parameter. Increasing the blur_factor increases the amount of blur applied to the mask edges, softening the transition between the original image and inpaint area. A low or zero blur_factor preserves the sharper edges of the mask.
To use this, create a blurred mask with the image processor.
import torch
from diffusers import AutoPipelineForInpainting
from diffusers.utils import load_image
from PIL import Image

pipeline = AutoPipelineForInpainting.from_pretrained("stable-diffusion-v1-5/stable-diffusion-v1-5", torch_dtype=torch.float16).to('cuda')

mask = load_image("https://huggingface.co/datasets/YiYiXu/testing-images/resolve/main/seashore_mask.png")
blurred_mask = pipeline.mask_processor.blur(mask, blur_factor=33)
blurred_mask

Popular models
Stable Diffusion Inpainting, Stable Diffusion XL (SDXL) Inpainting, and Kandinsky 2.2 Inpainting are among the most popular models for inpainting. SDXL typically produces higher resolution images than Stable Diffusion v1.5, and Kandinsky 2.2 is also capable of generating high-quality images.
Stable Diffusion Inpainting
Stable Diffusion Inpainting is a latent diffusion model finetuned on 512x512 images on inpainting. It is a good starting point because it is relatively fast and generates good quality images. To use this model for inpainting, you’ll need to pass a prompt, base and mask image to the pipeline:
import torch
from diffusers import AutoPipelineForInpainting
from diffusers.utils import load_image, make_image_grid
pipeline = AutoPipelineForInpainting.from_pretrained(
"stable-diffusion-v1-5/stable-diffusion-inpainting", torch_dtype=torch.float16, variant="fp16"
)
pipeline.enable_model_cpu_offload()
# remove following line if xFormers is not installed or you have PyTorch 2.0 or higher installed
pipeline.enable_xformers_memory_efficient_attention()
# load base and mask image
init_image = load_image("https://huggingface.co/datasets/huggingface/documentation-images/resolve/main/diffusers/inpaint.png")
mask_image = load_image("https://huggingface.co/datasets/huggingface/documentation-images/resolve/main/diffusers/inpaint_mask.png")
generator = torch.Generator("cuda").manual_seed(92)
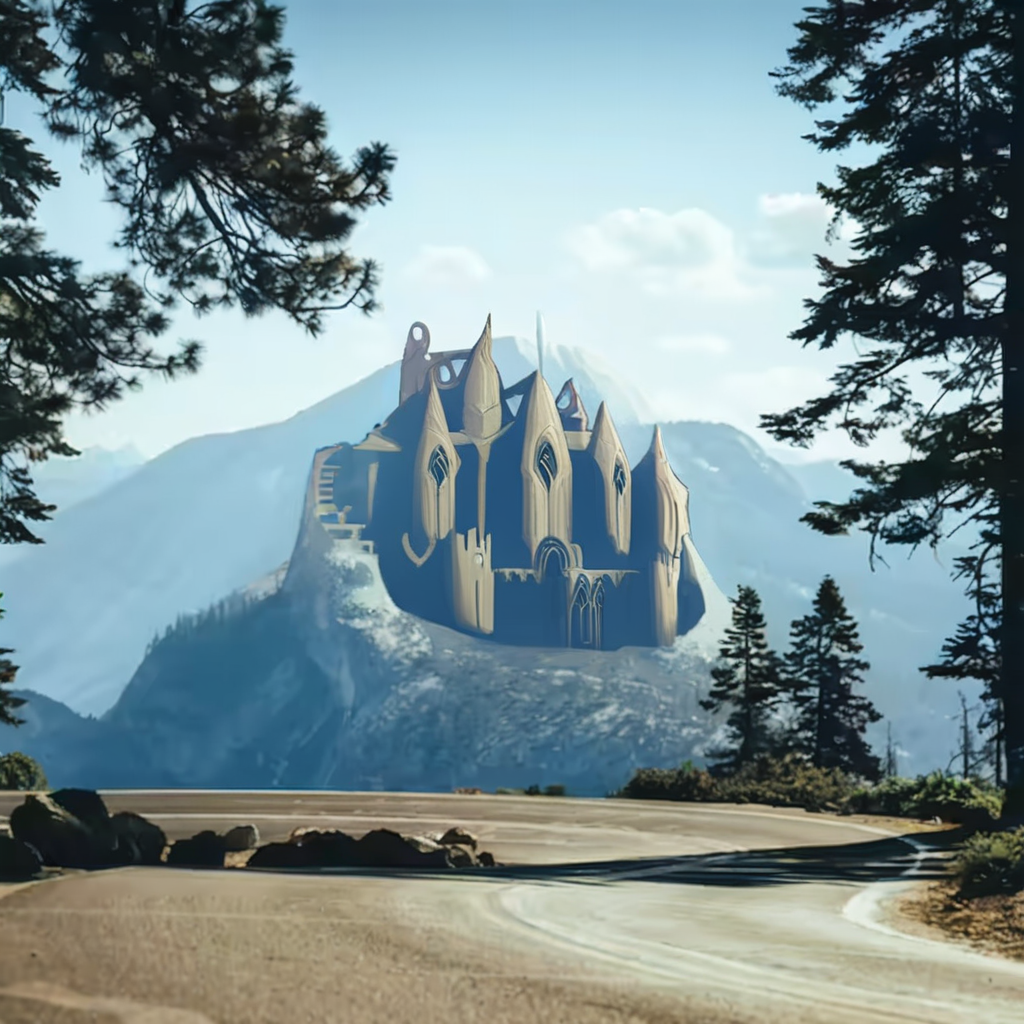
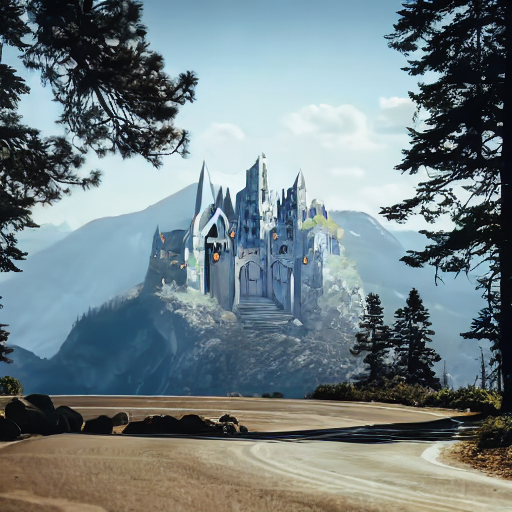
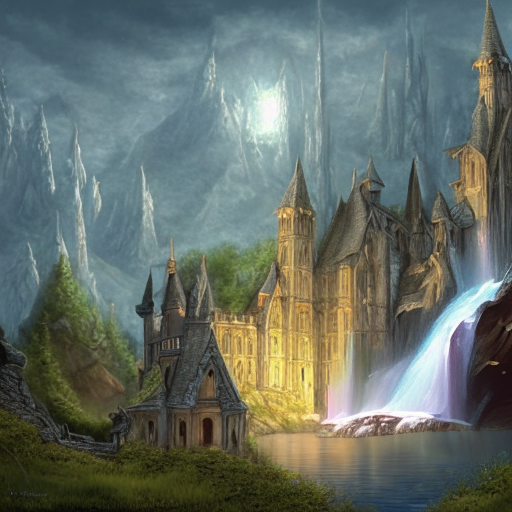
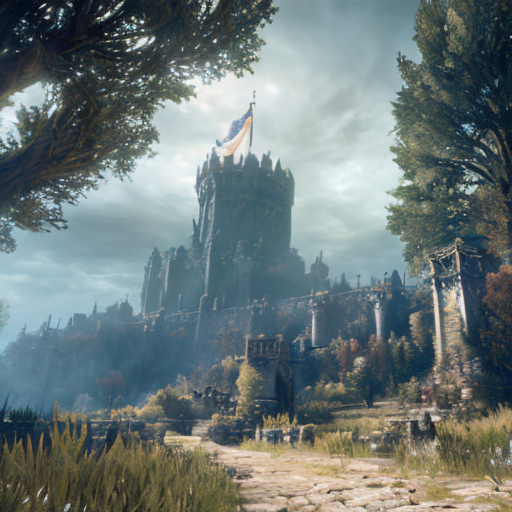
prompt = "concept art digital painting of an elven castle, inspired by lord of the rings, highly detailed, 8k"
image = pipeline(prompt=prompt, image=init_image, mask_image=mask_image, generator=generator).images[0]
make_image_grid([init_image, mask_image, image], rows=1, cols=3)Stable Diffusion XL (SDXL) Inpainting
SDXL is a larger and more powerful version of Stable Diffusion v1.5. This model can follow a two-stage model process (though each model can also be used alone); the base model generates an image, and a refiner model takes that image and further enhances its details and quality. Take a look at the SDXL guide for a more comprehensive guide on how to use SDXL and configure it’s parameters.
import torch
from diffusers import AutoPipelineForInpainting
from diffusers.utils import load_image, make_image_grid
pipeline = AutoPipelineForInpainting.from_pretrained(
"diffusers/stable-diffusion-xl-1.0-inpainting-0.1", torch_dtype=torch.float16, variant="fp16"
)
pipeline.enable_model_cpu_offload()
# remove following line if xFormers is not installed or you have PyTorch 2.0 or higher installed
pipeline.enable_xformers_memory_efficient_attention()
# load base and mask image
init_image = load_image("https://huggingface.co/datasets/huggingface/documentation-images/resolve/main/diffusers/inpaint.png")
mask_image = load_image("https://huggingface.co/datasets/huggingface/documentation-images/resolve/main/diffusers/inpaint_mask.png")
generator = torch.Generator("cuda").manual_seed(92)
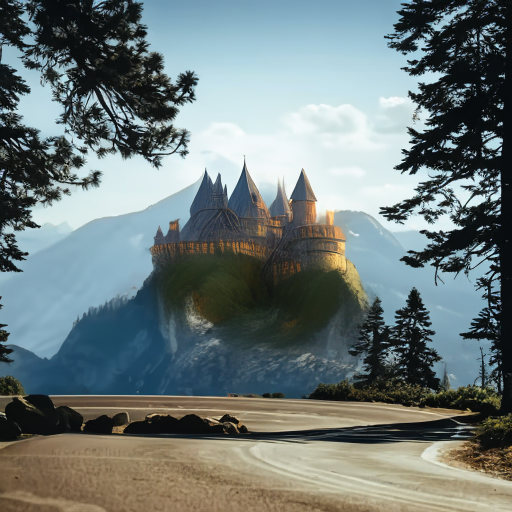
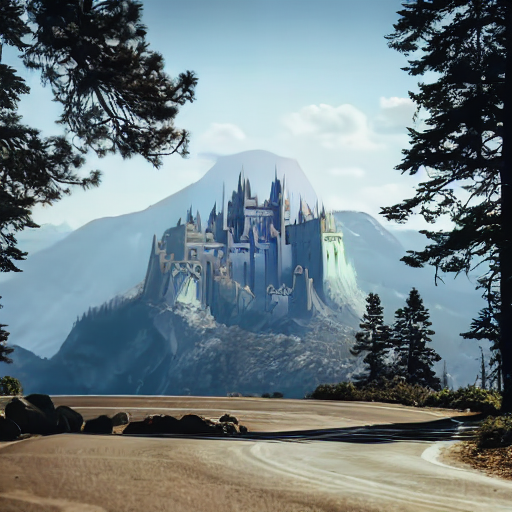
prompt = "concept art digital painting of an elven castle, inspired by lord of the rings, highly detailed, 8k"
image = pipeline(prompt=prompt, image=init_image, mask_image=mask_image, generator=generator).images[0]
make_image_grid([init_image, mask_image, image], rows=1, cols=3)Kandinsky 2.2 Inpainting
The Kandinsky model family is similar to SDXL because it uses two models as well; the image prior model creates image embeddings, and the diffusion model generates images from them. You can load the image prior and diffusion model separately, but the easiest way to use Kandinsky 2.2 is to load it into the AutoPipelineForInpainting class which uses the KandinskyV22InpaintCombinedPipeline under the hood.
import torch
from diffusers import AutoPipelineForInpainting
from diffusers.utils import load_image, make_image_grid
pipeline = AutoPipelineForInpainting.from_pretrained(
"kandinsky-community/kandinsky-2-2-decoder-inpaint", torch_dtype=torch.float16
)
pipeline.enable_model_cpu_offload()
# remove following line if xFormers is not installed or you have PyTorch 2.0 or higher installed
pipeline.enable_xformers_memory_efficient_attention()
# load base and mask image
init_image = load_image("https://huggingface.co/datasets/huggingface/documentation-images/resolve/main/diffusers/inpaint.png")
mask_image = load_image("https://huggingface.co/datasets/huggingface/documentation-images/resolve/main/diffusers/inpaint_mask.png")
generator = torch.Generator("cuda").manual_seed(92)
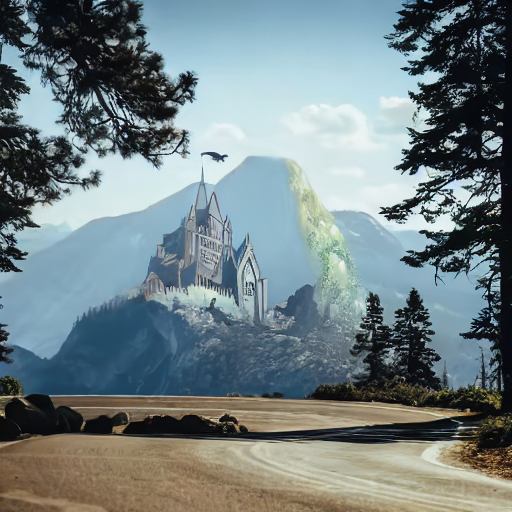
prompt = "concept art digital painting of an elven castle, inspired by lord of the rings, highly detailed, 8k"
image = pipeline(prompt=prompt, image=init_image, mask_image=mask_image, generator=generator).images[0]
make_image_grid([init_image, mask_image, image], rows=1, cols=3) 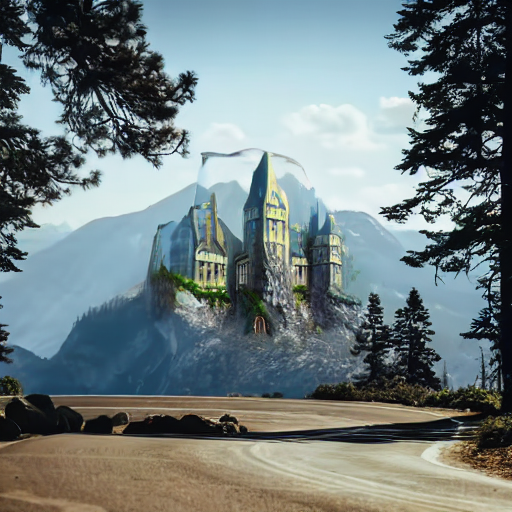
Non-inpaint specific checkpoints
So far, this guide has used inpaint specific checkpoints such as stable-diffusion-v1-5/stable-diffusion-inpainting. But you can also use regular checkpoints like stable-diffusion-v1-5/stable-diffusion-v1-5. Let’s compare the results of the two checkpoints.
The image on the left is generated from a regular checkpoint, and the image on the right is from an inpaint checkpoint. You’ll immediately notice the image on the left is not as clean, and you can still see the outline of the area the model is supposed to inpaint. The image on the right is much cleaner and the inpainted area appears more natural.
import torch
from diffusers import AutoPipelineForInpainting
from diffusers.utils import load_image, make_image_grid
pipeline = AutoPipelineForInpainting.from_pretrained(
"stable-diffusion-v1-5/stable-diffusion-v1-5", torch_dtype=torch.float16, variant="fp16"
)
pipeline.enable_model_cpu_offload()
# remove following line if xFormers is not installed or you have PyTorch 2.0 or higher installed
pipeline.enable_xformers_memory_efficient_attention()
# load base and mask image
init_image = load_image("https://huggingface.co/datasets/huggingface/documentation-images/resolve/main/diffusers/inpaint.png")
mask_image = load_image("https://huggingface.co/datasets/huggingface/documentation-images/resolve/main/diffusers/inpaint_mask.png")
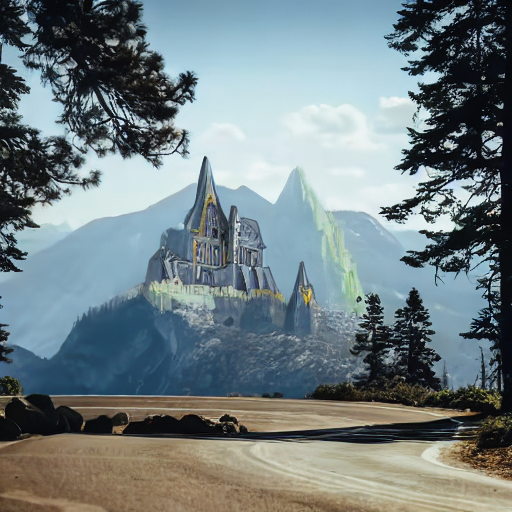
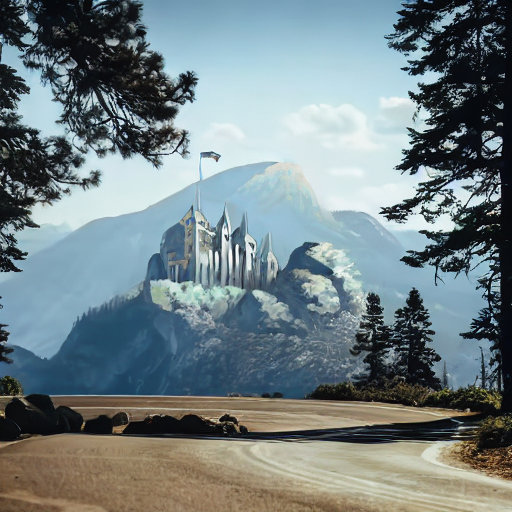
generator = torch.Generator("cuda").manual_seed(92)
prompt = "concept art digital painting of an elven castle, inspired by lord of the rings, highly detailed, 8k"
image = pipeline(prompt=prompt, image=init_image, mask_image=mask_image, generator=generator).images[0]
make_image_grid([init_image, image], rows=1, cols=2)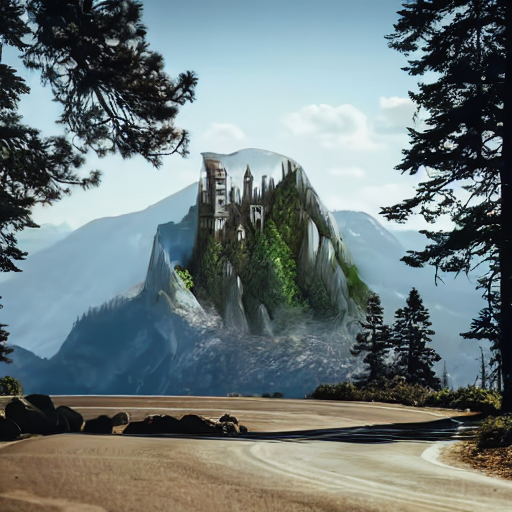
However, for more basic tasks like erasing an object from an image (like the rocks in the road for example), a regular checkpoint yields pretty good results. There isn’t as noticeable of difference between the regular and inpaint checkpoint.
import torch
from diffusers import AutoPipelineForInpainting
from diffusers.utils import load_image, make_image_grid

pipeline = AutoPipelineForInpainting.from_pretrained(
    "stable-diffusion-v1-5/stable-diffusion-v1-5", torch_dtype=torch.float16, variant="fp16"
)
pipeline.enable_model_cpu_offload()
# remove following line if xFormers is not installed or you have PyTorch 2.0 or higher installed
pipeline.enable_xformers_memory_efficient_attention()

# load base and mask image
init_image = load_image("https://huggingface.co/datasets/huggingface/documentation-images/resolve/main/diffusers/inpaint.png")
mask_image = load_image("https://huggingface.co/datasets/huggingface/documentation-images/resolve/main/diffusers/road-mask.png")

image = pipeline(prompt="road", image=init_image, mask_image=mask_image).images[0]
make_image_grid([init_image, image], rows=1, cols=2)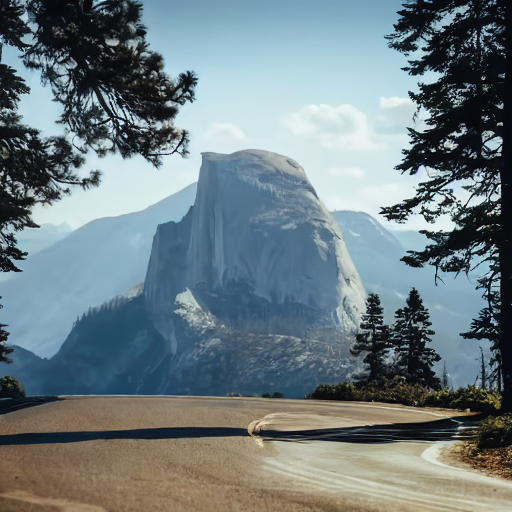
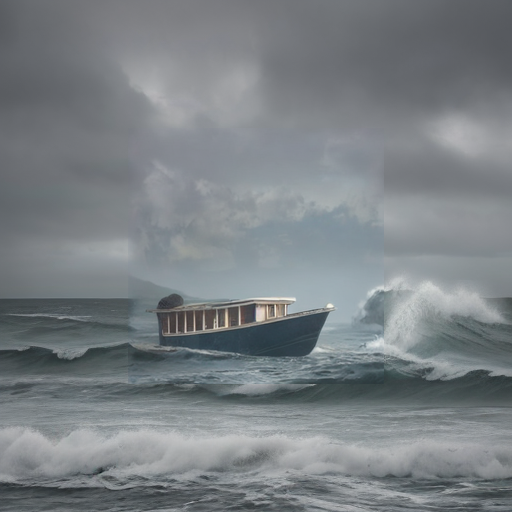
The trade-off of using a non-inpaint specific checkpoint is the overall image quality may be lower, but it generally tends to preserve the mask area (that is why you can see the mask outline). The inpaint specific checkpoints are intentionally trained to generate higher quality inpainted images, and that includes creating a more natural transition between the masked and unmasked areas. As a result, these checkpoints are more likely to change your unmasked area.
If preserving the unmasked area is important for your task, you can use the VaeImageProcessor.apply_overlay method to force the unmasked area of an image to remain the same at the expense of some more unnatural transitions between the masked and unmasked areas.
import PIL
import numpy as np
import torch

from diffusers import AutoPipelineForInpainting
from diffusers.utils import load_image, make_image_grid

device = "cuda"
pipeline = AutoPipelineForInpainting.from_pretrained(
    "stable-diffusion-v1-5/stable-diffusion-inpainting",
    torch_dtype=torch.float16,
    variant="fp16"
)
pipeline = pipeline.to(device)

img_url = "https://raw.githubusercontent.com/CompVis/latent-diffusion/main/data/inpainting_examples/overture-creations-5sI6fQgYIuo.png"
mask_url = "https://raw.githubusercontent.com/CompVis/latent-diffusion/main/data/inpainting_examples/overture-creations-5sI6fQgYIuo_mask.png"

init_image = load_image(img_url).resize((512, 512))
mask_image = load_image(mask_url).resize((512, 512))

prompt = "Face of a yellow cat, high resolution, sitting on a park bench"
repainted_image = pipeline(prompt=prompt, image=init_image, mask_image=mask_image).images[0]
repainted_image.save("repainted_image.png")

unmasked_unchanged_image = pipeline.image_processor.apply_overlay(mask_image, init_image, repainted_image)
unmasked_unchanged_image.save("force_unmasked_unchanged.png")
make_image_grid([init_image, mask_image, repainted_image, unmasked_unchanged_image], rows=2, cols=2)
Configure pipeline parameters
Image features - like quality and “creativity” - are dependent on pipeline parameters. Knowing what these parameters do is important for getting the results you want. Let’s take a look at the most important parameters and see how changing them affects the output.
Strength
strength is a measure of how much noise is added to the base image, which influences how similar the output is to the base image.
- 📈 a high
strengthvalue means more noise is added to an image and the denoising process takes longer, but you’ll get higher quality images that are more different from the base image - 📉 a low
strengthvalue means less noise is added to an image and the denoising process is faster, but the image quality may not be as great and the generated image resembles the base image more
import torch
from diffusers import AutoPipelineForInpainting
from diffusers.utils import load_image, make_image_grid

pipeline = AutoPipelineForInpainting.from_pretrained(
    "stable-diffusion-v1-5/stable-diffusion-inpainting", torch_dtype=torch.float16, variant="fp16"
)
pipeline.enable_model_cpu_offload()
# remove following line if xFormers is not installed or you have PyTorch 2.0 or higher installed
pipeline.enable_xformers_memory_efficient_attention()

# load base and mask image
init_image = load_image("https://huggingface.co/datasets/huggingface/documentation-images/resolve/main/diffusers/inpaint.png")
mask_image = load_image("https://huggingface.co/datasets/huggingface/documentation-images/resolve/main/diffusers/inpaint_mask.png")

prompt = "concept art digital painting of an elven castle, inspired by lord of the rings, highly detailed, 8k"
image = pipeline(prompt=prompt, image=init_image, mask_image=mask_image, strength=0.6).images[0]
make_image_grid([init_image, mask_image, image], rows=1, cols=3)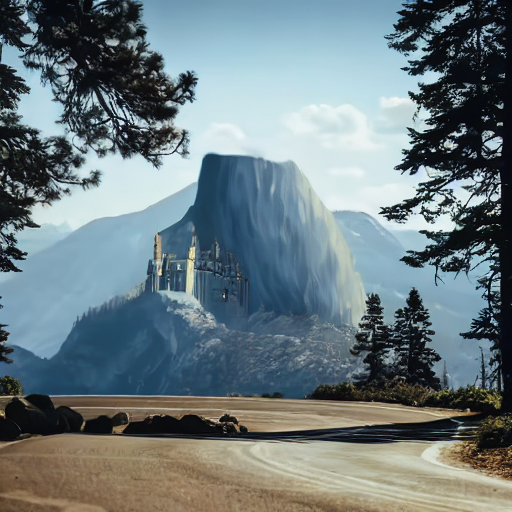
Guidance scale
guidance_scale affects how aligned the text prompt and generated image are.
- 📈 a high
guidance_scalevalue means the prompt and generated image are closely aligned, so the output is a stricter interpretation of the prompt - 📉 a low
guidance_scalevalue means the prompt and generated image are more loosely aligned, so the output may be more varied from the prompt
You can use strength and guidance_scale together for more control over how expressive the model is. For example, a combination high strength and guidance_scale values gives the model the most creative freedom.
import torch
from diffusers import AutoPipelineForInpainting
from diffusers.utils import load_image, make_image_grid

pipeline = AutoPipelineForInpainting.from_pretrained(
    "stable-diffusion-v1-5/stable-diffusion-inpainting", torch_dtype=torch.float16, variant="fp16"
)
pipeline.enable_model_cpu_offload()
# remove following line if xFormers is not installed or you have PyTorch 2.0 or higher installed
pipeline.enable_xformers_memory_efficient_attention()

# load base and mask image
init_image = load_image("https://huggingface.co/datasets/huggingface/documentation-images/resolve/main/diffusers/inpaint.png")
mask_image = load_image("https://huggingface.co/datasets/huggingface/documentation-images/resolve/main/diffusers/inpaint_mask.png")

prompt = "concept art digital painting of an elven castle, inspired by lord of the rings, highly detailed, 8k"
image = pipeline(prompt=prompt, image=init_image, mask_image=mask_image, guidance_scale=2.5).images[0]
make_image_grid([init_image, mask_image, image], rows=1, cols=3)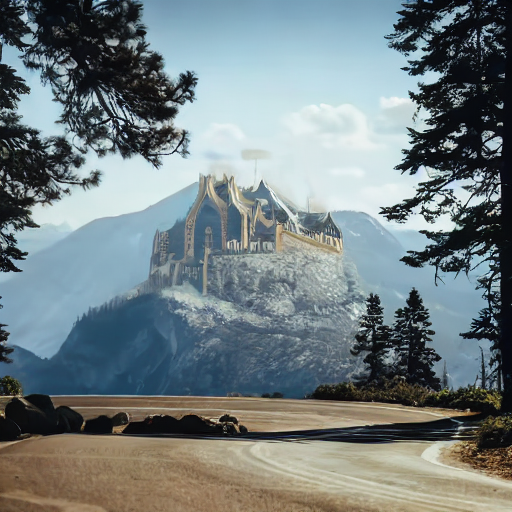
Negative prompt
A negative prompt assumes the opposite role of a prompt; it guides the model away from generating certain things in an image. This is useful for quickly improving image quality and preventing the model from generating things you don’t want.
import torch
from diffusers import AutoPipelineForInpainting
from diffusers.utils import load_image, make_image_grid

pipeline = AutoPipelineForInpainting.from_pretrained(
    "stable-diffusion-v1-5/stable-diffusion-inpainting", torch_dtype=torch.float16, variant="fp16"
)
pipeline.enable_model_cpu_offload()
# remove following line if xFormers is not installed or you have PyTorch 2.0 or higher installed
pipeline.enable_xformers_memory_efficient_attention()

# load base and mask image
init_image = load_image("https://huggingface.co/datasets/huggingface/documentation-images/resolve/main/diffusers/inpaint.png")
mask_image = load_image("https://huggingface.co/datasets/huggingface/documentation-images/resolve/main/diffusers/inpaint_mask.png")

prompt = "concept art digital painting of an elven castle, inspired by lord of the rings, highly detailed, 8k"
negative_prompt = "bad architecture, unstable, poor details, blurry"
image = pipeline(prompt=prompt, negative_prompt=negative_prompt, image=init_image, mask_image=mask_image).images[0]
make_image_grid([init_image, mask_image, image], rows=1, cols=3)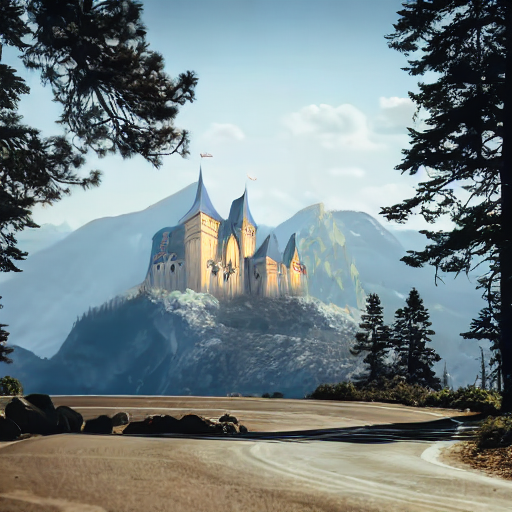
Padding mask crop
A method for increasing the inpainting image quality is to use the padding_mask_crop parameter. When enabled, this option crops the masked area with some user-specified padding and it’ll also crop the same area from the original image. Both the image and mask are upscaled to a higher resolution for inpainting, and then overlaid on the original image. This is a quick and easy way to improve image quality without using a separate pipeline like StableDiffusionUpscalePipeline.
Add the padding_mask_crop parameter to the pipeline call and set it to the desired padding value.
import torch
from diffusers import AutoPipelineForInpainting
from diffusers.utils import load_image
from PIL import Image

generator = torch.Generator(device='cuda').manual_seed(0)
pipeline = AutoPipelineForInpainting.from_pretrained("stable-diffusion-v1-5/stable-diffusion-v1-5", torch_dtype=torch.float16).to('cuda')

base = load_image("https://huggingface.co/datasets/YiYiXu/testing-images/resolve/main/seashore.png")
mask = load_image("https://huggingface.co/datasets/YiYiXu/testing-images/resolve/main/seashore_mask.png")

image = pipeline("boat", image=base, mask_image=mask, strength=0.75, generator=generator, padding_mask_crop=32).images[0]
image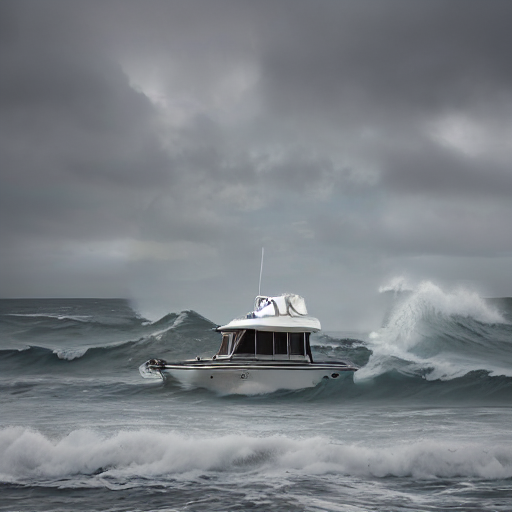
Chained inpainting pipelines
AutoPipelineForInpainting can be chained with other 🤗 Diffusers pipelines to edit their outputs. This is often useful for improving the output quality from your other diffusion pipelines, and if you’re using multiple pipelines, it can be more memory-efficient to chain them together to keep the outputs in latent space and reuse the same pipeline components.
Text-to-image-to-inpaint
Chaining a text-to-image and inpainting pipeline allows you to inpaint the generated image, and you don’t have to provide a base image to begin with. This makes it convenient to edit your favorite text-to-image outputs without having to generate an entirely new image.
Start with the text-to-image pipeline to create a castle:
import torch
from diffusers import AutoPipelineForText2Image, AutoPipelineForInpainting
from diffusers.utils import load_image, make_image_grid

pipeline = AutoPipelineForText2Image.from_pretrained(
    "stable-diffusion-v1-5/stable-diffusion-v1-5", torch_dtype=torch.float16, variant="fp16", use_safetensors=True
)
pipeline.enable_model_cpu_offload()
# remove following line if xFormers is not installed or you have PyTorch 2.0 or higher installed
pipeline.enable_xformers_memory_efficient_attention()

text2image = pipeline("concept art digital painting of an elven castle, inspired by lord of the rings, highly detailed, 8k").images[0]
Load the mask image of the output from above:
mask_image = load_image("https://huggingface.co/datasets/huggingface/documentation-images/resolve/main/diffusers/inpaint_text-chain-mask.png")And let’s inpaint the masked area with a waterfall:
pipeline = AutoPipelineForInpainting.from_pretrained(
    "kandinsky-community/kandinsky-2-2-decoder-inpaint", torch_dtype=torch.float16
)
pipeline.enable_model_cpu_offload()
# remove following line if xFormers is not installed or you have PyTorch 2.0 or higher installed
pipeline.enable_xformers_memory_efficient_attention()

prompt = "digital painting of a fantasy waterfall, cloudy"
image = pipeline(prompt=prompt, image=text2image, mask_image=mask_image).images[0]
make_image_grid([text2image, mask_image, image], rows=1, cols=3)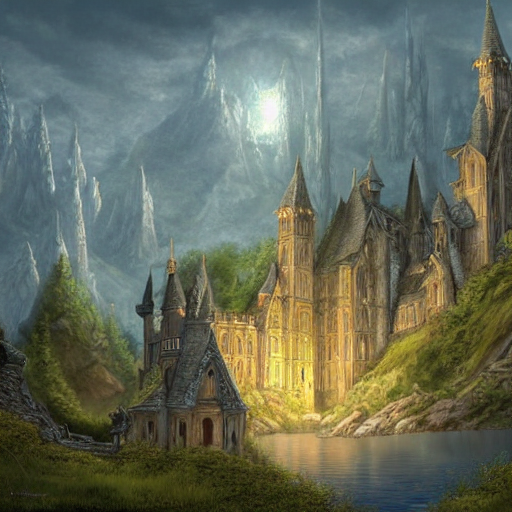
Inpaint-to-image-to-image
You can also chain an inpainting pipeline before another pipeline like image-to-image or an upscaler to improve the quality.
Begin by inpainting an image:
import torch
from diffusers import AutoPipelineForInpainting, AutoPipelineForImage2Image
from diffusers.utils import load_image, make_image_grid

pipeline = AutoPipelineForInpainting.from_pretrained(
    "stable-diffusion-v1-5/stable-diffusion-inpainting", torch_dtype=torch.float16, variant="fp16"
)
pipeline.enable_model_cpu_offload()
# remove following line if xFormers is not installed or you have PyTorch 2.0 or higher installed
pipeline.enable_xformers_memory_efficient_attention()

# load base and mask image
init_image = load_image("https://huggingface.co/datasets/huggingface/documentation-images/resolve/main/diffusers/inpaint.png")
mask_image = load_image("https://huggingface.co/datasets/huggingface/documentation-images/resolve/main/diffusers/inpaint_mask.png")

prompt = "concept art digital painting of an elven castle, inspired by lord of the rings, highly detailed, 8k"
image_inpainting = pipeline(prompt=prompt, image=init_image, mask_image=mask_image).images[0]

# resize image to 1024x1024 for SDXL
image_inpainting = image_inpainting.resize((1024, 1024))
Now let’s pass the image to another inpainting pipeline with SDXL’s refiner model to enhance the image details and quality:
pipeline = AutoPipelineForInpainting.from_pretrained(
    "stabilityai/stable-diffusion-xl-refiner-1.0", torch_dtype=torch.float16, variant="fp16"
)
pipeline.enable_model_cpu_offload()
# remove following line if xFormers is not installed or you have PyTorch 2.0 or higher installed
pipeline.enable_xformers_memory_efficient_attention()

image = pipeline(prompt=prompt, image=image_inpainting, mask_image=mask_image, output_type="latent").images[0]
It is important to specify
output_type="latent"in the pipeline to keep all the outputs in latent space to avoid an unnecessary decode-encode step. This only works if the chained pipelines are using the same VAE. For example, in the Text-to-image-to-inpaint section, Kandinsky 2.2 uses a different VAE class than the Stable Diffusion model so it won’t work. But if you use Stable Diffusion v1.5 for both pipelines, then you can keep everything in latent space because they both use AutoencoderKL.
Finally, you can pass this image to an image-to-image pipeline to put the finishing touches on it. It is more efficient to use the from_pipe() method to reuse the existing pipeline components, and avoid unnecessarily loading all the pipeline components into memory again.
pipeline = AutoPipelineForImage2Image.from_pipe(pipeline)
# remove following line if xFormers is not installed or you have PyTorch 2.0 or higher installed
pipeline.enable_xformers_memory_efficient_attention()

image = pipeline(prompt=prompt, image=image).images[0]
make_image_grid([init_image, mask_image, image_inpainting, image], rows=2, cols=2) 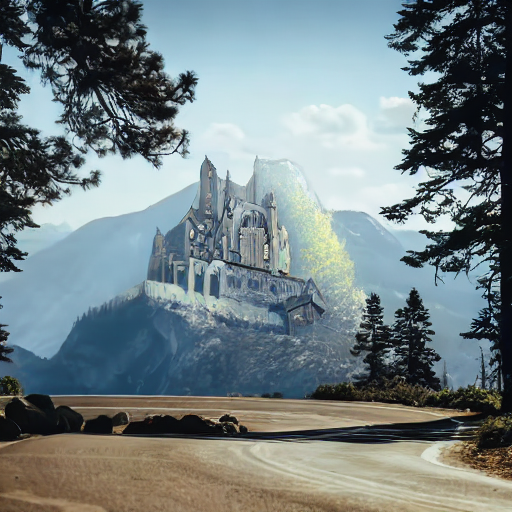
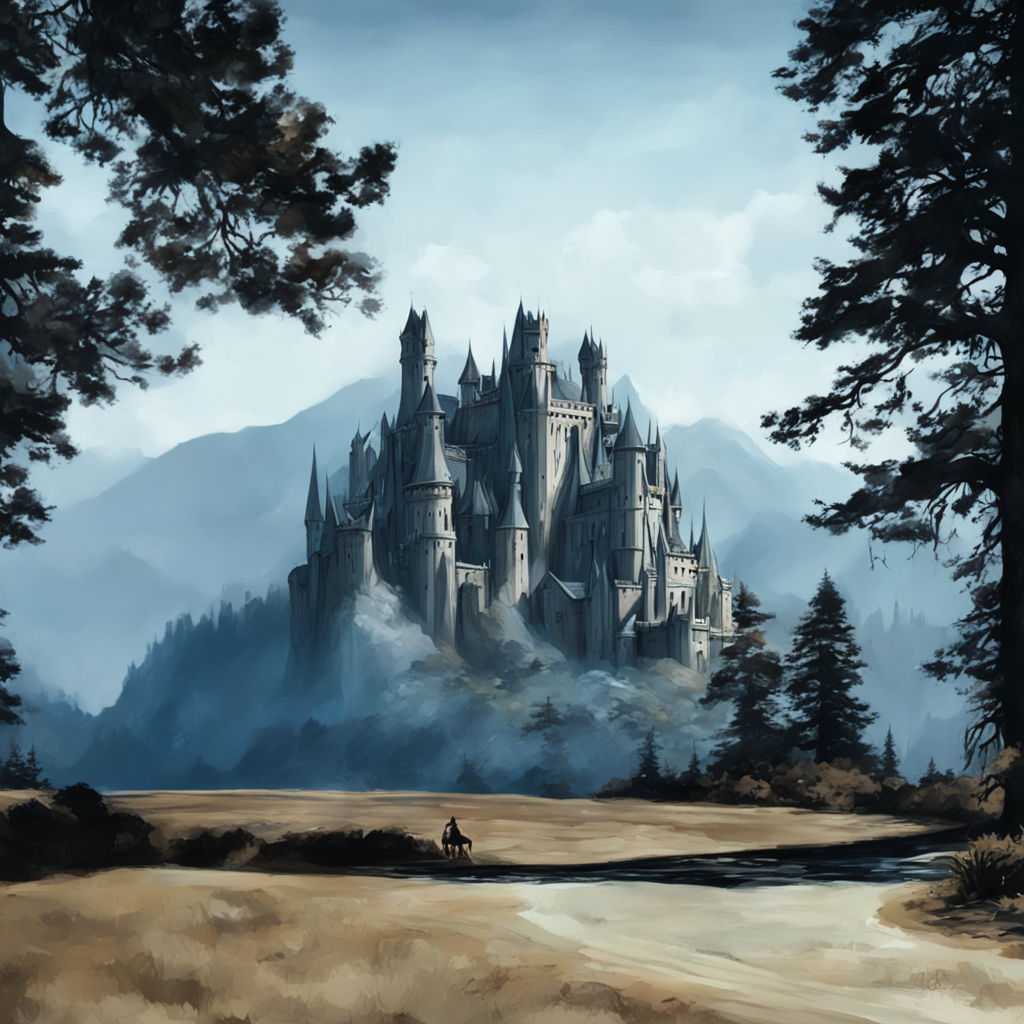
Image-to-image and inpainting are actually very similar tasks. Image-to-image generates a new image that resembles the existing provided image. Inpainting does the same thing, but it only transforms the image area defined by the mask and the rest of the image is unchanged. You can think of inpainting as a more precise tool for making specific changes and image-to-image has a broader scope for making more sweeping changes.
Control image generation
Getting an image to look exactly the way you want is challenging because the denoising process is random. While you can control certain aspects of generation by configuring parameters like negative_prompt, there are better and more efficient methods for controlling image generation.
Prompt weighting
Prompt weighting provides a quantifiable way to scale the representation of concepts in a prompt. You can use it to increase or decrease the magnitude of the text embedding vector for each concept in the prompt, which subsequently determines how much of each concept is generated. The Compel library offers an intuitive syntax for scaling the prompt weights and generating the embeddings. Learn how to create the embeddings in the Prompt weighting guide.
Once you’ve generated the embeddings, pass them to the prompt_embeds (and negative_prompt_embeds if you’re using a negative prompt) parameter in the AutoPipelineForInpainting. The embeddings replace the prompt parameter:
import torch
from diffusers import AutoPipelineForInpainting
from diffusers.utils import make_image_grid

pipeline = AutoPipelineForInpainting.from_pretrained(
    "stable-diffusion-v1-5/stable-diffusion-inpainting", torch_dtype=torch.float16,
)
pipeline.enable_model_cpu_offload()
# remove following line if xFormers is not installed or you have PyTorch 2.0 or higher installed
pipeline.enable_xformers_memory_efficient_attention()

image = pipeline(prompt_embeds=prompt_embeds, # generated from Compel
    negative_prompt_embeds=negative_prompt_embeds, # generated from Compel
    image=init_image,
    mask_image=mask_image
).images[0]
make_image_grid([init_image, mask_image, image], rows=1, cols=3)
ControlNet
ControlNet models are used with other diffusion models like Stable Diffusion, and they provide an even more flexible and accurate way to control how an image is generated. A ControlNet accepts an additional conditioning image input that guides the diffusion model to preserve the features in it.
For example, let’s condition an image with a ControlNet pretrained on inpaint images:
import torch
import numpy as np
from diffusers import ControlNetModel, StableDiffusionControlNetInpaintPipeline
from diffusers.utils import load_image, make_image_grid

# load ControlNet
controlnet = ControlNetModel.from_pretrained("lllyasviel/control_v11p_sd15_inpaint", torch_dtype=torch.float16, variant="fp16")

# pass ControlNet to the pipeline
pipeline = StableDiffusionControlNetInpaintPipeline.from_pretrained(
    "stable-diffusion-v1-5/stable-diffusion-inpainting", controlnet=controlnet, torch_dtype=torch.float16, variant="fp16"
)
pipeline.enable_model_cpu_offload()
# remove following line if xFormers is not installed or you have PyTorch 2.0 or higher installed
pipeline.enable_xformers_memory_efficient_attention()

# load base and mask image
init_image = load_image("https://huggingface.co/datasets/huggingface/documentation-images/resolve/main/diffusers/inpaint.png")
mask_image = load_image("https://huggingface.co/datasets/huggingface/documentation-images/resolve/main/diffusers/inpaint_mask.png")

# prepare control image
def make_inpaint_condition(init_image, mask_image):
    init_image = np.array(init_image.convert("RGB")).astype(np.float32) / 255.0
    mask_image = np.array(mask_image.convert("L")).astype(np.float32) / 255.0

    assert init_image.shape[0:1] == mask_image.shape[0:1], "image and image_mask must have the same image size"
    init_image[mask_image > 0.5] = -1.0  # set as masked pixel
    init_image = np.expand_dims(init_image, 0).transpose(0, 3, 1, 2)
    init_image = torch.from_numpy(init_image)
    return init_image

control_image = make_inpaint_condition(init_image, mask_image)
Now generate an image from the base, mask and control images. You’ll notice features of the base image are strongly preserved in the generated image.
prompt = "concept art digital painting of an elven castle, inspired by lord of the rings, highly detailed, 8k"
image = pipeline(prompt=prompt, image=init_image, mask_image=mask_image, control_image=control_image).images[0]
make_image_grid([init_image, mask_image, PIL.Image.fromarray(np.uint8(control_image[0][0])).convert('RGB'), image], rows=2, cols=2)
You can take this a step further and chain it with an image-to-image pipeline to apply a new style:
from diffusers import AutoPipelineForImage2Image

pipeline = AutoPipelineForImage2Image.from_pretrained(
    "nitrosocke/elden-ring-diffusion", torch_dtype=torch.float16,
)
pipeline.enable_model_cpu_offload()
# remove following line if xFormers is not installed or you have PyTorch 2.0 or higher installed
pipeline.enable_xformers_memory_efficient_attention()

prompt = "elden ring style castle" # include the token "elden ring style" in the prompt
negative_prompt = "bad architecture, deformed, disfigured, poor details"

image_elden_ring = pipeline(prompt, negative_prompt=negative_prompt, image=image).images[0]
make_image_grid([init_image, mask_image, image, image_elden_ring], rows=2, cols=2) 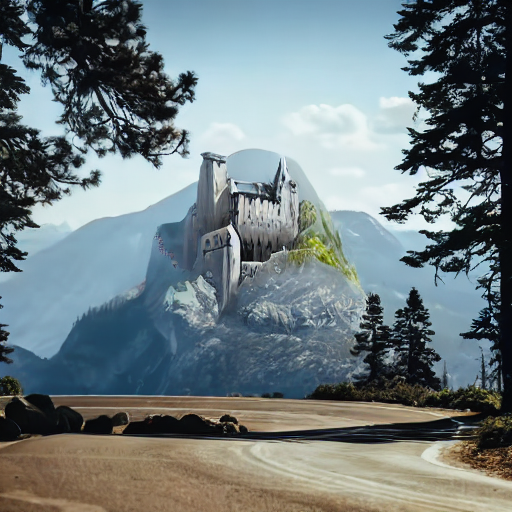
Optimize
It can be difficult and slow to run diffusion models if you’re resource constrained, but it doesn’t have to be with a few optimization tricks. One of the biggest (and easiest) optimizations you can enable is switching to memory-efficient attention. If you’re using PyTorch 2.0, scaled-dot product attention is automatically enabled and you don’t need to do anything else. For non-PyTorch 2.0 users, you can install and use xFormers’s implementation of memory-efficient attention. Both options reduce memory usage and accelerate inference.
You can also offload the model to the CPU to save even more memory:
+ pipeline.enable_xformers_memory_efficient_attention()
+ pipeline.enable_model_cpu_offload()
To speed-up your inference code even more, use torch_compile. You should wrap torch.compile around the most intensive component in the pipeline which is typically the UNet:
pipeline.unet = torch.compile(pipeline.unet, mode="reduce-overhead", fullgraph=True)Learn more in the Reduce memory usage and Accelerate inference guides.
Update on GitHub