Transformers documentation
Zero-shot object detection
Zero-shot object detection
Traditionally, models used for object detection require labeled image datasets for training, and are limited to detecting the set of classes from the training data.
Zero-shot object detection is supported by the OWL-ViT model which uses a different approach. OWL-ViT is an open-vocabulary object detector. It means that it can detect objects in images based on free-text queries without the need to fine-tune the model on labeled datasets.
OWL-ViT leverages multi-modal representations to perform open-vocabulary detection. It combines CLIP with lightweight object classification and localization heads. Open-vocabulary detection is achieved by embedding free-text queries with the text encoder of CLIP and using them as input to the object classification and localization heads. associate images and their corresponding textual descriptions, and ViT processes image patches as inputs. The authors of OWL-ViT first trained CLIP from scratch and then fine-tuned OWL-ViT end to end on standard object detection datasets using a bipartite matching loss.
With this approach, the model can detect objects based on textual descriptions without prior training on labeled datasets.
In this guide, you will learn how to use OWL-ViT:
- to detect objects based on text prompts
- for batch object detection
- for image-guided object detection
Before you begin, make sure you have all the necessary libraries installed:
pip install -q transformers
Zero-shot object detection pipeline
The simplest way to try out inference with OWL-ViT is to use it in a pipeline(). Instantiate a pipeline for zero-shot object detection from a checkpoint on the Hugging Face Hub:
>>> from transformers import pipeline

>>> checkpoint = "google/owlvit-base-patch32"
>>> detector = pipeline(model=checkpoint, task="zero-shot-object-detection")
Next, choose an image you’d like to detect objects in. Here we’ll use the image of astronaut Eileen Collins that is a part of the NASA Great Images dataset.
>>> import skimage
>>> import numpy as np
>>> from PIL import Image

>>> image = skimage.data.astronaut()
>>> image = Image.fromarray(np.uint8(image)).convert("RGB")

>>> image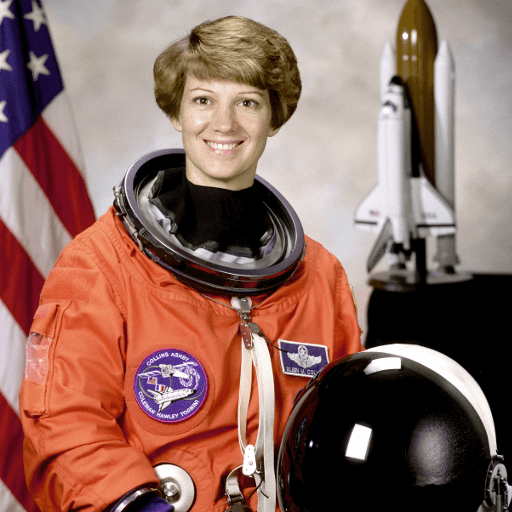
Pass the image and the candidate object labels to look for to the pipeline. Here we pass the image directly; other suitable options include a local path to an image or an image url. We also pass text descriptions for all items we want to query the image for.
>>> predictions = detector(
...     image,
...     candidate_labels=["human face", "rocket", "nasa badge", "star-spangled banner"],
... )
>>> predictions
[{'score': 0.3571370542049408,
  'label': 'human face',
  'box': {'xmin': 180, 'ymin': 71, 'xmax': 271, 'ymax': 178}},
 {'score': 0.28099656105041504,
  'label': 'nasa badge',
  'box': {'xmin': 129, 'ymin': 348, 'xmax': 206, 'ymax': 427}},
 {'score': 0.2110239565372467,
  'label': 'rocket',
  'box': {'xmin': 350, 'ymin': -1, 'xmax': 468, 'ymax': 288}},
 {'score': 0.13790413737297058,
  'label': 'star-spangled banner',
  'box': {'xmin': 1, 'ymin': 1, 'xmax': 105, 'ymax': 509}},
 {'score': 0.11950037628412247,
  'label': 'nasa badge',
  'box': {'xmin': 277, 'ymin': 338, 'xmax': 327, 'ymax': 380}},
 {'score': 0.10649408400058746,
  'label': 'rocket',
  'box': {'xmin': 358, 'ymin': 64, 'xmax': 424, 'ymax': 280}}]
Let’s visualize the predictions:
>>> from PIL import ImageDraw

>>> draw = ImageDraw.Draw(image)

>>> for prediction in predictions:
...     box = prediction["box"]
...     label = prediction["label"]
...     score = prediction["score"]

...     xmin, ymin, xmax, ymax = box.values()
...     draw.rectangle((xmin, ymin, xmax, ymax), outline="red", width=1)
...     draw.text((xmin, ymin), f"{label}: {round(score,2)}", fill="white")

>>> image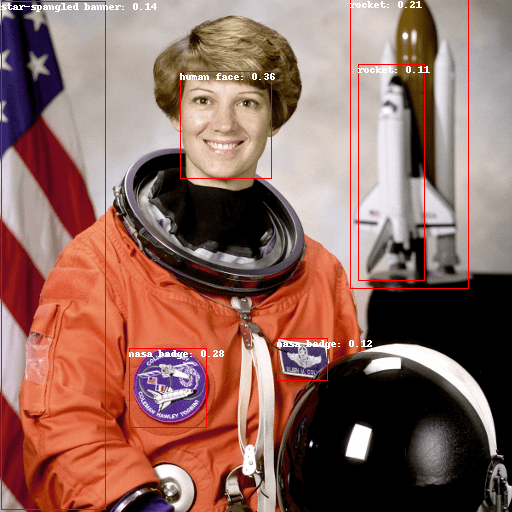
Text-prompted zero-shot object detection by hand
Now that you’ve seen how to use the zero-shot object detection pipeline, let’s replicate the same result manually.
Start by loading the model and associated processor from a checkpoint on the Hugging Face Hub. Here we’ll use the same checkpoint as before:
>>> from transformers import AutoProcessor, AutoModelForZeroShotObjectDetection

>>> model = AutoModelForZeroShotObjectDetection.from_pretrained(checkpoint)
>>> processor = AutoProcessor.from_pretrained(checkpoint)
Let’s take a different image to switch things up.
>>> import requests

>>> url = "https://unsplash.com/photos/oj0zeY2Ltk4/download?ixid=MnwxMjA3fDB8MXxzZWFyY2h8MTR8fHBpY25pY3xlbnwwfHx8fDE2Nzc0OTE1NDk&force=true&w=640"
>>> im = Image.open(requests.get(url, stream=True).raw)
>>> im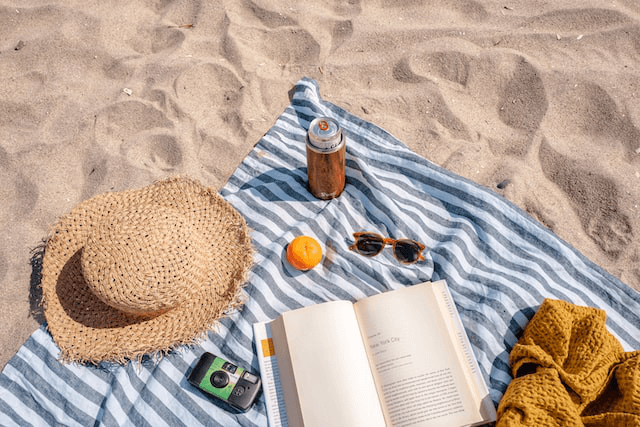
Use the processor to prepare the inputs for the model. The processor combines an image processor that prepares the image for the model by resizing and normalizing it, and a CLIPTokenizer that takes care of the text inputs.
>>> text_queries = ["hat", "book", "sunglasses", "camera"]
>>> inputs = processor(text=text_queries, images=im, return_tensors="pt")
Pass the inputs through the model, post-process, and visualize the results. Since the image processor resized images before feeding them to the model, you need to use the post_process_object_detection() method to make sure the predicted bounding boxes have the correct coordinates relative to the original image:
>>> import torch

>>> with torch.no_grad():
...     outputs = model(**inputs)
...     target_sizes = torch.tensor([im.size[::-1]])
...     results = processor.post_process_object_detection(outputs, threshold=0.1, target_sizes=target_sizes)[0]

>>> draw = ImageDraw.Draw(im)

>>> scores = results["scores"].tolist()
>>> labels = results["labels"].tolist()
>>> boxes = results["boxes"].tolist()

>>> for box, score, label in zip(boxes, scores, labels):
...     xmin, ymin, xmax, ymax = box
...     draw.rectangle((xmin, ymin, xmax, ymax), outline="red", width=1)
...     draw.text((xmin, ymin), f"{text_queries[label]}: {round(score,2)}", fill="white")

>>> im
Batch processing
You can pass multiple sets of images and text queries to search for different (or same) objects in several images. Let’s use both an astronaut image and the beach image together. For batch processing, you should pass text queries as a nested list to the processor and images as lists of PIL images, PyTorch tensors, or NumPy arrays.
>>> images = [image, im]
>>> text_queries = [
...     ["human face", "rocket", "nasa badge", "star-spangled banner"],
...     ["hat", "book", "sunglasses", "camera"],
... ]
>>> inputs = processor(text=text_queries, images=images, return_tensors="pt")
Previously for post-processing you passed the single image’s size as a tensor, but you can also pass a tuple, or, in case
of several images, a list of tuples. Let’s create predictions for the two examples, and visualize the second one (image_idx = 1).
>>> with torch.no_grad():
...     outputs = model(**inputs)
...     target_sizes = [x.size[::-1] for x in images]
...     results = processor.post_process_object_detection(outputs, threshold=0.1, target_sizes=target_sizes)

>>> image_idx = 1
>>> draw = ImageDraw.Draw(images[image_idx])

>>> scores = results[image_idx]["scores"].tolist()
>>> labels = results[image_idx]["labels"].tolist()
>>> boxes = results[image_idx]["boxes"].tolist()

>>> for box, score, label in zip(boxes, scores, labels):
...     xmin, ymin, xmax, ymax = box
...     draw.rectangle((xmin, ymin, xmax, ymax), outline="red", width=1)
...     draw.text((xmin, ymin), f"{text_queries[image_idx][label]}: {round(score,2)}", fill="white")

>>> images[image_idx]
Image-guided object detection
In addition to zero-shot object detection with text queries, OWL-ViT offers image-guided object detection. This means you can use an image query to find similar objects in the target image. Unlike text queries, only a single example image is allowed.
Let’s take an image with two cats on a couch as a target image, and an image of a single cat as a query:
>>> url = "http://images.cocodataset.org/val2017/000000039769.jpg"
>>> image_target = Image.open(requests.get(url, stream=True).raw)

>>> query_url = "http://images.cocodataset.org/val2017/000000524280.jpg"
>>> query_image = Image.open(requests.get(query_url, stream=True).raw)
Let’s take a quick look at the images:
>>> import matplotlib.pyplot as plt

>>> fig, ax = plt.subplots(1, 2)
>>> ax[0].imshow(image_target)
>>> ax[1].imshow(query_image)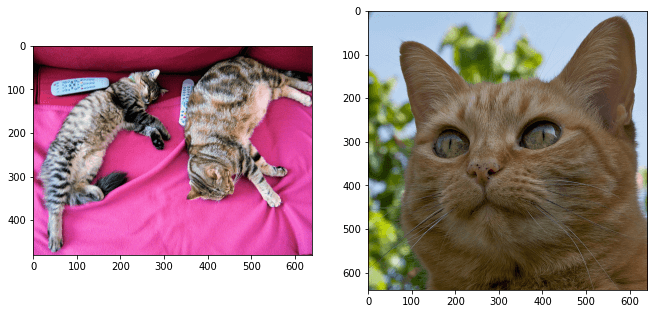
In the preprocessing step, instead of text queries, you now need to use query_images:
>>> inputs = processor(images=image_target, query_images=query_image, return_tensors="pt")For predictions, instead of passing the inputs to the model, pass them to image_guided_detection(). Draw the predictions as before except now there are no labels.
>>> with torch.no_grad():
...     outputs = model.image_guided_detection(**inputs)
...     target_sizes = torch.tensor([image_target.size[::-1]])
...     results = processor.post_process_image_guided_detection(outputs=outputs, target_sizes=target_sizes)[0]

>>> draw = ImageDraw.Draw(image_target)

>>> scores = results["scores"].tolist()
>>> boxes = results["boxes"].tolist()

>>> for box, score, label in zip(boxes, scores, labels):
...     xmin, ymin, xmax, ymax = box
...     draw.rectangle((xmin, ymin, xmax, ymax), outline="white", width=4)

>>> image_target
If you’d like to interactively try out inference with OWL-ViT, check out this demo: