The dataset viewer is not available because its heuristics could not detect any supported data files. You can try uploading some data files, or configuring the data files location manually.
Community Pipeline Examples
For more information about community pipelines, please have a look at this issue.
Community pipeline examples consist pipelines that have been added by the community. Please have a look at the following tables to get an overview of all community examples. Click on the Code Example to get a copy-and-paste ready code example that you can try out. If a community pipeline doesn't work as expected, please open an issue and ping the author on it.
Please also check out our Community Scripts examples for tips and tricks that you can use with diffusers without having to run a community pipeline.
| Example | Description | Code Example | Colab | Author |
|---|---|---|---|---|
| Differential Diffusion | Differential Diffusion modifies an image according to a text prompt, and according to a map that specifies the amount of change in each region. | Differential Diffusion | Eran Levin and Ohad Fried | |
| HD-Painter | HD-Painter enables prompt-faithfull and high resolution (up to 2k) image inpainting upon any diffusion-based image inpainting method. | HD-Painter | Manukyan Hayk and Sargsyan Andranik | |
| Marigold Monocular Depth Estimation | A universal monocular depth estimator, utilizing Stable Diffusion, delivering sharp predictions in the wild. (See the project page and full codebase for more details.) | Marigold Depth Estimation | Bingxin Ke and Anton Obukhov | |
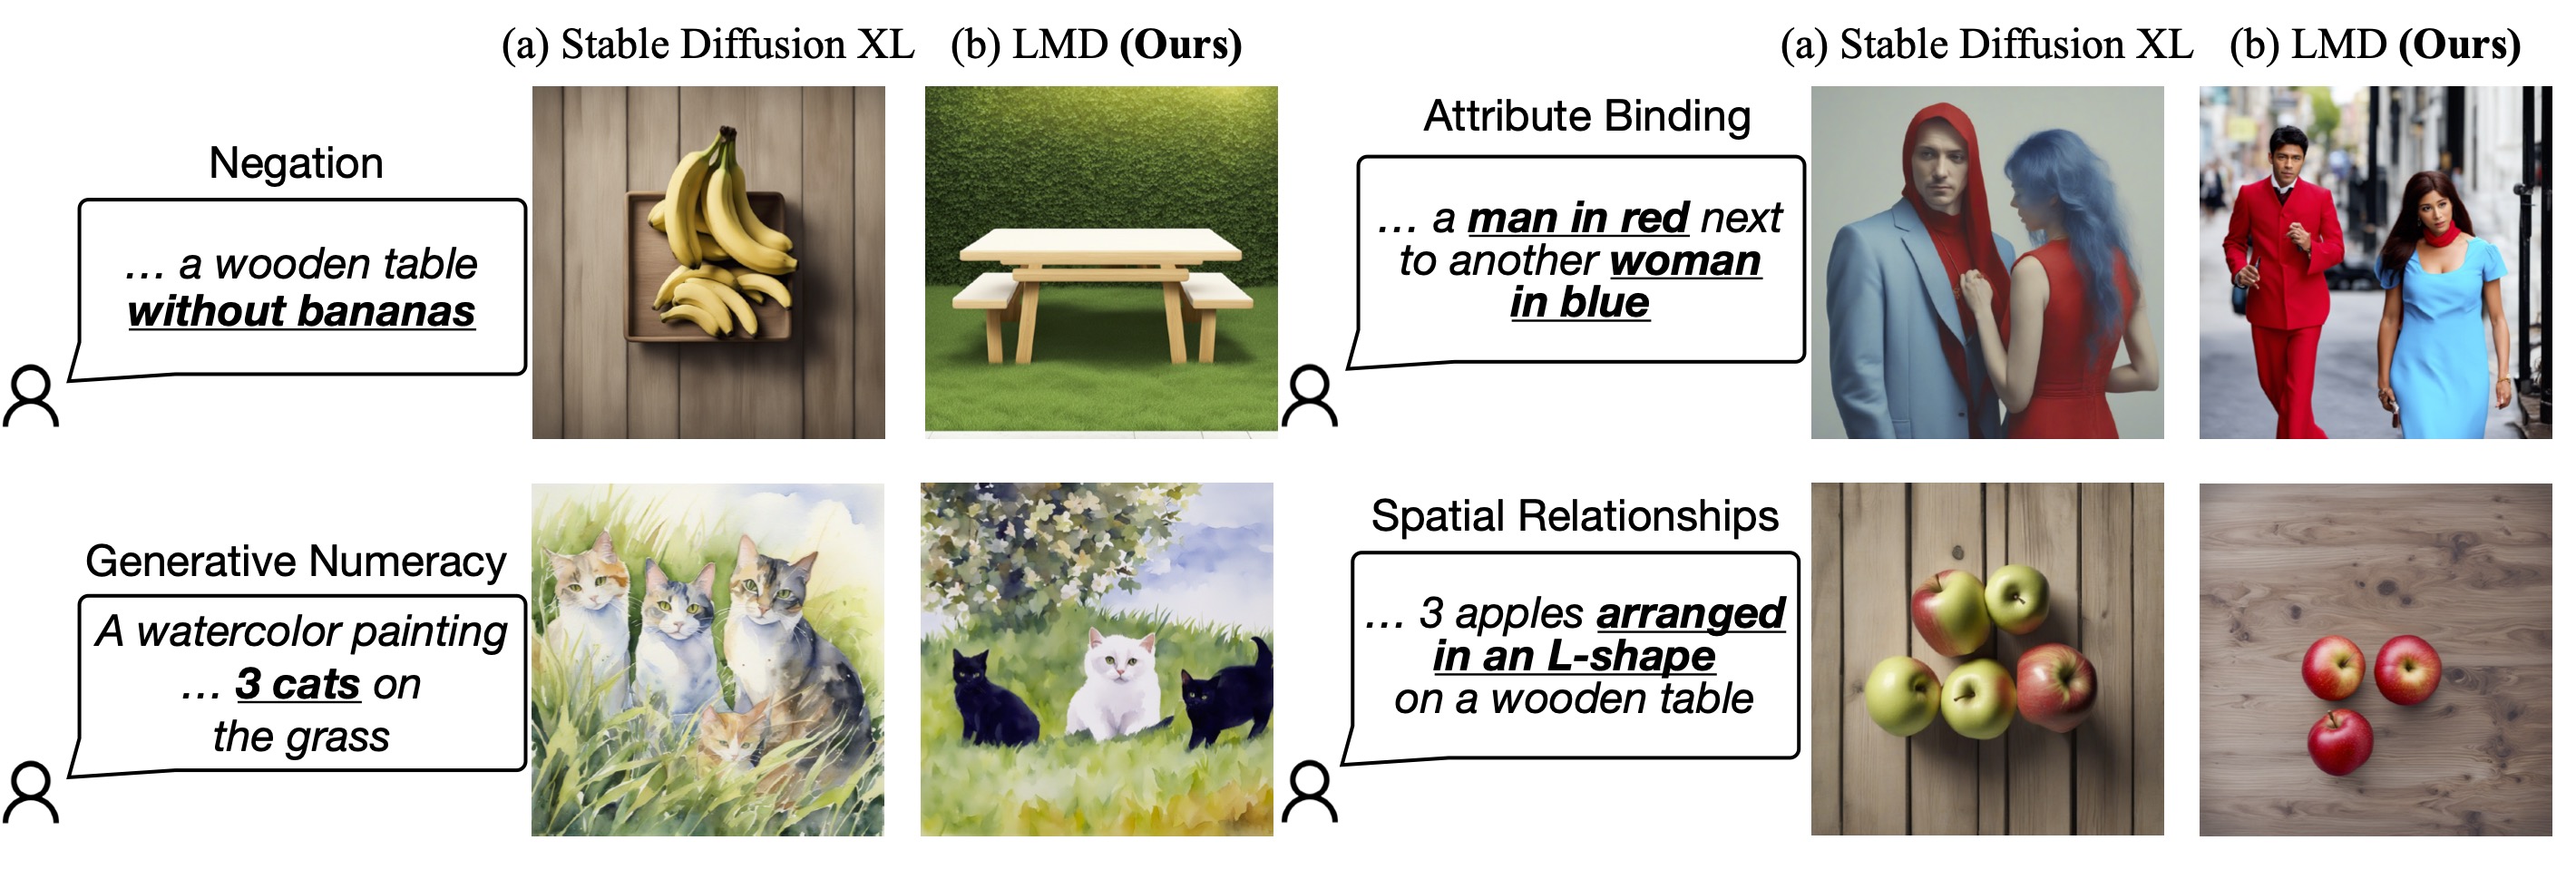
| LLM-grounded Diffusion (LMD+) | LMD greatly improves the prompt following ability of text-to-image generation models by introducing an LLM as a front-end prompt parser and layout planner. Project page. See our full codebase (also with diffusers). | LLM-grounded Diffusion (LMD+) | Huggingface Demo |
Long (Tony) Lian |
| CLIP Guided Stable Diffusion | Doing CLIP guidance for text to image generation with Stable Diffusion | CLIP Guided Stable Diffusion | Suraj Patil | |
| One Step U-Net (Dummy) | Example showcasing of how to use Community Pipelines (see https://github.com/huggingface/diffusers/issues/841) | One Step U-Net | - | Patrick von Platen |
| Stable Diffusion Interpolation | Interpolate the latent space of Stable Diffusion between different prompts/seeds | Stable Diffusion Interpolation | - | Nate Raw |
| Stable Diffusion Mega | One Stable Diffusion Pipeline with all functionalities of Text2Image, Image2Image and Inpainting | Stable Diffusion Mega | - | Patrick von Platen |
| Long Prompt Weighting Stable Diffusion | One Stable Diffusion Pipeline without tokens length limit, and support parsing weighting in prompt. | Long Prompt Weighting Stable Diffusion | - | SkyTNT |
| Speech to Image | Using automatic-speech-recognition to transcribe text and Stable Diffusion to generate images | Speech to Image | - | Mikail Duzenli |
| Wild Card Stable Diffusion | Stable Diffusion Pipeline that supports prompts that contain wildcard terms (indicated by surrounding double underscores), with values instantiated randomly from a corresponding txt file or a dictionary of possible values | Wildcard Stable Diffusion | - | Shyam Sudhakaran |
| Composable Stable Diffusion | Stable Diffusion Pipeline that supports prompts that contain "|" in prompts (as an AND condition) and weights (separated by "|" as well) to positively / negatively weight prompts. | Composable Stable Diffusion | - | Mark Rich |
| Seed Resizing Stable Diffusion | Stable Diffusion Pipeline that supports resizing an image and retaining the concepts of the 512 by 512 generation. | Seed Resizing | - | Mark Rich |
| Imagic Stable Diffusion | Stable Diffusion Pipeline that enables writing a text prompt to edit an existing image | Imagic Stable Diffusion | - | Mark Rich |
| Multilingual Stable Diffusion | Stable Diffusion Pipeline that supports prompts in 50 different languages. | Multilingual Stable Diffusion | - | Juan Carlos Piñeros |
| GlueGen Stable Diffusion | Stable Diffusion Pipeline that supports prompts in different languages using GlueGen adapter. | GlueGen Stable Diffusion | - | Phạm Hồng Vinh |
| Image to Image Inpainting Stable Diffusion | Stable Diffusion Pipeline that enables the overlaying of two images and subsequent inpainting | Image to Image Inpainting Stable Diffusion | - | Alex McKinney |
| Text Based Inpainting Stable Diffusion | Stable Diffusion Inpainting Pipeline that enables passing a text prompt to generate the mask for inpainting | Text Based Inpainting Stable Diffusion | - | Dhruv Karan |
| Bit Diffusion | Diffusion on discrete data | Bit Diffusion | - | Stuti R. |
| K-Diffusion Stable Diffusion | Run Stable Diffusion with any of K-Diffusion's samplers | Stable Diffusion with K Diffusion | - | Patrick von Platen |
| Checkpoint Merger Pipeline | Diffusion Pipeline that enables merging of saved model checkpoints | Checkpoint Merger Pipeline | - | Naga Sai Abhinay Devarinti |
| Stable Diffusion v1.1-1.4 Comparison | Run all 4 model checkpoints for Stable Diffusion and compare their results together | Stable Diffusion Comparison | - | Suvaditya Mukherjee |
| MagicMix | Diffusion Pipeline for semantic mixing of an image and a text prompt | MagicMix | - | Partho Das |
| Stable UnCLIP | Diffusion Pipeline for combining prior model (generate clip image embedding from text, UnCLIPPipeline "kakaobrain/karlo-v1-alpha") and decoder pipeline (decode clip image embedding to image, StableDiffusionImageVariationPipeline "lambdalabs/sd-image-variations-diffusers" ). |
Stable UnCLIP | - | Ray Wang |
| UnCLIP Text Interpolation Pipeline | Diffusion Pipeline that allows passing two prompts and produces images while interpolating between the text-embeddings of the two prompts | UnCLIP Text Interpolation Pipeline | - | Naga Sai Abhinay Devarinti |
| UnCLIP Image Interpolation Pipeline | Diffusion Pipeline that allows passing two images/image_embeddings and produces images while interpolating between their image-embeddings | UnCLIP Image Interpolation Pipeline | - | Naga Sai Abhinay Devarinti |
| DDIM Noise Comparative Analysis Pipeline | Investigating how the diffusion models learn visual concepts from each noise level (which is a contribution of P2 weighting (CVPR 2022)) | DDIM Noise Comparative Analysis Pipeline | - | Aengus (Duc-Anh) |
| CLIP Guided Img2Img Stable Diffusion Pipeline | Doing CLIP guidance for image to image generation with Stable Diffusion | CLIP Guided Img2Img Stable Diffusion | - | Nipun Jindal |
| TensorRT Stable Diffusion Text to Image Pipeline | Accelerates the Stable Diffusion Text2Image Pipeline using TensorRT | TensorRT Stable Diffusion Text to Image Pipeline | - | Asfiya Baig |
| EDICT Image Editing Pipeline | Diffusion pipeline for text-guided image editing | EDICT Image Editing Pipeline | - | Joqsan Azocar |
| Stable Diffusion RePaint | Stable Diffusion pipeline using RePaint for inpainting. | Stable Diffusion RePaint | - | Markus Pobitzer |
| TensorRT Stable Diffusion Image to Image Pipeline | Accelerates the Stable Diffusion Image2Image Pipeline using TensorRT | TensorRT Stable Diffusion Image to Image Pipeline | - | Asfiya Baig |
| Stable Diffusion IPEX Pipeline | Accelerate Stable Diffusion inference pipeline with BF16/FP32 precision on Intel Xeon CPUs with IPEX | Stable Diffusion on IPEX | - | Yingjie Han |
| CLIP Guided Images Mixing Stable Diffusion Pipeline | Сombine images using usual diffusion models. | CLIP Guided Images Mixing Using Stable Diffusion | - | Karachev Denis |
| TensorRT Stable Diffusion Inpainting Pipeline | Accelerates the Stable Diffusion Inpainting Pipeline using TensorRT | TensorRT Stable Diffusion Inpainting Pipeline | - | Asfiya Baig |
| IADB Pipeline | Implementation of Iterative α-(de)Blending: a Minimalist Deterministic Diffusion Model | IADB Pipeline | - | Thomas Chambon |
| Zero1to3 Pipeline | Implementation of Zero-1-to-3: Zero-shot One Image to 3D Object | Zero1to3 Pipeline | - | Xin Kong |
| Stable Diffusion XL Long Weighted Prompt Pipeline | A pipeline support unlimited length of prompt and negative prompt, use A1111 style of prompt weighting | Stable Diffusion XL Long Weighted Prompt Pipeline | Andrew Zhu | |
| FABRIC - Stable Diffusion with feedback Pipeline | pipeline supports feedback from liked and disliked images | Stable Diffusion Fabric Pipeline | - | Shauray Singh |
| sketch inpaint - Inpainting with non-inpaint Stable Diffusion | sketch inpaint much like in automatic1111 | Masked Im2Im Stable Diffusion Pipeline | - | Anatoly Belikov |
| prompt-to-prompt | change parts of a prompt and retain image structure (see paper page) | Prompt2Prompt Pipeline | - | Umer H. Adil |
| Latent Consistency Pipeline | Implementation of Latent Consistency Models: Synthesizing High-Resolution Images with Few-Step Inference | Latent Consistency Pipeline | - | Simian Luo |
| Latent Consistency Img2img Pipeline | Img2img pipeline for Latent Consistency Models | Latent Consistency Img2Img Pipeline | - | Logan Zoellner |
| Latent Consistency Interpolation Pipeline | Interpolate the latent space of Latent Consistency Models with multiple prompts | Latent Consistency Interpolation Pipeline | Aryan V S | |
| SDE Drag Pipeline | The pipeline supports drag editing of images using stochastic differential equations | SDE Drag Pipeline | - | NieShen Fengqi Zhu |
| Regional Prompting Pipeline | Assign multiple prompts for different regions | Regional Prompting Pipeline | - | hako-mikan |
| LDM3D-sr (LDM3D upscaler) | Upscale low resolution RGB and depth inputs to high resolution | StableDiffusionUpscaleLDM3D Pipeline | - | Estelle Aflalo |
| AnimateDiff ControlNet Pipeline | Combines AnimateDiff with precise motion control using ControlNets | AnimateDiff ControlNet Pipeline | Aryan V S and Edoardo Botta | |
| DemoFusion Pipeline | Implementation of DemoFusion: Democratising High-Resolution Image Generation With No $$$ | DemoFusion Pipeline | - | Ruoyi Du |
| Instaflow Pipeline | Implementation of InstaFlow! One-Step Stable Diffusion with Rectified Flow | Instaflow Pipeline | - | Ayush Mangal |
| Null-Text Inversion Pipeline | Implement Null-text Inversion for Editing Real Images using Guided Diffusion Models as a pipeline. | Null-Text Inversion | - | Junsheng Luan |
| Rerender A Video Pipeline | Implementation of [SIGGRAPH Asia 2023] Rerender A Video: Zero-Shot Text-Guided Video-to-Video Translation | Rerender A Video Pipeline | - | Yifan Zhou |
| StyleAligned Pipeline | Implementation of Style Aligned Image Generation via Shared Attention | StyleAligned Pipeline | Aryan V S | |
| AnimateDiff Image-To-Video Pipeline | Experimental Image-To-Video support for AnimateDiff (open to improvements) | AnimateDiff Image To Video Pipeline | Aryan V S | |
| IP Adapter FaceID Stable Diffusion | Stable Diffusion Pipeline that supports IP Adapter Face ID | IP Adapter Face ID | - | Fabio Rigano |
| InstantID Pipeline | Stable Diffusion XL Pipeline that supports InstantID | InstantID Pipeline | Haofan Wang | |
| UFOGen Scheduler | Scheduler for UFOGen Model (compatible with Stable Diffusion pipelines) | UFOGen Scheduler | - | dg845 |
| Stable Diffusion XL IPEX Pipeline | Accelerate Stable Diffusion XL inference pipeline with BF16/FP32 precision on Intel Xeon CPUs with IPEX | Stable Diffusion XL on IPEX | - | Dan Li |
| Stable Diffusion BoxDiff Pipeline | Training-free controlled generation with bounding boxes using BoxDiff | Stable Diffusion BoxDiff Pipeline | - | Jingyang Zhang |
| FRESCO V2V Pipeline | Implementation of [CVPR 2024] FRESCO: Spatial-Temporal Correspondence for Zero-Shot Video Translation | FRESCO V2V Pipeline | - | Yifan Zhou |
To load a custom pipeline you just need to pass the custom_pipeline argument to DiffusionPipeline, as one of the files in diffusers/examples/community. Feel free to send a PR with your own pipelines, we will merge them quickly.
pipe = DiffusionPipeline.from_pretrained("runwayml/stable-diffusion-v1-5", custom_pipeline="filename_in_the_community_folder")
Example usages
Differential Diffusion
Eran Levin, Ohad Fried
Tel Aviv University, Reichman University
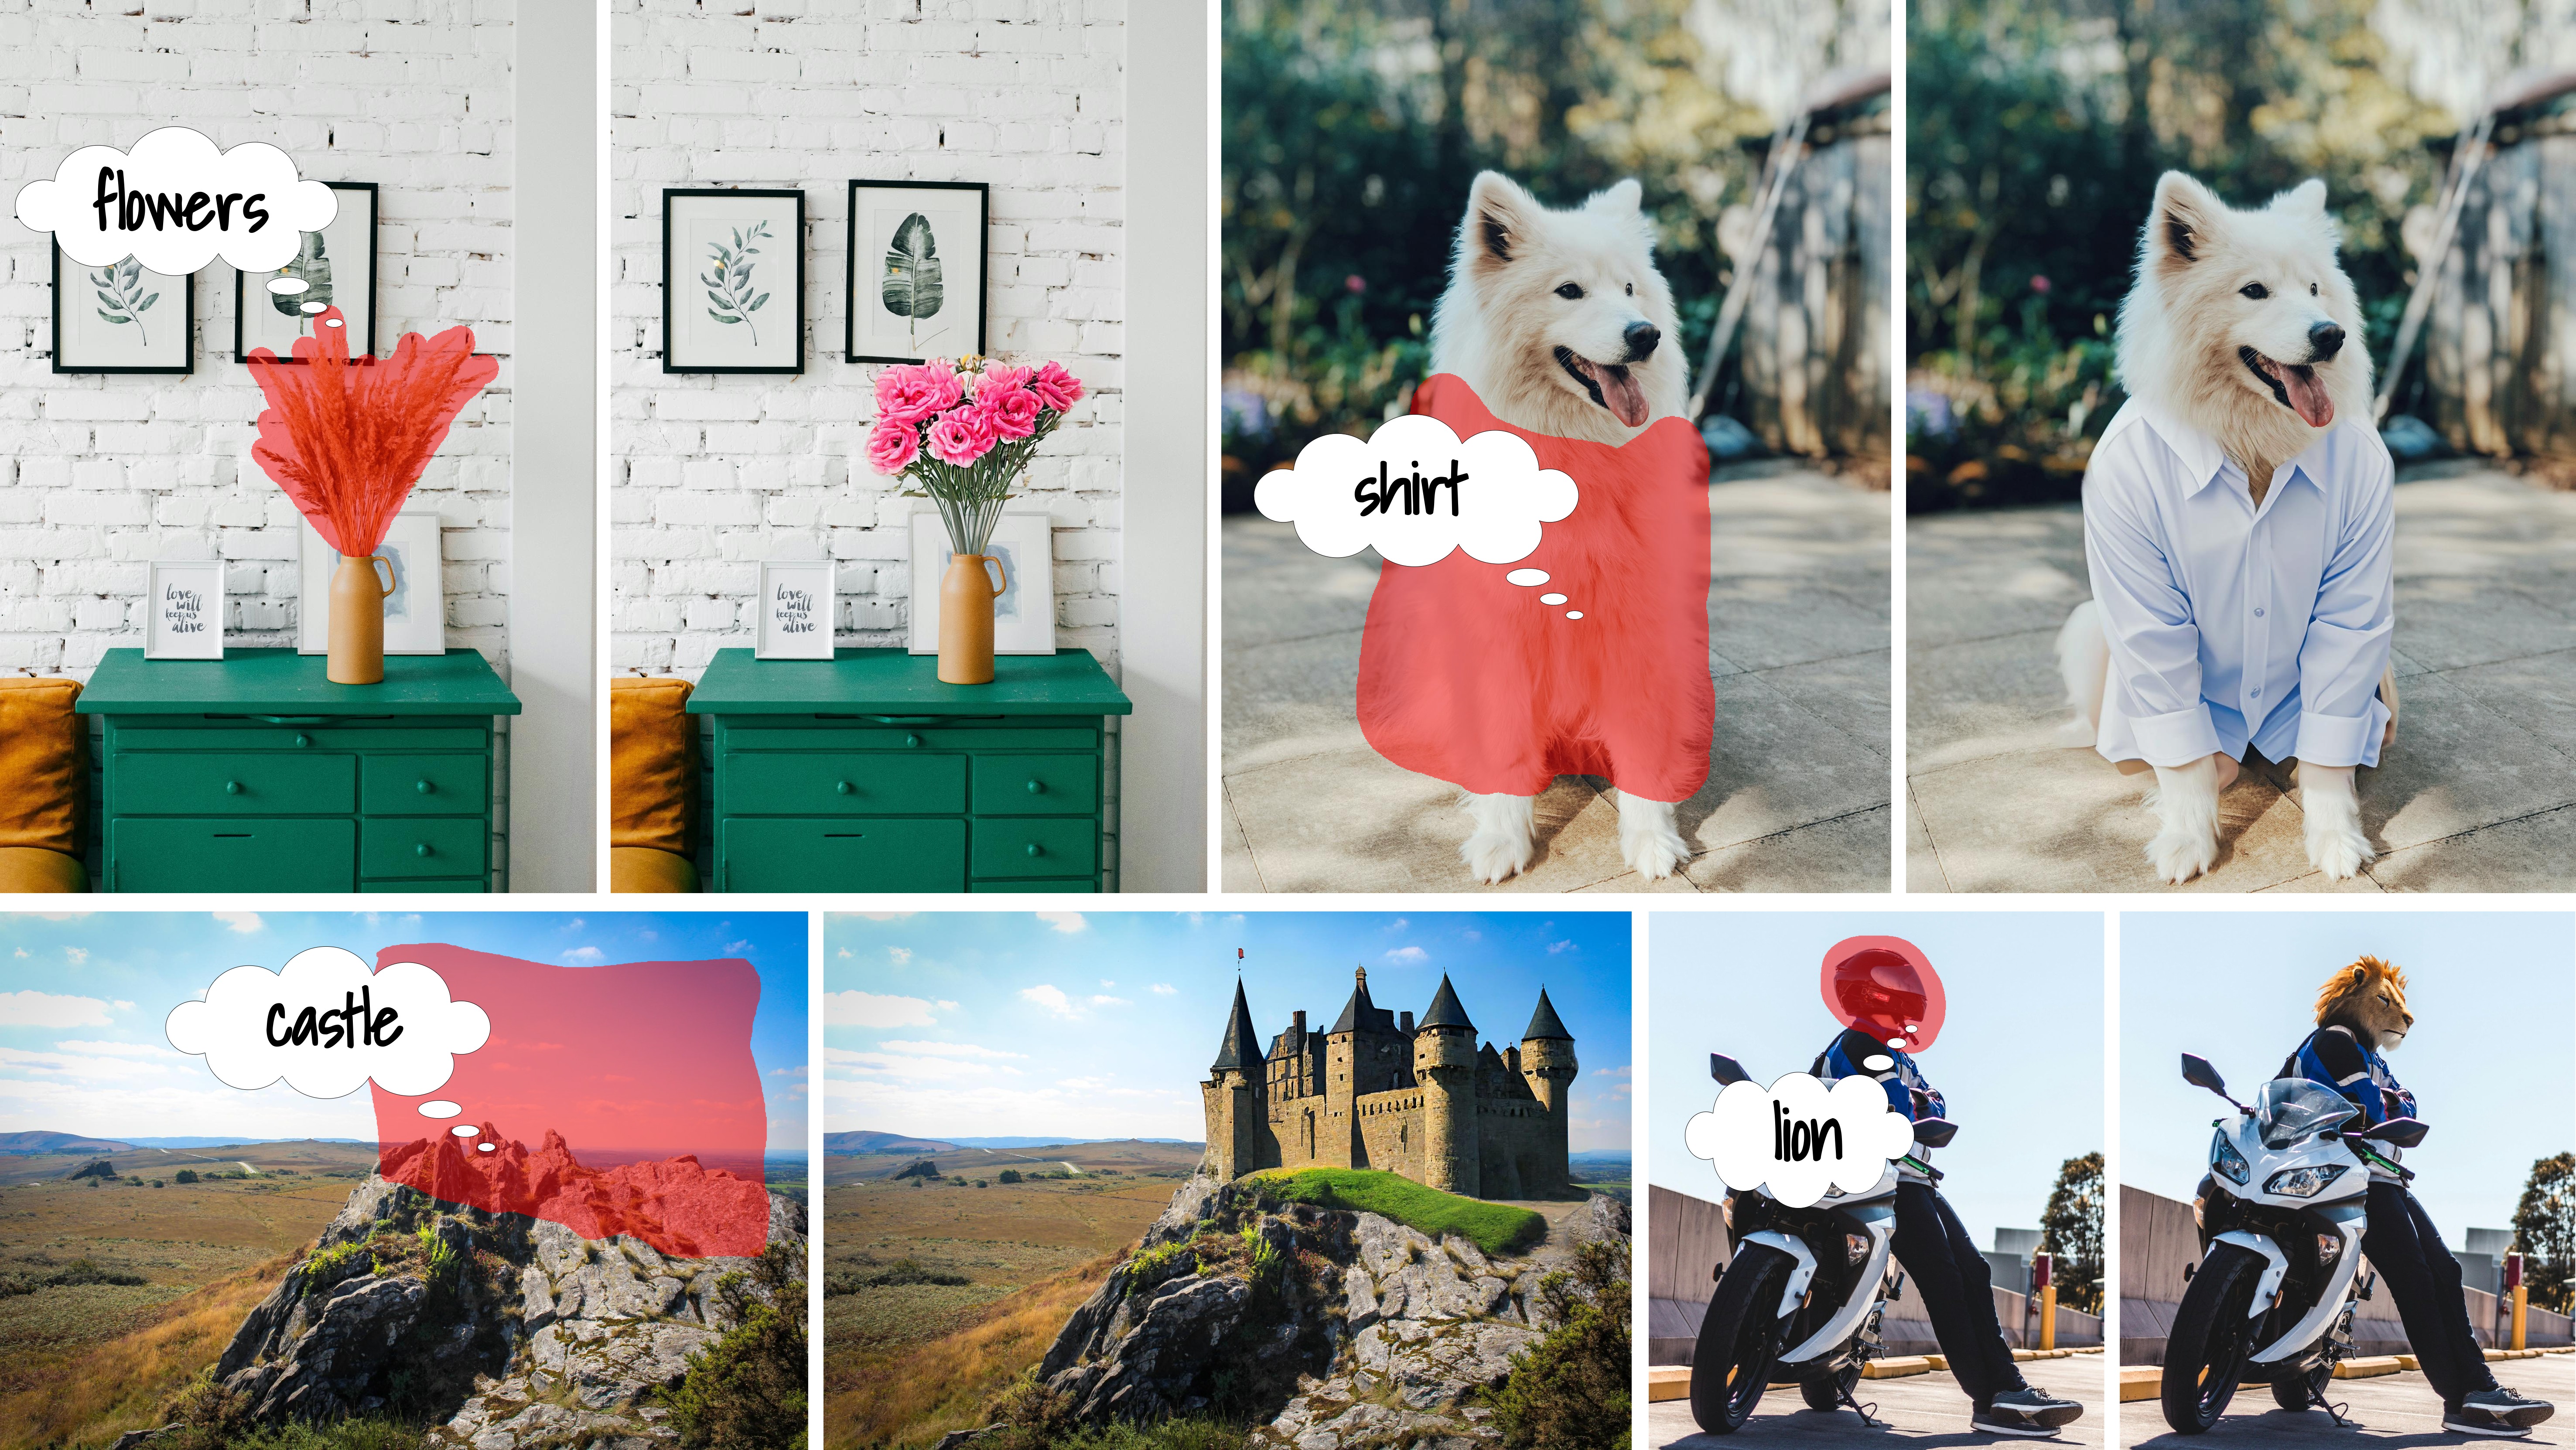
Diffusion models have revolutionized image generation and editing, producing state-of-the-art results in conditioned and unconditioned image synthesis. While current techniques enable user control over the degree of change in an image edit, the controllability is limited to global changes over an entire edited region. This paper introduces a novel framework that enables customization of the amount of change per pixel or per image region. Our framework can be integrated into any existing diffusion model, enhancing it with this capability. Such granular control on the quantity of change opens up a diverse array of new editing capabilities, such as control of the extent to which individual objects are modified, or the ability to introduce gradual spatial changes. Furthermore, we showcase the framework's effectiveness in soft-inpainting---the completion of portions of an image while subtly adjusting the surrounding areas to ensure seamless integration. Additionally, we introduce a new tool for exploring the effects of different change quantities. Our framework operates solely during inference, requiring no model training or fine-tuning. We demonstrate our method with the current open state-of-the-art models, and validate it via both quantitative and qualitative comparisons, and a user study.

You can find additional information about Differential Diffusion in the paper or in the project website.
Usage example
import torch
from torchvision import transforms

from diffusers import DPMSolverMultistepScheduler
from diffusers.utils import load_image
from examples.community.pipeline_stable_diffusion_xl_differential_img2img import (
    StableDiffusionXLDifferentialImg2ImgPipeline,
)


pipeline = StableDiffusionXLDifferentialImg2ImgPipeline.from_pretrained(
    "SG161222/RealVisXL_V4.0", torch_dtype=torch.float16, variant="fp16"
).to("cuda")
pipeline.scheduler = DPMSolverMultistepScheduler.from_config(pipeline.scheduler.config, use_karras_sigmas=True)


def preprocess_image(image):
    image = image.convert("RGB")
    image = transforms.CenterCrop((image.size[1] // 64 * 64, image.size[0] // 64 * 64))(image)
    image = transforms.ToTensor()(image)
    image = image * 2 - 1
    image = image.unsqueeze(0).to("cuda")
    return image


def preprocess_map(map):
    map = map.convert("L")
    map = transforms.CenterCrop((map.size[1] // 64 * 64, map.size[0] // 64 * 64))(map)
    map = transforms.ToTensor()(map)
    map = map.to("cuda")
    return map


image = preprocess_image(
    load_image(
        "https://huggingface.co/datasets/OzzyGT/testing-resources/resolve/main/differential/20240329211129_4024911930.png?download=true"
    )
)

mask = preprocess_map(
    load_image(
        "https://huggingface.co/datasets/OzzyGT/testing-resources/resolve/main/differential/gradient_mask.png?download=true"
    )
)

prompt = "a green pear"
negative_prompt = "blurry"

image = pipeline(
    prompt=prompt,
    negative_prompt=negative_prompt,
    guidance_scale=7.5,
    num_inference_steps=25,
    original_image=image,
    image=image,
    strength=1.0,
    map=mask,
).images[0]

image.save("result.png")
HD-Painter
Implementation of HD-Painter: High-Resolution and Prompt-Faithful Text-Guided Image Inpainting with Diffusion Models.
The abstract from the paper is:
Recent progress in text-guided image inpainting, based on the unprecedented success of text-to-image diffusion models, has led to exceptionally realistic and visually plausible results. However, there is still significant potential for improvement in current text-to-image inpainting models, particularly in better aligning the inpainted area with user prompts and performing high-resolution inpainting. Therefore, in this paper we introduce HD-Painter, a completely training-free approach that accurately follows to prompts and coherently scales to high-resolution image inpainting. To this end, we design the Prompt-Aware Introverted Attention (PAIntA) layer enhancing self-attention scores by prompt information and resulting in better text alignment generations. To further improve the prompt coherence we introduce the Reweighting Attention Score Guidance (RASG) mechanism seamlessly integrating a post-hoc sampling strategy into general form of DDIM to prevent out-of-distribution latent shifts. Moreover, HD-Painter allows extension to larger scales by introducing a specialized super-resolution technique customized for inpainting, enabling the completion of missing regions in images of up to 2K resolution. Our experiments demonstrate that HD-Painter surpasses existing state-of-the-art approaches qualitatively and quantitatively, achieving an impressive generation accuracy improvement of 61.4 vs 51.9. We will make the codes publicly available.
You can find additional information about Text2Video-Zero in the paper or the original codebase.
Usage example
import torch
from diffusers import DiffusionPipeline, DDIMScheduler
from diffusers.utils import load_image, make_image_grid

pipe = DiffusionPipeline.from_pretrained(
    "stabilityai/stable-diffusion-2-inpainting",
    custom_pipeline="hd_painter"
)
pipe.scheduler = DDIMScheduler.from_config(pipe.scheduler.config)

prompt = "wooden boat"
init_image = load_image("https://raw.githubusercontent.com/Picsart-AI-Research/HD-Painter/main/__assets__/samples/images/2.jpg")
mask_image = load_image("https://raw.githubusercontent.com/Picsart-AI-Research/HD-Painter/main/__assets__/samples/masks/2.png")

image = pipe (prompt, init_image, mask_image, use_rasg = True, use_painta = True, generator=torch.manual_seed(12345)).images[0]

make_image_grid([init_image, mask_image, image], rows=1, cols=3)
Marigold Depth Estimation
Marigold is a universal monocular depth estimator that delivers accurate and sharp predictions in the wild. Based on Stable Diffusion, it is trained exclusively with synthetic depth data and excels in zero-shot adaptation to real-world imagery. This pipeline is an official implementation of the inference process. More details can be found on our project page and full codebase (also implemented with diffusers).
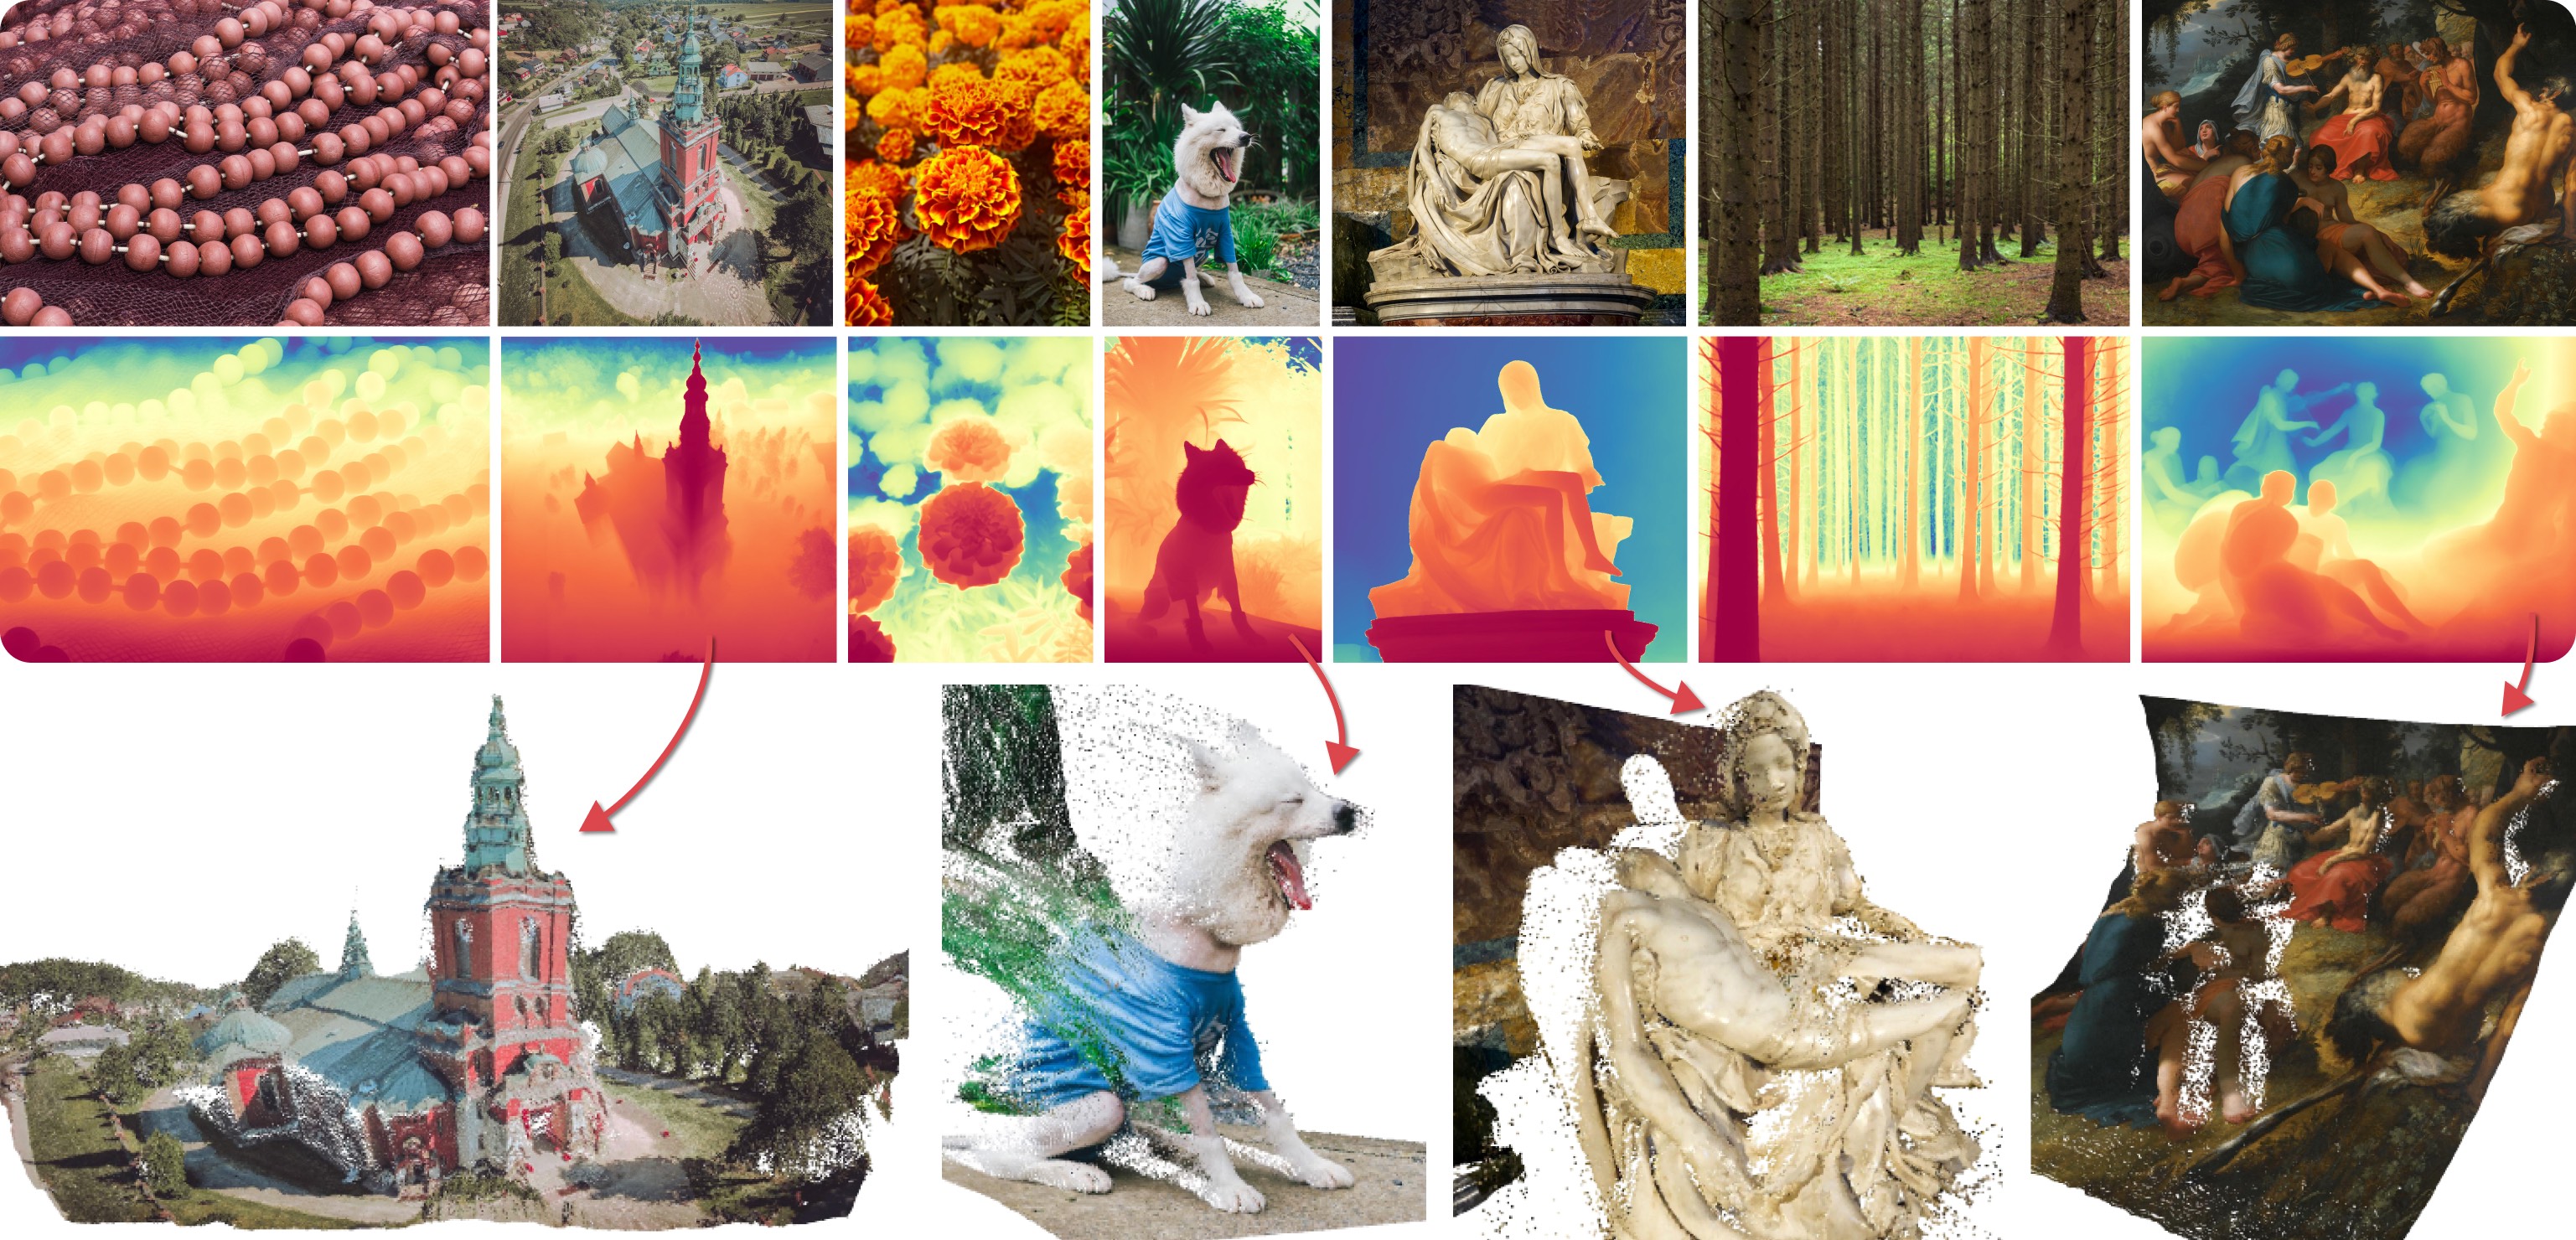
This depth estimation pipeline processes a single input image through multiple diffusion denoising stages to estimate depth maps. These maps are subsequently merged to produce the final output. Below is an example code snippet, including optional arguments:
import numpy as np
import torch
from PIL import Image
from diffusers import DiffusionPipeline
from diffusers.utils import load_image

# Original DDIM version (higher quality)
pipe = DiffusionPipeline.from_pretrained(
    "prs-eth/marigold-v1-0",
    custom_pipeline="marigold_depth_estimation"
    # torch_dtype=torch.float16,                # (optional) Run with half-precision (16-bit float).
    # variant="fp16",                           # (optional) Use with `torch_dtype=torch.float16`, to directly load fp16 checkpoint
)

# (New) LCM version (faster speed)
pipe = DiffusionPipeline.from_pretrained(
    "prs-eth/marigold-lcm-v1-0",
    custom_pipeline="marigold_depth_estimation"
    # torch_dtype=torch.float16,                # (optional) Run with half-precision (16-bit float).
    # variant="fp16",                           # (optional) Use with `torch_dtype=torch.float16`, to directly load fp16 checkpoint
)

pipe.to("cuda")

img_path_or_url = "https://share.phys.ethz.ch/~pf/bingkedata/marigold/pipeline_example.jpg"
image: Image.Image = load_image(img_path_or_url)

pipeline_output = pipe(
    image,                    # Input image.
    # ----- recommended setting for DDIM version -----
    # denoising_steps=10,     # (optional) Number of denoising steps of each inference pass. Default: 10.
    # ensemble_size=10,       # (optional) Number of inference passes in the ensemble. Default: 10.
    # ------------------------------------------------

    # ----- recommended setting for LCM version ------
    # denoising_steps=4,
    # ensemble_size=5,
    # -------------------------------------------------

    # processing_res=768,     # (optional) Maximum resolution of processing. If set to 0: will not resize at all. Defaults to 768.
    # match_input_res=True,   # (optional) Resize depth prediction to match input resolution.
    # batch_size=0,           # (optional) Inference batch size, no bigger than `num_ensemble`. If set to 0, the script will automatically decide the proper batch size. Defaults to 0.
    # seed=2024,              # (optional) Random seed can be set to ensure additional reproducibility. Default: None (unseeded). Note: forcing --batch_size 1 helps to increase reproducibility. To ensure full reproducibility, deterministic mode needs to be used.
    # color_map="Spectral",   # (optional) Colormap used to colorize the depth map. Defaults to "Spectral". Set to `None` to skip colormap generation.
    # show_progress_bar=True, # (optional) If true, will show progress bars of the inference progress.
)

depth: np.ndarray = pipeline_output.depth_np                    # Predicted depth map
depth_colored: Image.Image = pipeline_output.depth_colored      # Colorized prediction

# Save as uint16 PNG
depth_uint16 = (depth * 65535.0).astype(np.uint16)
Image.fromarray(depth_uint16).save("./depth_map.png", mode="I;16")

# Save colorized depth map
depth_colored.save("./depth_colored.png")
LLM-grounded Diffusion
LMD and LMD+ greatly improves the prompt understanding ability of text-to-image generation models by introducing an LLM as a front-end prompt parser and layout planner. It improves spatial reasoning, the understanding of negation, attribute binding, generative numeracy, etc. in a unified manner without explicitly aiming for each. LMD is completely training-free (i.e., uses SD model off-the-shelf). LMD+ takes in additional adapters for better control. This is a reproduction of LMD+ model used in our work. Project page. See our full codebase (also with diffusers).
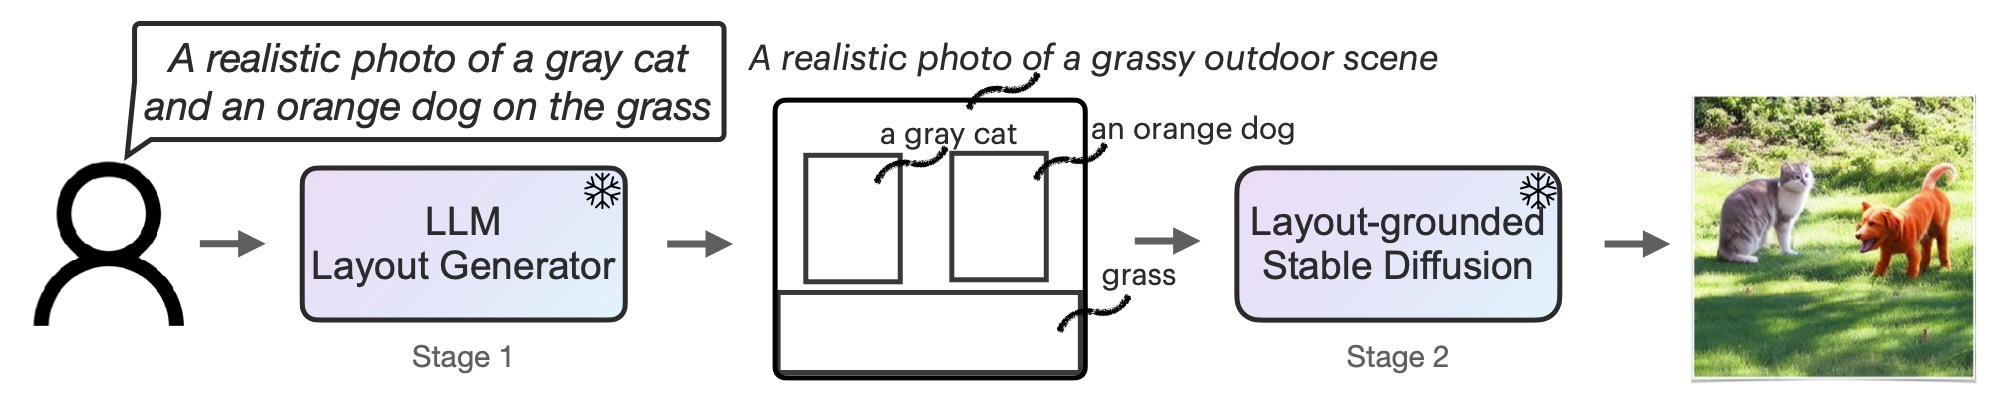
This pipeline can be used with an LLM or on its own. We provide a parser that parses LLM outputs to the layouts. You can obtain the prompt to input to the LLM for layout generation here. After feeding the prompt to an LLM (e.g., GPT-4 on ChatGPT website), you can feed the LLM response into our pipeline.
The following code has been tested on 1x RTX 4090, but it should also support GPUs with lower GPU memory.
Use this pipeline with an LLM
import torch
from diffusers import DiffusionPipeline

pipe = DiffusionPipeline.from_pretrained(
    "longlian/lmd_plus",
    custom_pipeline="llm_grounded_diffusion",
    custom_revision="main",
    variant="fp16", torch_dtype=torch.float16
)
pipe.enable_model_cpu_offload()

# Generate directly from a text prompt and an LLM response
prompt = "a waterfall and a modern high speed train in a beautiful forest with fall foliage"
phrases, boxes, bg_prompt, neg_prompt = pipe.parse_llm_response("""
[('a waterfall', [71, 105, 148, 258]), ('a modern high speed train', [255, 223, 181, 149])]
Background prompt: A beautiful forest with fall foliage
Negative prompt:
""")

images = pipe(
    prompt=prompt,
    negative_prompt=neg_prompt,
    phrases=phrases,
    boxes=boxes,
    gligen_scheduled_sampling_beta=0.4,
    output_type="pil",
    num_inference_steps=50,
    lmd_guidance_kwargs={}
).images

images[0].save("./lmd_plus_generation.jpg")
Use this pipeline on its own for layout generation
import torch
from diffusers import DiffusionPipeline

pipe = DiffusionPipeline.from_pretrained(
    "longlian/lmd_plus",
    custom_pipeline="llm_grounded_diffusion",
    variant="fp16", torch_dtype=torch.float16
)
pipe.enable_model_cpu_offload()

# Generate an image described by the prompt and
# insert objects described by text at the region defined by bounding boxes
prompt = "a waterfall and a modern high speed train in a beautiful forest with fall foliage"
boxes = [[0.1387, 0.2051, 0.4277, 0.7090], [0.4980, 0.4355, 0.8516, 0.7266]]
phrases = ["a waterfall", "a modern high speed train"]

images = pipe(
    prompt=prompt,
    phrases=phrases,
    boxes=boxes,
    gligen_scheduled_sampling_beta=0.4,
    output_type="pil",
    num_inference_steps=50,
    lmd_guidance_kwargs={}
).images

images[0].save("./lmd_plus_generation.jpg")
CLIP Guided Stable Diffusion
CLIP guided stable diffusion can help to generate more realistic images by guiding stable diffusion at every denoising step with an additional CLIP model.
The following code requires roughly 12GB of GPU RAM.
from diffusers import DiffusionPipeline
from transformers import CLIPImageProcessor, CLIPModel
import torch


feature_extractor = CLIPImageProcessor.from_pretrained("laion/CLIP-ViT-B-32-laion2B-s34B-b79K")
clip_model = CLIPModel.from_pretrained("laion/CLIP-ViT-B-32-laion2B-s34B-b79K", torch_dtype=torch.float16)


guided_pipeline = DiffusionPipeline.from_pretrained(
    "runwayml/stable-diffusion-v1-5",
    custom_pipeline="clip_guided_stable_diffusion",
    clip_model=clip_model,
    feature_extractor=feature_extractor,

    torch_dtype=torch.float16,
)
guided_pipeline.enable_attention_slicing()
guided_pipeline = guided_pipeline.to("cuda")

prompt = "fantasy book cover, full moon, fantasy forest landscape, golden vector elements, fantasy magic, dark light night, intricate, elegant, sharp focus, illustration, highly detailed, digital painting, concept art, matte, art by WLOP and Artgerm and Albert Bierstadt, masterpiece"

generator = torch.Generator(device="cuda").manual_seed(0)
images = []
for i in range(4):
    image = guided_pipeline(
        prompt,
        num_inference_steps=50,
        guidance_scale=7.5,
        clip_guidance_scale=100,
        num_cutouts=4,
        use_cutouts=False,
        generator=generator,
    ).images[0]
    images.append(image)

# save images locally
for i, img in enumerate(images):
    img.save(f"./clip_guided_sd/image_{i}.png")
The images list contains a list of PIL images that can be saved locally or displayed directly in a google colab.
Generated images tend to be of higher qualtiy than natively using stable diffusion. E.g. the above script generates the following images:
 .
.
One Step Unet
The dummy "one-step-unet" can be run as follows:
from diffusers import DiffusionPipeline

pipe = DiffusionPipeline.from_pretrained("google/ddpm-cifar10-32", custom_pipeline="one_step_unet")
pipe()
Note: This community pipeline is not useful as a feature, but rather just serves as an example of how community pipelines can be added (see https://github.com/huggingface/diffusers/issues/841).
Stable Diffusion Interpolation
The following code can be run on a GPU of at least 8GB VRAM and should take approximately 5 minutes.
from diffusers import DiffusionPipeline
import torch

pipe = DiffusionPipeline.from_pretrained(
    "CompVis/stable-diffusion-v1-4",
    revision='fp16',
    torch_dtype=torch.float16,
    safety_checker=None,  # Very important for videos...lots of false positives while interpolating
    custom_pipeline="interpolate_stable_diffusion",
).to('cuda')
pipe.enable_attention_slicing()

frame_filepaths = pipe.walk(
    prompts=['a dog', 'a cat', 'a horse'],
    seeds=[42, 1337, 1234],
    num_interpolation_steps=16,
    output_dir='./dreams',
    batch_size=4,
    height=512,
    width=512,
    guidance_scale=8.5,
    num_inference_steps=50,
)
The output of the walk(...) function returns a list of images saved under the folder as defined in output_dir. You can use these images to create videos of stable diffusion.
Please have a look at https://github.com/nateraw/stable-diffusion-videos for more in-detail information on how to create videos using stable diffusion as well as more feature-complete functionality.
Stable Diffusion Mega
The Stable Diffusion Mega Pipeline lets you use the main use cases of the stable diffusion pipeline in a single class.
#!/usr/bin/env python3
from diffusers import DiffusionPipeline
import PIL
import requests
from io import BytesIO
import torch


def download_image(url):
    response = requests.get(url)
    return PIL.Image.open(BytesIO(response.content)).convert("RGB")

pipe = DiffusionPipeline.from_pretrained("runwayml/stable-diffusion-v1-5", custom_pipeline="stable_diffusion_mega", torch_dtype=torch.float16, revision="fp16")
pipe.to("cuda")
pipe.enable_attention_slicing()


### Text-to-Image

images = pipe.text2img("An astronaut riding a horse").images

### Image-to-Image

init_image = download_image("https://raw.githubusercontent.com/CompVis/stable-diffusion/main/assets/stable-samples/img2img/sketch-mountains-input.jpg")

prompt = "A fantasy landscape, trending on artstation"

images = pipe.img2img(prompt=prompt, image=init_image, strength=0.75, guidance_scale=7.5).images

### Inpainting

img_url = "https://raw.githubusercontent.com/CompVis/latent-diffusion/main/data/inpainting_examples/overture-creations-5sI6fQgYIuo.png"
mask_url = "https://raw.githubusercontent.com/CompVis/latent-diffusion/main/data/inpainting_examples/overture-creations-5sI6fQgYIuo_mask.png"
init_image = download_image(img_url).resize((512, 512))
mask_image = download_image(mask_url).resize((512, 512))

prompt = "a cat sitting on a bench"
images = pipe.inpaint(prompt=prompt, image=init_image, mask_image=mask_image, strength=0.75).images
As shown above this one pipeline can run all both "text-to-image", "image-to-image", and "inpainting" in one pipeline.
Long Prompt Weighting Stable Diffusion
Features of this custom pipeline:
- Input a prompt without the 77 token length limit.
- Includes tx2img, img2img. and inpainting pipelines.
- Emphasize/weigh part of your prompt with parentheses as so:
a baby deer with (big eyes) - De-emphasize part of your prompt as so:
a [baby] deer with big eyes - Precisely weigh part of your prompt as so:
a baby deer with (big eyes:1.3)
Prompt weighting equivalents:
a baby deer with==(a baby deer with:1.0)(big eyes)==(big eyes:1.1)((big eyes))==(big eyes:1.21)[big eyes]==(big eyes:0.91)
You can run this custom pipeline as so:
pytorch
from diffusers import DiffusionPipeline
import torch

pipe = DiffusionPipeline.from_pretrained(
    'hakurei/waifu-diffusion',
    custom_pipeline="lpw_stable_diffusion",

    torch_dtype=torch.float16
)
pipe=pipe.to("cuda")

prompt = "best_quality (1girl:1.3) bow bride brown_hair closed_mouth frilled_bow frilled_hair_tubes frills (full_body:1.3) fox_ear hair_bow hair_tubes happy hood japanese_clothes kimono long_sleeves red_bow smile solo tabi uchikake white_kimono wide_sleeves cherry_blossoms"
neg_prompt = "lowres, bad_anatomy, error_body, error_hair, error_arm, error_hands, bad_hands, error_fingers, bad_fingers, missing_fingers, error_legs, bad_legs, multiple_legs, missing_legs, error_lighting, error_shadow, error_reflection, text, error, extra_digit, fewer_digits, cropped, worst_quality, low_quality, normal_quality, jpeg_artifacts, signature, watermark, username, blurry"

pipe.text2img(prompt, negative_prompt=neg_prompt, width=512,height=512,max_embeddings_multiples=3).images[0]
onnxruntime
from diffusers import DiffusionPipeline
import torch

pipe = DiffusionPipeline.from_pretrained(
    'CompVis/stable-diffusion-v1-4',
    custom_pipeline="lpw_stable_diffusion_onnx",
    revision="onnx",
    provider="CUDAExecutionProvider"
)

prompt = "a photo of an astronaut riding a horse on mars, best quality"
neg_prompt = "lowres, bad anatomy, error body, error hair, error arm, error hands, bad hands, error fingers, bad fingers, missing fingers, error legs, bad legs, multiple legs, missing legs, error lighting, error shadow, error reflection, text, error, extra digit, fewer digits, cropped, worst quality, low quality, normal quality, jpeg artifacts, signature, watermark, username, blurry"

pipe.text2img(prompt,negative_prompt=neg_prompt, width=512, height=512, max_embeddings_multiples=3).images[0]
if you see Token indices sequence length is longer than the specified maximum sequence length for this model ( *** > 77 ) . Running this sequence through the model will result in indexing errors. Do not worry, it is normal.
Speech to Image
The following code can generate an image from an audio sample using pre-trained OpenAI whisper-small and Stable Diffusion.
import torch

import matplotlib.pyplot as plt
from datasets import load_dataset
from diffusers import DiffusionPipeline
from transformers import (
    WhisperForConditionalGeneration,
    WhisperProcessor,
)


device = "cuda" if torch.cuda.is_available() else "cpu"

ds = load_dataset("hf-internal-testing/librispeech_asr_dummy", "clean", split="validation")

audio_sample = ds[3]

text = audio_sample["text"].lower()
speech_data = audio_sample["audio"]["array"]

model = WhisperForConditionalGeneration.from_pretrained("openai/whisper-small").to(device)
processor = WhisperProcessor.from_pretrained("openai/whisper-small")

diffuser_pipeline = DiffusionPipeline.from_pretrained(
    "CompVis/stable-diffusion-v1-4",
    custom_pipeline="speech_to_image_diffusion",
    speech_model=model,
    speech_processor=processor,

    torch_dtype=torch.float16,
)

diffuser_pipeline.enable_attention_slicing()
diffuser_pipeline = diffuser_pipeline.to(device)

output = diffuser_pipeline(speech_data)
plt.imshow(output.images[0])
This example produces the following image:
Wildcard Stable Diffusion
Following the great examples from https://github.com/jtkelm2/stable-diffusion-webui-1/blob/master/scripts/wildcards.py and https://github.com/AUTOMATIC1111/stable-diffusion-webui/wiki/Custom-Scripts#wildcards, here's a minimal implementation that allows for users to add "wildcards", denoted by __wildcard__ to prompts that are used as placeholders for randomly sampled values given by either a dictionary or a .txt file. For example:
Say we have a prompt:
prompt = "__animal__ sitting on a __object__ wearing a __clothing__"
We can then define possible values to be sampled for animal, object, and clothing. These can either be from a .txt with the same name as the category.
The possible values can also be defined / combined by using a dictionary like: {"animal":["dog", "cat", mouse"]}.
The actual pipeline works just like StableDiffusionPipeline, except the __call__ method takes in:
wildcard_files: list of file paths for wild card replacement
wildcard_option_dict: dict with key as wildcard and values as a list of possible replacements
num_prompt_samples: number of prompts to sample, uniformly sampling wildcards
A full example:
create animal.txt, with contents like:
dog
cat
mouse
create object.txt, with contents like:
chair
sofa
bench
from diffusers import DiffusionPipeline
import torch

pipe = DiffusionPipeline.from_pretrained(
    "CompVis/stable-diffusion-v1-4",
    custom_pipeline="wildcard_stable_diffusion",

    torch_dtype=torch.float16,
)
prompt = "__animal__ sitting on a __object__ wearing a __clothing__"
out = pipe(
    prompt,
    wildcard_option_dict={
        "clothing":["hat", "shirt", "scarf", "beret"]
    },
    wildcard_files=["object.txt", "animal.txt"],
    num_prompt_samples=1
)
Composable Stable diffusion
Composable Stable Diffusion proposes conjunction and negation (negative prompts) operators for compositional generation with conditional diffusion models.
import torch as th
import numpy as np
import torchvision.utils as tvu

from diffusers import DiffusionPipeline

import argparse

parser = argparse.ArgumentParser()
parser.add_argument("--prompt", type=str, default="mystical trees | A magical pond | dark",
                    help="use '|' as the delimiter to compose separate sentences.")
parser.add_argument("--steps", type=int, default=50)
parser.add_argument("--scale", type=float, default=7.5)
parser.add_argument("--weights", type=str, default="7.5 | 7.5 | -7.5")
parser.add_argument("--seed", type=int, default=2)
parser.add_argument("--model_path", type=str, default="CompVis/stable-diffusion-v1-4")
parser.add_argument("--num_images", type=int, default=1)
args = parser.parse_args()

has_cuda = th.cuda.is_available()
device = th.device('cpu' if not has_cuda else 'cuda')

prompt = args.prompt
scale = args.scale
steps = args.steps

pipe = DiffusionPipeline.from_pretrained(
    args.model_path,
    custom_pipeline="composable_stable_diffusion",
).to(device)

pipe.safety_checker = None

images = []
generator = th.Generator("cuda").manual_seed(args.seed)
for i in range(args.num_images):
    image = pipe(prompt, guidance_scale=scale, num_inference_steps=steps,
                 weights=args.weights, generator=generator).images[0]
    images.append(th.from_numpy(np.array(image)).permute(2, 0, 1) / 255.)
grid = tvu.make_grid(th.stack(images, dim=0), nrow=4, padding=0)
tvu.save_image(grid, f'{prompt}_{args.weights}' + '.png')
Imagic Stable Diffusion
Allows you to edit an image using stable diffusion.
import requests
from PIL import Image
from io import BytesIO
import torch
import os
from diffusers import DiffusionPipeline, DDIMScheduler
has_cuda = torch.cuda.is_available()
device = torch.device('cpu' if not has_cuda else 'cuda')
pipe = DiffusionPipeline.from_pretrained(
    "CompVis/stable-diffusion-v1-4",
        safety_checker=None,
    custom_pipeline="imagic_stable_diffusion",
    scheduler = DDIMScheduler(beta_start=0.00085, beta_end=0.012, beta_schedule="scaled_linear", clip_sample=False, set_alpha_to_one=False)
).to(device)
generator = torch.Generator("cuda").manual_seed(0)
seed = 0
prompt = "A photo of Barack Obama smiling with a big grin"
url = 'https://www.dropbox.com/s/6tlwzr73jd1r9yk/obama.png?dl=1'
response = requests.get(url)
init_image = Image.open(BytesIO(response.content)).convert("RGB")
init_image = init_image.resize((512, 512))
res = pipe.train(
    prompt,
    image=init_image,
    generator=generator)
res = pipe(alpha=1, guidance_scale=7.5, num_inference_steps=50)
os.makedirs("imagic", exist_ok=True)
image = res.images[0]
image.save('./imagic/imagic_image_alpha_1.png')
res = pipe(alpha=1.5, guidance_scale=7.5, num_inference_steps=50)
image = res.images[0]
image.save('./imagic/imagic_image_alpha_1_5.png')
res = pipe(alpha=2, guidance_scale=7.5, num_inference_steps=50)
image = res.images[0]
image.save('./imagic/imagic_image_alpha_2.png')
Seed Resizing
Test seed resizing. Originally generate an image in 512 by 512, then generate image with same seed at 512 by 592 using seed resizing. Finally, generate 512 by 592 using original stable diffusion pipeline.
import torch as th
import numpy as np
from diffusers import DiffusionPipeline

has_cuda = th.cuda.is_available()
device = th.device('cpu' if not has_cuda else 'cuda')

pipe = DiffusionPipeline.from_pretrained(
    "CompVis/stable-diffusion-v1-4",
    custom_pipeline="seed_resize_stable_diffusion"
).to(device)

def dummy(images, **kwargs):
    return images, False

pipe.safety_checker = dummy


images = []
th.manual_seed(0)
generator = th.Generator("cuda").manual_seed(0)

seed = 0
prompt = "A painting of a futuristic cop"

width = 512
height = 512

res = pipe(
    prompt,
    guidance_scale=7.5,
    num_inference_steps=50,
    height=height,
    width=width,
    generator=generator)
image = res.images[0]
image.save('./seed_resize/seed_resize_{w}_{h}_image.png'.format(w=width, h=height))


th.manual_seed(0)
generator = th.Generator("cuda").manual_seed(0)

pipe = DiffusionPipeline.from_pretrained(
    "CompVis/stable-diffusion-v1-4",
    custom_pipeline="/home/mark/open_source/diffusers/examples/community/"
).to(device)

width = 512
height = 592

res = pipe(
    prompt,
    guidance_scale=7.5,
    num_inference_steps=50,
    height=height,
    width=width,
    generator=generator)
image = res.images[0]
image.save('./seed_resize/seed_resize_{w}_{h}_image.png'.format(w=width, h=height))

pipe_compare = DiffusionPipeline.from_pretrained(
    "CompVis/stable-diffusion-v1-4",
    custom_pipeline="/home/mark/open_source/diffusers/examples/community/"
).to(device)

res = pipe_compare(
    prompt,
    guidance_scale=7.5,
    num_inference_steps=50,
    height=height,
    width=width,
    generator=generator
)

image = res.images[0]
image.save('./seed_resize/seed_resize_{w}_{h}_image_compare.png'.format(w=width, h=height))
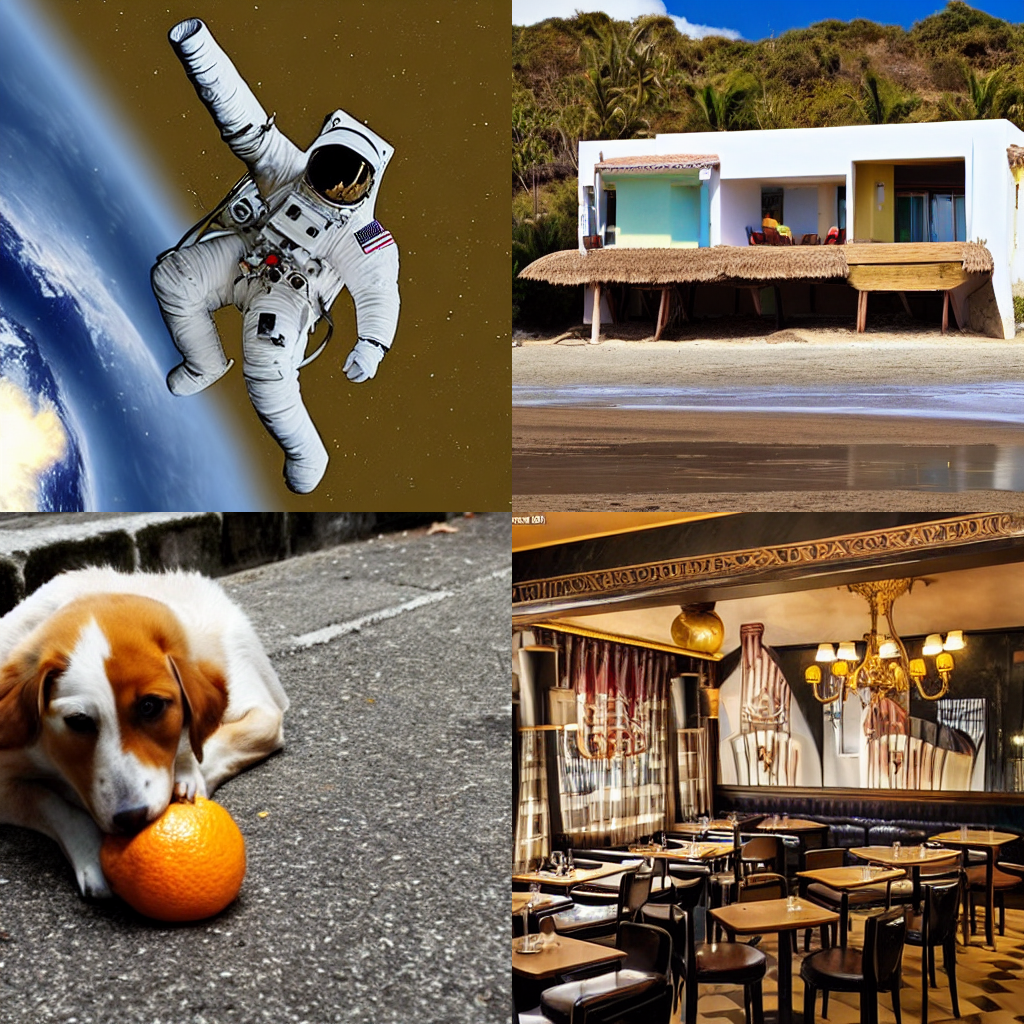
Multilingual Stable Diffusion Pipeline
The following code can generate an images from texts in different languages using the pre-trained mBART-50 many-to-one multilingual machine translation model and Stable Diffusion.
from PIL import Image

import torch

from diffusers import DiffusionPipeline
from transformers import (
    pipeline,
    MBart50TokenizerFast,
    MBartForConditionalGeneration,
)
device = "cuda" if torch.cuda.is_available() else "cpu"
device_dict = {"cuda": 0, "cpu": -1}

# helper function taken from: https://huggingface.co/blog/stable_diffusion
def image_grid(imgs, rows, cols):
    assert len(imgs) == rows*cols

    w, h = imgs[0].size
    grid = Image.new('RGB', size=(cols*w, rows*h))
    grid_w, grid_h = grid.size

    for i, img in enumerate(imgs):
        grid.paste(img, box=(i%cols*w, i//cols*h))
    return grid

# Add language detection pipeline
language_detection_model_ckpt = "papluca/xlm-roberta-base-language-detection"
language_detection_pipeline = pipeline("text-classification",
                                       model=language_detection_model_ckpt,
                                       device=device_dict[device])

# Add model for language translation
trans_tokenizer = MBart50TokenizerFast.from_pretrained("facebook/mbart-large-50-many-to-one-mmt")
trans_model = MBartForConditionalGeneration.from_pretrained("facebook/mbart-large-50-many-to-one-mmt").to(device)

diffuser_pipeline = DiffusionPipeline.from_pretrained(
    "CompVis/stable-diffusion-v1-4",
    custom_pipeline="multilingual_stable_diffusion",
    detection_pipeline=language_detection_pipeline,
    translation_model=trans_model,
    translation_tokenizer=trans_tokenizer,

    torch_dtype=torch.float16,
)

diffuser_pipeline.enable_attention_slicing()
diffuser_pipeline = diffuser_pipeline.to(device)

prompt = ["a photograph of an astronaut riding a horse",
          "Una casa en la playa",
          "Ein Hund, der Orange isst",
          "Un restaurant parisien"]

output = diffuser_pipeline(prompt)

images = output.images

grid = image_grid(images, rows=2, cols=2)
This example produces the following images:
GlueGen Stable Diffusion Pipeline
GlueGen is a minimal adapter that allow alignment between any encoder (Text Encoder of different language, Multilingual Roberta, AudioClip) and CLIP text encoder used in standard Stable Diffusion model. This method allows easy language adaptation to available english Stable Diffusion checkpoints without the need of an image captioning dataset as well as long training hours.
Make sure you downloaded gluenet_French_clip_overnorm_over3_noln.ckpt for French (there are also pre-trained weights for Chinese, Italian, Japanese, Spanish or train your own) at GlueGen's official repo
from PIL import Image

import torch

from transformers import AutoModel, AutoTokenizer

from diffusers import DiffusionPipeline

if __name__ == "__main__":
    device = "cuda"

    lm_model_id = "xlm-roberta-large"
    token_max_length = 77

    text_encoder = AutoModel.from_pretrained(lm_model_id)
    tokenizer = AutoTokenizer.from_pretrained(lm_model_id, model_max_length=token_max_length, use_fast=False)

    tensor_norm = torch.Tensor([[43.8203],[28.3668],[27.9345],[28.0084],[28.2958],[28.2576],[28.3373],[28.2695],[28.4097],[28.2790],[28.2825],[28.2807],[28.2775],[28.2708],[28.2682],[28.2624],[28.2589],[28.2611],[28.2616],[28.2639],[28.2613],[28.2566],[28.2615],[28.2665],[28.2799],[28.2885],[28.2852],[28.2863],[28.2780],[28.2818],[28.2764],[28.2532],[28.2412],[28.2336],[28.2514],[28.2734],[28.2763],[28.2977],[28.2971],[28.2948],[28.2818],[28.2676],[28.2831],[28.2890],[28.2979],[28.2999],[28.3117],[28.3363],[28.3554],[28.3626],[28.3589],[28.3597],[28.3543],[28.3660],[28.3731],[28.3717],[28.3812],[28.3753],[28.3810],[28.3777],[28.3693],[28.3713],[28.3670],[28.3691],[28.3679],[28.3624],[28.3703],[28.3703],[28.3720],[28.3594],[28.3576],[28.3562],[28.3438],[28.3376],[28.3389],[28.3433],[28.3191]])

    pipeline = DiffusionPipeline.from_pretrained(
        "runwayml/stable-diffusion-v1-5",
        text_encoder=text_encoder,
        tokenizer=tokenizer,
        custom_pipeline="gluegen"
    ).to(device)
    pipeline.load_language_adapter("gluenet_French_clip_overnorm_over3_noln.ckpt", num_token=token_max_length, dim=1024, dim_out=768, tensor_norm=tensor_norm)

    prompt = "une voiture sur la plage"

    generator = torch.Generator(device=device).manual_seed(42)
    image = pipeline(prompt, generator=generator).images[0]
    image.save("gluegen_output_fr.png")
Which will produce:
Image to Image Inpainting Stable Diffusion
Similar to the standard stable diffusion inpainting example, except with the addition of an inner_image argument.
image, inner_image, and mask should have the same dimensions. inner_image should have an alpha (transparency) channel.
The aim is to overlay two images, then mask out the boundary between image and inner_image to allow stable diffusion to make the connection more seamless.
For example, this could be used to place a logo on a shirt and make it blend seamlessly.
import PIL
import torch

from diffusers import DiffusionPipeline

image_path = "./path-to-image.png"
inner_image_path = "./path-to-inner-image.png"
mask_path = "./path-to-mask.png"

init_image = PIL.Image.open(image_path).convert("RGB").resize((512, 512))
inner_image = PIL.Image.open(inner_image_path).convert("RGBA").resize((512, 512))
mask_image = PIL.Image.open(mask_path).convert("RGB").resize((512, 512))

pipe = DiffusionPipeline.from_pretrained(
    "runwayml/stable-diffusion-inpainting",
    custom_pipeline="img2img_inpainting",

    torch_dtype=torch.float16
)
pipe = pipe.to("cuda")

prompt = "Your prompt here!"
image = pipe(prompt=prompt, image=init_image, inner_image=inner_image, mask_image=mask_image).images[0]
Text Based Inpainting Stable Diffusion
Use a text prompt to generate the mask for the area to be inpainted. Currently uses the CLIPSeg model for mask generation, then calls the standard Stable Diffusion Inpainting pipeline to perform the inpainting.
from transformers import CLIPSegProcessor, CLIPSegForImageSegmentation
from diffusers import DiffusionPipeline

from PIL import Image
import requests

processor = CLIPSegProcessor.from_pretrained("CIDAS/clipseg-rd64-refined")
model = CLIPSegForImageSegmentation.from_pretrained("CIDAS/clipseg-rd64-refined")

pipe = DiffusionPipeline.from_pretrained(
    "runwayml/stable-diffusion-inpainting",
    custom_pipeline="text_inpainting",
    segmentation_model=model,
    segmentation_processor=processor
)
pipe = pipe.to("cuda")


url = "https://github.com/timojl/clipseg/blob/master/example_image.jpg?raw=true"
image = Image.open(requests.get(url, stream=True).raw).resize((512, 512))
text = "a glass"  # will mask out this text
prompt = "a cup"  # the masked out region will be replaced with this

image = pipe(image=image, text=text, prompt=prompt).images[0]
Bit Diffusion
Based https://arxiv.org/abs/2208.04202, this is used for diffusion on discrete data - eg, discreate image data, DNA sequence data. An unconditional discreate image can be generated like this:
from diffusers import DiffusionPipeline
pipe = DiffusionPipeline.from_pretrained("google/ddpm-cifar10-32", custom_pipeline="bit_diffusion")
image = pipe().images[0]
Stable Diffusion with K Diffusion
Make sure you have @crowsonkb's https://github.com/crowsonkb/k-diffusion installed:
pip install k-diffusion
You can use the community pipeline as follows:
from diffusers import DiffusionPipeline

pipe = DiffusionPipeline.from_pretrained("CompVis/stable-diffusion-v1-4", custom_pipeline="sd_text2img_k_diffusion")
pipe = pipe.to("cuda")

prompt = "an astronaut riding a horse on mars"
pipe.set_scheduler("sample_heun")
generator = torch.Generator(device="cuda").manual_seed(seed)
image = pipe(prompt, generator=generator, num_inference_steps=20).images[0]

image.save("./astronaut_heun_k_diffusion.png")
To make sure that K Diffusion and diffusers yield the same results:
Diffusers:
from diffusers import DiffusionPipeline, EulerDiscreteScheduler

seed = 33

pipe = DiffusionPipeline.from_pretrained("CompVis/stable-diffusion-v1-4")
pipe.scheduler = EulerDiscreteScheduler.from_config(pipe.scheduler.config)
pipe = pipe.to("cuda")

generator = torch.Generator(device="cuda").manual_seed(seed)
image = pipe(prompt, generator=generator, num_inference_steps=50).images[0]

K Diffusion:
from diffusers import DiffusionPipeline, EulerDiscreteScheduler

seed = 33

pipe = DiffusionPipeline.from_pretrained("CompVis/stable-diffusion-v1-4", custom_pipeline="sd_text2img_k_diffusion")
pipe.scheduler = EulerDiscreteScheduler.from_config(pipe.scheduler.config)
pipe = pipe.to("cuda")

pipe.set_scheduler("sample_euler")
generator = torch.Generator(device="cuda").manual_seed(seed)
image = pipe(prompt, generator=generator, num_inference_steps=50).images[0]

Checkpoint Merger Pipeline
Based on the AUTOMATIC1111/webui for checkpoint merging. This is a custom pipeline that merges upto 3 pretrained model checkpoints as long as they are in the HuggingFace model_index.json format.
The checkpoint merging is currently memory intensive as it modifies the weights of a DiffusionPipeline object in place. Expect at least 13GB RAM Usage on Kaggle GPU kernels and on colab you might run out of the 12GB memory even while merging two checkpoints.
Usage:-
from diffusers import DiffusionPipeline

#Return a CheckpointMergerPipeline class that allows you to merge checkpoints.
#The checkpoint passed here is ignored. But still pass one of the checkpoints you plan to
#merge for convenience
pipe = DiffusionPipeline.from_pretrained("CompVis/stable-diffusion-v1-4", custom_pipeline="checkpoint_merger")

#There are multiple possible scenarios:
#The pipeline with the merged checkpoints is returned in all the scenarios

#Compatible checkpoints a.k.a matched model_index.json files. Ignores the meta attributes in model_index.json during comparison.( attrs with _ as prefix )
merged_pipe = pipe.merge(["CompVis/stable-diffusion-v1-4","CompVis/stable-diffusion-v1-2"], interp = "sigmoid", alpha = 0.4)

#Incompatible checkpoints in model_index.json but merge might be possible. Use force = True to ignore model_index.json compatibility
merged_pipe_1 = pipe.merge(["CompVis/stable-diffusion-v1-4","hakurei/waifu-diffusion"], force = True, interp = "sigmoid", alpha = 0.4)

#Three checkpoint merging. Only "add_difference" method actually works on all three checkpoints. Using any other options will ignore the 3rd checkpoint.
merged_pipe_2 = pipe.merge(["CompVis/stable-diffusion-v1-4","hakurei/waifu-diffusion","prompthero/openjourney"], force = True, interp = "add_difference", alpha = 0.4)

prompt = "An astronaut riding a horse on Mars"

image = merged_pipe(prompt).images[0]
Some examples along with the merge details:
- "CompVis/stable-diffusion-v1-4" + "hakurei/waifu-diffusion" ; Sigmoid interpolation; alpha = 0.8

- "hakurei/waifu-diffusion" + "prompthero/openjourney" ; Inverse Sigmoid interpolation; alpha = 0.8

- "CompVis/stable-diffusion-v1-4" + "hakurei/waifu-diffusion" + "prompthero/openjourney"; Add Difference interpolation; alpha = 0.5

Stable Diffusion Comparisons
This Community Pipeline enables the comparison between the 4 checkpoints that exist for Stable Diffusion. They can be found through the following links:
from diffusers import DiffusionPipeline
import matplotlib.pyplot as plt

pipe = DiffusionPipeline.from_pretrained('CompVis/stable-diffusion-v1-4', custom_pipeline='suvadityamuk/StableDiffusionComparison')
pipe.enable_attention_slicing()
pipe = pipe.to('cuda')
prompt = "an astronaut riding a horse on mars"
output = pipe(prompt)

plt.subplots(2,2,1)
plt.imshow(output.images[0])
plt.title('Stable Diffusion v1.1')
plt.axis('off')
plt.subplots(2,2,2)
plt.imshow(output.images[1])
plt.title('Stable Diffusion v1.2')
plt.axis('off')
plt.subplots(2,2,3)
plt.imshow(output.images[2])
plt.title('Stable Diffusion v1.3')
plt.axis('off')
plt.subplots(2,2,4)
plt.imshow(output.images[3])
plt.title('Stable Diffusion v1.4')
plt.axis('off')

plt.show()
As a result, you can look at a grid of all 4 generated images being shown together, that captures a difference the advancement of the training between the 4 checkpoints.
Magic Mix
Implementation of the MagicMix: Semantic Mixing with Diffusion Models paper. This is a Diffusion Pipeline for semantic mixing of an image and a text prompt to create a new concept while preserving the spatial layout and geometry of the subject in the image. The pipeline takes an image that provides the layout semantics and a prompt that provides the content semantics for the mixing process.
There are 3 parameters for the method-
mix_factor: It is the interpolation constant used in the layout generation phase. The greater the value ofmix_factor, the greater the influence of the prompt on the layout generation process.kmaxandkmin: These determine the range for the layout and content generation process. A higher value of kmax results in loss of more information about the layout of the original image and a higher value of kmin results in more steps for content generation process.
Here is an example usage-
from diffusers import DiffusionPipeline, DDIMScheduler
from PIL import Image

pipe = DiffusionPipeline.from_pretrained(
    "CompVis/stable-diffusion-v1-4",
    custom_pipeline="magic_mix",
    scheduler = DDIMScheduler.from_pretrained("CompVis/stable-diffusion-v1-4", subfolder="scheduler"),
).to('cuda')

img = Image.open('phone.jpg')
mix_img = pipe(
    img,
    prompt = 'bed',
    kmin = 0.3,
    kmax = 0.5,
    mix_factor = 0.5,
    )
mix_img.save('phone_bed_mix.jpg')
The mix_img is a PIL image that can be saved locally or displayed directly in a google colab. Generated image is a mix of the layout semantics of the given image and the content semantics of the prompt.
E.g. the above script generates the following image:
phone.jpg

phone_bed_mix.jpg

For more example generations check out this demo notebook.
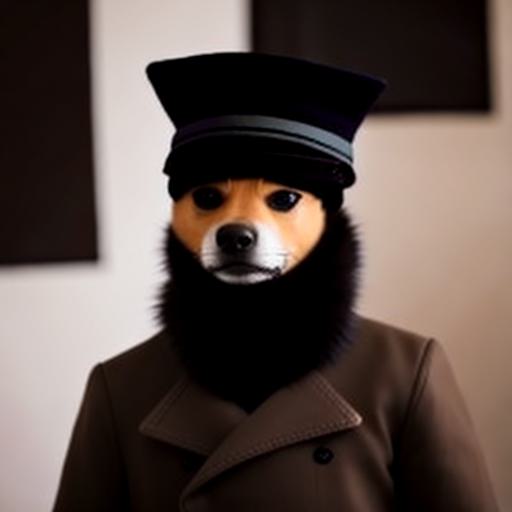
Stable UnCLIP
UnCLIPPipeline("kakaobrain/karlo-v1-alpha") provide a prior model that can generate clip image embedding from text. StableDiffusionImageVariationPipeline("lambdalabs/sd-image-variations-diffusers") provide a decoder model than can generate images from clip image embedding.
import torch
from diffusers import DiffusionPipeline

device = torch.device("cpu" if not torch.cuda.is_available() else "cuda")

pipeline = DiffusionPipeline.from_pretrained(
    "kakaobrain/karlo-v1-alpha",
    torch_dtype=torch.float16,
    custom_pipeline="stable_unclip",
    decoder_pipe_kwargs=dict(
        image_encoder=None,
    ),
)
pipeline.to(device)

prompt = "a shiba inu wearing a beret and black turtleneck"
random_generator = torch.Generator(device=device).manual_seed(1000)
output = pipeline(
    prompt=prompt,
    width=512,
    height=512,
    generator=random_generator,
    prior_guidance_scale=4,
    prior_num_inference_steps=25,
    decoder_guidance_scale=8,
    decoder_num_inference_steps=50,
)

image = output.images[0]
image.save("./shiba-inu.jpg")

# debug

# `pipeline.decoder_pipe` is a regular StableDiffusionImageVariationPipeline instance.
# It is used to convert clip image embedding to latents, then fed into VAE decoder.
print(pipeline.decoder_pipe.__class__)
# <class 'diffusers.pipelines.stable_diffusion.pipeline_stable_diffusion_image_variation.StableDiffusionImageVariationPipeline'>

# this pipeline only use prior module in "kakaobrain/karlo-v1-alpha"
# It is used to convert clip text embedding to clip image embedding.
print(pipeline)
# StableUnCLIPPipeline {
#   "_class_name": "StableUnCLIPPipeline",
#   "_diffusers_version": "0.12.0.dev0",
#   "prior": [
#     "diffusers",
#     "PriorTransformer"
#   ],
#   "prior_scheduler": [
#     "diffusers",
#     "UnCLIPScheduler"
#   ],
#   "text_encoder": [
#     "transformers",
#     "CLIPTextModelWithProjection"
#   ],
#   "tokenizer": [
#     "transformers",
#     "CLIPTokenizer"
#   ]
# }

# pipeline.prior_scheduler is the scheduler used for prior in UnCLIP.
print(pipeline.prior_scheduler)
# UnCLIPScheduler {
#   "_class_name": "UnCLIPScheduler",
#   "_diffusers_version": "0.12.0.dev0",
#   "clip_sample": true,
#   "clip_sample_range": 5.0,
#   "num_train_timesteps": 1000,
#   "prediction_type": "sample",
#   "variance_type": "fixed_small_log"
# }
shiba-inu.jpg
UnCLIP Text Interpolation Pipeline
This Diffusion Pipeline takes two prompts and interpolates between the two input prompts using spherical interpolation ( slerp ). The input prompts are converted to text embeddings by the pipeline's text_encoder and the interpolation is done on the resulting text_embeddings over the number of steps specified. Defaults to 5 steps.
import torch
from diffusers import DiffusionPipeline

device = torch.device("cpu" if not torch.cuda.is_available() else "cuda")

pipe = DiffusionPipeline.from_pretrained(
    "kakaobrain/karlo-v1-alpha",
    torch_dtype=torch.float16,
    custom_pipeline="unclip_text_interpolation"
)
pipe.to(device)

start_prompt = "A photograph of an adult lion"
end_prompt = "A photograph of a lion cub"
#For best results keep the prompts close in length to each other. Of course, feel free to try out with differing lengths.
generator = torch.Generator(device=device).manual_seed(42)

output = pipe(start_prompt, end_prompt, steps = 6, generator = generator, enable_sequential_cpu_offload=False)

for i,image in enumerate(output.images):
    img.save('result%s.jpg' % i)
The resulting images in order:-


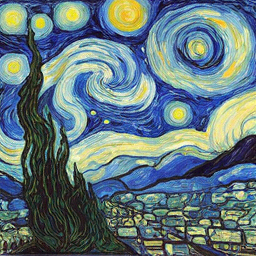
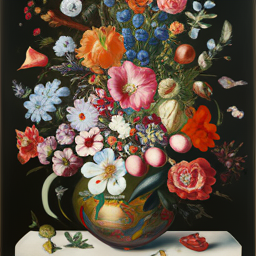
UnCLIP Image Interpolation Pipeline
This Diffusion Pipeline takes two images or an image_embeddings tensor of size 2 and interpolates between their embeddings using spherical interpolation ( slerp ). The input images/image_embeddings are converted to image embeddings by the pipeline's image_encoder and the interpolation is done on the resulting image_embeddings over the number of steps specified. Defaults to 5 steps.
import torch
from diffusers import DiffusionPipeline
from PIL import Image

device = torch.device("cpu" if not torch.cuda.is_available() else "cuda")
dtype = torch.float16 if torch.cuda.is_available() else torch.bfloat16

pipe = DiffusionPipeline.from_pretrained(
    "kakaobrain/karlo-v1-alpha-image-variations",
    torch_dtype=dtype,
    custom_pipeline="unclip_image_interpolation"
)
pipe.to(device)

images = [Image.open('./starry_night.jpg'), Image.open('./flowers.jpg')]
#For best results keep the prompts close in length to each other. Of course, feel free to try out with differing lengths.
generator = torch.Generator(device=device).manual_seed(42)

output = pipe(image = images ,steps = 6, generator = generator)

for i,image in enumerate(output.images):
    image.save('starry_to_flowers_%s.jpg' % i)
The original images:-


The resulting images in order:-


DDIM Noise Comparative Analysis Pipeline
Research question: What visual concepts do the diffusion models learn from each noise level during training?
The P2 weighting (CVPR 2022) paper proposed an approach to answer the above question, which is their second contribution. The approach consists of the following steps:
- The input is an image x0.
- Perturb it to xt using a diffusion process q(xt|x0).
strengthis a value between 0.0 and 1.0, that controls the amount of noise that is added to the input image. Values that approach 1.0 allow for lots of variations but will also produce images that are not semantically consistent with the input.
- Reconstruct the image with the learned denoising process pθ(ˆx0|xt).
- Compare x0 and ˆx0 among various t to show how each step contributes to the sample. The authors used openai/guided-diffusion model to denoise images in FFHQ dataset. This pipeline extends their second contribution by investigating DDIM on any input image.
import torch
from PIL import Image
import numpy as np

image_path = "path/to/your/image" # images from CelebA-HQ might be better
image_pil = Image.open(image_path)
image_name = image_path.split("/")[-1].split(".")[0]

device = torch.device("cpu" if not torch.cuda.is_available() else "cuda")
pipe = DiffusionPipeline.from_pretrained(
    "google/ddpm-ema-celebahq-256",
    custom_pipeline="ddim_noise_comparative_analysis",
)
pipe = pipe.to(device)

for strength in np.linspace(0.1, 1, 25):
    denoised_image, latent_timestep = pipe(
        image_pil, strength=strength, return_dict=False
    )
    denoised_image = denoised_image[0]
    denoised_image.save(
        f"noise_comparative_analysis_{image_name}_{latent_timestep}.png"
    )
Here is the result of this pipeline (which is DDIM) on CelebA-HQ dataset.
CLIP Guided Img2Img Stable Diffusion
CLIP guided Img2Img stable diffusion can help to generate more realistic images with an initial image by guiding stable diffusion at every denoising step with an additional CLIP model.
The following code requires roughly 12GB of GPU RAM.
from io import BytesIO
import requests
import torch
from diffusers import DiffusionPipeline
from PIL import Image
from transformers import CLIPFeatureExtractor, CLIPModel
feature_extractor = CLIPFeatureExtractor.from_pretrained(
    "laion/CLIP-ViT-B-32-laion2B-s34B-b79K"
)
clip_model = CLIPModel.from_pretrained(
    "laion/CLIP-ViT-B-32-laion2B-s34B-b79K", torch_dtype=torch.float16
)
guided_pipeline = DiffusionPipeline.from_pretrained(
    "CompVis/stable-diffusion-v1-4",
    # custom_pipeline="clip_guided_stable_diffusion",
    custom_pipeline="/home/njindal/diffusers/examples/community/clip_guided_stable_diffusion.py",
    clip_model=clip_model,
    feature_extractor=feature_extractor,
    torch_dtype=torch.float16,
)
guided_pipeline.enable_attention_slicing()
guided_pipeline = guided_pipeline.to("cuda")
prompt = "fantasy book cover, full moon, fantasy forest landscape, golden vector elements, fantasy magic, dark light night, intricate, elegant, sharp focus, illustration, highly detailed, digital painting, concept art, matte, art by WLOP and Artgerm and Albert Bierstadt, masterpiece"
url = "https://raw.githubusercontent.com/CompVis/stable-diffusion/main/assets/stable-samples/img2img/sketch-mountains-input.jpg"
response = requests.get(url)
init_image = Image.open(BytesIO(response.content)).convert("RGB")
image = guided_pipeline(
    prompt=prompt,
    num_inference_steps=30,
    image=init_image,
    strength=0.75,
    guidance_scale=7.5,
    clip_guidance_scale=100,
    num_cutouts=4,
    use_cutouts=False,
).images[0]
display(image)
Init Image

Output Image

TensorRT Text2Image Stable Diffusion Pipeline
The TensorRT Pipeline can be used to accelerate the Text2Image Stable Diffusion Inference run.
NOTE: The ONNX conversions and TensorRT engine build may take up to 30 minutes.
import torch
from diffusers import DDIMScheduler
from diffusers.pipelines.stable_diffusion import StableDiffusionPipeline

# Use the DDIMScheduler scheduler here instead
scheduler = DDIMScheduler.from_pretrained("stabilityai/stable-diffusion-2-1",
                                            subfolder="scheduler")

pipe = StableDiffusionPipeline.from_pretrained("stabilityai/stable-diffusion-2-1",
                                                custom_pipeline="stable_diffusion_tensorrt_txt2img",
                                                revision='fp16',
                                                torch_dtype=torch.float16,
                                                scheduler=scheduler,)

# re-use cached folder to save ONNX models and TensorRT Engines
pipe.set_cached_folder("stabilityai/stable-diffusion-2-1", revision='fp16',)

pipe = pipe.to("cuda")

prompt = "a beautiful photograph of Mt. Fuji during cherry blossom"
image = pipe(prompt).images[0]
image.save('tensorrt_mt_fuji.png')
EDICT Image Editing Pipeline
This pipeline implements the text-guided image editing approach from the paper EDICT: Exact Diffusion Inversion via Coupled Transformations. You have to pass:
- (
PIL)imageyou want to edit. base_prompt: the text prompt describing the current image (before editing).target_prompt: the text prompt describing with the edits.
from diffusers import DiffusionPipeline, DDIMScheduler
from transformers import CLIPTextModel
import torch, PIL, requests
from io import BytesIO
from IPython.display import display

def center_crop_and_resize(im):

    width, height = im.size
    d = min(width, height)
    left = (width - d) / 2
    upper = (height - d) / 2
    right = (width + d) / 2
    lower = (height + d) / 2

    return im.crop((left, upper, right, lower)).resize((512, 512))

torch_dtype = torch.float16
device = torch.device('cuda' if torch.cuda.is_available() else 'cpu')

# scheduler and text_encoder param values as in the paper
scheduler = DDIMScheduler(
        num_train_timesteps=1000,
        beta_start=0.00085,
        beta_end=0.012,
        beta_schedule="scaled_linear",
        set_alpha_to_one=False,
        clip_sample=False,
)

text_encoder = CLIPTextModel.from_pretrained(
    pretrained_model_name_or_path="openai/clip-vit-large-patch14",
    torch_dtype=torch_dtype,
)

# initialize pipeline
pipeline = DiffusionPipeline.from_pretrained(
    pretrained_model_name_or_path="CompVis/stable-diffusion-v1-4",
    custom_pipeline="edict_pipeline",
    revision="fp16",
    scheduler=scheduler,
    text_encoder=text_encoder,
    leapfrog_steps=True,
    torch_dtype=torch_dtype,
).to(device)

# download image
image_url = "https://huggingface.co/datasets/Joqsan/images/resolve/main/imagenet_dog_1.jpeg"
response = requests.get(image_url)
image = PIL.Image.open(BytesIO(response.content))

# preprocess it
cropped_image = center_crop_and_resize(image)

# define the prompts
base_prompt = "A dog"
target_prompt = "A golden retriever"

# run the pipeline
result_image = pipeline(
      base_prompt=base_prompt,
      target_prompt=target_prompt,
      image=cropped_image,
)

display(result_image)
Init Image

Output Image

Stable Diffusion RePaint
This pipeline uses the RePaint logic on the latent space of stable diffusion. It can be used similarly to other image inpainting pipelines but does not rely on a specific inpainting model. This means you can use models that are not specifically created for inpainting.
Make sure to use the RePaintScheduler as shown in the example below.
Disclaimer: The mask gets transferred into latent space, this may lead to unexpected changes on the edge of the masked part. The inference time is a lot slower.
import PIL
import requests
import torch
from io import BytesIO
from diffusers import StableDiffusionPipeline, RePaintScheduler
def download_image(url):
    response = requests.get(url)
    return PIL.Image.open(BytesIO(response.content)).convert("RGB")
img_url = "https://raw.githubusercontent.com/CompVis/latent-diffusion/main/data/inpainting_examples/overture-creations-5sI6fQgYIuo.png"
mask_url = "https://raw.githubusercontent.com/CompVis/latent-diffusion/main/data/inpainting_examples/overture-creations-5sI6fQgYIuo_mask.png"
init_image = download_image(img_url).resize((512, 512))
mask_image = download_image(mask_url).resize((512, 512))
mask_image = PIL.ImageOps.invert(mask_image)
pipe = StableDiffusionPipeline.from_pretrained(
    "CompVis/stable-diffusion-v1-4", torch_dtype=torch.float16, custom_pipeline="stable_diffusion_repaint",
)
pipe.scheduler = RePaintScheduler.from_config(pipe.scheduler.config)
pipe = pipe.to("cuda")
prompt = "Face of a yellow cat, high resolution, sitting on a park bench"
image = pipe(prompt=prompt, image=init_image, mask_image=mask_image).images[0]
TensorRT Image2Image Stable Diffusion Pipeline
The TensorRT Pipeline can be used to accelerate the Image2Image Stable Diffusion Inference run.
NOTE: The ONNX conversions and TensorRT engine build may take up to 30 minutes.
import requests
from io import BytesIO
from PIL import Image
import torch
from diffusers import DDIMScheduler
from diffusers.pipelines.stable_diffusion import StableDiffusionImg2ImgPipeline

# Use the DDIMScheduler scheduler here instead
scheduler = DDIMScheduler.from_pretrained("stabilityai/stable-diffusion-2-1",
                                            subfolder="scheduler")


pipe = StableDiffusionImg2ImgPipeline.from_pretrained("stabilityai/stable-diffusion-2-1",
                                                custom_pipeline="stable_diffusion_tensorrt_img2img",
                                                revision='fp16',
                                                torch_dtype=torch.float16,
                                                scheduler=scheduler,)

# re-use cached folder to save ONNX models and TensorRT Engines
pipe.set_cached_folder("stabilityai/stable-diffusion-2-1", revision='fp16',)

pipe = pipe.to("cuda")

url = "https://pajoca.com/wp-content/uploads/2022/09/tekito-yamakawa-1.png"
response = requests.get(url)
input_image = Image.open(BytesIO(response.content)).convert("RGB")

prompt = "photorealistic new zealand hills"
image = pipe(prompt, image=input_image, strength=0.75,).images[0]
image.save('tensorrt_img2img_new_zealand_hills.png')
Stable Diffusion BoxDiff
BoxDiff is a training-free method for controlled generation with bounding box coordinates. It shoud work with any Stable Diffusion model. Below shows an example with stable-diffusion-2-1-base.
import torch
from PIL import Image, ImageDraw
from copy import deepcopy

from examples.community.pipeline_stable_diffusion_boxdiff import StableDiffusionBoxDiffPipeline

def draw_box_with_text(img, boxes, names):
    colors = ["red", "olive", "blue", "green", "orange", "brown", "cyan", "purple"]
    img_new = deepcopy(img)
    draw = ImageDraw.Draw(img_new)

    W, H = img.size
    for bid, box in enumerate(boxes):
        draw.rectangle([box[0] * W, box[1] * H, box[2] * W, box[3] * H], outline=colors[bid % len(colors)], width=4)
        draw.text((box[0] * W, box[1] * H), names[bid], fill=colors[bid % len(colors)])
    return img_new

pipe = StableDiffusionBoxDiffPipeline.from_pretrained(
    "stabilityai/stable-diffusion-2-1-base",
    torch_dtype=torch.float16,
)
pipe.to("cuda")

# example 1
prompt = "as the aurora lights up the sky, a herd of reindeer leisurely wanders on the grassy meadow, admiring the breathtaking view, a serene lake quietly reflects the magnificent display, and in the distance, a snow-capped mountain stands majestically, fantasy, 8k, highly detailed"
phrases = [
    "aurora",
    "reindeer",
    "meadow",
    "lake",
    "mountain"
]
boxes = [[1,3,512,202], [75,344,421,495], [1,327,508,507], [2,217,507,341], [1,135,509,242]]

# example 2
# prompt = "A rabbit wearing sunglasses looks very proud"
# phrases = ["rabbit", "sunglasses"]
# boxes = [[67,87,366,512], [66,130,364,262]]

boxes = [[x / 512 for x in box] for box in boxes]

images = pipe(
    prompt,
    boxdiff_phrases=phrases,
    boxdiff_boxes=boxes,
    boxdiff_kwargs={
        "attention_res": 16,
        "normalize_eot": True
    },
    num_inference_steps=50,
    guidance_scale=7.5,
    generator=torch.manual_seed(42),
    safety_checker=None
).images

draw_box_with_text(images[0], boxes, phrases).save("output.png")
Stable Diffusion Reference
This pipeline uses the Reference Control. Refer to the sd-webui-controlnet discussion: Reference-only Controlsd-webui-controlnet discussion: Reference-adain Control.
Based on this issue,
EulerAncestralDiscreteSchedulergot poor results.
import torch
from diffusers import UniPCMultistepScheduler
from diffusers.utils import load_image

input_image = load_image("https://hf.co/datasets/huggingface/documentation-images/resolve/main/diffusers/input_image_vermeer.png")

pipe = StableDiffusionReferencePipeline.from_pretrained(
       "runwayml/stable-diffusion-v1-5",
       safety_checker=None,
       torch_dtype=torch.float16
       ).to('cuda:0')

pipe.scheduler = UniPCMultistepScheduler.from_config(pipe.scheduler.config)

result_img = pipe(ref_image=input_image,
      prompt="1girl",
      num_inference_steps=20,
      reference_attn=True,
      reference_adain=True).images[0]
Reference Image

Output Image of reference_attn=True and reference_adain=False
Output Image of reference_attn=False and reference_adain=True
Output Image of reference_attn=True and reference_adain=True
Stable Diffusion ControlNet Reference
This pipeline uses the Reference Control with ControlNet. Refer to the sd-webui-controlnet discussion: Reference-only Controlsd-webui-controlnet discussion: Reference-adain Control.
Based on this issue,
EulerAncestralDiscreteSchedulergot poor results.guess_mode=Trueworks well for ControlNet v1.1
import cv2
import torch
import numpy as np
from PIL import Image
from diffusers import UniPCMultistepScheduler
from diffusers.utils import load_image

input_image = load_image("https://hf.co/datasets/huggingface/documentation-images/resolve/main/diffusers/input_image_vermeer.png")

# get canny image
image = cv2.Canny(np.array(input_image), 100, 200)
image = image[:, :, None]
image = np.concatenate([image, image, image], axis=2)
canny_image = Image.fromarray(image)

controlnet = ControlNetModel.from_pretrained("lllyasviel/sd-controlnet-canny", torch_dtype=torch.float16)
pipe = StableDiffusionControlNetReferencePipeline.from_pretrained(
       "runwayml/stable-diffusion-v1-5",
       controlnet=controlnet,
       safety_checker=None,
       torch_dtype=torch.float16
       ).to('cuda:0')

pipe.scheduler = UniPCMultistepScheduler.from_config(pipe.scheduler.config)

result_img = pipe(ref_image=input_image,
      prompt="1girl",
      image=canny_image,
      num_inference_steps=20,
      reference_attn=True,
      reference_adain=True).images[0]
Reference Image
Output Image
Stable Diffusion on IPEX
This diffusion pipeline aims to accelarate the inference of Stable-Diffusion on Intel Xeon CPUs with BF16/FP32 precision using IPEX.
To use this pipeline, you need to:
- Install IPEX
Note: For each PyTorch release, there is a corresponding release of the IPEX. Here is the mapping relationship. It is recommended to install Pytorch/IPEX2.0 to get the best performance.
You can simply use pip to install IPEX with the latest version.
python -m pip install intel_extension_for_pytorch
Note: To install a specific version, run with the following command:
python -m pip install intel_extension_for_pytorch==<version_name> -f https://developer.intel.com/ipex-whl-stable-cpu
- After pipeline initialization,
prepare_for_ipex()should be called to enable IPEX accelaration. Supported inference datatypes are Float32 and BFloat16.
Note: The setting of generated image height/width for prepare_for_ipex() should be same as the setting of pipeline inference.
pipe = DiffusionPipeline.from_pretrained("runwayml/stable-diffusion-v1-5", custom_pipeline="stable_diffusion_ipex")
# For Float32
pipe.prepare_for_ipex(prompt, dtype=torch.float32, height=512, width=512) #value of image height/width should be consistent with the pipeline inference
# For BFloat16
pipe.prepare_for_ipex(prompt, dtype=torch.bfloat16, height=512, width=512) #value of image height/width should be consistent with the pipeline inference
Then you can use the ipex pipeline in a similar way to the default stable diffusion pipeline.
# For Float32
image = pipe(prompt, num_inference_steps=20, height=512, width=512).images[0] #value of image height/width should be consistent with 'prepare_for_ipex()'
# For BFloat16
with torch.cpu.amp.autocast(enabled=True, dtype=torch.bfloat16):
    image = pipe(prompt, num_inference_steps=20, height=512, width=512).images[0] #value of image height/width should be consistent with 'prepare_for_ipex()'
The following code compares the performance of the original stable diffusion pipeline with the ipex-optimized pipeline.
import torch
import intel_extension_for_pytorch as ipex
from diffusers import StableDiffusionPipeline
import time

prompt = "sailing ship in storm by Rembrandt"
model_id = "runwayml/stable-diffusion-v1-5"
# Helper function for time evaluation
def elapsed_time(pipeline, nb_pass=3, num_inference_steps=20):
    # warmup
    for _ in range(2):
        images = pipeline(prompt, num_inference_steps=num_inference_steps, height=512, width=512).images
    #time evaluation
    start = time.time()
    for _ in range(nb_pass):
        pipeline(prompt, num_inference_steps=num_inference_steps, height=512, width=512)
    end = time.time()
    return (end - start) / nb_pass

##############     bf16 inference performance    ###############

# 1. IPEX Pipeline initialization
pipe = DiffusionPipeline.from_pretrained(model_id, custom_pipeline="stable_diffusion_ipex")
pipe.prepare_for_ipex(prompt, dtype=torch.bfloat16, height=512, width=512)

# 2. Original Pipeline initialization
pipe2 = StableDiffusionPipeline.from_pretrained(model_id)

# 3. Compare performance between Original Pipeline and IPEX Pipeline
with torch.cpu.amp.autocast(enabled=True, dtype=torch.bfloat16):
    latency = elapsed_time(pipe)
    print("Latency of StableDiffusionIPEXPipeline--bf16", latency)
    latency = elapsed_time(pipe2)
    print("Latency of StableDiffusionPipeline--bf16",latency)

##############     fp32 inference performance    ###############

# 1. IPEX Pipeline initialization
pipe3 = DiffusionPipeline.from_pretrained(model_id, custom_pipeline="stable_diffusion_ipex")
pipe3.prepare_for_ipex(prompt, dtype=torch.float32, height=512, width=512)

# 2. Original Pipeline initialization
pipe4 = StableDiffusionPipeline.from_pretrained(model_id)

# 3. Compare performance between Original Pipeline and IPEX Pipeline
latency = elapsed_time(pipe3)
print("Latency of StableDiffusionIPEXPipeline--fp32", latency)
latency = elapsed_time(pipe4)
print("Latency of StableDiffusionPipeline--fp32",latency)
Stable Diffusion XL on IPEX
This diffusion pipeline aims to accelarate the inference of Stable-Diffusion XL on Intel Xeon CPUs with BF16/FP32 precision using IPEX.
To use this pipeline, you need to:
- Install IPEX
Note: For each PyTorch release, there is a corresponding release of IPEX. Here is the mapping relationship. It is recommended to install Pytorch/IPEX2.0 to get the best performance.
You can simply use pip to install IPEX with the latest version.
python -m pip install intel_extension_for_pytorch
Note: To install a specific version, run with the following command:
python -m pip install intel_extension_for_pytorch==<version_name> -f https://developer.intel.com/ipex-whl-stable-cpu
- After pipeline initialization,
prepare_for_ipex()should be called to enable IPEX accelaration. Supported inference datatypes are Float32 and BFloat16.
Note: The values of height and width used during preparation with prepare_for_ipex() should be the same when running inference with the prepared pipeline.
pipe = StableDiffusionXLPipelineIpex.from_pretrained("stabilityai/sdxl-turbo", low_cpu_mem_usage=True, use_safetensors=True)
# value of image height/width should be consistent with the pipeline inference
# For Float32
pipe.prepare_for_ipex(torch.float32, prompt, height=512, width=512)
# For BFloat16
pipe.prepare_for_ipex(torch.bfloat16, prompt, height=512, width=512)
Then you can use the ipex pipeline in a similar way to the default stable diffusion xl pipeline.
# value of image height/width should be consistent with 'prepare_for_ipex()'
# For Float32
image = pipe(prompt, num_inference_steps=num_inference_steps, height=512, width=512, guidance_scale=guidance_scale).images[0]
# For BFloat16
with torch.cpu.amp.autocast(enabled=True, dtype=torch.bfloat16):
    image = pipe(prompt, num_inference_steps=num_inference_steps, height=512, width=512, guidance_scale=guidance_scale).images[0]
The following code compares the performance of the original stable diffusion xl pipeline with the ipex-optimized pipeline. By using this optimized pipeline, we can get about 1.4-2 times performance boost with BFloat16 on fourth generation of Intel Xeon CPUs, code-named Sapphire Rapids.
import torch
from diffusers import StableDiffusionXLPipeline
from pipeline_stable_diffusion_xl_ipex import StableDiffusionXLPipelineIpex
import time

prompt = "sailing ship in storm by Rembrandt"
model_id = "stabilityai/sdxl-turbo"
steps = 4

# Helper function for time evaluation
def elapsed_time(pipeline, nb_pass=3, num_inference_steps=1):
    # warmup
    for _ in range(2):
        images = pipeline(prompt, num_inference_steps=num_inference_steps, height=512, width=512, guidance_scale=0.0).images
    #time evaluation
    start = time.time()
    for _ in range(nb_pass):
        pipeline(prompt, num_inference_steps=num_inference_steps, height=512, width=512, guidance_scale=0.0)
    end = time.time()
    return (end - start) / nb_pass

##############     bf16 inference performance    ###############

# 1. IPEX Pipeline initialization
pipe = StableDiffusionXLPipelineIpex.from_pretrained(model_id, low_cpu_mem_usage=True, use_safetensors=True)
pipe.prepare_for_ipex(torch.bfloat16, prompt, height=512, width=512)

# 2. Original Pipeline initialization
pipe2 = StableDiffusionXLPipeline.from_pretrained(model_id, low_cpu_mem_usage=True, use_safetensors=True)

# 3. Compare performance between Original Pipeline and IPEX Pipeline
with torch.cpu.amp.autocast(enabled=True, dtype=torch.bfloat16):
    latency = elapsed_time(pipe, num_inference_steps=steps)
    print("Latency of StableDiffusionXLPipelineIpex--bf16", latency, "s for total", steps, "steps")
    latency = elapsed_time(pipe2, num_inference_steps=steps)
    print("Latency of StableDiffusionXLPipeline--bf16", latency, "s for total", steps, "steps")

##############     fp32 inference performance    ###############

# 1. IPEX Pipeline initialization
pipe3 = StableDiffusionXLPipelineIpex.from_pretrained(model_id, low_cpu_mem_usage=True, use_safetensors=True)
pipe3.prepare_for_ipex(torch.float32, prompt, height=512, width=512)

# 2. Original Pipeline initialization
pipe4 = StableDiffusionXLPipeline.from_pretrained(model_id, low_cpu_mem_usage=True, use_safetensors=True)

# 3. Compare performance between Original Pipeline and IPEX Pipeline
latency = elapsed_time(pipe3, num_inference_steps=steps)
print("Latency of StableDiffusionXLPipelineIpex--fp32", latency, "s for total", steps, "steps")
latency = elapsed_time(pipe4, num_inference_steps=steps)
print("Latency of StableDiffusionXLPipeline--fp32",latency, "s for total", steps, "steps")
CLIP Guided Images Mixing With Stable Diffusion

CLIP guided stable diffusion images mixing pipeline allows to combine two images using standard diffusion models. This approach is using (optional) CoCa model to avoid writing image description. More code examples
Stable Diffusion XL Long Weighted Prompt Pipeline
This SDXL pipeline support unlimited length prompt and negative prompt, compatible with A1111 prompt weighted style.
You can provide both prompt and prompt_2. If only one prompt is provided, prompt_2 will be a copy of the provided prompt. Here is a sample code to use this pipeline.
from diffusers import DiffusionPipeline
from diffusers.utils import load_image
import torch

pipe = DiffusionPipeline.from_pretrained(
    "stabilityai/stable-diffusion-xl-base-1.0"
    , torch_dtype       = torch.float16
    , use_safetensors   = True
    , variant           = "fp16"
    , custom_pipeline   = "lpw_stable_diffusion_xl",
)

prompt = "photo of a cute (white) cat running on the grass" * 20
prompt2 = "chasing (birds:1.5)" * 20
prompt = f"{prompt},{prompt2}"
neg_prompt = "blur, low quality, carton, animate"

pipe.to("cuda")

# text2img
t2i_images = pipe(
    prompt=prompt,
    negative_prompt=neg_prompt,
).images # alternatively, you can call the .text2img() function

# img2img
input_image = load_image("/path/to/local/image.png") # or URL to your input image
i2i_images = pipe.img2img(
  prompt=prompt,
  negative_prompt=neg_prompt,
  image=input_image,
  strength=0.8, # higher strength will result in more variation compared to original image
).images

# inpaint
input_mask = load_image("/path/to/local/mask.png") # or URL to your input inpainting mask
inpaint_images = pipe.inpaint(
  prompt="photo of a cute (black) cat running on the grass" * 20,
  negative_prompt=neg_prompt,
  image=input_image,
  mask=input_mask,
  strength=0.6, # higher strength will result in more variation compared to original image
).images

pipe.to("cpu")
torch.cuda.empty_cache()

from IPython.display import display # assuming you are using this code in a notebook
display(t2i_images[0])
display(i2i_images[0])
display(inpaint_images[0])
In the above code, the prompt2 is appended to the prompt, which is more than 77 tokens. "birds" are showing up in the result.

For more results, checkout PR #6114.
Example Images Mixing (with CoCa)
import requests
from io import BytesIO

import PIL
import torch
import open_clip
from open_clip import SimpleTokenizer
from diffusers import DiffusionPipeline
from transformers import CLIPFeatureExtractor, CLIPModel


def download_image(url):
    response = requests.get(url)
    return PIL.Image.open(BytesIO(response.content)).convert("RGB")

# Loading additional models
feature_extractor = CLIPFeatureExtractor.from_pretrained(
    "laion/CLIP-ViT-B-32-laion2B-s34B-b79K"
)
clip_model = CLIPModel.from_pretrained(
    "laion/CLIP-ViT-B-32-laion2B-s34B-b79K", torch_dtype=torch.float16
)
coca_model = open_clip.create_model('coca_ViT-L-14', pretrained='laion2B-s13B-b90k').to('cuda')
coca_model.dtype = torch.float16
coca_transform = open_clip.image_transform(
    coca_model.visual.image_size,
    is_train = False,
    mean = getattr(coca_model.visual, 'image_mean', None),
    std = getattr(coca_model.visual, 'image_std', None),
)
coca_tokenizer = SimpleTokenizer()

# Pipeline creating
mixing_pipeline = DiffusionPipeline.from_pretrained(
    "CompVis/stable-diffusion-v1-4",
    custom_pipeline="clip_guided_images_mixing_stable_diffusion",
    clip_model=clip_model,
    feature_extractor=feature_extractor,
    coca_model=coca_model,
    coca_tokenizer=coca_tokenizer,
    coca_transform=coca_transform,
    torch_dtype=torch.float16,
)
mixing_pipeline.enable_attention_slicing()
mixing_pipeline = mixing_pipeline.to("cuda")

# Pipeline running
generator = torch.Generator(device="cuda").manual_seed(17)

def download_image(url):
    response = requests.get(url)
    return PIL.Image.open(BytesIO(response.content)).convert("RGB")

content_image = download_image("https://huggingface.co/datasets/TheDenk/images_mixing/resolve/main/boromir.jpg")
style_image = download_image("https://huggingface.co/datasets/TheDenk/images_mixing/resolve/main/gigachad.jpg")

pipe_images = mixing_pipeline(
    num_inference_steps=50,
    content_image=content_image,
    style_image=style_image,
    noise_strength=0.65,
    slerp_latent_style_strength=0.9,
    slerp_prompt_style_strength=0.1,
    slerp_clip_image_style_strength=0.1,
    guidance_scale=9.0,
    batch_size=1,
    clip_guidance_scale=100,
    generator=generator,
).images

Stable Diffusion Mixture Tiling
This pipeline uses the Mixture. Refer to the Mixture paper for more details.
from diffusers import LMSDiscreteScheduler, DiffusionPipeline

# Creater scheduler and model (similar to StableDiffusionPipeline)
scheduler = LMSDiscreteScheduler(beta_start=0.00085, beta_end=0.012, beta_schedule="scaled_linear", num_train_timesteps=1000)
pipeline = DiffusionPipeline.from_pretrained("CompVis/stable-diffusion-v1-4", scheduler=scheduler, custom_pipeline="mixture_tiling")
pipeline.to("cuda")

# Mixture of Diffusers generation
image = pipeline(
    prompt=[[
        "A charming house in the countryside, by jakub rozalski, sunset lighting, elegant, highly detailed, smooth, sharp focus, artstation, stunning masterpiece",
        "A dirt road in the countryside crossing pastures, by jakub rozalski, sunset lighting, elegant, highly detailed, smooth, sharp focus, artstation, stunning masterpiece",
        "An old and rusty giant robot lying on a dirt road, by jakub rozalski, dark sunset lighting, elegant, highly detailed, smooth, sharp focus, artstation, stunning masterpiece"
    ]],
    tile_height=640,
    tile_width=640,
    tile_row_overlap=0,
    tile_col_overlap=256,
    guidance_scale=8,
    seed=7178915308,
    num_inference_steps=50,
)["images"][0]

TensorRT Inpainting Stable Diffusion Pipeline
The TensorRT Pipeline can be used to accelerate the Inpainting Stable Diffusion Inference run.
NOTE: The ONNX conversions and TensorRT engine build may take up to 30 minutes.
import requests
from io import BytesIO
from PIL import Image
import torch
from diffusers import PNDMScheduler
from diffusers.pipelines.stable_diffusion import StableDiffusionInpaintPipeline

# Use the PNDMScheduler scheduler here instead
scheduler = PNDMScheduler.from_pretrained("stabilityai/stable-diffusion-2-inpainting", subfolder="scheduler")


pipe = StableDiffusionInpaintPipeline.from_pretrained("stabilityai/stable-diffusion-2-inpainting",
    custom_pipeline="stable_diffusion_tensorrt_inpaint",
    revision='fp16',
    torch_dtype=torch.float16,
    scheduler=scheduler,
    )

# re-use cached folder to save ONNX models and TensorRT Engines
pipe.set_cached_folder("stabilityai/stable-diffusion-2-inpainting", revision='fp16',)

pipe = pipe.to("cuda")

url = "https://raw.githubusercontent.com/CompVis/latent-diffusion/main/data/inpainting_examples/overture-creations-5sI6fQgYIuo.png"
response = requests.get(url)
input_image = Image.open(BytesIO(response.content)).convert("RGB")

mask_url = "https://raw.githubusercontent.com/CompVis/latent-diffusion/main/data/inpainting_examples/overture-creations-5sI6fQgYIuo_mask.png"
response = requests.get(mask_url)
mask_image = Image.open(BytesIO(response.content)).convert("RGB")

prompt = "a mecha robot sitting on a bench"
image = pipe(prompt, image=input_image, mask_image=mask_image, strength=0.75,).images[0]
image.save('tensorrt_inpaint_mecha_robot.png')
Stable Diffusion Mixture Canvas
This pipeline uses the Mixture. Refer to the Mixture paper for more details.
from PIL import Image
from diffusers import LMSDiscreteScheduler, DiffusionPipeline
from diffusers.pipelines.pipeline_utils import Image2ImageRegion, Text2ImageRegion, preprocess_image


# Load and preprocess guide image
iic_image = preprocess_image(Image.open("input_image.png").convert("RGB"))

# Creater scheduler and model (similar to StableDiffusionPipeline)
scheduler = LMSDiscreteScheduler(beta_start=0.00085, beta_end=0.012, beta_schedule="scaled_linear", num_train_timesteps=1000)
pipeline = DiffusionPipeline.from_pretrained("CompVis/stable-diffusion-v1-4", scheduler=scheduler).to("cuda:0", custom_pipeline="mixture_canvas")
pipeline.to("cuda")

# Mixture of Diffusers generation
output = pipeline(
    canvas_height=800,
    canvas_width=352,
    regions=[
        Text2ImageRegion(0, 800, 0, 352, guidance_scale=8,
            prompt=f"best quality, masterpiece, WLOP, sakimichan, art contest winner on pixiv, 8K, intricate details, wet effects, rain drops, ethereal, mysterious, futuristic, UHD, HDR, cinematic lighting, in a beautiful forest, rainy day, award winning, trending on artstation, beautiful confident cheerful young woman, wearing a futuristic sleeveless dress, ultra beautiful detailed  eyes, hyper-detailed face, complex,  perfect, model,  textured,  chiaroscuro, professional make-up, realistic, figure in frame, "),
        Image2ImageRegion(352-800, 352, 0, 352, reference_image=iic_image, strength=1.0),
    ],
    num_inference_steps=100,
    seed=5525475061,
)["images"][0]


IADB pipeline
This pipeline is the implementation of the α-(de)Blending: a Minimalist Deterministic Diffusion Model paper. It is a simple and minimalist diffusion model.
The following code shows how to use the IADB pipeline to generate images using a pretrained celebahq-256 model.
pipeline_iadb = DiffusionPipeline.from_pretrained("thomasc4/iadb-celebahq-256", custom_pipeline='iadb')

pipeline_iadb = pipeline_iadb.to('cuda')

output = pipeline_iadb(batch_size=4,num_inference_steps=128)
for i in range(len(output[0])):
    plt.imshow(output[0][i])
    plt.show()
Sampling with the IADB formulation is easy, and can be done in a few lines (the pipeline already implements it):
def sample_iadb(model, x0, nb_step):
    x_alpha = x0
    for t in range(nb_step):
        alpha = (t/nb_step)
        alpha_next =((t+1)/nb_step)

        d = model(x_alpha, torch.tensor(alpha, device=x_alpha.device))['sample']
        x_alpha = x_alpha + (alpha_next-alpha)*d

    return x_alpha
The training loop is also straightforward:
# Training loop
while True:
    x0 = sample_noise()
    x1 = sample_dataset()

    alpha = torch.rand(batch_size)

    # Blend
    x_alpha = (1-alpha) * x0 + alpha * x1

    # Loss
    loss = torch.sum((D(x_alpha, alpha)- (x1-x0))**2)
    optimizer.zero_grad()
    loss.backward()
    optimizer.step()
Zero1to3 pipeline
This pipeline is the implementation of the Zero-1-to-3: Zero-shot One Image to 3D Object paper. The original pytorch-lightning repo and a diffusers repo.
The following code shows how to use the Zero1to3 pipeline to generate novel view synthesis images using a pretrained stable diffusion model.
import os
import torch
from pipeline_zero1to3 import Zero1to3StableDiffusionPipeline
from diffusers.utils import load_image

model_id = "kxic/zero123-165000" # zero123-105000, zero123-165000, zero123-xl

pipe = Zero1to3StableDiffusionPipeline.from_pretrained(model_id, torch_dtype=torch.float16)

pipe.enable_xformers_memory_efficient_attention()
pipe.enable_vae_tiling()
pipe.enable_attention_slicing()
pipe = pipe.to("cuda")

num_images_per_prompt = 4

# test inference pipeline
# x y z, Polar angle (vertical rotation in degrees)  Azimuth angle (horizontal rotation in degrees)  Zoom (relative distance from center)
query_pose1 = [-75.0, 100.0, 0.0]
query_pose2 = [-20.0, 125.0, 0.0]
query_pose3 = [-55.0, 90.0, 0.0]

# load image
# H, W = (256, 256) # H, W = (512, 512)   # zero123 training is 256,256

# for batch input
input_image1 = load_image("./demo/4_blackarm.png") #load_image("https://cvlab-zero123-live.hf.space/file=/home/user/app/configs/4_blackarm.png")
input_image2 = load_image("./demo/8_motor.png") #load_image("https://cvlab-zero123-live.hf.space/file=/home/user/app/configs/8_motor.png")
input_image3 = load_image("./demo/7_london.png") #load_image("https://cvlab-zero123-live.hf.space/file=/home/user/app/configs/7_london.png")
input_images = [input_image1, input_image2, input_image3]
query_poses = [query_pose1, query_pose2, query_pose3]

# # for single input
# H, W = (256, 256)
# input_images = [input_image2.resize((H, W), PIL.Image.NEAREST)]
# query_poses = [query_pose2]


# better do preprocessing
from gradio_new import preprocess_image, create_carvekit_interface
import numpy as np
import PIL.Image as Image

pre_images = []
models = dict()
print('Instantiating Carvekit HiInterface...')
models['carvekit'] = create_carvekit_interface()
if not isinstance(input_images, list):
    input_images = [input_images]
for raw_im in input_images:
    input_im = preprocess_image(models, raw_im, True)
    H, W = input_im.shape[:2]
    pre_images.append(Image.fromarray((input_im * 255.0).astype(np.uint8)))
input_images = pre_images

# infer pipeline, in original zero123 num_inference_steps=76
images = pipe(input_imgs=input_images, prompt_imgs=input_images, poses=query_poses, height=H, width=W,
              guidance_scale=3.0, num_images_per_prompt=num_images_per_prompt, num_inference_steps=50).images


# save imgs
log_dir = "logs"
os.makedirs(log_dir, exist_ok=True)
bs = len(input_images)
i = 0
for obj in range(bs):
    for idx in range(num_images_per_prompt):
        images[i].save(os.path.join(log_dir,f"obj{obj}_{idx}.jpg"))
        i += 1
Stable Diffusion XL Reference
This pipeline uses the Reference . Refer to the stable_diffusion_reference.
import torch
from PIL import Image
from diffusers.utils import load_image
from diffusers import DiffusionPipeline
from diffusers.schedulers import UniPCMultistepScheduler
input_image = load_image("https://hf.co/datasets/huggingface/documentation-images/resolve/main/diffusers/input_image_vermeer.png")

# pipe = DiffusionPipeline.from_pretrained(
#     "stabilityai/stable-diffusion-xl-base-1.0",
#     custom_pipeline="stable_diffusion_xl_reference",
#     torch_dtype=torch.float16,
#     use_safetensors=True,
#     variant="fp16").to('cuda:0')

pipe = StableDiffusionXLReferencePipeline.from_pretrained(
    "stabilityai/stable-diffusion-xl-base-1.0",
    torch_dtype=torch.float16,
    use_safetensors=True,
    variant="fp16").to('cuda:0')

pipe.scheduler = UniPCMultistepScheduler.from_config(pipe.scheduler.config)

result_img = pipe(ref_image=input_image,
      prompt="1girl",
      num_inference_steps=20,
      reference_attn=True,
      reference_adain=True).images[0]
Reference Image
Output Image
prompt: 1 girl
reference_attn=True, reference_adain=True, num_inference_steps=20
Reference Image
Output Image
prompt: A dog
reference_attn=True, reference_adain=False, num_inference_steps=20
Reference Image
Output Image
prompt: An astronaut riding a lion
reference_attn=True, reference_adain=True, num_inference_steps=20
Stable diffusion fabric pipeline
FABRIC approach applicable to a wide range of popular diffusion models, which exploits the self-attention layer present in the most widely used architectures to condition the diffusion process on a set of feedback images.
import requests
import torch
from PIL import Image
from io import BytesIO

from diffusers import DiffusionPipeline

# load the pipeline
# make sure you're logged in with `huggingface-cli login`
model_id_or_path = "runwayml/stable-diffusion-v1-5"
#can also be used with dreamlike-art/dreamlike-photoreal-2.0
pipe = DiffusionPipeline.from_pretrained(model_id_or_path, torch_dtype=torch.float16, custom_pipeline="pipeline_fabric").to("cuda")

# let's specify a prompt
prompt = "An astronaut riding an elephant"
negative_prompt = "lowres, cropped"

# call the pipeline
image = pipe(
    prompt=prompt,
    negative_prompt=negative_prompt,
    num_inference_steps=20,
    generator=torch.manual_seed(12)
).images[0]

image.save("horse_to_elephant.jpg")

# let's try another example with feedback
url = "https://raw.githubusercontent.com/ChenWu98/cycle-diffusion/main/data/dalle2/A%20black%20colored%20car.png"
response = requests.get(url)
init_image = Image.open(BytesIO(response.content)).convert("RGB")

prompt = "photo, A blue colored car, fish eye"
liked = [init_image]
## same goes with disliked

# call the pipeline
torch.manual_seed(0)
image = pipe(
    prompt=prompt,
    negative_prompt=negative_prompt,
    liked = liked,
    num_inference_steps=20,
).images[0]

image.save("black_to_blue.png")
With enough feedbacks you can create very similar high quality images.
The original codebase can be found at sd-fabric/fabric, and available checkpoints are dreamlike-art/dreamlike-photoreal-2.0, runwayml/stable-diffusion-v1-5, and stabilityai/stable-diffusion-2-1 (may give unexpected results).
Let's have a look at the images (512X512)
| Without Feedback | With Feedback (1st image) |
|---|---|
 |
 |
Masked Im2Im Stable Diffusion Pipeline
This pipeline reimplements sketch inpaint feature from A1111 for non-inpaint models. The following code reads two images, original and one with mask painted over it. It computes mask as a difference of two images and does the inpainting in the area defined by the mask.
img = PIL.Image.open("./mech.png")
# read image with mask painted over
img_paint = PIL.Image.open("./mech_painted.png")
neq = numpy.any(numpy.array(img) != numpy.array(img_paint), axis=-1)
mask = neq / neq.max()

pipeline = MaskedStableDiffusionImg2ImgPipeline.from_pretrained("frankjoshua/icbinpICantBelieveIts_v8")

# works best with EulerAncestralDiscreteScheduler
pipeline.scheduler = EulerAncestralDiscreteScheduler.from_config(pipeline.scheduler.config)
generator = torch.Generator(device="cpu").manual_seed(4)

prompt = "a man wearing a mask"
result = pipeline(prompt=prompt, image=img_paint, mask=mask, strength=0.75,
                  generator=generator)
result.images[0].save("result.png")
original image mech.png
<img src=https://github.com/noskill/diffusers/assets/733626/10ad972d-d655-43cb-8de1-039e3d79e849 width="25%" >
image with mask mech_painted.png
<img src=https://github.com/noskill/diffusers/assets/733626/c334466a-67fe-4377-9ff7-f46021b9c224 width="25%" >
result:
<img src=https://github.com/noskill/diffusers/assets/733626/23a0a71d-51db-471e-926a-107ac62512a8 width="25%" >
Prompt2Prompt Pipeline
Prompt2Prompt allows the following edits:
- ReplaceEdit (change words in prompt)
- ReplaceEdit with local blend (change words in prompt, keep image part unrelated to changes constant)
- RefineEdit (add words to prompt)
- RefineEdit with local blend (add words to prompt, keep image part unrelated to changes constant)
- ReweightEdit (modulate importance of words)
Here's a full example for `ReplaceEdit``:
import torch
import numpy as np
import matplotlib.pyplot as plt
from diffusers import DiffusionPipeline

pipe = DiffusionPipeline.from_pretrained("CompVis/stable-diffusion-v1-4", custom_pipeline="pipeline_prompt2prompt").to("cuda")

prompts = ["A turtle playing with a ball",
           "A monkey playing with a ball"]

cross_attention_kwargs = {
    "edit_type": "replace",
    "cross_replace_steps": 0.4,
    "self_replace_steps": 0.4
}

outputs = pipe(prompt=prompts, height=512, width=512, num_inference_steps=50, cross_attention_kwargs=cross_attention_kwargs)
And abbreviated examples for the other edits:
ReplaceEdit with local blend
prompts = ["A turtle playing with a ball",
           "A monkey playing with a ball"]

cross_attention_kwargs = {
    "edit_type": "replace",
    "cross_replace_steps": 0.4,
    "self_replace_steps": 0.4,
    "local_blend_words": ["turtle", "monkey"]
}
RefineEdit
prompts = ["A turtle",
           "A turtle in a forest"]

cross_attention_kwargs = {
    "edit_type": "refine",
    "cross_replace_steps": 0.4,
    "self_replace_steps": 0.4,
}
RefineEdit with local blend
prompts = ["A turtle",
           "A turtle in a forest"]

cross_attention_kwargs = {
    "edit_type": "refine",
    "cross_replace_steps": 0.4,
    "self_replace_steps": 0.4,
    "local_blend_words": ["in", "a" , "forest"]
}
ReweightEdit
prompts = ["A smiling turtle"] * 2

edit_kcross_attention_kwargswargs = {
    "edit_type": "reweight",
    "cross_replace_steps": 0.4,
    "self_replace_steps": 0.4,
    "equalizer_words": ["smiling"],
    "equalizer_strengths": [5]
}
Side note: See this GitHub gist if you want to visualize the attention maps.
Latent Consistency Pipeline
Latent Consistency Models was proposed in Latent Consistency Models: Synthesizing High-Resolution Images with Few-Step Inference by Simian Luo, Yiqin Tan, Longbo Huang, Jian Li, Hang Zhao from Tsinghua University.
The abstract of the paper reads as follows:
Latent Diffusion models (LDMs) have achieved remarkable results in synthesizing high-resolution images. However, the iterative sampling process is computationally intensive and leads to slow generation. Inspired by Consistency Models (song et al.), we propose Latent Consistency Models (LCMs), enabling swift inference with minimal steps on any pre-trained LDMs, including Stable Diffusion (rombach et al). Viewing the guided reverse diffusion process as solving an augmented probability flow ODE (PF-ODE), LCMs are designed to directly predict the solution of such ODE in latent space, mitigating the need for numerous iterations and allowing rapid, high-fidelity sampling. Efficiently distilled from pre-trained classifier-free guided diffusion models, a high-quality 768 x 768 2~4-step LCM takes only 32 A100 GPU hours for training. Furthermore, we introduce Latent Consistency Fine-tuning (LCF), a novel method that is tailored for fine-tuning LCMs on customized image datasets. Evaluation on the LAION-5B-Aesthetics dataset demonstrates that LCMs achieve state-of-the-art text-to-image generation performance with few-step inference. Project Page: this https URL
The model can be used with diffusers as follows:
- 1. Load the model from the community pipeline.
from diffusers import DiffusionPipeline
import torch

pipe = DiffusionPipeline.from_pretrained("SimianLuo/LCM_Dreamshaper_v7", custom_pipeline="latent_consistency_txt2img", custom_revision="main")

# To save GPU memory, torch.float16 can be used, but it may compromise image quality.
pipe.to(torch_device="cuda", torch_dtype=torch.float32)
- Run inference with as little as 4 steps:
prompt = "Self-portrait oil painting, a beautiful cyborg with golden hair, 8k"

# Can be set to 1~50 steps. LCM support fast inference even <= 4 steps. Recommend: 1~8 steps.
num_inference_steps = 4

images = pipe(prompt=prompt, num_inference_steps=num_inference_steps, guidance_scale=8.0, lcm_origin_steps=50, output_type="pil").images
For any questions or feedback, feel free to reach out to Simian Luo.
You can also try this pipeline directly in the 🚀 official spaces.
Latent Consistency Img2img Pipeline
This pipeline extends the Latent Consistency Pipeline to allow it to take an input image.
from diffusers import DiffusionPipeline
import torch

pipe = DiffusionPipeline.from_pretrained("SimianLuo/LCM_Dreamshaper_v7", custom_pipeline="latent_consistency_img2img")

# To save GPU memory, torch.float16 can be used, but it may compromise image quality.
pipe.to(torch_device="cuda", torch_dtype=torch.float32)
- Run inference with as little as 4 steps:
prompt = "Self-portrait oil painting, a beautiful cyborg with golden hair, 8k"


input_image=Image.open("myimg.png")

strength = 0.5 #strength =0 (no change) strength=1 (completely overwrite image)

# Can be set to 1~50 steps. LCM support fast inference even <= 4 steps. Recommend: 1~8 steps.
num_inference_steps = 4

images = pipe(prompt=prompt, image=input_image, strength=strength, num_inference_steps=num_inference_steps, guidance_scale=8.0, lcm_origin_steps=50, output_type="pil").images
Latent Consistency Interpolation Pipeline
This pipeline extends the Latent Consistency Pipeline to allow for interpolation of the latent space between multiple prompts. It is similar to the Stable Diffusion Interpolate and unCLIP Interpolate community pipelines.
import torch
import numpy as np

from diffusers import DiffusionPipeline

pipe = DiffusionPipeline.from_pretrained("SimianLuo/LCM_Dreamshaper_v7", custom_pipeline="latent_consistency_interpolate")

# To save GPU memory, torch.float16 can be used, but it may compromise image quality.
pipe.to(torch_device="cuda", torch_dtype=torch.float32)

prompts = [
    "Self-portrait oil painting, a beautiful cyborg with golden hair, Margot Robbie, 8k",
    "Self-portrait oil painting, an extremely strong man, body builder, Huge Jackman, 8k",
    "An astronaut floating in space, renaissance art, realistic, high quality, 8k",
    "Oil painting of a cat, cute, dream-like",
    "Hugging face emoji, cute, realistic"
]
num_inference_steps = 4
num_interpolation_steps = 60
seed = 1337

torch.manual_seed(seed)
np.random.seed(seed)

images = pipe(
    prompt=prompts,
    height=512,
    width=512,
    num_inference_steps=num_inference_steps,
    num_interpolation_steps=num_interpolation_steps,
    guidance_scale=8.0,
    embedding_interpolation_type="lerp",
    latent_interpolation_type="slerp",
    process_batch_size=4, # Make it higher or lower based on your GPU memory
    generator=torch.Generator(seed),
)

assert len(images) == (len(prompts) - 1) * num_interpolation_steps
StableDiffusionUpscaleLDM3D Pipeline
LDM3D-VR is an extended version of LDM3D.
The abstract from the paper is: Latent diffusion models have proven to be state-of-the-art in the creation and manipulation of visual outputs. However, as far as we know, the generation of depth maps jointly with RGB is still limited. We introduce LDM3D-VR, a suite of diffusion models targeting virtual reality development that includes LDM3D-pano and LDM3D-SR. These models enable the generation of panoramic RGBD based on textual prompts and the upscaling of low-resolution inputs to high-resolution RGBD, respectively. Our models are fine-tuned from existing pretrained models on datasets containing panoramic/high-resolution RGB images, depth maps and captions. Both models are evaluated in comparison to existing related methods
Two checkpoints are available for use:
- ldm3d-pano. This checkpoint enables the generation of panoramic images and requires the StableDiffusionLDM3DPipeline pipeline to be used.
- ldm3d-sr. This checkpoint enables the upscaling of RGB and depth images. Can be used in cascade after the original LDM3D pipeline using the StableDiffusionUpscaleLDM3DPipeline pipeline.
'''py from PIL import Image import os import torch from diffusers import StableDiffusionLDM3DPipeline, DiffusionPipeline
Generate a rgb/depth output from LDM3D
pipe_ldm3d = StableDiffusionLDM3DPipeline.from_pretrained("Intel/ldm3d-4c") pipe_ldm3d.to("cuda")
prompt =f"A picture of some lemons on a table" output = pipe_ldm3d(prompt) rgb_image, depth_image = output.rgb, output.depth rgb_image[0].save(f"lemons_ldm3d_rgb.jpg") depth_image[0].save(f"lemons_ldm3d_depth.png")
Upscale the previous output to a resolution of (1024, 1024)
pipe_ldm3d_upscale = DiffusionPipeline.from_pretrained("Intel/ldm3d-sr", custom_pipeline="pipeline_stable_diffusion_upscale_ldm3d")
pipe_ldm3d_upscale.to("cuda")
low_res_img = Image.open(f"lemons_ldm3d_rgb.jpg").convert("RGB") low_res_depth = Image.open(f"lemons_ldm3d_depth.png").convert("L") outputs = pipe_ldm3d_upscale(prompt="high quality high resolution uhd 4k image", rgb=low_res_img, depth=low_res_depth, num_inference_steps=50, target_res=[1024, 1024])
upscaled_rgb, upscaled_depth =outputs.rgb[0], outputs.depth[0] upscaled_rgb.save(f"upscaled_lemons_rgb.png") upscaled_depth.save(f"upscaled_lemons_depth.png") '''
ControlNet + T2I Adapter Pipeline
This pipelines combines both ControlNet and T2IAdapter into a single pipeline, where the forward pass is executed once.
It receives control_image and adapter_image, as well as controlnet_conditioning_scale and adapter_conditioning_scale, for the ControlNet and Adapter modules, respectively. Whenever adapter_conditioning_scale = 0 or controlnet_conditioning_scale = 0, it will act as a full ControlNet module or as a full T2IAdapter module, respectively.
import cv2
import numpy as np
import torch
from controlnet_aux.midas import MidasDetector
from PIL import Image

from diffusers import AutoencoderKL, ControlNetModel, MultiAdapter, T2IAdapter
from diffusers.pipelines.controlnet.multicontrolnet import MultiControlNetModel
from diffusers.utils import load_image
from examples.community.pipeline_stable_diffusion_xl_controlnet_adapter import (
    StableDiffusionXLControlNetAdapterPipeline,
)

controlnet_depth = ControlNetModel.from_pretrained(
    "diffusers/controlnet-depth-sdxl-1.0",
    torch_dtype=torch.float16,
    variant="fp16",
    use_safetensors=True
)
adapter_depth = T2IAdapter.from_pretrained(
  "TencentARC/t2i-adapter-depth-midas-sdxl-1.0", torch_dtype=torch.float16, variant="fp16", use_safetensors=True
)
vae = AutoencoderKL.from_pretrained("madebyollin/sdxl-vae-fp16-fix", torch_dtype=torch.float16, use_safetensors=True)

pipe = StableDiffusionXLControlNetAdapterPipeline.from_pretrained(
    "stabilityai/stable-diffusion-xl-base-1.0",
    controlnet=controlnet_depth,
    adapter=adapter_depth,
    vae=vae,
    variant="fp16",
    use_safetensors=True,
    torch_dtype=torch.float16,
)
pipe = pipe.to("cuda")
pipe.enable_xformers_memory_efficient_attention()
# pipe.enable_freeu(s1=0.6, s2=0.4, b1=1.1, b2=1.2)
midas_depth = MidasDetector.from_pretrained(
  "valhalla/t2iadapter-aux-models", filename="dpt_large_384.pt", model_type="dpt_large"
).to("cuda")

prompt = "a tiger sitting on a park bench"
img_url = "https://raw.githubusercontent.com/CompVis/latent-diffusion/main/data/inpainting_examples/overture-creations-5sI6fQgYIuo.png"

image = load_image(img_url).resize((1024, 1024))

depth_image = midas_depth(
  image, detect_resolution=512, image_resolution=1024
)

strength = 0.5

images = pipe(
    prompt,
    control_image=depth_image,
    adapter_image=depth_image,
    num_inference_steps=30,
    controlnet_conditioning_scale=strength,
    adapter_conditioning_scale=strength,
).images
images[0].save("controlnet_and_adapter.png")
ControlNet + T2I Adapter + Inpainting Pipeline
import cv2
import numpy as np
import torch
from controlnet_aux.midas import MidasDetector
from PIL import Image

from diffusers import AutoencoderKL, ControlNetModel, MultiAdapter, T2IAdapter
from diffusers.pipelines.controlnet.multicontrolnet import MultiControlNetModel
from diffusers.utils import load_image
from examples.community.pipeline_stable_diffusion_xl_controlnet_adapter_inpaint import (
    StableDiffusionXLControlNetAdapterInpaintPipeline,
)

controlnet_depth = ControlNetModel.from_pretrained(
    "diffusers/controlnet-depth-sdxl-1.0",
    torch_dtype=torch.float16,
    variant="fp16",
    use_safetensors=True
)
adapter_depth = T2IAdapter.from_pretrained(
  "TencentARC/t2i-adapter-depth-midas-sdxl-1.0", torch_dtype=torch.float16, variant="fp16", use_safetensors=True
)
vae = AutoencoderKL.from_pretrained("madebyollin/sdxl-vae-fp16-fix", torch_dtype=torch.float16, use_safetensors=True)

pipe = StableDiffusionXLControlNetAdapterInpaintPipeline.from_pretrained(
    "diffusers/stable-diffusion-xl-1.0-inpainting-0.1",
    controlnet=controlnet_depth,
    adapter=adapter_depth,
    vae=vae,
    variant="fp16",
    use_safetensors=True,
    torch_dtype=torch.float16,
)
pipe = pipe.to("cuda")
pipe.enable_xformers_memory_efficient_attention()
# pipe.enable_freeu(s1=0.6, s2=0.4, b1=1.1, b2=1.2)
midas_depth = MidasDetector.from_pretrained(
  "valhalla/t2iadapter-aux-models", filename="dpt_large_384.pt", model_type="dpt_large"
).to("cuda")

prompt = "a tiger sitting on a park bench"
img_url = "https://raw.githubusercontent.com/CompVis/latent-diffusion/main/data/inpainting_examples/overture-creations-5sI6fQgYIuo.png"
mask_url = "https://raw.githubusercontent.com/CompVis/latent-diffusion/main/data/inpainting_examples/overture-creations-5sI6fQgYIuo_mask.png"

image = load_image(img_url).resize((1024, 1024))
mask_image = load_image(mask_url).resize((1024, 1024))

depth_image = midas_depth(
  image, detect_resolution=512, image_resolution=1024
)

strength = 0.4

images = pipe(
    prompt,
    image=image,
    mask_image=mask_image,
    control_image=depth_image,
    adapter_image=depth_image,
    num_inference_steps=30,
    controlnet_conditioning_scale=strength,
    adapter_conditioning_scale=strength,
    strength=0.7,
).images
images[0].save("controlnet_and_adapter_inpaint.png")
Regional Prompting Pipeline
This pipeline is a port of the Regional Prompter extension for Stable Diffusion web UI to diffusers.
This code implements a pipeline for the Stable Diffusion model, enabling the division of the canvas into multiple regions, with different prompts applicable to each region. Users can specify regions in two ways: using Cols and Rows modes for grid-like divisions, or the Prompt mode for regions calculated based on prompts.

Usage
Sample Code
from examples.community.regional_prompting_stable_diffusion import RegionalPromptingStableDiffusionPipeline
pipe = RegionalPromptingStableDiffusionPipeline.from_single_file(model_path, vae=vae)

rp_args = {
    "mode":"rows",
    "div": "1;1;1"
}

prompt ="""
green hair twintail BREAK
red blouse BREAK
blue skirt
"""

images = pipe(
    prompt=prompt,
    negative_prompt=negative_prompt,
    guidance_scale=7.5,
    height = 768,
    width = 512,
    num_inference_steps =20,
    num_images_per_prompt = 1,
    rp_args = rp_args
        ).images

time = time.strftime(r"%Y%m%d%H%M%S")
i = 1
for image in images:
    i += 1
    fileName = f'img-{time}-{i+1}.png'
    image.save(fileName)
Cols, Rows mode
In the Cols, Rows mode, you can split the screen vertically and horizontally and assign prompts to each region. The split ratio can be specified by 'div', and you can set the division ratio like '3;3;2' or '0.1;0.5'. Furthermore, as will be described later, you can also subdivide the split Cols, Rows to specify more complex regions.
In this image, the image is divided into three parts, and a separate prompt is applied to each. The prompts are divided by 'BREAK', and each is applied to the respective region.

green hair twintail BREAK
red blouse BREAK
blue skirt
2-Dimentional division
The prompt consists of instructions separated by the term BREAK and is assigned to different regions of a two-dimensional space. The image is initially split in the main splitting direction, which in this case is rows, due to the presence of a single semicolon;, dividing the space into an upper and a lower section. Additional sub-splitting is then applied, indicated by commas. The upper row is split into ratios of 2:1:1, while the lower row is split into a ratio of 4:6. Rows themselves are split in a 1:2 ratio. According to the reference image, the blue sky is designated as the first region, green hair as the second, the bookshelf as the third, and so on, in a sequence based on their position from the top left. The terrarium is placed on the desk in the fourth region, and the orange dress and sofa are in the fifth region, conforming to their respective splits.
rp_args = {
    "mode":"rows",
    "div": "1,2,1,1;2,4,6"
}

prompt ="""
blue sky BREAK
green hair BREAK
book shelf BREAK
terrarium on desk BREAK
orange dress and sofa
"""

Prompt Mode
There are limitations to methods of specifying regions in advance. This is because specifying regions can be a hindrance when designating complex shapes or dynamic compositions. In the region specified by the prompt, the regions is determined after the image generation has begun. This allows us to accommodate compositions and complex regions. For further infomagen, see here.
syntax
baseprompt target1 target2 BREAK
effect1, target1 BREAK
effect2 ,target2
First, write the base prompt. In the base prompt, write the words (target1, target2) for which you want to create a mask. Next, separate them with BREAK. Next, write the prompt corresponding to target1. Then enter a comma and write target1. The order of the targets in the base prompt and the order of the BREAK-separated targets can be back to back.
target2 baseprompt target1  BREAK
effect1, target1 BREAK
effect2 ,target2
is also effective.
Sample
In this example, masks are calculated for shirt, tie, skirt, and color prompts are specified only for those regions.
rp_args = {
    "mode":"prompt-ex",
    "save_mask":True,
    "th": "0.4,0.6,0.6",
}

prompt ="""
a girl in street with shirt, tie, skirt BREAK
red, shirt BREAK
green, tie BREAK
blue , skirt
"""

threshold
The threshold used to determine the mask created by the prompt. This can be set as many times as there are masks, as the range varies widely depending on the target prompt. If multiple regions are used, enter them separated by commas. For example, hair tends to be ambiguous and requires a small value, while face tends to be large and requires a small value. These should be ordered by BREAK.
a lady ,hair, face  BREAK
red, hair BREAK
tanned ,face
threshold : 0.4,0.6
If only one input is given for multiple regions, they are all assumed to be the same value.
Prompt and Prompt-EX
The difference is that in Prompt, duplicate regions are added, whereas in Prompt-EX, duplicate regions are overwritten sequentially. Since they are processed in order, setting a TARGET with a large regions first makes it easier for the effect of small regions to remain unmuffled.
Accuracy
In the case of a 512 x 512 image, Attention mode reduces the size of the region to about 8 x 8 pixels deep in the U-Net, so that small regions get mixed up; Latent mode calculates 64*64, so that the region is exact.
girl hair twintail frills,ribbons, dress, face BREAK
girl, ,face
Mask
When an image is generated, the generated mask is displayed. It is generated at the same size as the image, but is actually used at a much smaller size.
Use common prompt
You can attach the prompt up to ADDCOMM to all prompts by separating it first with ADDCOMM. This is useful when you want to include elements common to all regions. For example, when generating pictures of three people with different appearances, it's necessary to include the instruction of 'three people' in all regions. It's also useful when inserting quality tags and other things."For example, if you write as follows:
best quality, 3persons in garden, ADDCOMM
a girl white dress BREAK
a boy blue shirt BREAK
an old man red suit
If common is enabled, this prompt is converted to the following:
best quality, 3persons in garden, a girl white dress BREAK
best quality, 3persons in garden, a boy blue shirt BREAK
best quality, 3persons in garden, an old man red suit
Negative prompt
Negative prompts are equally effective across all regions, but it is possible to set region-specific prompts for negative prompts as well. The number of BREAKs must be the same as the number of prompts. If the number of prompts does not match, the negative prompts will be used without being divided into regions.
Parameters
To activate Regional Prompter, it is necessary to enter settings in rp_args. The items that can be set are as follows. rp_args is a dictionary type.
Input Parameters
Parameters are specified through the rp_arg(dictionary type).
rp_args = {
    "mode":"rows",
    "div": "1;1;1"
}

pipe(prompt =prompt, rp_args = rp_args)
Required Parameters
mode: Specifies the method for defining regions. Choose fromCols,Rows,PromptorPrompt-Ex. This parameter is case-insensitive.divide: Used inColsandRowsmodes. Details on how to specify this are provided under the respectiveColsandRowssections.th: Used inPromptmode. The method of specification is detailed under thePromptsection.
Optional Parameters
save_mask: InPromptmode, choose whether to output the generated mask along with the image. The default isFalse.
The Pipeline supports compel syntax. Input prompts using the compel structure will be automatically applied and processed.
Diffusion Posterior Sampling Pipeline
Reference paper
@article{chung2022diffusion,
title={Diffusion posterior sampling for general noisy inverse problems},
author={Chung, Hyungjin and Kim, Jeongsol and Mccann, Michael T and Klasky, Marc L and Ye, Jong Chul},
journal={arXiv preprint arXiv:2209.14687},
year={2022}
}
This pipeline allows zero-shot conditional sampling from the posterior distribution $p(x|y)$, given observation on $y$, unconditional generative model $p(x)$ and differentiable operator $y=f(x)$.
For example, $f(.)$ can be downsample operator, then $y$ is a downsampled image, and the pipeline becomes a super-resolution pipeline.
To use this pipeline, you need to know your operator $f(.)$ and corrupted image $y$, and pass them during the call. For example, as in the main function of dps_pipeline.py, you need to first define the Gaussian blurring operator $f(.)$. The operator should be a callable nn.Module, with all the parameter gradient disabled:
import torch.nn.functional as F
import scipy
from torch import nn

# define the Gaussian blurring operator first
class GaussialBlurOperator(nn.Module):
    def __init__(self, kernel_size, intensity):
        super().__init__()

        class Blurkernel(nn.Module):
            def __init__(self, blur_type='gaussian', kernel_size=31, std=3.0):
                super().__init__()
                self.blur_type = blur_type
                self.kernel_size = kernel_size
                self.std = std
                self.seq = nn.Sequential(
                    nn.ReflectionPad2d(self.kernel_size//2),
                    nn.Conv2d(3, 3, self.kernel_size, stride=1, padding=0, bias=False, groups=3)
                )
                self.weights_init()

            def forward(self, x):
                return self.seq(x)

            def weights_init(self):
                if self.blur_type == "gaussian":
                    n = np.zeros((self.kernel_size, self.kernel_size))
                    n[self.kernel_size // 2,self.kernel_size // 2] = 1
                    k = scipy.ndimage.gaussian_filter(n, sigma=self.std)
                    k = torch.from_numpy(k)
                    self.k = k
                    for name, f in self.named_parameters():
                        f.data.copy_(k)
                elif self.blur_type == "motion":
                    k = Kernel(size=(self.kernel_size, self.kernel_size), intensity=self.std).kernelMatrix
                    k = torch.from_numpy(k)
                    self.k = k
                    for name, f in self.named_parameters():
                        f.data.copy_(k)

            def update_weights(self, k):
                if not torch.is_tensor(k):
                    k = torch.from_numpy(k)
                for name, f in self.named_parameters():
                    f.data.copy_(k)

            def get_kernel(self):
                return self.k

        self.kernel_size = kernel_size
        self.conv = Blurkernel(blur_type='gaussian',
                            kernel_size=kernel_size,
                            std=intensity)
        self.kernel = self.conv.get_kernel()
        self.conv.update_weights(self.kernel.type(torch.float32))

        for param in self.parameters():
            param.requires_grad=False

    def forward(self, data, **kwargs):
        return self.conv(data)

    def transpose(self, data, **kwargs):
        return data

    def get_kernel(self):
        return self.kernel.view(1, 1, self.kernel_size, self.kernel_size)
Next, you should obtain the corrupted image $y$ by the operator. In this example, we generate $y$ from the source image $x$. However in practice, having the operator $f(.)$ and corrupted image $y$ is enough:
# set up source image
src = Image.open('sample.png')
# read image into [1,3,H,W]
src = torch.from_numpy(np.array(src, dtype=np.float32)).permute(2,0,1)[None]
# normalize image to [-1,1]
src = (src / 127.5) - 1.0
src = src.to("cuda")

# set up operator and measurement
operator = GaussialBlurOperator(kernel_size=61, intensity=3.0).to("cuda")
measurement = operator(src)

# save the source and corrupted images
save_image((src+1.0)/2.0, "dps_src.png")
save_image((measurement+1.0)/2.0, "dps_mea.png")
We provide an example pair of saved source and corrupted images, using the Gaussian blur operator above
- Source image:
- Gaussian blurred image:
- You can download those image to run the example on your own.
Next, we need to define a loss function used for diffusion posterior sample. For most of the cases, the RMSE is fine:
def RMSELoss(yhat, y):
    return torch.sqrt(torch.sum((yhat-y)**2))
And next, as any other diffusion models, we need the score estimator and scheduler. As we are working with $256x256$ face images, we use ddmp-celebahq-256:
# set up scheduler
scheduler = DDPMScheduler.from_pretrained("google/ddpm-celebahq-256")
scheduler.set_timesteps(1000)

# set up model
model = UNet2DModel.from_pretrained("google/ddpm-celebahq-256").to("cuda")
And finally, run the pipeline:
# finally, the pipeline
dpspipe = DPSPipeline(model, scheduler)
image = dpspipe(
    measurement = measurement,
    operator = operator,
    loss_fn = RMSELoss,
    zeta = 1.0,
).images[0]
image.save("dps_generated_image.png")
The zeta is a hyperparameter that is in range of $[0,1]$. It need to be tuned for best effect. By setting zeta=1, you should be able to have the reconstructed result:
- Reconstructed image:
The reconstruction is perceptually similar to the source image, but different in details.
In dps_pipeline.py, we also provide a super-resolution example, which should produce:
- Downsampled image:
- Reconstructed image:


AnimateDiff ControlNet Pipeline
This pipeline combines AnimateDiff and ControlNet. Enjoy precise motion control for your videos! Refer to this issue for more details.
import torch
from diffusers import AutoencoderKL, ControlNetModel, MotionAdapter
from diffusers.pipelines import DiffusionPipeline
from diffusers.schedulers import DPMSolverMultistepScheduler
from PIL import Image

motion_id = "guoyww/animatediff-motion-adapter-v1-5-2"
adapter = MotionAdapter.from_pretrained(motion_id)
controlnet = ControlNetModel.from_pretrained("lllyasviel/control_v11p_sd15_openpose", torch_dtype=torch.float16)
vae = AutoencoderKL.from_pretrained("stabilityai/sd-vae-ft-mse", torch_dtype=torch.float16)

model_id = "SG161222/Realistic_Vision_V5.1_noVAE"
pipe = DiffusionPipeline.from_pretrained(
    model_id,
    motion_adapter=adapter,
    controlnet=controlnet,
    vae=vae,
    custom_pipeline="pipeline_animatediff_controlnet",
).to(device="cuda", dtype=torch.float16)
pipe.scheduler = DPMSolverMultistepScheduler.from_pretrained(
    model_id, subfolder="scheduler", beta_schedule="linear", clip_sample=False, timestep_spacing="linspace", steps_offset=1
)
pipe.enable_vae_slicing()

conditioning_frames = []
for i in range(1, 16 + 1):
    conditioning_frames.append(Image.open(f"frame_{i}.png"))

prompt = "astronaut in space, dancing"
negative_prompt = "bad quality, worst quality, jpeg artifacts, ugly"
result = pipe(
    prompt=prompt,
    negative_prompt=negative_prompt,
    width=512,
    height=768,
    conditioning_frames=conditioning_frames,
    num_inference_steps=20,
).frames[0]

from diffusers.utils import export_to_gif
export_to_gif(result.frames[0], "result.gif")
| Conditioning Frames | |
 |
|
| AnimateDiff model: SG161222/Realistic_Vision_V5.1_noVAE | |
| AnimateDiff model: CardosAnime | |
You can also use multiple controlnets at once!
import torch
from diffusers import AutoencoderKL, ControlNetModel, MotionAdapter
from diffusers.pipelines import DiffusionPipeline
from diffusers.schedulers import DPMSolverMultistepScheduler
from PIL import Image

motion_id = "guoyww/animatediff-motion-adapter-v1-5-2"
adapter = MotionAdapter.from_pretrained(motion_id)
controlnet1 = ControlNetModel.from_pretrained("lllyasviel/control_v11p_sd15_openpose", torch_dtype=torch.float16)
controlnet2 = ControlNetModel.from_pretrained("lllyasviel/sd-controlnet-canny", torch_dtype=torch.float16)
vae = AutoencoderKL.from_pretrained("stabilityai/sd-vae-ft-mse", torch_dtype=torch.float16)

model_id = "SG161222/Realistic_Vision_V5.1_noVAE"
pipe = DiffusionPipeline.from_pretrained(
    model_id,
    motion_adapter=adapter,
    controlnet=[controlnet1, controlnet2],
    vae=vae,
    custom_pipeline="pipeline_animatediff_controlnet",
).to(device="cuda", dtype=torch.float16)
pipe.scheduler = DPMSolverMultistepScheduler.from_pretrained(
    model_id, subfolder="scheduler", clip_sample=False, timestep_spacing="linspace", steps_offset=1, beta_schedule="linear",
)
pipe.enable_vae_slicing()

def load_video(file_path: str):
    images = []

    if file_path.startswith(('http://', 'https://')):
        # If the file_path is a URL
        response = requests.get(file_path)
        response.raise_for_status()
        content = BytesIO(response.content)
        vid = imageio.get_reader(content)
    else:
        # Assuming it's a local file path
        vid = imageio.get_reader(file_path)

    for frame in vid:
        pil_image = Image.fromarray(frame)
        images.append(pil_image)

    return images

video = load_video("dance.gif")

# You need to install it using `pip install controlnet_aux`
from controlnet_aux.processor import Processor

p1 = Processor("openpose_full")
cn1 = [p1(frame) for frame in video]

p2 = Processor("canny")
cn2 = [p2(frame) for frame in video]

prompt = "astronaut in space, dancing"
negative_prompt = "bad quality, worst quality, jpeg artifacts, ugly"
result = pipe(
    prompt=prompt,
    negative_prompt=negative_prompt,
    width=512,
    height=768,
    conditioning_frames=[cn1, cn2],
    num_inference_steps=20,
)

from diffusers.utils import export_to_gif
export_to_gif(result.frames[0], "result.gif")
DemoFusion
This pipeline is the official implementation of DemoFusion: Democratising High-Resolution Image Generation With No $$$. The original repo can be found at repo.
view_batch_size(int, defaults to 16): The batch size for multiple denoising paths. Typically, a larger batch size can result in higher efficiency but comes with increased GPU memory requirements.stride(int, defaults to 64): The stride of moving local patches. A smaller stride is better for alleviating seam issues, but it also introduces additional computational overhead and inference time.cosine_scale_1(float, defaults to 3): Control the strength of skip-residual. For specific impacts, please refer to Appendix C in the DemoFusion paper.cosine_scale_2(float, defaults to 1): Control the strength of dilated sampling. For specific impacts, please refer to Appendix C in the DemoFusion paper.cosine_scale_3(float, defaults to 1): Control the strength of the Gaussian filter. For specific impacts, please refer to Appendix C in the DemoFusion paper.sigma(float, defaults to 1): The standard value of the Gaussian filter. Larger sigma promotes the global guidance of dilated sampling, but has the potential of over-smoothing.multi_decoder(bool, defaults to True): Determine whether to use a tiled decoder. Generally, when the resolution exceeds 3072x3072, a tiled decoder becomes necessary.show_image(bool, defaults to False): Determine whether to show intermediate results during generation.
from diffusers import DiffusionPipeline

pipe = DiffusionPipeline.from_pretrained(
    "stabilityai/stable-diffusion-xl-base-1.0",
    custom_pipeline="pipeline_demofusion_sdxl",
    custom_revision="main",
    torch_dtype=torch.float16,
)
pipe = pipe.to("cuda")

prompt = "Envision a portrait of an elderly woman, her face a canvas of time, framed by a headscarf with muted tones of rust and cream. Her eyes, blue like faded denim. Her attire, simple yet dignified."
negative_prompt = "blurry, ugly, duplicate, poorly drawn, deformed, mosaic"

images = pipe(
    prompt,
    negative_prompt=negative_prompt,
    height=3072,
    width=3072,
    view_batch_size=16,
    stride=64,
    num_inference_steps=50,
    guidance_scale=7.5,
    cosine_scale_1=3,
    cosine_scale_2=1,
    cosine_scale_3=1,
    sigma=0.8,
    multi_decoder=True,
    show_image=True
)
You can display and save the generated images as:
def image_grid(imgs, save_path=None):

    w = 0
    for i, img in enumerate(imgs):
        h_, w_ = imgs[i].size
        w += w_
    h = h_
    grid = Image.new('RGB', size=(w, h))
    grid_w, grid_h = grid.size

    w = 0
    for i, img in enumerate(imgs):
        h_, w_ = imgs[i].size
        grid.paste(img, box=(w, h - h_))
        if save_path != None:
            img.save(save_path + "/img_{}.jpg".format((i + 1) * 1024))
        w += w_

    return grid

image_grid(images, save_path="./outputs/")

SDE Drag pipeline
This pipeline provides drag-and-drop image editing using stochastic differential equations. It enables image editing by inputting prompt, image, mask_image, source_points, and target_points.
See paper, paper page, original repo for more infomation.
import PIL
import torch
from diffusers import DDIMScheduler, DiffusionPipeline

# Load the pipeline
model_path = "runwayml/stable-diffusion-v1-5"
scheduler = DDIMScheduler.from_pretrained(model_path, subfolder="scheduler")
pipe = DiffusionPipeline.from_pretrained(model_path, scheduler=scheduler, custom_pipeline="sde_drag")
pipe.to('cuda')

# To save GPU memory, torch.float16 can be used, but it may compromise image quality.
# If not training LoRA, please avoid using torch.float16
# pipe.to(torch.float16)

# Provide prompt, image, mask image, and the starting and target points for drag editing.
prompt = "prompt of the image"
image = PIL.Image.open('/path/to/image')
mask_image = PIL.Image.open('/path/to/mask_image')
source_points = [[123, 456]]
target_points = [[234, 567]]

# train_lora is optional, and in most cases, using train_lora can better preserve consistency with the original image.
pipe.train_lora(prompt, image)

output = pipe(prompt, image, mask_image, source_points, target_points)
output_image = PIL.Image.fromarray(output)
output_image.save("./output.png")
Instaflow Pipeline
InstaFlow is an ultra-fast, one-step image generator that achieves image quality close to Stable Diffusion, significantly reducing the demand of computational resources. This efficiency is made possible through a recent Rectified Flow technique, which trains probability flows with straight trajectories, hence inherently requiring only a single step for fast inference.
from diffusers import DiffusionPipeline
import torch


pipe = DiffusionPipeline.from_pretrained("XCLIU/instaflow_0_9B_from_sd_1_5", torch_dtype=torch.float16, custom_pipeline="instaflow_one_step")
pipe.to("cuda")  ### if GPU is not available, comment this line
prompt = "A hyper-realistic photo of a cute cat."

images = pipe(prompt=prompt,
            num_inference_steps=1,
            guidance_scale=0.0).images
images[0].save("./image.png")

You can also combine it with LORA out of the box, like https://huggingface.co/artificialguybr/logo-redmond-1-5v-logo-lora-for-liberteredmond-sd-1-5, to unlock cool use cases in single step!
from diffusers import DiffusionPipeline
import torch


pipe = DiffusionPipeline.from_pretrained("XCLIU/instaflow_0_9B_from_sd_1_5", torch_dtype=torch.float16, custom_pipeline="instaflow_one_step")
pipe.to("cuda")  ### if GPU is not available, comment this line
pipe.load_lora_weights("artificialguybr/logo-redmond-1-5v-logo-lora-for-liberteredmond-sd-1-5")
prompt = "logo, A logo for a fitness app, dynamic running figure, energetic colors (red, orange) ),LogoRedAF ,"
images = pipe(prompt=prompt,
            num_inference_steps=1,
            guidance_scale=0.0).images
images[0].save("./image.png")
![]()
Null-Text Inversion pipeline
This pipeline provides null-text inversion for editing real images. It enables null-text optimization, and DDIM reconstruction via w, w/o null-text optimization. No prompt-to-prompt code is implemented as there is a Prompt2PromptPipeline.
Reference paper
title={Prompt-to-prompt image editing with cross attention control},
author={Hertz, Amir and Mokady, Ron and Tenenbaum, Jay and Aberman, Kfir and Pritch, Yael and Cohen-Or, Daniel},
booktitle={arXiv preprint arXiv:2208.01626},
year={2022}
```}
from diffusers.schedulers import DDIMScheduler
from examples.community.pipeline_null_text_inversion import NullTextPipeline
import torch

# Load the pipeline
device = "cuda"
# Provide invert_prompt and the image for null-text optimization.
invert_prompt = "A lying cat"
input_image = "siamese.jpg"
steps = 50

# Provide prompt used for generation. Same if reconstruction
prompt = "A lying cat"
# or different if editing.
prompt = "A lying dog"

#Float32 is essential to a well optimization
model_path = "runwayml/stable-diffusion-v1-5"
scheduler = DDIMScheduler(num_train_timesteps=1000, beta_start=0.00085, beta_end=0.0120, beta_schedule="scaled_linear")
pipeline = NullTextPipeline.from_pretrained(model_path, scheduler = scheduler, torch_dtype=torch.float32).to(device)

#Saves the inverted_latent to save time
inverted_latent, uncond = pipeline.invert(input_image, invert_prompt, num_inner_steps=10, early_stop_epsilon= 1e-5, num_inference_steps = steps)
pipeline(prompt, uncond, inverted_latent, guidance_scale=7.5, num_inference_steps=steps).images[0].save(input_image+".output.jpg")
Rerender A Video
This is the Diffusers implementation of zero-shot video-to-video translation pipeline Rerender A Video (without Ebsynth postprocessing). To run the code, please install gmflow. Then modify the path in gmflow_dir. After that, you can run the pipeline with:
import sys
gmflow_dir = "/path/to/gmflow"
sys.path.insert(0, gmflow_dir)

from diffusers import ControlNetModel, AutoencoderKL, DDIMScheduler
from diffusers.utils import export_to_video
import numpy as np
import torch

import cv2
from PIL import Image

def video_to_frame(video_path: str, interval: int):
    vidcap = cv2.VideoCapture(video_path)
    success = True

    count = 0
    res = []
    while success:
        count += 1
        success, image = vidcap.read()
        if count % interval != 1:
            continue
        if image is not None:
            image = cv2.cvtColor(image, cv2.COLOR_BGR2RGB)
            res.append(image)

    vidcap.release()
    return res

input_video_path = 'path/to/video'
input_interval = 10
frames = video_to_frame(
    input_video_path, input_interval)

control_frames = []
# get canny image
for frame in frames:
    np_image = cv2.Canny(frame, 50, 100)
    np_image = np_image[:, :, None]
    np_image = np.concatenate([np_image, np_image, np_image], axis=2)
    canny_image = Image.fromarray(np_image)
    control_frames.append(canny_image)

# You can use any ControlNet here
controlnet = ControlNetModel.from_pretrained(
    "lllyasviel/sd-controlnet-canny").to('cuda')

# You can use any fintuned SD here
pipe = DiffusionPipeline.from_pretrained(
    "runwayml/stable-diffusion-v1-5", controlnet=controlnet, custom_pipeline='rerender_a_video').to('cuda')

# Optional: you can download vae-ft-mse-840000-ema-pruned.ckpt to enhance the results
# pipe.vae = AutoencoderKL.from_single_file(
#     "path/to/vae-ft-mse-840000-ema-pruned.ckpt").to('cuda')

pipe.scheduler = DDIMScheduler.from_config(pipe.scheduler.config)

generator = torch.manual_seed(0)
frames = [Image.fromarray(frame) for frame in frames]
output_frames = pipe(
    "a beautiful woman in CG style, best quality, extremely detailed",
    frames,
    control_frames,
    num_inference_steps=20,
    strength=0.75,
    controlnet_conditioning_scale=0.7,
    generator=generator,
    warp_start=0.0,
    warp_end=0.1,
    mask_start=0.5,
    mask_end=0.8,
    mask_strength=0.5,
    negative_prompt='longbody, lowres, bad anatomy, bad hands, missing fingers, extra digit, fewer digits, cropped, worst quality, low quality'
).frames[0]

export_to_video(
    output_frames, "/path/to/video.mp4", 5)
StyleAligned Pipeline
This pipeline is the implementation of Style Aligned Image Generation via Shared Attention. You can find more results here.
Large-scale Text-to-Image (T2I) models have rapidly gained prominence across creative fields, generating visually compelling outputs from textual prompts. However, controlling these models to ensure consistent style remains challenging, with existing methods necessitating fine-tuning and manual intervention to disentangle content and style. In this paper, we introduce StyleAligned, a novel technique designed to establish style alignment among a series of generated images. By employing minimal `attention sharing' during the diffusion process, our method maintains style consistency across images within T2I models. This approach allows for the creation of style-consistent images using a reference style through a straightforward inversion operation. Our method's evaluation across diverse styles and text prompts demonstrates high-quality synthesis and fidelity, underscoring its efficacy in achieving consistent style across various inputs.
from typing import List

import torch
from diffusers.pipelines.pipeline_utils import DiffusionPipeline
from PIL import Image

model_id = "a-r-r-o-w/dreamshaper-xl-turbo"
pipe = DiffusionPipeline.from_pretrained(model_id, torch_dtype=torch.float16, variant="fp16", custom_pipeline="pipeline_sdxl_style_aligned")
pipe = pipe.to("cuda")

# Enable memory saving techniques
pipe.enable_vae_slicing()
pipe.enable_vae_tiling()

prompt = [
  "a toy train. macro photo. 3d game asset",
  "a toy airplane. macro photo. 3d game asset",
  "a toy bicycle. macro photo. 3d game asset",
  "a toy car. macro photo. 3d game asset",
]
negative_prompt = "low quality, worst quality, "

# Enable StyleAligned
pipe.enable_style_aligned(
    share_group_norm=False,
    share_layer_norm=False,
    share_attention=True,
    adain_queries=True,
    adain_keys=True,
    adain_values=False,
    full_attention_share=False,
    shared_score_scale=1.0,
    shared_score_shift=0.0,
    only_self_level=0.0,
)

# Run inference
images = pipe(
    prompt=prompt,
    negative_prompt=negative_prompt,
    guidance_scale=2,
    height=1024,
    width=1024,
    num_inference_steps=10,
    generator=torch.Generator().manual_seed(42),
).images

# Disable StyleAligned if you do not wish to use it anymore
pipe.disable_style_aligned()
AnimateDiff Image-To-Video Pipeline
This pipeline adds experimental support for the image-to-video task using AnimateDiff. Refer to this PR for more examples and results.
This pipeline relies on a "hack" discovered by the community that allows the generation of videos given an input image with AnimateDiff. It works by creating a copy of the image num_frames times and progressively adding more noise to the image based on the strength and latent interpolation method.
import torch
from diffusers import MotionAdapter, DiffusionPipeline, DDIMScheduler
from diffusers.utils import export_to_gif, load_image

model_id = "SG161222/Realistic_Vision_V5.1_noVAE"
adapter = MotionAdapter.from_pretrained("guoyww/animatediff-motion-adapter-v1-5-2")
pipe = DiffusionPipeline.from_pretrained(model_id, motion_adapter=adapter, custom_pipeline="pipeline_animatediff_img2video").to("cuda")
pipe.scheduler = DDIMScheduler.from_pretrained(model_id, subfolder="scheduler", clip_sample=False, timestep_spacing="linspace", beta_schedule="linear", steps_offset=1)

image = load_image("snail.png")
output = pipe(
  image=image,
  prompt="A snail moving on the ground",
  strength=0.8,
  latent_interpolation_method="slerp", # can be lerp, slerp, or your own callback
)
frames = output.frames[0]
export_to_gif(frames, "animation.gif")
IP Adapter Face ID
IP Adapter FaceID is an experimental IP Adapter model that uses image embeddings generated by insightface, so no image encoder needs to be loaded.
You need to install insightface and all its requirements to use this model.
You must pass the image embedding tensor as image_embeds to the StableDiffusionPipeline instead of ip_adapter_image.
You can find more results here.
import diffusers
import torch
from diffusers.utils import load_image
import cv2
import numpy as np
from diffusers import DiffusionPipeline, AutoencoderKL, DDIMScheduler
from insightface.app import FaceAnalysis


noise_scheduler = DDIMScheduler(
    num_train_timesteps=1000,
    beta_start=0.00085,
    beta_end=0.012,
    beta_schedule="scaled_linear",
    clip_sample=False,
    set_alpha_to_one=False,
    steps_offset=1,
)
vae = AutoencoderKL.from_pretrained("stabilityai/sd-vae-ft-mse").to(dtype=torch.float16)
pipeline = DiffusionPipeline.from_pretrained(
    "SG161222/Realistic_Vision_V4.0_noVAE",
    torch_dtype=torch.float16,
    scheduler=noise_scheduler,
    vae=vae,
    custom_pipeline="ip_adapter_face_id"
)
pipeline.load_ip_adapter_face_id("h94/IP-Adapter-FaceID", "ip-adapter-faceid_sd15.bin")
pipeline.to("cuda")

generator = torch.Generator(device="cpu").manual_seed(42)
num_images=2

image = load_image("https://huggingface.co/datasets/YiYiXu/testing-images/resolve/main/ai_face2.png")

app = FaceAnalysis(name="buffalo_l", providers=['CUDAExecutionProvider', 'CPUExecutionProvider'])
app.prepare(ctx_id=0, det_size=(640, 640))
image = cv2.cvtColor(np.asarray(image), cv2.COLOR_BGR2RGB)
faces = app.get(image)
image = torch.from_numpy(faces[0].normed_embedding).unsqueeze(0)
images = pipeline(
    prompt="A photo of a girl wearing a black dress, holding red roses in hand, upper body, behind is the Eiffel Tower",
    image_embeds=image,
    negative_prompt="monochrome, lowres, bad anatomy, worst quality, low quality",
    num_inference_steps=20, num_images_per_prompt=num_images, width=512, height=704,
    generator=generator
).images

for i in range(num_images):
    images[i].save(f"c{i}.png")
InstantID Pipeline
InstantID is a new state-of-the-art tuning-free method to achieve ID-Preserving generation with only single image, supporting various downstream tasks. For any usgae question, please refer to the official implementation.
# !pip install opencv-python transformers accelerate insightface
import diffusers
from diffusers.utils import load_image
from diffusers.models import ControlNetModel

import cv2
import torch
import numpy as np
from PIL import Image

from insightface.app import FaceAnalysis
from pipeline_stable_diffusion_xl_instantid import StableDiffusionXLInstantIDPipeline, draw_kps

# prepare 'antelopev2' under ./models
# https://github.com/deepinsight/insightface/issues/1896#issuecomment-1023867304
app = FaceAnalysis(name='antelopev2', root='./', providers=['CUDAExecutionProvider', 'CPUExecutionProvider'])
app.prepare(ctx_id=0, det_size=(640, 640))

# prepare models under ./checkpoints
# https://huggingface.co/InstantX/InstantID
from huggingface_hub import hf_hub_download
hf_hub_download(repo_id="InstantX/InstantID", filename="ControlNetModel/config.json", local_dir="./checkpoints")
hf_hub_download(repo_id="InstantX/InstantID", filename="ControlNetModel/diffusion_pytorch_model.safetensors", local_dir="./checkpoints")
hf_hub_download(repo_id="InstantX/InstantID", filename="ip-adapter.bin", local_dir="./checkpoints")

face_adapter = f'./checkpoints/ip-adapter.bin'
controlnet_path = f'./checkpoints/ControlNetModel'

# load IdentityNet
controlnet = ControlNetModel.from_pretrained(controlnet_path, torch_dtype=torch.float16)

base_model = 'wangqixun/YamerMIX_v8'
pipe = StableDiffusionXLInstantIDPipeline.from_pretrained(
    base_model,
    controlnet=controlnet,
    torch_dtype=torch.float16
)
pipe.cuda()

# load adapter
pipe.load_ip_adapter_instantid(face_adapter)

# load an image
face_image = load_image("https://huggingface.co/datasets/YiYiXu/testing-images/resolve/main/ai_face2.png")

# prepare face emb
face_info = app.get(cv2.cvtColor(np.array(face_image), cv2.COLOR_RGB2BGR))
face_info = sorted(face_info, key=lambda x:(x['bbox'][2]-x['bbox'][0])*x['bbox'][3]-x['bbox'][1])[-1]  # only use the maximum face
face_emb = face_info['embedding']
face_kps = draw_kps(face_image, face_info['kps'])

# prompt
prompt = "film noir style, ink sketch|vector, male man, highly detailed, sharp focus, ultra sharpness, monochrome, high contrast, dramatic shadows, 1940s style, mysterious, cinematic"
negative_prompt = "ugly, deformed, noisy, blurry, low contrast, realism, photorealistic, vibrant, colorful"

# generate image
pipe.set_ip_adapter_scale(0.8)
image = pipe(
    prompt,
    image_embeds=face_emb,
    image=face_kps,
    controlnet_conditioning_scale=0.8,
).images[0]
UFOGen Scheduler
UFOGen is a generative model designed for fast one-step text-to-image generation, trained via adversarial training starting from an initial pretrained diffusion model such as Stable Diffusion. scheduling_ufogen.py implements a onestep and multistep sampling algorithm for UFOGen models compatible with pipelines like StableDiffusionPipeline. A usage example is as follows:
import torch
from diffusers import StableDiffusionPipeline

from scheduling_ufogen import UFOGenScheduler

# NOTE: currently, I am not aware of any publicly available UFOGen model checkpoints trained from SD v1.5.
ufogen_model_id_or_path = "/path/to/ufogen/model"
pipe = StableDiffusionPipeline(
    ufogen_model_id_or_path,
    torch_dtype=torch.float16,
)

# You can initialize a UFOGenScheduler as follows:
pipe.scheduler = UFOGenScheduler.from_config(pipe.scheduler.config)

prompt = "Three cats having dinner at a table at new years eve, cinematic shot, 8k."

# Onestep sampling
onestep_image = pipe(prompt, num_inference_steps=1).images[0]

# Multistep sampling
multistep_image = pipe(prompt, num_inference_steps=4).images[0]
FRESCO
This is the Diffusers implementation of zero-shot video-to-video translation pipeline FRESCO (without Ebsynth postprocessing and background smooth). To run the code, please install gmflow. Then modify the path in gmflow_dir. After that, you can run the pipeline with:
from PIL import Image
import cv2
import torch
import numpy as np

from diffusers import ControlNetModel,DDIMScheduler, DiffusionPipeline
import sys
gmflow_dir = "/path/to/gmflow"
sys.path.insert(0, gmflow_dir)

def video_to_frame(video_path: str, interval: int):
    vidcap = cv2.VideoCapture(video_path)
    success = True

    count = 0
    res = []
    while success:
        count += 1
        success, image = vidcap.read()
        if count % interval != 1:
            continue
        if image is not None:
            image = cv2.cvtColor(image, cv2.COLOR_BGR2RGB)
            res.append(image)
            if len(res) >= 8:
                break

    vidcap.release()
    return res


input_video_path = 'https://github.com/williamyang1991/FRESCO/raw/main/data/car-turn.mp4'
output_video_path = 'car.gif'

# You can use any fintuned SD here
model_path = 'SG161222/Realistic_Vision_V2.0'

prompt = 'a red car turns in the winter'
a_prompt = ', RAW photo, subject, (high detailed skin:1.2), 8k uhd, dslr, soft lighting, high quality, film grain, Fujifilm XT3, '
n_prompt = '(deformed iris, deformed pupils, semi-realistic, cgi, 3d, render, sketch, cartoon, drawing, anime, mutated hands and fingers:1.4), (deformed, distorted, disfigured:1.3), poorly drawn, bad anatomy, wrong anatomy, extra limb, missing limb, floating limbs, disconnected limbs, mutation, mutated, ugly, disgusting, amputation'

input_interval = 5
frames = video_to_frame(
    input_video_path, input_interval)

control_frames = []
# get canny image
for frame in frames:
    image = cv2.Canny(frame, 50, 100)
    np_image = np.array(image)
    np_image = np_image[:, :, None]
    np_image = np.concatenate([np_image, np_image, np_image], axis=2)
    canny_image = Image.fromarray(np_image)
    control_frames.append(canny_image)

# You can use any ControlNet here
controlnet = ControlNetModel.from_pretrained(
    "lllyasviel/sd-controlnet-canny").to('cuda')

pipe = DiffusionPipeline.from_pretrained(
    model_path, controlnet=controlnet, custom_pipeline='fresco_v2v').to('cuda')
pipe.scheduler = DDIMScheduler.from_config(pipe.scheduler.config)

generator = torch.manual_seed(0)
frames = [Image.fromarray(frame) for frame in frames]

output_frames = pipe(
    prompt + a_prompt,
    frames,
    control_frames,
    num_inference_steps=20,
    strength=0.75,
    controlnet_conditioning_scale=0.7,
    generator=generator,
    negative_prompt=n_prompt
).images

output_frames[0].save(output_video_path, save_all=True,
                 append_images=output_frames[1:], duration=100, loop=0)
Perturbed-Attention Guidance
This implementation is based on Diffusers. StableDiffusionPAGPipeline is a modification of StableDiffusionPipeline to support Perturbed-Attention Guidance (PAG).
Example Usage
import os
import torch

from accelerate.utils import set_seed

from diffusers import StableDiffusionPipeline
from diffusers.utils import load_image, make_image_grid
from diffusers.utils.torch_utils import randn_tensor

pipe = StableDiffusionPipeline.from_pretrained(
    "runwayml/stable-diffusion-v1-5",
    custom_pipeline="hyoungwoncho/sd_perturbed_attention_guidance",
    torch_dtype=torch.float16
)

device="cuda"
pipe = pipe.to(device)

pag_scale = 5.0
pag_applied_layers_index = ['m0']

batch_size = 4
seed=10

base_dir = "./results/"
grid_dir = base_dir + "/pag" + str(pag_scale) + "/"

if not os.path.exists(grid_dir):
    os.makedirs(grid_dir)

set_seed(seed)

latent_input = randn_tensor(shape=(batch_size,4,64,64),generator=None, device=device, dtype=torch.float16)

output_baseline = pipe(
    "",
    width=512,
    height=512,
    num_inference_steps=50,
    guidance_scale=0.0,
    pag_scale=0.0,
    pag_applied_layers_index=pag_applied_layers_index,
    num_images_per_prompt=batch_size,
    latents=latent_input
).images

output_pag = pipe(
    "",
    width=512,
    height=512,
    num_inference_steps=50,
    guidance_scale=0.0,
    pag_scale=5.0,
    pag_applied_layers_index=pag_applied_layers_index,
    num_images_per_prompt=batch_size,
    latents=latent_input
).images

grid_image = make_image_grid(output_baseline + output_pag, rows=2, cols=batch_size)
grid_image.save(grid_dir + "sample.png")
PAG Parameters
pag_scale : gudiance scale of PAG (ex: 5.0)
pag_applied_layers_index : index of the layer to apply perturbation (ex: ['m0'])
- Downloads last month
- 31,797