Transformers documentation
Monocular depth estimation
Monocular depth estimation
単眼奥行き推定は、シーンの奥行き情報を画像から予測することを含むコンピューター ビジョン タスクです。 単一の画像。言い換えれば、シーン内のオブジェクトの距離を距離から推定するプロセスです。 単一カメラの視点。
単眼奥行き推定には、3D 再構築、拡張現実、自動運転、 そしてロボット工学。モデルがオブジェクト間の複雑な関係を理解する必要があるため、これは困難な作業です。 シーンとそれに対応する深度情報(照明条件などの要因の影響を受ける可能性があります) オクルージョンとテクスチャ。
このタスクと互換性のあるすべてのアーキテクチャとチェックポイントを確認するには、タスクページ を確認することをお勧めします。
このガイドでは、次の方法を学びます。
- 深度推定パイプラインを作成する
- 手動で深度推定推論を実行します
始める前に、必要なライブラリがすべてインストールされていることを確認してください。
pip install -q transformers
Depth estimation pipeline
深度推定をサポートするモデルで推論を試す最も簡単な方法は、対応する pipeline() を使用することです。 Hugging Face Hub のチェックポイント からパイプラインをインスタンス化します。
>>> from transformers import pipeline

>>> checkpoint = "vinvino02/glpn-nyu"
>>> depth_estimator = pipeline("depth-estimation", model=checkpoint)
次に、分析する画像を選択します。
>>> from PIL import Image
>>> import requests

>>> url = "https://unsplash.com/photos/HwBAsSbPBDU/download?ixid=MnwxMjA3fDB8MXxzZWFyY2h8MzR8fGNhciUyMGluJTIwdGhlJTIwc3RyZWV0fGVufDB8MHx8fDE2Nzg5MDEwODg&force=true&w=640"
>>> image = Image.open(requests.get(url, stream=True).raw)
>>> image
画像をパイプラインに渡します。
>>> predictions = depth_estimator(image)パイプラインは 2 つのエントリを含む辞書を返します。最初のものはpredicted_ Depthと呼ばれ、次の値を持つテンソルです。
深さは各ピクセルのメートル単位で表されます。
2 番目のdepthは、深度推定結果を視覚化する PIL 画像です。
視覚化された結果を見てみましょう。
>>> predictions["depth"]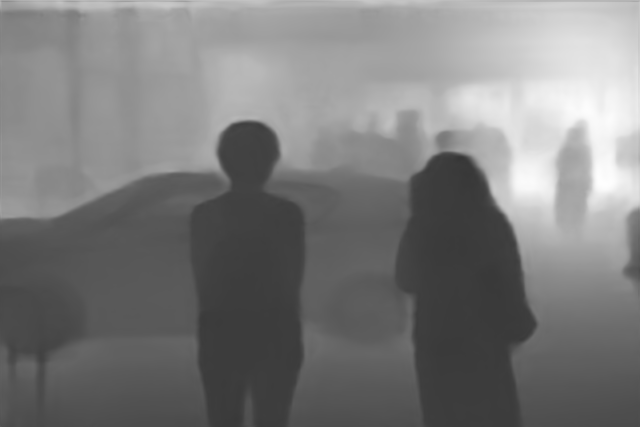
Depth estimation inference by hand
深度推定パイプラインの使用方法を理解したので、同じ結果を手動で複製する方法を見てみましょう。
まず、Hugging Face Hub のチェックポイント からモデルと関連プロセッサをロードします。 ここでは、前と同じチェックポイントを使用します。
>>> from transformers import AutoImageProcessor, AutoModelForDepthEstimation

>>> checkpoint = "vinvino02/glpn-nyu"

>>> image_processor = AutoImageProcessor.from_pretrained(checkpoint)
>>> model = AutoModelForDepthEstimation.from_pretrained(checkpoint)必要な画像変換を処理するimage_processorを使用して、モデルの画像入力を準備します。
サイズ変更や正規化など:
>>> pixel_values = image_processor(image, return_tensors="pt").pixel_values準備された入力をモデルに渡します。
>>> import torch

>>> with torch.no_grad():
...     outputs = model(pixel_values)
...     predicted_depth = outputs.predicted_depth
結果を視覚化します。
>>> import numpy as np

>>> # interpolate to original size
>>> prediction = torch.nn.functional.interpolate(
...     predicted_depth.unsqueeze(1),
...     size=image.size[::-1],
...     mode="bicubic",
...     align_corners=False,
... ).squeeze()
>>> output = prediction.numpy()

>>> formatted = (output * 255 / np.max(output)).astype("uint8")
>>> depth = Image.fromarray(formatted)
>>> depth