Transformers documentation
Zero-shot object detection
Zero-shot object detection
従来、オブジェクト検出 に使用されるモデルには、トレーニング用のラベル付き画像データセットが必要でした。 トレーニング データからのクラスのセットの検出に限定されます。
ゼロショットオブジェクト検出は、別のアプローチを使用する OWL-ViT モデルによってサポートされています。 OWL-ViT オープン語彙オブジェクト検出器です。これは、フリーテキストクエリに基づいて画像内のオブジェクトを検出できることを意味します。 ラベル付きデータセットでモデルを微調整する必要性。
OWL-ViTは、マルチモーダル表現を利用してオープン語彙の検出を実行します。 CLIP とを組み合わせます。 軽量のオブジェクト分類および位置特定ヘッド。オープン語彙の検出は、CLIP のテキスト エンコーダーを使用してフリーテキスト クエリを埋め込み、それらをオブジェクト分類およびローカリゼーション ヘッドへの入力として使用することによって実現されます。 画像とそれに対応するテキストの説明を関連付け、ViT は画像パッチを入力として処理します。作家たち のOWL-ViTは、まずCLIPをゼロからトレーニングし、次に標準の物体検出データセットを使用してOWL-ViTをエンドツーエンドで微調整しました。 二部マッチング損失。
このアプローチを使用すると、モデルはラベル付きデータセットで事前にトレーニングしなくても、テキストの説明に基づいてオブジェクトを検出できます。
このガイドでは、OWL-ViT の使用方法を学習します。
- テキストプロンプトに基づいてオブジェクトを検出します
- バッチオブジェクト検出用
- 画像誘導物体検出用
始める前に、必要なライブラリがすべてインストールされていることを確認してください。
pip install -q transformers
Zero-shot object detection pipeline
OWL-ViTによる推論を試す最も簡単な方法は、OWL-ViTをpipeline()で使用することです。パイプラインをインスタンス化する Hugging Face Hub のチェックポイント からのゼロショット オブジェクト検出の場合:
>>> from transformers import pipeline

>>> checkpoint = "google/owlvit-base-patch32"
>>> detector = pipeline(model=checkpoint, task="zero-shot-object-detection")
次に、物体を検出したい画像を選択します。ここでは、宇宙飛行士アイリーン・コリンズの画像を使用します。 NASA Great Images データセットの一部。
>>> import skimage
>>> import numpy as np
>>> from PIL import Image

>>> image = skimage.data.astronaut()
>>> image = Image.fromarray(np.uint8(image)).convert("RGB")

>>> image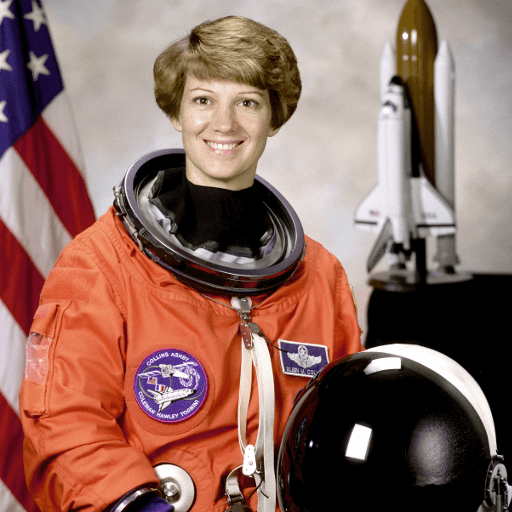
検索する画像と候補オブジェクトのラベルをパイプラインに渡します。 ここでは画像を直接渡します。他の適切なオプションには、画像へのローカル パスまたは画像 URL が含まれます。また、画像をクエリするすべてのアイテムのテキスト説明も渡します。
>>> predictions = detector(
...     image,
...     candidate_labels=["human face", "rocket", "nasa badge", "star-spangled banner"],
... )
>>> predictions
[{'score': 0.3571370542049408,
  'label': 'human face',
  'box': {'xmin': 180, 'ymin': 71, 'xmax': 271, 'ymax': 178}},
 {'score': 0.28099656105041504,
  'label': 'nasa badge',
  'box': {'xmin': 129, 'ymin': 348, 'xmax': 206, 'ymax': 427}},
 {'score': 0.2110239565372467,
  'label': 'rocket',
  'box': {'xmin': 350, 'ymin': -1, 'xmax': 468, 'ymax': 288}},
 {'score': 0.13790413737297058,
  'label': 'star-spangled banner',
  'box': {'xmin': 1, 'ymin': 1, 'xmax': 105, 'ymax': 509}},
 {'score': 0.11950037628412247,
  'label': 'nasa badge',
  'box': {'xmin': 277, 'ymin': 338, 'xmax': 327, 'ymax': 380}},
 {'score': 0.10649408400058746,
  'label': 'rocket',
  'box': {'xmin': 358, 'ymin': 64, 'xmax': 424, 'ymax': 280}}]
予測を視覚化してみましょう。
>>> from PIL import ImageDraw

>>> draw = ImageDraw.Draw(image)

>>> for prediction in predictions:
...     box = prediction["box"]
...     label = prediction["label"]
...     score = prediction["score"]

...     xmin, ymin, xmax, ymax = box.values()
...     draw.rectangle((xmin, ymin, xmax, ymax), outline="red", width=1)
...     draw.text((xmin, ymin), f"{label}: {round(score,2)}", fill="white")

>>> image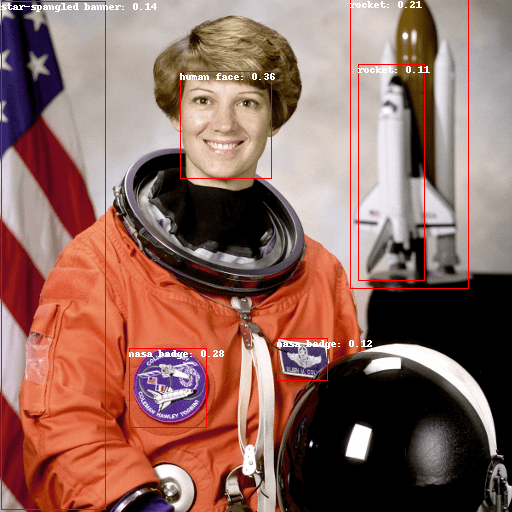
Text-prompted zero-shot object detection by hand
ゼロショット物体検出パイプラインの使用方法を確認したので、同じことを再現してみましょう。 手動で結果を取得します。
まず、Hugging Face Hub のチェックポイント からモデルと関連プロセッサをロードします。 ここでは、前と同じチェックポイントを使用します。
>>> from transformers import AutoProcessor, AutoModelForZeroShotObjectDetection

>>> model = AutoModelForZeroShotObjectDetection.from_pretrained(checkpoint)
>>> processor = AutoProcessor.from_pretrained(checkpoint)
気分を変えて、別の画像を撮ってみましょう。
>>> import requests

>>> url = "https://unsplash.com/photos/oj0zeY2Ltk4/download?ixid=MnwxMjA3fDB8MXxzZWFyY2h8MTR8fHBpY25pY3xlbnwwfHx8fDE2Nzc0OTE1NDk&force=true&w=640"
>>> im = Image.open(requests.get(url, stream=True).raw)
>>> im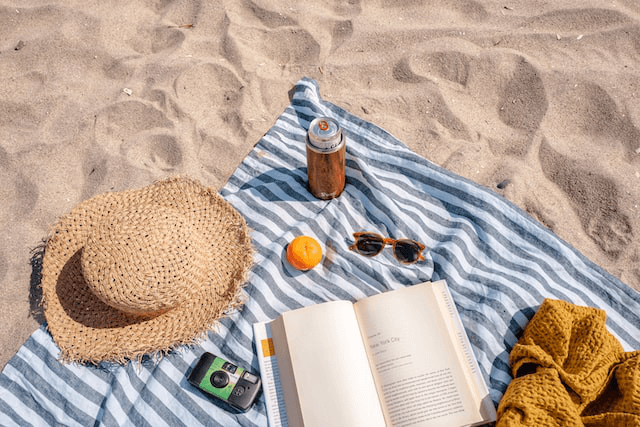
プロセッサを使用してモデルの入力を準備します。プロセッサーは、 サイズ変更と正規化によるモデルの画像と、テキスト入力を処理する CLIPTokenizer です。
>>> text_queries = ["hat", "book", "sunglasses", "camera"]
>>> inputs = processor(text=text_queries, images=im, return_tensors="pt")
入力をモデルに渡し、後処理し、結果を視覚化します。以前は画像プロセッサによって画像のサイズが変更されていたため、
それらをモデルにフィードするには、post_process_object_detection() メソッドを使用して、予測された境界を確認する必要があります。
ボックスは元の画像を基準とした正しい座標を持ちます。
>>> import torch

>>> with torch.no_grad():
...     outputs = model(**inputs)
...     target_sizes = torch.tensor([im.size[::-1]])
...     results = processor.post_process_object_detection(outputs, threshold=0.1, target_sizes=target_sizes)[0]

>>> draw = ImageDraw.Draw(im)

>>> scores = results["scores"].tolist()
>>> labels = results["labels"].tolist()
>>> boxes = results["boxes"].tolist()

>>> for box, score, label in zip(boxes, scores, labels):
...     xmin, ymin, xmax, ymax = box
...     draw.rectangle((xmin, ymin, xmax, ymax), outline="red", width=1)
...     draw.text((xmin, ymin), f"{text_queries[label]}: {round(score,2)}", fill="white")

>>> im
Batch processing
複数の画像セットとテキスト クエリを渡して、複数の画像内の異なる (または同じ) オブジェクトを検索できます。 宇宙飛行士の画像とビーチの画像を組み合わせてみましょう。 バッチ処理の場合、テキスト クエリをネストされたリストとしてプロセッサに渡し、画像を PIL イメージのリストとして渡す必要があります。 PyTorch テンソル、または NumPy 配列。
>>> images = [image, im]
>>> text_queries = [
...     ["human face", "rocket", "nasa badge", "star-spangled banner"],
...     ["hat", "book", "sunglasses", "camera"],
... ]
>>> inputs = processor(text=text_queries, images=images, return_tensors="pt")
以前は後処理のために単一の画像のサイズをテンソルとして渡していましたが、タプルを渡すこともできます。
複数の画像のタプルのリスト。 2 つの例の予測を作成し、2 番目の例 (image_idx = 1) を視覚化しましょう。
>>> with torch.no_grad():
...     outputs = model(**inputs)
...     target_sizes = [x.size[::-1] for x in images]
...     results = processor.post_process_object_detection(outputs, threshold=0.1, target_sizes=target_sizes)

>>> image_idx = 1
>>> draw = ImageDraw.Draw(images[image_idx])

>>> scores = results[image_idx]["scores"].tolist()
>>> labels = results[image_idx]["labels"].tolist()
>>> boxes = results[image_idx]["boxes"].tolist()

>>> for box, score, label in zip(boxes, scores, labels):
...     xmin, ymin, xmax, ymax = box
...     draw.rectangle((xmin, ymin, xmax, ymax), outline="red", width=1)
...     draw.text((xmin, ymin), f"{text_queries[image_idx][label]}: {round(score,2)}", fill="white")

>>> images[image_idx]
Image-guided object detection
テキストクエリによるゼロショットオブジェクト検出に加えて、OWL-ViTは画像ガイドによるオブジェクト検出を提供します。これはつまり 画像クエリを使用して、ターゲット画像内の類似したオブジェクトを検索できます。 テキスト クエリとは異なり、使用できるサンプル画像は 1 つだけです。
対象画像としてソファに2匹の猫がいる画像と、1匹の猫の画像を撮影しましょう クエリとして:
>>> url = "http://images.cocodataset.org/val2017/000000039769.jpg"
>>> image_target = Image.open(requests.get(url, stream=True).raw)

>>> query_url = "http://images.cocodataset.org/val2017/000000524280.jpg"
>>> query_image = Image.open(requests.get(query_url, stream=True).raw)
画像を簡単に見てみましょう。
>>> import matplotlib.pyplot as plt

>>> fig, ax = plt.subplots(1, 2)
>>> ax[0].imshow(image_target)
>>> ax[1].imshow(query_image)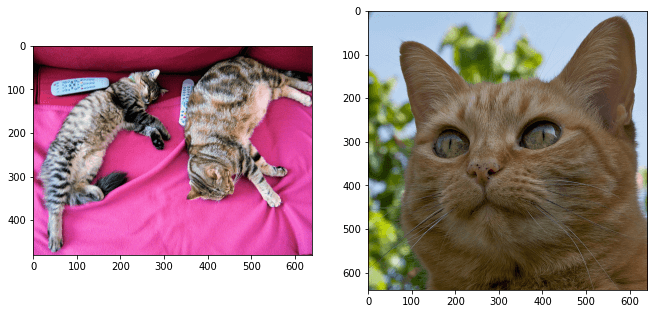
前処理ステップでは、テキスト クエリの代わりに query_images を使用する必要があります。
>>> inputs = processor(images=image_target, query_images=query_image, return_tensors="pt")予測の場合、入力をモデルに渡す代わりに、image_guided_detection() に渡します。予測を描く
ラベルがないことを除いては以前と同様です。
>>> with torch.no_grad():
...     outputs = model.image_guided_detection(**inputs)
...     target_sizes = torch.tensor([image_target.size[::-1]])
...     results = processor.post_process_image_guided_detection(outputs=outputs, target_sizes=target_sizes)[0]

>>> draw = ImageDraw.Draw(image_target)

>>> scores = results["scores"].tolist()
>>> boxes = results["boxes"].tolist()

>>> for box, score, label in zip(boxes, scores, labels):
...     xmin, ymin, xmax, ymax = box
...     draw.rectangle((xmin, ymin, xmax, ymax), outline="white", width=4)

>>> image_target
OWL-ViTによる推論をインタラクティブに試したい場合は、このデモをチェックしてください。
Update on GitHub