Diffusers documentation
Unconditional Image-Generation
Unconditional Image-Generation
In this section, we explain how one can train an unconditional image generation diffusion model. “Unconditional” because the model is not conditioned on any context to generate an image - once trained the model will simply generate images that resemble its training data distribution.
Installing the dependencies
Before running the scipts, make sure to install the library’s training dependencies:
pip install diffusers[training] accelerate datasets
And initialize an 🤗Accelerate environment with:
accelerate config
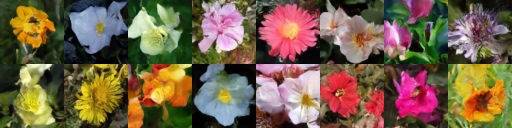
Unconditional Flowers
The command to train a DDPM UNet model on the Oxford Flowers dataset:
accelerate launch train_unconditional.py \
  --dataset_name="huggan/flowers-102-categories" \
  --resolution=64 \
  --output_dir="ddpm-ema-flowers-64" \
  --train_batch_size=16 \
  --num_epochs=100 \
  --gradient_accumulation_steps=1 \
  --learning_rate=1e-4 \
  --lr_warmup_steps=500 \
  --mixed_precision=no \
  --push_to_hub
An example trained model: https://huggingface.co/anton-l/ddpm-ema-flowers-64
A full training run takes 2 hours on 4xV100 GPUs.
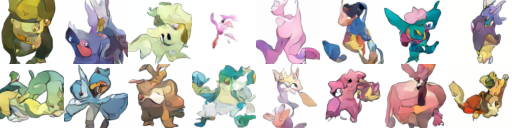
Unconditional Pokemon
The command to train a DDPM UNet model on the Pokemon dataset:
accelerate launch train_unconditional.py \
  --dataset_name="huggan/pokemon" \
  --resolution=64 \
  --output_dir="ddpm-ema-pokemon-64" \
  --train_batch_size=16 \
  --num_epochs=100 \
  --gradient_accumulation_steps=1 \
  --learning_rate=1e-4 \
  --lr_warmup_steps=500 \
  --mixed_precision=no \
  --push_to_hub
An example trained model: https://huggingface.co/anton-l/ddpm-ema-pokemon-64
A full training run takes 2 hours on 4xV100 GPUs.
Using your own data
To use your own dataset, there are 2 ways:
- you can either provide your own folder as
--train_data_dir - or you can upload your dataset to the hub (possibly as a private repo, if you prefer so), and simply pass the
--dataset_nameargument.
Note: If you want to create your own training dataset please have a look at this document.
Below, we explain both in more detail.
Provide the dataset as a folder
If you provide your own folders with images, the script expects the following directory structure:
data_dir/xxx.png
data_dir/xxy.png
data_dir/[...]/xxz.png
In other words, the script will take care of gathering all images inside the folder. You can then run the script like this:
accelerate launch train_unconditional.py \
    --train_data_dir <path-to-train-directory> \
    <other-arguments>
Internally, the script will use the ImageFolder feature which will automatically turn the folders into 🤗 Dataset objects.
Upload your data to the hub, as a (possibly private) repo
It’s very easy (and convenient) to upload your image dataset to the hub using the ImageFolder feature available in 🤗 Datasets. Simply do the following:
from datasets import load_dataset

# example 1: local folder
dataset = load_dataset("imagefolder", data_dir="path_to_your_folder")

# example 2: local files (suppoted formats are tar, gzip, zip, xz, rar, zstd)
dataset = load_dataset("imagefolder", data_files="path_to_zip_file")

# example 3: remote files (supported formats are tar, gzip, zip, xz, rar, zstd)
dataset = load_dataset(
    "imagefolder",
    data_files="https://download.microsoft.com/download/3/E/1/3E1C3F21-ECDB-4869-8368-6DEBA77B919F/kagglecatsanddogs_3367a.zip",
)

# example 4: providing several splits
dataset = load_dataset(
    "imagefolder", data_files={"train": ["path/to/file1", "path/to/file2"], "test": ["path/to/file3", "path/to/file4"]}
)
ImageFolder will create an image column containing the PIL-encoded images.
Next, push it to the hub!
# assuming you have ran the huggingface-cli login command in a terminal
dataset.push_to_hub("name_of_your_dataset")

# if you want to push to a private repo, simply pass private=True:
dataset.push_to_hub("name_of_your_dataset", private=True)
and that’s it! You can now train your model by simply setting the --dataset_name argument to the name of your dataset on the hub.
More on this can also be found in this blog post.