course documentation
Optimization လုပ်ထားသော Inference Deployment
Optimization လုပ်ထားသော Inference Deployment
ဒီအပိုင်းမှာတော့ LLM deployments တွေကို optimization လုပ်ဖို့အတွက် အဆင့်မြင့် frameworks တွေဖြစ်တဲ့ Text Generation Inference (TGI), vLLM, နဲ့ llama.cpp တို့ကို လေ့လာသွားပါမယ်။ ဒီ application တွေက အဓိကအားဖြင့် ထုတ်လုပ်မှု ပတ်ဝန်းကျင် (production environments) တွေမှာ LLM တွေကို သုံးစွဲသူများဆီသို့ ဝန်ဆောင်မှုပေးဖို့ အသုံးပြုကြပါတယ်။ ဒီအပိုင်းက ဒီ frameworks တွေကို production မှာ ဘယ်လို deploy လုပ်ရမယ်ဆိုတာကို အဓိကထားပြီး၊ single machine တစ်ခုပေါ်မှာ inference အတွက် ဘယ်လိုအသုံးပြုရမယ်ဆိုတာကို အာရုံစိုက်ထားခြင်း မရှိပါဘူး။
ဒီ tools တွေက inference efficiency ကို ဘယ်လိုအမြင့်ဆုံးမြှင့်တင်ပြီး Large Language Models တွေကို production deployments တွေကို ဘယ်လို ရိုးရှင်းအောင် လုပ်ဆောင်တယ်ဆိုတာကို ကျွန်တော်တို့ ဖော်ပြပေးပါမယ်။
Framework ရွေးချယ်မှု လမ်းညွှန်
TGI, vLLM, နဲ့ llama.cpp တို့ဟာ ရည်ရွယ်ချက်ချင်း တူညီပေမယ့်၊ မတူညီတဲ့ အသုံးပြုမှုပုံစံတွေအတွက် ပိုမိုသင့်လျော်စေတဲ့ ထူးခြားတဲ့ အင်္ဂါရပ်တွေ ရှိပါတယ်။ ၎င်းတို့ကြားက အဓိက ကွာခြားချက်တွေကို စွမ်းဆောင်ရည် (performance) နဲ့ ပေါင်းစပ်မှု (integration) ကို အာရုံစိုက်ပြီး ကြည့်ရအောင်။
Memory Management နှင့် Performance
TGI ကို production မှာ တည်ငြိမ်ပြီး ခန့်မှန်းနိုင်စေဖို့ ဒီဇိုင်းထုတ်ထားပြီး၊ memory အသုံးပြုမှုကို တသမတ်တည်း ထိန်းထားဖို့အတွက် fixed sequence lengths တွေကို အသုံးပြုပါတယ်။ TGI က Flash Attention 2 နဲ့ continuous batching နည်းစနစ်တွေကို အသုံးပြုပြီး memory ကို စီမံခန့်ခွဲပါတယ်။ ဒါက ၎င်းသည် attention calculations တွေကို အလွန်ထိထိရောက်ရောက် လုပ်ဆောင်နိုင်ပြီး GPU ကို အလုပ်တွေ အဆက်မပြတ် ပေးခြင်းဖြင့် အလုပ်များနေအောင် ထိန်းထားနိုင်တယ်လို့ ဆိုလိုပါတယ်။ လိုအပ်တဲ့အခါ စနစ်က model ရဲ့ အစိတ်အပိုင်းတွေကို CPU နဲ့ GPU ကြား ရွှေ့ပြောင်းနိုင်တာကြောင့် ပိုကြီးတဲ့ model တွေကို ကိုင်တွယ်ရာမှာ အထောက်အကူ ဖြစ်စေပါတယ်။
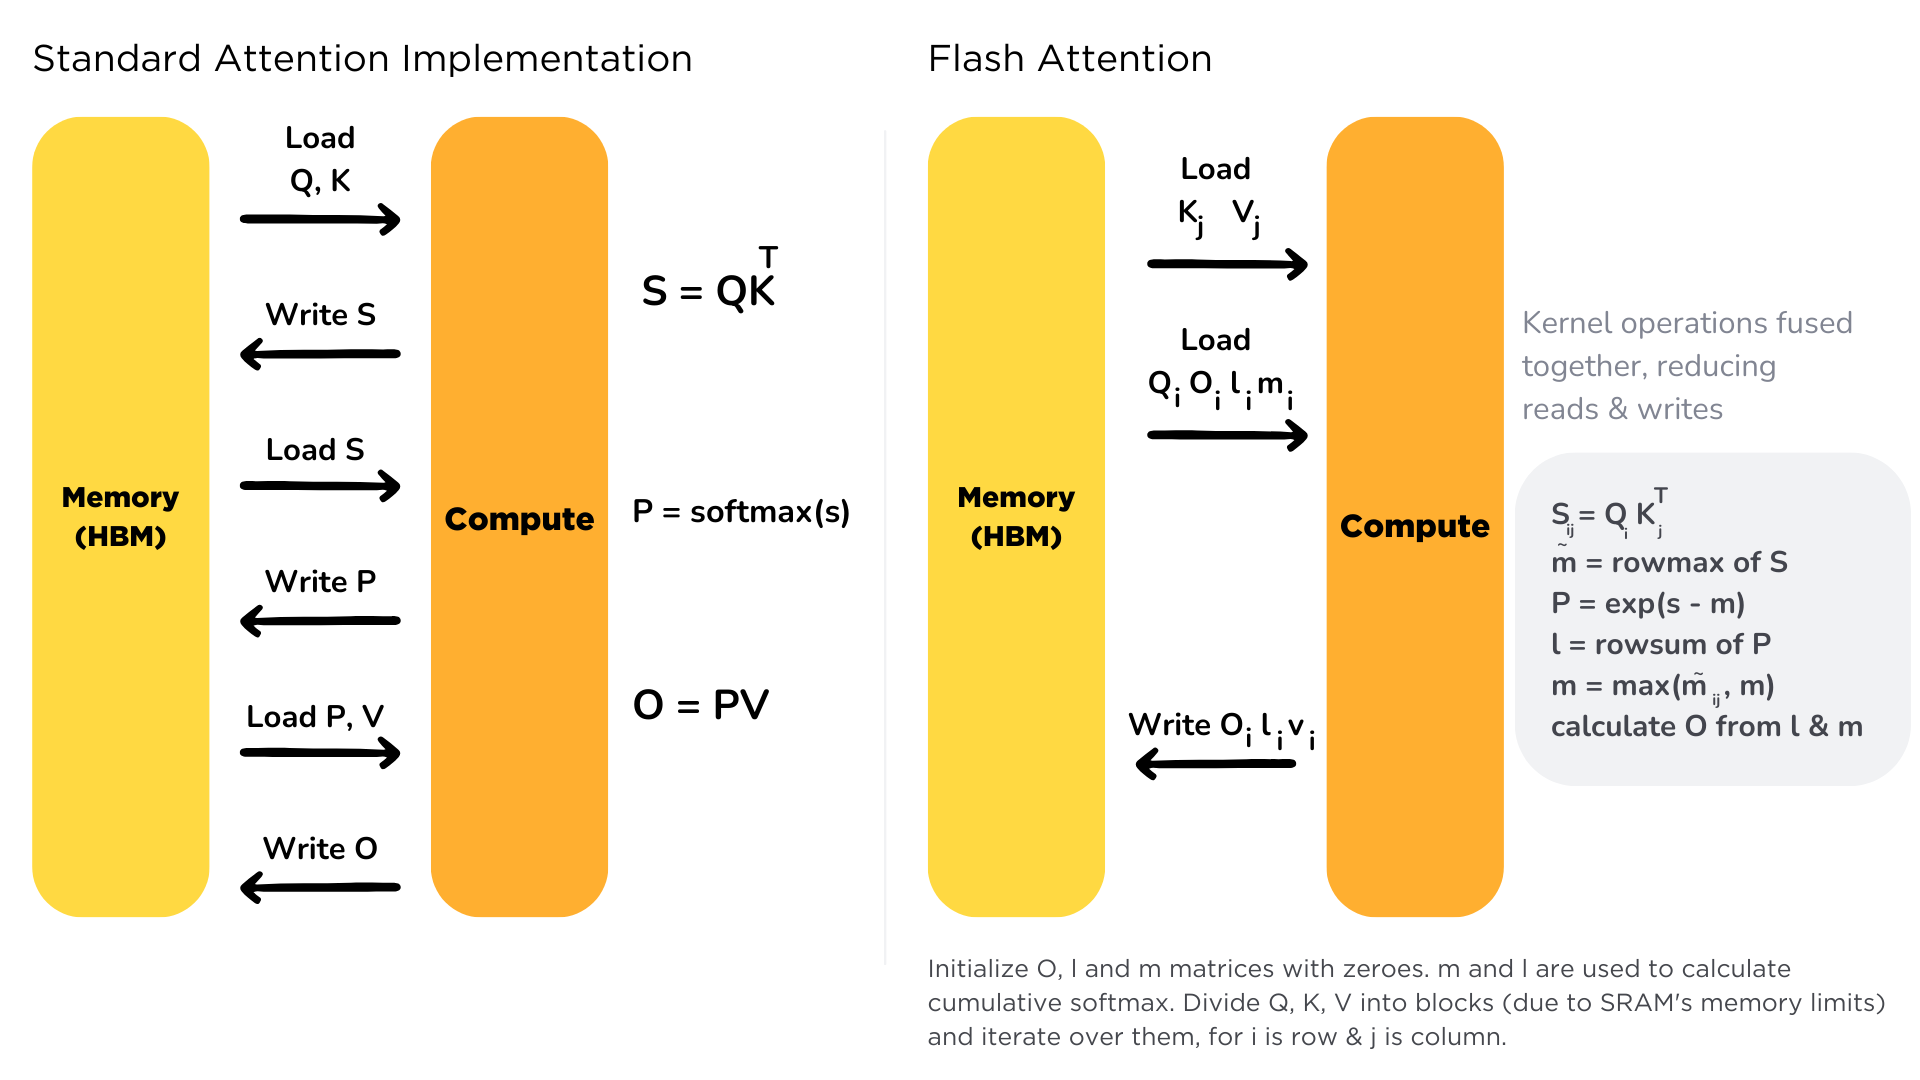
Flash Attention ဆိုတာ transformer models တွေမှာ attention mechanism ကို memory bandwidth bottlenecks တွေကို ဖြေရှင်းပေးခြင်းဖြင့် optimization လုပ်တဲ့ နည်းပညာတစ်ခုပါ။ Chapter 1.8 မှာ ယခင်က ဆွေးနွေးခဲ့သလိုပဲ၊ attention mechanism မှာ quadratic complexity နဲ့ memory usage ရှိတာကြောင့် ရှည်လျားတဲ့ sequences တွေအတွက် ထိရောက်မှု မရှိပါဘူး။
အဓိက တီထွင်မှုကတော့ High Bandwidth Memory (HBM) နဲ့ ပိုမြန်တဲ့ SRAM cache ကြား memory transfers တွေကို ဘယ်လို စီမံခန့်ခွဲလဲဆိုတဲ့ အချက်မှာပါပဲ။ ရိုးရာ attention နည်းလမ်းက HBM နဲ့ SRAM ကြား ဒေတာတွေကို အကြိမ်ကြိမ် transfer လုပ်တာကြောင့် GPU ကို အလုပ်မရှိဘဲ ထားခြင်းဖြင့် bottlenecks တွေ ဖြစ်စေပါတယ်။ Flash Attention က ဒေတာတွေကို SRAM ထဲကို တစ်ကြိမ်တည်း load လုပ်ပြီး အဲဒီမှာပဲ calculations တွေအားလုံးကို လုပ်ဆောင်တာကြောင့် ကုန်ကျစရိတ်များတဲ့ memory transfers တွေကို လျှော့ချပေးပါတယ်။
အကျိုးကျေးဇူးတွေက training လုပ်နေစဉ်မှာ အရေးအပါဆုံး ဖြစ်ပေမယ့်၊ Flash Attention ရဲ့ လျှော့ချထားတဲ့ VRAM အသုံးပြုမှုနဲ့ တိုးတက်လာတဲ့ efficiency က inference အတွက်ပါ အဖိုးတန်စေပြီး၊ ပိုမိုမြန်ဆန်ပြီး ပိုမို scalable ဖြစ်တဲ့ LLM serving ကို ဖြစ်ပေါ်စေပါတယ်။
vLLM က PagedAttention ကို အသုံးပြုပြီး မတူညီတဲ့ နည်းလမ်းတစ်ခုကို အသုံးပြုပါတယ်။ ကွန်ပျူတာက memory ကို pages တွေနဲ့ စီမံခန့်ခွဲသလိုပဲ၊ vLLM က model ရဲ့ memory ကို ပိုသေးငယ်တဲ့ blocks တွေအဖြစ် ပိုင်းခြားပါတယ်။ ဒီ clever system ကြောင့် ၎င်းသည် မတူညီတဲ့ အရွယ်အစားရှိတဲ့ requests တွေကို ပိုမိုပြောင်းလွယ်ပြင်လွယ် ကိုင်တွယ်နိုင်ပြီး memory space ကို မဖြုန်းတီးပါဘူး။ ဒါက မတူညီတဲ့ requests တွေကြား memory ကို မျှဝေရာမှာ အထူးကောင်းမွန်ပြီး memory fragmentation ကို လျှော့ချပေးတာကြောင့် စနစ်တစ်ခုလုံးကို ပိုမိုထိရောက်စေပါတယ်။
PagedAttention ဆိုတာ LLM inference မှာ နောက်ထပ် အရေးကြီးတဲ့ bottleneck တစ်ခုဖြစ်တဲ့ KV cache memory management ကို ဖြေရှင်းပေးတဲ့ နည်းပညာတစ်ခုပါ။ Chapter 1.8 မှာ ဆွေးနွေးခဲ့သလိုပဲ၊ text generation လုပ်နေစဉ်မှာ model က attention keys နဲ့ values (KV cache) တွေကို ထုတ်လုပ်လိုက်တဲ့ token တစ်ခုစီအတွက် သိမ်းဆည်းထားပြီး ထပ်ခါတလဲလဲ တွက်ချက်မှုတွေကို လျှော့ချပါတယ်။ KV cache က အထူးသဖြင့် ရှည်လျားတဲ့ sequences တွေ ဒါမှမဟုတ် concurrent requests များစွာနဲ့ဆိုရင် အလွန်ကြီးမားလာနိုင်ပါတယ်။
vLLM ရဲ့ အဓိက တီထွင်မှုကတော့ ဒီ cache ကို ဘယ်လို စီမံခန့်ခွဲလဲဆိုတဲ့ အချက်မှာပါပဲ-
- Memory Paging: KV cache ကို ကြီးမားတဲ့ block တစ်ခုအဖြစ် မမှတ်ယူဘဲ၊ ၎င်းကို fixed-size “pages” တွေအဖြစ် ပိုင်းခြားထားပါတယ် (operating systems တွေမှာ virtual memory နဲ့ ဆင်တူပါတယ်)။
- Non-contiguous Storage: Pages တွေကို GPU memory မှာ ဆက်တိုက် သိမ်းဆည်းထားဖို့ မလိုအပ်တာကြောင့် ပိုမိုပြောင်းလွယ်ပြင်လွယ်ရှိတဲ့ memory allocation ကို ဖြစ်ပေါ်စေပါတယ်။
- Page Table Management: Page table တစ်ခုက ဘယ် pages တွေက ဘယ် sequence နဲ့ သက်ဆိုင်တယ်ဆိုတာကို ခြေရာခံပြီး၊ ထိရောက်တဲ့ lookup နဲ့ access ကို ဖြစ်ပေါ်စေပါတယ်။
- Memory Sharing: parallel sampling လို လုပ်ငန်းတွေအတွက်၊ prompt အတွက် KV cache ကို သိမ်းဆည်းထားတဲ့ pages တွေကို sequences များစွာမှာ မျှဝေအသုံးပြုနိုင်ပါတယ်။
PagedAttention နည်းလမ်းက ရိုးရာနည်းလမ်းတွေနဲ့ နှိုင်းယှဉ်ရင် throughput ကို ၂၄ ဆအထိ ပိုမိုမြင့်မားစေနိုင်တာကြောင့် production LLM deployments တွေအတွက် game-changer တစ်ခု ဖြစ်ပါတယ်။ PagedAttention ဘယ်လိုအလုပ်လုပ်တယ်ဆိုတာကို တကယ်နက်နက်နဲနဲ လေ့လာချင်တယ်ဆိုရင် vLLM documentation ရဲ့ လမ်းညွှန် ကို ဖတ်ရှုနိုင်ပါတယ်။
llama.cpp ဟာ မူလက LLaMA models တွေကို consumer hardware တွေမှာ run ဖို့ ဒီဇိုင်းထုတ်ထားတဲ့ highly optimized C/C++ implementation တစ်ခုပါ။ ဒါက optional GPU acceleration ပါဝင်တဲ့ CPU efficiency ကို အာရုံစိုက်ပြီး၊ resource-constrained environments တွေအတွက် အကောင်းဆုံးပါပဲ။ llama.cpp က model size နဲ့ memory requirements တွေကို လျှော့ချဖို့အတွက် quantization နည်းစနစ်တွေကို အသုံးပြုပြီး ကောင်းမွန်တဲ့ performance ကို ထိန်းသိမ်းထားပါတယ်။ ဒါက အမျိုးမျိုးသော CPU architectures တွေအတွက် optimized kernels တွေကို implement လုပ်ထားပြီး၊ ထိရောက်တဲ့ token generation အတွက် basic KV cache management ကို ထောက်ပံ့ပေးပါတယ်။
llama.cpp မှာ Quantization ဆိုတာ model weights တွေရဲ့ precision ကို 32-bit ဒါမှမဟုတ် 16-bit floating point ကနေ 8-bit integers (INT8)၊ 4-bit ဒါမှမဟုတ် ပိုနိမ့်တဲ့ precision formats တွေအဖြစ် လျှော့ချတာပါ။ ဒါက memory အသုံးပြုမှုကို သိသိသာသာ လျှော့ချပေးပြီး အနည်းဆုံး အရည်အသွေး ဆုံးရှုံးမှုနဲ့အတူ inference speed ကို မြှင့်တင်ပေးပါတယ်။
llama.cpp မှာ အဓိက quantization features တွေကတော့-
- Multiple Quantization Levels: 8-bit, 4-bit, 3-bit, နဲ့ 2-bit quantization ကိုပါ ထောက်ပံ့ပေးပါတယ်။
- GGML/GGUF Format: Quantized inference အတွက် optimization လုပ်ထားတဲ့ custom tensor formats တွေကို အသုံးပြုပါတယ်။
- Mixed Precision: Model ရဲ့ မတူညီတဲ့ အစိတ်အပိုင်းတွေမှာ မတူညီတဲ့ quantization levels တွေကို အသုံးပြုနိုင်ပါတယ်။
- Hardware-Specific Optimizations: အမျိုးမျိုးသော CPU architectures တွေ (AVX2, AVX-512, NEON) အတွက် optimized code paths တွေ ပါဝင်ပါတယ်။
ဒီနည်းလမ်းက limited memory ရှိတဲ့ consumer hardware တွေမှာ billion-parameter models တွေကို run နိုင်စေပြီး၊ local deployments နဲ့ edge devices တွေအတွက် အကောင်းဆုံး ဖြစ်စေပါတယ်။
Deployment နှင့် Integration
frameworks တွေကြားက deployment နဲ့ integration ကွာခြားချက်တွေကို ဆက်သွားရအောင်။
TGI က သူ့ရဲ့ production-ready features တွေနဲ့ enterprise-level deployment တွေမှာ ထူးချွန်ပါတယ်။ ဒါက built-in Kubernetes support နဲ့ Prometheus နဲ့ Grafana ကနေတဆင့် monitoring လုပ်ခြင်း၊ automatic scaling, နဲ့ ပြည့်စုံတဲ့ safety features တွေလို production မှာ run ဖို့ လိုအပ်တဲ့ အရာအားလုံး ပါဝင်ပါတယ်။ စနစ်က enterprise-grade logging နဲ့ content filtering နဲ့ rate limiting လိုမျိုး အမျိုးမျိုးသော ကာကွယ်မှု နည်းလမ်းတွေပါ ပါဝင်တာကြောင့် သင့် deployment ကို လုံခြုံပြီး တည်ငြိမ်အောင် ထိန်းထားနိုင်ပါတယ်။
vLLM က deployment အတွက် ပိုမိုပြောင်းလွယ်ပြင်လွယ်ရှိပြီး developer-friendly ဖြစ်တဲ့ ချဉ်းကပ်မှုကို အသုံးပြုပါတယ်။ ဒါက Python ကို အဓိကထားပြီး တည်ဆောက်ထားတာကြောင့် သင့်ရဲ့ လက်ရှိ application တွေမှာ OpenAI ရဲ့ API ကို အလွယ်တကူ အစားထိုးနိုင်ပါတယ်။ framework က raw performance ကို ပေးစွမ်းဖို့ အာရုံစိုက်ပြီး၊ သင့်ရဲ့ သီးခြားလိုအပ်ချက်တွေနဲ့ ကိုက်ညီအောင် စိတ်ကြိုက်ပြင်ဆင်နိုင်ပါတယ်။ ဒါက clusters တွေကို စီမံခန့်ခွဲဖို့အတွက် Ray နဲ့ အထူးကောင်းမွန်စွာ အလုပ်လုပ်တာကြောင့် high performance နဲ့ adaptability လိုအပ်တဲ့အခါ အကောင်းဆုံး ရွေးချယ်မှုတစ်ခု ဖြစ်ပါတယ်။
llama.cpp က ရိုးရှင်းမှုနဲ့ portability ကို ဦးစားပေးပါတယ်။ သူ့ရဲ့ server implementation က ပေါ့ပါးပြီး hardware အမျိုးမျိုး (powerful servers တွေကနေ consumer laptops တွေနဲ့ အချို့ high-end mobile devices တွေအထိ) မှာ run နိုင်ပါတယ်။ အနည်းဆုံး dependencies တွေနဲ့ ရိုးရှင်းတဲ့ C/C++ core နဲ့ဆိုရင်၊ Python frameworks တွေ install လုပ်ဖို့ ခက်ခဲတဲ့ environments တွေမှာ deploy လုပ်ဖို့ လွယ်ကူပါတယ်။ server က OpenAI-compatible API ကို ပံ့ပိုးပေးထားပြီး အခြား solution တွေထက် resource အသုံးပြုမှုက အများကြီး သေးငယ်ပါတယ်။
စတင်ခြင်း
LLMs တွေကို deploy လုပ်ဖို့ ဒီ frameworks တွေကို ဘယ်လိုအသုံးပြုရမလဲဆိုတာကို လေ့လာကြည့်ရအောင်။ installation နဲ့ basic setup ကနေ စတင်ပါမယ်။
Installation နှင့် Basic Setup
TGI က install လုပ်ဖို့နဲ့ အသုံးပြုဖို့ လွယ်ကူပြီး၊ Hugging Face ecosystem ထဲမှာ နက်ရှိုင်းစွာ ပေါင်းစပ်ထားပါတယ်။
ပထမဆုံး၊ Docker ကို အသုံးပြုပြီး TGI server ကို launch လုပ်ပါ။
docker run --gpus all \
    --shm-size 1g \
    -p 8080:80 \
    -v ~/.cache/huggingface:/data \
    ghcr.io/huggingface/text-generation-inference:latest \
    --model-id HuggingFaceTB/SmolLM2-360M-Instruct
အဲဒီနောက် Hugging Face ရဲ့ InferenceClient ကို အသုံးပြုပြီး အပြန်အလှန်ဆက်သွယ်ပါ။
from huggingface_hub import InferenceClient

# TGI endpoint ကို ညွှန်ပြပြီး client ကို Initialize လုပ်ပါ။
client = InferenceClient(
    model="http://localhost:8080",  # URL to the TGI server
)

# Text generation
response = client.text_generation(
    "Tell me a story",
    max_new_tokens=100,
    temperature=0.7,
    top_p=0.95,
    details=True,
    stop_sequences=[],
)
print(response.generated_text)

# For chat format
response = client.chat_completion(
    messages=[
        {"role": "system", "content": "You are a helpful assistant."},
        {"role": "user", "content": "Tell me a story"},
    ],
    max_tokens=100,
    temperature=0.7,
    top_p=0.95,
)
print(response.choices[0].message.content)
တနည်းအားဖြင့် OpenAI client ကို အသုံးပြုနိုင်ပါတယ်။
from openai import OpenAI

# Initialize client pointing to TGI endpoint
client = OpenAI(
    base_url="http://localhost:8080/v1",  # /v1 ကို ထည့်သွင်းဖို့ သေချာပါစေ။
    api_key="not-needed",  # TGI က default အားဖြင့် API key မလိုအပ်ပါဘူး။
)

# Chat completion
response = client.chat.completions.create(
    model="HuggingFaceTB/SmolLM2-360M-Instruct",
    messages=[
        {"role": "system", "content": "You are a helpful assistant."},
        {"role": "user", "content": "Tell me a story"},
    ],
    max_tokens=100,
    temperature=0.7,
    top_p=0.95,
)
print(response.choices[0].message.content)llama.cpp က install လုပ်ဖို့နဲ့ အသုံးပြုဖို့ လွယ်ကူပြီး၊ အနည်းဆုံး dependencies တွေပဲ လိုအပ်ကာ CPU နဲ့ GPU inference နှစ်ခုလုံးကို ထောက်ပံ့ပါတယ်။
ပထမဆုံး၊ llama.cpp ကို install လုပ်ပြီး build လုပ်ပါ။
# Repository ကို clone လုပ်ပါ။
git clone https://github.com/ggerganov/llama.cpp
cd llama.cpp

# Project ကို build လုပ်ပါ။
make

# SmolLM2-1.7B-Instruct-GGUF model ကို download လုပ်ပါ။
curl -L -O https://huggingface.co/HuggingFaceTB/SmolLM2-1.7B-Instruct-GGUF/resolve/main/smollm2-1.7b-instruct.Q4_K_M.gguf
အဲဒီနောက် server ကို launch လုပ်ပါ (OpenAI API compatibility နဲ့)။
# Start the server
./server \
    -m smollm2-1.7b-instruct.Q4_K_M.gguf \
    --host 0.0.0.0 \
    --port 8080 \
    -c 4096 \
    --n-gpu-layers 0  # GPU ကို အသုံးပြုရန်အတွက် ပိုမိုမြင့်မားသော နံပါတ်ကို သတ်မှတ်ပါ။
Hugging Face ရဲ့ InferenceClient ကို အသုံးပြုပြီး server နဲ့ အပြန်အလှန်ဆက်သွယ်ပါ။
from huggingface_hub import InferenceClient

# llama.cpp server ကို ညွှန်ပြပြီး client ကို Initialize လုပ်ပါ။
client = InferenceClient(
    model="http://localhost:8080/v1",  # llama.cpp server ရဲ့ URL
    token="sk-no-key-required",  # llama.cpp server က ဒီ placeholder ကို လိုအပ်ပါတယ်။
)

# Text generation
response = client.text_generation(
    "Tell me a story",
    max_new_tokens=100,
    temperature=0.7,
    top_p=0.95,
    details=True,
)
print(response.generated_text)

# Chat format အတွက်
response = client.chat_completion(
    messages=[
        {"role": "system", "content": "You are a helpful assistant."},
        {"role": "user", "content": "Tell me a story"},
    ],
    max_tokens=100,
    temperature=0.7,
    top_p=0.95,
)
print(response.choices[0].message.content)
တနည်းအားဖြင့် OpenAI client ကို အသုံးပြုနိုင်ပါတယ်။
from openai import OpenAI

# llama.cpp server ကို ညွှန်ပြပြီး client ကို Initialize လုပ်ပါ။
client = OpenAI(
    base_url="http://localhost:8080/v1",
    api_key="sk-no-key-required",  # llama.cpp server က ဒီ placeholder ကို လိုအပ်ပါတယ်။
)

# Chat completion
response = client.chat.completions.create(
    model="smollm2-1.7b-instruct",  # Server က model တစ်ခုတည်းသာ load လုပ်တာကြောင့် model identifier က ဘာပဲဖြစ်ဖြစ် ရပါတယ်။
    messages=[
        {"role": "system", "content": "You are a helpful assistant."},
        {"role": "user", "content": "Tell me a story"},
    ],
    max_tokens=100,
    temperature=0.7,
    top_p=0.95,
)
print(response.choices[0].message.content)vLLM က install လုပ်ဖို့နဲ့ အသုံးပြုဖို့ လွယ်ကူပြီး၊ OpenAI API compatibility နဲ့ native Python interface နှစ်ခုလုံး ပါဝင်ပါတယ်။
ပထမဆုံး၊ vLLM OpenAI-compatible server ကို launch လုပ်ပါ။
python -m vllm.entrypoints.openai.api_server \
    --model HuggingFaceTB/SmolLM2-360M-Instruct \
    --host 0.0.0.0 \
    --port 8000
အဲဒီနောက် Hugging Face ရဲ့ InferenceClient ကို အသုံးပြုပြီး အပြန်အလှန်ဆက်သွယ်ပါ။
from huggingface_hub import InferenceClient

# vLLM endpoint ကို ညွှန်ပြပြီး client ကို Initialize လုပ်ပါ။
client = InferenceClient(
    model="http://localhost:8000/v1",  # vLLM server ရဲ့ URL
)

# Text generation
response = client.text_generation(
    "Tell me a story",
    max_new_tokens=100,
    temperature=0.7,
    top_p=0.95,
    details=True,
)
print(response.generated_text)

# Chat format အတွက်
response = client.chat_completion(
    messages=[
        {"role": "system", "content": "You are a helpful assistant."},
        {"role": "user", "content": "Tell me a story"},
    ],
    max_tokens=100,
    temperature=0.7,
    top_p=0.95,
)
print(response.choices[0].message.content)
တနည်းအားဖြင့် OpenAI client ကို အသုံးပြုနိုင်ပါတယ်။
from openai import OpenAI

# vLLM endpoint ကို ညွှန်ပြပြီး client ကို Initialize လုပ်ပါ။
client = OpenAI(
    base_url="http://localhost:8000/v1",
    api_key="not-needed",  # vLLM က default အားဖြင့် API key မလိုအပ်ပါဘူး။
)

# Chat completion
response = client.chat.completions.create(
    model="HuggingFaceTB/SmolLM2-360M-Instruct",
    messages=[
        {"role": "system", "content": "You are a helpful assistant."},
        {"role": "user", "content": "Tell me a story"},
    ],
    max_tokens=100,
    temperature=0.7,
    top_p=0.95,
)
print(response.choices[0].message.content)Basic Text Generation
frameworks တွေနဲ့ text generation ရဲ့ ဥပမာတွေကို ကြည့်ရအောင်။
ပထမဆုံး၊ TGI ကို အဆင့်မြင့် parameters တွေနဲ့ deploy လုပ်ပါ။
docker run --gpus all \
    --shm-size 1g \
    -p 8080:80 \
    -v ~/.cache/huggingface:/data \
    ghcr.io/huggingface/text-generation-inference:latest \
    --model-id HuggingFaceTB/SmolLM2-360M-Instruct \
    --max-total-tokens 4096 \
    --max-input-length 3072 \
    --max-batch-total-tokens 8192 \
    --waiting-served-ratio 1.2
ပြောင်းလွယ်ပြင်လွယ်ရှိတဲ့ text generation အတွက် InferenceClient ကို အသုံးပြုပါ။
from huggingface_hub import InferenceClient

client = InferenceClient(model="http://localhost:8080")

# အဆင့်မြင့် parameters ဥပမာ
response = client.chat_completion(
    messages=[
        {"role": "system", "content": "You are a creative storyteller."},
        {"role": "user", "content": "Write a creative story"},
    ],
    temperature=0.8,
    max_tokens=200,
    top_p=0.95,
)
print(response.choices[0].message.content)

# Raw text generation
response = client.text_generation(
    "Write a creative story about space exploration",
    max_new_tokens=200,
    temperature=0.8,
    top_p=0.95,
    repetition_penalty=1.1,
    do_sample=True,
    details=True,
)
print(response.generated_text)
ဒါမှမဟုတ် OpenAI client ကို အသုံးပြုပါ။
from openai import OpenAI

client = OpenAI(base_url="http://localhost:8080/v1", api_key="not-needed")

# အဆင့်မြင့် parameters ဥပမာ
response = client.chat.completions.create(
    model="HuggingFaceTB/SmolLM2-360M-Instruct",
    messages=[
        {"role": "system", "content": "You are a creative storyteller."},
        {"role": "user", "content": "Write a creative story"},
    ],
    temperature=0.8,  # Higher for more creativity
)
print(response.choices[0].message.content)llama.cpp အတွက် အဆင့်မြင့် parameters တွေကို server ကို launch လုပ်တဲ့အခါ သတ်မှတ်နိုင်ပါတယ်။
./server \
    -m smollm2-1.7b-instruct.Q4_K_M.gguf \
    --host 0.0.0.0 \
    --port 8080 \
    -c 4096 \            # Context size
    --threads 8 \        # CPU threads to use
    --batch-size 512 \   # Batch size for prompt evaluation
    --n-gpu-layers 0     # GPU layers (0 = CPU only)
InferenceClient ကို အသုံးပြုပါ။
from huggingface_hub import InferenceClient

client = InferenceClient(model="http://localhost:8080/v1", token="sk-no-key-required")

# Advanced parameters example
response = client.chat_completion(
    messages=[
        {"role": "system", "content": "You are a creative storyteller."},
        {"role": "user", "content": "Write a creative story"},
    ],
    temperature=0.8,
    max_tokens=200,
    top_p=0.95,
)
print(response.choices[0].message.content)

# တိုက်ရိုက် text generation အတွက်
response = client.text_generation(
    "Write a creative story about space exploration",
    max_new_tokens=200,
    temperature=0.8,
    top_p=0.95,
    repetition_penalty=1.1,
    details=True,
)
print(response.generated_text)
ဒါမှမဟုတ် sampling parameters တွေကို ထိန်းချုပ်ပြီး generation လုပ်ဖို့ OpenAI client ကို အသုံးပြုပါ။
from openai import OpenAI

client = OpenAI(base_url="http://localhost:8080/v1", api_key="sk-no-key-required")

# အဆင့်မြင့် parameters ဥပမာ
response = client.chat.completions.create(
    model="smollm2-1.7b-instruct",
    messages=[
        {"role": "system", "content": "You are a creative storyteller."},
        {"role": "user", "content": "Write a creative story"},
    ],
    temperature=0.8,  # ပိုမိုဖန်တီးမှုရှိရန် ပိုမိုမြင့်မားသော တန်ဖိုး
    top_p=0.95,  # Nucleus sampling probability
    frequency_penalty=0.5,  # မကြာခဏ ပေါ်လာသော tokens များကို ထပ်ခါတလဲလဲ မဖြစ်အောင် လျှော့ချပါ။
    presence_penalty=0.5,  # ရှိပြီးသား tokens များကို ပြန်လည်ပေါ်ထွက်မှုကို လျှော့ချပါ။
    max_tokens=200,  # အများဆုံး generation length
)
print(response.choices[0].message.content)
llama.cpp ရဲ့ native library ကိုလည်း ပိုမိုထိန်းချုပ်နိုင်ရန် အသုံးပြုနိုင်ပါတယ်။
# တိုက်ရိုက် model access အတွက် llama-cpp-python package ကို အသုံးပြုခြင်း
from llama_cpp import Llama

# Model ကို load လုပ်ပါ။
llm = Llama(
    model_path="smollm2-1.7b-instruct.Q4_K_M.gguf",
    n_ctx=4096,  # Context window size
    n_threads=8,  # CPU threads
    n_gpu_layers=0,  # GPU layers (0 = CPU only)
)

# Model ရဲ့ မျှော်လင့်ထားတဲ့ format အတိုင်း prompt ကို format လုပ်ပါ။
prompt = """<|im_start|>system
You are a creative storyteller.
<|im_end|>
<|im_start|>user
Write a creative story
<|im_end|>
<|im_start|>assistant
"""

# တိကျတဲ့ parameter ထိန်းချုပ်မှုနဲ့ response ကို generate လုပ်ပါ။
output = llm(
    prompt,
    max_tokens=200,
    temperature=0.8,
    top_p=0.95,
    frequency_penalty=0.5,
    presence_penalty=0.5,
    stop=["<|im_end|>"],
)

print(output["choices"][0]["text"])vLLM နဲ့ အဆင့်မြင့် အသုံးပြုမှုအတွက် InferenceClient ကို အသုံးပြုနိုင်ပါတယ်။
from huggingface_hub import InferenceClient

client = InferenceClient(model="http://localhost:8000/v1")

# အဆင့်မြင့် parameters ဥပမာ
response = client.chat_completion(
    messages=[
        {"role": "system", "content": "You are a creative storyteller."},
        {"role": "user", "content": "Write a creative story"},
    ],
    temperature=0.8,
    max_tokens=200,
    top_p=0.95,
)
print(response.choices[0].message.content)

# တိုက်ရိုက် text generation အတွက်
response = client.text_generation(
    "Write a creative story about space exploration",
    max_new_tokens=200,
    temperature=0.8,
    top_p=0.95,
    details=True,
)
print(response.generated_text)
OpenAI client ကိုလည်း အသုံးပြုနိုင်ပါတယ်။
from openai import OpenAI

client = OpenAI(base_url="http://localhost:8000/v1", api_key="not-needed")

# အဆင့်မြင့် parameters ဥပမာ
response = client.chat.completions.create(
    model="HuggingFaceTB/SmolLM2-360M-Instruct",
    messages=[
        {"role": "system", "content": "You are a creative storyteller."},
        {"role": "user", "content": "Write a creative story"},
    ],
    temperature=0.8,
    top_p=0.95,
    max_tokens=200,
)
print(response.choices[0].message.content)
vLLM က fine-grained control ပါဝင်တဲ့ native Python interface ကိုလည်း ပံ့ပိုးပေးပါတယ်-
from vllm import LLM, SamplingParams

# အဆင့်မြင့် parameters တွေနဲ့ model ကို Initialize လုပ်ပါ။
llm = LLM(
    model="HuggingFaceTB/SmolLM2-360M-Instruct",
    gpu_memory_utilization=0.85,
    max_num_batched_tokens=8192,
    max_num_seqs=256,
    block_size=16,
)

# Sampling parameters တွေကို Configure လုပ်ပါ။
sampling_params = SamplingParams(
    temperature=0.8,  # ပိုမိုဖန်တီးမှုရှိရန် ပိုမိုမြင့်မားသော တန်ဖိုး
    top_p=0.95,  # 95% ဖြစ်နိုင်ခြေအများဆုံး tokens များကို ထည့်သွင်းစဉ်းစားပါ။
    max_tokens=100,  # အများဆုံး အရှည်
    presence_penalty=1.1,  # ထပ်ခါတလဲလဲ မဖြစ်အောင် လျှော့ချပါ။
    frequency_penalty=1.1,  # ထပ်ခါတလဲလဲ မဖြစ်အောင် လျှော့ချပါ။
    stop=["\n\n", "###"],  # Stop sequences
)

# Text generate လုပ်ပါ။
prompt = "Write a creative story"
outputs = llm.generate(prompt, sampling_params)
print(outputs[0].outputs[0].text)

# Chat-style interactions အတွက်
chat_prompt = [
    {"role": "system", "content": "You are a creative storyteller."},
    {"role": "user", "content": "Write a creative story"},
]
formatted_prompt = llm.get_chat_template()(chat_prompt)  # Uses model's chat template
outputs = llm.generate(formatted_prompt, sampling_params)
print(outputs[0].outputs[0].text)Advanced Generation Control
Token Selection နှင့် Sampling
text ကို generate လုပ်တဲ့ လုပ်ငန်းစဉ်မှာ အဆင့်တိုင်းမှာ နောက်ထပ် token ကို ရွေးချယ်တာ ပါဝင်ပါတယ်။ ဒီရွေးချယ်မှု လုပ်ငန်းစဉ်ကို parameters အမျိုးမျိုးကနေတစ်ဆင့် ထိန်းချုပ်နိုင်ပါတယ် -
- Raw Logits: token တစ်ခုစီအတွက် မူရင်း output probabilities များ။
- Temperature: ရွေးချယ်မှုမှာရှိတဲ့ ကျပန်းဆန်မှုကို ထိန်းချုပ်ပါတယ် (ပိုမြင့်ရင် ပိုမိုဖန်တီးမှုရှိပါတယ်)။
- Top-p (Nucleus) Sampling: ဖြစ်နိုင်ခြေပမာဏ X% ကို ဖွဲ့စည်းထားတဲ့ ထိပ်ဆုံး tokens တွေကို စစ်ထုတ်ပါတယ်။
- Top-k Filtering: ဖြစ်နိုင်ခြေအများဆုံး tokens k ခုအထိ ရွေးချယ်မှုကို ကန့်သတ်ပါတယ်။
ဒီ parameters တွေကို ဘယ်လို configure လုပ်ရမလဲဆိုတာကတော့…
client.generate(
    "Write a creative story",
    temperature=0.8,  # ပိုမိုဖန်တီးမှုရှိရန် ပိုမိုမြင့်မားသော တန်ဖိုး
    top_p=0.95,  # 95% ဖြစ်နိုင်ခြေအများဆုံး tokens များကို ထည့်သွင်းစဉ်းစားပါ။
    top_k=50,  # ထိပ်ဆုံး 50 tokens များကို ထည့်သွင်းစဉ်းစားပါ။
    max_new_tokens=100,  # အများဆုံး အရှည်
    repetition_penalty=1.1,  # ထပ်ခါတလဲလဲ မဖြစ်အောင် လျှော့ချပါ။
)# OpenAI API compatibility မှတစ်ဆင့်
response = client.completions.create(
model="smollm2-1.7b-instruct", # Model name (llama.cpp server အတွက် မည်သည့် string မဆို ဖြစ်နိုင်သည်)
prompt="ဖန်တီးမှုရှိတဲ့ ပုံပြင်တစ်ပုဒ် ရေးပေးပါ။",
temperature=0.8, # ပိုမိုဖန်တီးမှုရှိရန် ပိုမိုမြင့်မားသော တန်ဖိုး
top_p=0.95, # 95% ဖြစ်နိုင်ခြေအများဆုံး tokens များကို ထည့်သွင်းစဉ်းစားပါ။
frequency_penalty=1.1, # မကြာခဏ ပေါ်လာသော tokens များကို ထပ်ခါတလဲလဲ မဖြစ်အောင် လျှော့ချပါ။
presence_penalty=0.1, # ရှိပြီးသား tokens များကို ထပ်ခါတလဲလဲ မဖြစ်အောင် လျှော့ချပါ။
max_tokens=100, # အများဆုံး အရှည်
)
# llama-cpp-python တိုက်ရိုက် access မှတစ်ဆင့်
output = llm(
"Write a creative story",
temperature=0.8,
top_p=0.95,
top_k=50,
max_tokens=100,
repeat_penalty=1.1,
)params = SamplingParams(
temperature=0.8, # ပိုမိုဖန်တီးမှုရှိရန် ပိုမိုမြင့်မားသော တန်ဖိုး
top_p=0.95, # 95% ဖြစ်နိုင်ခြေအများဆုံး tokens များကို ထည့်သွင်းစဉ်းစားပါ။
top_k=50, # ထိပ်ဆုံး 50 tokens များကို ထည့်သွင်းစဉ်းစားပါ။
max_tokens=100, # အများဆုံး အရှည်
presence_penalty=0.1, # ထပ်ခါတလဲလဲ မဖြစ်အောင် လျှော့ချပါ။
)
llm.generate("Write a creative story", sampling_params=params)ထပ်ခါတလဲလဲ ဖြစ်မှုကို ထိန်းချုပ်ခြင်း
frameworks နှစ်ခုလုံးက ထပ်ခါတလဲလဲ text generation ကို ကာကွယ်ဖို့ နည်းလမ်းတွေ ပံ့ပိုးပေးပါတယ်။
client.generate(
    "Write a varied text",
    repetition_penalty=1.1,  # ထပ်ခါတလဲလဲ ဖြစ်သော tokens များကို ဒဏ်ခတ်ပါ။
    no_repeat_ngram_size=3,  # 3-gram ထပ်ခါတလဲလဲ ဖြစ်မှုကို ကာကွယ်ပါ။
)# OpenAI API မှတစ်ဆင့်
response = client.completions.create(
model="smollm2-1.7b-instruct",
prompt="Write a varied text",
frequency_penalty=1.1, # မကြာခဏ ပေါ်လာသော tokens များကို ဒဏ်ခတ်ပါ။
presence_penalty=0.8, # ရှိပြီးသား tokens များကို ဒဏ်ခတ်ပါ။
)
# တိုက်ရိုက် library မှတစ်ဆင့်
output = llm(
"Write a varied text",
repeat_penalty=1.1, # Penalize repeated tokens
frequency_penalty=0.5, # အပို frequency penalty
presence_penalty=0.5, # အပို presence penalty
)params = SamplingParams(
presence_penalty=0.1, # Token ရှိခြင်းအတွက် ဒဏ်ခတ်ပါ။
frequency_penalty=0.1, # Token မကြာခဏ ပေါ်လာခြင်းအတွက် ဒဏ်ခတ်ပါ။
)အရှည် ထိန်းချုပ်ခြင်းနှင့် ရပ်တန့်ခြင်း Sequences များ
generation length ကို ထိန်းချုပ်နိုင်ပြီး ဘယ်အချိန်မှာ ရပ်တန့်ရမယ်ဆိုတာ သတ်မှတ်နိုင်ပါတယ်။
client.generate(
    "Generate a short paragraph",
    max_new_tokens=100,
    min_new_tokens=10,
    stop_sequences=["\n\n", "###"],
)# OpenAI API မှတစ်ဆင့်
response = client.completions.create(
model="smollm2-1.7b-instruct",
prompt="Generate a short paragraph",
max_tokens=100,
stop=["\n\n", "###"],
)
# တိုက်ရိုက် library မှတစ်ဆင့်
output = llm("Generate a short paragraph", max_tokens=100, stop=["\n\n", "###"])params = SamplingParams(
max_tokens=100,
min_tokens=10,
stop=["###", "\n\n"],
ignore_eos=False,
skip_special_tokens=True,
)Memory Management
frameworks နှစ်ခုလုံးက ထိရောက်တဲ့ inference အတွက် အဆင့်မြင့် memory management နည်းစနစ်တွေကို implement လုပ်ထားပါတယ်။
TGI က Flash Attention 2 နဲ့ continuous batching ကို အသုံးပြုပါတယ်။
# Memory optimization ပါဝင်တဲ့ Docker deployment
docker run --gpus all -p 8080:80 \
    --shm-size 1g \
    ghcr.io/huggingface/text-generation-inference:latest \
    --model-id HuggingFaceTB/SmolLM2-1.7B-Instruct \
    --max-batch-total-tokens 8192 \
--max-input-length 4096llama.cpp က quantization နဲ့ optimized memory layout ကို အသုံးပြုပါတယ်-
# Memory optimizations ပါဝင်တဲ့ Server
./server \
    -m smollm2-1.7b-instruct.Q4_K_M.gguf \
    --host 0.0.0.0 \
    --port 8080 \
    -c 2048 \               # Context size
    --threads 4 \           # CPU threads
    --n-gpu-layers 32 \     # ပိုကြီးတဲ့ models တွေအတွက် GPU layers များများ အသုံးပြုပါ
    --mlock \               # Swapping မဖြစ်စေရန် memory ကို lock လုပ်ပါ
    --cont-batching         # Continuous batching ကို ဖွင့်ပါ။
သင့် GPU အတွက် အရမ်းကြီးတဲ့ models တွေအတွက် CPU offloading ကို အသုံးပြုနိုင်ပါတယ်။
./server \
    -m smollm2-1.7b-instruct.Q4_K_M.gguf \
    --n-gpu-layers 20 \     # ပထမဆုံး 20 layers ကို GPU မှာ ထားပါ
--threads 8 # CPU layers တွေအတွက် CPU threads များများ အသုံးပြုပါvLLM က အကောင်းဆုံး memory management အတွက် PagedAttention ကို အသုံးပြုပါတယ်။
from vllm.engine.arg_utils import AsyncEngineArgs

engine_args = AsyncEngineArgs(
    model="HuggingFaceTB/SmolLM2-1.7B-Instruct",
    gpu_memory_utilization=0.85,
    max_num_batched_tokens=8192,
    block_size=16,
)

llm = LLM(engine_args=engine_args)အရင်းအမြစ်များ
- Text Generation Inference Documentation
- TGI GitHub Repository
- vLLM Documentation
- vLLM GitHub Repository
- PagedAttention Paper
- llama.cpp GitHub Repository
- llama-cpp-python Repository
ဝေါဟာရ ရှင်းလင်းချက် (Glossary)
- Optimized Inference Deployment: AI မော်ဒယ်များကို အသုံးပြုသူများထံသို့ ထိရောက်စွာနှင့် လျင်မြန်စွာ ဝန်ဆောင်မှုပေးနိုင်ရန် အကောင်းဆုံးဖြစ်အောင် ပြုလုပ်ထားသော လုပ်ငန်းစဉ်။
- LLM (Large Language Model): လူသားဘာသာစကားကို နားလည်ပြီး ထုတ်လုပ်ပေးနိုင်တဲ့ အလွန်ကြီးမားတဲ့ Artificial Intelligence (AI) မော်ဒယ်တွေ ဖြစ်ပါတယ်။
- Text Generation Inference (TGI): Hugging Face မှ LLM များအတွက် မြန်နှုန်းမြင့် text generation ကို အထူးပြုထားသော framework တစ်ခု။
- vLLM: မြန်နှုန်းမြင့် LLM inference အတွက် ဒီဇိုင်းထုတ်ထားသော library တစ်ခုဖြစ်ပြီး PagedAttention ကို အသုံးပြုသည်။
- llama.cpp: LLaMA models များကို consumer hardware ပေါ်တွင် run နိုင်ရန် အဓိကထားသော C/C++ implementation တစ်ခု။
- Production Environments: ဆော့ဖ်ဝဲလ် သို့မဟုတ် မော်ဒယ်များကို အစစ်အမှန် အသုံးပြုသူများထံသို့ ဝန်ဆောင်မှုပေးသည့် ပတ်ဝန်းကျင်။
- Inference Efficiency: AI မော်ဒယ်တစ်ခုက input data မှ output ကို ထုတ်လုပ်ရာတွင် အချိန်နှင့် အရင်းအမြစ်များကို မည်မျှ ထိရောက်စွာ အသုံးပြုနိုင်မှု။
- Framework Selection Guide: မတူညီသော အသုံးပြုမှုပုံစံများအတွက် သင့်လျော်သော framework ကို ရွေးချယ်ရန် လမ်းညွှန်။
- Memory Management: ကွန်ပျူတာ၏ memory ကို ထိထိရောက်ရောက် စီမံခန့်ခွဲခြင်း။
- Performance: စနစ်တစ်ခု၏ အလုပ်လုပ်နိုင်စွမ်း သို့မဟုတ် အရှိန်အဟုန်။
- Flash Attention 2: Transformer models များတွင် attention mechanism ကို memory bandwidth bottlenecks များကို ဖြေရှင်းပေးခြင်းဖြင့် optimization လုပ်သော နည်းပညာ။
- Continuous Batching: GPU ကို အလုပ်များနေအောင် ထိန်းထားနိုင်ရန် requests များကို အဆက်မပြတ် batch လုပ်ပြီး ပေးပို့သော နည်းလမ်း။
- GPU (Graphics Processing Unit): AI/ML လုပ်ငန်းများတွင် အရှိန်မြှင့်ရန် အသုံးပြုသော processor။
- CPU (Central Processing Unit): ကွန်ပျူတာ၏ အဓိက processor။
- VRAM (Video RAM): GPU တွင် အသုံးပြုသော RAM အမျိုးအစား။
- PagedAttention: LLM inference တွင် KV cache memory management ကို optimization လုပ်သော နည်းပညာ။
- KV Cache: Text generation လုပ်နေစဉ်အတွင်း Transformer model က သိမ်းဆည်းထားသော attention keys နှင့် values များ။
- Memory Paging: Memory ကို fixed-size “pages” များအဖြစ် ပိုင်းခြားခြင်း။
- Memory Fragmentation: Memory ကို ထိရောက်စွာ အသုံးမပြုနိုင်ဘဲ အပိုင်းအစများအဖြစ် ပြန့်ကျဲနေခြင်း။
- Throughput: အချိန်ယူနစ်တစ်ခုအတွင်း စနစ်တစ်ခုက လုပ်ဆောင်နိုင်သော လုပ်ငန်းပမာဏ။
- Quantization: Model weights တွေရဲ့ precision ကို လျှော့ချခြင်းဖြင့် model size နဲ့ memory requirements တွေကို လျှော့ချသော နည်းလမ်း။
- INT8 (8-bit integers): 8-bit integers ဖြင့် ကိုယ်စားပြုသော ကိန်းဂဏန်းများ။
- GGML/GGUF Format: llama.cpp မှ quantized inference အတွက် အကောင်းဆုံးဖြစ်အောင် ပြုလုပ်ထားသော custom tensor formats များ။
- Mixed Precision: Model ၏ မတူညီသော အစိတ်အပိုင်းများတွင် မတူညီသော quantization levels များကို အသုံးပြုခြင်း။
- CPU Architectures: CPU အမျိုးအစားများ (ဥပမာ - AVX2, AVX-512, NEON)။
- Local Deployments: မော်ဒယ်များကို သုံးစွဲသူ၏ ကွန်ပျူတာ သို့မဟုတ် local server ပေါ်တွင် တပ်ဆင်အသုံးပြုခြင်း။
- Edge Devices: ကွန်ပျူတာကွန်ရက်၏ အစွန်းပိုင်း (ဥပမာ - mobile devices, IoT devices) တွင် အလုပ်လုပ်သော devices များ။
- Enterprise-level Deployment: လုပ်ငန်းကြီးများအတွက် ဒီဇိုင်းထုတ်ထားသော deployment ပုံစံ။
- Kubernetes Support: Containerized application များကို automate လုပ်ပြီး deploy, scale လုပ်ရန်အတွက် Kubernetes platform ကို ထောက်ပံ့ခြင်း။
- Prometheus: Monitoring system တစ်ခု။
- Grafana: Data visualization tool တစ်ခု။
- Automatic Scaling: requests များ၏ ပမာဏအပေါ် မူတည်ပြီး resources များကို အလိုအလျောက် ချိန်ညှိခြင်း။
- Content Filtering: မသင့်လျော်သော သို့မဟုတ် အန္တရာယ်ရှိသော အကြောင်းအရာများကို စစ်ထုတ်ခြင်း။
- Rate Limiting: အချိန်အတိုင်းအတာတစ်ခုအတွင်း requests အရေအတွက်ကို ကန့်သတ်ခြင်း။
- Developer-friendly Approach: Developers များအတွက် အသုံးပြုရလွယ်ကူသော ချဉ်းကပ်မှု။
- OpenAI API Compatibility: OpenAI ၏ API နှင့် တွဲဖက်အသုံးပြုနိုင်ခြင်း။
- Ray: Distributed computing အတွက် Python framework တစ်ခု။
- Portability: ဆော့ဖ်ဝဲလ်တစ်ခုကို မတူညီသော platform များ သို့မဟုတ် environments များသို့ အလွယ်တကူ ရွှေ့ပြောင်းအသုံးပြုနိုင်ခြင်း။
docker run --gpus all: Docker container ကို GPU အားလုံးကို အသုံးပြုပြီး run ရန် command။--shm-size 1g: Shared memory size ကို 1GB အဖြစ် သတ်မှတ်ခြင်း။InferenceClient: Hugging Face Hub မှ inference endpoint များနှင့် အပြန်အလှန်ဆက်သွယ်ရန် Python client။openai: OpenAI API ကို အသုံးပြုရန်အတွက် Python client library။git clone: Git repository ကို download လုပ်ရန် command။make: Source code ကို executable file အဖြစ် build လုပ်ရန် command။curl -L -O: URL မှ file တစ်ခုကို download လုပ်ရန် command။--host,--port: Server ကို listen လုပ်မည့် host address နှင့် port နံပါတ်။--n-gpu-layers: GPU တွင် ထားရှိမည့် model layers အရေအတွက်။- Context Size (
-c): Model က တစ်ကြိမ်တည်း လုပ်ဆောင်နိုင်သော tokens အရေအတွက် အများဆုံး။ - CPU Threads (
--threads): CPU တွင် အသုံးပြုမည့် threads အရေအတွက်။ - Batch Size (
--batch-size): Prompt evaluation အတွက် batch အရွယ်အစား။ llama_cpp: llama.cpp C++ library အတွက် Python bindings။LlamaClass: llama-cpp-python library မှ LLaMA model ကို load လုပ်ရန် class။n_ctx: Model ၏ context window size။n_threads: CPU threads အရေအတွက်။n_gpu_layers: GPU ပေါ်တွင် ထားရှိမည့် layers အရေအတွက်။SamplingParams: vLLM တွင် text generation အတွက် sampling parameters များကို သတ်မှတ်ရန် class။- Temperature: generated text ၏ randomness သို့မဟုတ် creativity ကို ထိန်းချုပ်သော parameter။
- Top-p (Nucleus) Sampling: ဖြစ်နိုင်ခြေအများဆုံး tokens အချို့ကို ရွေးချယ်ပြီး ၎င်းတို့၏ စုစုပေါင်း ဖြစ်နိုင်ခြေသည် သတ်မှတ်ထားသော တန်ဖိုး (ဥပမာ - 0.95) ထက် မကျော်လွန်စေရ။
- Top-k Filtering: ဖြစ်နိုင်ခြေအများဆုံး tokens
kခုကိုသာ ရွေးချယ်ပြီး ကျန်များကို လျစ်လျူရှုသည်။ max_new_tokens/max_tokens: Generate လုပ်မည့် tokens အရေအတွက် အများဆုံး။repetition_penalty: ထပ်ခါတလဲလဲ ဖြစ်သော tokens များကို ဒဏ်ခတ်ရန် parameter။do_sample: True ဖြစ်ပါက sampling ကို အသုံးပြုပြီး၊ False ဖြစ်ပါက greedy decoding ကို အသုံးပြုသည်။frequency_penalty: မကြာခဏ ပေါ်လာသော tokens များကို ထပ်ခါတလဲလဲ မဖြစ်အောင် လျှော့ချရန် parameter။presence_penalty: ရှိပြီးသား tokens များကို ထပ်ခါတလဲလဲ မဖြစ်အောင် လျှော့ချရန် parameter။min_new_tokens/min_tokens: Generate လုပ်မည့် tokens အရေအတွက် အနည်းဆုံး။stop_sequences: Generated text ကို ရပ်တန့်ရန်အတွက် သတ်မှတ်ထားသော sequence များ။ignore_eos: End-of-sequence token ကို လျစ်လျူရှုရန်။skip_special_tokens: Generated text မှ special tokens များကို ဖယ်ရှားရန်။- CPU Offloading: Model ၏ အစိတ်အပိုင်းအချို့ကို GPU မှ CPU သို့ ရွှေ့ပြောင်းပြီး လုပ်ဆောင်ခြင်း။
--mlock: Memory ကို lock လုပ်ပြီး swapping မဖြစ်စေရန် ကာကွယ်ခြင်း။