Deploying 🤗 ViT on Kubernetes with TF Serving


In the previous post, we showed how to deploy a Vision Transformer (ViT) model from 🤗 Transformers locally with TensorFlow Serving. We covered topics like embedding preprocessing and postprocessing operations within the Vision Transformer model, handling gRPC requests, and more!
While local deployments are an excellent head start to building something useful, you’d need to perform deployments that can serve many users in real-life projects. In this post, you’ll learn how to scale the local deployment from the previous post with Docker and Kubernetes. Therefore, we assume some familiarity with Docker and Kubernetes.
This post builds on top of the previous post, so, we highly recommend reading it first. You can find all the code discussed throughout this post in this repository.
Why go with Docker and Kubernetes?
The basic workflow of scaling up a deployment like ours includes the following steps:
Containerizing the application logic: The application logic involves a served model that can handle requests and return predictions. For containerization, Docker is the industry-standard go-to.
Deploying the Docker container: You have various options here. The most widely used option is deploying the Docker container on a Kubernetes cluster. Kubernetes provides numerous deployment-friendly features (e.g. autoscaling and security). You can use a solution like Minikube to manage Kubernetes clusters locally or a serverless solution like Elastic Kubernetes Service (EKS).
You might be wondering why use an explicit setup like this in the age of Sagemaker, Vertex AI that provides ML deployment-specific features right off the bat. It is fair to think about it.
The above workflow is widely adopted in the industry, and many organizations benefit from it. It has already been battle-tested for many years. It also lets you have more granular control of your deployments while abstracting away the non-trivial bits.
This post uses Google Kubernetes Engine (GKE)
to provision and manage a Kubernetes cluster. We assume you already have a
billing-enabled GCP project if you’re using GKE. Also, note that you’d need to
configure the gcloud utility for
performing the deployment on GKE. But the concepts discussed in this post
equally apply should you decide to use Minikube.
Note: The code snippets shown in this post can be executed on a Unix terminal
as long as you have configured the gcloud utility along with Docker and kubectl.
More instructions are available in the accompanying repository.
Containerization with Docker
The serving model can handle raw image inputs as bytes and is capable of preprocessing and postprocessing.
In this section, you’ll see how to containerize that model using the
base TensorFlow Serving Image. TensorFlow Serving consumes models
in the SavedModel format. Recall how you
obtained such a SavedModel in the previous post. We assume that
you have the SavedModel compressed in tar.gz format. You can fetch
it from here
just in case. Then SavedModel should be placed in the special directory
structure of <MODEL_NAME>/<VERSION>/<SavedModel>. This is how TensorFlow Serving simultaneously manages multiple deployments of different versioned models.
Preparing the Docker image
The shell script below places the SavedModel in hf-vit/1 under the
parent directory models. You'll copy everything inside it when preparing
the Docker image. There is only one model in this example, but this
is a more generalizable approach.
$ MODEL_TAR=model.tar.gz
$ MODEL_NAME=hf-vit
$ MODEL_VERSION=1
$ MODEL_PATH=models/$MODEL_NAME/$MODEL_VERSION

$ mkdir -p $MODEL_PATH
$ tar -xvf $MODEL_TAR --directory $MODEL_PATH
Below, we show how the models directory is structured in our case:
$ find /models
/models
/models/hf-vit
/models/hf-vit/1
/models/hf-vit/1/keras_metadata.pb
/models/hf-vit/1/variables
/models/hf-vit/1/variables/variables.index
/models/hf-vit/1/variables/variables.data-00000-of-00001
/models/hf-vit/1/assets
/models/hf-vit/1/saved_model.pb
The custom TensorFlow Serving image should be built on top of the base one.
There are various approaches for this, but you’ll do this by running a Docker container as illustrated in the
official document. We start by running tensorflow/serving image in background mode, then the entire models directory is copied to the running container
as below.
$ docker run -d --name serving_base tensorflow/serving
$ docker cp models/ serving_base:/models/
We used the official Docker image of TensorFlow Serving as the base, but you can use ones that you have built from source as well.
Note: TensorFlow Serving benefits from hardware optimizations that leverage instruction sets such as AVX512. These instruction sets can speed up deep learning model inference. So, if you know the hardware on which the model will be deployed, it’s often beneficial to obtain an optimized build of the TensorFlow Serving image and use it throughout.
Now that the running container has all the required files in the
appropriate directory structure, we need to create a new Docker image
that includes these changes. This can be done with the docker commit command below, and you'll have a new Docker image named $NEW_IMAGE.
One important thing to note is that you need to set the MODEL_NAME
environment variable to the model name, which is hf-vit in this
case. This tells TensorFlow Serving what model to deploy.
$ NEW_IMAGE=tfserving:$MODEL_NAME

$ docker commit \
    --change "ENV MODEL_NAME $MODEL_NAME" \
    serving_base $NEW_IMAGE
Running the Docker image locally
Lastly, you can run the newly built Docker image locally to see if it
works fine. Below you see the output of the docker run command. Since
the output is verbose, we trimmed it down to focus on the important
bits. Also, it is worth noting that it opens up 8500 and 8501
ports for gRPC and HTTP/REST endpoints, respectively.
$ docker run -p 8500:8500 -p 8501:8501 -t $NEW_IMAGE &


---------OUTPUT---------
(Re-)adding model: hf-vit
Successfully reserved resources to load servable {name: hf-vit version: 1}
Approving load for servable version {name: hf-vit version: 1}
Loading servable version {name: hf-vit version: 1}
Reading SavedModel from: /models/hf-vit/1
Reading SavedModel debug info (if present) from: /models/hf-vit/1
Successfully loaded servable version {name: hf-vit version: 1}
Running gRPC ModelServer at 0.0.0.0:8500 ...
Exporting HTTP/REST API at:localhost:8501 ...
Pushing the Docker image
The final step here is to push the Docker image to an image repository. You'll use Google Container Registry (GCR) for this purpose. The following lines of code can do this for you:
$ GCP_PROJECT_ID=<GCP_PROJECT_ID>
$ GCP_IMAGE=gcr.io/$GCP_PROJECT_ID/$NEW_IMAGE

$ gcloud auth configure-docker
$ docker tag $NEW_IMAGE $GCP_IMAGE
$ docker push $GCP_IMAGE
Since we’re using GCR, you need to prefix the
Docker image tag (note the other formats too) with gcr.io/<GCP_PROJECT_ID> . With the Docker image prepared and pushed to GCR, you can now proceed to deploy it on a
Kubernetes cluster.
Deploying on a Kubernetes cluster
Deployment on a Kubernetes cluster requires the following:
Provisioning a Kubernetes cluster, done with Google Kubernetes Engine (GKE) in this post. However, you’re welcome to use other platforms and tools like EKS or Minikube.
Connecting to the Kubernetes cluster to perform a deployment.
Writing YAML manifests.
Performing deployment with the manifests with a utility tool,
kubectl.
Let’s go over each of these steps.
Provisioning a Kubernetes cluster on GKE
You can use a shell script like so for this (available here):
$ GKE_CLUSTER_NAME=tfs-cluster
$ GKE_CLUSTER_ZONE=us-central1-a
$ NUM_NODES=2
$ MACHINE_TYPE=n1-standard-8

$ gcloud container clusters create $GKE_CLUSTER_NAME \
    --zone=$GKE_CLUSTER_ZONE \
    --machine-type=$MACHINE_TYPE \
    --num-nodes=$NUM_NODES
GCP offers a variety of machine types to configure the deployment in a way you want. We encourage you to refer to the documentation to learn more about it.
Once the cluster is provisioned, you need to connect to it to perform the deployment. Since GKE is used here, you also need to authenticate yourself. You can use a shell script like so to do both of these:
$ GCP_PROJECT_ID=<GCP_PROJECT_ID>

$ export USE_GKE_GCLOUD_AUTH_PLUGIN=True

$ gcloud container clusters get-credentials $GKE_CLUSTER_NAME \
    --zone $GKE_CLUSTER_ZONE \
    --project $GCP_PROJECT_ID
The gcloud container clusters get-credentials command takes care of
both connecting to the cluster and authentication. Once this is done,
you’re ready to write the manifests.
Writing Kubernetes manifests
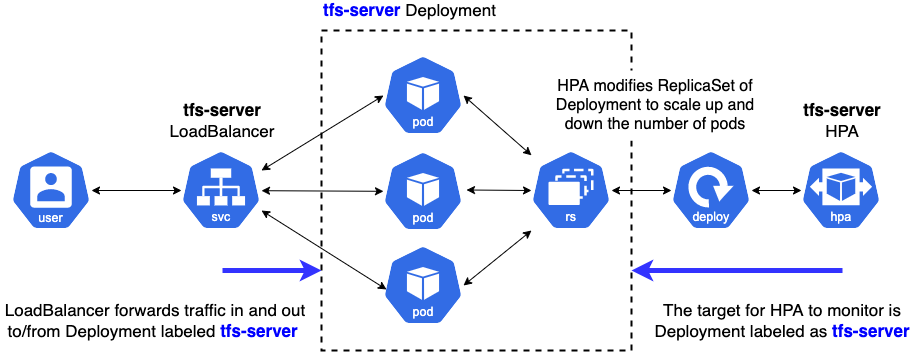
Kubernetes manifests are written in YAML files. While it’s possible to use a single manifest file to perform the deployment, creating separate manifest files is often beneficial for delegating the separation of concerns. It’s common to use three manifest files for achieving this:
deployment.yamldefines the desired state of the Deployment by providing the name of the Docker image, additional arguments when running the Docker image, the ports to open for external accesses, and the limits of resources.service.yamldefines connections between external clients and inside Pods in the Kubernetes cluster.hpa.yamldefines rules to scale up and down the number of Pods consisting of the Deployment, such as the percentage of CPU utilization.
You can find the relevant manifests for this post here. Below, we present a pictorial overview of how these manifests are consumed.
Next, we go through the important parts of each of these manifests.
deployment.yaml:
apiVersion: apps/v1
kind: Deployment
metadata:
  labels:
    app: tfs-server
  name: tfs-server
...
spec:
  containers:
  - image: gcr.io/$GCP_PROJECT_ID/tfserving-hf-vit:latest
    name: tfs-k8s
    imagePullPolicy: Always
    args: ["--tensorflow_inter_op_parallelism=2",
           "--tensorflow_intra_op_parallelism=8"]
    ports:
    - containerPort: 8500
      name: grpc
    - containerPort: 8501
      name: restapi
    resources:
      limits:
        cpu: 800m
      requests:
        cpu: 800m
...
You can configure the names like tfs-server, tfs-k8s any way you
want. Under containers, you specify the Docker image URI the
deployment will use. The current resource utilization gets monitored by
setting the allowed bounds of the resources for the container. It
can let Horizontal Pod Autoscaler (discussed later) decide to scale up or down the number of
containers. requests.cpu is the minimal amount of CPU resources to
make the container work correctly set by operators. Here 800m means 80%
of the whole CPU resource. So, HPA monitors the average CPU utilization
out of the sum of requests.cpu across all Pods to make scaling
decisions.
Besides Kubernetes specific configuration, you can specify TensorFlow
Serving specific options in args.In this case, you have two:
tensorflow_inter_op_parallelism, which sets the number of threads to run in parallel to execute independent operations. The recommended value for this is 2.tensorflow_intra_op_parallelism, which sets the number of threads to run in parallel to execute individual operations. The recommended value is the number of physical cores the deployment CPU has.
You can learn more about these options (and others) and tips on tuning them for deployment from here and here.
service.yaml:
apiVersion: v1
kind: Service
metadata:
  labels:
    app: tfs-server
  name: tfs-server
spec:
  ports:
  - port: 8500
    protocol: TCP
    targetPort: 8500
    name: tf-serving-grpc
  - port: 8501
    protocol: TCP
    targetPort: 8501
    name: tf-serving-restapi
  selector:
    app: tfs-server
  type: LoadBalancer
We made the service type ‘LoadBalancer’ so the endpoints are exposed externally to the Kubernetes cluster. It selects the ‘tfs-server’ Deployment to make connections with external clients via the specified ports. We open two ports of ‘8500’ and ‘8501’ for gRPC and HTTP/REST connections respectively.
hpa.yaml:
apiVersion: autoscaling/v1
kind: HorizontalPodAutoscaler
metadata:
 name: tfs-server

spec:
 scaleTargetRef:
   apiVersion: apps/v1
   kind: Deployment
   name: tfs-server
 minReplicas: 1
 maxReplicas: 3
 targetCPUUtilizationPercentage: 80
HPA stands for Horizontal Pod Autoscaler. It sets criteria to decide when to scale the number of Pods in the target Deployment. You can learn more about the autoscaling algorithm internally used by Kubernetes here.
Here you specify how Kubernetes should handle autoscaling. In
particular, you define the replica bound within which it should perform
autoscaling – minReplicas\ and maxReplicas and the target CPU
utilization. targetCPUUtilizationPercentage is an important metric
for autoscaling. The following thread aptly summarizes what it means
(taken from here):
The CPU utilization is the average CPU usage of all Pods in a deployment across the last minute divided by the requested CPU of this deployment. If the mean of the Pods' CPU utilization is higher than the target you defined, your replicas will be adjusted.
Recall specifying resources in the deployment manifest. By
specifying the resources, the Kubernetes control plane starts
monitoring the metrics, so the targetCPUUtilization works.
Otherwise, HPA doesn't know the current status of the Deployment.
You can experiment and set these to the required numbers based on your requirements. Note, however, that autoscaling will be contingent on the quota you have available on GCP since GKE internally uses Google Compute Engine to manage these resources.
Performing the deployment
Once the manifests are ready, you can apply them to the currently
connected Kubernetes cluster with the
kubectl apply
command.
$ kubectl apply -f deployment.yaml
$ kubectl apply -f service.yaml
$ kubectl apply -f hpa.yaml
While using kubectl is fine for applying each of the manifests to
perform the deployment, it can quickly become harder if you have many
different manifests. This is where a utility like
Kustomize can be helpful. You simply
define another specification named kustomization.yaml like so:
commonLabels:
  app: tfs-server
resources:
- deployment.yaml
- hpa.yaml
- service.yaml
apiVersion: kustomize.config.k8s.io/v1beta1
kind: Kustomization
Then it’s just a one-liner to perform the actual deployment:
$ kustomize build . | kubectl apply -f -
Complete instructions are available here. Once the deployment has been performed, we can retrieve the endpoint IP like so:
$ kubectl rollout status deployment/tfs-server
$ kubectl get svc tfs-server --watch

---------OUTPUT---------
NAME        TYPE          CLUSTER-IP   EXTERNAL-IP  PORT(S)                        AGE
tfs-server  LoadBalancer  xxxxxxxxxx   xxxxxxxxxx   8500:30869/TCP,8501:31469/TCP  xxx
Note down the external IP when it becomes available.
And that sums up all the steps you need to deploy your model on Kubernetes! Kubernetes elegantly provides abstractions for complex bits like autoscaling and cluster management while letting you focus on the crucial aspects you should care about while deploying a model. These include resource utilization, security (we didn’t cover that here), performance north stars like latency, etc.
Testing the endpoint
Given that you got an external IP for the endpoint, you can use the following listing to test it:
import tensorflow as tf
import json
import base64

image_path = tf.keras.utils.get_file(
    "image.jpg", "http://images.cocodataset.org/val2017/000000039769.jpg"
)
bytes_inputs = tf.io.read_file(image_path)
b64str = base64.urlsafe_b64encode(bytes_inputs.numpy()).decode("utf-8")
data = json.dumps(
    {"signature_name": "serving_default", "instances": [b64str]}
)

json_response = requests.post(
    "http://<ENDPOINT-IP>:8501/v1/models/hf-vit:predict",
    headers={"content-type": "application/json"},
    data=data
)
print(json.loads(json_response.text))

---------OUTPUT---------
{'predictions': [{'label': 'Egyptian cat', 'confidence': 0.896659195}]}
If you’re interested to know how this deployment would perform if it meets more traffic then we recommend you to check this article. Refer to the corresponding repository to know more about running load tests with Locust and visualize the results.
Notes on different TF Serving configurations
TensorFlow Serving provides various options to tailor the deployment based on your application use case. Below, we briefly discuss some of them.
enable_batching enables the batch inference capability that
collects incoming requests with a certain amount of timing window,
collates them as a batch, performs a batch inference, and returns the
results of each request to the appropriate clients. TensorFlow Serving
provides a rich set of configurable options (such as max_batch_size,
num_batch_threads) to tailor your deployment needs. You can learn
more about them
here. Batching is
particularly beneficial for applications where you don't need predictions from a model
instantly. In those cases, you'd typically gather together multiple samples for prediction in batches and
then send those batches for prediction. Lucky for us, TensorFlow Serving can configure all of these
automatically when we enable its batching capabilities.
enable_model_warmup warms up some of the TensorFlow components
that are lazily instantiated with dummy input data. This way, you can
ensure everything is appropriately loaded up and that there will be no
lags during the actual service time.
Conclusion
In this post and the associated repository, you learned about deploying the Vision Transformer model from 🤗 Transformers on a Kubernetes cluster. If you’re doing this for the first time, the steps may appear to be a little daunting, but once you get the grasp, they’ll soon become an essential component of your toolbox. If you were already familiar with this workflow, we hope this post was still beneficial for you.
We applied the same deployment workflow for an ONNX-optimized version of the same Vision Transformer model. For more details, check out this link. ONNX-optimized models are especially beneficial if you're using x86 CPUs for deployment.
In the next post, we’ll show you how to perform these deployments with
significantly less code with Vertex AI – more like
model.deploy(autoscaling_config=...) and boom! We hope you’re just as
excited as we are.
Acknowledgement
Thanks to the ML Developer Relations Program team at Google, which provided us with GCP credits for conducting the experiments.