LLaVA-Onevision Model Card
Check out also the Google Colab demo to run Llava on a free-tier Google Colab instance:
Below is the model card of 7B LLaVA-Onevision model which is copied from the original LLaVA-Onevision model card that you can find here.
Model details
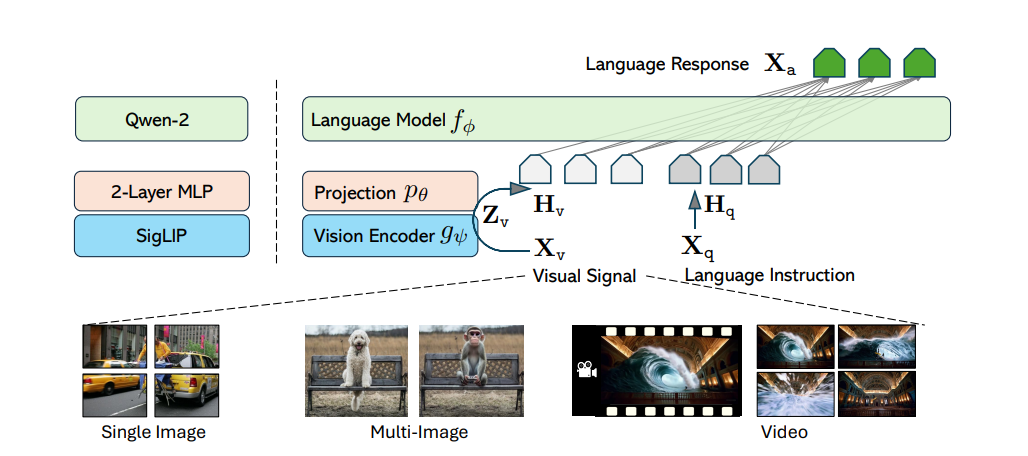
Model type: LLaVA-Onevision is an open-source multimodal LLM trained by fine-tuning Qwen2 on GPT-generated multimodal instruction-following data. LLaVA-OneVision is the first single model that can simultaneously push the performance boundaries of open LMMs in three important computer vision scenarios: single-image, multi-image, and video scenarios. Importantly, the design of LLaVA-OneVision allows strong transfer learning across different modalities/scenarios, yielding new emerging capabilities. In particular, strong video understanding and cross-scenario capabilities are demonstrated through task transfer from images to videos.
Model date: LLaVA-Onevision-7b-si was added in August 2024.
Paper or resources for more information: https://llava-vl.github.io/
- Architecture: SO400M + Qwen2
- Pretraining Stage: LCS-558K, 1 epoch, projector
- Mid Stage: A mixture of 4.7M high-quality synthetic data, 1 epoch, full model
- Final-Image Stage: A mixture of 3.6M single-image data, 1 epoch, full model
- OneVision Stage: A mixture of 1.6M single-image/multi-image/video data, 1 epoch, full model
- Precision: bfloat16
How to use the model
First, make sure to have transformers installed from branch or transformers >= 4.45.0.
The model supports multi-image and multi-prompt generation. Meaning that you can pass multiple images in your prompt. Make sure also to follow the correct prompt template by applyong chat template:
Using pipeline:
Below we used "llava-hf/llava-onevision-qwen2-7b-ov-hf" checkpoint.
from transformers import pipeline, AutoProcessor
from PIL import Image
import requests

model_id = "llava-hf/llava-onevision-qwen2-7b-ov-hf"
pipe = pipeline("image-to-text", model=model_id)
processor = AutoProcessor.from_pretrained(model_id)

url = "https://huggingface.co/datasets/huggingface/documentation-images/resolve/main/transformers/tasks/ai2d-demo.jpg"
image = Image.open(requests.get(url, stream=True).raw)

# Define a chat history and use `apply_chat_template` to get correctly formatted prompt
# Each value in "content" has to be a list of dicts with types ("text", "image")
conversation = [
    {

      "role": "user",
      "content": [
          {"type": "text", "text": "What does the label 15 represent? (1) lava (2) core (3) tunnel (4) ash cloud"},
          {"type": "image"},
        ],
    },
]
prompt = processor.apply_chat_template(conversation, add_generation_prompt=True)

outputs = pipe(image, prompt=prompt, generate_kwargs={"max_new_tokens": 200})
print(outputs)
>>> {"generated_text": "user\n\nWhat does the label 15 represent? (1) lava (2) core (3) tunnel (4) ash cloud\nassistant\nLava"}
Using pure transformers:
Below is an example script to run generation in float16 precision on a GPU device:
import requests
from PIL import Image

import torch
from transformers import AutoProcessor, LlavaOnevisionForConditionalGeneration

model_id = "llava-hf/llava-onevision-qwen2-7b-ov-hf"
model = LlavaOnevisionForConditionalGeneration.from_pretrained(
    model_id,
    torch_dtype=torch.float16,
    low_cpu_mem_usage=True,
).to(0)

processor = AutoProcessor.from_pretrained(model_id)

# Define a chat history and use `apply_chat_template` to get correctly formatted prompt
# Each value in "content" has to be a list of dicts with types ("text", "image")
conversation = [
    {

      "role": "user",
      "content": [
          {"type": "text", "text": "What are these?"},
          {"type": "image"},
        ],
    },
]
prompt = processor.apply_chat_template(conversation, add_generation_prompt=True)

image_file = "http://images.cocodataset.org/val2017/000000039769.jpg"
raw_image = Image.open(requests.get(image_file, stream=True).raw)
inputs = processor(images=raw_image, text=prompt, return_tensors='pt').to(0, torch.float16)

output = model.generate(**inputs, max_new_tokens=200, do_sample=False)
print(processor.decode(output[0][2:], skip_special_tokens=True))
Model optimization
4-bit quantization through bitsandbytes library
First make sure to install bitsandbytes, pip install bitsandbytes and make sure to have access to a CUDA compatible GPU device. Simply change the snippet above with:
model = LlavaOnevisionForConditionalGeneration.from_pretrained(
    model_id,
    torch_dtype=torch.float16,
    low_cpu_mem_usage=True,
+   load_in_4bit=True
)
Use Flash-Attention 2 to further speed-up generation
First make sure to install flash-attn. Refer to the original repository of Flash Attention regarding that package installation. Simply change the snippet above with:
model = LlavaOnevisionForConditionalGeneration.from_pretrained(
    model_id,
    torch_dtype=torch.float16,
    low_cpu_mem_usage=True,
+   use_flash_attention_2=True
).to(0)
Citation
@misc{li2024llavaonevisioneasyvisualtask,
      title={LLaVA-OneVision: Easy Visual Task Transfer},
      author={Bo Li and Yuanhan Zhang and Dong Guo and Renrui Zhang and Feng Li and Hao Zhang and Kaichen Zhang and Yanwei Li and Ziwei Liu and Chunyuan Li},
      year={2024},
      eprint={2408.03326},
      archivePrefix={arXiv},
      primaryClass={cs.CV},
      url={https://arxiv.org/abs/2408.03326},
}
- Downloads last month
- 42,997
