Diffusers documentation
Unconditional image generation
Unconditional image generation
Unconditional image generation is not conditioned on any text or images, unlike text- or image-to-image models. It only generates images that resemble its training data distribution.
This guide will show you how to train an unconditional image generation model on existing datasets as well as your own custom dataset. All the training scripts for unconditional image generation can be found here if you’re interested in learning more about the training details.
Before running the script, make sure you install the library’s training dependencies:
pip install diffusers[training] accelerate datasets
Next, initialize an 🤗 Accelerate environment with:
accelerate config
To setup a default 🤗 Accelerate environment without choosing any configurations:
accelerate config default
Or if your environment doesn’t support an interactive shell like a notebook, you can use:
from accelerate.utils import write_basic_config

write_basic_config()
Upload model to Hub
You can upload your model on the Hub by adding the following argument to the training script:
--push_to_hub
Save and load checkpoints
It is a good idea to regularly save checkpoints in case anything happens during training. To save a checkpoint, pass the following argument to the training script:
--checkpointing_steps=500
The full training state is saved in a subfolder in the output_dir every 500 steps, which allows you to load a checkpoint and resume training if you pass the --resume_from_checkpoint argument to the training script:
--resume_from_checkpoint="checkpoint-1500"Finetuning
You’re ready to launch the training script now! Specify the dataset name to finetune on with the --dataset_name argument and then save it to the path in --output_dir.
💡 A full training run takes 2 hours on 4xV100 GPUs.
For example, to finetune on the Oxford Flowers dataset:
accelerate launch train_unconditional.py \
  --dataset_name="huggan/flowers-102-categories" \
  --resolution=64 \
  --output_dir="ddpm-ema-flowers-64" \
  --train_batch_size=16 \
  --num_epochs=100 \
  --gradient_accumulation_steps=1 \
  --learning_rate=1e-4 \
  --lr_warmup_steps=500 \
  --mixed_precision=no \
  --push_to_hub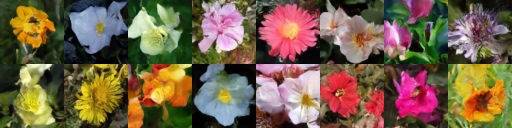
Or if you want to train your model on the Pokemon dataset:
accelerate launch train_unconditional.py \
  --dataset_name="huggan/pokemon" \
  --resolution=64 \
  --output_dir="ddpm-ema-pokemon-64" \
  --train_batch_size=16 \
  --num_epochs=100 \
  --gradient_accumulation_steps=1 \
  --learning_rate=1e-4 \
  --lr_warmup_steps=500 \
  --mixed_precision=no \
  --push_to_hub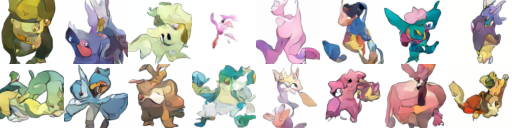
Training with multiple GPUs
accelerate allows for seamless multi-GPU training. Follow the instructions here
for running distributed training with accelerate. Here is an example command:
accelerate launch --mixed_precision="fp16" --multi_gpu train_unconditional.py \
  --dataset_name="huggan/pokemon" \
  --resolution=64 --center_crop --random_flip \
  --output_dir="ddpm-ema-pokemon-64" \
  --train_batch_size=16 \
  --num_epochs=100 \
  --gradient_accumulation_steps=1 \
  --use_ema \
  --learning_rate=1e-4 \
  --lr_warmup_steps=500 \
  --mixed_precision="fp16" \
  --logger="wandb"
Finetuning with your own data
There are two ways to finetune a model on your own dataset:
- provide your own folder of images to the
--train_data_dirargument - upload your dataset to the Hub and pass the dataset repository id to the
--dataset_nameargument.
💡 Learn more about how to create an image dataset for training in the Create an image dataset guide.
Below, we explain both in more detail.
Provide the dataset as a folder
If you provide your own dataset as a folder, the script expects the following directory structure:
data_dir/xxx.png
data_dir/xxy.png
data_dir/[...]/xxz.png
Pass the path to the folder containing the images to the --train_data_dir argument and launch the training:
accelerate launch train_unconditional.py \
    --train_data_dir <path-to-train-directory> \
    <other-arguments>
Internally, the script uses the ImageFolder to automatically build a dataset from the folder.
Upload your data to the Hub
💡 For more details and context about creating and uploading a dataset to the Hub, take a look at the Image search with 🤗 Datasets post.
To upload your dataset to the Hub, you can start by creating one with the ImageFolder feature, which creates an image column containing the PIL-encoded images, from 🤗 Datasets:
from datasets import load_dataset

# example 1: local folder
dataset = load_dataset("imagefolder", data_dir="path_to_your_folder")

# example 2: local files (supported formats are tar, gzip, zip, xz, rar, zstd)
dataset = load_dataset("imagefolder", data_files="path_to_zip_file")

# example 3: remote files (supported formats are tar, gzip, zip, xz, rar, zstd)
dataset = load_dataset(
    "imagefolder",
    data_files="https://download.microsoft.com/download/3/E/1/3E1C3F21-ECDB-4869-8368-6DEBA77B919F/kagglecatsanddogs_3367a.zip",
)

# example 4: providing several splits
dataset = load_dataset(
    "imagefolder", data_files={"train": ["path/to/file1", "path/to/file2"], "test": ["path/to/file3", "path/to/file4"]}
)
Then you can use the push_to_hub method to upload it to the Hub:
# assuming you have ran the huggingface-cli login command in a terminal
dataset.push_to_hub("name_of_your_dataset")

# if you want to push to a private repo, simply pass private=True:
dataset.push_to_hub("name_of_your_dataset", private=True)
Now train your model by simply setting the --dataset_name argument to the name of your dataset on the Hub.