
full_name
stringlengths 7
70
| description
stringlengths 4
590
⌀ | created_at
stringlengths 20
20
| last_commit
float64 | readme
stringlengths 14
559k
⌀ | label
int64 0
1
|
|---|---|---|---|---|---|
totond/TextPathView | A View with text path animation! | 2018-01-10T10:36:47Z | null | # TextPathView

<figure class="half">
<img src="https://github.com/totond/MyTUKU/blob/master/textdemo1.gif?raw=true">
<img src="https://github.com/totond/MyTUKU/blob/master/text1.gif?raw=true">
</figure>
> [Go to the English README](https://github.com/totond/TextPathView/blob/master/README-en.md)
## 介绍
TextPathView是一个把文字转化为路径动画然后展现出来的自定义控件。效果如上图。
> 这里有[原理解析!](https://juejin.im/post/5a9677b16fb9a063375765ad)
### v0.2.+重要更新
- 现在不但可以控制文字路径结束位置end,还可以控制开始位置start,如上图二
- 可以通过PathCalculator的子类来控制实现一些字路径变化,如下面的MidCalculator、AroundCalculator、BlinkCalculator
- 可以通知直接设置FillColor属性来控制结束时是否填充颜色
## 使用
主要的使用流程就是输入文字,然后设置一些动画的属性,还有画笔特效,最后启动就行了。想要自己控制绘画的进度也可以,详情见下面。
### Gradle
```
compile 'com.yanzhikai:TextPathView:0.2.1'
```
> minSdkVersion 16
> 如果遇到播放完后消失的问题,请关闭硬件加速,可能是硬件加速对`drawPath()`方法不支持
### 使用方法
#### TextPathView
TextPathView分为两种,一种是每个笔画按顺序刻画的SyncTextPathView,一种是每个笔画同时刻画的AsyncTextPathView,使用方法都是一样,在xml里面配置属性,然后直接在java里面调用startAnimation()方法就行了,具体的可以看例子和demo。下面是一个简单的例子:
xml里面:
```
<yanzhikai.textpath.SyncTextPathView
android:id="@+id/stpv_2017"
android:layout_width="match_parent"
android:layout_height="wrap_content"
app:duration="12000"
app:showPainter="true"
app:text="2017"
app:textInCenter="true"
app:textSize="60sp"
android:layout_weight="1"
/>
<yanzhikai.textpath.AsyncTextPathView
android:id="@+id/atpv_1"
android:layout_width="wrap_content"
android:layout_height="wrap_content"
app:duration="12000"
app:showPainter="true"
app:text="炎之铠"
app:textStrokeColor="@android:color/holo_orange_light"
app:textInCenter="true"
app:textSize="62sp"
android:layout_gravity="center_horizontal"
/>
```
java里面使用:
```
atpv1 = findViewById(R.id.atpv_1);
stpv_2017 = findViewById(R.id.stpv_2017);
//从无到显示
atpv1.startAnimation(0,1);
//从显示到消失
stpv_2017.startAnimation(1,0);
```
还可以通过控制进度,来控制TextPathView显示,这里用SeekBar:
```
sb_progress.setOnSeekBarChangeListener(new SeekBar.OnSeekBarChangeListener() {
@Override
public void onProgressChanged(SeekBar seekBar, int progress, boolean fromUser) {
atpv1.drawPath(progress / 1000f);
stpv_2017.drawPath(progress / 1000f);
}
}
```
#### PathView
PathView是0.1.1版本之后新增的,拥有三个子类TextPathView、SyncPathView和AsyncPathView,前者上面有介绍是文字的路径,后面这两个就是图形的路径,必须要输入一个Path类,才能正常运行:
```
public class TestPath extends Path {
public TestPath(){
init();
}
private void init() {
addCircle(350,300,150,Direction.CCW);
addCircle(350,300,100,Direction.CW);
addCircle(350,300,50,Direction.CCW);
moveTo(350,300);
lineTo(550,500);
}
}
```
```
//必须先调用setPath设置路径
aspv.setPath(new TestPath());
aspv.startAnimation(0,1);
```

(录屏可能有些问题,实际上是没有背景色的)上面就是SyncPathView和AsyncPathView效果,区别和文字路径是一样的。
### 属性
|**属性名称**|**意义**|**类型**|**默认值**|
|--|--|:--:|:--:|
|textSize | 文字的大小size | integer| 108 |
|text | 文字的具体内容 | String| Test|
|autoStart| 是否加载完后自动启动动画 | boolean| false|
|showInStart| 是否一开始就把文字全部显示 | boolean| false|
|textInCenter| 是否让文字内容处于控件中心 | boolean| false|
|duration | 动画的持续时间,单位ms | integer| 10000|
|showPainter | 在动画执行的时候是否执行画笔特效 | boolean| false|
|showPainterActually| 在所有时候是否展示画笔特效| boolean| false|
|~~textStrokeWidth~~ strokeWidth | 路径刻画的线条粗细 | dimension| 5px|
|~~textStrokeColor~~ pathStrokeColor| 路径刻画的线条颜色 | color| Color.black|
|paintStrokeWidth | 画笔特效刻画的线条粗细 | dimension| 3px|
|paintStrokeColor | 画笔特效刻画的线条颜色 | color| Color.black|
|repeat| 是否重复播放动画,重复类型| enum | NONE|
|fillColor| 文字动画结束时是否填充颜色 | boolean | false |
|**repeat属性值**|**意义**|
|--|--|
|NONE|不重复播放|
|RESTART|动画从头重复播放|
|REVERSE|动画从尾重复播放|
> PS:showPainterActually属性,由于动画绘画完毕应该将画笔特效消失,所以每次执行完动画都会自动设置为false。因此最好用于使用非自带动画的时候。
### 方法
#### 画笔特效
```
//设置画笔特效
public void setPainter(SyncPathPainter painter);
//设置画笔特效
public void setPainter(SyncPathPainter painter);
```
因为绘画的原理不一样,画笔特效也分两种:
```
public interface SyncPathPainter extends PathPainter {
//开始动画的时候执行
void onStartAnimation();
/**
* 绘画画笔特效时候执行
* @param x 当前绘画点x坐标
* @param y 当前绘画点y坐标
* @param paintPath 画笔Path对象,在这里画出想要的画笔特效
*/
@Override
void onDrawPaintPath(float x, float y, Path paintPath);
}
public interface AsyncPathPainter extends PathPainter {
/**
* 绘画画笔特效时候执行
* @param x 当前绘画点x坐标
* @param y 当前绘画点y坐标
* @param paintPath 画笔Path对象,在这里画出想要的画笔特效
*/
@Override
void onDrawPaintPath(float x, float y, Path paintPath);
}
```
看名字就知道是对应哪一个了,想要自定义画笔特效的话就可以实现上面之中的一个或者两个接口来自己画啦。
另外,还有里面已经自带了3种画笔特效,可供参考和使用(关于这些画笔特效的实现,可以参考[原理解析](http://blog.csdn.net/totond/article/details/79375200)):
```
//箭头画笔特效,根据传入的当前点与上一个点之间的速度方向,来调整箭头方向
public class ArrowPainter implements SyncPathPainter {
//一支笔的画笔特效,就是在绘画点旁边画多一支笔
public class PenPainter implements SyncPathPainter,AsyncPathPainter {
//火花特效,根据箭头引申变化而来,根据当前点与上一个点算出的速度方向来控制火花的方向
public class FireworksPainter implements SyncPathPainter {
```
由上面可见,因为烟花和箭头画笔特效都需要记录上一个点的位置,所以只适合按顺序绘画的SyncTextPathView,而PenPainter就适合两种TextPathView。仔细看它的代码的话,会发现画起来都是很简单的哦。
#### 自定义画笔特效
自定义画笔特效也是非常简单的,原理就是在当前绘画点上加上一个附加的Path,实现SyncPathPainter和AsyncPathPainter之中的一个或者两个接口,重写里面的`onDrawPaintPath(float x, float y, Path paintPath)`方法就行了,如下面这个:
```
atpv2.setPathPainter(new AsyncPathPainter() {
@Override
public void onDrawPaintPath(float x, float y, Path paintPath) {
paintPath.addCircle(x,y,6, Path.Direction.CCW);
}
});
```

#### 动画监听
```
//设置自定义动画监听
public void setAnimatorListener(PathAnimatorListener animatorListener);
```
PathAnimatorListener是实现了AnimatorListener接口的类,继承它的时候注意不要删掉super父类方法,因为里面可能有一些操作。
#### 画笔获取
```
//获取绘画文字的画笔
public Paint getDrawPaint() {
return mDrawPaint;
}
//获取绘画画笔特效的画笔
public Paint getPaint() {
return mPaint;
}
```
#### 控制绘画
```
/**
* 绘画文字路径的方法
*
* @param start 路径开始点百分比
* @param end 路径结束点百分比
*/
public abstract void drawPath(float start, float end);
/**
* 开始绘制路径动画
* @param start 路径比例,范围0-1
* @param end 路径比例,范围0-1
*/
public void startAnimation(float start, float end);
/**
* 绘画路径的方法
* @param progress 绘画进度,0-1
*/
public void drawPath(float progress);
/**
* Stop animation
*/
public void stopAnimation();
/**
* Pause animation
*/
@RequiresApi(api = Build.VERSION_CODES.KITKAT)
public void pauseAnimation();
/**
* Resume animation
*/
@RequiresApi(api = Build.VERSION_CODES.KITKAT)
public void resumeAnimation();
```
#### 填充颜色
```
//直接显示填充好颜色了的全部文字
public void showFillColorText();
//设置动画播放完后是否填充颜色
public void setFillColor(boolean fillColor)
```
由于正在绘画的时候文字路径不是封闭的,填充颜色会变得很混乱,所以这里给出`showFillColorText()`来设置直接显示填充好颜色了的全部文字,一般可以在动画结束后文字完全显示后过渡填充

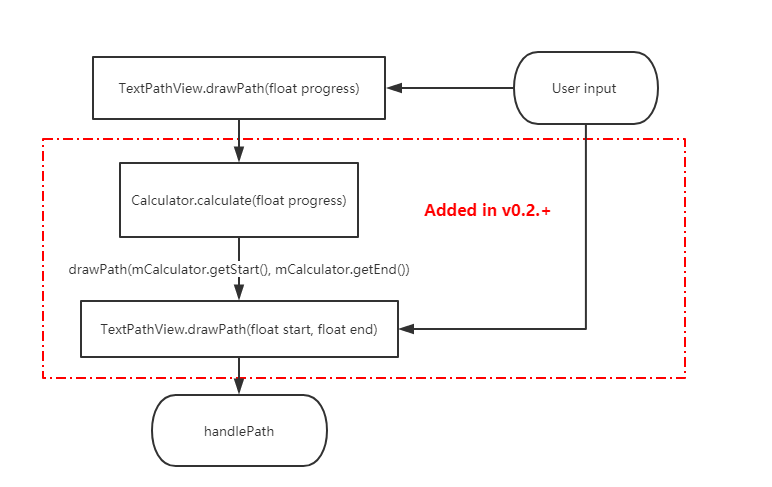
#### 取值计算器
0.2.+版本开始,加入了取值计算器PathCalculator,可以通过`setCalculator(PathCalculator calculator)`方法设置。PathCalculator可以控制路径的起点start和终点end属性在不同progress对应的取值。TextPathView自带一些PathCalculator子类:
- **MidCalculator**
start和end从0.5开始往两边扩展:

- **AroundCalculator**
start会跟着end增长,end增长到0.75后start会反向增长

- **BlinkCalculator**
start一直为0,end自然增长,但是每增加几次会有一次end=1,造成闪烁

- **自定义PathCalculator:**用户可以通过继承抽象类PathCalculator,通过里面的`setStart(float start)`和`setEnd(float end)`,具体可以参考上面几个自带的PathCalculator实现代码。
#### 其他
```
//设置文字内容
public void setText(String text);
//设置路径,必须先设置好路径在startAnimation(),不然会报错!
public void setPath(Path path) ;
//设置字体样式
public void setTypeface(Typeface typeface);
//清除画面
public void clear();
//设置动画时能否显示画笔效果
public void setShowPainter(boolean showPainter);
//设置所有时候是否显示画笔效果,由于动画绘画完毕应该将画笔特效消失,所以每次执行完动画都会自动设置为false
public void setCanShowPainter(boolean canShowPainter);
//设置动画持续时间
public void setDuration(int duration);
//设置重复方式
public void setRepeatStyle(int repeatStyle);
//设置Path开始结束取值的计算器
public void setCalculator(PathCalculator calculator)
```
## 更新
- 2018/03/08 **version 0.0.5**:
- 增加了`showFillColorText()`方法来设置直接显示填充好颜色了的全部文字。
- 把PathAnimatorListener从TextPathView的内部类里面解放出来,之前使用太麻烦了。
- 增加`showPainterActually`属性,设置所有时候是否显示画笔效果,由于动画绘画完毕应该将画笔特效消失,所以每次执行完动画都会自动将它设置为false。因此它用处就是在不使用自带Animator的时候显示画笔特效。
- 2018/03/08 **version 0.0.6**:
- 增加了`stop(), pause(), resume()`方法来控制动画。之前是觉得让使用者自己用Animator实现就好了,现在一位外国友人[toanvc](https://github.com/toanvc)提交的PR封装好了,我稍作修改,不过后两者使用时API要大于等于19。
- 增加了`repeat`属性,让动画支持重复播放,也是[toanvc](https://github.com/toanvc)同学的PR。
- 2018/03/18 **version 0.1.0**:
- 重构代码,加入路径动画SyncPathView和AsyncPathView,把总父类抽象为PathView
- 增加`setDuration()`、`setRepeatStyle()`
- 修改一系列名字如下:
|Old Name|New Name|
|---|---|
|TextPathPainter|PathPainter|
|SyncTextPainter|SyncPathPainter|
|AsyncTextPainter|AsyncPathPainter|
|TextAnimatorListener|PathAnimatorListener|
- 2018/03/21 **version 0.1.2**:
- 修复高度warp_content时候内容有可能显示不全
- 原来PathMeasure获取文字Path时候,最后会有大概一个像素的缺失,现在只能在onDraw判断progress是否为1来显示完全路径(但是这样可能会导致硬件加速上显示不出来,需要手动关闭这个View的硬件加速)
- 增加字体设置
- 支持自动换行

- 2018/09/09 **version 0.1.3**:
- 默认关闭此控件的硬件加速
- 加入内存泄漏控制
- 准备后续优化
- 2019/04/04 **version 0.2.1**:
- 现在不但可以控制文字路径结束位置end,还可以控制开始位置start
- 可以通过PathCalculator的子类来控制实现一些字路径变化,如上面的MidCalculator、AroundCalculator、BlinkCalculator
- 可以通知直接设置FillColor属性来控制结束时是否填充颜色
- 硬件加速问题解决,默认打开
- 去除无用log和报错
#### 后续将会往下面的方向努力:
- 更多的特效,更多的动画,如果有什么想法和建议的欢迎issue提出来一起探讨,还可以提交PR出一份力。
- 更好的性能,目前单个TextPathView在模拟器上运行动画时是不卡的,多个就有一点点卡顿了,在性能较好的真机多个也是没问题的,这个性能方面目前还没头绪。
- 文字换行符支持。
- Path的宽高测量(包含空白,从坐标(0,0)开始)
## 贡献代码
如果想为TextPathView的完善出一份力的同学,欢迎提交PR:
- 首先请创建一个分支branch。
- 如果加入新的功能或者效果,请不要覆盖demo里面原来用于演示Activity代码,如FristActivity里面的实例,可以选择新增一个Activity做演示测试,或者不添加演示代码。
- 如果修改某些功能或者代码,请附上合理的依据和想法。
- 翻译成English版README(暂时没空更新英文版)
## 开源协议
TextPathView遵循MIT协议。
## 关于作者
> id:炎之铠
> 炎之铠的邮箱:yanzhikai_yjk@qq.com
> CSDN:http://blog.csdn.net/totond
| 0 |
square/mortar | A simple library that makes it easy to pair thin views with dedicated controllers, isolated from most of the vagaries of the Activity life cycle. | 2013-11-09T00:01:50Z | null | # Mortar
## Deprecated
Mortar had a good run and served us well, but new use is strongly discouraged. The app suite at Square that drove its creation is in the process of replacing Mortar with [Square Workflow](https://square.github.io/workflow/).
## What's a Mortar?
Mortar provides a simplified, composable overlay for the Android lifecycle,
to aid in the use of [Views as the modular unit of Android applications][rant].
It leverages [Context#getSystemService][services] to act as an a la carte supplier
of services like dependency injection, bundle persistence, and whatever else
your app needs to provide itself.
One of the most useful services Mortar can provide is its [BundleService][bundle-service],
which gives any View (or any object with access to the Activity context) safe access to
the Activity lifecycle's persistence bundle. For fans of the [Model View Presenter][mvp]
pattern, we provide a persisted [Presenter][presenter] class that builds on BundleService.
Presenters are completely isolated from View concerns. They're particularly good at
surviving configuration changes, weathering the storm as Android destroys your portrait
Activity and Views and replaces them with landscape doppelgangers.
Mortar can similarly make [Dagger][dagger] ObjectGraphs (or [Dagger2][dagger2]
Components) visible as system services. Or not — these services are
completely decoupled.
Everything is managed by [MortarScope][scope] singletons, typically
backing the top level Application and Activity contexts. You can also spawn
your own shorter lived scopes to manage transient sessions, like the state of
an object being built by a set of wizard screens.
<!--
This example is a little bit confusing. Maybe explain why you would want to have an extended graph for a wizard, then explain how Mortar shadows the parent graph with that extended graph.
-->
These nested scopes can shadow the services provided by higher level scopes.
For example, a [Dagger extension graph][ogplus] specific to your wizard session
can cover the one normally available, transparently to the wizard Views.
Calls like `ObjectGraphService.inject(getContext(), this)` are now possible
without considering which graph will do the injection.
## The Big Picture
An application will typically have a singleton MortarScope instance.
Its job is to serve as a delegate to the app's `getSystemService` method, something like:
```java
public class MyApplication extends Application {
private MortarScope rootScope;
@Override public Object getSystemService(String name) {
if (rootScope == null) rootScope = MortarScope.buildRootScope().build(getScopeName());
return rootScope.hasService(name) ? rootScope.getService(name) : super.getSystemService(name);
}
}
```
This exposes a single, core service, the scope itself. From the scope you can
spawn child scopes, and you can register objects that implement the
[Scoped](https://github.com/square/mortar/blob/master/mortar/src/main/java/mortar/Scoped.java#L18)
interface with it for setup and tear-down calls.
* `Scoped#onEnterScope(MortarScope)`
* `Scoped#onExitScope(MortarScope)`
To make a scope provide other services, like a [Dagger ObjectGraph][og],
you register them while building the scope. That would make our Application's
`getSystemService` method look like this:
```java
@Override public Object getSystemService(String name) {
if (rootScope == null) {
rootScope = MortarScope.buildRootScope()
.with(ObjectGraphService.SERVICE_NAME, ObjectGraph.create(new RootModule()))
.build(getScopeName());
}
return rootScope.hasService(name) ? rootScope.getService(name) : super.getSystemService(name);
}
```
Now any part of our app that has access to a `Context` can inject itself:
```java
public class MyView extends LinearLayout {
@Inject SomeService service;
public MyView(Context context, AttributeSet attrs) {
super(context, attrs);
ObjectGraphService.inject(context, this);
}
}
```
To take advantage of the BundleService describe above, you'll put similar code
into your Activity. If it doesn't exist already, you'll
build a sub-scope to back the Activity's `getSystemService` method, and
while building it set up the `BundleServiceRunner`. You'll also notify
the BundleServiceRunner each time `onCreate` and `onSaveInstanceState` are
called, to make the persistence bundle available to the rest of the app.
```java
public class MyActivity extends Activity {
private MortarScope activityScope;
@Override public Object getSystemService(String name) {
MortarScope activityScope = MortarScope.findChild(getApplicationContext(), getScopeName());
if (activityScope == null) {
activityScope = MortarScope.buildChild(getApplicationContext()) //
.withService(BundleServiceRunner.SERVICE_NAME, new BundleServiceRunner())
.withService(HelloPresenter.class.getName(), new HelloPresenter())
.build(getScopeName());
}
return activityScope.hasService(name) ? activityScope.getService(name)
: super.getSystemService(name);
}
@Override protected void onCreate(Bundle savedInstanceState) {
super.onCreate(savedInstanceState);
BundleServiceRunner.getBundleServiceRunner(this).onCreate(savedInstanceState);
setContentView(R.layout.main_view);
}
@Override protected void onSaveInstanceState(Bundle outState) {
super.onSaveInstanceState(outState);
BundleServiceRunner.getBundleServiceRunner(this).onSaveInstanceState(outState);
}
}
```
With that in place, any object in your app can sign up with the `BundleService`
to save and restore its state. This is nice for views, since Bundles are less
of a hassle than the `Parcelable` objects required by `View#onSaveInstanceState`,
and a boon to any business objects in the rest of your app.
Download
--------
Download [the latest JAR][jar] or grab via Maven:
```xml
<dependency>
<groupId>com.squareup.mortar</groupId>
<artifactId>mortar</artifactId>
<version>(insert latest version)</version>
</dependency>
```
Gradle:
```groovy
compile 'com.squareup.mortar:mortar:(latest version)'
```
## Full Disclosure
This stuff has been in "rapid" development over a pretty long gestation period,
but is finally stabilizing. We don't expect drastic changes before cutting a
1.0 release, but we still cannot promise a stable API from release to release.
Mortar is a key component of multiple Square apps, including our flagship
[Square Register][register] app.
License
--------
Copyright 2013 Square, Inc.
Licensed under the Apache License, Version 2.0 (the "License");
you may not use this file except in compliance with the License.
You may obtain a copy of the License at
http://www.apache.org/licenses/LICENSE-2.0
Unless required by applicable law or agreed to in writing, software
distributed under the License is distributed on an "AS IS" BASIS,
WITHOUT WARRANTIES OR CONDITIONS OF ANY KIND, either express or implied.
See the License for the specific language governing permissions and
limitations under the License.
[bundle-service]: https://github.com/square/mortar/blob/master/mortar/src/main/java/mortar/bundler/BundleService.java
[mvp]: http://en.wikipedia.org/wiki/Model%E2%80%93view%E2%80%93presenter
[dagger]: http://square.github.io/dagger/
[dagger2]: http://google.github.io/dagger/
[jar]: http://repository.sonatype.org/service/local/artifact/maven/redirect?r=central-proxy&g=com.squareup.mortar&a=mortar&v=LATEST
[og]: https://square.github.io/dagger/1.x/dagger/dagger/ObjectGraph.html
[ogplus]: https://github.com/square/dagger/blob/dagger-parent-1.1.0/core/src/main/java/dagger/ObjectGraph.java#L96
[presenter]: https://github.com/square/mortar/blob/master/mortar/src/main/java/mortar/Presenter.java
[rant]: http://corner.squareup.com/2014/10/advocating-against-android-fragments.html
[register]: https://play.google.com/store/apps/details?id=com.squareup
[scope]: https://github.com/square/mortar/blob/master/mortar/src/main/java/mortar/MortarScope.java
[services]: http://developer.android.com/reference/android/content/Context.html#getSystemService(java.lang.String)
| 0 |
joyoyao/superCleanMaster | [DEPRECATED] | 2015-02-12T03:37:41Z | null | # superCleanMaster
superCleanMaster is deprecated Thanks for all your support!
| 0 |
frogermcs/GithubClient | Example of Github API client implemented on top of Dagger 2 DI framework. | 2015-05-27T16:43:03Z | null | # GithubClient
Example of Github API client implemented on top of Dagger 2 DI framework.
This code was created as an example for Dependency Injection with Dagger 2 series on my dev-blog:
- [Introdution to Dependency Injection](http://frogermcs.github.io/dependency-injection-with-dagger-2-introdution-to-di/)
- [Dagger 2 API](http://frogermcs.github.io/dependency-injection-with-dagger-2-the-api/)
- [Dagger 2 - custom scopes](http://frogermcs.github.io/dependency-injection-with-dagger-2-custom-scopes/)
- [Dagger 2 - graph creation performance](http://frogermcs.github.io/dagger-graph-creation-performance/)
- [Dependency injection with Dagger 2 - Producers](http://frogermcs.github.io/dependency-injection-with-dagger-2-producers/)
- [Inject everything - ViewHolder and Dagger 2 (with Multibinding and AutoFactory example)](http://frogermcs.github.io/inject-everything-viewholder-and-dagger-2-example/)
This code was originally prepared for my presentation at Google I/O Extended 2015 in Tech Space Cracow. http://www.meetup.com/GDG-Krakow/events/221822600/
| 1 |
patric-r/jvmtop | Java monitoring for the command-line, profiler included | 2015-07-14T12:58:49Z | null | <b>jvmtop</b> is a lightweight console application to monitor all accessible, running jvms on a machine.<br>
In a top-like manner, it displays <a href='https://github.com/patric-r/jvmtop/blob/master/doc/ExampleOutput.md'>JVM internal metrics</a> (e.g. memory information) of running java processes.<br>
<br>
Jvmtop does also include a <a href='https://github.com/patric-r/jvmtop/blob/master/doc/ConsoleProfiler.md'>CPU console profiler</a>.<br>
<br>
It's tested with different releases of Oracle JDK, IBM JDK and OpenJDK on Linux, Solaris, FreeBSD and Windows hosts.<br>
Jvmtop requires a JDK - a JRE will not suffice.<br>
<br>
Please note that it's currently in an alpha state -<br>
if you experience an issue or need further help, please <a href='https://github.com/patric-r/jvmtop/issues'>let us know</a>.<br>
<br>
Jvmtop is open-source. Checkout the <a href='https://github.com/patric-r/jvmtop'>source code</a>. Patches are very welcome!<br>
<br>
Also have a look at the <a href='https://github.com/patric-r/jvmtop/blob/master/doc/Documentation.md'>documentation</a> or at a <a href='https://github.com/patric-r/jvmtop/blob/master/doc/ExampleOutput.md'>captured live-example</a>.<br>
```
JvmTop 0.8.0 alpha amd64 8 cpus, Linux 2.6.32-27, load avg 0.12
https://github.com/patric-r/jvmtop
PID MAIN-CLASS HPCUR HPMAX NHCUR NHMAX CPU GC VM USERNAME #T DL
3370 rapperSimpleApp 165m 455m 109m 176m 0.12% 0.00% S6U37 web 21
11272 ver.resin.Resin [ERROR: Could not attach to VM]
27338 WatchdogManager 11m 28m 23m 130m 0.00% 0.00% S6U37 web 31
19187 m.jvmtop.JvmTop 20m 3544m 13m 130m 0.93% 0.47% S6U37 web 20
16733 artup.Bootstrap 159m 455m 166m 304m 0.12% 0.00% S6U37 web 46
```
<hr />
<h3>Installation</h3>
Click on the <a href="https://github.com/patric-r/jvmtop/releases"> releases tab</a>, download the
most recent tar.gz archive. Extract it, ensure that the `JAVA_HOME` environment variable points to a valid JDK and run `./jvmtop.sh`.<br><br>
Further information can be found in the [INSTALL file](https://github.com/patric-r/jvmtop/blob/master/INSTALL)
<h3>08/14/2013 jvmtop 0.8.0 released</h3>
<b>Changes:</b>
<ul><li>improved attach compatibility for all IBM jvms<br>
</li><li>fixed wrong CPU/GC values for IBM J9 jvms<br>
</li><li>in case of unsupported heap size metric retrieval, n/a will be displayed instead of 0m<br>
</li><li>improved argument parsing, support for short-options, added help (pass <code>--help</code>), see <a href='https://github.com/patric-r/jvmtop/issues/28'>issue #28</a> (now using the great <a href='http://pholser.github.io/jopt-simple'>jopt-simple</a> library)<br>
</li><li>when passing the <code>--once</code> option, terminal will not be cleared anymore (see <a href='https://github.com/patric-r/jvmtop/issues/27'>issue #27</a>)<br>
</li><li>improved shell script for guessing the path if a <code>JAVA_HOME</code> environment variable is not present (thanks to <a href='https://groups.google.com/forum/#!topic/jvmtop-discuss/KGg_WpL_yAU'>Markus Kolb</a>)</li></ul>
<a href='https://github.com/patric-r/jvmtop/blob/master/doc/Changelog.md'>Full changelog</a>
<hr />
In <a href='https://github.com/patric-r/jvmtop/blob/master/doc/ExampleOutput.md'>VM detail mode</a> it shows you the top CPU-consuming threads, beside detailed metrics:<br>
<br>
<br>
```
JvmTop 0.8.0 alpha amd64, 4 cpus, Linux 2.6.18-34
https://github.com/patric-r/jvmtop
PID 3539: org.apache.catalina.startup.Bootstrap
ARGS: start
VMARGS: -Djava.util.logging.config.file=/home/webserver/apache-tomcat-5.5[...]
VM: Sun Microsystems Inc. Java HotSpot(TM) 64-Bit Server VM 1.6.0_25
UP: 869:33m #THR: 106 #THRPEAK: 143 #THRCREATED: 128020 USER: webserver
CPU: 4.55% GC: 3.25% HEAP: 137m / 227m NONHEAP: 75m / 304m
TID NAME STATE CPU TOTALCPU BLOCKEDBY
25 http-8080-Processor13 RUNNABLE 4.55% 1.60%
128022 RMI TCP Connection(18)-10.101. RUNNABLE 1.82% 0.02%
36578 http-8080-Processor164 RUNNABLE 0.91% 2.35%
36453 http-8080-Processor94 RUNNABLE 0.91% 1.52%
27 http-8080-Processor15 RUNNABLE 0.91% 1.81%
14 http-8080-Processor2 RUNNABLE 0.91% 3.17%
128026 JMX server connection timeout TIMED_WAITING 0.00% 0.00%
```
<a href='https://github.com/patric-r/jvmtop/issues'>Pull requests / bug reports</a> are always welcome.<br>
<br>
| 0 |
Gavin-ZYX/StickyDecoration | null | 2017-05-31T07:38:49Z | null | # StickyDecoration
利用`RecyclerView.ItemDecoration`实现顶部悬浮效果

## 支持
- **LinearLayoutManager**
- **GridLayoutManager**
- **点击事件**
- **分割线**
## 添加依赖
项目要求: `minSdkVersion` >= 14.
在你的`build.gradle`中 :
```gradle
repositories {
maven { url 'https://jitpack.io' }
}
dependencies {
compile 'com.github.Gavin-ZYX:StickyDecoration:1.6.1'
}
```
**最新版本**
[](https://jitpack.io/#Gavin-ZYX/StickyDecoration)
## 使用
#### 文字悬浮——StickyDecoration
> **注意**
使用recyclerView.addItemDecoration()之前,必须先调用recyclerView.setLayoutManager();
代码:
```java
GroupListener groupListener = new GroupListener() {
@Override
public String getGroupName(int position) {
//获取分组名
return mList.get(position).getProvince();
}
};
StickyDecoration decoration = StickyDecoration.Builder
.init(groupListener)
//重置span(使用GridLayoutManager时必须调用)
//.resetSpan(mRecyclerView, (GridLayoutManager) manager)
.build();
...
mRecyclerView.setLayoutManager(manager);
//需要在setLayoutManager()之后调用addItemDecoration()
mRecyclerView.addItemDecoration(decoration);
```
效果:


**支持的方法:**
| 方法 | 功能 | 默认 |
|-|-|-|
| setGroupBackground | 背景色 | #48BDFF |
| setGroupHeight | 高度 | 120px |
| setGroupTextColor | 字体颜色 | Color.WHITE |
| setGroupTextSize | 字体大小 | 50px |
| setDivideColor | 分割线颜色 | #CCCCCC |
| setDivideHeight | 分割线高宽度 | 0 |
| setTextSideMargin | 边距(靠左时为左边距 靠右时为右边距) | 10 |
| setHeaderCount | 头部Item数量(仅LinearLayoutManager) | 0 |
| setSticky | 是否需要吸顶效果 | true |
|方法|功能|描述|
|-|-|-|
| setOnClickListener | 点击事件 | 设置点击事件,返回当前分组下第一个item的position |
| resetSpan | 重置 | 使用GridLayoutManager时必须调用 |
### 自定义View悬浮——PowerfulStickyDecoration
先创建布局`item_group`
```xml
<?xml version="1.0" encoding="utf-8"?>
<LinearLayout
xmlns:android="http://schemas.android.com/apk/res/android"
android:id="@+id/ll"
android:orientation="horizontal"
...>
<ImageView
android:id="@+id/iv"
.../>
<TextView
android:id="@+id/tv"
.../>
</LinearLayout>
```
创建`PowerfulStickyDecoration`,实现自定`View`悬浮
```java
PowerGroupListener listener = new PowerGroupListener() {
@Override
public String getGroupName(int position) {
return mList.get(position).getProvince();
}
@Override
public View getGroupView(int position) {
//获取自定定义的组View
View view = getLayoutInflater().inflate(R.layout.item_group, null, false);
((TextView) view.findViewById(R.id.tv)).setText(mList.get(position).getProvince());
return view;
}
};
PowerfulStickyDecoration decoration = PowerfulStickyDecoration.Builder
.init(listener)
//重置span(注意:使用GridLayoutManager时必须调用)
//.resetSpan(mRecyclerView, (GridLayoutManager) manager)
.build();
...
mRecyclerView.addItemDecoration(decoration);
```
效果:

**支持的方法:**
| 方法 | 功能 | 默认 |
| -- | -- | -- |
| setGroupHeight | 高度 | 120px |
| setGroupBackground | 背景色 | #48BDFF |
| setDivideColor | 分割线颜色 | #CCCCCC |
| setDivideHeight | 分割线高宽度 | 0 |
| setCacheEnable | 是否使用缓存| 使用缓存 |
| setHeaderCount | 头部Item数量(仅LinearLayoutManager) | 0 |
| setSticky | 是否需要吸顶效果 | true |
|方法|功能|描述|
|-|-|-|
| setOnClickListener | 点击事件 | 设置点击事件,返回当前分组下第一个item的position以及对应的viewId |
| resetSpan | 重置span |使用GridLayoutManager时必须调用 |
| notifyRedraw | 通知重新绘制 | 使用场景:网络图片加载后调用方法使用) |
| clearCache | 清空缓存 | 在使用缓存的情况下,数据改变时需要清理缓存 |
**Tips**
1、若使用网络图片时,在图片加载完成后需要调用
```java
decoration.notifyRedraw(mRv, view, position);
```
2、使用缓存时,若数据源改变,需要调用clearCache清除数据
3、点击事件穿透问题,参考demo中MyRecyclerView。[issue47](https://github.com/Gavin-ZYX/StickyDecoration/issues/37)
# 更新日志
----------------------------- 1.6.0 (2022-8-21)----------------------------
- fix:取消缓存无效问题
- 迁移仓库
- 迁移到Androidx
----------------------------- 1.5.3 (2020-12-15)----------------------------
- 支持是否需要吸顶效果
----------------------------- 1.5.2 (2019-9-3)----------------------------
- fix:特殊情况下,吸顶效果不佳问题
----------------------------- 1.5.1 (2019-8-8)----------------------------
- fix:setHeaderCount导致显示错乱问题
----------------------------- 1.5.0 (2019-6-17)----------------------------
- fix:GridLayoutManager刷新后数据混乱问题
----------------------------- 1.4.12 (2019-5-8)----------------------------
- fix:setDivideColor不生效问题
----------------------------- 1.4.9 (2018-10-9)----------------------------
- fix:由于添加header导致的一些问题
----------------------------- 1.4.8 (2018-08-26)----------------------------
- 顶部悬浮栏点击事件穿透问题:提供处理方案
----------------------------- 1.4.7 (2018-08-16)----------------------------
- fix:数据变化后,布局未刷新问题
----------------------------- 1.4.6 (2018-07-29)----------------------------
- 修改缓存方式
- 加入性能检测
----------------------------- 1.4.5 (2018-06-17)----------------------------
- 在GridLayoutManager中使用setHeaderCount方法导致布局错乱问题
----------------------------- 1.4.4 (2018-06-2)----------------------------
- 添加setHeaderCount方法
- 修改README
- 修复bug
----------------------------- 1.4.3 (2018-05-27)----------------------------
- 修复一些bug,更改命名
----------------------------- 1.4.2 (2018-04-2)----------------------------
- 增强点击事件,现在可以得到悬浮条内View点击事件(没有设置id时,返回View.NO_ID)
- 修复加载更多返回null崩溃或出现多余的悬浮Item问题(把加载更多放在Item中的加载方式)
----------------------------- 1.4.1 (2018-03-21)----------------------------
- 默认取消缓存,避免数据改变时显示出问题
- 添加clearCache方法用于清理缓存
----------------------------- 1.4.0 (2018-03-04)----------------------------
- 支持异步加载后的重新绘制(如网络图片加载)
- 优化缓存
- 优化GridLayoutManager的分割线
----------------------------- 1.3.1 (2018-01-30)----------------------------
- 修改测量方式
----------------------------- 1.3.0 (2018-01-28)----------------------------
- 删除isAlignLeft()方法,需要靠右时,直接在布局中处理就可以了。
- 优化缓存机制。
| 0 |
in28minutes/spring-master-class | An updated introduction to the Spring Framework 5. Become an Expert understanding the core features of Spring In Depth. You would write Unit Tests, AOP, JDBC and JPA code during the course. Includes introductions to Spring Boot, JPA, Eclipse, Maven, JUnit and Mockito. | 2017-08-07T06:56:45Z | null | # Spring Master Class - Journey from Beginner to Expert
[](https://www.udemy.com/course/spring-tutorial-for-beginners/)
Learn the magic of Spring Framework. From IOC (Inversion of Control), DI (Dependency Injection), Application Context to the world of Spring Boot, AOP, JDBC and JPA. Get set for an incredible journey.
### Introduction
Spring Framework remains as popular today as it was when I first used it 12 years back. How is this possible in the incredibly dynamic world where architectures have completely changed?
### What You will learn
- You will learn the basics of Spring Framework - Dependency Injection, IOC Container, Application Context and Bean Factory.
- You will understand how to use Spring Annotations - @Autowired, @Component, @Service, @Repository, @Configuration, @Primary....
- You will understand Spring MVC in depth - DispatcherServlet , Model, Controllers and ViewResolver
- You will use a variety of Spring Boot Starters - Spring Boot Starter Web, Starter Data Jpa, Starter Test
- You will learn the basics of Spring Boot, Spring AOP, Spring JDBC and JPA
- You will learn the basics of Eclipse, Maven, JUnit and Mockito
- You will develop a basic Web application step by step using JSP Servlets and Spring MVC
- You will learn to write unit tests with XML, Java Application Contexts and Mockito
### Requirements
- You should have working knowledge of Java and Annotations.
- We will help you install Eclipse and get up and running with Maven and Tomcat.
### Step Wise Details
Refer each section
## Installing Tools
- Installation Video : https://www.youtube.com/playlist?list=PLBBog2r6uMCSmMVTW_QmDLyASBvovyAO3
- GIT Repository For Installation : https://github.com/in28minutes/getting-started-in-5-steps
- PDF : https://github.com/in28minutes/SpringIn28Minutes/blob/master/InstallationGuide-JavaEclipseAndMaven_v2.pdf
## Running Examples
- Download the zip or clone the Git repository.
- Unzip the zip file (if you downloaded one)
- Open Command Prompt and Change directory (cd) to folder containing pom.xml
- Open Eclipse
- File -> Import -> Existing Maven Project -> Navigate to the folder where you unzipped the zip
- Select the right project
- Choose the Spring Boot Application file (search for @SpringBootApplication)
- Right Click on the file and Run as Java Application
- You are all Set
- For help : use our installation guide - https://www.youtube.com/playlist?list=PLBBog2r6uMCSmMVTW_QmDLyASBvovyAO3
### Troubleshooting
- Refer our TroubleShooting Guide - https://github.com/in28minutes/in28minutes-initiatives/tree/master/The-in28Minutes-TroubleshootingGuide-And-FAQ
## Youtube Playlists - 500+ Videos
[Click here - 30+ Playlists with 500+ Videos on Spring, Spring Boot, REST, Microservices and the Cloud](https://www.youtube.com/user/rithustutorials/playlists?view=1&sort=lad&flow=list)
## Keep Learning in28Minutes
in28Minutes is creating amazing solutions for you to learn Spring Boot, Full Stack and the Cloud - Docker, Kubernetes, AWS, React, Angular etc. - [Check out all our courses here](https://github.com/in28minutes/learn)

| 1 |
JeasonWong/Particle | It's a cool animation which can use in splash or somewhere else. | 2016-08-29T09:21:15Z | null | ## What's Particle ?
It's a cool animation which can use in splash or anywhere else.
## Demo

## Article
[手摸手教你用Canvas实现简单粒子动画](http://www.wangyuwei.me/2016/08/29/%E6%89%8B%E6%91%B8%E6%89%8B%E6%95%99%E4%BD%A0%E5%AE%9E%E7%8E%B0%E7%AE%80%E5%8D%95%E7%B2%92%E5%AD%90%E5%8A%A8%E7%94%BB/)
## Attributes
|name|format|description|中文解释
|:---:|:---:|:---:|:---:|
| pv_host_text | string |set left host text|设置左边主文案
| pv_host_text_size | dimension |set host text size|设置主文案的大小
| pv_particle_text | string |set right particle text|设置右边粒子上的文案
| pv_particle_text_size | dimension |set particle text size|设置粒子上文案的大小
| pv_text_color | color |set host text color|设置左边主文案颜色
|pv_background_color|color|set background color|设置背景颜色
| pv_text_anim_time | integer |set particle text duration|设置粒子上文案的运动时间
| pv_spread_anim_time | integer |set particle text spread duration|设置粒子上文案的伸展时间
|pv_host_text_anim_time|integer|set host text displacement duration|设置左边主文案的位移时间
## Usage
#### Define your banner under your xml :
```xml
<me.wangyuwei.particleview.ParticleView
android:layout_width="match_parent"
android:layout_height="match_parent"
pv:pv_background_color="#2E2E2E"
pv:pv_host_text="github"
pv:pv_host_text_size="14sp"
pv:pv_particle_text=".com"
pv:pv_particle_text_size="14sp"
pv:pv_text_color="#FFF"
pv:pv_text_anim_time="3000"
pv:pv_spread_anim_time="2000"
pv:pv_host_text_anim_time="3000" />
```
#### Start animation :
```java
mParticleView.startAnim();
```
#### Add animation listener to listen the end callback :
```java
mParticleView.setOnParticleAnimListener(new ParticleView.ParticleAnimListener() {
@Override
public void onAnimationEnd() {
Toast.makeText(MainActivity.this, "Animation is End", Toast.LENGTH_SHORT).show();
}
});
```
## Import
Step 1. Add it in your project's build.gradle at the end of repositories:
```gradle
repositories {
maven {
url 'https://dl.bintray.com/wangyuwei/maven'
}
}
```
Step 2. Add the dependency:
```gradle
dependencies {
compile 'me.wangyuwei:ParticleView:1.0.4'
}
```
### About Me
[Weibo](http://weibo.com/WongYuwei)
[Blog](http://www.wangyuwei.me)
### QQ Group 欢迎讨论
**479729938**
##**License**
```license
Copyright [2016] [JeasonWong of copyright owner]
Licensed under the Apache License, Version 2.0 (the "License");
you may not use this file except in compliance with the License.
You may obtain a copy of the License at
http://www.apache.org/licenses/LICENSE-2.0
Unless required by applicable law or agreed to in writing, software
distributed under the License is distributed on an "AS IS" BASIS,
WITHOUT WARRANTIES OR CONDITIONS OF ANY KIND, either express or implied.
See the License for the specific language governing permissions and
limitations under the License.
``` | 0 |
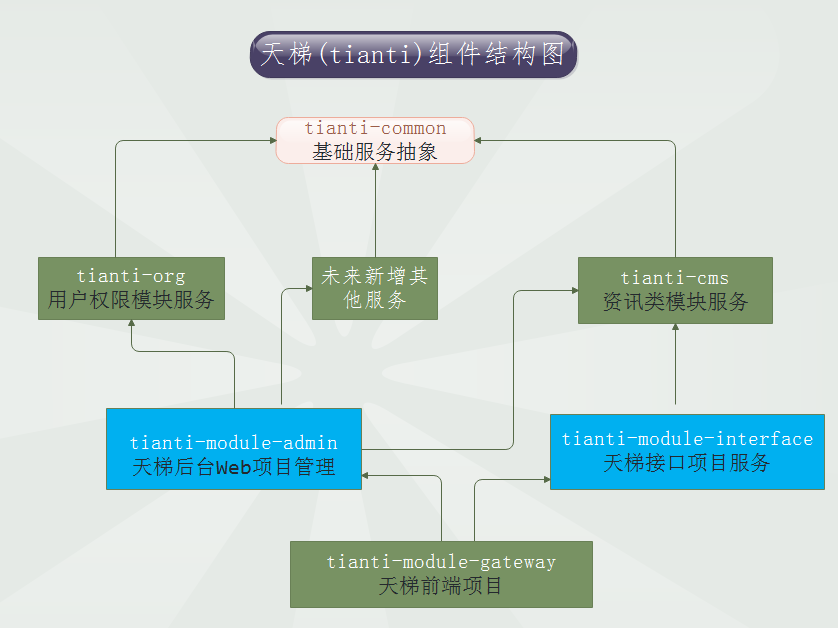
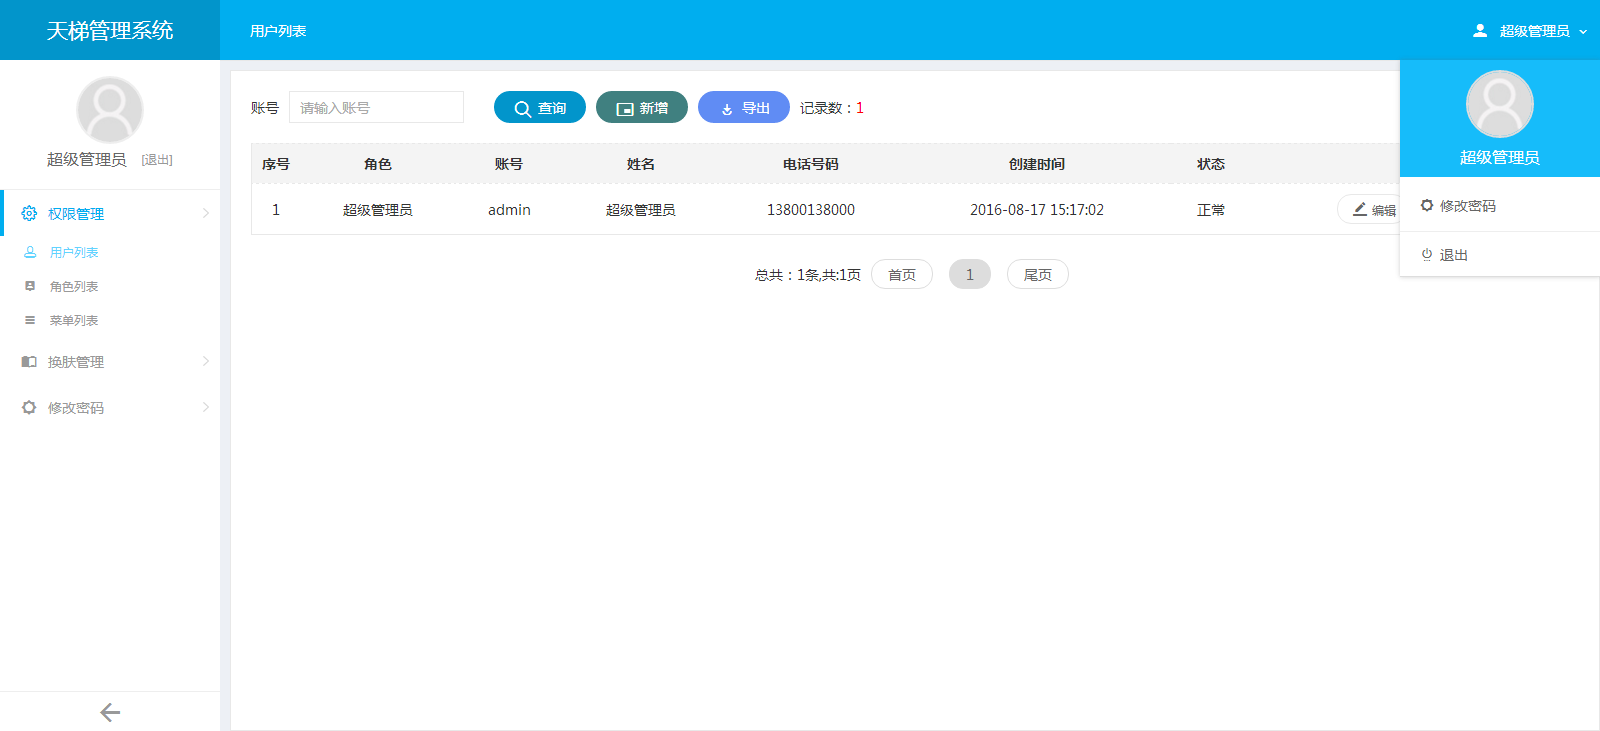
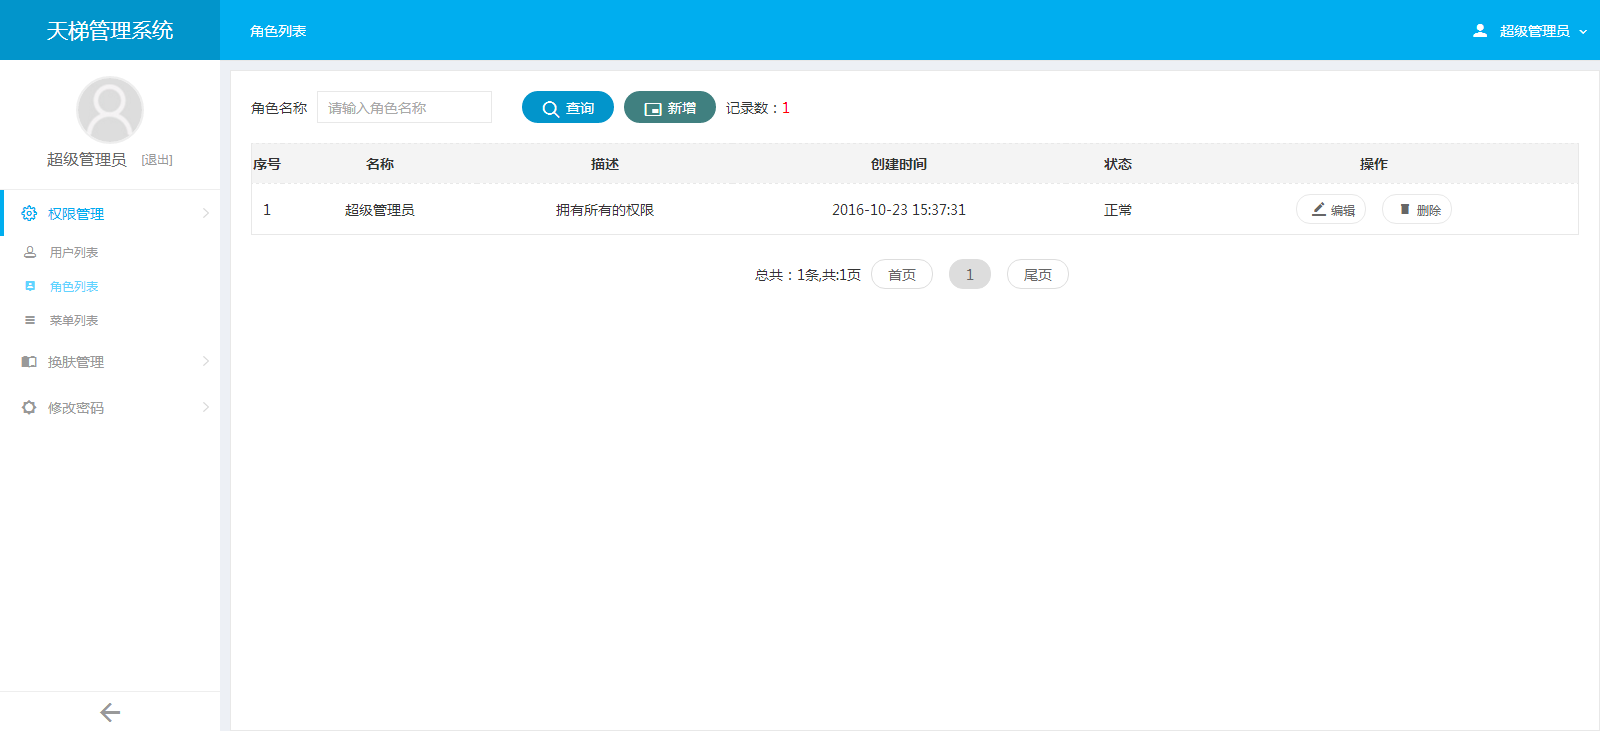
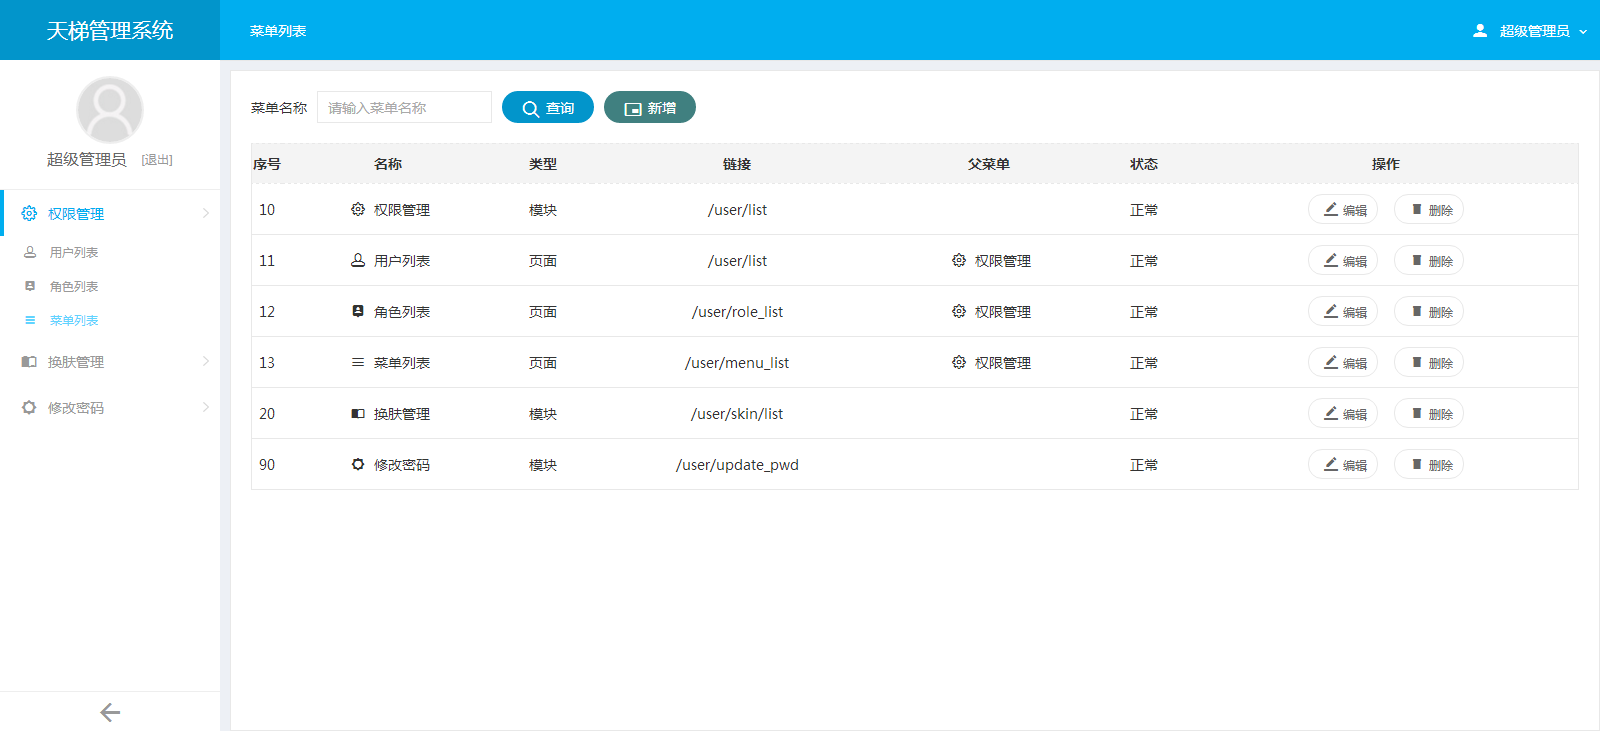
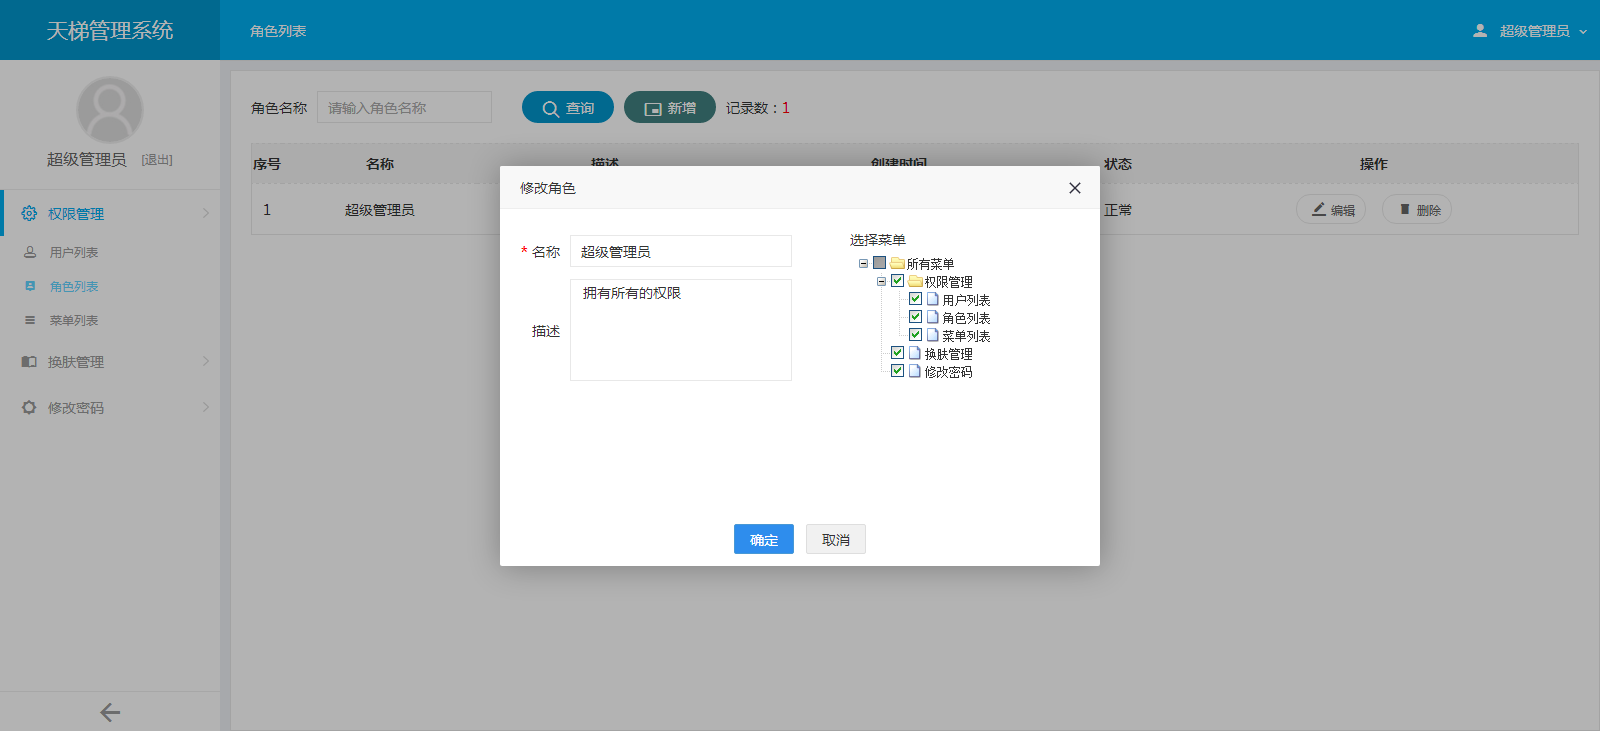
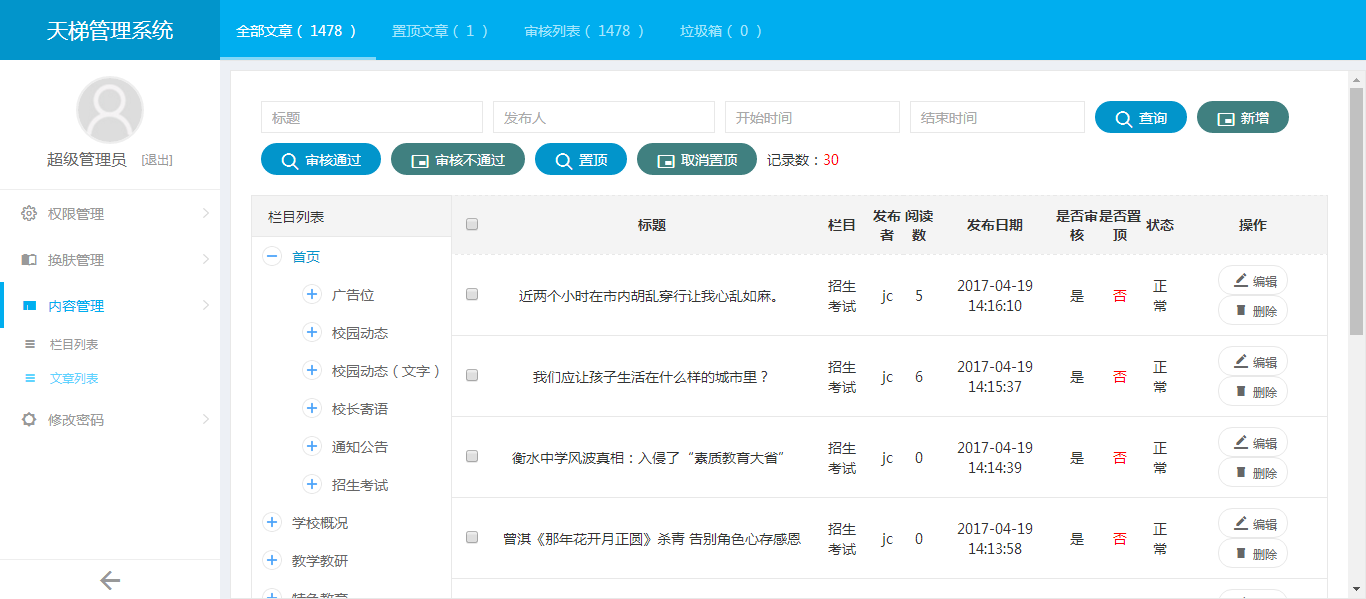
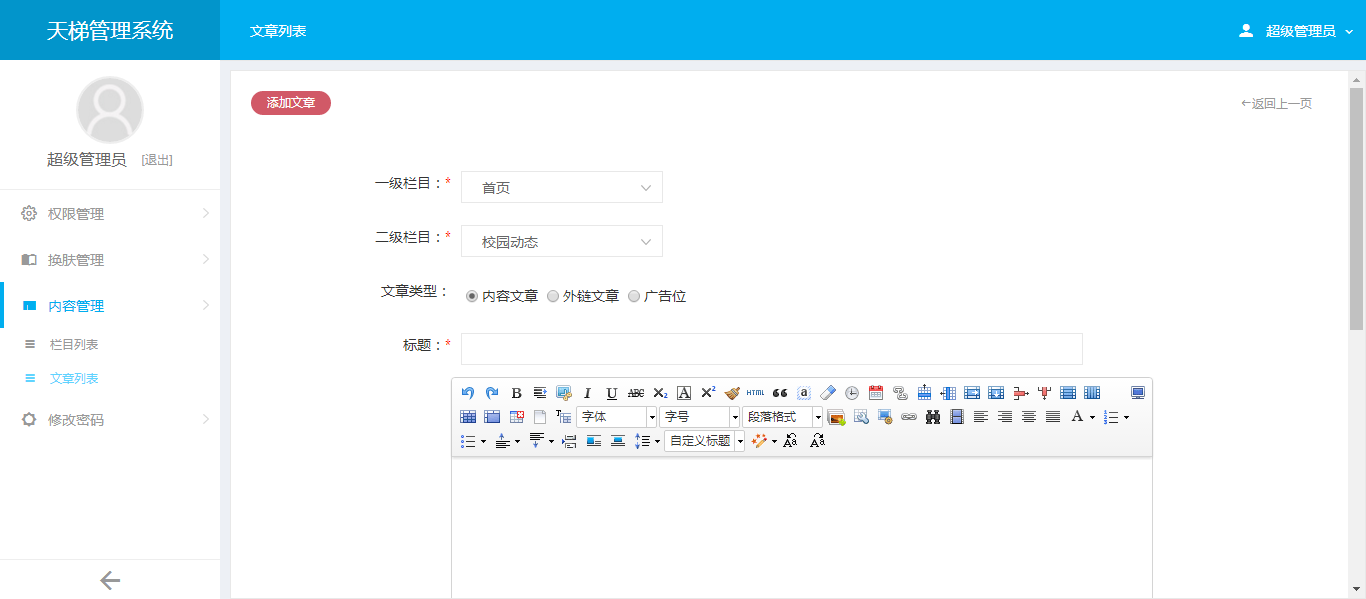
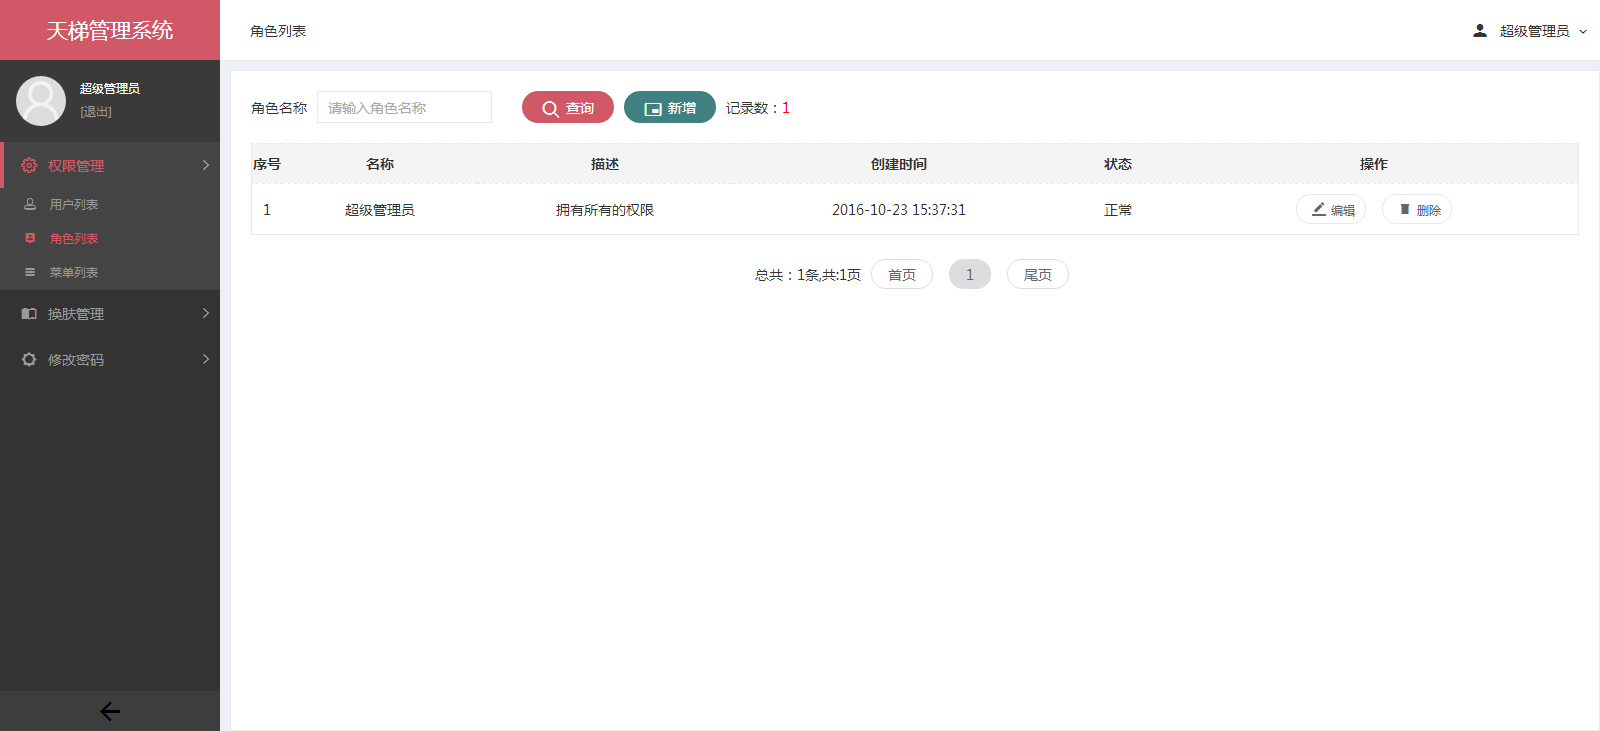
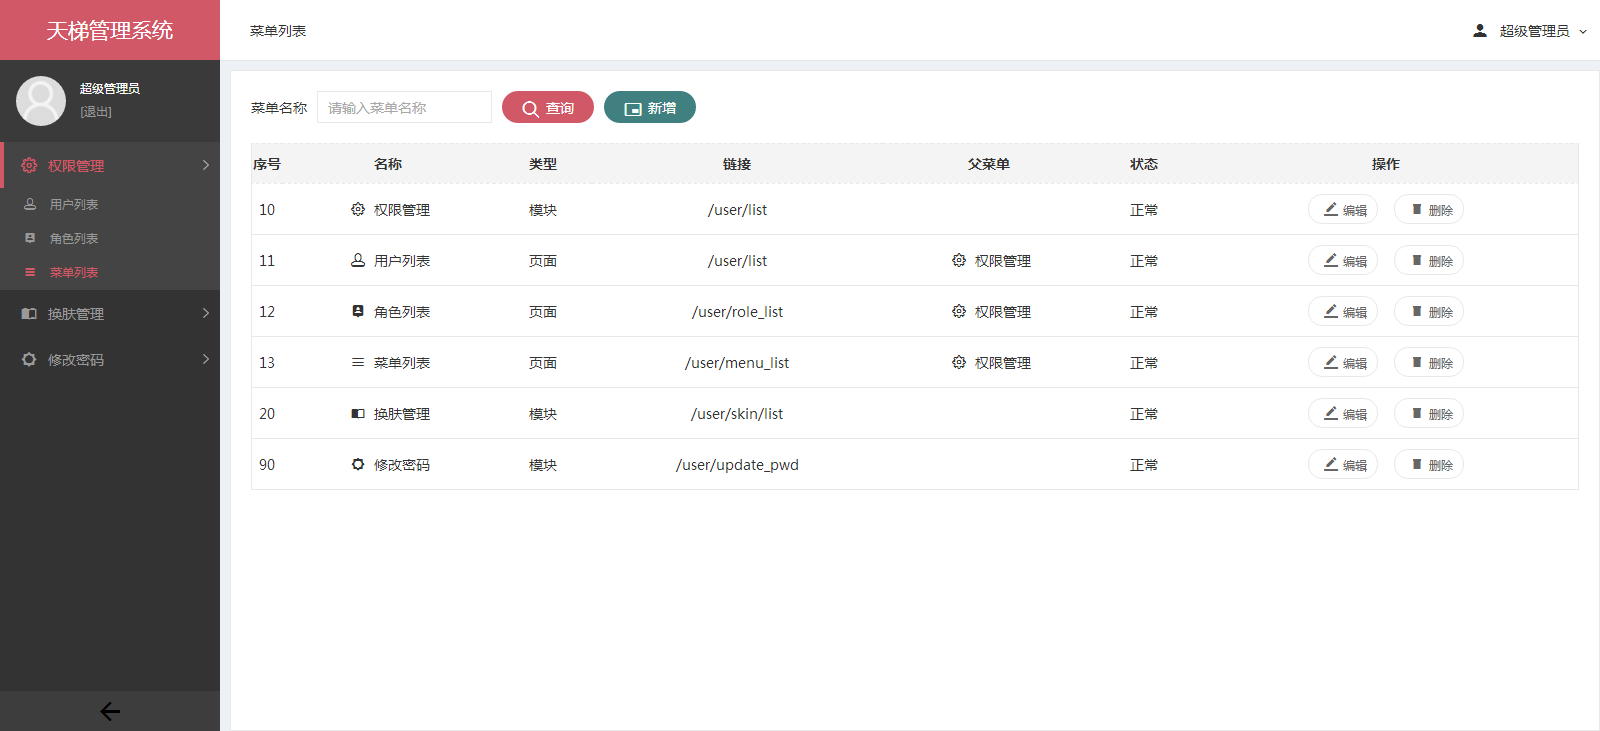
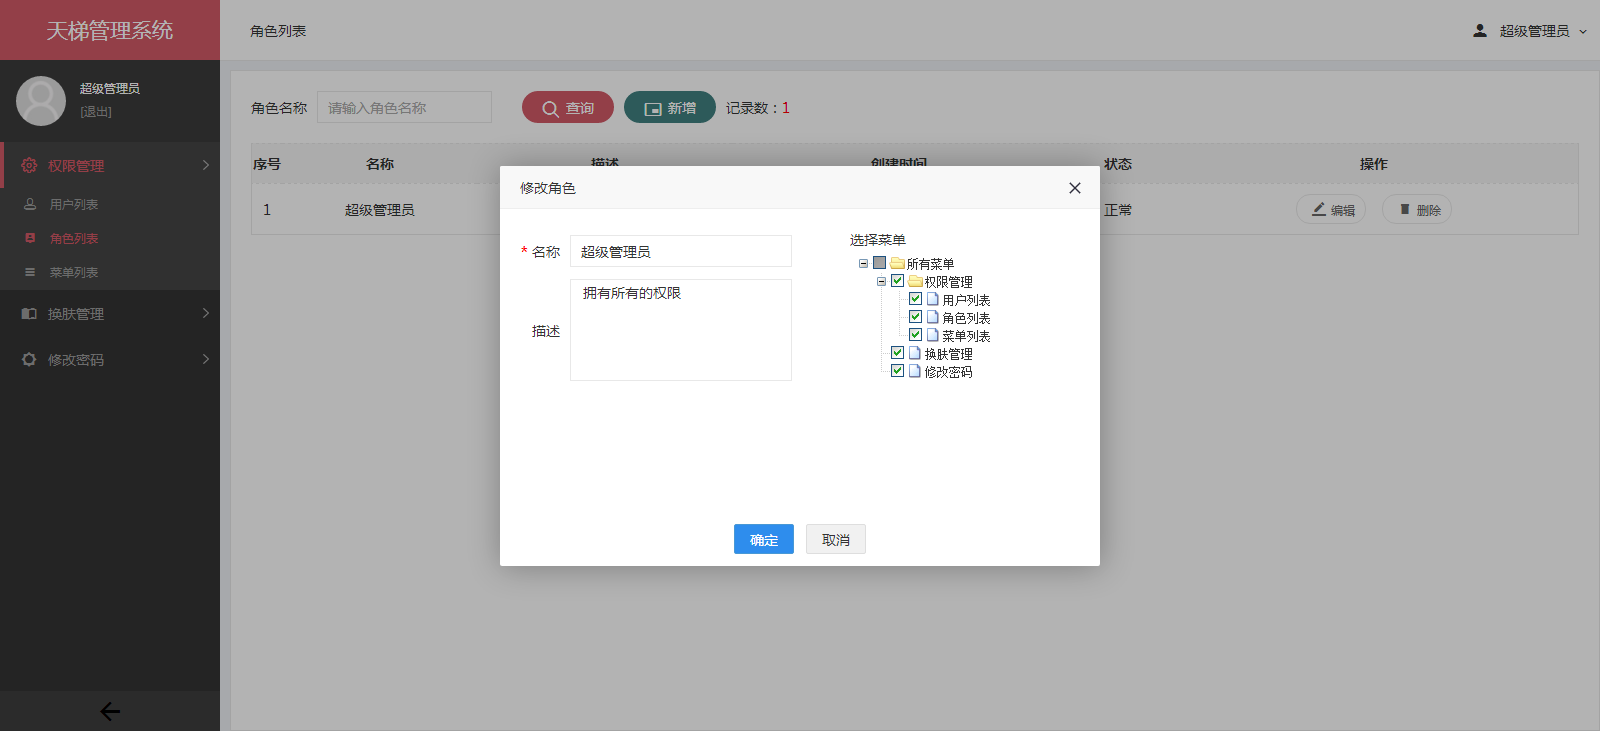
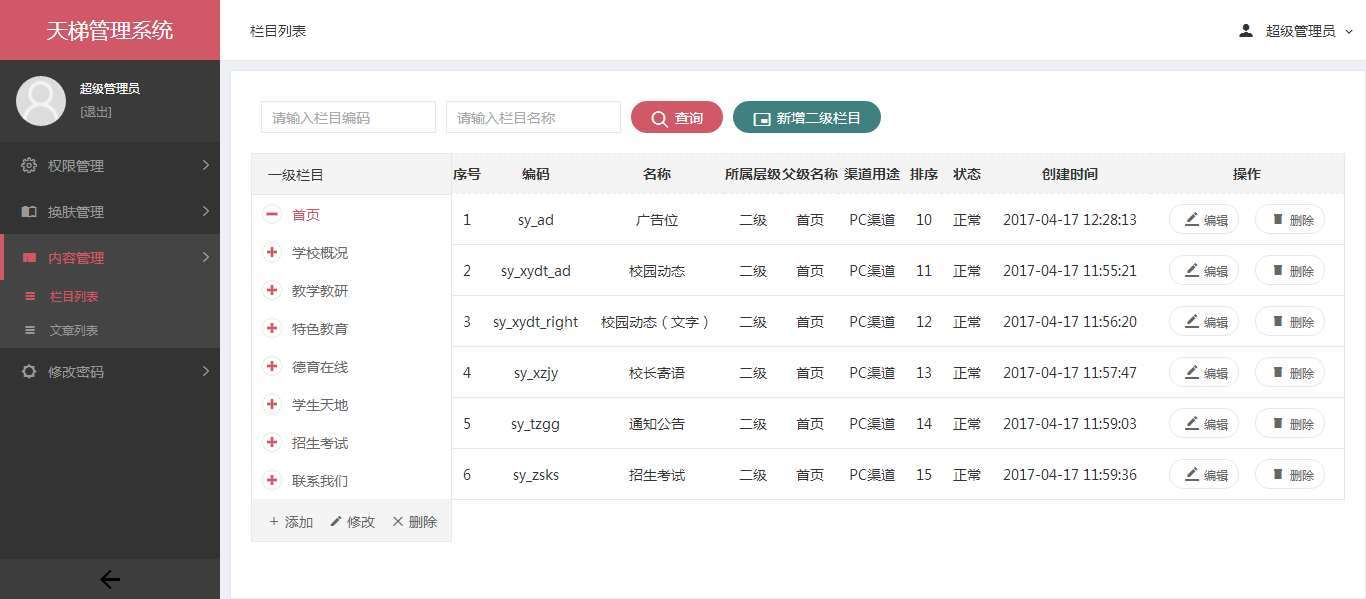
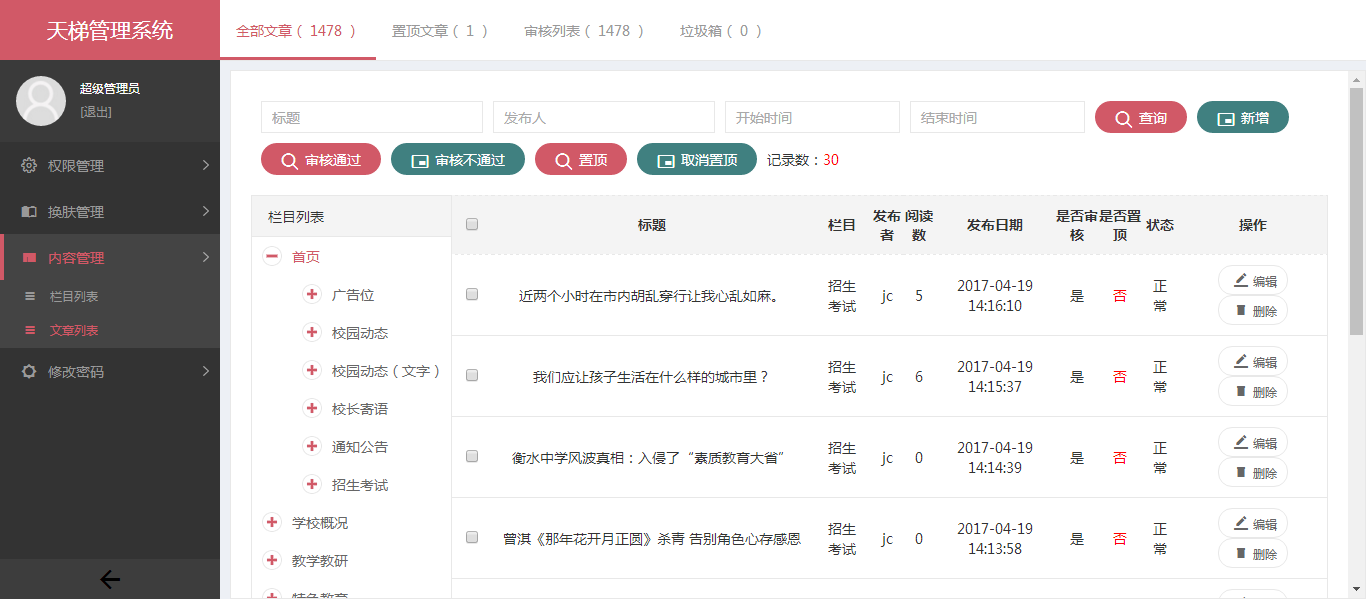
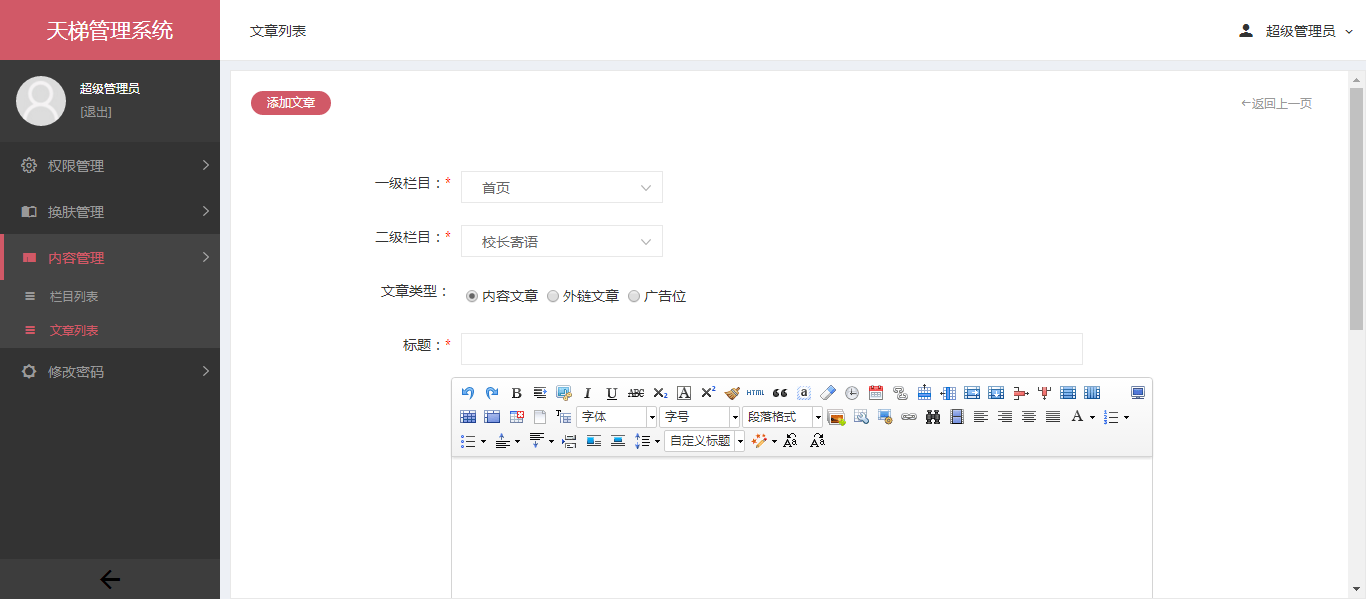
xujeff/tianti | java轻量级的CMS解决方案-天梯。天梯是一个用java相关技术搭建的后台CMS解决方案,用户可以结合自身业务进行相应扩展,同时提供了针对dao、service等的代码生成工具。技术选型:Spring Data JPA、Hibernate、Shiro、 Spring MVC、Layer、Mysql等。 | 2017-02-08T08:21:02Z | null | # 天梯(tianti)
[天梯](https://yuedu.baidu.com/ebook/7a5efa31fbd6195f312b3169a45177232f60e487)[tianti-tool](https://github.com/xujeff/tianti-tool)简介:<br>
1、天梯是一款使用Java编写的免费的轻量级CMS系统,目前提供了从后台管理到前端展现的整体解决方案。
2、用户可以不编写一句代码,就制作出一个默认风格的CMS站点。
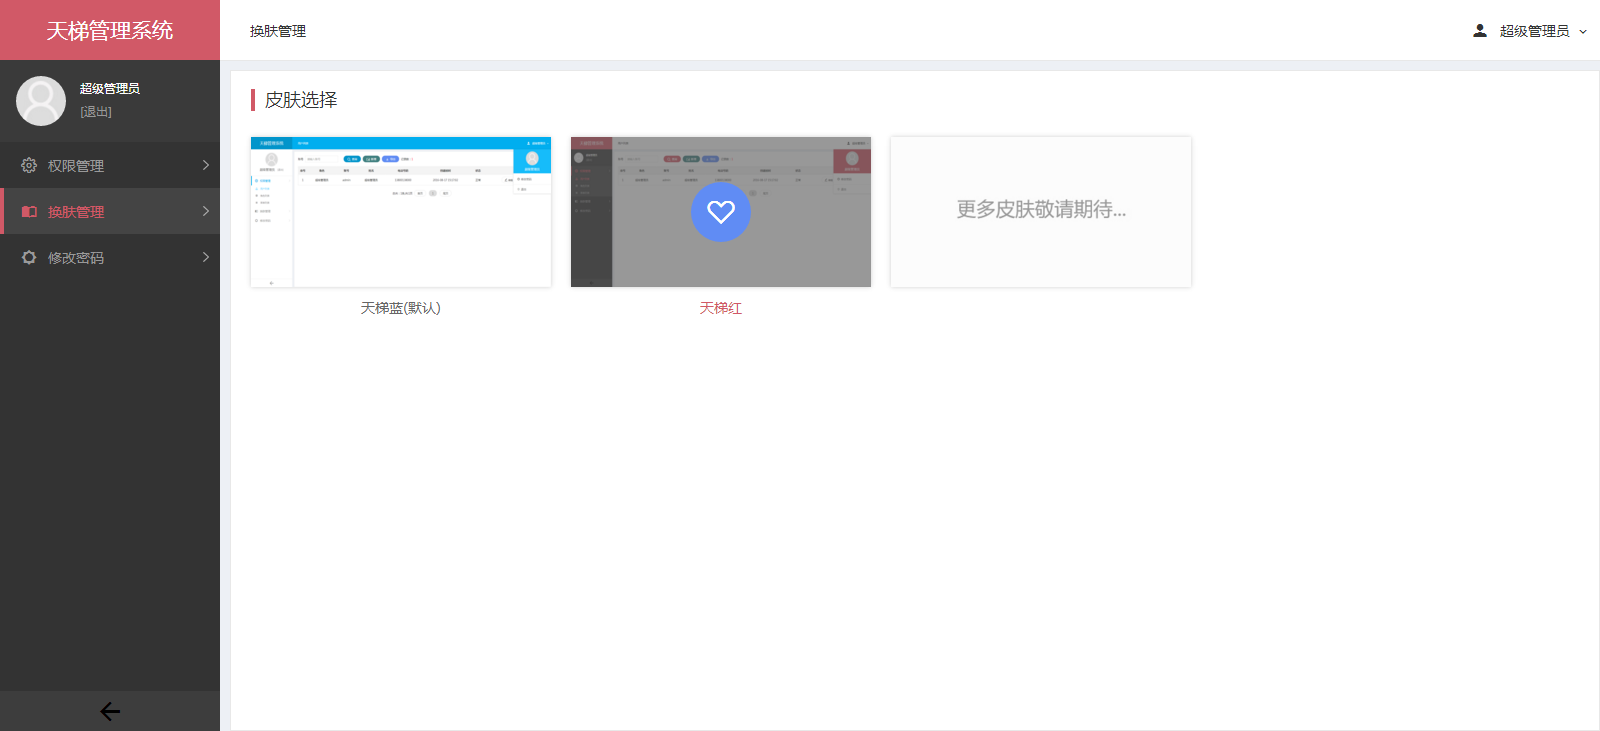
3、前端页面自适应,支持PC和H5端,采用前后端分离的机制实现。后端支持天梯蓝和天梯红换肤功能。
4、项目技术分层明显,用户可以根据自己的业务模块进行相应地扩展,很方便二次开发。
 <br>
 <br>
技术架构:<br>
1、技术选型:
后端
·核心框架:Spring Framework 4.2.5.RELEASE
·安全框架:Apache Shiro 1.3.2
·视图框架:Spring MVC 4.2.5.RELEASE
·数据库连接池:Tomcat JDBC
·缓存框架:Ehcache
·ORM框架:Spring Data JPA、hibernate 4.3.5.Final
·日志管理:SLF4J 1.7.21、Log4j
·编辑器:ueditor
·工具类:Apache Commons、Jackson 2.8.5、POI 3.15
·view层:JSP
·数据库:mysql、oracle等关系型数据库
前端
·dom : Jquery
·分页 : jquery.pagination
·UI管理 : common
·UI集成 : uiExtend
·滚动条 : jquery.nicescroll.min.js
·图表 : highcharts
·3D图表 :highcharts-more
·轮播图 : jquery-swipe
·表单提交 :jquery.form
·文件上传 :jquery.uploadify
·表单验证 :jquery.validator
·展现树 :jquery.ztree
·html模版引擎 :template
2、项目结构:
2.1、tianti-common:系统基础服务抽象,包括entity、dao和service的基础抽象;
2.2、tianti-org:用户权限模块服务实现;
2.3、tianti-cms:资讯类模块服务实现;
2.4、tianti-module-admin:天梯后台web项目实现;
2.5、tianti-module-interface:天梯接口项目实现;
2.6、tianti-module-gateway:天梯前端自适应项目实现(是一个静态项目,调用tianti-module-interface获取数据);
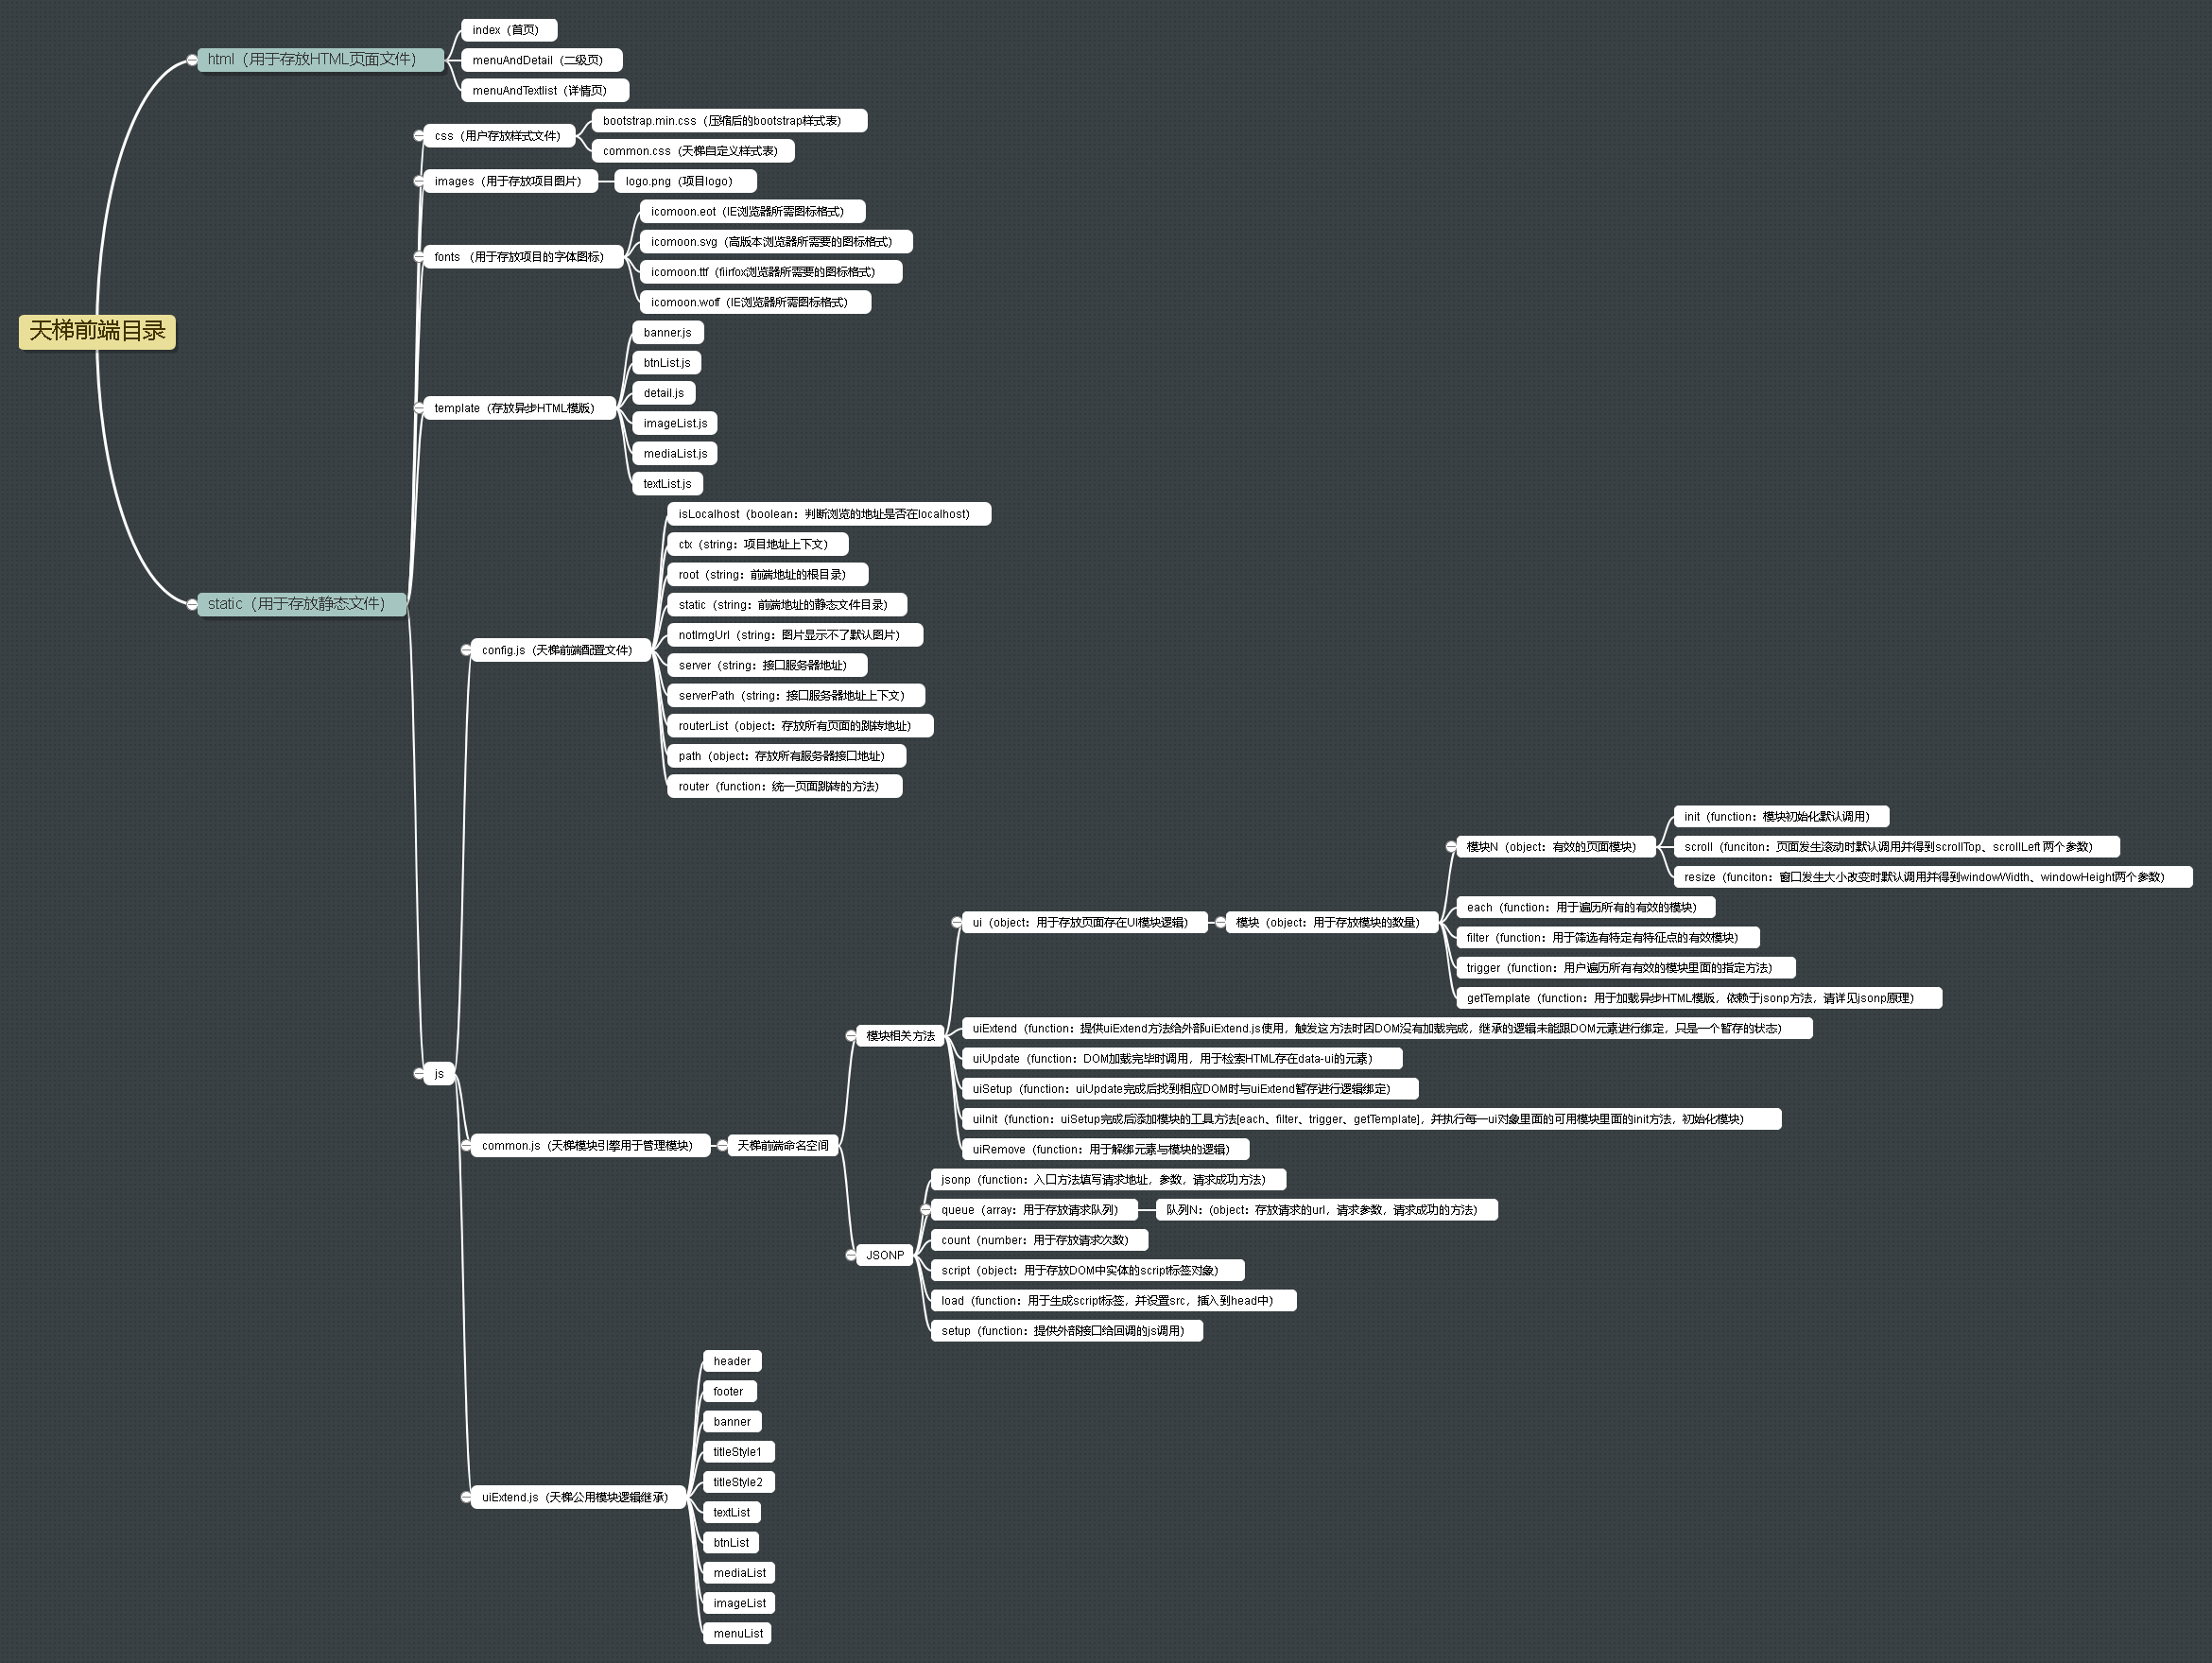
前端项目概览:<br>
PC:<br>


H5:<br>


<br>
后台项目概览:<br>
天梯登陆页面:

天梯蓝风格(默认):

天梯红风格:


| 0 |
heysupratim/material-daterange-picker | A material Date Range Picker based on wdullaers MaterialDateTimePicker | 2015-09-14T12:00:47Z | null | [](http://android-arsenal.com/details/1/2501)
[  ](https://bintray.com/borax12/maven/material-datetime-rangepicker/_latestVersion)
[](https://maven-badges.herokuapp.com/maven-central/com.borax12.materialdaterangepicker/library)
Material Date and Time Picker with Range Selection
======================================================
Credits to the original amazing material date picker library by wdullaer - https://github.com/wdullaer/MaterialDateTimePicker
## Adding to your project
Add the jcenter repository information in your build.gradle file like this
```java
repositories {
jcenter()
}
dependencies {
implementation 'com.borax12.materialdaterangepicker:library:2.0'
}
```
Beginning Version 2.0 now also available on Maven Central
## Date Selection


## Time Selection


Support for Android 4.0 and up.
From the original library documentation -
You may also add the library as an Android Library to your project. All the library files live in ```library```.
Using the Pickers
--------------------------------
1. Implement an `OnDateSetListener` or `OnTimeSetListener`
2. Create a ``DatePickerDialog` using the supplied factory
### Implement an `OnDateSetListener`
In order to receive the date set in the picker, you will need to implement the `OnDateSetListener` interfaces. Typically this will be the `Activity` or `Fragment` that creates the Pickers.
or
### Implement an `OnTimeSetListener`
In order to receive the time set in the picker, you will need to implement the `OnTimeSetListener` interfaces. Typically this will be the `Activity` or `Fragment` that creates the Pickers.
```java
//new onDateSet
@Override
public void onDateSet(DatePickerDialog view, int year, int monthOfYear, int dayOfMonth,int yearEnd, int monthOfYearEnd, int dayOfMonthEnd) {
}
@Override
public void onTimeSet(DatePickerDialog view, int year, int monthOfYear, int dayOfMonth,int yearEnd, int monthOfYearEnd, int dayOfMonthEnd) {
String hourString = hourOfDay < 10 ? "0"+hourOfDay : ""+hourOfDay;
String minuteString = minute < 10 ? "0"+minute : ""+minute;
String hourStringEnd = hourOfDayEnd < 10 ? "0"+hourOfDayEnd : ""+hourOfDayEnd;
String minuteStringEnd = minuteEnd < 10 ? "0"+minuteEnd : ""+minuteEnd;
String time = "You picked the following time: From - "+hourString+"h"+minuteString+" To - "+hourStringEnd+"h"+minuteStringEnd;
timeTextView.setText(time);
}
```
### Create a DatePickerDialog` using the supplied factory
You will need to create a new instance of `DatePickerDialog` using the static `newInstance()` method, supplying proper default values and a callback. Once the dialogs are configured, you can call `show()`.
```java
Calendar now = Calendar.getInstance();
DatePickerDialog dpd = DatePickerDialog.newInstance(
MainActivity.this,
now.get(Calendar.YEAR),
now.get(Calendar.MONTH),
now.get(Calendar.DAY_OF_MONTH)
);
dpd.show(getFragmentManager(), "Datepickerdialog");
```
### Create a TimePickerDialog` using the supplied factory
You will need to create a new instance of `TimePickerDialog` using the static `newInstance()` method, supplying proper default values and a callback. Once the dialogs are configured, you can call `show()`.
```java
Calendar now = Calendar.getInstance();
TimePickerDialog tpd = TimePickerDialog.newInstance(
MainActivity.this,
now.get(Calendar.HOUR_OF_DAY),
now.get(Calendar.MINUTE),
false
);
tpd.show(getFragmentManager(), "Timepickerdialog");
```
For other documentation regarding theming , handling orientation changes , and callbacks - check out the original documentation - https://github.com/wdullaer/MaterialDateTimePicker | 0 |
strapdata/elassandra | Elassandra = Elasticsearch + Apache Cassandra | 2015-08-22T13:52:08Z | null | # Elassandra [](https://travis-ci.org/strapdata/elassandra) [](https://elassandra.readthedocs.io/en/latest/?badge=latest) [](https://github.com/strapdata/elassandra/releases/latest)
[](https://twitter.com/strapdataio)

## [http://www.elassandra.io/](http://www.elassandra.io/)
Elassandra is an [Apache Cassandra](http://cassandra.apache.org) distribution including an [Elasticsearch](https://github.com/elastic/elasticsearch) search engine.
Elassandra is a multi-master multi-cloud database and search engine with support for replicating across multiple datacenters in active/active mode.
Elasticsearch code is embedded in Cassanda nodes providing advanced search features on Cassandra tables and Cassandra serves as an Elasticsearch data and configuration store.

Elassandra supports Cassandra vnodes and scales horizontally by adding more nodes without the need to reshard indices.
Project documentation is available at [doc.elassandra.io](http://doc.elassandra.io).
## Benefits of Elassandra
For Cassandra users, elassandra provides Elasticsearch features :
* Cassandra updates are indexed in Elasticsearch.
* Full-text and spatial search on your Cassandra data.
* Real-time aggregation (does not require Spark or Hadoop to GROUP BY)
* Provide search on multiple keyspaces and tables in one query.
* Provide automatic schema creation and support nested documents using [User Defined Types](https://docs.datastax.com/en/cql/3.1/cql/cql_using/cqlUseUDT.html).
* Provide read/write JSON REST access to Cassandra data.
* Numerous Elasticsearch plugins and products like [Kibana](https://www.elastic.co/guide/en/kibana/current/introduction.html).
* Manage concurrent elasticsearch mappings changes and applies batched atomic CQL schema changes.
* Support [Elasticsearch ingest processors](https://www.elastic.co/guide/en/elasticsearch/reference/master/ingest.html) allowing to transform input data.
For Elasticsearch users, elassandra provides useful features :
* Elassandra is masterless. Cluster state is managed through [cassandra lightweight transactions](http://www.datastax.com/dev/blog/lightweight-transactions-in-cassandra-2-0).
* Elassandra is a sharded multi-master database, where Elasticsearch is sharded master-slave. Thus, Elassandra has no Single Point Of Write, helping to achieve high availability.
* Elassandra inherits Cassandra data repair mechanisms (hinted handoff, read repair and nodetool repair) providing support for **cross datacenter replication**.
* When adding a node to an Elassandra cluster, only data pulled from existing nodes are re-indexed in Elasticsearch.
* Cassandra could be your unique datastore for indexed and non-indexed data. It's easier to manage and secure. Source documents are now stored in Cassandra, reducing disk space if you need a NoSQL database and Elasticsearch.
* Write operations are not restricted to one primary shard, but distributed across all Cassandra nodes in a virtual datacenter. The number of shards does not limit your write throughput. Adding elassandra nodes increases both read and write throughput.
* Elasticsearch indices can be replicated among many Cassandra datacenters, allowing write to the closest datacenter and search globally.
* The [cassandra driver](http://www.planetcassandra.org/client-drivers-tools/) is Datacenter and Token aware, providing automatic load-balancing and failover.
* Elassandra efficiently stores Elasticsearch documents in binary SSTables without any JSON overhead.
## Quick start
* [Quick Start](http://doc.elassandra.io/en/latest/quickstart.html) guide to run a single node Elassandra cluster in docker.
* [Deploy Elassandra by launching a Google Kubernetes Engine](./docs/google-kubernetes-tutorial.md):
[](https://console.cloud.google.com/cloudshell/open?git_repo=https://github.com/strapdata/elassandra-google-k8s-marketplace&tutorial=docs/google-kubernetes-tutorial.md)
## Upgrade Instructions
#### Elassandra 6.8.4.2+
<<<<<<< HEAD
Since version 6.8.4.2, the gossip X1 application state can be compressed using a system property. Enabling this settings allows the creation of a lot of virtual indices.
Before enabling this setting, upgrade all the 6.8.4.x nodes to the 6.8.4.2 (or higher). Once all the nodes are in 6.8.4.2, they are able to decompress the application state even if the settings isn't yet configured locally.
#### Elassandra 6.2.3.25+
Elassandra use the Cassandra GOSSIP protocol to manage the Elasticsearch routing table and Elassandra 6.8.4.2+ add support for compression of
the X1 application state to increase the maxmimum number of Elasticsearch indices. For backward compatibility, the compression is disabled by default,
but once all your nodes are upgraded into version 6.8.4.2+, you should enable the X1 compression by adding **-Des.compress_x1=true** in your **conf/jvm.options** and rolling restart all nodes.
Nodes running version 6.8.4.2+ are able to read compressed and not compressed X1.
#### Elassandra 6.2.3.21+
Before version 6.2.3.21, the Cassandra replication factor for the **elasic_admin** keyspace (and elastic_admin_[datacenter.group]) was automatically adjusted to the
number of nodes of the datacenter. Since version 6.2.3.21 and because it has a performance impact on large clusters, it's now up to your Elassandra administrator to
properly adjust the replication factor for this keyspace. Keep in mind that Elasticsearch mapping updates rely on a PAXOS transaction that requires QUORUM nodes to succeed,
so replication factor should be at least 3 on each datacenter.
#### Elassandra 6.2.3.19+
Elassandra 6.2.3.19 metadata version now relies on the Cassandra table **elastic_admin.metadata_log** (that was **elastic_admin.metadata** from 6.2.3.8 to 6.2.3.18)
to keep the elasticsearch mapping update history and automatically recover from a possible PAXOS write timeout issue.
When upgrading the first node of a cluster, Elassandra automatically copy the current **metadata.version** into the new **elastic_admin.metadata_log** table.
To avoid Elasticsearch mapping inconsistency, you must avoid mapping update while the rolling upgrade is in progress. Once all nodes are upgraded,
the **elastic_admin.metadata** is not more used and can be removed. Then, you can get the mapping update history from the new **elastic_admin.metadata_log** and know
which node has updated the mapping, when and for which reason.
#### Elassandra 6.2.3.8+
Elassandra 6.2.3.8+ now fully manages the elasticsearch mapping in the CQL schema through the use of CQL schema extensions (see *system_schema.tables*, column *extensions*). These table extensions and the CQL schema updates resulting of elasticsearch index creation/modification are updated in batched atomic schema updates to ensure consistency when concurrent updates occurs. Moreover, these extensions are stored in binary and support partial updates to be more efficient. As the result, the elasticsearch mapping is not more stored in the *elastic_admin.metadata* table.
WARNING: During the rolling upgrade, elasticserach mapping changes are not propagated between nodes running the new and the old versions, so don't change your mapping while you're upgrading. Once all your nodes have been upgraded to 6.2.3.8+ and validated, apply the following CQL statements to remove useless elasticsearch metadata:
```bash
ALTER TABLE elastic_admin.metadata DROP metadata;
ALTER TABLE elastic_admin.metadata WITH comment = '';
```
WARNING: Due to CQL table extensions used by Elassandra, some old versions of **cqlsh** may lead to the following error message **"'module' object has no attribute 'viewkeys'."**. This comes from the old python cassandra driver embedded in Cassandra and has been reported in [CASSANDRA-14942](https://issues.apache.org/jira/browse/CASSANDRA-14942). Possible workarounds:
* Use the **cqlsh** embedded with Elassandra
* Install a recent version of the **cqlsh** utility (*pip install cqlsh*) or run it from a docker image:
```bash
docker run -it --rm strapdata/cqlsh:0.1 node.example.com
```
#### Elassandra 6.x changes
* Elasticsearch now supports only one document type per index backed by one Cassandra table. Unless you specify an elasticsearch type name in your mapping, data is stored in a cassandra table named **"_doc"**. If you want to search many cassandra tables, you now need to create and search many indices.
* Elasticsearch 6.x manages shard consistency through several metadata fields (_primary_term, _seq_no, _version) that are not used in elassandra because replication is fully managed by cassandra.
## Installation
Ensure Java 8 is installed and `JAVA_HOME` points to the correct location.
* [Download](https://github.com/strapdata/elassandra/releases) and extract the distribution tarball
* Define the CASSANDRA_HOME environment variable : `export CASSANDRA_HOME=<extracted_directory>`
* Run `bin/cassandra -e`
* Run `bin/nodetool status`
* Run `curl -XGET localhost:9200/_cluster/state`
#### Example
Try indexing a document on a non-existing index:
```bash
curl -XPUT 'http://localhost:9200/twitter/_doc/1?pretty' -H 'Content-Type: application/json' -d '{
"user": "Poulpy",
"post_date": "2017-10-04T13:12:00Z",
"message": "Elassandra adds dynamic mapping to Cassandra"
}'
```
Then look-up in Cassandra:
```bash
bin/cqlsh -e "SELECT * from twitter.\"_doc\""
```
Behind the scenes, Elassandra has created a new Keyspace `twitter` and table `_doc`.
```CQL
admin@cqlsh>DESC KEYSPACE twitter;
CREATE KEYSPACE twitter WITH replication = {'class': 'NetworkTopologyStrategy', 'DC1': '1'} AND durable_writes = true;
CREATE TABLE twitter."_doc" (
"_id" text PRIMARY KEY,
message list<text>,
post_date list<timestamp>,
user list<text>
) WITH bloom_filter_fp_chance = 0.01
AND caching = {'keys': 'ALL', 'rows_per_partition': 'NONE'}
AND comment = ''
AND compaction = {'class': 'org.apache.cassandra.db.compaction.SizeTieredCompactionStrategy', 'max_threshold': '32', 'min_threshold': '4'}
AND compression = {'chunk_length_in_kb': '64', 'class': 'org.apache.cassandra.io.compress.LZ4Compressor'}
AND crc_check_chance = 1.0
AND dclocal_read_repair_chance = 0.1
AND default_time_to_live = 0
AND gc_grace_seconds = 864000
AND max_index_interval = 2048
AND memtable_flush_period_in_ms = 0
AND min_index_interval = 128
AND read_repair_chance = 0.0
AND speculative_retry = '99PERCENTILE';
CREATE CUSTOM INDEX elastic__doc_idx ON twitter."_doc" () USING 'org.elassandra.index.ExtendedElasticSecondaryIndex';
```
By default, multi valued Elasticsearch fields are mapped to Cassandra list.
Now, insert a row with CQL :
```CQL
INSERT INTO twitter."_doc" ("_id", user, post_date, message)
VALUES ( '2', ['Jimmy'], [dateof(now())], ['New data is indexed automatically']);
SELECT * FROM twitter."_doc";
_id | message | post_date | user
-----+--------------------------------------------------+-------------------------------------+------------
2 | ['New data is indexed automatically'] | ['2019-07-04 06:00:21.893000+0000'] | ['Jimmy']
1 | ['Elassandra adds dynamic mapping to Cassandra'] | ['2017-10-04 13:12:00.000000+0000'] | ['Poulpy']
(2 rows)
```
Then search for it with the Elasticsearch API:
```bash
curl "localhost:9200/twitter/_search?q=user:Jimmy&pretty"
```
And here is a sample response :
```JSON
{
"took" : 3,
"timed_out" : false,
"_shards" : {
"total" : 1,
"successful" : 1,
"skipped" : 0,
"failed" : 0
},
"hits" : {
"total" : 1,
"max_score" : 0.6931472,
"hits" : [
{
"_index" : "twitter",
"_type" : "_doc",
"_id" : "2",
"_score" : 0.6931472,
"_source" : {
"post_date" : "2019-07-04T06:00:21.893Z",
"message" : "New data is indexed automatically",
"user" : "Jimmy"
}
}
]
}
}
```
## Support
* Commercial support is available through [Strapdata](http://www.strapdata.com/).
* Community support available via [elassandra google groups](https://groups.google.com/forum/#!forum/elassandra).
* Post feature requests and bugs on https://github.com/strapdata/elassandra/issues
## License
```
This software is licensed under the Apache License, version 2 ("ALv2"), quoted below.
Copyright 2015-2018, Strapdata (contact@strapdata.com).
Licensed under the Apache License, Version 2.0 (the "License"); you may not
use this file except in compliance with the License. You may obtain a copy of
the License at
http://www.apache.org/licenses/LICENSE-2.0
Unless required by applicable law or agreed to in writing, software
distributed under the License is distributed on an "AS IS" BASIS, WITHOUT
WARRANTIES OR CONDITIONS OF ANY KIND, either express or implied. See the
License for the specific language governing permissions and limitations under
the License.
```
## Acknowledgments
* Elasticsearch, Logstash, Beats and Kibana are trademarks of Elasticsearch BV, registered in the U.S. and in other countries.
* Apache Cassandra, Apache Lucene, Apache, Lucene and Cassandra are trademarks of the Apache Software Foundation.
* Elassandra is a trademark of Strapdata SAS.
| 0 |
dongjunkun/DropDownMenu | 一个实用的多条件筛选菜单 | 2015-06-23T07:43:56Z | null | [](https://jitpack.io/#dongjunkun/DropDownMenu)
## 简介
一个实用的多条件筛选菜单,在很多App上都能看到这个效果,如美团,爱奇艺电影票等
我的博客 [自己造轮子--android常用多条件帅选菜单实现思路(类似美团,爱奇艺电影票下拉菜单)](http://www.jianshu.com/p/d9407f799d2d)
## 特色
- 支持多级菜单
- 你可以完全自定义你的菜单样式,我这里只是封装了一些实用的方法,Tab的切换效果,菜单显示隐藏效果等
- 并非用popupWindow实现,无卡顿
## ScreenShot
<img src="https://raw.githubusercontent.com/dongjunkun/DropDownMenu/master/art/simple.gif"/>
<a href="https://raw.githubusercontent.com/dongjunkun/DropDownMenu/master/app/build/outputs/apk/app-debug.apk">Download APK</a>
或者扫描二维码
<img src="https://raw.githubusercontent.com/dongjunkun/DropDownMenu/master/art/download.png"/>
## Gradle Dependency
```
allprojects {
repositories {
...
maven { url "https://jitpack.io" }
}
}
dependencies {
compile 'com.github.dongjunkun:DropDownMenu:1.0.4'
}
```
## 使用
添加DropDownMenu 到你的布局文件,如下
```
<com.yyydjk.library.DropDownMenu
android:id="@+id/dropDownMenu"
android:layout_width="match_parent"
android:layout_height="match_parent"
app:ddmenuTextSize="13sp" //tab字体大小
app:ddtextUnselectedColor="@color/drop_down_unselected" //tab未选中颜色
app:ddtextSelectedColor="@color/drop_down_selected" //tab选中颜色
app:dddividerColor="@color/gray" //分割线颜色
app:ddunderlineColor="@color/gray" //下划线颜色
app:ddmenuSelectedIcon="@mipmap/drop_down_selected_icon" //tab选中状态图标
app:ddmenuUnselectedIcon="@mipmap/drop_down_unselected_icon"//tab未选中状态图标
app:ddmaskColor="@color/mask_color" //遮罩颜色,一般是半透明
app:ddmenuBackgroundColor="@color/white" //tab 背景颜色
app:ddmenuMenuHeightPercent="0.5" 菜单的最大高度,根据屏幕高度的百分比设置
...
/>
```
我们只需要在java代码中调用下面的代码
```
//tabs 所有标题,popupViews 所有菜单,contentView 内容
mDropDownMenu.setDropDownMenu(tabs, popupViews, contentView);
```
如果你要了解更多,可以直接看源码 <a href="https://github.com/dongjunkun/DropDownMenu/blob/master/app/src/main/java/com/yyy/djk/dropdownmenu/MainActivity.java">Example</a>
> 建议拷贝代码到项目中使用,拷贝DropDownMenu.java 以及res下的所有文件即可
## 关于我
简书[dongjunkun](http://www.jianshu.com/users/f07458c1a8f3/latest_articles)
| 0 |
DingMouRen/PaletteImageView | 懂得智能配色的ImageView,还能给自己设置多彩的阴影哦。(Understand the intelligent color matching ImageView, but also to set their own colorful shadow Oh!) | 2017-04-25T12:05:08Z | null | 
### English Readme
[English Version](https://github.com/hasanmohdkhan/PaletteImageView/blob/master/README%20English.md)
(Thank you, [hasanmohdkhan](https://github.com/hasanmohdkhan))
### 简介
* 可以解析图片中的主色调,**默认将主色调作为控件阴影的颜色**
* 可以**自定义设置控件的阴影颜色**
* 可以**控制控件四个角的圆角大小**(如果控件设置成正方向,随着圆角半径增大,可以将控件变成圆形)
* 可以**控制控件的阴影半径大小**
* 可以分别**控制阴影在x方向和y方向上的偏移量**
* 可以将图片中的颜色解析出**六种主题颜色**,每一种主题颜色都有相应的**匹配背景、标题、正文的推荐颜色**
### build.gradle中引用
```
compile 'com.dingmouren.paletteimageview:paletteimageview:1.0.7'
```

##### 1.参数的控制
圆角半径|阴影模糊范围|阴影偏移量
---|---|---
 |  | 
##### 2.阴影颜色默认是图片的主色调


##### 3.图片颜色主题解析

### 使用
```
<com.dingmouren.paletteimageview.PaletteImageView
android:id="@+id/palette"
android:layout_width="match_parent"
android:layout_height="wrap_content"
app:palettePadding="20dp"
app:paletteOffsetX="15dp"
app:paletteOffsetY="15dp"
/>
mPaletteImageView.setOnParseColorListener(new PaletteImageView.OnParseColorListener() {
@Override//解析图片的颜色完毕
public void onComplete(PaletteImageView paletteImageView) {
int[] vibrant = paletteImageView.getVibrantColor();
int[] vibrantDark = paletteImageView.getDarkVibrantColor();
int[] vibrantLight = paletteImageView.getLightVibrantColor();
int[] muted = paletteImageView.getMutedColor();
int[] mutedDark = paletteImageView.getDarkMutedColor();
int[] mutedLight = paletteImageView.getLightMutedColor();
}
@Override//解析图片的颜色失败
public void onFail() {
}
});
```
### xml属性
xml属性 | 描述
---|---
app:palettePadding | **表示阴影显示最大空间距离。值为0,没有阴影,大于0,才有阴影。**
app:paletteOffsetX | 表示阴影在x方向上的偏移量
app:paletteOffsetY | 表示阴影在y方向上的偏移量
app:paletteSrc | 表示图片资源
app:paletteRadius | 表示圆角半径
app:paletteShadowRadius | 表示阴影模糊范围
### 公共的方法
方法 | 描述
---|---
public void setShadowColor(int color) | 表示自定义设置控件阴影的颜色
public void setBitmap(Bitmap bitmap) | 表示设置控件位图
public void setPaletteRadius(int raius) | 表示设置控件圆角半径
public void setPaletteShadowOffset(int offsetX, int offsetY) | 表示设置阴影在控件阴影在x方向 或 y方向上的偏移量
public void setPaletteShadowRadius(int radius) | 表示设置控件阴影模糊范围
public void setOnParseColorListener(OnParseColorListener listener) | 设置控件解析图片颜色的监听器
public int[] getVibrantColor() | 表示获取Vibrant主题的颜色数组;假设颜色数组为arry,arry[0]是推荐标题使用的颜色,arry[1]是推荐正文使用的颜色,arry[2]是推荐背景使用的颜色。颜色只是用于推荐,可以自行选择
public int[] getDarkVibrantColor()| 表示获取DarkVibrant主题的颜色数组,数组元素含义同上
public int[] getLightVibrantColor()| 表示获取LightVibrant主题的颜色数组,数组元素含义同上
public int[] getMutedColor()| 表示获取Muted主题的颜色数组,数组元素含义同上
public int[] getDarkMutedColor()| 表示获取DarkMuted主题的颜色数组,数组元素含义同上
public int[] getLightMutedColor()| 表示获取LightMuted主题的颜色数组,数组元素含义同上
<br>此项目已暂停维护<br>
| 0 |
Sunzxyong/Recovery | a crash recovery framework.(一个App异常恢复框架) | 2016-09-04T08:13:19Z | null | # **Recovery**
A crash recovery framework!
----
[  ](https://bintray.com/sunzxyong/maven/Recovery/_latestVersion)  [](https://github.com/Sunzxyong/Recovery/blob/master/LICENSE)
[中文文档](https://github.com/Sunzxyong/Recovery/blob/master/README-Chinese.md)
# **Introduction**
[Blog entry with introduction](http://zhengxiaoyong.com/2016/09/05/Android%E8%BF%90%E8%A1%8C%E6%97%B6Crash%E8%87%AA%E5%8A%A8%E6%81%A2%E5%A4%8D%E6%A1%86%E6%9E%B6-Recovery)
“Recovery” can help you to automatically handle application crash in runtime. It provides you with following functionality:
* Automatic recovery activity with stack and data;
* Ability to recover to the top activity;
* A way to view and save crash info;
* Ability to restart and clear the cache;
* Allows you to do a restart instead of recovering if failed twice in one minute.
# **Art**

# **Usage**
## **Installation**
**Using Gradle**
```gradle
implementation 'com.zxy.android:recovery:1.0.0'
```
or
```gradle
debugImplementation 'com.zxy.android:recovery:1.0.0'
releaseImplementation 'com.zxy.android:recovery-no-op:1.0.0'
```
**Using Maven**
```xml
<dependency>
<groupId>com.zxy.android</groupId>
<artifactId>recovery</artifactId>
<version>1.0.0</version>
<type>pom</type>
</dependency>
```
## **Initialization**
You can use this code sample to initialize Recovery in your application:
```java
Recovery.getInstance()
.debug(true)
.recoverInBackground(false)
.recoverStack(true)
.mainPage(MainActivity.class)
.recoverEnabled(true)
.callback(new MyCrashCallback())
.silent(false, Recovery.SilentMode.RECOVER_ACTIVITY_STACK)
.skip(TestActivity.class)
.init(this);
```
If you don't want to show the RecoveryActivity when the application crash in runtime,you can use silence recover to restore your application.
You can use this code sample to initialize Recovery in your application:
```java
Recovery.getInstance()
.debug(true)
.recoverInBackground(false)
.recoverStack(true)
.mainPage(MainActivity.class)
.recoverEnabled(true)
.callback(new MyCrashCallback())
.silent(true, Recovery.SilentMode.RECOVER_ACTIVITY_STACK)
.skip(TestActivity.class)
.init(this);
```
If you only need to display 'RecoveryActivity' page in development to obtain the debug data, and in the online version does not display, you can set up `recoverEnabled(false);`
## **Arguments**
| Argument | Type | Function |
| :-: | :-: | :-: |
| debug | boolean | Whether to open the debug mode |
| recoverInBackgroud | boolean | When the App in the background, whether to restore the stack |
| recoverStack | boolean | Whether to restore the activity stack, or to restore the top activity |
| mainPage | Class<? extends Activity> | Initial page activity |
| callback | RecoveryCallback | Crash info callback |
| silent | boolean,SilentMode | Whether to use silence recover,if true it will not display RecoveryActivity and restore the activity stack automatically |
**SilentMode**
> 1. RESTART - Restart App
> 2. RECOVER_ACTIVITY_STACK - Restore the activity stack
> 3. RECOVER_TOP_ACTIVITY - Restore the top activity
> 4. RESTART_AND_CLEAR - Restart App and clear data
## **Callback**
```java
public interface RecoveryCallback {
void stackTrace(String stackTrace);
void cause(String cause);
void exception(
String throwExceptionType,
String throwClassName,
String throwMethodName,
int throwLineNumber
);
void throwable(Throwable throwable);
}
```
## **Custom Theme**
You can customize UI by setting these properties in your styles file:
```xml
<color name="recovery_colorPrimary">#2E2E36</color>
<color name="recovery_colorPrimaryDark">#2E2E36</color>
<color name="recovery_colorAccent">#BDBDBD</color>
<color name="recovery_background">#3C4350</color>
<color name="recovery_textColor">#FFFFFF</color>
<color name="recovery_textColor_sub">#C6C6C6</color>
```
## **Crash File Path**
> {SDCard Dir}/Android/data/{packageName}/files/recovery_crash/
----
## **Update history**
* `VERSION-0.0.5`——**Support silent recovery**
* `VERSION-0.0.6`——**Strengthen the protection of silent restore mode**
* `VERSION-0.0.7`——**Add confusion configuration**
* `VERSION-0.0.8`——**Add the skip Activity features,method:skip()**
* `VERSION-0.0.9`——**Update the UI and solve some problems**
* `VERSION-0.1.0`——**Optimization of crash exception delivery, initial Recovery framework can be in any position, release the official version-0.1.0**
* `VERSION-0.1.3`——**Add 'no-op' support**
* `VERSION-0.1.4`——**update default theme**
* `VERSION-0.1.5`——**fix 8.0+ hook bug**
* `VERSION-0.1.6`——**update**
* `VERSION-1.0.0`——**Fix 8.0 compatibility issue**
## **About**
* **Blog**:[https://zhengxiaoyong.com](https://zhengxiaoyong.com)
* **Wechat**:

# **LICENSE**
```
Copyright 2016 zhengxiaoyong
Licensed under the Apache License, Version 2.0 (the "License");
you may not use this file except in compliance with the License.
You may obtain a copy of the License at
http://www.apache.org/licenses/LICENSE-2.0
Unless required by applicable law or agreed to in writing, software
distributed under the License is distributed on an "AS IS" BASIS,
WITHOUT WARRANTIES OR CONDITIONS OF ANY KIND, either express or implied.
See the License for the specific language governing permissions and
limitations under the License.
```
| 0 |
Jude95/EasyRecyclerView | ArrayAdapter,pull to refresh,auto load more,Header/Footer,EmptyView,ProgressView,ErrorView | 2015-07-18T13:11:48Z | null | # EasyRecyclerView
[中文](https://github.com/Jude95/EasyRecyclerView/blob/master/README_ch.md) | [English](https://github.com/Jude95/EasyRecyclerView/blob/master/README.md)
Encapsulate many API about RecyclerView into the library,such as arrayAdapter,pull to refresh,auto load more,no more and error in the end,header&footer.
The library uses a new usage of ViewHolder,decoupling the ViewHolder and Adapter.
Adapter will do less work,adapter only direct the ViewHolder,if you use MVP,you can put adapter into presenter.ViewHolder only show the item,then you can use one ViewHolder for many Adapter.
Part of the code modified from [Malinskiy/SuperRecyclerView](https://github.com/Malinskiy/SuperRecyclerView),make more functions handed by Adapter.
# Dependency
```groovy
compile 'com.jude:easyrecyclerview:4.4.2'
```
# ScreenShot

# Usage
## EasyRecyclerView
```xml
<com.jude.easyrecyclerview.EasyRecyclerView
android:id="@+id/recyclerView"
android:layout_width="match_parent"
android:layout_height="match_parent"
app:layout_empty="@layout/view_empty"
app:layout_progress="@layout/view_progress"
app:layout_error="@layout/view_error"
app:recyclerClipToPadding="true"
app:recyclerPadding="8dp"
app:recyclerPaddingTop="8dp"
app:recyclerPaddingBottom="8dp"
app:recyclerPaddingLeft="8dp"
app:recyclerPaddingRight="8dp"
app:scrollbarStyle="insideOverlay"//insideOverlay or insideInset or outsideOverlay or outsideInset
app:scrollbars="none"//none or vertical or horizontal
/>
```
**Attention** EasyRecyclerView is not a RecyclerView just contain a RecyclerView.use 'getRecyclerView()' to get the RecyclerView;
**EmptyView&LoadingView&ErrorView**
xml:
```xml
app:layout_empty="@layout/view_empty"
app:layout_progress="@layout/view_progress"
app:layout_error="@layout/view_error"
```
code:
```java
void setEmptyView(View emptyView)
void setProgressView(View progressView)
void setErrorView(View errorView)
```
then you can show it by this whenever:
```java
void showEmpty()
void showProgress()
void showError()
void showRecycler()
```
**scrollToPosition**
```java
void scrollToPosition(int position); // such as scroll to top
```
**control the pullToRefresh**
```java
void setRefreshing(boolean isRefreshing);
void setRefreshing(final boolean isRefreshing, final boolean isCallback); //second params is callback immediately
```
##RecyclerArrayAdapter<T>
there is no relation between RecyclerArrayAdapter and EasyRecyclerView.you can user any Adapter for the EasyRecyclerView,and use the RecyclerArrayAdapter for any RecyclerView.
**Data Manage**
```java
void add(T object);
void addAll(Collection<? extends T> collection);
void addAll(T ... items);
void insert(T object, int index);
void update(T object, int index);
void remove(T object);
void clear();
void sort(Comparator<? super T> comparator);
```
**Header&Footer**
```java
void addHeader(ItemView view)
void addFooter(ItemView view)
```
ItemView is not a view but a view creator;
```java
public interface ItemView {
View onCreateView(ViewGroup parent);
void onBindView(View itemView);
}
```
The onCreateView and onBindView correspond the callback in RecyclerView's Adapter,so adapter will call `onCreateView` once and `onBindView` more than once;
It recommend that add the ItemView to Adapter after the data is loaded,initialization View in onCreateView and nothing in onBindView.
Header and Footer support `LinearLayoutManager`,`GridLayoutManager`,`StaggeredGridLayoutManager`.
In `GridLayoutManager` you must add this:
```java
//make adapter obtain a LookUp for LayoutManager,param is maxSpan。
gridLayoutManager.setSpanSizeLookup(adapter.obtainGridSpanSizeLookUp(2));
```
**OnItemClickListener&OnItemLongClickListener**
```java
adapter.setOnItemClickListener(new RecyclerArrayAdapter.OnItemClickListener() {
@Override
public void onItemClick(int position) {
//position not contain Header
}
});
adapter.setOnItemLongClickListener(new RecyclerArrayAdapter.OnItemLongClickListener() {
@Override
public boolean onItemLongClick(int position) {
return true;
}
});
```
equal 'itemview.setOnClickListener()' in ViewHolder.
if you set listener after RecyclerView has layout.you should use 'notifyDataSetChange()';
###the API below realized by add a Footer。
**LoadMore**
```java
void setMore(final int res,OnMoreListener listener);
void setMore(final View view,OnMoreListener listener);
```
Attention when you add null or the length of data you add is 0 ,it will finish LoadMore and show NoMore;
also you can show NoMore manually `adapter.stopMore();`
**LoadError**
```java
void setError(final int res,OnErrorListener listener)
void setError(final View view,OnErrorListener listener)
```
use `adapter.pauseMore()` to show Error,when your loading throw an error;
if you add data when showing Error.it will resume to load more;
when the ErrorView display to screen again,it will resume to load more too,and callback the OnLoadMoreListener(retry).
`adapter.resumeMore()`you can resume to load more manually,it will callback the OnLoadMoreListener immediately.
you can put resumeMore() into the OnClickListener of ErrorView to realize click to retry.
**NoMore**
```java
void setNoMore(final int res,OnNoMoreListener listener)
void setNoMore(final View view,OnNoMoreListener listener)
```
when loading is finished(add null or empty or stop manually),it while show in the end.
## BaseViewHolder\<M\>
decoupling the ViewHolder and Adapter,new ViewHolder in Adapter and inflate view in ViewHolder.
Example:
```java
public class PersonViewHolder extends BaseViewHolder<Person> {
private TextView mTv_name;
private SimpleDraweeView mImg_face;
private TextView mTv_sign;
public PersonViewHolder(ViewGroup parent) {
super(parent,R.layout.item_person);
mTv_name = $(R.id.person_name);
mTv_sign = $(R.id.person_sign);
mImg_face = $(R.id.person_face);
}
@Override
public void setData(final Person person){
mTv_name.setText(person.getName());
mTv_sign.setText(person.getSign());
mImg_face.setImageURI(Uri.parse(person.getFace()));
}
}
-----------------------------------------------------------------------
public class PersonAdapter extends RecyclerArrayAdapter<Person> {
public PersonAdapter(Context context) {
super(context);
}
@Override
public BaseViewHolder OnCreateViewHolder(ViewGroup parent, int viewType) {
return new PersonViewHolder(parent);
}
}
```
## Decoration
Now there are three commonly used decoration provide for you.
**DividerDecoration**
Usually used in LinearLayoutManager.add divider between items.
```java
DividerDecoration itemDecoration = new DividerDecoration(Color.GRAY, Util.dip2px(this,0.5f), Util.dip2px(this,72),0);//color & height & paddingLeft & paddingRight
itemDecoration.setDrawLastItem(true);//sometimes you don't want draw the divider for the last item,default is true.
itemDecoration.setDrawHeaderFooter(false);//whether draw divider for header and footer,default is false.
recyclerView.addItemDecoration(itemDecoration);
```
this is the demo:
<image src="http://o84n5syhk.bkt.clouddn.com/divider.jpg?imageView2/2/w/300" width=300/>
**SpaceDecoration**
Usually used in GridLayoutManager and StaggeredGridLayoutManager.add space between items.
```java
SpaceDecoration itemDecoration = new SpaceDecoration((int) Utils.convertDpToPixel(8,this));//params is height
itemDecoration.setPaddingEdgeSide(true);//whether add space for left and right adge.default is true.
itemDecoration.setPaddingStart(true);//whether add top space for the first line item(exclude header).default is true.
itemDecoration.setPaddingHeaderFooter(false);//whether add space for header and footer.default is false.
recyclerView.addItemDecoration(itemDecoration);
```
this is the demo:
<image src="http://o84n5syhk.bkt.clouddn.com/space.jpg?imageView2/2/w/300" width=300/>
**StickHeaderDecoration**
Group the items,add a GroupHeaderView for each group.The usage of StickyHeaderAdapter is the same with RecyclerView.Adapter.
this part is modified from [edubarr/header-decor](https://github.com/edubarr/header-decor)
```java
StickyHeaderDecoration decoration = new StickyHeaderDecoration(new StickyHeaderAdapter(this));
decoration.setIncludeHeader(false);
recyclerView.addItemDecoration(decoration);
```
for example:
<image src="http://7xkr5d.com1.z0.glb.clouddn.com/recyclerview_sticky.png?imageView2/2/w/300" width=300/>
**for detail,see the demo**
License
-------
Copyright 2015 Jude
Licensed under the Apache License, Version 2.0 (the "License");
you may not use this file except in compliance with the License.
You may obtain a copy of the License at
http://www.apache.org/licenses/LICENSE-2.0
Unless required by applicable law or agreed to in writing, software
distributed under the License is distributed on an "AS IS" BASIS,
WITHOUT WARRANTIES OR CONDITIONS OF ANY KIND, either express or implied.
See the License for the specific language governing permissions and
limitations under the License.
| 0 |
AndroidKnife/RxBus | Event Bus By RxJava. | 2015-11-25T10:36:57Z | null | RxBus - An event bus by [ReactiveX/RxJava](https://github.com/ReactiveX/RxJava)/[ReactiveX/RxAndroid](https://github.com/ReactiveX/RxAndroid)
=============================
This is an event bus designed to allowing your application to communicate efficiently.
I have use it in many projects, and now i think maybe someone would like it, so i publish it.
RxBus support annotations(@produce/@subscribe), and it can provide you to produce/subscribe on other thread
like MAIN_THREAD, NEW_THREAD, IO, COMPUTATION, TRAMPOLINE, IMMEDIATE, even the EXECUTOR and HANDLER thread,
more in [EventThread](rxbus/src/main/java/com/hwangjr/rxbus/thread/EventThread.java).
Also RxBus provide the event tag to define the event. The method's first (and only) parameter and tag defines the event type.
**Thanks to:**
[square/otto](https://github.com/square/otto)
[greenrobot/EventBus](https://github.com/greenrobot/EventBus)
Usage
--------
Just 2 Steps:
**STEP 1**
Add dependency to your gradle file:
```groovy
compile 'com.hwangjr.rxbus:rxbus:3.0.0'
```
Or maven:
``` xml
<dependency>
<groupId>com.hwangjr.rxbus</groupId>
<artifactId>rxbus</artifactId>
<version>3.0.0</version>
<type>aar</type>
</dependency>
```
**TIP:** Maybe you also use the [JakeWharton/timber](https://github.com/JakeWharton/timber) to log your message, you may need to exclude the timber (from version 1.0.4, timber dependency update from [AndroidKnife/Utils/timber](https://github.com/AndroidKnife/Utils/tree/master/timber) to JakeWharton):
``` groovy
compile ('com.hwangjr.rxbus:rxbus:3.0.0') {
exclude group: 'com.jakewharton.timber', module: 'timber'
}
```
en
Snapshots of the development version are available in [Sonatype's `snapshots` repository](https://oss.sonatype.org/content/repositories/snapshots/).
**STEP 2**
Just use the provided(Any Thread Enforce):
``` java
com.hwangjr.rxbus.RxBus
```
Or make RxBus instance is a better choice:
``` java
public static final class RxBus {
private static Bus sBus;
public static synchronized Bus get() {
if (sBus == null) {
sBus = new Bus();
}
return sBus;
}
}
```
Add the code where you want to produce/subscribe events, and register and unregister the class.
``` java
public class MainActivity extends AppCompatActivity {
...
@Override
protected void onCreate(Bundle savedInstanceState) {
...
RxBus.get().register(this);
...
}
@Override
protected void onDestroy() {
...
RxBus.get().unregister(this);
...
}
@Subscribe
public void eat(String food) {
// purpose
}
@Subscribe(
thread = EventThread.IO,
tags = {
@Tag(BusAction.EAT_MORE)
}
)
public void eatMore(List<String> foods) {
// purpose
}
@Produce
public String produceFood() {
return "This is bread!";
}
@Produce(
thread = EventThread.IO,
tags = {
@Tag(BusAction.EAT_MORE)
}
)
public List<String> produceMoreFood() {
return Arrays.asList("This is breads!");
}
public void post() {
RxBus.get().post(this);
}
public void postByTag() {
RxBus.get().post(Constants.EventType.TAG_STORY, this);
}
...
}
```
**That is all done!**
Lint
--------
Features
--------
* JUnit test
* Docs
History
--------
Here is the [CHANGELOG](CHANGELOG.md).
FAQ
--------
**Q:** How to do pull requests?<br/>
**A:** Ensure good code quality and consistent formatting.
License
--------
Copyright 2015 HwangJR, Inc.
Licensed under the Apache License, Version 2.0 (the "License");
you may not use this file except in compliance with the License.
You may obtain a copy of the License at
http://www.apache.org/licenses/LICENSE-2.0
Unless required by applicable law or agreed to in writing, software
distributed under the License is distributed on an "AS IS" BASIS,
WITHOUT WARRANTIES OR CONDITIONS OF ANY KIND, either express or implied.
See the License for the specific language governing permissions and
limitations under the License.
| 0 |
corretto/corretto-8 | Amazon Corretto 8 is a no-cost, multi-platform, production-ready distribution of OpenJDK 8 | 2018-11-07T19:49:10Z | null | ## Corretto 8
Amazon Corretto is a no-cost, multiplatform, production-ready distribution of the Open Java Development Kit (OpenJDK). Corretto is used internally at Amazon for production services. With Corretto, you can develop and run Java applications on operating systems such as Amazon Linux 2, Windows, and macOS.
The latest binary Corretto 8 release builds can be downloaded from [https://github.com/corretto/corretto-8/releases](https://github.com/corretto/corretto-8/releases).
Documentation is available at [https://docs.aws.amazon.com/corretto](https://docs.aws.amazon.com/corretto).
### Licenses and Trademarks
Please read these files: "LICENSE", "THIRD_PARTY_README", "ASSEMBLY_EXCEPTION", "TRADEMARKS.md".
### Branches
_develop_
: The default branch. It absorbs active development contributions from forks or topic branches via pull requests that pass smoke testing and are accepted.
_master_
: The stable branch. Starting point for the release process. It absorbs contributions from the develop branch that pass more thorough testing and are selected for releasing.
_ga-release_
: The source code of the GA release on 01/31/2019.
_preview-release_
: The source code of the preview release on 11/14/2018.
_release-8.XXX.YY.Z_
: The source code for each release is recorded by a branch or a tag with a name of this form. XXX stands for the OpenJDK 8 update number, YY for the OpenJDK 8 build number, and Z for the Corretto-specific revision number. The latter starts at 1 and is incremented in subsequent releases as long as the update and build number remain constant.
### OpenJDK Readme
```
Welcome to the JDK!
===================
For build instructions please see https://openjdk.java.net/groups/build/doc/building.html,
or either of these files:
- doc/building.html (html version)
- doc/building.md (markdown version)
See https://openjdk.java.net for more information about the OpenJDK Community and the JDK.
```
| 0 |
sirthias/pegdown | A pure-Java Markdown processor based on a parboiled PEG parser supporting a number of extensions | 2010-04-30T11:44:16Z | null | null | 0 |
unofficial-openjdk/openjdk | Do not send pull requests! Automated Git clone of various OpenJDK branches | 2012-08-09T20:39:52Z | null | This repository is no longer actively updated. Please see https://github.com/openjdk for a much better mirror of OpenJDK!
| 0 |
psiegman/epublib | a java library for reading and writing epub files | 2009-11-18T09:37:52Z | null | # epublib
Epublib is a java library for reading/writing/manipulating epub files.
It consists of 2 parts: a core that reads/writes epub and a collection of tools.
The tools contain an epub cleanup tool, a tool to create epubs from html files, a tool to create an epub from an uncompress html file.
It also contains a swing-based epub viewer.

The core runs both on android and a standard java environment. The tools run only on a standard java environment.
This means that reading/writing epub files works on Android.
## Build status
* Travis Build Status: [](https://travis-ci.org/psiegman/epublib)
## Command line examples
Set the author of an existing epub
java -jar epublib-3.0-SNAPSHOT.one-jar.jar --in input.epub --out result.epub --author Tester,Joe
Set the cover image of an existing epub
java -jar epublib-3.0-SNAPSHOT.one-jar.jar --in input.epub --out result.epub --cover-image my_cover.jpg
## Creating an epub programmatically
package nl.siegmann.epublib.examples;
import java.io.InputStream;
import java.io.FileOutputStream;
import nl.siegmann.epublib.domain.Author;
import nl.siegmann.epublib.domain.Book;
import nl.siegmann.epublib.domain.Metadata;
import nl.siegmann.epublib.domain.Resource;
import nl.siegmann.epublib.domain.TOCReference;
import nl.siegmann.epublib.epub.EpubWriter;
public class Translator {
private static InputStream getResource( String path ) {
return Translator.class.getResourceAsStream( path );
}
private static Resource getResource( String path, String href ) {
return new Resource( getResource( path ), href );
}
public static void main(String[] args) {
try {
// Create new Book
Book book = new Book();
Metadata metadata = book.getMetadata();
// Set the title
metadata.addTitle("Epublib test book 1");
// Add an Author
metadata.addAuthor(new Author("Joe", "Tester"));
// Set cover image
book.setCoverImage(
getResource("/book1/test_cover.png", "cover.png") );
// Add Chapter 1
book.addSection("Introduction",
getResource("/book1/chapter1.html", "chapter1.html") );
// Add css file
book.getResources().add(
getResource("/book1/book1.css", "book1.css") );
// Add Chapter 2
TOCReference chapter2 = book.addSection( "Second Chapter",
getResource("/book1/chapter2.html", "chapter2.html") );
// Add image used by Chapter 2
book.getResources().add(
getResource("/book1/flowers_320x240.jpg", "flowers.jpg"));
// Add Chapter2, Section 1
book.addSection(chapter2, "Chapter 2, section 1",
getResource("/book1/chapter2_1.html", "chapter2_1.html"));
// Add Chapter 3
book.addSection("Conclusion",
getResource("/book1/chapter3.html", "chapter3.html"));
// Create EpubWriter
EpubWriter epubWriter = new EpubWriter();
// Write the Book as Epub
epubWriter.write(book, new FileOutputStream("test1_book1.epub"));
} catch (Exception e) {
e.printStackTrace();
}
}
}
## Usage in Android
Add the following lines to your `app` module's `build.gradle` file:
repositories {
maven {
url 'https://github.com/psiegman/mvn-repo/raw/master/releases'
}
}
dependencies {
implementation('nl.siegmann.epublib:epublib-core:4.0') {
exclude group: 'org.slf4j'
exclude group: 'xmlpull'
}
implementation 'org.slf4j:slf4j-android:1.7.25'
}
| 0 |
warmuuh/milkman | An Extensible Request/Response Workbench | 2019-03-27T13:42:47Z | null | null | 0 |
bootique/bootique | Bootique is a minimally opinionated platform for modern runnable Java apps. | 2015-12-10T14:45:15Z | null | <!--
Licensed to ObjectStyle LLC under one
or more contributor license agreements. See the NOTICE file
distributed with this work for additional information
regarding copyright ownership. The ObjectStyle LLC licenses
this file to you under the Apache License, Version 2.0 (the
"License"); you may not use this file except in compliance
with the License. You may obtain a copy of the License at
http://www.apache.org/licenses/LICENSE-2.0
Unless required by applicable law or agreed to in writing,
software distributed under the License is distributed on an
"AS IS" BASIS, WITHOUT WARRANTIES OR CONDITIONS OF ANY
KIND, either express or implied. See the License for the
specific language governing permissions and limitations
under the License.
-->
[](https://github.com/bootique/bootique/actions)
[](https://search.maven.org/artifact/io.bootique/bootique)
Bootique is a [minimally opinionated](https://medium.com/@andrus_a/bootique-a-minimally-opinionated-platform-for-modern-java-apps-644194c23872#.odwmsbnbh)
java launcher and integration technology. It is intended for building container-less runnable Java applications.
With Bootique you can create REST services, webapps, jobs, DB migration tasks, etc. and run them as if they were
simple commands. No JavaEE container required! Among other things Bootique is an ideal platform for
Java [microservices](http://martinfowler.com/articles/microservices.html), as it allows you to create a fully-functional
app with minimal setup.
Each Bootique app is a collection of modules interacting with each other via dependency injection. This GitHub project
provides Bootique core. Bootique team also develops a number of important modules. A full list is available
[here](http://bootique.io/docs/).
## Quick Links
* [WebSite](https://bootique.io)
* [Getting Started](https://bootique.io/docs/2.x/getting-started/)
* [Docs](https://bootique.io/docs/) - documentation collection for Bootique core and all standard
modules.
## Support
You have two options:
* [Open an issue](https://github.com/bootique/bootique/issues) on GitHub with a label of "help wanted" or "question"
(or "bug" if you think you found a bug).
* Post a question on the [Bootique forum](https://groups.google.com/forum/#!forum/bootique-user).
## TL;DR
For the impatient, here is how to get started with Bootique:
* Declare the official module collection:
```xml
<dependencyManagement>
<dependencies>
<dependency>
<groupId>io.bootique.bom</groupId>
<artifactId>bootique-bom</artifactId>
<version>3.0-M4</version>
<type>pom</type>
<scope>import</scope>
</dependency>
</dependencies>
</dependencyManagement>
```
* Include the modules that you need:
```xml
<dependencies>
<dependency>
<groupId>io.bootique.jersey</groupId>
<artifactId>bootique-jersey</artifactId>
</dependency>
<dependency>
<groupId>io.bootique.logback</groupId>
<artifactId>bootique-logback</artifactId>
</dependency>
</dependencies>
```
* Write your app:
```java
package com.foo;
import io.bootique.Bootique;
public class Application {
public static void main(String[] args) {
Bootique
.app(args)
.autoLoadModules()
.exec()
.exit();
}
}
```
It has ```main()``` method, so you can run it!
*For a more detailed tutorial proceed to [this link](https://bootique.io/docs/2.x/getting-started/).*
## Upgrading
See the "maven-central" badge above for the current production version of ```bootique-bom```.
When upgrading, don't forget to check [upgrade notes](https://github.com/bootique/bootique/blob/master/UPGRADE.md)
specific to your version.
| 0 |
hanks-zyh/SmallBang | twitter like animation for any view :heartbeat: | 2015-12-24T14:48:37Z | null | # SmallBang
twitter like animation for any view :heartbeat:
<img src="https://github.com/hanks-zyh/SmallBang/blob/master/screenshots/demo2.gif" width="35%" />
[Demo APK](https://github.com/hanks-zyh/SmallBang/blob/master/screenshots/demo.apk?raw=true)
## Usage
```groovy
dependencies {
implementation 'pub.hanks:smallbang:1.2.2'
}
```
```xml
<xyz.hanks.library.bang.SmallBangView
android:id="@+id/like_heart"
android:layout_width="56dp"
android:layout_height="56dp">
<ImageView
android:id="@+id/image"
android:layout_width="20dp"
android:layout_height="20dp"
android:layout_gravity="center"
android:src="@drawable/heart_selector"
android:text="Hello World!"/>
</xyz.hanks.library.bang.SmallBangView>
```
or
```xml
<xyz.hanks.library.bang.SmallBangView
android:id="@+id/like_text"
android:layout_width="wrap_content"
android:layout_height="wrap_content"
app:circle_end_color="#ffbc00"
app:circle_start_color="#fa9651"
app:dots_primary_color="#fa9651"
app:dots_secondary_color="#ffbc00">
<TextView
android:id="@+id/text"
android:layout_width="50dp"
android:layout_height="20dp"
android:layout_gravity="center"
android:gravity="center"
android:text="hanks"
android:textColor="@color/text_selector"
android:textSize="14sp"/>
</xyz.hanks.library.bang.SmallBangView>
```
## Donate
If this project help you reduce time to develop, you can give me a cup of coffee :)
[](https://www.paypal.com/cgi-bin/webscr?cmd=_s-xclick&hosted_button_id=UGENU2RU26RUG)
<img src="https://github.com/hanks-zyh/SmallBang/blob/master/screenshots/donate.png" width="50%" />
## Contact & Help
Please fell free to contact me if there is any problem when using the library.
- **email**: zhangyuhan2014@gmail.com
- **twitter**: https://twitter.com/zhangyuhan3030
- **weibo**: http://weibo.com/hanksZyh
- **blog**: http://hanks.pub
welcome to commit [issue](https://github.com/hanks-zyh/SmallBang/issues) & [pr](https://github.com/hanks-zyh/SmallBang/pulls)
---
## License
This library is licensed under the [Apache Software License, Version 2.0](http://www.apache.org/licenses/LICENSE-2.0).
See [`LICENSE`](LICENSE) for full of the license text.
Copyright (C) 2015 [Hanks](https://github.com/hanks-zyh)
Licensed under the Apache License, Version 2.0 (the "License");
you may not use this file except in compliance with the License.
You may obtain a copy of the License at
http://www.apache.org/licenses/LICENSE-2.0
Unless required by applicable law or agreed to in writing, software
distributed under the License is distributed on an "AS IS" BASIS,
WITHOUT WARRANTIES OR CONDITIONS OF ANY KIND, either express or implied.
See the License for the specific language governing permissions and
limitations under the License.
| 0 |
DeemOpen/zkui | A UI dashboard that allows CRUD operations on Zookeeper. | 2014-05-22T06:15:53Z | null | zkui - Zookeeper UI Dashboard
====================
A UI dashboard that allows CRUD operations on Zookeeper.
Requirements
====================
Requires Java 7 to run.
Setup
====================
1. mvn clean install
2. Copy the config.cfg to the folder with the jar file. Modify it to point to the zookeeper instance. Multiple zk instances are coma separated. eg: server1:2181,server2:2181. First server should always be the leader.
3. Run the jar. ( nohup java -jar zkui-2.0-SNAPSHOT-jar-with-dependencies.jar & )
4. <a href="http://localhost:9090">http://localhost:9090</a>
Login Info
====================
username: admin, pwd: manager (Admin privileges, CRUD operations supported)
username: appconfig, pwd: appconfig (Readonly privileges, Read operations supported)
You can change this in the config.cfg
Technology Stack
====================
1. Embedded Jetty Server.
2. Freemarker template.
3. H2 DB.
4. Active JDBC.
5. JSON.
6. SLF4J.
7. Zookeeper.
8. Apache Commons File upload.
9. Bootstrap.
10. Jquery.
11. Flyway DB migration.
Features
====================
1. CRUD operation on zookeeper properties.
2. Export properties.
3. Import properties via call back url.
4. Import properties via file upload.
5. History of changes + Path specific history of changes.
6. Search feature.
7. Rest API for accessing Zookeeper properties.
8. Basic Role based authentication.
9. LDAP authentication supported.
10. Root node /zookeeper hidden for safety.
11. ACL supported global level.
Import File Format
====================
# add property
/appconfig/path=property=value
# remove a property
-/path/property
You can either upload a file or specify a http url of the version control system that way all your zookeeper changes will be in version control.
Export File Format
====================
/appconfig/path=property=value
You can export a file and then use the same format to import.
SOPA/PIPA BLACKLISTED VALUE
====================
All password will be displayed as SOPA/PIPA BLACKLISTED VALUE for a normal user. Admins will be able to view and edit the actual value upon login.
Password will be not shown on search / export / view for normal user.
For a property to be eligible for black listing it should have (PWD / pwd / PASSWORD / password) in the property name.
LDAP
====================
If you want to use LDAP authentication provide the ldap url. This will take precedence over roleSet property file authentication.
ldapUrl=ldap://<ldap_host>:<ldap_port>/dc=mycom,dc=com
If you dont provide this then default roleSet file authentication will be used.
REST call
====================
A lot of times you require your shell scripts to be able to read properties from zookeeper. This can now be achieved with a http call. Password are not exposed via rest api for security reasons. The rest call is a read only operation requiring no authentication.
Eg:
http://localhost:9090/acd/appconfig?propNames=foo&host=myhost.com
This will first lookup the host name under /appconfig/hosts and then find out which path the host point to. Then it will look for the property under that path.
There are 2 additional properties that can be added to give better control.
cluster=cluster1
http://localhost:9090/acd/appconfig?propNames=foo&cluster=cluster1&host=myhost.com
In this case the lookup will happen on lookup path + cluster1.
app=myapp
http://localhost:9090/acd/appconfig?propNames=foo&app=myapp&host=myhost.com
In this case the lookup will happen on lookup path + myapp.
A shell script will call this via
MY_PROPERTY="$(curl -f -s -S -k "http://localhost:9090/acd/appconfig?propNames=foo&host=`hostname -f`" | cut -d '=' -f 2)"
echo $MY_PROPERTY
Standardization
====================
Zookeeper doesnt enforce any order in which properties are stored and retrieved. ZKUI however organizes properties in the following manner for easy lookup.
Each server/box has its hostname listed under /appconfig/hosts and that points to the path where properties reside for that path. So when the lookup for a property occurs over a rest call it first finds the hostname entry under /appconfig/hosts and then looks for that property in the location mentioned.
eg: /appconfig/hosts/myserver.com=/appconfig/dev/app1
This means that when myserver.com tries to lookup the propery it looks under /appconfig/dev/app1
You can also append app name to make lookup easy.
eg: /appconfig/hosts/myserver.com:testapp=/appconfig/dev/test/app1
eg: /appconfig/hosts/myserver.com:prodapp=/appconfig/dev/prod/app1
Lookup can be done by grouping of app and cluster. A cluster can have many apps under it. When the bootloader entry looks like this /appconfig/hosts/myserver.com=/appconfig/dev the rest lookup happens on the following paths.
/appconfig/dev/..
/appconfig/dev/hostname..
/appconfig/dev/app..
/appconfig/dev/cluster..
/appconfig/dev/cluster/app..
This standardization is only needed if you choose to use the rest lookup. You can use zkui to update properties in general without worry about this organizing structure.
HTTPS
====================
You can enable https if needed.
keytool -keystore keystore -alias jetty -genkey -keyalg RSA
Limitations
====================
1. ACLs are fully supported but at a global level.
Screenshots
====================
Basic Role Based Authentication
<br/>
<img src="https://raw.github.com/DeemOpen/zkui/master/images/zkui-0.png"/>
<br/>
Dashboard Console
<br/>
<img src="https://raw.github.com/DeemOpen/zkui/master/images/zkui-1.png"/>
<br/>
CRUD Operations
<br/>
<img src="https://raw.github.com/DeemOpen/zkui/master/images/zkui-2.png"/>
<br/>
Import Feature
<br/>
<img src="https://raw.github.com/DeemOpen/zkui/master/images/zkui-3.png"/>
<br/>
Track History of changes
<br/>
<img src="https://raw.github.com/DeemOpen/zkui/master/images/zkui-4.png"/>
<br/>
Status of Zookeeper Servers
<br/>
<img src="https://raw.github.com/DeemOpen/zkui/master/images/zkui-5.png"/>
<br/>
License & Contribution
====================
ZKUI is released under the Apache 2.0 license. Comments, bugs, pull requests, and other contributions are all welcomed!
Thanks to Jozef Krajčovič for creating the logo which has been used in the project.
https://www.iconfinder.com/iconsets/origami-birds
| 0 |
microsoft/HydraLab | Intelligent cloud testing made easy. | 2022-04-28T09:18:16Z | null | <h1 align="center">Hydra Lab</h1>
<p align="center">Build your own cloud testing infrastructure</p>
<div align="center">
[中文(完善中)](README.zh-CN.md)
[](https://dlwteam.visualstudio.com/Next/_build/latest?definitionId=743&branchName=main)


---
https://github.com/microsoft/HydraLab/assets/8344245/cefefe24-4e11-4cc7-a3af-70cb44974735
[What is Hydra Lab?](#what-is) | [Get Started](#get-started) | [Contribute](#contribute) | [Contact Us](#contact) | [Wiki](https://github.com/microsoft/HydraLab/wiki)
</div>
<span id="what-is"></span>
## What is Hydra Lab?
As mentioned in the above video, Hydra Lab is a framework that can help you easily build a cloud-testing platform utilizing the test devices/machines in hand.
Capabilities of Hydra Lab include:
- Scalable test device management under the center-agent distributed design; Test task management and test result visualization.
- Powering [Android Espresso Test](https://developer.android.com/training/testing/espresso), and Appium(Java) test on different platforms: Windows/iOS/Android/Browser/Cross-platform.
- Case-free test automation: Monkey test, Smart exploratory test.
For more details, you may refer to:
- [Introduction: What is Hydra Lab?](https://github.com/microsoft/HydraLab/wiki)
- [How Hydra Lab Empowers Microsoft Mobile Testing and Test Intelligence](https://medium.com/microsoft-mobile-engineering/how-hydra-lab-empowers-microsoft-mobile-testing-e4bd831ecf41)
<span id="get-started"></span>
## Get Started
Please visit our **[GitHub Project Wiki](https://github.com/microsoft/HydraLab/wiki)** to understand the dev environment setup procedure: [Contribution Guideline](CONTRIBUTING.md).
**Supported environments for Hydra Lab agent**: Windows, Mac OSX, and Linux ([Docker](https://github.com/microsoft/HydraLab/blob/main/agent/README.md#run-agent-in-docker)).
**Supported platforms and frameworks matrix**:
| | Appium(Java) | Espresso | XCTest | Maestro | Python Runner |
| ---- |--------------|---- | ---- | ---- | --- |
|Android| ✔ | ✔ | x | ✔ | ✔ |
|iOS| ✔ | x | ✔ | ✔ | ✔ |
|Windows| ✔ | x | x | x | ✔ |
|Web (Browser)| ✔ | x | x | x | ✔ |
<span id="quick-start"></span>
### Quick guide on out-of-box Uber docker image
Hydra Lab offers an out-of-box experience of the Docker image, and we call it `Uber`. You can follow the below steps and start your docker container with both a center instance and an agent instance:
**Step 1. Download and install [Docker](https://www.docker.com)**
**Step 2. Download latest Uber Docker image**
```bash
docker pull ghcr.io/microsoft/hydra-lab-uber:latest
```
**This step is necessary.** Without this step and jump to step 3, you may target at the local cached Docker image with `latest` tag if it exists.
**Step 3. Run on your machine**
By Default, Hydra Lab will use the local file system as a storage solution, and you may type the following in your terminal to run it:
```bash
docker run -p 9886:9886 --name=hydra-lab ghcr.io/microsoft/hydra-lab-uber:latest
```
> We strongly recommend using [Azure Blob Storage](https://azure.microsoft.com/en-us/products/storage/blobs/) service as the file storage solution, and Hydra Lab has native, consistent, and validated support for it.
**Step 3. Visit the web page and view your connected devices**
> Url: http://localhost:9886/portal/index.html#/ (or your custom port).
Enjoy starting your journey of exploration!
**Step 4. Perform the test procedure with a minimal setup**
Note: For Android, Uber image only supports **Espresso/Instrumentation** test. See the "User Manual" section on this page for more features: [Hydra Lab Wikis](https://github.com/microsoft/HydraLab/wiki).
**To run a test with Uber image and local storage:**
- On the front-end page, go to the `Runner` tab and select `HydraLab Client`.
- Click `Run` and change "Espresso test scope" to `Test app`, click `Next`.
- Pick an available device, click `Next` again, and click `Run` to start the test.
- When the test is finished, you can view the test result in the `Task` tab on the left navigator of the front-end page.

### Build and run Hydra Lab from the source
You can also run the center java Spring Boot service (a runnable Jar) separately with the following commands:
> The build and run process will require JDK11 | NPM | Android SDK platform-tools in position.
**Step 1. Run Hydra Lab center service**
```bash
# In the project root, switch to the react folder to build the Web front.
cd react
npm ci
npm run pub
# Get back to the project root, and build the center runnable Jar.
cd ..
# For the gradlew command, if you are on Windows please replace it with `./gradlew` or `./gradlew.bat`
gradlew :center:bootJar
# Run it, and then visit http://localhost:9886/portal/index.html#/
java -jar center/build/libs/center.jar
# Then visit http://localhost:9886/portal/index.html#/auth to generate a new agent ID and agent secret.
```
> If you encounter the error: `Error: error:0308010C:digital envelope routines::unsupported`, set the System Variable `NODE_OPTIONS` as `--openssl-legacy-provider` and then restart the terminal.
**Step 2. Run Hydra Lab agent service**
```bash
# In the project root
cd android_client
# Build the Android client APK
./gradlew assembleDebug
cp app/build/outputs/apk/debug/app-debug.apk ../common/src/main/resources/record_release.apk
# If you don't have the SDK for Android ,you can download the prebuilt APK in https://github.com/microsoft/HydraLab/releases
# Back to the project root
cd ..
# In the project root, copy the sample config file and update the:
# YOUR_AGENT_NAME, YOUR_REGISTERED_AGENT_ID and YOUR_REGISTERED_AGENT_SECRET.
cp agent/application-sample.yml application.yml
# Then build an agent jar and run it
gradlew :agent:bootJar
java -jar agent/build/libs/agent.jar
```
**Step 3. visit http://localhost:9886/portal/index.html#/ and view your connected devices**
### More integration guidelines:
- [Test agent setup](https://github.com/microsoft/HydraLab/wiki/Test-agent-setup)
- [Trigger a test task run in the Hydra Lab test service](https://github.com/microsoft/HydraLab/wiki/Trigger-a-test-task-run-in-the-Hydra-Lab-test-service)
- [Deploy Center Docker Container](https://github.com/microsoft/HydraLab/wiki/Deploy-Center-Docker-Container)
<span id="contribute"></span>
## Contribute
Your contribution to Hydra Lab will make a difference for the entire test automation ecosystem. Please refer to **[CONTRIBUTING.md](CONTRIBUTING.md)** for instructions.
### Contributor Hero Wall:
<a href="https://github.com/Microsoft/hydralab/graphs/contributors">
<img src="https://contrib.rocks/image?repo=Microsoft/hydralab" />
</a>
<span id="contact"></span>
## Contact Us
You can reach us by [opening an issue](https://github.com/microsoft/HydraLab/issues/new) or [sending us mails](mailto:hydra_lab_support@microsoft.com).
<span id="ms-give"></span>
## Microsoft Give Sponsors
Thank you for your contribution to [Microsoft employee giving program](https://aka.ms/msgive) in the name of Hydra Lab:
[@Germey(崔庆才)](https://github.com/Germey), [@SpongeOnline(王创)](https://github.com/SpongeOnline), [@ellie-mac(陈佳佩)](https://github.com/ellie-mac), [@Yawn(刘俊钦)](https://github.com/Aqinqin48), [@White(刘子凡)](https://github.com/jkfhklh), [@597(姜志鹏)](https://github.com/JZP1996), [@HCG(尹照宇)](https://github.com/mahoshojoHCG)
<span id="license-trademarks"></span>
## License & Trademarks
The entire codebase is under [MIT license](https://github.com/microsoft/HydraLab/blob/main/LICENSE).
This project may contain trademarks or logos for projects, products, or services. Authorized use of Microsoft trademarks or logos is subject to and must follow [Microsoft’s Trademark & Brand Guidelines](https://www.microsoft.com/en-us/legal/intellectualproperty/trademarks/usage/general). Use of Microsoft trademarks or logos in modified versions of this project must not cause confusion or imply Microsoft sponsorship. Any use of third-party trademarks or logos are subject to those third-party’s policies.
We use the Microsoft Clarity Analysis Platform for front end client data dashboard, please refer to [Clarity Overview](https://learn.microsoft.com/en-us/clarity/setup-and-installation/about-clarity) and https://clarity.microsoft.com/ to learn more.
Instructions to turn off the Clarity:
Open [MainActivity](https://github.com/microsoft/HydraLab/blob/main/android_client/app/src/main/java/com/microsoft/hydralab/android/client/MainActivity.java), comment the line which call the initClarity(), and rebuild the Hydra Lab Client apk, repalce the one in the agent resources folder.
[Telemetry/data collection notice](https://docs.opensource.microsoft.com/releasing/general-guidance/telemetry)
| 0 |
zalando/logbook | An extensible Java library for HTTP request and response logging | 2015-09-14T15:29:12Z | null | # Logbook: HTTP request and response logging
[](#attributions)
[](https://masterminds.github.io/stability/active.html)

[](https://coveralls.io/r/zalando/logbook)
[](http://www.javadoc.io/doc/org.zalando/logbook-core)
[](https://github.com/zalando/logbook/releases)
[](https://maven-badges.herokuapp.com/maven-central/org.zalando/logbook-parent)
[](https://raw.githubusercontent.com/zalando/logbook/main/LICENSE)
[](https://sourcespy.com/github/zalandologbook/)
> **Logbook** noun, /lɑɡ bʊk/: A book in which measurements from the ship's log are recorded, along with other salient details of the voyage.
**Logbook** is an extensible Java library to enable complete request and response logging for different client- and server-side technologies. It satisfies a special need by a) allowing web application
developers to log any HTTP traffic that an application receives or sends b) in a way that makes it easy to persist and analyze it later. This can be useful for traditional log analysis, meeting audit
requirements or investigating individual historic traffic issues.
Logbook is ready to use out of the box for most common setups. Even for uncommon applications and technologies, it should be simple to implement the necessary interfaces to connect a
library/framework/etc. to it.
## Features
- **Logging**: of HTTP requests and responses, including the body; partial logging (no body) for unauthorized requests
- **Customization**: of logging format, logging destination, and conditions that request to log
- **Support**: for Servlet containers, Apache’s HTTP client, Square's OkHttp, and (via its elegant API) other frameworks
- Optional obfuscation of sensitive data
- [Spring Boot](http://projects.spring.io/spring-boot/) Auto Configuration
- [Scalyr](docs/scalyr.md) compatible
- Sensible defaults
## Dependencies
- Java 8 (for Spring 6 / Spring Boot 3 and JAX-RS 3.x, Java 17 is required)
- Any build tool using Maven Central, or direct download
- Servlet Container (optional)
- Apache HTTP Client 4.x **or 5.x** (optional)
- JAX-RS 3.x (aka Jakarta RESTful Web Services) Client and Server (optional)
- JAX-RS 2.x Client and Server (optional)
- Netty 4.x (optional)
- OkHttp 2.x **or 3.x** (optional)
- Spring **6.x** or Spring 5.x (optional, see instructions below)
- Spring Boot **3.x** or 2.x (optional)
- Ktor (optional)
- logstash-logback-encoder 5.x (optional)
## Installation
Add the following dependency to your project:
```xml
<dependency>
<groupId>org.zalando</groupId>
<artifactId>logbook-core</artifactId>
<version>${logbook.version}</version>
</dependency>
```
### Spring 5 / Spring Boot 2 Support
For Spring 5 / Spring Boot 2 backwards compatibility please add the following import:
```xml
<dependency>
<groupId>org.zalando</groupId>
<artifactId>logbook-servlet</artifactId>
<version>${logbook.version}</version>
<classifier>javax</classifier>
</dependency>
```
Additional modules/artifacts of Logbook always share the same version number.
Alternatively, you can import our *bill of materials*...
```xml
<dependencyManagement>
<dependencies>
<dependency>
<groupId>org.zalando</groupId>
<artifactId>logbook-bom</artifactId>
<version>${logbook.version}</version>
<type>pom</type>
<scope>import</scope>
</dependency>
</dependencies>
</dependencyManagement>
```
<details>
<summary>... which allows you to omit versions:</summary>
```xml
<dependency>
<groupId>org.zalando</groupId>
<artifactId>logbook-core</artifactId>
</dependency>
<dependency>
<groupId>org.zalando</groupId>
<artifactId>logbook-httpclient</artifactId>
</dependency>
<dependency>
<groupId>org.zalando</groupId>
<artifactId>logbook-jaxrs</artifactId>
</dependency>
<dependency>
<groupId>org.zalando</groupId>
<artifactId>logbook-json</artifactId>
</dependency>
<dependency>
<groupId>org.zalando</groupId>
<artifactId>logbook-netty</artifactId>
</dependency>
<dependency>
<groupId>org.zalando</groupId>
<artifactId>logbook-okhttp</artifactId>
</dependency>
<dependency>
<groupId>org.zalando</groupId>
<artifactId>logbook-okhttp2</artifactId>
</dependency>
<dependency>
<groupId>org.zalando</groupId>
<artifactId>logbook-servlet</artifactId>
</dependency>
<dependency>
<groupId>org.zalando</groupId>
<artifactId>logbook-spring-boot-starter</artifactId>
</dependency>
<dependency>
<groupId>org.zalando</groupId>
<artifactId>logbook-ktor-common</artifactId>
</dependency>
<dependency>
<groupId>org.zalando</groupId>
<artifactId>logbook-ktor-client</artifactId>
</dependency>
<dependency>
<groupId>org.zalando</groupId>
<artifactId>logbook-ktor-server</artifactId>
</dependency>
<dependency>
<groupId>org.zalando</groupId>
<artifactId>logbook-ktor</artifactId>
</dependency>
<dependency>
<groupId>org.zalando</groupId>
<artifactId>logbook-logstash</artifactId>
</dependency>
```
</details>
The logbook logger must be configured to trace level in order to log the requests and responses. With Spring Boot 2 (using Logback) this can be accomplished by adding the following line to your `application.properties`
```
logging.level.org.zalando.logbook: TRACE
```
## Usage
All integrations require an instance of `Logbook` which holds all configuration and wires all necessary parts together.
You can either create one using all the defaults:
```java
Logbook logbook = Logbook.create();
```
or create a customized version using the `LogbookBuilder`:
```java
Logbook logbook = Logbook.builder()
.condition(new CustomCondition())
.queryFilter(new CustomQueryFilter())
.pathFilter(new CustomPathFilter())
.headerFilter(new CustomHeaderFilter())
.bodyFilter(new CustomBodyFilter())
.requestFilter(new CustomRequestFilter())
.responseFilter(new CustomResponseFilter())
.sink(new DefaultSink(
new CustomHttpLogFormatter(),
new CustomHttpLogWriter()
))
.build();
```
### Strategy
Logbook used to have a very rigid strategy how to do request/response logging:
- Requests/responses are logged separately
- Requests/responses are logged soon as possible
- Requests/responses are logged as a pair or not logged at all
(i.e. no partial logging of traffic)
Some of those restrictions could be mitigated with custom [`HttpLogWriter`](#writing)
implementations, but they were never ideal.
Starting with version 2.0 Logbook now comes with a [Strategy pattern](https://en.wikipedia.org/wiki/Strategy_pattern)
at its core. Make sure you read the documentation of the [`Strategy`](logbook-api/src/main/java/org/zalando/logbook/Strategy.java)
interface to understand the implications.
Logbook comes with some built-in strategies:
- [`BodyOnlyIfStatusAtLeastStrategy`](logbook-core/src/main/java/org/zalando/logbook/core/BodyOnlyIfStatusAtLeastStrategy.java)
- [`StatusAtLeastStrategy`](logbook-core/src/main/java/org/zalando/logbook/core/StatusAtLeastStrategy.java)
- [`WithoutBodyStrategy`](logbook-core/src/main/java/org/zalando/logbook/core/WithoutBodyStrategy.java)
### Attribute Extractor
Starting with version 3.4.0, Logbook is equipped with a feature called *Attribute Extractor*. Attributes are basically a
list of key/value pairs that can be extracted from request and/or response, and logged with them. The idea was sprouted
from [issue 381](https://github.com/zalando/logbook/issues/381), where a feature was requested to extract the subject
claim from JWT tokens in the authorization header.
The `AttributeExtractor` interface has two `extract` methods: One that can extract attributes from the request only, and
one that has both request and response at its avail. The both return an instance of the `HttpAttributes` class, which is
basically a fancy `Map<String, Object>`. Notice that since the map values are of type `Object`, they should have a
proper `toString()` method in order for them to appear in the logs in a meaningful way. Alternatively, log formatters
can work around this by implementing their own serialization logic. For instance, the built-in log formatter
`JsonHttpLogFormatter` uses `ObjectMapper` to serialize the values.
Here is an example:
```java
final class OriginExtractor implements AttributeExtractor {
@Override
public HttpAttributes extract(final HttpRequest request) {
return HttpAttributes.of("origin", request.getOrigin());
}
}
```
Logbook must then be created by registering this attribute extractor:
```java
final Logbook logbook = Logbook.builder()
.attributeExtractor(new OriginExtractor())
.build();
```
This will result in request logs to include something like:
```text
"attributes":{"origin":"LOCAL"}
```
For more advanced examples, look at the `JwtFirstMatchingClaimExtractor` and `JwtAllMatchingClaimsExtractor` classes.
The former extracts the first claim matching a list of claim names from the request JWT token.
The latter extracts all claims matching a list of claim names from the request JWT token.
If you require to incorporate multiple `AttributeExtractor`s, you can use the class `CompositeAttributeExtractor`:
```java
final List<AttributeExtractor> extractors = List.of(
extractor1,
extractor2,
extractor3
);
final Logbook logbook = Logbook.builder()
.attributeExtractor(new CompositeAttributeExtractor(extractors))
.build();
```
### Phases
Logbook works in several different phases:
1. [Conditional](#conditional),
2. [Filtering](#filtering),
3. [Formatting](#formatting) and
4. [Writing](#writing)
Each phase is represented by one or more interfaces that can be used for customization. Every phase has a sensible default.
#### Conditional
Logging HTTP messages and including their bodies is a rather expensive task, so it makes a lot of sense to disable logging for certain requests. A common use case would be to ignore *health check*
requests from a load balancer, or any request to management endpoints typically issued by developers.
Defining a condition is as easy as writing a special `Predicate` that decides whether a request (and its corresponding response) should be logged or not. Alternatively you can use and combine
predefined predicates:
```java
Logbook logbook = Logbook.builder()
.condition(exclude(
requestTo("/health"),
requestTo("/admin/**"),
contentType("application/octet-stream"),
header("X-Secret", newHashSet("1", "true")::contains)))
.build();
```
Exclusion patterns, e.g. `/admin/**`, are loosely following [Ant's style of path patterns](https://ant.apache.org/manual/dirtasks.html#patterns)
without taking the the query string of the URL into consideration.
#### Filtering
The goal of *Filtering* is to prevent the logging of certain sensitive parts of HTTP requests and responses. This
usually includes the *Authorization* header, but could also apply to certain plaintext query or form parameters —
e.g. *password*.
Logbook supports different types of filters:
| Type | Operates on | Applies to | Default |
|------------------|--------------------------------|------------|-----------------------------------------------------------------------------------|
| `QueryFilter` | Query string | request | `access_token` |
| `PathFilter` | Path | request | n/a |
| `HeaderFilter` | Header (single key-value pair) | both | `Authorization` |
| `BodyFilter` | Content-Type and body | both | json: `access_token` and `refresh_token`<br> form: `client_secret` and `password` |
| `RequestFilter` | `HttpRequest` | request | Replace binary, multipart and stream bodies. |
| `ResponseFilter` | `HttpResponse` | response | Replace binary, multipart and stream bodies. |
`QueryFilter`, `PathFilter`, `HeaderFilter` and `BodyFilter` are relatively high-level and should cover all needs in ~90% of all
cases. For more complicated setups one should fallback to the low-level variants, i.e. `RequestFilter` and `ResponseFilter`
respectively (in conjunction with `ForwardingHttpRequest`/`ForwardingHttpResponse`).
You can configure filters like this:
```java
import static org.zalando.logbook.core.HeaderFilters.authorization;
import static org.zalando.logbook.core.HeaderFilters.eachHeader;
import static org.zalando.logbook.core.QueryFilters.accessToken;
import static org.zalando.logbook.core.QueryFilters.replaceQuery;
Logbook logbook = Logbook.builder()
.requestFilter(RequestFilters.replaceBody(message -> contentType("audio/*").test(message) ? "mmh mmh mmh mmh" : null))
.responseFilter(ResponseFilters.replaceBody(message -> contentType("*/*-stream").test(message) ? "It just keeps going and going..." : null))
.queryFilter(accessToken())
.queryFilter(replaceQuery("password", "<secret>"))
.headerFilter(authorization())
.headerFilter(eachHeader("X-Secret"::equalsIgnoreCase, "<secret>"))
.build();
```
You can configure as many filters as you want - they will run consecutively.
##### JsonPath body filtering (experimental)
You can apply [JSON Path](https://github.com/json-path/JsonPath) filtering to JSON bodies.
Here are some examples:
```java
import static org.zalando.logbook.json.JsonPathBodyFilters.jsonPath;
import static java.util.regex.Pattern.compile;
Logbook logbook = Logbook.builder()
.bodyFilter(jsonPath("$.password").delete())
.bodyFilter(jsonPath("$.active").replace("unknown"))
.bodyFilter(jsonPath("$.address").replace("X"))
.bodyFilter(jsonPath("$.name").replace(compile("^(\\w).+"), "$1."))
.bodyFilter(jsonPath("$.friends.*.name").replace(compile("^(\\w).+"), "$1."))
.bodyFilter(jsonPath("$.grades.*").replace(1.0))
.build();
```
Take a look at the following example, before and after filtering was applied:
<details>
<summary>Before</summary>
```json
{
"id": 1,
"name": "Alice",
"password": "s3cr3t",
"active": true,
"address": "Anhalter Straße 17 13, 67278 Bockenheim an der Weinstraße",
"friends": [
{
"id": 2,
"name": "Bob"
},
{
"id": 3,
"name": "Charlie"
}
],
"grades": {
"Math": 1.0,
"English": 2.2,
"Science": 1.9,
"PE": 4.0
}
}
```
</details>
<details>
<summary>After</summary>
```json
{
"id": 1,
"name": "Alice",
"active": "unknown",
"address": "XXX",
"friends": [
{
"id": 2,
"name": "B."
},
{
"id": 3,
"name": "C."
}
],
"grades": {
"Math": 1.0,
"English": 1.0,
"Science": 1.0,
"PE": 1.0
}
}
```
</details>
#### Correlation
Logbook uses a *correlation id* to correlate requests and responses. This allows match-related requests and responses that would usually be located in different places in the log file.
If the default implementation of the correlation id is insufficient for your use case, you may provide a custom implementation:
```java
Logbook logbook = Logbook.builder()
.correlationId(new CustomCorrelationId())
.build();
```
#### Formatting
*Formatting* defines how requests and responses will be transformed to strings basically. Formatters do **not** specify where requests and responses are logged to — writers do that work.
Logbook comes with two different default formatters: *HTTP* and *JSON*.
##### HTTP
*HTTP* is the default formatting style, provided by the `DefaultHttpLogFormatter`. It is primarily designed to be used for local development and debugging, not for production use. This is because it’s
not as readily machine-readable as JSON.
###### Request
```http
Incoming Request: 2d66e4bc-9a0d-11e5-a84c-1f39510f0d6b
GET http://example.org/test HTTP/1.1
Accept: application/json
Host: localhost
Content-Type: text/plain
Hello world!
```
###### Response
```http
Outgoing Response: 2d66e4bc-9a0d-11e5-a84c-1f39510f0d6b
Duration: 25 ms
HTTP/1.1 200
Content-Type: application/json
{"value":"Hello world!"}
```
##### JSON
*JSON* is an alternative formatting style, provided by the `JsonHttpLogFormatter`. Unlike HTTP, it is primarily designed for production use — parsers and log consumers can easily consume it.
Requires the following dependency:
```xml
<dependency>
<groupId>org.zalando</groupId>
<artifactId>logbook-json</artifactId>
</dependency>
```
###### Request
```json
{
"origin": "remote",
"type": "request",
"correlation": "2d66e4bc-9a0d-11e5-a84c-1f39510f0d6b",
"protocol": "HTTP/1.1",
"sender": "127.0.0.1",
"method": "GET",
"uri": "http://example.org/test",
"host": "example.org",
"path": "/test",
"scheme": "http",
"port": null,
"headers": {
"Accept": ["application/json"],
"Content-Type": ["text/plain"]
},
"body": "Hello world!"
}
```
###### Response
```json
{
"origin": "local",
"type": "response",
"correlation": "2d66e4bc-9a0d-11e5-a84c-1f39510f0d6b",
"duration": 25,
"protocol": "HTTP/1.1",
"status": 200,
"headers": {
"Content-Type": ["text/plain"]
},
"body": "Hello world!"
}
```
Note: Bodies of type `application/json` (and `application/*+json`) will be *inlined* into the resulting JSON tree. I.e.,
a JSON response body will **not** be escaped and represented as a string:
```json
{
"origin": "local",
"type": "response",
"correlation": "2d66e4bc-9a0d-11e5-a84c-1f39510f0d6b",
"duration": 25,
"protocol": "HTTP/1.1",
"status": 200,
"headers": {
"Content-Type": ["application/json"]
},
"body": {
"greeting": "Hello, world!"
}
}
```
##### Common Log Format
The Common Log Format ([CLF](https://httpd.apache.org/docs/trunk/logs.html#common)) is a standardized text file format used by web servers when generating server log files. The format is supported via
the `CommonsLogFormatSink`:
```text
185.85.220.253 - - [02/Aug/2019:08:16:41 0000] "GET /search?q=zalando HTTP/1.1" 200 -
```
##### Extended Log Format
The Extended Log Format ([ELF](https://en.wikipedia.org/wiki/Extended_Log_Format)) is a standardised text file format, like Common Log Format (CLF), that is used by web servers when generating log
files, but ELF files provide more information and flexibility. The format is supported via the `ExtendedLogFormatSink`.
Also see [W3C](https://www.w3.org/TR/WD-logfile.html) document.
Default fields:
```text
date time c-ip s-dns cs-method cs-uri-stem cs-uri-query sc-status sc-bytes cs-bytes time-taken cs-protocol cs(User-Agent) cs(Cookie) cs(Referrer)
```
Default log output example:
```text
2019-08-02 08:16:41 185.85.220.253 localhost POST /search ?q=zalando 200 21 20 0.125 HTTP/1.1 "Mozilla/5.0 (Windows NT 6.1; Win64; x64; rv:47.0) Gecko/20100101 Firefox/47.0" "name=value" "https://example.com/page?q=123"
```
Users may override default fields with their custom fields through the constructor of `ExtendedLogFormatSink`:
```java
new ExtendedLogFormatSink(new DefaultHttpLogWriter(),"date time cs(Custom-Request-Header) sc(Custom-Response-Header)")
```
For Http header fields: `cs(Any-Header)` and `sc(Any-Header)`, users could specify any headers they want to extract from the request.
Other supported fields are listed in the value of `ExtendedLogFormatSink.Field`, which can be put in the custom field expression.
##### cURL
*cURL* is an alternative formatting style, provided by the `CurlHttpLogFormatter` which will render requests as
executable [`cURL`](https://curl.haxx.se/) commands. Unlike JSON, it is primarily designed for humans.
###### Request
```bash
curl -v -X GET 'http://localhost/test' -H 'Accept: application/json'
```
###### Response
See [HTTP](#http) or provide own fallback for responses:
```java
new CurlHttpLogFormatter(new JsonHttpLogFormatter());
```
##### Splunk
*Splunk* is an alternative formatting style, provided by the `SplunkHttpLogFormatter` which will render
requests and response as key-value pairs.
###### Request
```text
origin=remote type=request correlation=2d66e4bc-9a0d-11e5-a84c-1f39510f0d6b protocol=HTTP/1.1 sender=127.0.0.1 method=POST uri=http://example.org/test host=example.org scheme=http port=null path=/test headers={Accept=[application/json], Content-Type=[text/plain]} body=Hello world!
```
###### Response
```text
origin=local type=response correlation=2d66e4bc-9a0d-11e5-a84c-1f39510f0d6b duration=25 protocol=HTTP/1.1 status=200 headers={Content-Type=[text/plain]} body=Hello world!
```
#### Writing
Writing defines where formatted requests and responses are written to. Logbook comes with three implementations:
Logger, Stream and Chunking.
##### Logger
By default, requests and responses are logged with an *slf4j* logger that uses the `org.zalando.logbook.Logbook`
category and the log level `trace`. This can be customized:
```java
Logbook logbook = Logbook.builder()
.sink(new DefaultSink(
new DefaultHttpLogFormatter(),
new DefaultHttpLogWriter()
))
.build();
```
##### Stream
An alternative implementation is to log requests and responses to a `PrintStream`, e.g. `System.out` or `System.err`. This is usually a bad choice for running in production, but can sometimes be
useful for short-term local development and/or investigation.
```java
Logbook logbook = Logbook.builder()
.sink(new DefaultSink(
new DefaultHttpLogFormatter(),
new StreamHttpLogWriter(System.err)
))
.build();
```
##### Chunking
The `ChunkingSink` will split long messages into smaller chunks and will write them individually while delegating to another sink:
```java
Logbook logbook = Logbook.builder()
.sink(new ChunkingSink(sink, 1000))
.build();
```
#### Sink
The combination of `HttpLogFormatter` and `HttpLogWriter` suits most use cases well, but it has limitations.
Implementing the `Sink` interface directly allows for more sophisticated use cases, e.g. writing requests/responses
to a structured persistent storage like a database.
Multiple sinks can be combined into one using the `CompositeSink`.
### Servlet
You’ll have to register the `LogbookFilter` as a `Filter` in your filter chain — either in your `web.xml` file (please note that the xml approach will use all the defaults and is not configurable):
```xml
<filter>
<filter-name>LogbookFilter</filter-name>
<filter-class>org.zalando.logbook.servlet.LogbookFilter</filter-class>
</filter>
<filter-mapping>
<filter-name>LogbookFilter</filter-name>
<url-pattern>/*</url-pattern>
<dispatcher>REQUEST</dispatcher>
<dispatcher>ASYNC</dispatcher>
</filter-mapping>
```
or programmatically, via the `ServletContext`:
```java
context.addFilter("LogbookFilter", new LogbookFilter(logbook))
.addMappingForUrlPatterns(EnumSet.of(REQUEST, ASYNC), true, "/*");
```
**Beware**: The `ERROR` dispatch is not supported. You're strongly advised to produce error responses within the
`REQUEST` or `ASNYC` dispatch.
The `LogbookFilter` will, by default, treat requests with a `application/x-www-form-urlencoded` body not different from
any other request, i.e you will see the request body in the logs. The downside of this approach is that you won't be
able to use any of the `HttpServletRequest.getParameter*(..)` methods. See issue [#94](../../issues/94) for some more
details.
#### Form Requests
As of Logbook 1.5.0, you can now specify one of three strategies that define how Logbook deals with this situation by
using the `logbook.servlet.form-request` system property:
| Value | Pros | Cons |
|------------------|-----------------------------------------------------------------------------------|----------------------------------------------------|
| `body` (default) | Body is logged | Downstream code can **not use `getParameter*()`** |
| `parameter` | Body is logged (but it's reconstructed from parameters) | Downstream code can **not use `getInputStream()`** |
| `off` | Downstream code can decide whether to use `getInputStream()` or `getParameter*()` | Body is **not logged** |
#### Security
Secure applications usually need a slightly different setup. You should generally avoid logging unauthorized requests, especially the body, because it quickly allows attackers to flood your logfile —
and, consequently, your precious disk space. Assuming that your application handles authorization inside another filter, you have two choices:
- Don't log unauthorized requests
- Log unauthorized requests without the request body
You can easily achieve the former setup by placing the `LogbookFilter` after your security filter. The latter is a little bit more sophisticated. You’ll need two `LogbookFilter` instances — one before
your security filter, and one after it:
```java
context.addFilter("SecureLogbookFilter", new SecureLogbookFilter(logbook))
.addMappingForUrlPatterns(EnumSet.of(REQUEST, ASYNC), true, "/*");
context.addFilter("securityFilter", new SecurityFilter())
.addMappingForUrlPatterns(EnumSet.of(REQUEST), true, "/*");
context.addFilter("LogbookFilter", new LogbookFilter(logbook))
.addMappingForUrlPatterns(EnumSet.of(REQUEST, ASYNC), true, "/*");
```
The first logbook filter will log unauthorized requests **only**. The second filter will log authorized requests, as always.
### HTTP Client
The `logbook-httpclient` module contains both an `HttpRequestInterceptor` and an `HttpResponseInterceptor` to use with the `HttpClient`:
```java
CloseableHttpClient client = HttpClientBuilder.create()
.addInterceptorFirst(new LogbookHttpRequestInterceptor(logbook))
.addInterceptorFirst(new LogbookHttpResponseInterceptor())
.build();
```
Since the `LogbookHttpResponseInterceptor` is incompatible with the `HttpAsyncClient` there is another way to log responses:
```java
CloseableHttpAsyncClient client = HttpAsyncClientBuilder.create()
.addInterceptorFirst(new LogbookHttpRequestInterceptor(logbook))
.build();
// and then wrap your response consumer
client.execute(producer, new LogbookHttpAsyncResponseConsumer<>(consumer), callback)
```
### HTTP Client 5
The `logbook-httpclient5` module contains an `ExecHandler` to use with the `HttpClient`:
```java
CloseableHttpClient client = HttpClientBuilder.create()
.addExecInterceptorFirst("Logbook", new LogbookHttpExecHandler(logbook))
.build();
```
The Handler should be added first, such that a compression is performed after logging and decompression is performed before logging.
To avoid a breaking change, there is also an `HttpRequestInterceptor` and an `HttpResponseInterceptor` to use with the `HttpClient`, which works fine as long as compression (or other ExecHandlers) is
not used:
```java
CloseableHttpClient client = HttpClientBuilder.create()
.addRequestInterceptorFirst(new LogbookHttpRequestInterceptor(logbook))
.addResponseInterceptorFirst(new LogbookHttpResponseInterceptor())
.build();
```
Since the `LogbookHttpResponseInterceptor` is incompatible with the `HttpAsyncClient` there is another way to log responses:
```java
CloseableHttpAsyncClient client = HttpAsyncClientBuilder.create()
.addRequestInterceptorFirst(new LogbookHttpRequestInterceptor(logbook))
.build();
// and then wrap your response consumer
client.execute(producer, new LogbookHttpAsyncResponseConsumer<>(consumer), callback)
```
### JAX-RS 2.x and 3.x (aka Jakarta RESTful Web Services)
> [!NOTE]
> **Support for JAX-RS 2.x**
>
> JAX-RS 2.x (legacy) support was dropped in Logbook 3.0 to 3.6.
>
> As of Logbook 3.7, JAX-RS 2.x support is back.
>
> However, you need to add the `javax` **classifier** to use the proper Logbook module:
>
> ```xml
> <dependency>
> <groupId>org.zalando</groupId>
> <artifactId>logbook-jaxrs</artifactId>
> <version>${logbook.version}</version>
> <classifier>javax</classifier>
> </dependency>
> ```
>
> You should also make sure that the following dependencies are on your classpath.
> By default, `logbook-jaxrs` imports `jersey-client 3.x`, which is not compatible with JAX-RS 2.x:
>
> * [jersey-client 2.x](https://mvnrepository.com/artifact/org.glassfish.jersey.core/jersey-client/2.41)
> * [jersey-hk2 2.x](https://mvnrepository.com/artifact/org.glassfish.jersey.inject/jersey-hk2/2.41)
> * [javax.activation](https://mvnrepository.com/artifact/javax.activation/activation/1.1.1)
The `logbook-jaxrs` module contains:
A `LogbookClientFilter` to be used for applications making HTTP requests
```java
client.register(new LogbookClientFilter(logbook));
```
A `LogbookServerFilter` for be used with HTTP servers
```java
resourceConfig.register(new LogbookServerFilter(logbook));
```
### JDK HTTP Server
The `logbook-jdkserver` module provides support for
[JDK HTTP server](https://docs.oracle.com/javase/8/docs/jre/api/net/httpserver/spec/com/sun/net/httpserver/HttpServer.html)
and contains:
A `LogbookFilter` to be used with the builtin server
```java
httpServer.createContext(path,handler).getFilters().add(new LogbookFilter(logbook))
```
### Netty
The `logbook-netty` module contains:
A `LogbookClientHandler` to be used with an `HttpClient`:
```java
HttpClient httpClient =
HttpClient.create()
.doOnConnected(
(connection -> connection.addHandlerLast(new LogbookClientHandler(logbook)))
);
```
A `LogbookServerHandler` for use used with an `HttpServer`:
```java
HttpServer httpServer =
HttpServer.create()
.doOnConnection(
connection -> connection.addHandlerLast(new LogbookServerHandler(logbook))
);
```
#### Spring WebFlux
Users of Spring WebFlux can pick any of the following options:
- Programmatically create a `NettyWebServer` (passing an `HttpServer`)
- Register a custom `NettyServerCustomizer`
- Programmatically create a `ReactorClientHttpConnector` (passing an `HttpClient`)
- Register a custom `WebClientCustomizer`
- Use separate connector-independent module `logbook-spring-webflux`
#### Micronaut
Users of Micronaut can follow the [official docs](https://docs.micronaut.io/snapshot/guide/index.html#nettyClientPipeline) on how to integrate Logbook with Micronaut.
:warning: Even though Quarkus and Vert.x use Netty under the hood, unfortunately neither of them allows accessing or customizing it (yet).
### OkHttp v2.x
The `logbook-okhttp2` module contains an `Interceptor` to use with version 2.x of the `OkHttpClient`:
```java
OkHttpClient client = new OkHttpClient();
client.networkInterceptors().add(new LogbookInterceptor(logbook));
```
If you're expecting gzip-compressed responses you need to register our `GzipInterceptor` in addition.
The transparent gzip support built into OkHttp will run after any network interceptor which forces
logbook to log compressed binary responses.
```java
OkHttpClient client = new OkHttpClient();
client.networkInterceptors().add(new LogbookInterceptor(logbook));
client.networkInterceptors().add(new GzipInterceptor());
```
### OkHttp v3.x
The `logbook-okhttp` module contains an `Interceptor` to use with version 3.x of the `OkHttpClient`:
```java
OkHttpClient client = new OkHttpClient.Builder()
.addNetworkInterceptor(new LogbookInterceptor(logbook))
.build();
```
If you're expecting gzip-compressed responses you need to register our `GzipInterceptor` in addition.
The transparent gzip support built into OkHttp will run after any network interceptor which forces
logbook to log compressed binary responses.
```java
OkHttpClient client = new OkHttpClient.Builder()
.addNetworkInterceptor(new LogbookInterceptor(logbook))
.addNetworkInterceptor(new GzipInterceptor())
.build();
```
### Ktor
The `logbook-ktor-client` module contains:
A `LogbookClient` to be used with an `HttpClient`:
```kotlin
private val client = HttpClient(CIO) {
install(LogbookClient) {
logbook = logbook
}
}
```
The `logbook-ktor-server` module contains:
A `LogbookServer` to be used with an `Application`:
```kotlin
private val server = embeddedServer(CIO) {
install(LogbookServer) {
logbook = logbook
}
}
```
Alternatively, you can use `logbook-ktor`, which ships both `logbook-ktor-client` and `logbook-ktor-server` modules.
### Spring
The `logbook-spring` module contains a `ClientHttpRequestInterceptor` to use with `RestTemplate`:
```java
LogbookClientHttpRequestInterceptor interceptor = new LogbookClientHttpRequestInterceptor(logbook);
RestTemplate restTemplate = new RestTemplate();
restTemplate.getInterceptors().add(interceptor);
```
### Spring Boot Starter
Logbook comes with a convenient auto configuration for Spring Boot users. It sets up all of the following parts automatically with sensible defaults:
- Servlet filter
- Second Servlet filter for unauthorized requests (if Spring Security is detected)
- Header-/Parameter-/Body-Filters
- HTTP-/JSON-style formatter
- Logging writer
Instead of declaring a dependency to `logbook-core` declare one to the Spring Boot Starter:
```xml
<dependency>
<groupId>org.zalando</groupId>
<artifactId>logbook-spring-boot-starter</artifactId>
<version>${logbook.version}</version>
</dependency>
```
Every bean can be overridden and customized if needed, e.g. like this:
```java
@Bean
public BodyFilter bodyFilter() {
return merge(
defaultValue(),
replaceJsonStringProperty(singleton("secret"), "XXX"));
}
```
Please refer to [`LogbookAutoConfiguration`](logbook-spring-boot-autoconfigure/src/main/java/org/zalando/logbook/autoconfigure/LogbookAutoConfiguration.java)
or the following table to see a list of possible integration points:
| Type | Name | Default |
|--------------------------|-----------------------|---------------------------------------------------------------------------|
| `FilterRegistrationBean` | `secureLogbookFilter` | Based on `LogbookFilter` |
| `FilterRegistrationBean` | `logbookFilter` | Based on `LogbookFilter` |
| `Logbook` | | Based on condition, filters, formatter and writer |
| `Predicate<HttpRequest>` | `requestCondition` | No filter; is later combined with `logbook.exclude` and `logbook.exclude` |
| `HeaderFilter` | | Based on `logbook.obfuscate.headers` |
| `PathFilter` | | Based on `logbook.obfuscate.paths` |
| `QueryFilter` | | Based on `logbook.obfuscate.parameters` |
| `BodyFilter` | | `BodyFilters.defaultValue()`, see [filtering](#filtering) |
| `RequestFilter` | | `RequestFilters.defaultValue()`, see [filtering](#filtering) |
| `ResponseFilter` | | `ResponseFilters.defaultValue()`, see [filtering](#filtering) |
| `Strategy` | | `DefaultStrategy` |
| `AttributeExtractor` | | `NoOpAttributeExtractor` |
| `Sink` | | `DefaultSink` |
| `HttpLogFormatter` | | `JsonHttpLogFormatter` |
| `HttpLogWriter` | | `DefaultHttpLogWriter` |
Multiple filters are merged into one.
#### Autoconfigured beans from `logbook-spring`
Some classes from `logbook-spring` are included in the auto configuration.
You can autowire `LogbookClientHttpRequestInterceptor` with code like:
```java
private final RestTemplate restTemplate;
MyClient(RestTemplateBuilder builder, LogbookClientHttpRequestInterceptor interceptor){
this.restTemplate = builder
.additionalInterceptors(interceptor)
.build();
}
```
#### Configuration
The following tables show the available configuration (sorted alphabetically):
| Configuration | Description | Default |
|------------------------------------------|---------------------------------------------------------------------------------------------------------------------------------------------------------------------------------------------------------------------|--------------------|
| `logbook.attribute-extractors` | List of [AttributeExtractor](#attribute-extractor)s, including configurations such as `type` (currently `JwtFirstMatchingClaimExtractor` or `JwtAllMatchingClaimsExtractor`), `claim-names` and `claim-key`. | `[]` |
| `logbook.filter.enabled` | Enable the [`LogbookFilter`](#servlet) | `true` |
| `logbook.filter.form-request-mode` | Determines how [form requests](#form-requests) are handled | `body` |
| `logbook.filters.body.default-enabled` | Enables/disables default body filters that are collected by java.util.ServiceLoader | `true` |
| `logbook.format.style` | [Formatting style](#formatting) (`http`, `json`, `curl` or `splunk`) | `json` |
| `logbook.httpclient.decompress-response` | Enables/disables additional decompression process for HttpClient with gzip encoded body (to logging purposes only). This means extra decompression and possible performance impact. | `false` (disabled) |
| `logbook.minimum-status` | Minimum status to enable logging (`status-at-least` and `body-only-if-status-at-least`) | `400` |
| `logbook.obfuscate.headers` | List of header names that need obfuscation | `[Authorization]` |
| `logbook.obfuscate.json-body-fields` | List of JSON body fields to be obfuscated | `[]` |
| `logbook.obfuscate.parameters` | List of parameter names that need obfuscation | `[access_token]` |
| `logbook.obfuscate.paths` | List of paths that need obfuscation. Check [Filtering](#filtering) for syntax. | `[]` |
| `logbook.obfuscate.replacement` | A value to be used instead of an obfuscated one | `XXX` |
| `logbook.predicate.include` | Include only certain paths and methods (if defined) | `[]` |
| `logbook.predicate.exclude` | Exclude certain paths and methods (overrides `logbook.preidcates.include`) | `[]` |
| `logbook.secure-filter.enabled` | Enable the [`SecureLogbookFilter`](#servlet) | `true` |
| `logbook.strategy` | [Strategy](#strategy) (`default`, `status-at-least`, `body-only-if-status-at-least`, `without-body`) | `default` |
| `logbook.write.chunk-size` | Splits log lines into smaller chunks of size up-to `chunk-size`. | `0` (disabled) |
| `logbook.write.max-body-size` | Truncates the body up to `max-body-size` and appends `...`. <br/> :warning: Logbook will still buffer the full body, if the request is eligible for logging, regardless of the `logbook.write.max-body-size` value | `-1` (disabled) |
##### Example configuration
```yaml
logbook:
predicate:
include:
- path: /api/**
methods:
- GET
- POST
- path: /actuator/**
exclude:
- path: /actuator/health
- path: /api/admin/**
methods:
- POST
filter.enabled: true
secure-filter.enabled: true
format.style: http
strategy: body-only-if-status-at-least
minimum-status: 400
obfuscate:
headers:
- Authorization
- X-Secret
parameters:
- access_token
- password
write:
chunk-size: 1000
attribute-extractors:
- type: JwtFirstMatchingClaimExtractor
claim-names: [ "sub", "subject" ]
claim-key: Principal
- type: JwtAllMatchingClaimsExtractor
claim-names: [ "sub", "iat" ]
```
### logstash-logback-encoder
For basic Logback configuraton
```
<appender name="STDOUT" class="ch.qos.logback.core.ConsoleAppender">
<encoder class="net.logstash.logback.encoder.LogstashEncoder"/>
</appender>
```
configure Logbook with a `LogstashLogbackSink`
```
HttpLogFormatter formatter = new JsonHttpLogFormatter();
LogstashLogbackSink sink = new LogstashLogbackSink(formatter);
```
for outputs like
```
{
"@timestamp" : "2019-03-08T09:37:46.239+01:00",
"@version" : "1",
"message" : "GET http://localhost/test?limit=1",
"logger_name" : "org.zalando.logbook.Logbook",
"thread_name" : "main",
"level" : "TRACE",
"level_value" : 5000,
"http" : {
// logbook request/response contents
}
}
```
#### Customizing default Logging Level
You have the flexibility to customize the default logging level by initializing `LogstashLogbackSink` with a specific level. For instance:
```
LogstashLogbackSink sink = new LogstashLogbackSink(formatter, Level.INFO);
```
## Known Issues
1. The Logbook Servlet Filter interferes with downstream code using `getWriter` and/or `getParameter*()`. See [Servlet](#servlet) for more details.
2. The Logbook Servlet Filter does **NOT** support `ERROR` dispatch. You're strongly encouraged to not use it to produce error responses.
## Getting Help with Logbook
If you have questions, concerns, bug reports, etc., please file an issue in this repository's [Issue Tracker](https://github.com/zalando/logbook/issues).
## Getting Involved/Contributing
To contribute, simply make a pull request and add a brief description (1-2 sentences) of your addition or change. For
more details, check the [contribution guidelines](.github/CONTRIBUTING.md).
## Alternatives
- [Apache HttpClient Wire Logging](http://hc.apache.org/httpcomponents-client-4.5.x/logging.html)
- Client-side only
- Apache HttpClient exclusive
- Support for HTTP bodies
- [Spring Boot Access Logging](http://docs.spring.io/spring-boot/docs/current/reference/htmlsingle/#howto-configure-accesslogs)
- Spring application only
- Server-side only
- Tomcat/Undertow/Jetty exclusive
- **No** support for HTTP bodies
- [Tomcat Request Dumper Filter](https://tomcat.apache.org/tomcat-7.0-doc/config/filter.html#Request_Dumper_Filter)
- Server-side only
- Tomcat exclusive
- **No** support for HTTP bodies
- [logback-access](http://logback.qos.ch/access.html)
- Server-side only
- Any servlet container
- Support for HTTP bodies
## Credits and References

[*Grand Turk, a replica of a three-masted 6th rate frigate from Nelson's days - logbook and charts*](https://commons.wikimedia.org/wiki/File:Grand_Turk(34).jpg)
by [JoJan](https://commons.wikimedia.org/wiki/User:JoJan) is licensed under a
[Creative Commons (Attribution-Share Alike 3.0 Unported)](http://creativecommons.org/licenses/by-sa/3.0/).
| 0 |
apache/geode | Apache Geode | 2015-04-30T07:00:05Z | null | <div align="center">
[](http://geode.apache.org)
[](https://concourse.apachegeode-ci.info/teams/main/pipelines/apache-develop-main) [](https://www.apache.org/licenses/LICENSE-2.0) [](http://search.maven.org/#search%7Cga%7C1%7Cg%3A%22org.apache.geode%22) [](https://formulae.brew.sh/formula/apache-geode) [](https://hub.docker.com/r/apachegeode/geode/) [](https://lgtm.com/projects/g/apache/geode/alerts/) [](https://lgtm.com/projects/g/apache/geode/context:java) [](https://lgtm.com/projects/g/apache/geode/context:javascript) [](https://lgtm.com/projects/g/apache/geode/context:python)
</div>
## Contents
1. [Overview](#overview)
2. [How to Get Apache Geode](#obtaining)
3. [Main Concepts and Components](#concepts)
4. [Location of Directions for Building from Source](#building)
5. [Geode in 5 minutes](#started)
6. [Application Development](#development)
7. [Documentation](https://geode.apache.org/docs/)
8. [Wiki](https://cwiki.apache.org/confluence/display/GEODE/Index)
9. [How to Contribute](https://cwiki.apache.org/confluence/display/GEODE/How+to+Contribute)
10. [Export Control](#export)
## <a name="overview"></a>Overview
[Apache Geode](http://geode.apache.org/) is
a data management platform that provides real-time, consistent access to
data-intensive applications throughout widely distributed cloud architectures.
Apache Geode pools memory, CPU, network resources, and optionally local disk
across multiple processes to manage application objects and behavior. It uses
dynamic replication and data partitioning techniques to implement high
availability, improved performance, scalability, and fault tolerance. In
addition to being a distributed data container, Apache Geode is an in-memory
data management system that provides reliable asynchronous event notifications
and guaranteed message delivery.
Apache Geode is a mature, robust technology originally developed by GemStone
Systems. Commercially available as GemFire™, it was first deployed in the
financial sector as the transactional, low-latency data engine used in Wall
Street trading platforms. Today Apache Geode technology is used by hundreds of
enterprise customers for high-scale business applications that must meet low
latency and 24x7 availability requirements.
## <a name="obtaining"></a>How to Get Apache Geode
You can download Apache Geode from the
[website](https://geode.apache.org/releases/), run a Docker
[image](https://hub.docker.com/r/apachegeode/geode/), or install with
[Homebrew](https://formulae.brew.sh/formula/apache-geode) on OSX. Application developers
can load dependencies from [Maven
Central](https://search.maven.org/#search%7Cga%7C1%7Cg%3A%22org.apache.geode%22).
Maven
```xml
<dependencies>
<dependency>
<groupId>org.apache.geode</groupId>
<artifactId>geode-core</artifactId>
<version>$VERSION</version>
</dependency>
</dependencies>
```
Gradle
```groovy
dependencies {
compile "org.apache.geode:geode-core:$VERSION"
}
```
## <a name="concepts"></a>Main Concepts and Components
_Caches_ are an abstraction that describe a node in an Apache Geode distributed
system.
Within each cache, you define data _regions_. Data regions are analogous to
tables in a relational database and manage data in a distributed fashion as
name/value pairs. A _replicated_ region stores identical copies of the data on
each cache member of a distributed system. A _partitioned_ region spreads the
data among cache members. After the system is configured, client applications
can access the distributed data in regions without knowledge of the underlying
system architecture. You can define listeners to receive notifications when
data has changed, and you can define expiration criteria to delete obsolete
data in a region.
_Locators_ provide clients with both discovery and server load balancing
services. Clients are configured with locator information, and the locators
maintain a dynamic list of member servers. The locators provide clients with
connection information to a server.
Apache Geode includes the following features:
* Combines redundancy, replication, and a "shared nothing" persistence
architecture to deliver fail-safe reliability and performance.
* Horizontally scalable to thousands of cache members, with multiple cache
topologies to meet different enterprise needs. The cache can be
distributed across multiple computers.
* Asynchronous and synchronous cache update propagation.
* Delta propagation distributes only the difference between old and new
versions of an object (delta) instead of the entire object, resulting in
significant distribution cost savings.
* Reliable asynchronous event notifications and guaranteed message delivery
through optimized, low latency distribution layer.
* Data awareness and real-time business intelligence. If data changes as
you retrieve it, you see the changes immediately.
* Integration with Spring Framework to speed and simplify the development
of scalable, transactional enterprise applications.
* JTA compliant transaction support.
* Cluster-wide configurations that can be persisted and exported to other
clusters.
* Remote cluster management through HTTP.
* REST APIs for REST-enabled application development.
* Rolling upgrades may be possible, but they will be subject to any
limitations imposed by new features.
## <a name="building"></a>Building this Release from Source
See [BUILDING.md](./BUILDING.md) for
instructions on how to build the project.
## <a name="testing"></a>Running Tests
See [TESTING.md](./TESTING.md) for
instructions on how to run tests.
## <a name="started"></a>Geode in 5 minutes
Geode requires installation of JDK version 1.8. After installing Apache Geode,
start a locator and server:
```console
$ gfsh
gfsh> start locator
gfsh> start server
```
Create a region:
```console
gfsh> create region --name=hello --type=REPLICATE
```
Write a client application (this example uses a [Gradle](https://gradle.org)
build script):
_build.gradle_
```groovy
apply plugin: 'java'
apply plugin: 'application'
mainClassName = 'HelloWorld'
repositories { mavenCentral() }
dependencies {
compile 'org.apache.geode:geode-core:1.4.0'
runtime 'org.slf4j:slf4j-log4j12:1.7.24'
}
```
_src/main/java/HelloWorld.java_
```java
import java.util.Map;
import org.apache.geode.cache.Region;
import org.apache.geode.cache.client.*;
public class HelloWorld {
public static void main(String[] args) throws Exception {
ClientCache cache = new ClientCacheFactory()
.addPoolLocator("localhost", 10334)
.create();
Region<String, String> region = cache
.<String, String>createClientRegionFactory(ClientRegionShortcut.CACHING_PROXY)
.create("hello");
region.put("1", "Hello");
region.put("2", "World");
for (Map.Entry<String, String> entry : region.entrySet()) {
System.out.format("key = %s, value = %s\n", entry.getKey(), entry.getValue());
}
cache.close();
}
}
```
Build and run the `HelloWorld` example:
```console
$ gradle run
```
The application will connect to the running cluster, create a local cache, put
some data in the cache, and print the cached data to the console:
```console
key = 1, value = Hello
key = 2, value = World
```
Finally, shutdown the Geode server and locator:
```console
gfsh> shutdown --include-locators=true
```
For more information see the [Geode
Examples](https://github.com/apache/geode-examples) repository or the
[documentation](https://geode.apache.org/docs/).
## <a name="development"></a>Application Development
Apache Geode applications can be written in these client technologies:
* Java [client](https://geode.apache.org/docs/guide/18/topologies_and_comm/cs_configuration/chapter_overview.html)
or [peer](https://geode.apache.org/docs/guide/18/topologies_and_comm/p2p_configuration/chapter_overview.html)
* [REST](https://geode.apache.org/docs/guide/18/rest_apps/chapter_overview.html)
* [Memcached](https://cwiki.apache.org/confluence/display/GEODE/Moving+from+memcached+to+gemcached)
The following libraries are available external to the Apache Geode project:
* [Spring Data GemFire](https://projects.spring.io/spring-data-gemfire/)
* [Spring Cache](https://docs.spring.io/spring/docs/current/spring-framework-reference/html/cache.html)
* [Python](https://github.com/gemfire/py-gemfire-rest)
## <a name="export"></a>Export Control
This distribution includes cryptographic software.
The country in which you currently reside may have restrictions
on the import, possession, use, and/or re-export to another country,
of encryption software. BEFORE using any encryption software,
please check your country's laws, regulations and policies
concerning the import, possession, or use, and re-export of
encryption software, to see if this is permitted.
See <http://www.wassenaar.org/> for more information.
The U.S. Government Department of Commerce, Bureau of Industry and Security (BIS),
has classified this software as Export Commodity Control Number (ECCN) 5D002.C.1,
which includes information security software using or performing
cryptographic functions with asymmetric algorithms.
The form and manner of this Apache Software Foundation distribution makes
it eligible for export under the License Exception
ENC Technology Software Unrestricted (TSU) exception
(see the BIS Export Administration Regulations, Section 740.13)
for both object code and source code.
The following provides more details on the included cryptographic software:
* Apache Geode is designed to be used with
[Java Secure Socket Extension](https://docs.oracle.com/javase/8/docs/technotes/guides/security/jsse/JSSERefGuide.html) (JSSE) and
[Java Cryptography Extension](https://docs.oracle.com/javase/8/docs/technotes/guides/security/crypto/CryptoSpec.html) (JCE).
The [JCE Unlimited Strength Jurisdiction Policy](https://www.oracle.com/technetwork/java/javase/downloads/jce8-download-2133166.html)
may need to be installed separately to use keystore passwords with 7 or more characters.
* Apache Geode links to and uses [OpenSSL](https://www.openssl.org/) ciphers.
| 0 |
End of preview. Expand
in Data Studio
README.md exists but content is empty.
- Downloads last month
- 52