Introducing Skops


Introducing Skops
At Hugging Face, we are working on tackling various problems in open-source machine learning, including, hosting models securely and openly, enabling reproducibility, explainability and collaboration. We are thrilled to introduce you to our new library: Skops! With Skops, you can host your scikit-learn models on the Hugging Face Hub, create model cards for model documentation and collaborate with others.
Let's go through an end-to-end example: train a model first, and see step-by-step how to leverage Skops for sklearn in production.
# let's import the libraries first
import sklearn
from sklearn.datasets import load_breast_cancer
from sklearn.tree import DecisionTreeClassifier
from sklearn.model_selection import train_test_split

# Load the data and split
X, y = load_breast_cancer(as_frame=True, return_X_y=True)
X_train, X_test, y_train, y_test = train_test_split(
    X, y, test_size=0.3, random_state=42
)

# Train the model
model = DecisionTreeClassifier().fit(X_train, y_train)
You can use any model filename and serialization method, like pickle or joblib. At the moment, our backend uses joblib to load the model. hub_utils.init creates a local folder containing the model in the given path, and the configuration file containing the specifications of the environment the model is trained in. The data and the task passed to the init will help Hugging Face Hub enable the inference widget on the model page as well as discoverability features to find the model.
from skops import hub_utils
import pickle

# let's save the model
model_path = "example.pkl"
local_repo = "my-awesome-model"
with open(model_path, mode="bw") as f:
    pickle.dump(model, file=f)

# we will now initialize a local repository
hub_utils.init(
    model=model_path,
    requirements=[f"scikit-learn={sklearn.__version__}"],
    dst=local_repo,
    task="tabular-classification",
    data=X_test,
)
The repository now contains the serialized model and the configuration file. The configuration contains the following:
- features of the model,
- the requirements of the model,
- an example input taken from
X_testthat we've passed, - name of the model file,
- name of the task to be solved here.
We will now create the model card. The card should match the expected Hugging Face Hub format: a markdown part and a metadata section, which is a yaml section at the top. The keys to the metadata section are defined here and are used for the discoverability of the models.
The content of the model card is determined by a template that has a:
yamlsection on top for metadata (e.g. model license, library name, and more)- markdown section with free text and sections to be filled (e.g. simple description of the model),
The following sections are extracted by
skopsto fill in the model card: - Hyperparameters of the model,
- Interactive diagram of the model,
- For metadata, library name, task identifier (e.g. tabular-classification), and information required by the inference widget are filled.
We will walk you through how to programmatically pass information to fill the model card. You can check out our documentation on the default template provided by skops, and its sections here to see what the template expects and what it looks like here.
You can create the model card by instantiating the Card class from skops. During model serialization, the task name and library name are written to the configuration file. This information is also needed in the card's metadata, so you can use the metadata_from_config method to extract the metadata from the configuration file and pass it to the card when you create it. You can add information and metadata using add.
from skops import card

# create the card
model_card = card.Card(model, metadata=card.metadata_from_config(Path(destination_folder)))

limitations = "This model is not ready to be used in production."
model_description = "This is a DecisionTreeClassifier model trained on breast cancer dataset."
model_card_authors = "skops_user"
get_started_code = "import pickle \nwith open(dtc_pkl_filename, 'rb') as file: \n    clf = pickle.load(file)"
citation_bibtex = "bibtex\n@inproceedings{...,year={2020}}"

# we can add the information using add
model_card.add(
    citation_bibtex=citation_bibtex,
    get_started_code=get_started_code,
    model_card_authors=model_card_authors,
    limitations=limitations,
    model_description=model_description,
)

# we can set the metadata part directly
model_card.metadata.license = "mit"
We will now evaluate the model and add a description of the evaluation method with add. The metrics are added by add_metrics, which will be parsed into a table.
from sklearn.metrics import (ConfusionMatrixDisplay, confusion_matrix,
                            accuracy_score, f1_score)
# let's make a prediction and evaluate the model
y_pred = model.predict(X_test)
# we can pass metrics using add_metrics and pass details with add
model_card.add(eval_method="The model is evaluated using test split, on accuracy and F1 score with macro average.")
model_card.add_metrics(accuracy=accuracy_score(y_test, y_pred))
model_card.add_metrics(**{"f1 score": f1_score(y_test, y_pred, average="micro")})
We can also add any plot of our choice to the card using add_plot like below.
import matplotlib.pyplot as plt
from pathlib import Path
# we will create a confusion matrix
cm = confusion_matrix(y_test, y_pred, labels=model.classes_)
disp = ConfusionMatrixDisplay(confusion_matrix=cm, display_labels=model.classes_)
disp.plot()

# save the plot
plt.savefig(Path(local_repo) / "confusion_matrix.png")

# the plot will be written to the model card under the name confusion_matrix
# we pass the path of the plot itself
model_card.add_plot(confusion_matrix="confusion_matrix.png")
Let's save the model card in the local repository. The file name here should be README.md since it is what Hugging Face Hub expects.
model_card.save(Path(local_repo) / "README.md")
We can now push the repository to the Hugging Face Hub. For this, we will use push from hub_utils. Hugging Face Hub requires tokens for authentication, therefore you need to pass your token in either notebook_login if you're logging in from a notebook, or huggingface-cli login if you're logging in from the CLI.
# if the repository doesn't exist remotely on the Hugging Face Hub, it will be created when we set create_remote to True
repo_id = "skops-user/my-awesome-model"
hub_utils.push(
    repo_id=repo_id,
    source=local_repo,
    token=token,
    commit_message="pushing files to the repo from the example!",
    create_remote=True,
)
Once we push the model to the Hub, anyone can use it unless the repository is private. You can download the models using download. Apart from the model file, the repository contains the model configuration and the environment requirements.
download_repo = "downloaded-model"
hub_utils.download(repo_id=repo_id, dst=download_repo)
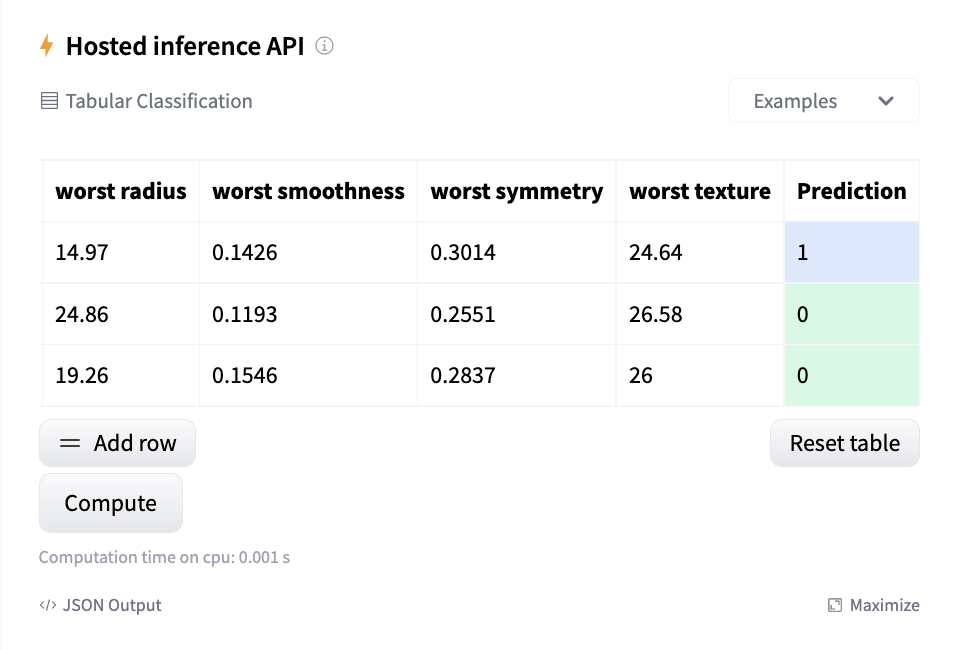
The inference widget is enabled to make predictions in the repository.
If the requirements of your project have changed, you can use update_env to update the environment.
hub_utils.update_env(path=local_repo, requirements=["scikit-learn"])
You can see the example repository pushed with above code here. We have prepared two examples to show how to save your models and use model card utilities. You can find them in the resources section below.