A community derived guide to some of the SOTA practices for SD-XL Dreambooth LoRA fine tuning
TL;DR
We combined the Pivotal Tuning technique used on Replicate's SDXL Cog trainer with the Prodigy optimizer used in the
Kohya trainer (plus a bunch of other optimizations) to achieve very good results on training Dreambooth LoRAs for SDXL.
Check out the training script on diffusers🧨. Try it out on Colab.
If you want to skip the technical talk, you can use all the techniques in this blog
and train on Hugging Face Spaces with a simple UI and curated parameters (that you can meddle with).
Overview
Stable Diffusion XL (SDXL) models fine-tuned with LoRA dreambooth achieve incredible results at capturing new concepts using only a
handful of images, while simultaneously maintaining the aesthetic and image quality of SDXL and requiring relatively
little compute and resources. Check out some of the awesome SDXL
LoRAs here. In this blog, we'll review some of the popular practices and techniques to make your LoRA finetunes go brrr, and show how you
can run or train yours now with diffusers!
Recap: LoRA (Low-Rank Adaptation) is a fine-tuning technique for Stable Diffusion models that makes slight
adjustments to the crucial cross-attention layers where images and prompts intersect. It achieves quality on par with
full fine-tuned models while being much faster and requiring less compute. To learn more on how LoRAs work, please see
our previous post - Using LoRA for Efficient Stable Diffusion Fine-Tuning.
Pivotal Tuning is a method that combines Textual Inversion with regular diffusion fine-tuning. For Dreambooth, it is
customary that you provide a rare token to be your trigger word, say "an sks dog". However, those tokens usually have
other semantic meaning associated with them and can affect your results. The sks example, popular in the community, is
actually associated with a weapons brand.
To tackle this issue, we insert new tokens into the text encoders of the model, instead of reusing existing ones.
We then optimize the newly-inserted token embeddings to represent the new concept: that is Textual Inversion –
we learn to represent the concept through new "words" in the embedding space. Once we obtain the new token and its
embeddings to represent it, we can train our Dreambooth LoRA with those token embeddings to get the best of both worlds.
Training
In our new training script, you can do textual inversion training by providing the following arguments
train_text_encoder_ti enables training the embeddings of new concepts
train_text_encoder_ti_frac specifies when to stop the textual inversion (i.e. stop optimization of the textual embeddings and continue optimizing the UNet only).
Pivoting halfway (i.e. performing textual inversion for the first half of the training epochs)
is the default value in the cog sdxl example and our experiments validate this as well. We encourage experimentation here.
token_abstraction this refers to the concept identifier,
the word used in the image captions to describe the concept we wish to train on.
Your choice of token abstraction should be used in your instance prompt,
validation prompt or custom captions. Here we chose TOK, so,
for example, "a photo of a TOK" can be the instance prompt.
As --token_abstraction is a place-holder, before training we insert the new
tokens in place of TOK and optimize them (meaning "a photo of TOK" becomes "a photo of <s0><s1>" during training, where <s0><s1> are the new tokens).
Hence, it's also crucial that token_abstraction corresponds to the identifier used in the instance prompt, validation prompt and custom prompts(if used).
num_new_tokens_per_abstraction the number of new tokens to initialize for each token_abstraction- i.e. how many new tokens to insert and train for each text encoder
of the model. The default is set to 2, we encourage you to experiment with this and share your results!
adam_weight_decay_text_encoder This is used to set a different weight decay value for the text encoder parameters (
different from the value used for the unet parameters).`
Adaptive Optimizers
When training/fine-tuning a diffusion model (or any machine learning model for that matter), we use optimizers to guide
us towards the optimal path that leads to convergence of our training objective - a minimum point of our chosen loss
function that represents a state where the model learned what we are trying to teach it. The standard (and
state-of-the-art) choices for deep learning tasks are the Adam and AdamW optimizers.
However, they require the user to meddle a lot with the hyperparameters that pave the path to convergence (such as
learning rate, weight decay, etc.). This can result in time-consuming experiments that lead to suboptimal outcomes, and
even if you land on an ideal learning rate, it may still lead to convergence issues if the learning rate is constant
during training. Some parameters may benefit from more frequent updates to expedite convergence, while others may
require smaller adjustments to avoid overshooting the optimal value. To tackle this challenge, algorithms with adaptable
learning rates such as Adafactor and Prodigy have been introduced. These
methods optimize the algorithm's traversal of the optimization landscape by dynamically adjusting the learning rate for
each parameter based on their past gradients.
We chose to focus a bit more on Prodigy as we think it can be especially beneficial for Dreambooth LoRA training!
Training
--optimizer="prodigy"
When using prodigy it's generally good practice to set-
--learning_rate=1.0
Additional settings that are considered beneficial for diffusion models and specifically LoRA training are:
--prodigy_safeguard_warmup=True
--prodigy_use_bias_correction=True
--adam_beta1=0.9
# Note these are set to values different than the default:
--adam_beta2=0.99
--adam_weight_decay=0.01
There are additional hyper-parameters you can adjust when training with prodigy
(like- --prodigy_beta3, prodigy_decouple, prodigy_safeguard_warmup), we will not delve into those in this post,
but you can learn more about them here.
Additional Good Practices
Besides pivotal tuning and adaptive optimizers, here are some additional techniques that can impact the quality of your
trained LoRA, all of them have been incorporated into the new diffusers training script.
Independent learning rates for text encoder and UNet
When optimizing the text encoder, it's been perceived by the community that setting different learning rates for it (
versus the learning rate of the UNet) can lead to better quality results - specifically a lower learning rate for
the text encoder as it tends to overfit faster.
* The importance of different unet and text encoder learning rates is evident when performing pivotal tuning as
well- in this case, setting a higher learning rate for the text encoder is perceived to be better.
* Notice, however, that when using Prodigy (or adaptive optimizers in general) we start with an identical initial
learning rate for all trained parameters, and let the optimizer work it's magic ✨
--train_text_encoder enables full text encoder training (i.e. the weights of the text encoders are fully optimized, as opposed to just optimizing the inserted embeddings we saw in textual inversion (--train_text_encoder_ti)).
If you wish the text encoder lr to always match --learning_rate, set --text_encoder_lr=None.
Custom Captioning
While it is possible to achieve good results by training on a set of images all captioned with the same instance
prompt, e.g. "photo of a person" or "in the style of " etc, using the same caption may lead to
suboptimal results, depending on the complexity of the learned concept, how "familiar" the model is with the concept,
and how well the training set captures it.
Training
To use custom captioning, first ensure that you have the datasets library installed, otherwise you can install it by -
!pip install datasets
To load the custom captions we need our training set directory to follow the structure of a datasets ImageFolder,
containing both the images and the corresponding caption for each image.
Option 1:
You choose a dataset from the hub that already contains images and prompts - for example LinoyTsaban/3d_icon. Now all you have to do
is specify the name of the dataset and the name of the caption column (in this case it's "prompt") in your training arguments:
Option 2:
You wish to use your own images and add captions to them. In that case, you can use this colab notebook to
automatically caption the images with BLIP, or you can manually create the captions in a metadata file. Then you
follow up the same way, by specifying --dataset_name with your folder path, and --caption_column with the column
name for the captions.
Min-SNR Gamma weighting
Training diffusion models often suffers from slow convergence, partly due to conflicting optimization directions
between timesteps. Hang et al. found a way to mitigate this issue by introducing
the simple Min-SNR-gamma approach. This method adapts loss weights of timesteps based on clamped signal-to-noise
ratios, which effectively balances the conflicts among timesteps.
* For small datasets, the effects of Min-SNR weighting strategy might not appear to be pronounced, but for larger
datasets, the effects will likely be more pronounced.
* snr visfind this project on Weights and Biases that compares
the loss surfaces of the following setups: snr_gamma set to 5.0, 1.0 and None.
Training
To use Min-SNR gamma, set a value for:
--snr_gamma=5.0
By default --snr_gamma=None, I.e. not used. When enabling --snr_gamma, the recommended value is 5.0.
Repeats
This argument refers to the number of times an image from your dataset is repeated in the training set. This differs
from epochs in that first the images are repeated, and only then shuffled.
Training
To enable repeats simply set an integer value > 1 as your repeats count-
--repeats
By default, --repeats=1, i.e. training set is not repeated
Training Set Creation
As the popular saying goes - “Garbage in - garbage out” Training a good Dreambooth LoRA can be done easily using
only a handful of images, but the quality of these images is very impactful on the fine tuned model.
Generally, when fine-tuning on an object/subject, we want to make sure the training set contains images that
portray the object/subject in as many distinct ways we would want to prompt for it as possible.
For example, if my concept is this red backpack: (available
in google/dreambooth dataset)
I would likely want to prompt it worn by people as well, so having examples like this:
in the training set - that fits that scenario - will likely make it easier for the model to generalize to that
setting/composition during inference.
Specifically when training on faces, you might want to keep in mind the following things regarding your dataset:
If possible, always choose high resolution, high quality images. Blurry or low resolution images can harm the
tuning process.
When training on faces, it is recommended that no other faces appear in the training set as we don't want to
create an ambiguous notion of what is the face we're training on.
Close-up photos are important to achieve realism, however good full-body shots should also be included to
improve the ability to generalize to different poses/compositions.
We recommend avoiding photos where the subject is far away, as most pixels in such images are not related to
the concept we wish to optimize on, there's not much for the model to learn from these.
Avoid repeating backgrounds/clothing/poses - aim for variety in terms of lighting, poses, backgrounds, and
facial expressions. The greater the diversity, the more flexible and generalizable the LoRA would be.
Prior preservation loss - Prior preservation loss is a method that uses a
model’s own generated samples to help
it learn how to generate more diverse images.
Because these sample images belong to the same class as
the images you provided, they help the model retain what it has learned about
the class and how it can use what it already knows about the class to make new
compositions.
real images for regularization VS model generated ones
When choosing class images, you can decide between synthetic ones (i.e. generated by the diffusion model) and
real ones. In favor of using real images, we can argue they improve the fine-tuned model's realism. On the other
hand, some will argue that using model generated images better serves the purpose of preserving the models
knowledge of the class and general aesthetics.
Celebrity lookalike - this is more a comment on the captioning/instance prompt used to train. Some fine
tuners experienced improvements in their results when prompting with a token identifier + a public person that
the base model knows about that resembles the person they trained on.
--with_prior_preservation - enables training with prior preservation --class_data_dir - path to folder containing class images —-num_class_images - Minimal class images for prior preservation loss. If there are not enough images already present
in --class_data_dir, additional images will be sampled with --class_prompt.
Experiments Settings and Results
To explore the described methods, we experimented with different combinations of these techniques on
different objectives (style tuning, faces and objects).
In order to narrow down the infinite amount of hyperparameters values, we used some of the more popular and common
configurations as starting points and tweaked our way from there.
Huggy Dreambooth LoRA
First, we were interested in fine-tuning a huggy LoRA which means
both teaching an artistic style, and a specific character at the same time.
For this example, we curated a high quality Huggy mascot dataset (using Chunte-Lee’s amazing artwork) containing 31
images paired with custom captions.
Full Text Encoder Tuning VS Pivotal Tuning - we noticed pivotal tuning achieves results competitive or better
than full text encoder training and yet without optimizing the weights of the text_encoder.
Min SNR Gamma
We compare between a version1
trained without snr_gamma, and a version2 trained with snr_gamma = 5.0
Specifically we used the following arguments in both versions (and added snr_gamma to version 2)
When training with optimizer=prodigy we set the initial learning rate to be 1. For adamW we used the default
learning rates used for pivotal tuning in cog-sdxl (1e-4, 3e-4 for learning_rate and text_encoder_lr respectively)
as we were able to reproduce good
results with these settings.
all other training parameters and settings were the same. Specifically:
Y2K Webpage LoRA
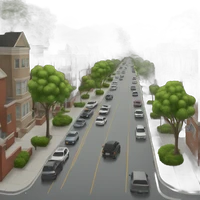
Let's explore another example, this time training on a dataset composed of 27 screenshots of webpages from the 1990s
and early 2000s that we (nostalgically 🥲) scraped from the internet:
This example showcases a slightly different behaviour than the previous.
While in both cases we used approximately the same amount of images (i.e. ~30),
we noticed that for this style LoRA, the same settings that induced good results for the Huggy LoRA, are overfitting for the webpage style. There
For v1, we chose as starting point the settings that worked best for us when training the Huggy LoRA - it was evidently overfit, so we tried to resolve that in the next versions by tweaking --max_train_steps, --repeats, --train_batch_size and --snr_gamma.
More specifically, these are the settings we changed between each version (all the rest we kept the same):
param
v1
v2
v3
v4
v5
v6
v7
v8
max_train_steps
1500
1500
1500
1000
1000
1000
1000
1000
repeats
1
1
2
2
1
1
2
1
train_batch_size
4
4
4
4
2
1
1
1
instance_data_dir
web_y2k
14 images randomly samples from web_y2k
web_y2k
web_y2k
web_y2k
web_y2k
web_y2k
web_y2k
snr_gamma
5.0
5.0
5.0
5.0
-
-
5.0
5.0
We found v4, v5 and v6 to strike the best balance:
Face LoRA
When training on face images, we aim for the LoRA to generate images as realistic and similar to the original person as possible,
while also being able to generalize well to backgrounds and compositions that were not seen in the training set.
For this use-case, we used different datasets of Linoy's face composed of 6-10 images, including a set of close-up photos taken all at the same time and a dataset of shots taken at different occasions (changing backgrounds, lighting and outfits) as well as full body shots.
We learned that less images with a better curation works better than more images if the images are of mid-to-low quality when it comes to lighting/resolution/focus on subject - less is more: pick your best pictures and use that to train the model!
Configurations:
contrary to common practices, we found the use of generated class images to reduce both resemblance to the subject and realism.
we created a dataset of real portrait images, using free licensed images downloaded from unsplash.
You can now use it automatically in the new training space as well!
When using the real image dataset, we did notice less language drift (i.e. the model doesn't associate the term woman/man with trained faces only and can generate different people as well) while at the same time maintaining realism and overall quality when prompted for the trained faces.
Rank
we compare LoRAs in ranks 4, 16, 32 and 64. We observed that in the settings tested in our explorations, images produced using the 64 rank LoRA tend to have a more air-brushed appearance, and less realistic looking skin texture.
Hence for the experiments detailed below as well as the LoRA ease space, we use a default rank of 32.
Training Steps
Even though few high quality images (in our example, 6) work well, we still need to determine an ideal number of steps to train the model.
We experimented with few different multipliers on the number of images: 6 x75 = 450 steps / 6 x100 = 600 steps / 6 x120 = 720 steps.
As you can see below, our preliminary results show that good results are achieved with a 120x multiplier (if the dataset is diverse enough to not overfit, it's preferable to not use the same shooting)
Inference
Inference with models trained with the techniques above should work the same as with any trainer, except that, when we do pivotal tuning, besides the *.safetensors weights of your LoRA, there is also the *.safetensors text embeddings trained with the model
for the new tokens. In order to do inference with those we add 2 steps to how we would normally load a LoRA:
Download our trained embeddings from the hub
(your embeddings filename is set by default to be {model_name}_emb.safetensors)
import torch
from huggingface_hub import hf_hub_download
from diffusers import DiffusionPipeline
from safetensors.torch import load_file
pipe = DiffusionPipeline.from_pretrained(
        "stabilityai/stable-diffusion-xl-base-1.0",
        torch_dtype=torch.float16,
        variant="fp16",
).to("cuda")

# download embeddings
embedding_path = hf_hub_download(repo_id="LinoyTsaban/web_y2k_lora", filename="web_y2k_emb.safetensors", repo_type="model")
Load the embeddings into the text encoders
# load embeddings to the text encoders
state_dict = load_file(embedding_path)
# notice we load the tokens <s0><s1>, as "TOK" as only a place-holder and training was performed using the new initialized tokens - <s0><s1># load embeddings of text_encoder 1 (CLIP ViT-L/14)
pipe.load_textual_inversion(state_dict["clip_l"], token=["<s0>", "<s1>"], text_encoder=pipe.text_encoder, tokenizer=pipe.tokenizer)
# load embeddings of text_encoder 2 (CLIP ViT-G/14)
pipe.load_textual_inversion(state_dict["clip_g"], token=["<s0>", "<s1>"], text_encoder=pipe.text_encoder_2, tokenizer=pipe.tokenizer_2)
Load your LoRA and prompt it!
# normal LoRA loading
pipe.load_lora_weights("LinoyTsaban/web_y2k_lora", weight_name="pytorch_lora_weights.safetensors")
prompt="a <s0><s1> webpage about an astronaut riding a horse"
images = pipe(
    prompt,
    cross_attention_kwargs={"scale": 0.8},
).images
# your output image
images[0]
Comfy UI / AUTOMATIC1111 Inference
The new script fully supports textual inversion loading with Comfy UI and AUTOMATIC1111 formats!
AUTOMATIC1111 / SD.Next In AUTOMATIC1111/SD.Next we will load a LoRA and a textual embedding at the same time.
LoRA: Besides the diffusers format, the script will also train a WebUI compatible LoRA. It is generated as {your_lora_name}.safetensors. You can then include it in your models/Lora directory.
Embedding: the embedding is the same for diffusers and WebUI. You can download your {lora_name}_emb.safetensors file from a trained model, and include it in your embeddings directory.
You can then run inference by prompting a y2k_emb webpage about the movie Mean Girls <lora:y2k:0.9>. You can use the y2k_emb token normally, including increasing its weight by doing (y2k_emb:1.2).
ComfyUI In ComfyUI we will load a LoRA and a textual embedding at the same time.
LoRA: Besides the diffusers format, the script will also train a ComfyUI compatible LoRA. It is generated as {your_lora_name}.safetensors. You can then include it in your models/Lora directory. Then you will load the LoRALoader node and hook that up with your model and CLIP. Official guide for loading LoRAs
Embedding: the embedding is the same for diffusers and WebUI. You can download your {lora_name}_emb.safetensors file from a trained model, and include it in your models/embeddings directory and use it in your prompts like embedding:y2k_emb. Official guide for loading embeddings.
What’s next?
🚀 More features coming soon!
We are working on adding even more control and flexibility to our advanced training script. Let us know what features
you find most helpful!
🤹 Multi concept LoRAs
A recent work of Shah et al. introduced ZipLoRAs - a method to
merge independently trained style and subject LoRAs in order to achieve generation of any user-provided subject in
any user-provided style. mkshing implemented an open source replication available
here and it uses the new and improved script.