Spaces:
Sleeping

Image pretraining examples
This directory contains Python scripts that allow you to pre-train Transformer-based vision models (like ViT, Swin Transformer) on your own data, after which you can easily load the weights into a AutoModelForImageClassification. It currently includes scripts for:
NOTE: If you encounter problems/have suggestions for improvement, open an issue on Github and tag @NielsRogge.
SimMIM
The run_mim.py script can be used to pre-train any Transformer-based vision model in the library (concretly, any model supported by the AutoModelForMaskedImageModeling API) for masked image modeling as proposed in SimMIM: A Simple Framework for Masked Image Modeling using PyTorch.
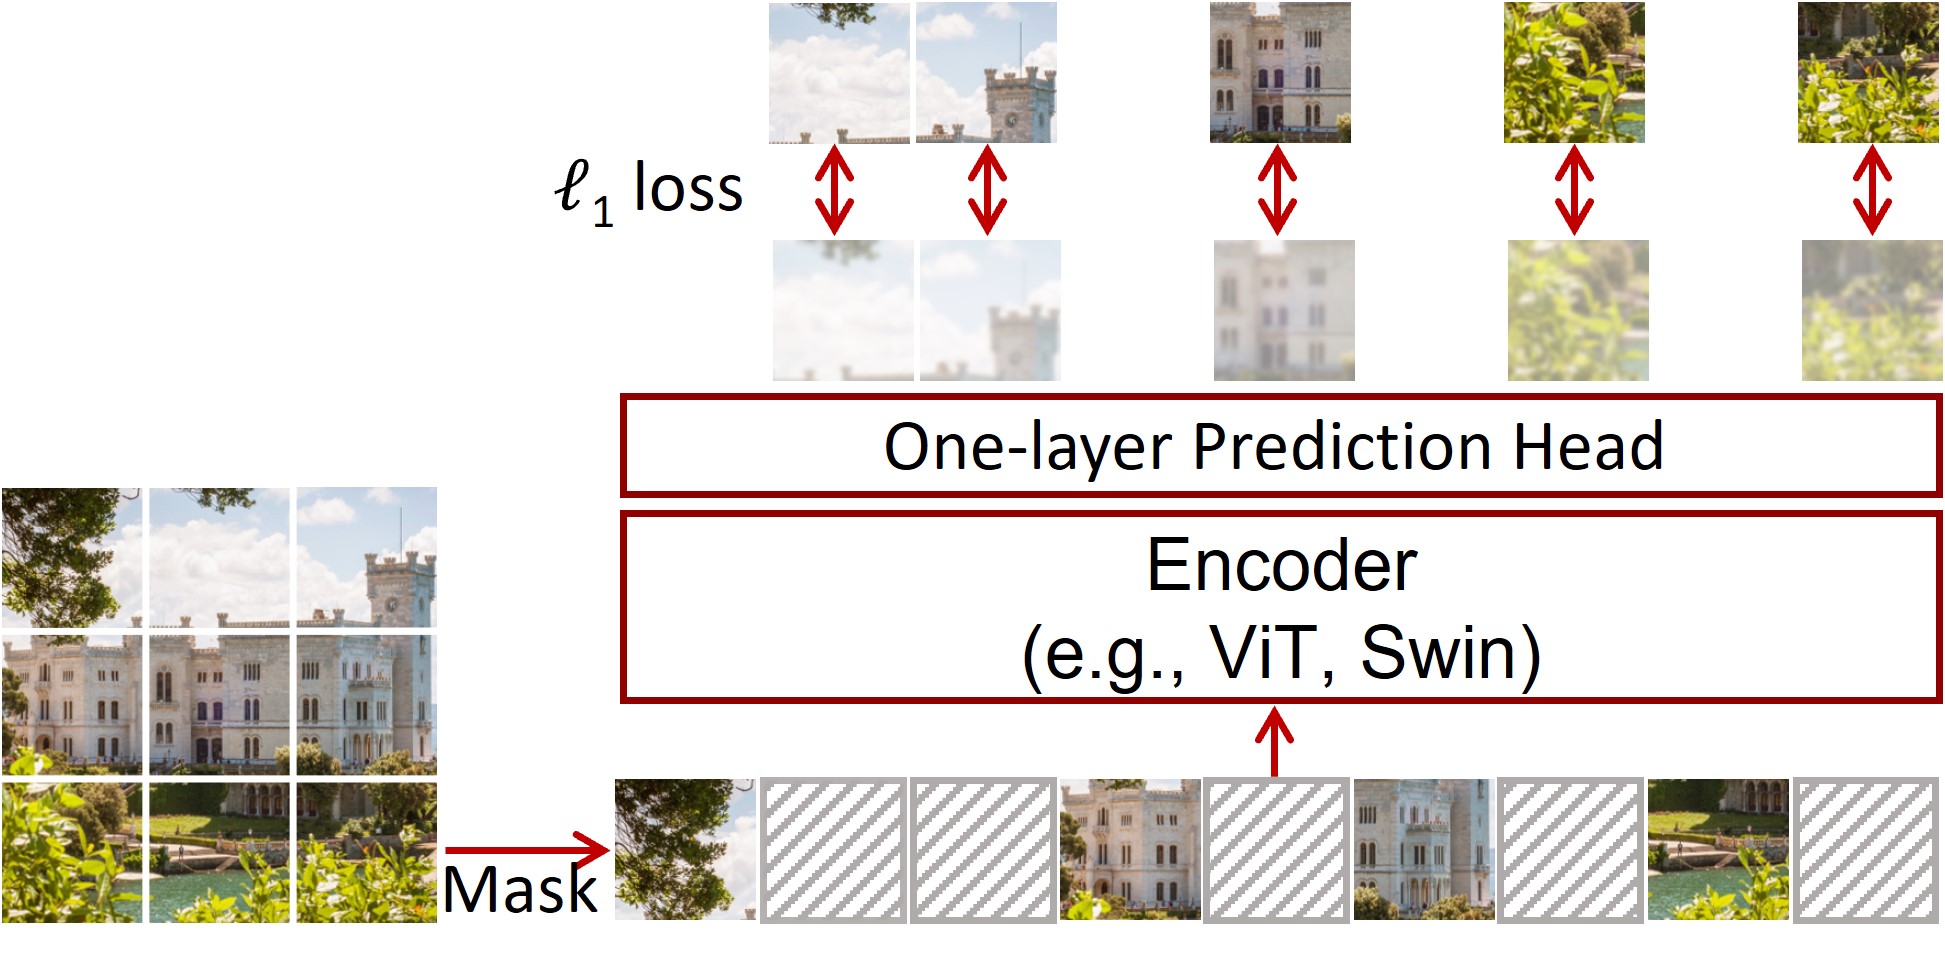
SimMIM framework. Taken from the original paper.
The goal for the model is to predict raw pixel values for the masked patches, using just a linear layer as prediction head. The model is trained using a simple L1 loss.
Using datasets from 🤗 datasets
Here we show how to pre-train a ViT from scratch for masked image modeling on the cifar10 dataset.
Alternatively, one can decide to further pre-train an already pre-trained (or fine-tuned) checkpoint from the hub. This can be done by setting the model_name_or_path argument to "google/vit-base-patch16-224-in21k" for example (and not specifying the model_type argument).
!python run_mim.py \
    --model_type vit \
    --output_dir ./outputs/ \
    --overwrite_output_dir \
    --remove_unused_columns False \
    --label_names bool_masked_pos \
    --do_train \
    --do_eval \
    --learning_rate 2e-5 \
    --weight_decay 0.05 \
    --num_train_epochs 100 \
    --per_device_train_batch_size 8 \
    --per_device_eval_batch_size 8 \
    --logging_strategy steps \
    --logging_steps 10 \
    --evaluation_strategy epoch \
    --save_strategy epoch \
    --load_best_model_at_end True \
    --save_total_limit 3 \
    --seed 1337
Here, we train for 100 epochs with a learning rate of 2e-5. Note that the SimMIM authors used a more sophisticated learning rate schedule, see the config files for more info. One can easily tweak the script to include this learning rate schedule (several learning rate schedulers are supported via the training arguments).
We can also for instance replicate the pre-training of a Swin Transformer using the same architecture as used by the SimMIM authors. For this, we first create a custom configuration and save it locally:
from transformers import SwinConfig

IMAGE_SIZE = 192
PATCH_SIZE = 4
EMBED_DIM = 128
DEPTHS = [2, 2, 18, 2]
NUM_HEADS = [4, 8, 16, 32]
WINDOW_SIZE = 6

config = SwinConfig(
    image_size=IMAGE_SIZE,
    patch_size=PATCH_SIZE,
    embed_dim=EMBED_DIM,
    depths=DEPTHS,
    num_heads=NUM_HEADS,
    window_size=WINDOW_SIZE,
)
config.save_pretrained("path_to_config")
Next, we can run the script by providing the path to this custom configuration (replace path_to_config below with your path):
!python run_mim.py \
    --config_name_or_path path_to_config \
    --model_type swin \
    --output_dir ./outputs/ \
    --overwrite_output_dir \
    --remove_unused_columns False \
    --label_names bool_masked_pos \
    --do_train \
    --do_eval \
    --learning_rate 2e-5 \
    --num_train_epochs 5 \
    --per_device_train_batch_size 8 \
    --per_device_eval_batch_size 8 \
    --logging_strategy steps \
    --logging_steps 10 \
    --evaluation_strategy epoch \
    --save_strategy epoch \
    --load_best_model_at_end True \
    --save_total_limit 3 \
    --seed 1337
This will train a Swin Transformer from scratch.
Using your own data
To use your own dataset, the training script expects the following directory structure:
root/dog/xxx.png
root/dog/xxy.png
root/dog/[...]/xxz.png

root/cat/123.png
root/cat/nsdf3.png
root/cat/[...]/asd932_.png
Note that you can put images in dummy subfolders, whose names will be ignored by default (as labels aren't required). You can also just place all images into a single dummy subfolder. Once you've prepared your dataset, you can run the script like this:
python run_mim.py \
    --model_type vit \
    --dataset_name nateraw/image-folder \
    --train_dir <path-to-train-root> \
    --output_dir ./outputs/ \
    --remove_unused_columns False \
    --label_names bool_masked_pos \
    --do_train \
    --do_eval
MAE
The run_mae.py script can be used to pre-train a Vision Transformer as a masked autoencoder (MAE), as proposed in Masked Autoencoders Are Scalable Vision Learners. The script can be used to train a ViTMAEForPreTraining model in the Transformers library, using PyTorch. After self-supervised pre-training, one can load the weights of the encoder directly into a ViTForImageClassification. The MAE method allows for learning high-capacity models that generalize well: e.g., a vanilla ViT-Huge model achieves the best accuracy (87.8%) among methods that use only ImageNet-1K data.
The goal for the model is to predict raw pixel values for the masked patches. As the model internally masks patches and learns to reconstruct them, there's no need for any labels. The model uses the mean squared error (MSE) between the reconstructed and original images in the pixel space.
Using datasets from 🤗 datasets
One can use the following command to pre-train a ViTMAEForPreTraining model from scratch on the cifar10 dataset:
python run_mae.py \
    --dataset_name cifar10 \
    --output_dir ./vit-mae-demo \
    --remove_unused_columns False \
    --label_names pixel_values \
    --mask_ratio 0.75 \
    --norm_pix_loss \
    --do_train \
    --do_eval \
    --base_learning_rate 1.5e-4 \
    --lr_scheduler_type cosine \
    --weight_decay 0.05 \
    --num_train_epochs 800 \
    --warmup_ratio 0.05 \
    --per_device_train_batch_size 8 \
    --per_device_eval_batch_size 8 \
    --logging_strategy steps \
    --logging_steps 10 \
    --evaluation_strategy epoch \
    --save_strategy epoch \
    --load_best_model_at_end True \
    --save_total_limit 3 \
    --seed 1337
Here we set:
mask_ratioto 0.75 (to mask 75% of the patches for each image)norm_pix_lossto use normalized pixel values as target (the authors reported better representations with this enabled)base_learning_rateto 1.5e-4. Note that the effective learning rate is computed by the linear schedule:lr=blr* total training batch size / 256. The total training batch size is computed astraining_args.train_batch_size*training_args.gradient_accumulation_steps*training_args.world_size.
This replicates the same hyperparameters as used in the original implementation, as shown in the table below.
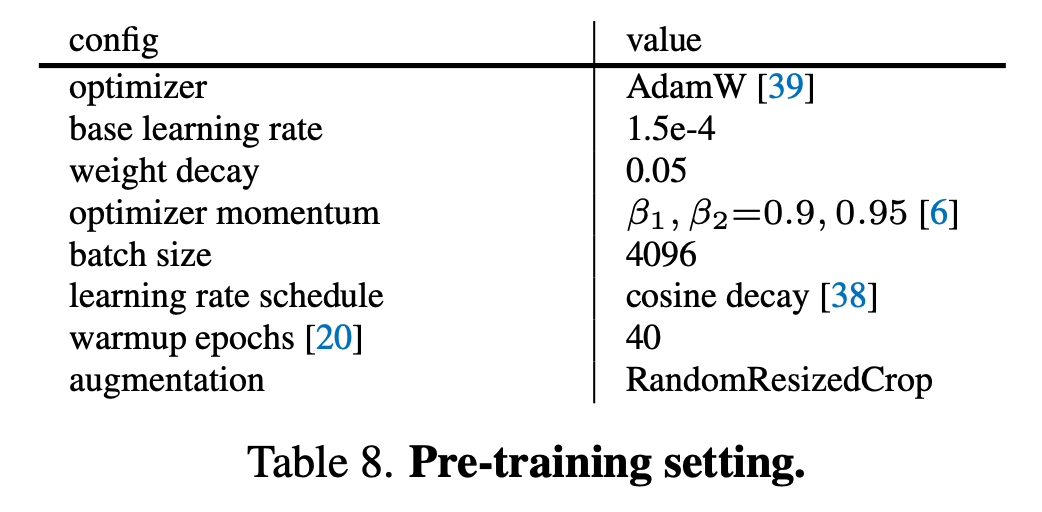
Original hyperparameters. Taken from the original paper.
Alternatively, one can decide to further pre-train an already pre-trained (or fine-tuned) checkpoint from the hub. This can be done by setting the model_name_or_path argument to "facebook/vit-mae-base" for example.
Using your own data
To use your own dataset, the training script expects the following directory structure:
root/dog/xxx.png
root/dog/xxy.png
root/dog/[...]/xxz.png

root/cat/123.png
root/cat/nsdf3.png
root/cat/[...]/asd932_.png
Note that you can put images in dummy subfolders, whose names will be ignored by default (as labels aren't required). You can also just place all images into a single dummy subfolder. Once you've prepared your dataset, you can run the script like this:
python run_mae.py \
    --model_type vit_mae \
    --dataset_name nateraw/image-folder \
    --train_dir <path-to-train-root> \
    --output_dir ./outputs/ \
    --remove_unused_columns False \
    --label_names pixel_values \
    --do_train \
    --do_eval
💡 The above will split the train dir into training and evaluation sets
- To control the split amount, use the
--train_val_splitflag. - To provide your own validation split in its own directory, you can pass the
--validation_dir <path-to-val-root>flag.
Sharing your model on 🤗 Hub
If you haven't already, sign up for a 🤗 account
Make sure you have
git-lfsinstalled and git set up.
$ apt install git-lfs
$ git config --global user.email "you@example.com"
$ git config --global user.name "Your Name"
- Log in with your HuggingFace account credentials using
huggingface-cli
$ huggingface-cli login
# ...follow the prompts
- When running the script, pass the following arguments:
python run_xxx.py \
    --push_to_hub \
    --push_to_hub_model_id <name-of-your-model> \
    ...