Hands-on
Now that you learned the basics of multi-agents, you’re ready to train your first agents in a multi-agent system: a 2vs2 soccer team that needs to beat the opponent team.
And you’re going to participate in AI vs. AI challenges where your trained agent will compete against other classmates’ agents every day and be ranked on a new leaderboard.
To validate this hands-on for the certification process, you just need to push a trained model. There are no minimal results to attain to validate it.
For more information about the certification process, check this section 👉 https://huggingface.co/deep-rl-course/en/unit0/introduction#certification-process
This hands-on will be different since to get correct results you need to train your agents from 4 hours to 8 hours. And given the risk of timeout in Colab, we advise you to train on your computer. You don’t need a supercomputer: a simple laptop is good enough for this exercise.
Let’s get started! 🔥
What is AI vs. AI?
AI vs. AI is an open-source tool we developed at Hugging Face to compete agents on the Hub against one another in a multi-agent setting. These models are then ranked in a leaderboard.
The idea of this tool is to have a robust evaluation tool: by evaluating your agent with a lot of others, you’ll get a good idea of the quality of your policy.
More precisely, AI vs. AI is three tools:
- A matchmaking process defining the matches (which model against which) and running the model fights using a background task in the Space.
- A leaderboard getting the match history results and displaying the models’ ELO ratings: https://huggingface.co/spaces/huggingface-projects/AIvsAI-SoccerTwos
- A Space demo to visualize your agents playing against others: https://huggingface.co/spaces/unity/ML-Agents-SoccerTwos
In addition to these three tools, your classmate cyllum created a 🤗 SoccerTwos Challenge Analytics where you can check the detailed match results of a model: https://huggingface.co/spaces/cyllum/soccertwos-analytics
We’re wrote a blog post to explain this AI vs. AI tool in detail, but to give you the big picture it works this way:
- Every four hours, our algorithm fetches all the available models for a given environment (in our case ML-Agents-SoccerTwos).
- It creates a queue of matches with the matchmaking algorithm.
- We simulate the match in a Unity headless process and gather the match result (1 if the first model won, 0.5 if it’s a draw, 0 if the second model won) in a Dataset.
- Then, when all matches from the matches queue are done, we update the ELO score for each model and update the leaderboard.
Competition Rules
This first AI vs. AI competition is an experiment: the goal is to improve the tool in the future with your feedback. So some breakups can happen during the challenge. But don’t worry all the results are saved in a dataset so we can always restart the calculation correctly without losing information.
In order for your model to get correctly evaluated against others you need to follow these rules:
- You can’t change the observation space or action space of the agent. By doing that your model will not work during evaluation.
- You can’t use a custom trainer for now, you need to use the Unity MLAgents ones.
- We provide executables to train your agents. You can also use the Unity Editor if you prefer , but to avoid bugs, we advise that you use our executables.
What will make the difference during this challenge are the hyperparameters you choose.
We’re constantly trying to improve our tutorials, so if you find some issues in this notebook, please open an issue on the GitHub Repo.
Chat with your classmates, share advice and ask questions on Discord
- We created a new channel called
ai-vs-ai-challengeto exchange advice and ask questions. - If you didn’t join the discord server yet, you can join here
Step 0: Install MLAgents and download the correct executable
We advise you to use conda as a package manager and create a new environment.
With conda, we create a new environment called rl with Python 3.10.12:
conda create --name rl python=3.10.12
conda activate rl
To be able to train our agents correctly and push to the Hub, we need to install ML-Agents
git clone https://github.com/Unity-Technologies/ml-agentsWhen the cloning is done (it takes 2.63 GB), we go inside the repository and install the package
cd ml-agents
pip install -e ./ml-agents-envs
pip install -e ./ml-agents
Finally, you need to install git-lfs: https://git-lfs.com/
Now that it’s installed, we need to add the environment training executable. Based on your operating system you need to download one of them, unzip it and place it in a new folder inside ml-agents that you call training-envs-executables
At the end your executable should be in ml-agents/training-envs-executables/SoccerTwos
Windows: Download this executable
Linux (Ubuntu): Download this executable
Mac: Download this executable
⚠ For Mac you need also to call this xattr -cr training-envs-executables/SoccerTwos/SoccerTwos.app to be able to run SoccerTwos
Step 1: Understand the environment
The environment is called SoccerTwos. The Unity MLAgents Team made it. You can find its documentation here
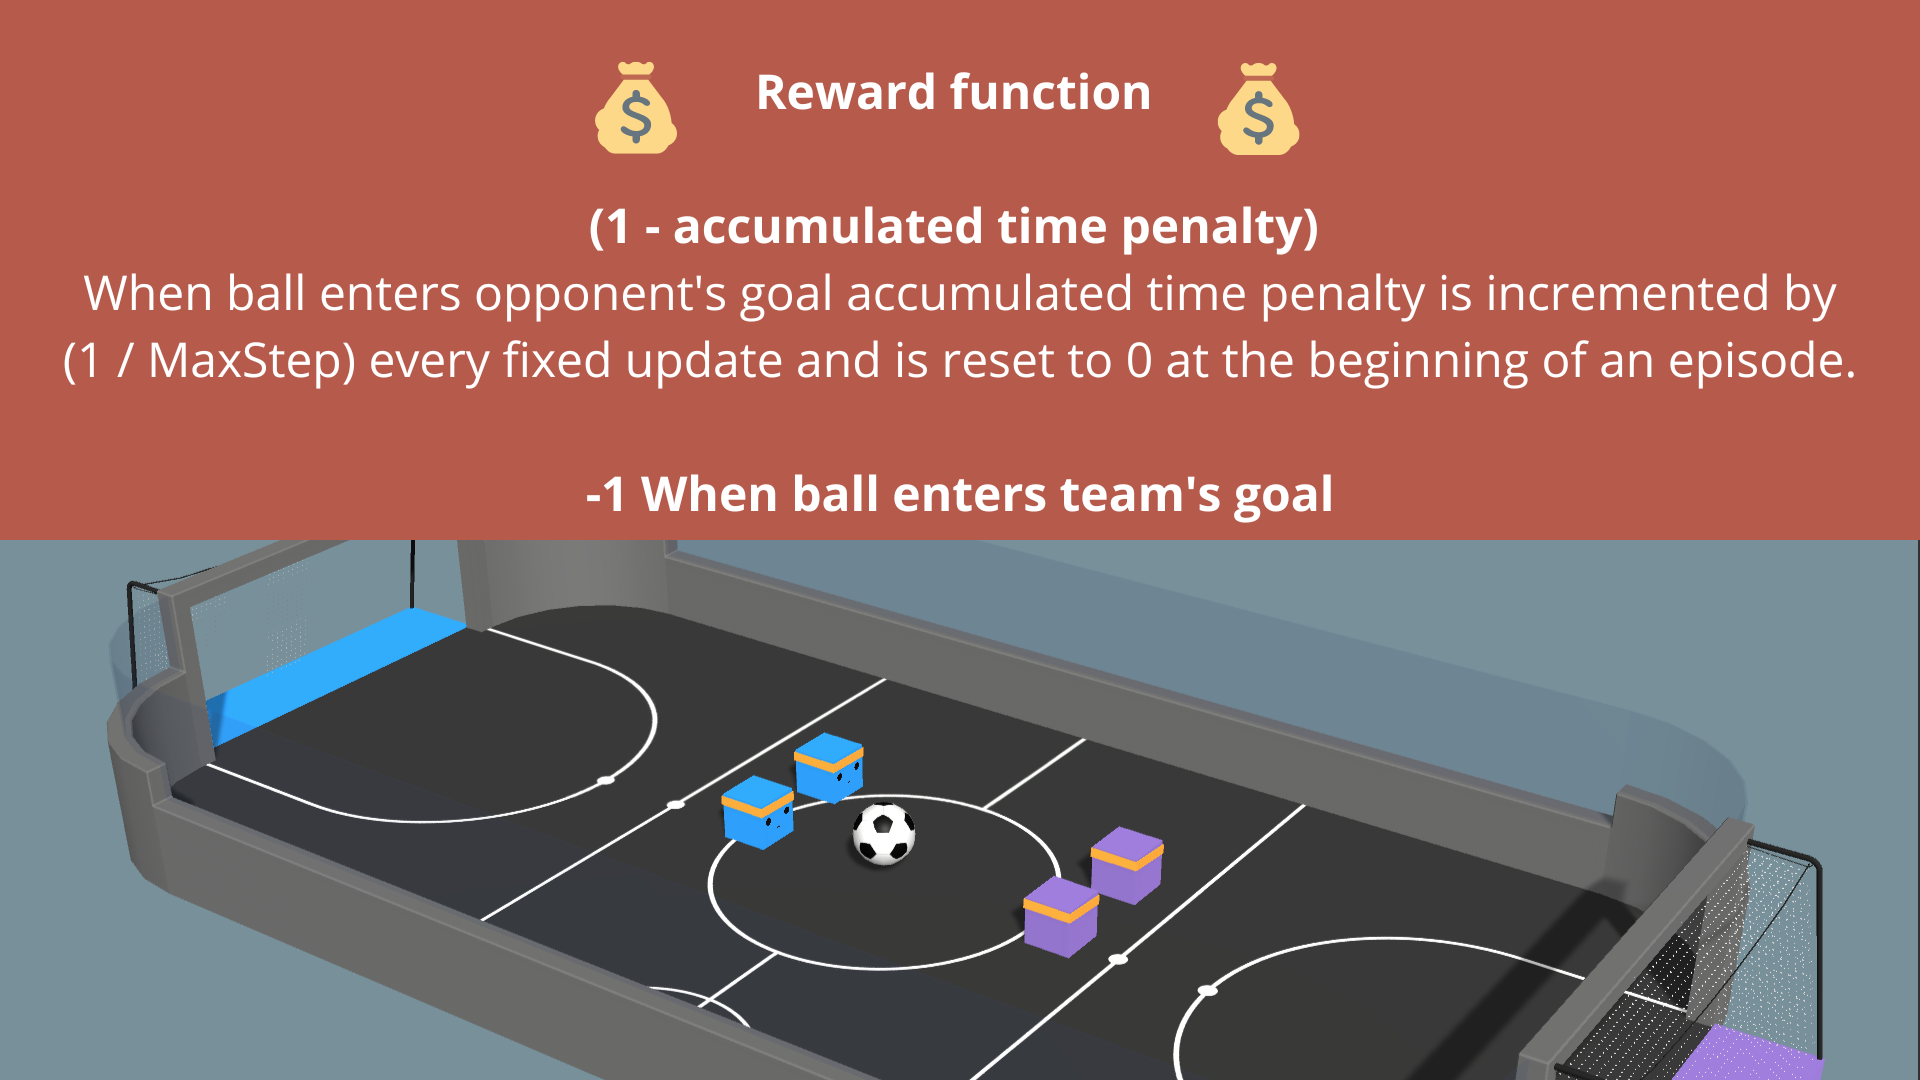
The goal in this environment is to get the ball into the opponent’s goal while preventing the ball from entering your own goal.
The reward function
The reward function is:
The observation space
The observation space is composed of vectors of size 336:
- 11 ray-casts forward distributed over 120 degrees (264 state dimensions)
- 3 ray-casts backward distributed over 90 degrees (72 state dimensions)
- Both of these ray-casts can detect 6 objects:
- Ball
- Blue Goal
- Purple Goal
- Wall
- Blue Agent
- Purple Agent
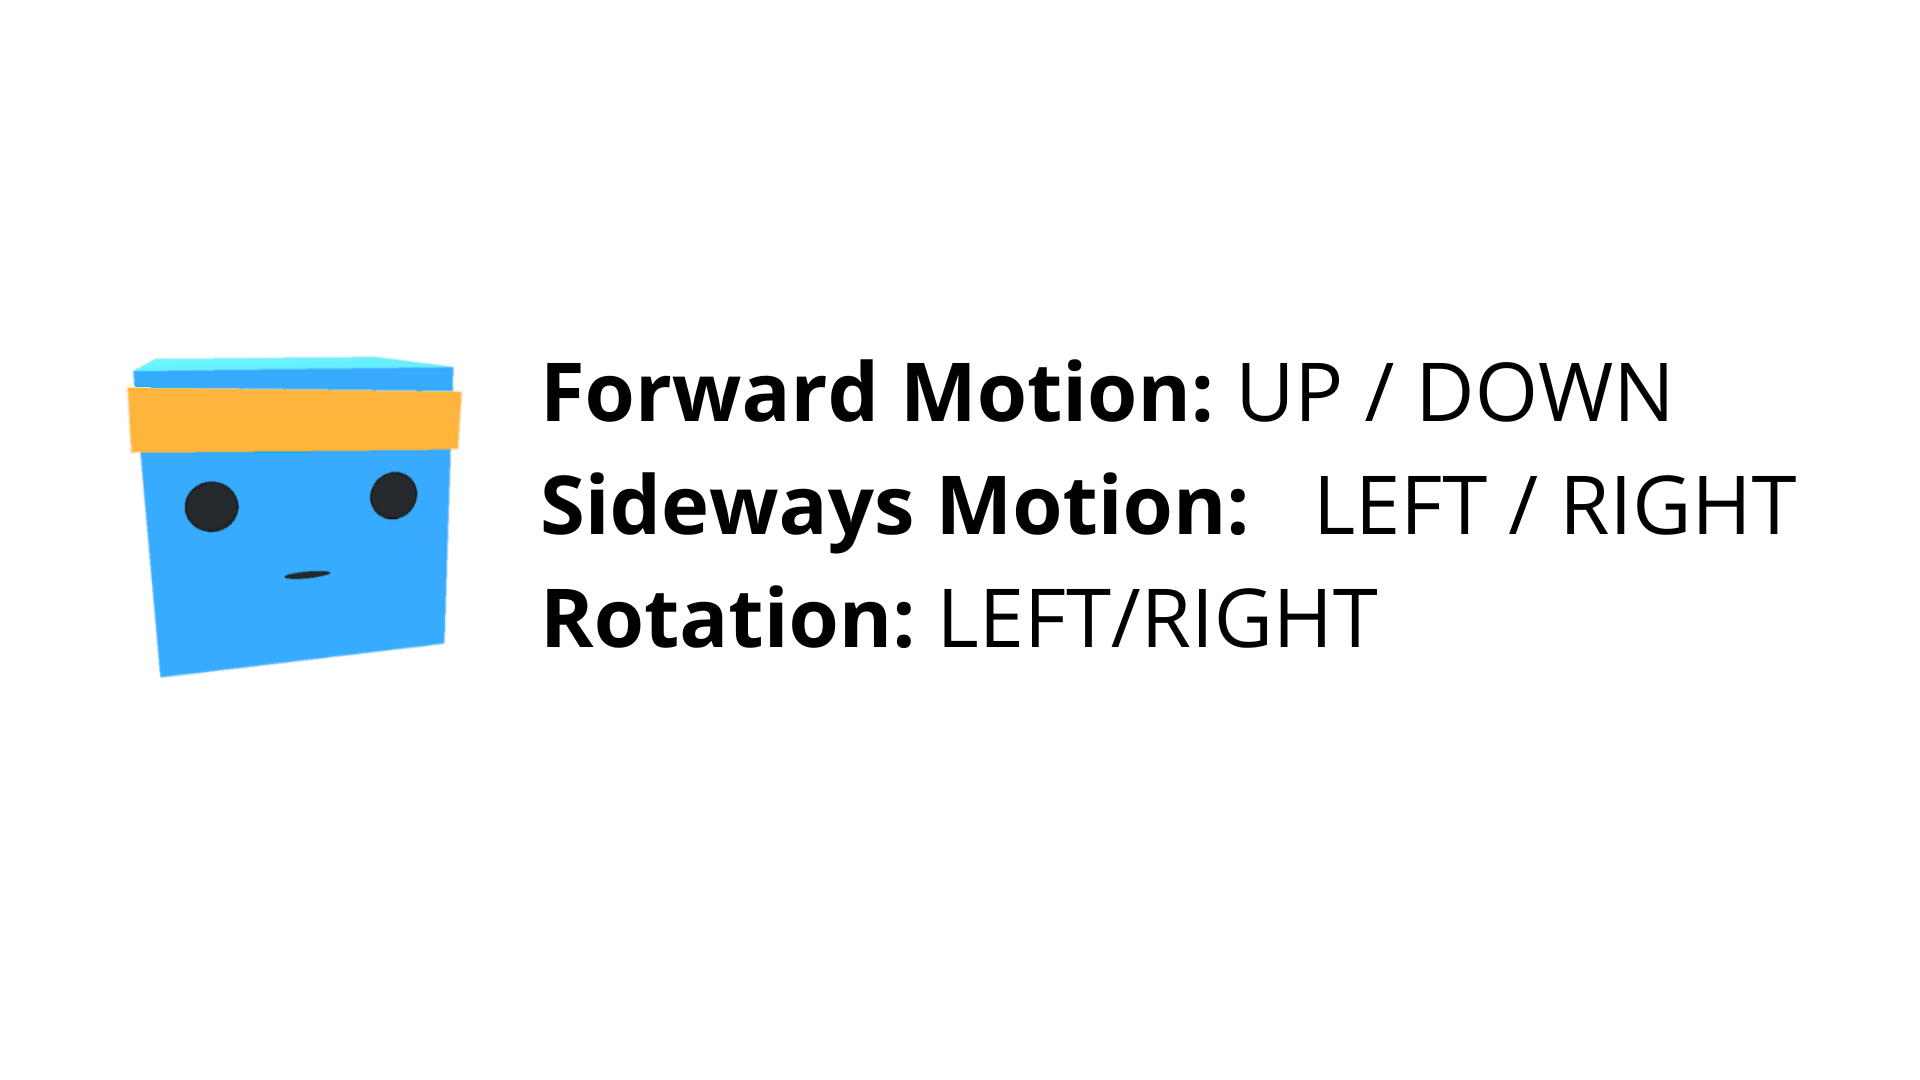
The action space
The action space is three discrete branches:
Step 2: Understand MA-POCA
We know how to train agents to play against others: we can use self-play. This is a perfect technique for a 1vs1.
But in our case we’re 2vs2, and each team has 2 agents. How then can we train cooperative behavior for groups of agents?
As explained in the Unity Blog, agents typically receive a reward as a group (+1 - penalty) when the team scores a goal. This implies that every agent on the team is rewarded even if each agent didn’t contribute the same to the win, which makes it difficult to learn what to do independently.
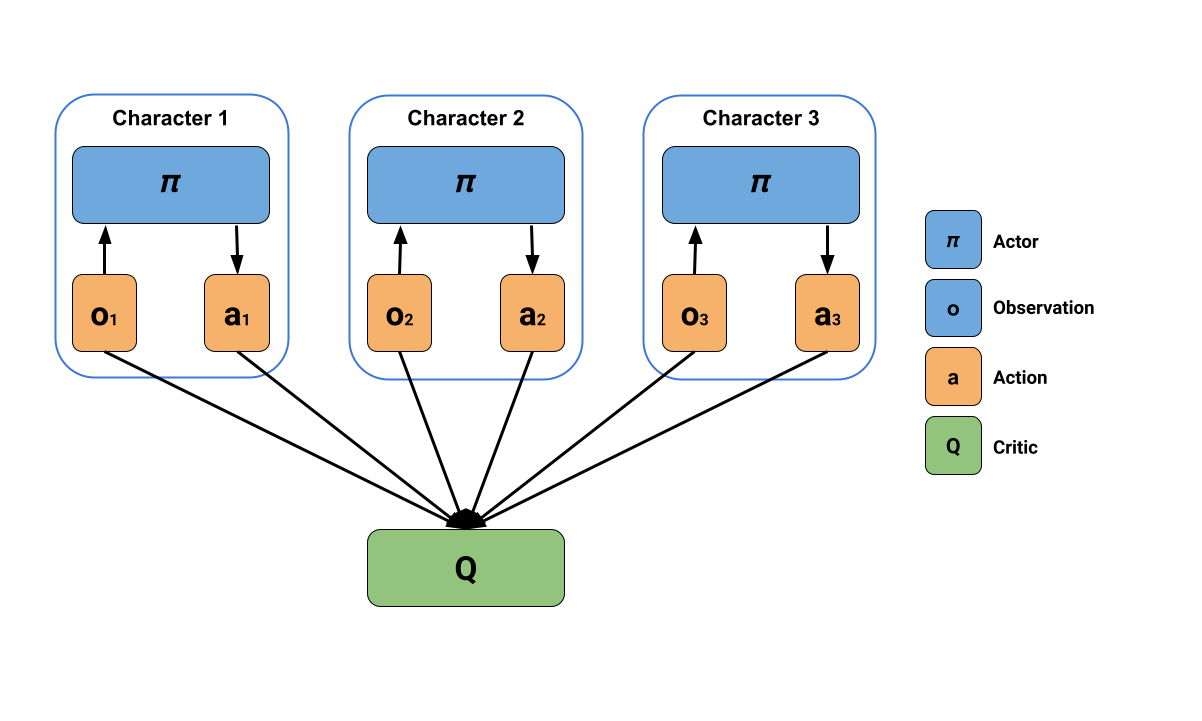
The Unity MLAgents team developed the solution in a new multi-agent trainer called MA-POCA (Multi-Agent POsthumous Credit Assignment).
The idea is simple but powerful: a centralized critic processes the states of all agents in the team to estimate how well each agent is doing. Think of this critic as a coach.
This allows each agent to make decisions based only on what it perceives locally, and simultaneously evaluate how good its behavior is in the context of the whole group.
The solution then is to use Self-Play with an MA-POCA trainer (called poca). The poca trainer will help us to train cooperative behavior and self-play to win against an opponent team.
If you want to dive deeper into this MA-POCA algorithm, you need to read the paper they published here and the sources we put on the additional readings section.
Step 3: Define the config file
We already learned in Unit 5 that in ML-Agents, you define the training hyperparameters in config.yaml files.
There are multiple hyperparameters. To understand them better, you should read the explanations for each of them in the documentation
The config file we’re going to use here is in ./config/poca/SoccerTwos.yaml. It looks like this:
behaviors:
  SoccerTwos:
    trainer_type: poca
    hyperparameters:
      batch_size: 2048
      buffer_size: 20480
      learning_rate: 0.0003
      beta: 0.005
      epsilon: 0.2
      lambd: 0.95
      num_epoch: 3
      learning_rate_schedule: constant
    network_settings:
      normalize: false
      hidden_units: 512
      num_layers: 2
      vis_encode_type: simple
    reward_signals:
      extrinsic:
        gamma: 0.99
        strength: 1.0
    keep_checkpoints: 5
    max_steps: 5000000
    time_horizon: 1000
    summary_freq: 10000
    self_play:
      save_steps: 50000
      team_change: 200000
      swap_steps: 2000
      window: 10
      play_against_latest_model_ratio: 0.5
      initial_elo: 1200.0
Compared to Pyramids or SnowballTarget, we have new hyperparameters with a self-play part. How you modify them can be critical in getting good results.
The advice I can give you here is to check the explanation and recommended value for each parameters (especially self-play ones) against the documentation.
Now that you’ve modified our config file, you’re ready to train your agents.
Step 4: Start the training
To train the agents, we need to launch mlagents-learn and select the executable containing the environment.
We define four parameters:
mlagents-learn <config>: the path where the hyperparameter config file is.-env: where the environment executable is.-run_id: the name you want to give to your training run id.-no-graphics: to not launch the visualization during the training.
Depending on your hardware, 5M timesteps (the recommended value, but you can also try 10M) will take 5 to 8 hours of training. You can continue using your computer in the meantime, but I advise deactivating the computer standby mode to prevent the training from being stopped.
Depending on the executable you use (windows, ubuntu, mac) the training command will look like this (your executable path can be different so don’t hesitate to check before running).
mlagents-learn ./config/poca/SoccerTwos.yaml --env=./training-envs-executables/SoccerTwos.exe --run-id="SoccerTwos" --no-graphicsThe executable contains 8 copies of SoccerTwos.
⚠️ It’s normal if you don’t see a big increase of ELO score (and even a decrease below 1200) before 2M timesteps, since your agents will spend most of their time moving randomly on the field before being able to goal.
⚠️ You can stop the training with Ctrl + C but beware of typing this command only once to stop the training since MLAgents needs to generate a final .onnx file before closing the run.
Step 5: Push the agent to the Hugging Face Hub
Now that we trained our agents, we’re ready to push them to the Hub to be able to participate in the AI vs. AI challenge and visualize them playing on your browser🔥.
To be able to share your model with the community, there are three more steps to follow:
1️⃣ (If it’s not already done) create an account to HF ➡ https://huggingface.co/join
2️⃣ Sign in and store your authentication token from the Hugging Face website.
Create a new token (https://huggingface.co/settings/tokens) with write role
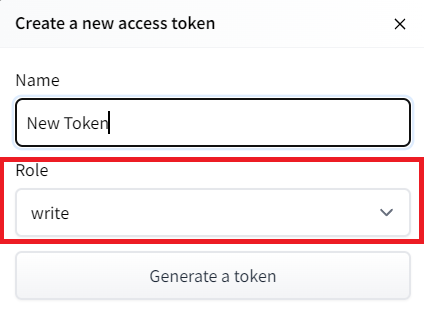
Copy the token, run this, and paste the token
huggingface-cli login
Then, we need to run mlagents-push-to-hf.
And we define four parameters:
-run-id: the name of the training run id.-local-dir: where the agent was saved, it’s results/<run_id name>, so in my case results/First Training.-repo-id: the name of the Hugging Face repo you want to create or update. It’s always <your huggingface username>/<the repo name> If the repo does not exist it will be created automatically--commit-message: since HF repos are git repositories you need to give a commit message.
In my case
mlagents-push-to-hf --run-id="SoccerTwos" --local-dir="./results/SoccerTwos" --repo-id="ThomasSimonini/poca-SoccerTwos" --commit-message="First Push"`mlagents-push-to-hf --run-id= # Add your run id --local-dir= # Your local dir --repo-id= # Your repo id --commit-message="First Push"If everything worked you should see this at the end of the process (but with a different url 😆) :
Your model is pushed to the Hub. You can view your model here: https://huggingface.co/ThomasSimonini/poca-SoccerTwos
It’s the link to your model. It contains a model card that explains how to use it, your Tensorboard, and your config file. What’s awesome is that it’s a git repository, which means you can have different commits, update your repository with a new push, etc.
Step 6: Verify that your model is ready for AI vs AI Challenge
Now that your model is pushed to the Hub, it’s going to be added automatically to the AI vs AI Challenge model pool. It can take a little bit of time before your model is added to the leaderboard given we do a run of matches every 4h.
But to ensure that everything works perfectly you need to check:
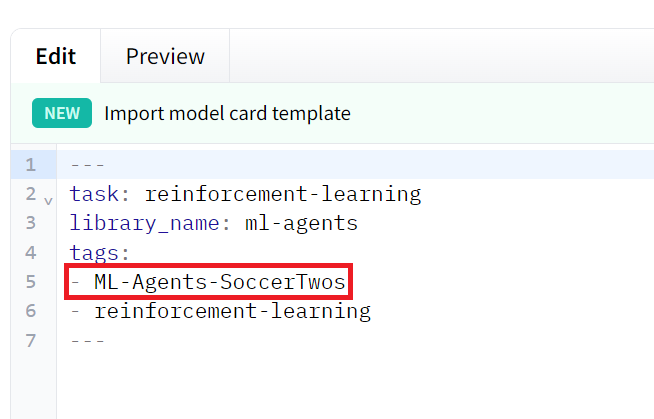
- That you have this tag in your model: ML-Agents-SoccerTwos. This is the tag we use to select models to be added to the challenge pool. To do that go to your model and check the tags

If it’s not the case you just need to modify the readme and add it
- That you have a
SoccerTwos.onnxfile
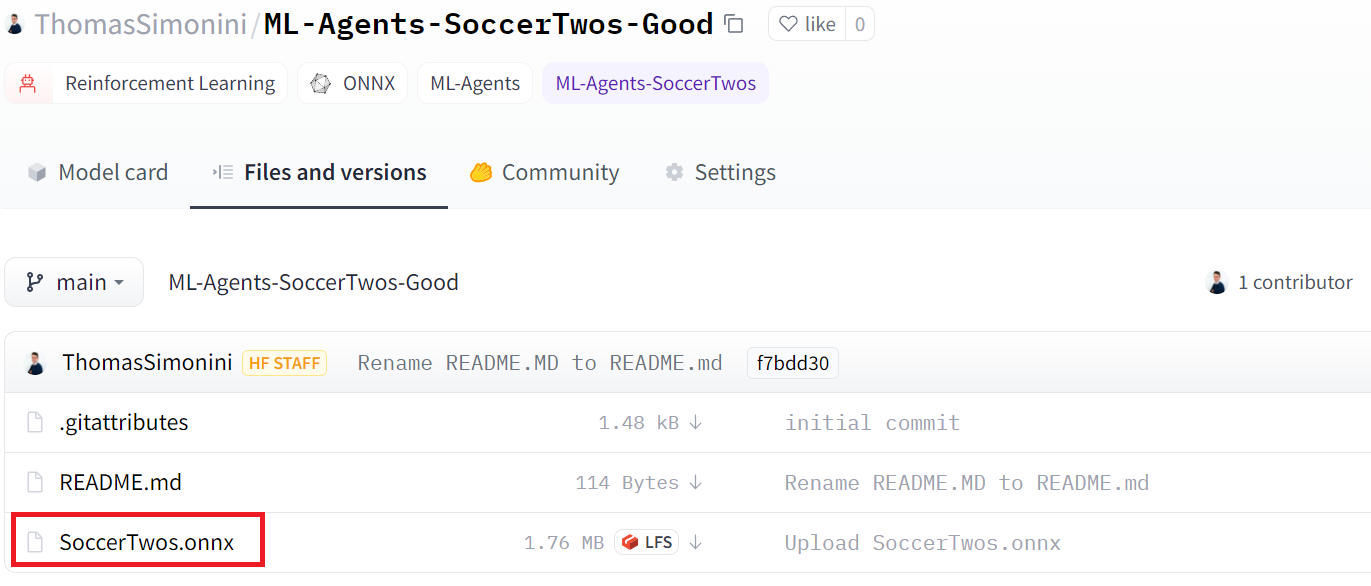
We strongly suggest that you create a new model when you push to the Hub if you want to train it again or train a new version.
Step 7: Visualize some match in our demo
Now that your model is part of AI vs AI Challenge, you can visualize how good it is compared to others: https://huggingface.co/spaces/unity/ML-Agents-SoccerTwos
In order to do that, you just need to go to this demo:
- Select your model as team blue (or team purple if you prefer) and another model to compete against. The best opponents to compare your model to are either whoever is on top of the leaderboard or the baseline model
The matches you see live are not used in the calculation of your result but they are a good way to visualize how good your agent is.
And don’t hesitate to share the best score your agent gets on discord in the #rl-i-made-this channel 🔥