Deep RL Course documentation
Advantage Actor Critic (A2C) using Robotics Simulations with Panda-Gym 🤖
Advantage Actor Critic (A2C) using Robotics Simulations with Panda-Gym 🤖
Now that you’ve studied the theory behind Advantage Actor Critic (A2C), you’re ready to train your A2C agent using Stable-Baselines3 in a robotic environment. And train a:
- A robotic arm 🦾 to move to the correct position.
We’re going to use
To validate this hands-on for the certification process, you need to push your two trained models to the Hub and get the following results:
PandaReachDense-v3get a result of >= -3.5.
To find your result, go to the leaderboard and find your model, the result = mean_reward - std of reward
For more information about the certification process, check this section 👉 https://huggingface.co/deep-rl-course/en/unit0/introduction#certification-process
To start the hands-on click on Open In Colab button 👇 :
![]()
Unit 6: Advantage Actor Critic (A2C) using Robotics Simulations with Panda-Gym 🤖
🎮 Environments:
📚 RL-Library:
We’re constantly trying to improve our tutorials, so if you find some issues in this notebook, please open an issue on the GitHub Repo.
Objectives of this notebook 🏆
At the end of the notebook, you will:
- Be able to use Panda-Gym, the environment library.
- Be able to train robots using A2C.
- Understand why we need to normalize the input.
- Be able to push your trained agent and the code to the Hub with a nice video replay and an evaluation score 🔥.
Prerequisites 🏗️
Before diving into the notebook, you need to:
🔲 📚 Study Actor-Critic methods by reading Unit 6 🤗
Let’s train our first robots 🤖
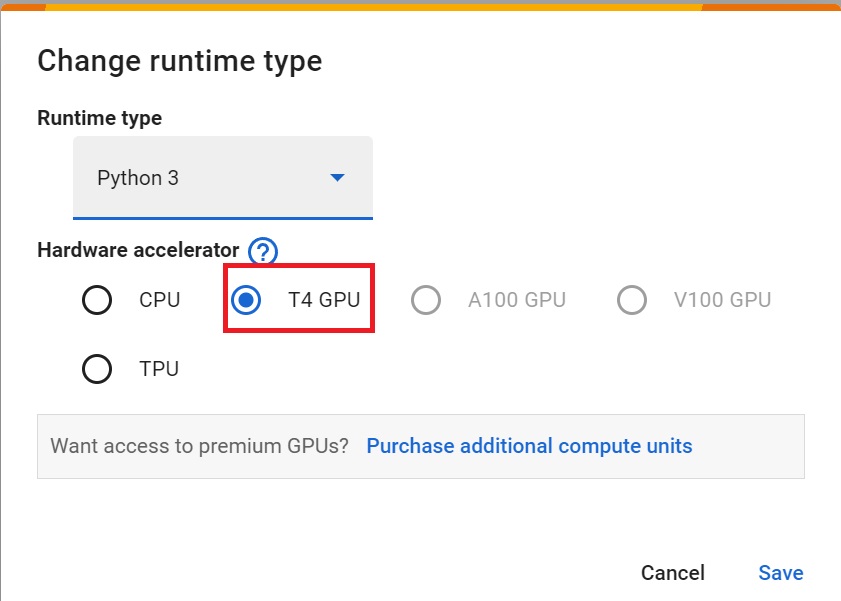
Set the GPU 💪
- To accelerate the agent’s training, we’ll use a GPU. To do that, go to
Runtime > Change Runtime type
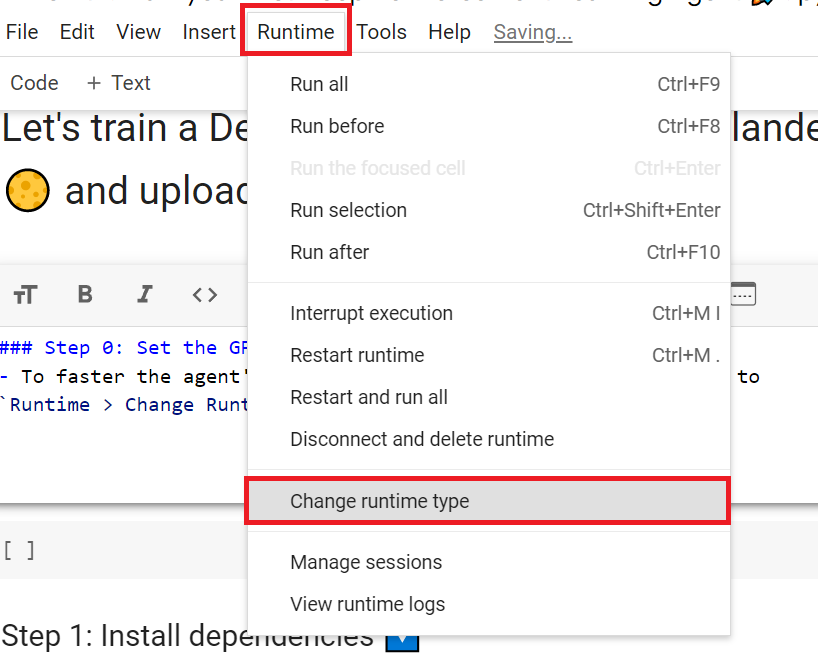
Hardware Accelerator > GPU
Create a virtual display 🔽
During the notebook, we’ll need to generate a replay video. To do so, with colab, we need to have a virtual screen to be able to render the environment (and thus record the frames).
The following cell will install the librairies and create and run a virtual screen 🖥
%%capture
!apt install python-opengl
!apt install ffmpeg
!apt install xvfb
!pip3 install pyvirtualdisplay
# Virtual display
from pyvirtualdisplay import Display

virtual_display = Display(visible=0, size=(1400, 900))
virtual_display.start()
Install dependencies 🔽
We’ll install multiple ones:
gymnasiumpanda-gym: Contains the robotics arm environments.stable-baselines3: The SB3 deep reinforcement learning library.huggingface_sb3: Additional code for Stable-baselines3 to load and upload models from the Hugging Face 🤗 Hub.huggingface_hub: Library allowing anyone to work with the Hub repositories.
!pip install stable-baselines3[extra]
!pip install gymnasium
!pip install huggingface_sb3
!pip install huggingface_hub
!pip install panda_gym
Import the packages 📦
import os

import gymnasium as gym
import panda_gym

from huggingface_sb3 import load_from_hub, package_to_hub

from stable_baselines3 import A2C
from stable_baselines3.common.evaluation import evaluate_policy
from stable_baselines3.common.vec_env import DummyVecEnv, VecNormalize
from stable_baselines3.common.env_util import make_vec_env

from huggingface_hub import notebook_login
PandaReachDense-v3 🦾
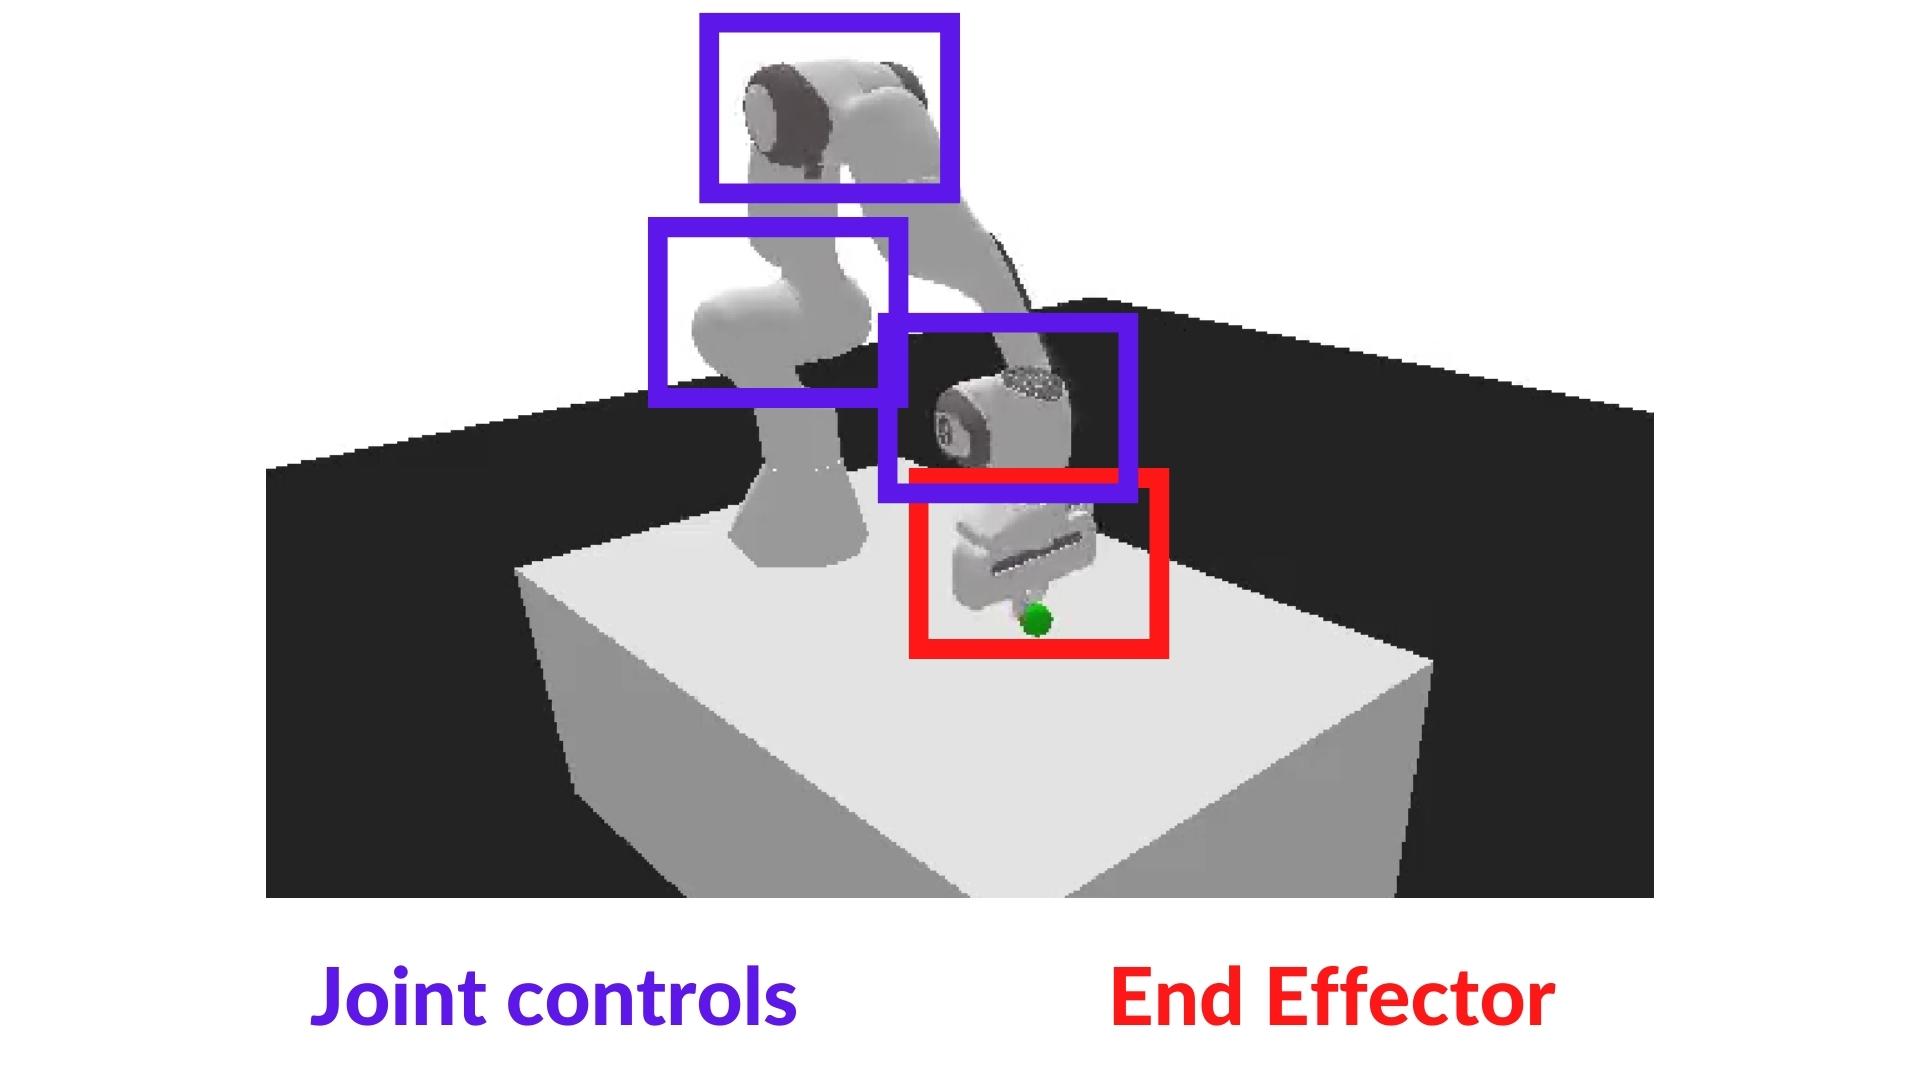
The agent we’re going to train is a robotic arm that needs to do controls (moving the arm and using the end-effector).
In robotics, the end-effector is the device at the end of a robotic arm designed to interact with the environment.
In PandaReach, the robot must place its end-effector at a target position (green ball).
We’re going to use the dense version of this environment. It means we’ll get a dense reward function that will provide a reward at each timestep (the closer the agent is to completing the task, the higher the reward). Contrary to a sparse reward function where the environment return a reward if and only if the task is completed.
Also, we’re going to use the End-effector displacement control, it means the action corresponds to the displacement of the end-effector. We don’t control the individual motion of each joint (joint control).
This way the training will be easier.
Create the environment
The environment 🎮
In PandaReachDense-v3 the robotic arm must place its end-effector at a target position (green ball).
env_id = "PandaReachDense-v3"

# Create the env
env = gym.make(env_id)

# Get the state space and action space
s_size = env.observation_space.shape
a_size = env.action_spaceprint("_____OBSERVATION SPACE_____ \n")
print("The State Space is: ", s_size)
print("Sample observation", env.observation_space.sample()) # Get a random observationThe observation space is a dictionary with 3 different elements:
achieved_goal: (x,y,z) position of the goal.desired_goal: (x,y,z) distance between the goal position and the current object position.observation: position (x,y,z) and velocity of the end-effector (vx, vy, vz).
Given it’s a dictionary as observation, we will need to use a MultiInputPolicy policy instead of MlpPolicy.
print("\n _____ACTION SPACE_____ \n")
print("The Action Space is: ", a_size)
print("Action Space Sample", env.action_space.sample()) # Take a random action
The action space is a vector with 3 values:
- Control x, y, z movement
Normalize observation and rewards
A good practice in reinforcement learning is to normalize input features.
For that purpose, there is a wrapper that will compute a running average and standard deviation of input features.
We also normalize rewards with this same wrapper by adding norm_reward = True
You should check the documentation to fill this cell
env = make_vec_env(env_id, n_envs=4)

# Adding this wrapper to normalize the observation and the reward
env = # TODO: Add the wrapper
Solution
env = make_vec_env(env_id, n_envs=4)

env = VecNormalize(env, norm_obs=True, norm_reward=True, clip_obs=10.)
Create the A2C Model 🤖
For more information about A2C implementation with StableBaselines3 check: https://stable-baselines3.readthedocs.io/en/master/modules/a2c.html#notes
To find the best parameters I checked the official trained agents by Stable-Baselines3 team.
model = # Create the A2C model and try to find the best parametersSolution
model = A2C(policy = "MultiInputPolicy",
            env = env,
            verbose=1)
Train the A2C agent 🏃
- Let’s train our agent for 1,000,000 timesteps, don’t forget to use GPU on Colab. It will take approximately ~25-40min
model.learn(1_000_000)# Save the model and VecNormalize statistics when saving the agent
model.save("a2c-PandaReachDense-v3")
env.save("vec_normalize.pkl")Evaluate the agent 📈
- Now that’s our agent is trained, we need to check its performance.
- Stable-Baselines3 provides a method to do that:
evaluate_policy
from stable_baselines3.common.vec_env import DummyVecEnv, VecNormalize

# Load the saved statistics
eval_env = DummyVecEnv([lambda: gym.make("PandaReachDense-v3")])
eval_env = VecNormalize.load("vec_normalize.pkl", eval_env)

# We need to override the render_mode
eval_env.render_mode = "rgb_array"

#  do not update them at test time
eval_env.training = False
# reward normalization is not needed at test time
eval_env.norm_reward = False

# Load the agent
model = A2C.load("a2c-PandaReachDense-v3")

mean_reward, std_reward = evaluate_policy(model, eval_env)

print(f"Mean reward = {mean_reward:.2f} +/- {std_reward:.2f}")
Publish your trained model on the Hub 🔥
Now that we saw we got good results after the training, we can publish our trained model on the Hub with one line of code.
📚 The libraries documentation 👉 https://github.com/huggingface/huggingface_sb3/tree/main#hugging-face—x-stable-baselines3-v20
By using package_to_hub, as we already mentionned in the former units, you evaluate, record a replay, generate a model card of your agent and push it to the hub.
This way:
- You can showcase our work 🔥
- You can visualize your agent playing 👀
- You can share with the community an agent that others can use 💾
- You can access a leaderboard 🏆 to see how well your agent is performing compared to your classmates 👉 https://huggingface.co/spaces/huggingface-projects/Deep-Reinforcement-Learning-Leaderboard
To be able to share your model with the community there are three more steps to follow:
1️⃣ (If it’s not already done) create an account to HF ➡ https://huggingface.co/join
2️⃣ Sign in and then, you need to store your authentication token from the Hugging Face website.
- Create a new token (https://huggingface.co/settings/tokens) with write role
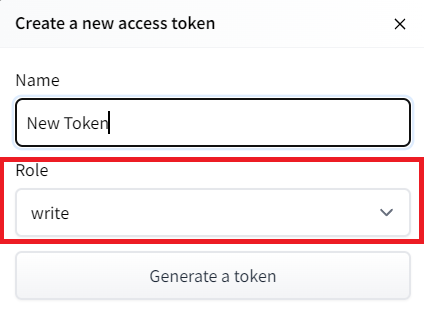
- Copy the token
- Run the cell below and paste the token
notebook_login()
!git config --global credential.helper store
If you don’t want to use a Google Colab or a Jupyter Notebook, you need to use this command instead: huggingface-cli login
3️⃣ We’re now ready to push our trained agent to the 🤗 Hub 🔥 using package_to_hub() function.
For this environment, running this cell can take approximately 10min
from huggingface_sb3 import package_to_hub

package_to_hub(
    model=model,
    model_name=f"a2c-{env_id}",
    model_architecture="A2C",
    env_id=env_id,
    eval_env=eval_env,
    repo_id=f"ThomasSimonini/a2c-{env_id}", # Change the username
    commit_message="Initial commit",
)
Some additional challenges 🏆
The best way to learn is to try things by your own! Why not trying PandaPickAndPlace-v3?
If you want to try more advanced tasks for panda-gym, you need to check what was done using TQC or SAC (a more sample-efficient algorithm suited for robotics tasks). In real robotics, you’ll use a more sample-efficient algorithm for a simple reason: contrary to a simulation if you move your robotic arm too much, you have a risk of breaking it.
PandaPickAndPlace-v1 (this model uses the v1 version of the environment): https://huggingface.co/sb3/tqc-PandaPickAndPlace-v1
And don’t hesitate to check panda-gym documentation here: https://panda-gym.readthedocs.io/en/latest/usage/train_with_sb3.html
We provide you the steps to train another agent (optional):
- Define the environment called “PandaPickAndPlace-v3”
- Make a vectorized environment
- Add a wrapper to normalize the observations and rewards. Check the documentation
- Create the A2C Model (don’t forget verbose=1 to print the training logs).
- Train it for 1M Timesteps
- Save the model and VecNormalize statistics when saving the agent
- Evaluate your agent
- Publish your trained model on the Hub 🔥 with
package_to_hub
Solution (optional)
# 1 - 2
env_id = "PandaPickAndPlace-v3"
env = make_vec_env(env_id, n_envs=4)

# 3
env = VecNormalize(env, norm_obs=True, norm_reward=True, clip_obs=10.)

# 4
model = A2C(policy = "MultiInputPolicy",
            env = env,
            verbose=1)
# 5
model.learn(1_000_000)# 6
model_name = "a2c-PandaPickAndPlace-v3";
model.save(model_name)
env.save("vec_normalize.pkl")
# 7
from stable_baselines3.common.vec_env import DummyVecEnv, VecNormalize
# Load the saved statistics
eval_env = DummyVecEnv([lambda: gym.make("PandaPickAndPlace-v3")])
eval_env = VecNormalize.load("vec_normalize.pkl", eval_env)
# do not update them at test time
eval_env.training = False
# reward normalization is not needed at test time
eval_env.norm_reward = False
# Load the agent
model = A2C.load(model_name)
mean_reward, std_reward = evaluate_policy(model, eval_env)
print(f"Mean reward = {mean_reward:.2f} +/- {std_reward:.2f}")
# 8
package_to_hub(
model=model,
model_name=f"a2c-{env_id}",
model_architecture="A2C",
env_id=env_id,
eval_env=eval_env,
repo_id=f"ThomasSimonini/a2c-{env_id}", # TODO: Change the username
commit_message="Initial commit",
)See you on Unit 7! 🔥