Transformers documentation
推理pipeline
推理pipeline
pipeline() 让使用Hub上的任何模型进行任何语言、计算机视觉、语音以及多模态任务的推理变得非常简单。即使您对特定的模态没有经验,或者不熟悉模型的源码,您仍然可以使用pipeline()进行推理!本教程将教您:
- 如何使用pipeline() 进行推理。
- 如何使用特定的
tokenizer(分词器)或模型。 - 如何使用pipeline() 进行音频、视觉和多模态任务的推理。
请查看pipeline()文档以获取已支持的任务和可用参数的完整列表。
Pipeline使用
虽然每个任务都有一个关联的pipeline(),但使用通用的抽象的pipeline()更加简单,其中包含所有特定任务的pipelines。pipeline()会自动加载一个默认模型和一个能够进行任务推理的预处理类。让我们以使用pipeline()进行自动语音识别(ASR)或语音转文本为例。
- 首先,创建一个pipeline()并指定推理任务:
>>> from transformers import pipeline

>>> transcriber = pipeline(task="automatic-speech-recognition")- 将您的输入传递给pipeline()。对于语音识别,这通常是一个音频输入文件:
>>> transcriber("https://huggingface.co/datasets/Narsil/asr_dummy/resolve/main/mlk.flac")
{'text': 'I HAVE A DREAM BUT ONE DAY THIS NATION WILL RISE UP LIVE UP THE TRUE MEANING OF ITS TREES'}您没有得到您期望的结果?可以在Hub上查看一些最受欢迎的自动语音识别模型 ,看看是否可以获得更好的转录。
让我们尝试来自 OpenAI 的Whisper large-v2 模型。Whisperb比Wav2Vec2晚2年发布,使用接近10倍的数据进行了训练。因此,它在大多数下游基准测试上击败了Wav2Vec2。 它还具有预测标点和大小写的附加优势,而Wav2Vec2则无法实现这些功能。
让我们在这里尝试一下,看看它的表现如何:
>>> transcriber = pipeline(model="openai/whisper-large-v2")
>>> transcriber("https://huggingface.co/datasets/Narsil/asr_dummy/resolve/main/mlk.flac")
{'text': ' I have a dream that one day this nation will rise up and live out the true meaning of its creed.'}现在这个结果看起来更准确了!要进行深入的Wav2Vec2与Whisper比较,请参阅音频变换器课程。 我们鼓励您在 Hub 上查看不同语言的模型,以及专业领域的模型等。您可以在Hub上直接查看并比较模型的结果,以确定是否适合或处理边缘情况是否比其他模型更好。如果您没有找到适用于您的用例的模型,您始终可以训练自己的模型!
如果您有多个输入,您可以将输入作为列表传递:
transcriber(
    [
        "https://huggingface.co/datasets/Narsil/asr_dummy/resolve/main/mlk.flac",
        "https://huggingface.co/datasets/Narsil/asr_dummy/resolve/main/1.flac",
    ]
)Pipelines非常适合用于测试,因为从一个模型切换到另一个模型非常琐碎;但是,还有一些方法可以将它们优化后用于大型工作负载而不仅仅是测试。请查看以下指南,深入探讨如何迭代整个数据集或在Web服务器中使用Pipelines:
参数
pipeline() 支持许多参数;有些是适用于特定任务的,而有些适用于所有pipeline。通常情况下,您可以在任何地方指定对应参数:
transcriber = pipeline(model="openai/whisper-large-v2", my_parameter=1)

out = transcriber(...)  # This will use `my_parameter=1`.
out = transcriber(..., my_parameter=2)  # This will override and use `my_parameter=2`.
out = transcriber(...)  # This will go back to using `my_parameter=1`.
让我们查看其中的三个重要参数:
设备
如果您使用 device=n,pipeline会自动将模型放在指定的设备上。无论您使用PyTorch还是Tensorflow,这都可以工作。
transcriber = pipeline(model="openai/whisper-large-v2", device=0)如果模型对于单个GPU来说过于庞大,并且您正在使用PyTorch,您可以设置 device_map="auto" 以自动确定如何加载和存储模型权重。使用 device_map 参数需要安装🤗 Accelerate 软件包:
pip install --upgrade accelerate
以下代码会自动在各个设备上加载和存储模型权重:
transcriber = pipeline(model="openai/whisper-large-v2", device_map="auto")请注意,如果传递了 device_map="auto",在实例化您的 pipeline 时不需要添加 device=device 参数,否则可能会遇到一些意外的状况!
批量大小
默认情况下,pipelines不会进行批量推理,原因在这里详细解释。因为批处理不一定更快,实际上在某些情况下可能会更慢。
但如果在您的用例中起作用,您可以使用:
transcriber = pipeline(model="openai/whisper-large-v2", device=0, batch_size=2)
audio_filenames = [f"https://huggingface.co/datasets/Narsil/asr_dummy/resolve/main/{i}.flac" for i in range(1, 5)]
texts = transcriber(audio_filenames)以上代码会在提供的4个音频文件上运行pipeline,它会将它们以2个一组的批次传递给模型(模型在GPU上,此时批处理更有可能有所帮助),而您无需编写额外的代码。输出应始终与没有批处理时收到的结果相一致。它只是一种帮助您更快地使用pipeline的方式。
pipeline也可以减轻一些批处理的复杂性,因为对于某些pipeline,需要将单个项目(如长音频文件)分成多个部分以供模型处理。pipeline为您执行这种chunk batching。
任务特定参数
所有任务都提供了特定于任务的参数,这些参数提供额外的灵活性和选择,以帮助您完成工作。
例如,transformers.AutomaticSpeechRecognitionPipeline.call() 方法具有一个 return_timestamps 参数,对于字幕视频似乎很有帮助:
>>> transcriber = pipeline(model="openai/whisper-large-v2", return_timestamps=True)
>>> transcriber("https://huggingface.co/datasets/Narsil/asr_dummy/resolve/main/mlk.flac")
{'text': ' I have a dream that one day this nation will rise up and live out the true meaning of its creed.', 'chunks': [{'timestamp': (0.0, 11.88), 'text': ' I have a dream that one day this nation will rise up and live out the true meaning of its'}, {'timestamp': (11.88, 12.38), 'text': ' creed.'}]}正如您所看到的,模型推断出了文本,还输出了各个句子发音的时间。
每个任务都有许多可用的参数,因此请查看每个任务的API参考,以了解您可以进行哪些调整!例如,AutomaticSpeechRecognitionPipeline 具有 chunk_length_s 参数,对于处理非常长的音频文件(例如,为整部电影或长达一小时的视频配字幕)非常有帮助,这通常是模型无法单独处理的:
>>> transcriber = pipeline(model="openai/whisper-large-v2", chunk_length_s=30, return_timestamps=True)
>>> transcriber("https://huggingface.co/datasets/sanchit-gandhi/librispeech_long/resolve/main/audio.wav")
{'text': " Chapter 16. I might have told you of the beginning of this liaison in a few lines, but I wanted you to see every step by which we came. I, too, agree to whatever Marguerite wished, Marguerite to be unable to live apart from me. It was the day after the evening...如果您找不到一个真正有帮助的参数,欢迎提出请求!
在数据集上使用pipelines
pipelines也可以对大型数据集进行推理。我们建议使用迭代器来完成这一任务,这是最简单的方法:
def data():
    for i in range(1000):
        yield f"My example {i}"


pipe = pipeline(model="openai-community/gpt2", device=0)
generated_characters = 0
for out in pipe(data()):
    generated_characters += len(out[0]["generated_text"])
迭代器 data() 会产生每个结果,pipelines会自动识别输入为可迭代对象,并在GPU上处理数据的同时开始获取数据(在底层使用DataLoader)。这一点非常重要,因为您不必为整个数据集分配内存,可以尽可能快地将数据传送到GPU。
由于批处理可以加速处理,因此在这里尝试调整 batch_size 参数可能会很有用。
迭代数据集的最简单方法就是从🤗 Datasets 中加载数据集:
# KeyDataset is a util that will just output the item we're interested in.
from transformers.pipelines.pt_utils import KeyDataset
from datasets import load_dataset

pipe = pipeline(model="hf-internal-testing/tiny-random-wav2vec2", device=0)
dataset = load_dataset("hf-internal-testing/librispeech_asr_dummy", "clean", split="validation[:10]")

for out in pipe(KeyDataset(dataset, "audio")):
    print(out)
在Web服务器上使用pipelines
创建推理引擎是一个复杂的主题,值得有自己的页面。
视觉流水线
对于视觉任务,使用pipeline() 几乎是相同的。
指定您的任务并将图像传递给分类器。图像可以是链接、本地路径或base64编码的图像。例如,下面显示的是哪种品种的猫?

>>> from transformers import pipeline

>>> vision_classifier = pipeline(model="google/vit-base-patch16-224")
>>> preds = vision_classifier(
...     images="https://huggingface.co/datasets/huggingface/documentation-images/resolve/main/pipeline-cat-chonk.jpeg"
... )
>>> preds = [{"score": round(pred["score"], 4), "label": pred["label"]} for pred in preds]
>>> preds
[{'score': 0.4335, 'label': 'lynx, catamount'}, {'score': 0.0348, 'label': 'cougar, puma, catamount, mountain lion, painter, panther, Felis concolor'}, {'score': 0.0324, 'label': 'snow leopard, ounce, Panthera uncia'}, {'score': 0.0239, 'label': 'Egyptian cat'}, {'score': 0.0229, 'label': 'tiger cat'}]
文本流水线
对于NLP任务,使用pipeline() 几乎是相同的。
>>> from transformers import pipeline

>>> # This model is a `zero-shot-classification` model.
>>> # It will classify text, except you are free to choose any label you might imagine
>>> classifier = pipeline(model="facebook/bart-large-mnli")
>>> classifier(
...     "I have a problem with my iphone that needs to be resolved asap!!",
...     candidate_labels=["urgent", "not urgent", "phone", "tablet", "computer"],
... )
{'sequence': 'I have a problem with my iphone that needs to be resolved asap!!', 'labels': ['urgent', 'phone', 'computer', 'not urgent', 'tablet'], 'scores': [0.504, 0.479, 0.013, 0.003, 0.002]}
多模态流水线
pipeline() 支持多个模态。例如,视觉问题回答(VQA)任务结合了文本和图像。请随意使用您喜欢的任何图像链接和您想要问关于该图像的问题。图像可以是URL或图像的本地路径。
例如,如果您使用这个invoice image:
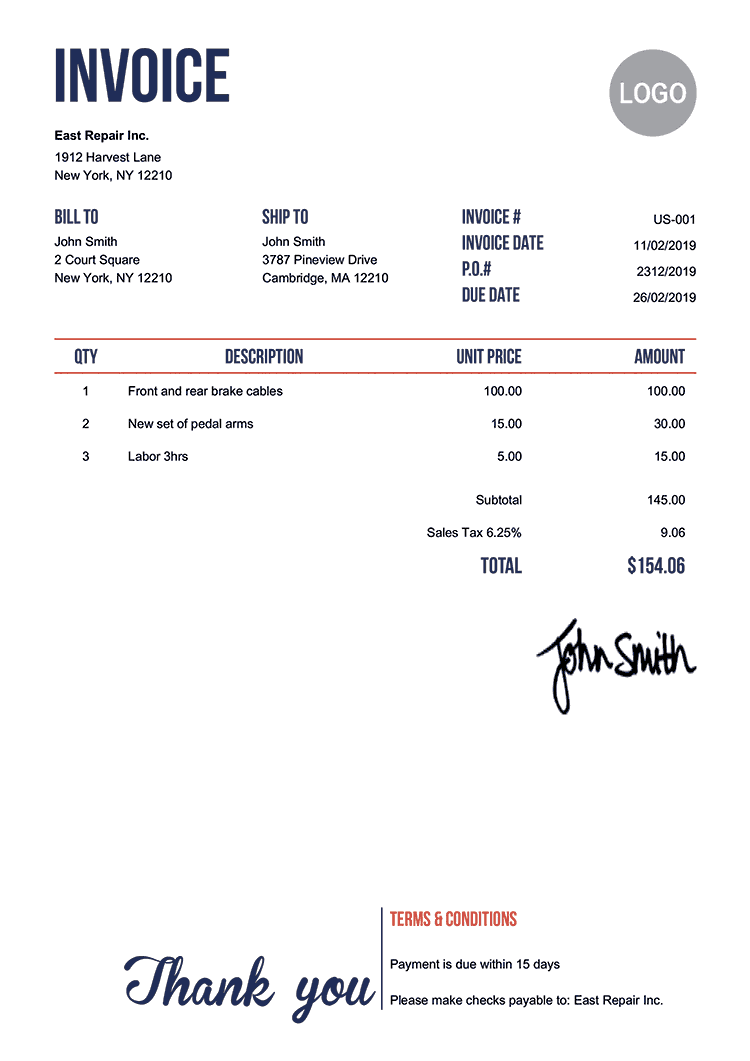
>>> from transformers import pipeline

>>> vqa = pipeline(model="impira/layoutlm-document-qa")
>>> output = vqa(
...     image="https://huggingface.co/spaces/impira/docquery/resolve/2359223c1837a7587402bda0f2643382a6eefeab/invoice.png",
...     question="What is the invoice number?",
... )
>>> output[0]["score"] = round(output[0]["score"], 3)
>>> output
[{'score': 0.425, 'answer': 'us-001', 'start': 16, 'end': 16}]
要运行上面的示例,除了🤗 Transformers之外,您需要安装
pytesseract。sudo apt install -y tesseract-ocr pip install pytesseract
在大模型上使用🤗 accelerate 和 pipeline :
您可以轻松地使用🤗 accelerate在大模型上运行 pipeline!首先确保您已经使用 pip install accelerate 安装了 accelerate。
首先使用 device_map="auto" 加载您的模型!我们将在示例中使用 facebook/opt-1.3b。
# pip install accelerate
import torch
from transformers import pipeline

pipe = pipeline(model="facebook/opt-1.3b", dtype=torch.bfloat16, device_map="auto")
output = pipe("This is a cool example!", do_sample=True, top_p=0.95)
如果安装 bitsandbytes 并添加参数 load_in_8bit=True,您还可以传递8位加载的模型。
# pip install accelerate bitsandbytes
import torch
from transformers import pipeline

pipe = pipeline(model="facebook/opt-1.3b", device_map="auto", model_kwargs={"load_in_8bit": True})
output = pipe("This is a cool example!", do_sample=True, top_p=0.95)请注意,您可以将checkpoint替换为任何支持大模型加载的Hugging Face模型,比如BLOOM!