PEFT documentation
DreamBooth fine-tuning with LoRA
DreamBooth fine-tuning with LoRA
This guide demonstrates how to use LoRA, a low-rank approximation technique, to fine-tune DreamBooth with the
CompVis/stable-diffusion-v1-4 model.
Although LoRA was initially designed as a technique for reducing the number of trainable parameters in large-language models, the technique can also be applied to diffusion models. Performing a complete model fine-tuning of diffusion models is a time-consuming task, which is why lightweight techniques like DreamBooth or Textual Inversion gained popularity. With the introduction of LoRA, customizing and fine-tuning a model on a specific dataset has become even faster.
In this guide we’ll be using a DreamBooth fine-tuning script that is available in PEFT’s GitHub repo. Feel free to explore it and learn how things work.
Set up your environment
Start by cloning the PEFT repository:
git clone https://github.com/huggingface/peftNavigate to the directory containing the training scripts for fine-tuning Dreambooth with LoRA:
cd peft/examples/lora_dreamboothSet up your environment: install PEFT, and all the required libraries. At the time of writing this guide we recommend installing PEFT from source.
pip install -r requirements.txt
pip install git+https://github.com/huggingface/peft
Fine-tuning DreamBooth
Prepare the images that you will use for fine-tuning the model. Set up a few environment variables:
export MODEL_NAME="CompVis/stable-diffusion-v1-4"
export INSTANCE_DIR="path-to-instance-images"
export CLASS_DIR="path-to-class-images"
export OUTPUT_DIR="path-to-save-model"
Here:
INSTANCE_DIR: The directory containing the images that you intend to use for training your model.CLASS_DIR: The directory containing class-specific images. In this example, we use prior preservation to avoid overfitting and language-drift. For prior preservation, you need other images of the same class as part of the training process. However, these images can be generated and the training script will save them to a local path you specify here.OUTPUT_DIR: The destination folder for storing the trained model’s weights.
To learn more about DreamBooth fine-tuning with prior-preserving loss, check out the Diffusers documentation.
Launch the training script with accelerate and pass hyperparameters, as well as LoRa-specific arguments to it such as:
use_lora: Enables LoRa in the training script.lora_r: The dimension used by the LoRA update matrices.lora_alpha: Scaling factor.lora_text_encoder_r: LoRA rank for text encoder.lora_text_encoder_alpha: LoRA alpha (scaling factor) for text encoder.
Here’s what the full set of script arguments may look like:
accelerate launch train_dreambooth.py \
  --pretrained_model_name_or_path=$MODEL_NAME  \
  --instance_data_dir=$INSTANCE_DIR \
  --class_data_dir=$CLASS_DIR \
  --output_dir=$OUTPUT_DIR \
  --train_text_encoder \
  --with_prior_preservation --prior_loss_weight=1.0 \
  --instance_prompt="a photo of sks dog" \
  --class_prompt="a photo of dog" \
  --resolution=512 \
  --train_batch_size=1 \
  --lr_scheduler="constant" \
  --lr_warmup_steps=0 \
  --num_class_images=200 \
  --use_lora \
  --lora_r 16 \
  --lora_alpha 27 \
  --lora_text_encoder_r 16 \
  --lora_text_encoder_alpha 17 \
  --learning_rate=1e-4 \
  --gradient_accumulation_steps=1 \
  --gradient_checkpointing \
  --max_train_steps=800
Inference with a single adapter
To run inference with the fine-tuned model, first specify the base model with which the fine-tuned LoRA weights will be combined:
import os
import torch

from diffusers import StableDiffusionPipeline
from peft import PeftModel, LoraConfig

MODEL_NAME = "CompVis/stable-diffusion-v1-4"
Next, add a function that will create a Stable Diffusion pipeline for image generation. It will combine the weights of
the base model with the fine-tuned LoRA weights using LoraConfig.
def get_lora_sd_pipeline(
    ckpt_dir, base_model_name_or_path=None, dtype=torch.float16, device="cuda", adapter_name="default"
):
    unet_sub_dir = os.path.join(ckpt_dir, "unet")
    text_encoder_sub_dir = os.path.join(ckpt_dir, "text_encoder")
    if os.path.exists(text_encoder_sub_dir) and base_model_name_or_path is None:
        config = LoraConfig.from_pretrained(text_encoder_sub_dir)
        base_model_name_or_path = config.base_model_name_or_path

    if base_model_name_or_path is None:
        raise ValueError("Please specify the base model name or path")

    pipe = StableDiffusionPipeline.from_pretrained(base_model_name_or_path, torch_dtype=dtype).to(device)
    pipe.unet = PeftModel.from_pretrained(pipe.unet, unet_sub_dir, adapter_name=adapter_name)

    if os.path.exists(text_encoder_sub_dir):
        pipe.text_encoder = PeftModel.from_pretrained(
            pipe.text_encoder, text_encoder_sub_dir, adapter_name=adapter_name
        )

    if dtype in (torch.float16, torch.bfloat16):
        pipe.unet.half()
        pipe.text_encoder.half()

    pipe.to(device)
    return pipe
Now you can use the function above to create a Stable Diffusion pipeline using the LoRA weights that you have created during the fine-tuning step.
Note, if you’re running inference on the same machine, the path you specify here will be the same as OUTPUT_DIR.
pipe = get_lora_sd_pipeline(Path("path-to-saved-model"), adapter_name="dog")Once you have the pipeline with your fine-tuned model, you can use it to generate images:
prompt = "sks dog playing fetch in the park"
negative_prompt = "low quality, blurry, unfinished"
image = pipe(prompt, num_inference_steps=50, guidance_scale=7, negative_prompt=negative_prompt).images[0]
image.save("DESTINATION_PATH_FOR_THE_IMAGE")
Multi-adapter inference
With PEFT you can combine multiple adapters for inference. In the previous example you have fine-tuned Stable Diffusion on
some dog images. The pipeline created based on these weights got a name - adapter_name="dog. Now, suppose you also fine-tuned
this base model on images of a crochet toy. Let’s see how we can use both adapters.
First, you’ll need to perform all the steps as in the single adapter inference example:
- Specify the base model.
- Add a function that creates a Stable Diffusion pipeline for image generation uses LoRA weights.
- Create a
pipewithadapter_name="dog"based on the model fine-tuned on dog images.
Next, you’re going to need a few more helper functions.
To load another adapter, create a load_adapter() function that leverages load_adapter() method of PeftModel (e.g. pipe.unet.load_adapter(peft_model_path, adapter_name)):
def load_adapter(pipe, ckpt_dir, adapter_name):
    unet_sub_dir = os.path.join(ckpt_dir, "unet")
    text_encoder_sub_dir = os.path.join(ckpt_dir, "text_encoder")
    pipe.unet.load_adapter(unet_sub_dir, adapter_name=adapter_name)
    if os.path.exists(text_encoder_sub_dir):
        pipe.text_encoder.load_adapter(text_encoder_sub_dir, adapter_name=adapter_name)
To switch between adapters, write a function that uses set_adapter() method of PeftModel (see pipe.unet.set_adapter(adapter_name))
def set_adapter(pipe, adapter_name):
    pipe.unet.set_adapter(adapter_name)
    if isinstance(pipe.text_encoder, PeftModel):
        pipe.text_encoder.set_adapter(adapter_name)
Finally, add a function to create weighted LoRA adapter.
def create_weighted_lora_adapter(pipe, adapters, weights, adapter_name="default"):
    pipe.unet.add_weighted_adapter(adapters, weights, adapter_name)
    if isinstance(pipe.text_encoder, PeftModel):
        pipe.text_encoder.add_weighted_adapter(adapters, weights, adapter_name)

    return pipe
Let’s load the second adapter from the model fine-tuned on images of a crochet toy, and give it a unique name:
load_adapter(pipe, Path("path-to-the-second-saved-model"), adapter_name="crochet")Create a pipeline using weighted adapters:
pipe = create_weighted_lora_adapter(pipe, ["crochet", "dog"], [1.0, 1.05], adapter_name="crochet_dog")Now you can switch between adapters. If you’d like to generate more dog images, set the adapter to "dog":
set_adapter(pipe, adapter_name="dog")
prompt = "sks dog in a supermarket isle"
negative_prompt = "low quality, blurry, unfinished"
image = pipe(prompt, num_inference_steps=50, guidance_scale=7, negative_prompt=negative_prompt).images[0]
image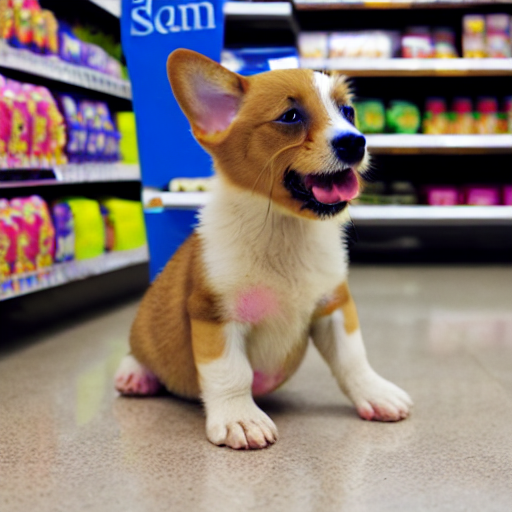
In the same way, you can switch to the second adapter:
set_adapter(pipe, adapter_name="crochet")
prompt = "a fish rendered in the style of <1>"
negative_prompt = "low quality, blurry, unfinished"
image = pipe(prompt, num_inference_steps=50, guidance_scale=7, negative_prompt=negative_prompt).images[0]
image
Finally, you can use combined weighted adapters:
set_adapter(pipe, adapter_name="crochet_dog")
prompt = "sks dog rendered in the style of <1>, close up portrait, 4K HD"
negative_prompt = "low quality, blurry, unfinished"
image = pipe(prompt, num_inference_steps=50, guidance_scale=7, negative_prompt=negative_prompt).images[0]
image