
Dataset Viewer
crawl/depth
int64 0
2
| crawl/httpStatusCode
float64 200
200
⌀ | crawl/loadedTime
stringlengths 24
24
| crawl/loadedUrl
stringlengths 26
85
| crawl/referrerUrl
stringclasses 9
values | debug/requestHandlerMode
stringclasses 2
values | markdown
stringlengths 150
39.8k
| metadata/author
float64 | metadata/canonicalUrl
stringlengths 26
65
| metadata/description
stringlengths 8
428
⌀ | metadata/headers/access-control-allow-origin
stringclasses 1
value | metadata/headers/age
int64 0
0
| metadata/headers/alt-svc
stringclasses 1
value | metadata/headers/cache-control
stringclasses 1
value | metadata/headers/cf-cache-status
stringclasses 1
value | metadata/headers/cf-ray
stringlengths 20
20
| metadata/headers/connection
stringclasses 1
value | metadata/headers/content-encoding
stringclasses 1
value | metadata/headers/content-type
stringclasses 1
value | metadata/headers/date
stringlengths 29
29
| metadata/headers/expires
stringlengths 29
29
⌀ | metadata/headers/last-modified
stringclasses 2
values | metadata/headers/nel
stringclasses 2
values | metadata/headers/report-to
stringlengths 233
251
| metadata/headers/server
stringclasses 1
value | metadata/headers/transfer-encoding
stringclasses 1
value | metadata/headers/vary
stringclasses 1
value | metadata/headers/via
stringclasses 1
value | metadata/headers/x-cache
stringclasses 2
values | metadata/headers/x-cache-hits
int64 0
0
| metadata/headers/x-fastly-request-id
stringlengths 40
40
| metadata/headers/x-firefox-spdy
stringclasses 1
value | metadata/headers/x-github-request-id
stringlengths 30
36
| metadata/headers/x-origin-cache
stringclasses 1
value | metadata/headers/x-proxy-cache
stringclasses 1
value | metadata/headers/x-served-by
stringlengths 17
25
| metadata/headers/x-timer
stringlengths 26
30
| metadata/jsonLd
float64 | metadata/keywords
float64 | metadata/languageCode
stringclasses 1
value | metadata/openGraph/0/content
stringclasses 1
value | metadata/openGraph/0/property
stringclasses 1
value | metadata/openGraph/1/content
stringlengths 26
65
| metadata/openGraph/1/property
stringclasses 1
value | metadata/openGraph/2/content
stringlengths 12
38
| metadata/openGraph/2/property
stringclasses 1
value | metadata/openGraph/3/content
stringlengths 8
428
⌀ | metadata/openGraph/3/property
stringclasses 1
value | metadata/title
stringlengths 12
38
| screenshotUrl
float64 | text
stringlengths 108
34.1k
| url
stringlengths 26
85
|
|---|---|---|---|---|---|---|---|---|---|---|---|---|---|---|---|---|---|---|---|---|---|---|---|---|---|---|---|---|---|---|---|---|---|---|---|---|---|---|---|---|---|---|---|---|---|---|---|---|---|---|---|
0 | 200 | 2024-04-23T15:11:06.208Z | https://wasp-lang.dev/docs | https://wasp-lang.dev/docs | browser | ## Introduction
note
If you are looking for the installation instructions, check out the [Quick Start](https://wasp-lang.dev/docs/quick-start) section.
We will give a brief overview of what Wasp is, how it works on a high level and when to use it.
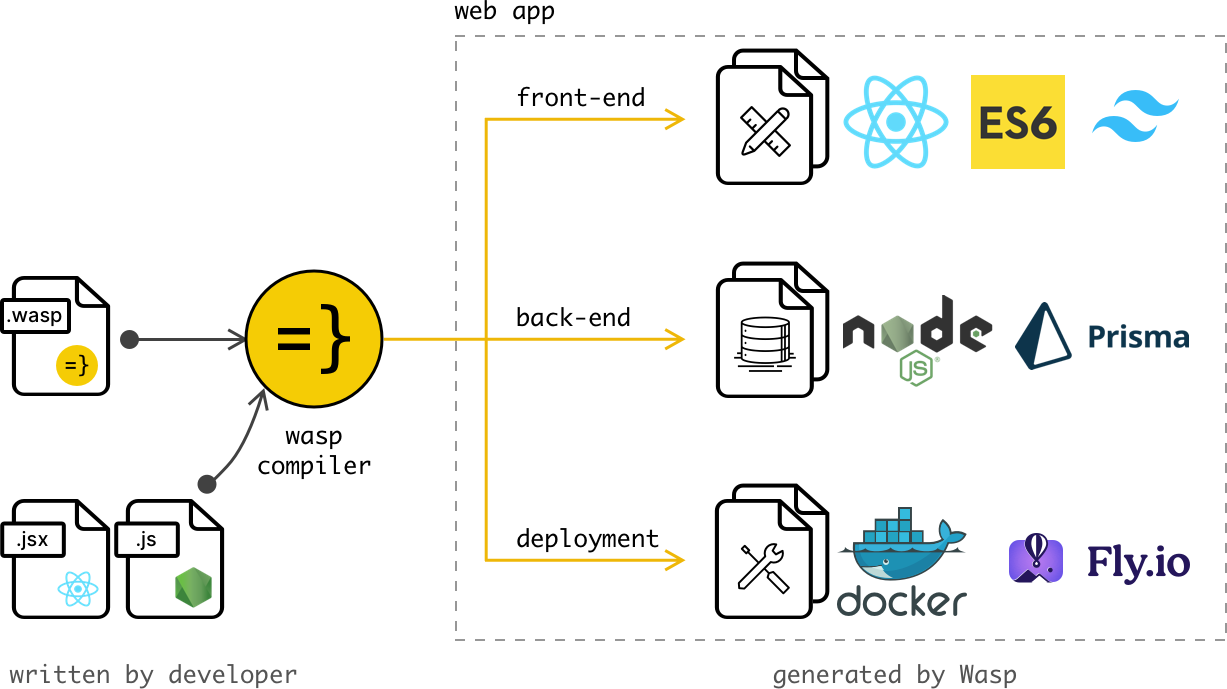
It is an opinionated way of building **full-stack web applications**. It takes care of all three major parts of a web application: **client** (front-end), **server** (back-end) and **database**.
### Works well with your existing stack[](#works-well-with-your-existing-stack "Direct link to Works well with your existing stack")
Wasp is not trying to do everything at once but rather focuses on the complexity which arises from connecting all the parts of the stack (client, server, database, deployment) together.
Wasp is using **React**, **Node.js** and **Prisma** under the hood and relies on them to define web components and server queries and actions.
### Wasp's secret sauce[](#wasps-secret-sauce "Direct link to Wasp's secret sauce")
At the core is the Wasp compiler which takes the Wasp config and your Javascript code and outputs the client app, server app and deployment code.
How the magic happens 🌈
The cool thing about having a compiler that understands your code is that it can do a lot of things for you.
Define your app in the Wasp config and get:
* login and signup with Auth UI components,
* full-stack type safety,
* e-mail sending,
* async processing jobs,
* React Query powered data fetching,
* security best practices,
* and more.
You don't need to write any code for these features, Wasp will take care of it for you 🤯 And what's even better, Wasp also maintains the code for you, so you don't have to worry about keeping up with the latest security best practices. As Wasp updates, so does your app.
## So what does the code look like?[](#so-what-does-the-code-look-like "Direct link to So what does the code look like?")
Let's say you want to build a web app that allows users to **create and share their favorite recipes**.
Let's start with the main.wasp file: it is the central file of your app, where you describe the app from the high level.
Let's give our app a title and let's immediately turn on the full-stack authentication via username and password:
main.wasp
```
app RecipeApp { title: "My Recipes", wasp: { version: "^0.13.0" }, auth: { methods: { usernameAndPassword: {} }, onAuthFailedRedirectTo: "/login", userEntity: User }}
```
Let's then add the data models for your recipes. We will want to have Users and Users can own Recipes:
main.wasp
```
...entity User {=psl // Data models are defined using Prisma Schema Language. id Int @id @default(autoincrement()) recipes Recipe[]psl=}entity Recipe {=psl id Int @id @default(autoincrement()) title String description String? userId Int user User @relation(fields: [userId], references: [id])psl=}
```
Next, let's define how to do something with these data models!
We do that by defining Operations, in this case a Query `getRecipes` and Action `addRecipe`, which are in their essence a Node.js functions that execute on server and can, thanks to Wasp, very easily be called from the client.
First, we define these Operations in our main.wasp file, so Wasp knows about them and can "beef them up":
main.wasp
```
// Queries have automatic cache invalidation and are type-safe.query getRecipes { fn: import { getRecipes } from "@src/recipe/operations.ts", entities: [Recipe],}// Actions are type-safe and can be used to perform side-effects.action addRecipe { fn: import { addRecipe } from "@src/recipe/operations.ts", entities: [Recipe],}
```
... and then implement them in our Javascript (or TypeScript) code (we show just the query here, using TypeScript):
src/recipe/operations.ts
```
// Wasp generates the types for you.import { type GetRecipes } from "wasp/server/operations";import { type Recipe } from "wasp/entities";export const getRecipes: GetRecipes<{}, Recipe[]> = async (_args, context) => { return context.entities.Recipe.findMany( // Prisma query { where: { user: { id: context.user.id } } } );};export const addRecipe ...
```
Now we can very easily use these in our React components!
For the end, let's create a home page of our app.
First we define it in main.wasp:
main.wasp
```
...route HomeRoute { path: "/", to: HomePage }page HomePage { component: import { HomePage } from "@src/pages/HomePage", authRequired: true // Will send user to /login if not authenticated.}
```
and then implement it as a React component in JS/TS (that calls the Operations we previously defined):
src/pages/HomePage.tsx
```
import { useQuery, getRecipes } from "wasp/client/operations";import { type User } from "wasp/entities";export function HomePage({ user }: { user: User }) { // Due to full-stack type safety, `recipes` will be of type `Recipe[]` here. const { data: recipes, isLoading } = useQuery(getRecipes); // Calling our query here! if (isLoading) { return <div>Loading...</div>; } return ( <div> <h1>Recipes</h1> <ul> {recipes ? recipes.map((recipe) => ( <li key={recipe.id}> <div>{recipe.title}</div> <div>{recipe.description}</div> </li> )) : 'No recipes defined yet!'} </ul> </div> );}
```
And voila! We are listing all the recipes in our app 🎉
This was just a quick example to give you a taste of what Wasp is. For step by step tour through the most important Wasp features, check out the [Todo app tutorial](https://wasp-lang.dev/docs/tutorial/create).
note
Above we skipped defining `/login` and `/signup` pages to keep the example a bit shorter, but those are very simple to do by using Wasp's Auth UI feature.
## When to use Wasp[](#when-to-use-wasp "Direct link to When to use Wasp")
Wasp is addressing the same core problems that typical web app frameworks are addressing, and it in big part [looks, swims and quacks](https://en.wikipedia.org/wiki/Duck_test) like a web app framework.
### Best used for[](#best-used-for "Direct link to Best used for")
* building full-stack web apps (like e.g. Airbnb or Asana)
* quickly starting a web app with industry best practices
* to be used alongside modern web dev stack (currently supported React and Node)
### Avoid using Wasp for[](#avoid-using-wasp-for "Direct link to Avoid using Wasp for")
* building static/presentational websites
* to be used as a no-code solution
* to be a solve-it-all tool in a single language
## Wasp is a DSL[](#wasp-is-a-dsl "Direct link to Wasp is a DSL")
note
You don't need to know what a DSL is to use Wasp, but if you are curious, you can read more about it below.
Wasp does not match typical expectations of a web app framework: it is not a set of libraries, it is instead a simple programming language that understands your code and can do a lot of things for you.
Wasp is a programming language, but a specific kind: it is specialized for a single purpose: **building modern web applications**. We call such languages _DSL_s (Domain Specific Language).
Other examples of _DSL_s that are often used today are e.g. _SQL_ for databases and _HTML_ for web page layouts. The main advantage and reason why _DSL_s exist is that they need to do only one task (e.g. database queries) so they can do it well and provide the best possible experience for the developer.
The same idea stands behind Wasp - a language that will allow developers to **build modern web applications with 10x less code and less stack-specific knowledge**. | null | https://wasp-lang.dev/docs | If you are looking for the installation instructions, check out the Quick Start section. | * | 0 | h3=":443"; ma=86400 | max-age=600 | DYNAMIC | 878ec8a35d714bcf-BUF | null | br | text/html; charset=utf-8 | Tue, 23 Apr 2024 15:11:01 GMT | Tue, 23 Apr 2024 15:21:01 GMT | Thu, 18 Apr 2024 15:50:27 GMT | {"success_fraction":0, "report_to":"cf-nel", "max_age":604800} | {"endpoints":[{"url":"https:\/\/a.nel.cloudflare.com\/report\/v4?s=ZT0IS6bdPIlLUYwJa4kd8wIiwZSLdenKtJS9kvs289oSRofo%2BSthoBpIdWkOzdNXBVMWSiWZIl31ESbvIMmn9DfgWYGoAGRK6YGdKMGF8jsAOkrqsup%2BSEsNDC3czSnX"}], "group":"cf-nel", "max_age":604800} | cloudflare | null | Accept-Encoding | 1.1 varnish | MISS | 0 | ad08172eddb5041ed557cdd511b3744770b26a99 | h2 | 8212:180046:3C22E64:4727758:6627CF85 | null | MISS | cache-nyc-kteb1890025-NYC | S1713885062.689630, VS0, VE21 | null | null | en | og:image | https://wasp-lang.dev/docs | og:url | Introduction | Wasp | og:title | If you are looking for the installation instructions, check out the Quick Start section. | og:description | Introduction | Wasp | null | Introduction
note
If you are looking for the installation instructions, check out the Quick Start section.
We will give a brief overview of what Wasp is, how it works on a high level and when to use it.
It is an opinionated way of building full-stack web applications. It takes care of all three major parts of a web application: client (front-end), server (back-end) and database.
Works well with your existing stack
Wasp is not trying to do everything at once but rather focuses on the complexity which arises from connecting all the parts of the stack (client, server, database, deployment) together.
Wasp is using React, Node.js and Prisma under the hood and relies on them to define web components and server queries and actions.
Wasp's secret sauce
At the core is the Wasp compiler which takes the Wasp config and your Javascript code and outputs the client app, server app and deployment code.
How the magic happens 🌈
The cool thing about having a compiler that understands your code is that it can do a lot of things for you.
Define your app in the Wasp config and get:
login and signup with Auth UI components,
full-stack type safety,
e-mail sending,
async processing jobs,
React Query powered data fetching,
security best practices,
and more.
You don't need to write any code for these features, Wasp will take care of it for you 🤯 And what's even better, Wasp also maintains the code for you, so you don't have to worry about keeping up with the latest security best practices. As Wasp updates, so does your app.
So what does the code look like?
Let's say you want to build a web app that allows users to create and share their favorite recipes.
Let's start with the main.wasp file: it is the central file of your app, where you describe the app from the high level.
Let's give our app a title and let's immediately turn on the full-stack authentication via username and password:
main.wasp
app RecipeApp {
title: "My Recipes",
wasp: { version: "^0.13.0" },
auth: {
methods: { usernameAndPassword: {} },
onAuthFailedRedirectTo: "/login",
userEntity: User
}
}
Let's then add the data models for your recipes. We will want to have Users and Users can own Recipes:
main.wasp
...
entity User {=psl // Data models are defined using Prisma Schema Language.
id Int @id @default(autoincrement())
recipes Recipe[]
psl=}
entity Recipe {=psl
id Int @id @default(autoincrement())
title String
description String?
userId Int
user User @relation(fields: [userId], references: [id])
psl=}
Next, let's define how to do something with these data models!
We do that by defining Operations, in this case a Query getRecipes and Action addRecipe, which are in their essence a Node.js functions that execute on server and can, thanks to Wasp, very easily be called from the client.
First, we define these Operations in our main.wasp file, so Wasp knows about them and can "beef them up":
main.wasp
// Queries have automatic cache invalidation and are type-safe.
query getRecipes {
fn: import { getRecipes } from "@src/recipe/operations.ts",
entities: [Recipe],
}
// Actions are type-safe and can be used to perform side-effects.
action addRecipe {
fn: import { addRecipe } from "@src/recipe/operations.ts",
entities: [Recipe],
}
... and then implement them in our Javascript (or TypeScript) code (we show just the query here, using TypeScript):
src/recipe/operations.ts
// Wasp generates the types for you.
import { type GetRecipes } from "wasp/server/operations";
import { type Recipe } from "wasp/entities";
export const getRecipes: GetRecipes<{}, Recipe[]> = async (_args, context) => {
return context.entities.Recipe.findMany( // Prisma query
{ where: { user: { id: context.user.id } } }
);
};
export const addRecipe ...
Now we can very easily use these in our React components!
For the end, let's create a home page of our app.
First we define it in main.wasp:
main.wasp
...
route HomeRoute { path: "/", to: HomePage }
page HomePage {
component: import { HomePage } from "@src/pages/HomePage",
authRequired: true // Will send user to /login if not authenticated.
}
and then implement it as a React component in JS/TS (that calls the Operations we previously defined):
src/pages/HomePage.tsx
import { useQuery, getRecipes } from "wasp/client/operations";
import { type User } from "wasp/entities";
export function HomePage({ user }: { user: User }) {
// Due to full-stack type safety, `recipes` will be of type `Recipe[]` here.
const { data: recipes, isLoading } = useQuery(getRecipes); // Calling our query here!
if (isLoading) {
return <div>Loading...</div>;
}
return (
<div>
<h1>Recipes</h1>
<ul>
{recipes ? recipes.map((recipe) => (
<li key={recipe.id}>
<div>{recipe.title}</div>
<div>{recipe.description}</div>
</li>
)) : 'No recipes defined yet!'}
</ul>
</div>
);
}
And voila! We are listing all the recipes in our app 🎉
This was just a quick example to give you a taste of what Wasp is. For step by step tour through the most important Wasp features, check out the Todo app tutorial.
note
Above we skipped defining /login and /signup pages to keep the example a bit shorter, but those are very simple to do by using Wasp's Auth UI feature.
When to use Wasp
Wasp is addressing the same core problems that typical web app frameworks are addressing, and it in big part looks, swims and quacks like a web app framework.
Best used for
building full-stack web apps (like e.g. Airbnb or Asana)
quickly starting a web app with industry best practices
to be used alongside modern web dev stack (currently supported React and Node)
Avoid using Wasp for
building static/presentational websites
to be used as a no-code solution
to be a solve-it-all tool in a single language
Wasp is a DSL
note
You don't need to know what a DSL is to use Wasp, but if you are curious, you can read more about it below.
Wasp does not match typical expectations of a web app framework: it is not a set of libraries, it is instead a simple programming language that understands your code and can do a lot of things for you.
Wasp is a programming language, but a specific kind: it is specialized for a single purpose: building modern web applications. We call such languages DSLs (Domain Specific Language).
Other examples of DSLs that are often used today are e.g. SQL for databases and HTML for web page layouts. The main advantage and reason why DSLs exist is that they need to do only one task (e.g. database queries) so they can do it well and provide the best possible experience for the developer.
The same idea stands behind Wasp - a language that will allow developers to build modern web applications with 10x less code and less stack-specific knowledge. | https://wasp-lang.dev/docs |
|
1 | 200 | 2024-04-23T15:11:22.222Z | https://wasp-lang.dev/docs/vision | https://wasp-lang.dev/docs | browser | ## Vision
With Wasp, we want to make developing web apps easy and enjoyable, for novices and experts in web development alike.
Ideal we are striving for is that programming in Wasp feels like describing an app using a human language - like writing a specification document where you describe primarily your requirements and as little implementation details as possible. Creating a new production-ready web app should be easy and deploying it to production should be straightforward.
That is why we believe Wasp needs to be a programming language (DSL) and not a library - we want to capture all parts of the web app into one integrated system that is perfectly tailored just for that purpose.
On the other hand, we believe that trying to capture every single detail in one language would not be reasonable. There are solutions out there that work very well for the specific task they aim to solve (React for web components, CSS/HTML for design/markup, JS/TS for logic, ...) and we don't want to replace them with Wasp. Instead, we see Wasp as a declarative "glue" code uniting all these specific solutions and providing a higher-level notion of the web app above them.
Wasp is still early in its development and therefore far from where we imagine it will be in the future. This is what we imagine:
* **Declarative, static language** with simple basic rules and **that understands a lot of web app concepts** - "horizontal language". Supports multiple files/modules, libraries.
* **Integrates seamlessly with the most popular technologies** for building specific, more complex parts of the web app (React, CSS, JS, ...). They can be used inline (mixed with Wasp code) or provided via external files.
* **Has hatches (escape mechanisms) that allow you to customize your web app** in all the right places, but remain hidden until you need them.
* **Entity (data model) is a first-class citizen** - defined via custom Wasp syntax and it integrates very closely with the rest of the features, serving as one of the central concepts around which everything is built.
* **Out of the box** support for CRUD UI based on the Entities, to get you quickly going, but also customizable to some level.
* **"Smart" operations (queries and actions)** that in most cases automatically figure out when to update, and if not it is easy to define custom logic to compensate for that. User worries about client-server gap as little as possible.
* Support, directly in Wasp, for **declaratively defining simple components and operations**.
* Besides Wasp as a programming language, there will also be a **visual builder that generates/edits Wasp code**, allowing non-developers to participate in development. Since Wasp is declarative, we imagine such builder to naturally follow from Wasp language.
* **Server side rendering, caching, packaging, security**, ... -> all those are taken care of by Wasp. You tell Wasp what you want, and Wasp figures out how to do it.
* As **simple deployment to production/staging** as it gets.
* While it comes with the official implementation(s), **Wasp language will not be coupled with the single implementation**. Others can provide implementations that compile to different web app stacks. | null | https://wasp-lang.dev/docs/vision | With Wasp, we want to make developing web apps easy and enjoyable, for novices and experts in web development alike. | * | 0 | h3=":443"; ma=86400 | max-age=600 | DYNAMIC | 878ec9007ae64bcf-BUF | null | br | text/html; charset=utf-8 | Tue, 23 Apr 2024 15:11:16 GMT | Tue, 23 Apr 2024 15:21:16 GMT | Thu, 18 Apr 2024 15:50:27 GMT | {"success_fraction":0, "report_to":"cf-nel", "max_age":604800} | {"endpoints":[{"url":"https:\/\/a.nel.cloudflare.com\/report\/v4?s=X3S8t1YhmncwAhc4B%2FyLSjhBUM8QH53eKgLdG1FZ3MB3vigATHKpYFw26TFI%2Foh2300atl8m62i0FnLtpqQ7m9IoOXAEK4Qv98%2FjZrpc9lXmOZz6IacJIFh575FnmPT1"}], "group":"cf-nel", "max_age":604800} | cloudflare | null | Accept-Encoding | 1.1 varnish | MISS | 0 | 56a4b10c9295f5795426b484d4660acea1deee3a | h2 | D3FC:209F3A:3A75104:4579FBA:6627CF93 | HIT | MISS | cache-nyc-kteb1890025-NYC | S1713885077.567829, VS0, VE17 | null | null | en | og:image | https://wasp-lang.dev/docs/vision | og:url | Vision | Wasp | og:title | With Wasp, we want to make developing web apps easy and enjoyable, for novices and experts in web development alike. | og:description | Vision | Wasp | null | Vision
With Wasp, we want to make developing web apps easy and enjoyable, for novices and experts in web development alike.
Ideal we are striving for is that programming in Wasp feels like describing an app using a human language - like writing a specification document where you describe primarily your requirements and as little implementation details as possible. Creating a new production-ready web app should be easy and deploying it to production should be straightforward.
That is why we believe Wasp needs to be a programming language (DSL) and not a library - we want to capture all parts of the web app into one integrated system that is perfectly tailored just for that purpose.
On the other hand, we believe that trying to capture every single detail in one language would not be reasonable. There are solutions out there that work very well for the specific task they aim to solve (React for web components, CSS/HTML for design/markup, JS/TS for logic, ...) and we don't want to replace them with Wasp. Instead, we see Wasp as a declarative "glue" code uniting all these specific solutions and providing a higher-level notion of the web app above them.
Wasp is still early in its development and therefore far from where we imagine it will be in the future. This is what we imagine:
Declarative, static language with simple basic rules and that understands a lot of web app concepts - "horizontal language". Supports multiple files/modules, libraries.
Integrates seamlessly with the most popular technologies for building specific, more complex parts of the web app (React, CSS, JS, ...). They can be used inline (mixed with Wasp code) or provided via external files.
Has hatches (escape mechanisms) that allow you to customize your web app in all the right places, but remain hidden until you need them.
Entity (data model) is a first-class citizen - defined via custom Wasp syntax and it integrates very closely with the rest of the features, serving as one of the central concepts around which everything is built.
Out of the box support for CRUD UI based on the Entities, to get you quickly going, but also customizable to some level.
"Smart" operations (queries and actions) that in most cases automatically figure out when to update, and if not it is easy to define custom logic to compensate for that. User worries about client-server gap as little as possible.
Support, directly in Wasp, for declaratively defining simple components and operations.
Besides Wasp as a programming language, there will also be a visual builder that generates/edits Wasp code, allowing non-developers to participate in development. Since Wasp is declarative, we imagine such builder to naturally follow from Wasp language.
Server side rendering, caching, packaging, security, ... -> all those are taken care of by Wasp. You tell Wasp what you want, and Wasp figures out how to do it.
As simple deployment to production/staging as it gets.
While it comes with the official implementation(s), Wasp language will not be coupled with the single implementation. Others can provide implementations that compile to different web app stacks. | https://wasp-lang.dev/docs/vision |
|
1 | 200 | 2024-04-23T15:11:18.440Z | https://wasp-lang.dev/docs/contributing | https://wasp-lang.dev/docs | browser | Version: 0.13.0
## Contributing
Any way you want to contribute is a good way, and we'd be happy to meet you! A single entry point for all contributors is the [CONTRIBUTING.md](https://github.com/wasp-lang/wasp/blob/main/CONTRIBUTING.md) file in our Github repo. All the requirements and instructions are there, so please check [CONTRIBUTING.md](https://github.com/wasp-lang/wasp/blob/main/CONTRIBUTING.md) for more details.
Some side notes to make your journey easier:
1. Join us on [Discord](https://discord.gg/rzdnErX) and let's talk! We can discuss language design, new/existing features, and weather, or you can tell us how you feel about Wasp :).
2. Wasp's compiler is built with Haskell. That means you'll need to be somewhat familiar with this language if you'd like to contribute to the compiler itself. But Haskell is just a part of Wasp, and you can contribute to lot of parts that require web dev skills, either by coding or by suggesting how to improve Wasp and its design as a web framework. If you don't have Haskell knowledge (or any dev experience at all) - no problem. There are a lot of JS-related tasks and documentation updates as well!
3. If there's something you'd like to bring to our attention, go to [docs GitHub repo](https://github.com/wasp-lang/wasp) and make an issue/PR!
Happy hacking! | null | https://wasp-lang.dev/docs/contributing | Any way you want to contribute is a good way, and we'd be happy to meet you! A single entry point for all contributors is the CONTRIBUTING.md file in our Github repo. All the requirements and instructions are there, so please check CONTRIBUTING.md for more details. | * | 0 | h3=":443"; ma=86400 | max-age=600 | DYNAMIC | 878ec8f5598f4bcf-BUF | null | br | text/html; charset=utf-8 | Tue, 23 Apr 2024 15:11:14 GMT | Tue, 23 Apr 2024 15:21:14 GMT | Thu, 18 Apr 2024 15:50:26 GMT | {"success_fraction":0, "report_to":"cf-nel", "max_age":604800} | {"endpoints":[{"url":"https:\/\/a.nel.cloudflare.com\/report\/v4?s=vA7z7gSIGyAqYTW7qe6S%2BB4NwIB%2FPda5rsVlLYKq%2BpCfdC9dSYnkcM27MmkU%2BfGAwnDh1WO0KVdRDKnd%2FpjeWASxhW9wrP%2Fx5LPAbqFktARMNBiCDUhvTCN0hqTIvMJt"}], "group":"cf-nel", "max_age":604800} | cloudflare | null | Accept-Encoding | 1.1 varnish | MISS | 0 | 240de283f418bfc4db77d984ea9bb38cb31054a0 | h2 | 68AA:170D:256FDC:2CE104:6627CF92 | null | MISS | cache-nyc-kteb1890025-NYC | S1713885075.788575, VS0, VE20 | null | null | en | og:image | https://wasp-lang.dev/docs/contributing | og:url | Contributing | Wasp | og:title | Any way you want to contribute is a good way, and we'd be happy to meet you! A single entry point for all contributors is the CONTRIBUTING.md file in our Github repo. All the requirements and instructions are there, so please check CONTRIBUTING.md for more details. | og:description | Contributing | Wasp | null | Version: 0.13.0
Contributing
Any way you want to contribute is a good way, and we'd be happy to meet you! A single entry point for all contributors is the CONTRIBUTING.md file in our Github repo. All the requirements and instructions are there, so please check CONTRIBUTING.md for more details.
Some side notes to make your journey easier:
Join us on Discord and let's talk! We can discuss language design, new/existing features, and weather, or you can tell us how you feel about Wasp :).
Wasp's compiler is built with Haskell. That means you'll need to be somewhat familiar with this language if you'd like to contribute to the compiler itself. But Haskell is just a part of Wasp, and you can contribute to lot of parts that require web dev skills, either by coding or by suggesting how to improve Wasp and its design as a web framework. If you don't have Haskell knowledge (or any dev experience at all) - no problem. There are a lot of JS-related tasks and documentation updates as well!
If there's something you'd like to bring to our attention, go to docs GitHub repo and make an issue/PR!
Happy hacking! | https://wasp-lang.dev/docs/contributing |
|
1 | 200 | 2024-04-23T15:11:24.759Z | https://wasp-lang.dev/docs/telemetry | https://wasp-lang.dev/docs | browser | ```
{ // Randomly generated, non-identifiable UUID representing a user. "distinct_id": "bf3fa7a8-1c11-4f82-9542-ec1a2d28786b", // Non-identifiable hash representing a project. "project_hash": "6d7e561d62b955d1", // True if command was `wasp build`, false otherwise. "is_build": true, // Captures `wasp deploy ...` args, but only those from the limited, pre-defined list of keywords. // Those are "fly", "setup", "create-db", "deploy" and "cmd". Everything else is ommited. "deploy_cmd_args": "fly;deploy", "wasp_version": "0.1.9.1", "os": "linux", // "CI" if running on CI, and whatever is the content of "WASP_TELEMETRY_CONTEXT" env var. // We use this to track when execution is happening in some special context, like on Gitpod, Replit or similar. "context": "CI"}
``` | null | https://wasp-lang.dev/docs/telemetry | Overview | * | 0 | h3=":443"; ma=86400 | max-age=600 | DYNAMIC | 878ec90c5d454bcf-BUF | null | br | text/html; charset=utf-8 | Tue, 23 Apr 2024 15:11:18 GMT | Tue, 23 Apr 2024 15:21:18 GMT | Thu, 18 Apr 2024 15:50:27 GMT | {"success_fraction":0, "report_to":"cf-nel", "max_age":604800} | {"endpoints":[{"url":"https:\/\/a.nel.cloudflare.com\/report\/v4?s=asaNfjrmWg%2Ftfptie69yCS2GKJ4%2Fbg57cEyoWNHm8WggbcvI2qDOseQMQT%2Bi6LWJ4iyE6dMu5f4J5cK8pIPVZBwWpyTc2dwXGqrDVZ0E6KZNuwXGmyEsM9mT%2FPM3PhDa"}], "group":"cf-nel", "max_age":604800} | cloudflare | null | Accept-Encoding | 1.1 varnish | MISS | 0 | 7fecc340551b85a2b8cb9462f1f48fdb134e58bd | h2 | EBAC:173D:D0C89:FF012:6627CF95 | HIT | MISS | cache-nyc-kteb1890025-NYC | S1713885078.463631, VS0, VE16 | null | null | en | og:image | https://wasp-lang.dev/docs/telemetry | og:url | Telemetry | Wasp | og:title | Overview | og:description | Telemetry | Wasp | null | {
// Randomly generated, non-identifiable UUID representing a user.
"distinct_id": "bf3fa7a8-1c11-4f82-9542-ec1a2d28786b",
// Non-identifiable hash representing a project.
"project_hash": "6d7e561d62b955d1",
// True if command was `wasp build`, false otherwise.
"is_build": true,
// Captures `wasp deploy ...` args, but only those from the limited, pre-defined list of keywords.
// Those are "fly", "setup", "create-db", "deploy" and "cmd". Everything else is ommited.
"deploy_cmd_args": "fly;deploy",
"wasp_version": "0.1.9.1",
"os": "linux",
// "CI" if running on CI, and whatever is the content of "WASP_TELEMETRY_CONTEXT" env var.
// We use this to track when execution is happening in some special context, like on Gitpod, Replit or similar.
"context": "CI"
} | https://wasp-lang.dev/docs/telemetry |
|
1 | 200 | 2024-04-23T15:11:25.654Z | https://wasp-lang.dev/docs/contact | https://wasp-lang.dev/docs | browser | Version: 0.13.0
## Contact
You can find us on [Discord](https://discord.gg/rzdnErX) or you can reach out to us via email at [hi@wasp-lang.dev](mailto:hi@wasp-lang.dev). | null | https://wasp-lang.dev/docs/contact | You can find us on Discord or you can reach out to us via email at hi@wasp-lang.dev. | * | 0 | h3=":443"; ma=86400 | max-age=600 | DYNAMIC | 878ec91899614bcf-BUF | null | br | text/html; charset=utf-8 | Tue, 23 Apr 2024 15:11:20 GMT | Tue, 23 Apr 2024 15:21:20 GMT | Thu, 18 Apr 2024 15:50:26 GMT | {"success_fraction":0, "report_to":"cf-nel", "max_age":604800} | {"endpoints":[{"url":"https:\/\/a.nel.cloudflare.com\/report\/v4?s=4GBkPSB08KYFE9NLLPILsB8hiyu85dZ5%2Fkpe97BMIcsn4aRxbXsQWBx6ntFeFUZ6VherzW29iD78gWQ58gzMEa%2FEZCC0QNDIiFBvXoHyeBgLp8w7YC4APjT9ZWX19TB0"}], "group":"cf-nel", "max_age":604800} | cloudflare | null | Accept-Encoding | 1.1 varnish | MISS | 0 | 427b9cb0d86b78a28ada0a2b8f6338326878f006 | h2 | 7002:1055D1:3A693B6:456D4BF:6627CF98 | HIT | MISS | cache-nyc-kteb1890025-NYC | S1713885080.429227, VS0, VE30 | null | null | en | og:image | https://wasp-lang.dev/docs/contact | og:url | Contact | Wasp | og:title | You can find us on Discord or you can reach out to us via email at hi@wasp-lang.dev. | og:description | Contact | Wasp | null | Version: 0.13.0
Contact
You can find us on Discord or you can reach out to us via email at hi@wasp-lang.dev. | https://wasp-lang.dev/docs/contact |
|
1 | 200 | 2024-04-23T15:11:38.420Z | https://wasp-lang.dev/docs/migrate-from-0-11-to-0-12 | https://wasp-lang.dev/docs | browser | The latest version of Wasp is 0.13.X
To fully migrate from 0.11.X to the latest version of Wasp, you should first migrate to **0.12.X and then to 0.13.X**.
Make sure to read the [migration guide from 0.12.X to 0.13.X](https://wasp-lang.dev/docs/migrate-from-0-12-to-0-13) after you finish this one.
## What's new in Wasp 0.12.0?[](#whats-new-in-wasp-0120 "Direct link to What's new in Wasp 0.12.0?")
### New project structure[](#new-project-structure "Direct link to New project structure")
Here's a file tree of a fresh Wasp project created with the previous version of Wasp. More precisely, this is what you'll get if you run `wasp new myProject` using Wasp 0.11.x:
```
.├── .gitignore├── main.wasp├── src│ ├── client│ │ ├── Main.css│ │ ├── MainPage.jsx│ │ ├── react-app-env.d.ts│ │ ├── tsconfig.json│ │ └── waspLogo.png│ ├── server│ │ └── tsconfig.json│ ├── shared│ │ └── tsconfig.json│ └── .waspignore└── .wasproot
```
Compare that with the file tree of a fresh Wasp project created with Wasp 0.12.0. In other words, this is what you will get by running `wasp new myProject` from this point onwards:
```
.├── .gitignore├── main.wasp├── package.json├── public│ └── .gitkeep├── src│ ├── Main.css│ ├── MainPage.jsx│ ├── queries.ts│ ├── vite-env.d.ts│ ├── .waspignore│ └── waspLogo.png├── tsconfig.json├── vite.config.ts└── .wasproot
```
The main differences are:
* The server/client code separation is no longer necessary. You can now organize your code however you want, as long as it's inside the `src` directory.
* All external imports in your Wasp file must have paths starting with `@src` (e.g., `import foo from '@src/bar.js'`) where `@src` refers to the `src` directory in your project root. The paths can no longer start with `@server` or `@client`.
* Your project now features a top-level `public` dir. Wasp will publicly serve all the files it finds in this directory. Read more about it [here](https://wasp-lang.dev/docs/project/static-assets).
Our [Overview docs](https://wasp-lang.dev/docs/tutorial/project-structure) explain the new structure in detail, while this page provides a [quick guide](#migrating-your-project-to-the-new-structure) for migrating existing projects.
### New auth[](#new-auth "Direct link to New auth")
In Wasp 0.11.X, authentication was based on the `User` model which the developer needed to set up properly and take care of the auth fields like `email` or `password`.
main.wasp
```
app myApp { wasp: { version: "^0.11.0" }, title: "My App", auth: { userEntity: User, externalAuthEntity: SocialLogin, methods: { gitHub: {} }, onAuthFailedRedirectTo: "/login" },}entity User {=psl id Int @id @default(autoincrement()) username String @unique password String externalAuthAssociations SocialLogin[]psl=}entity SocialLogin {=psl id Int @id @default(autoincrement()) provider String providerId String user User @relation(fields: [userId], references: [id], onDelete: Cascade) userId Int createdAt DateTime @default(now()) @@unique([provider, providerId, userId])psl=}
```
From 0.12.X onwards, authentication is based on the auth models which are automatically set up by Wasp. You don't need to take care of the auth fields anymore.
The `User` model is now just a business logic model and you use it for storing the data that is relevant for your app.
main.wasp
```
app myApp { wasp: { version: "^0.12.0" }, title: "My App", auth: { userEntity: User, methods: { gitHub: {} }, onAuthFailedRedirectTo: "/login" },}entity User {=psl id Int @id @default(autoincrement())psl=}
```
Regression Note: Multiple Auth Identities per User
With our old auth implementation, if you were using both Google and email auth methods, your users could sign up with Google first and then, later on, reset their password and therefore also enable logging in with their email and password. This was the only way in which a single user could have multiple login methods at the same time (Google and email).
This is not possible anymore. **The new auth system doesn't support multiple login methods per user at the moment**. We do plan to add this soon though, with the introduction of the [account merging feature](https://github.com/wasp-lang/wasp/issues/954).
If you have any users that have both Google and email login credentials at the same time, you will have to pick only one of those for that user to keep when migrating them.
Regression Note: `_waspCustomValidations` is deprecated
Auth field customization is no longer possible using the `_waspCustomValidations` on the `User` entity. This is a part of auth refactoring that we are doing to make it easier to customize auth. We will be adding more customization options in the future.
You can read more about the new auth system in the [Auth Entities](https://wasp-lang.dev/docs/auth/entities) section.
## How to Migrate?[](#how-to-migrate "Direct link to How to Migrate?")
These instructions are for migrating your app from Wasp `0.11.X` to Wasp `0.12.X`, meaning they will work for all minor releases that fit this pattern (e.g., the guide applies to `0.12.0`, `0.12.1`, ...).
The guide consists of two big steps:
1. Migrating your Wasp project to the new structure.
2. Migrating to the new auth.
If you get stuck at any point, don't hesitate to ask for help on [our Discord server](https://discord.gg/rzdnErX).
### Migrating Your Project to the New Structure[](#migrating-your-project-to-the-new-structure "Direct link to Migrating Your Project to the New Structure")
You can easily migrate your old Wasp project to the new structure by following a series of steps. Assuming you have a project called `foo` inside the directory `foo`, you should:
0. **Install the `0.12.x` version** of Wasp.
```
curl -sSL https://get.wasp-lang.dev/installer.sh | sh -s -- -v 0.12.4
```
1. Make sure to **backup or save your project** before starting the procedure (e.g., by committing it to source control or creating a copy).
2. **Position yourself in the terminal** in the directory that is a parent of your wasp project directory (so one level above: if you do `ls`, you should see your wasp project dir listed).
3. **Run the migration script** (replace `foo` at the end with the name of your Wasp project directory) and follow the instructions:
In case the migration script doesn't work well for you, you can do the same steps manually, as described here:
That's it! You now have a properly structured Wasp 0.12.0 project in the `foo` directory. Your app probably doesn't quite work yet due to some other changes in Wasp 0.12.0, but we'll get to that in the next sections.
### Migrating declaration names[](#migrating-declaration-names "Direct link to Migrating declaration names")
Wasp 0.12.0 adds a casing constraints when naming Queries, Actions, Jobs, and Entities in the `main.wasp` file.
The following casing conventions have now become mandatory:
* Operation (i.e., Query and Action) names must begin with a lowercase letter: `query getTasks {...}`, `action createTask {...}`.
* Job names must begin with a lowercase letter: `job sendReport {...}`.
* Entity names must start with an uppercase letter: `entity Task {...}`.
### Migrating the Tailwind Setup[](#migrating-the-tailwind-setup "Direct link to Migrating the Tailwind Setup")
note
If you don't use Tailwind in your project, you can skip this section.
There is a small change in how the `tailwind.config.cjs` needs to be defined in Wasp 0.12.0.
You'll need to wrap all your paths in the `content` field with the `resolveProjectPath` function. This makes sure that the paths are resolved correctly when generating your CSS.
Here's how you can do it:
* Before
* After
tailwind.config.cjs
```
/** @type {import('tailwindcss').Config} */module.exports = { content: [ './src/**/*.{js,jsx,ts,tsx}', ], theme: { extend: {}, }, plugins: [],}
```
### Default Server Dockerfile Changed[](#default-server-dockerfile-changed "Direct link to Default Server Dockerfile Changed")
note
If you didn't customize your Dockerfile or had a custom build process for the Wasp server, you can skip this section.
Between Wasp 0.11.X and 0.12.X, the Dockerfile that Wasp generates for you for deploying the server has changed. If you defined a custom Dockerfile in your project root dir or in any other way relied on its contents, you'll need to update it to incorporate the changes that Wasp 0.12.X made.
We suggest that you temporarily move your custom Dockerfile to a different location, then run `wasp start` to generate the new Dockerfile. Check out the `.wasp/out/Dockerfile` to see the new Dockerfile and what changes you need to make. You'll probably need to copy some of the changes from the new Dockerfile to your custom one to make your app work with Wasp 0.12.X.
### Migrating to the New Auth[](#migrating-to-the-new-auth "Direct link to Migrating to the New Auth")
As shown in [the previous section](#new-auth), Wasp significantly changed how authentication works in version 0.12.0. This section leads you through migrating your app from Wasp 0.11.X to Wasp 0.12.X.
Migrating your existing app to the new auth system is a two-step process:
1. Migrate to the new auth system
2. Clean up the old auth system
Migrating a deployed app
While going through these steps, we will focus first on doing the changes locally (including your local development database).
Once we confirm everything works well locally, we will apply the same changes to the deployed app (including your production database).
**We'll put extra info for migrating a deployed app in a box like this one.**
#### 1\. Migrate to the New Auth System[](#1-migrate-to-the-new-auth-system "Direct link to 1. Migrate to the New Auth System")
You can follow these steps to migrate to the new auth system (assuming you already migrated the project structure to 0.12, as described [above](#migrating-your-project-to-the-new-structure)):
1. **Migrate `getUserFields` and/or `additionalSignupFields` in the `main.wasp` file to the new `userSignupFields` field.**
If you are not using them, you can skip this step.
In Wasp 0.11.X, you could define a `getUserFieldsFn` to specify extra fields that would get saved to the `User` when using Google or GitHub to sign up.
You could also define `additionalSignupFields` to specify extra fields for the Email or Username & Password signup.
In 0.12.X, we unified these two concepts into the `userSignupFields` field.
Migration for [Email](https://wasp-lang.dev/docs/auth/email) and [Username & Password](https://wasp-lang.dev/docs/auth/username-and-pass)Migration for [Github](https://wasp-lang.dev/docs/auth/social-auth/github) and [Google](https://wasp-lang.dev/docs/auth/social-auth/google)
2. **Remove the `auth.methods.email.allowUnverifiedLogin` field** from your `main.wasp` file.
In Wasp 0.12.X we removed the `auth.methods.email.allowUnverifiedLogin` field to make our Email auth implementation easier to reason about. If you were using it, you should remove it from your `main.wasp` file.
3. Ensure your **local development database is running**.
4. **Do the schema migration** (create the new auth tables in the database) by running:
You should see the new `Auth`, `AuthIdentity` and `Session` tables in your database. You can use the `wasp db studio` command to open the database in a GUI and verify the tables are there. At the moment, they will be empty.
5. **Do the data migration** (move existing users from the old auth system to the new one by filling the new auth tables in the database with their data):
1. **Implement your data migration function(s)** in e.g. `src/migrateToNewAuth.ts`.
Below we prepared [examples of migration functions](#example-data-migration-functions) for each of the auth methods, for you to use as a starting point. They should be fine to use as-is, meaning you can just copy them and they are likely to work out of the box for typical use cases, but you can also modify them for your needs.
We recommend you create one function per each auth method that you use in your app.
2. **Define custom API endpoints for each migration function** you implemented.
With each data migration function below, we provided a relevant `api` declaration that you should add to your `main.wasp` file.
3. **Run the data migration function(s)** on the local development database by calling the API endpoints you defined in the previous step.
You can call the endpoint by visiting the URL in your browser, or by using a tool like `curl` or Postman.
For example, if you defined the API endpoint at `/migrate-username-and-password`, you can call it by visiting `http://localhost:3001/migrate-username-and-password` in your browser.
This should be it, you can now run `wasp db studio` again and verify that there is now relevant data in the new auth tables (`Auth` and `AuthIdentity`; `Session` should still be empty for now).
6. **Verify that the basic auth functionality works** by running `wasp start` and successfully signing up / logging in with each of the auth methods.
7. **Update your JS/TS code** to work correctly with the new auth.
You might want to use the new auth helper functions to get the `email` or `username` from a user object. For example, `user.username` might not work anymore for you, since the `username` obtained by the Username & Password auth method isn't stored on the `User` entity anymore (unless you are explicitly storing something into `user.username`, e.g. via `userSignupFields` for a social auth method like Github). Same goes for `email` from Email auth method.
Instead, you can now use `getUsername(user)` to get the username obtained from Username & Password auth method, or `getEmail(user)` to get the email obtained from Email auth method.
Read more about the helpers in the [Auth Entities - Accessing the Auth Fields](https://wasp-lang.dev/docs/auth/entities#accessing-the-auth-fields) section.
8. Finally, **check that your app now fully works as it worked before**. If all the above steps were done correctly, everything should be working now.
Migrating a deployed app
After successfully performing migration locally so far, and verifying that your app works as expected, it is time to also migrate our deployed app.
Before migrating your production (deployed) app, we advise you to back up your production database in case something goes wrong. Also, besides testing it in development, it's good to test the migration in a staging environment if you have one.
We will perform the production migration in 2 steps:
* Deploying the new code to production (client and server).
* Migrating the production database data.
* * *
Between these two steps, so after successfully deploying the new code to production and before migrating the production database data, your app will not be working completely: new users will be able to sign up, but existing users won't be able to log in, and already logged in users will be logged out. Once you do the second step, migrating the production database data, it will all be back to normal. You will likely want to keep the time between the two steps as short as you can.
* * *
* **First step: deploy the new code** (client and server), either via `wasp deploy` (i.e. `wasp deploy fly deploy`) or manually.
Check our [Deployment docs](https://wasp-lang.dev/docs/advanced/deployment/overview) for more details.
* **Second step: run the data migration functions** on the production database.
You can do this by calling the API endpoints you defined in the previous step, just like you did locally. You can call the endpoint by visiting the URL in your browser, or by using a tool like `curl` or Postman.
For example, if you defined the API endpoint at `/migrate-username-and-password`, you can call it by visiting `https://your-server-url.com/migrate-username-and-password` in your browser.
Your deployed app should be working normally now, with the new auth system.
#### 2\. Cleanup the Old Auth System[](#2-cleanup-the-old-auth-system "Direct link to 2. Cleanup the Old Auth System")
Your app should be working correctly and using new auth, but to finish the migration, we need to clean up the old auth system:
1. In `main.wasp` file, **delete auth-related fields from the `User` entity**, since with 0.12 they got moved to the internal Wasp entity `AuthIdentity`.
* This means any fields that were required by Wasp for authentication, like `email`, `password`, `isEmailVerified`, `emailVerificationSentAt`, `passwordResetSentAt`, `username`, etc.
* There are situations in which you might want to keep some of them, e.g. `email` and/or `username`, if they are still relevant for you due to your custom logic (e.g. you are populating them with `userSignupFields` upon social signup in order to have this info easily available on the `User` entity). Note that they won't be used by Wasp Auth anymore, they are here just for your business logic.
2. In `main.wasp` file, **remove the `externalAuthEntity` field from the `app.auth`** and also **remove the whole `SocialLogin` entity** if you used Google or GitHub auth.
3. **Delete the data migration function(s)** you implemented earlier (e.g. in `src/migrateToNewAuth.ts`) and also the corresponding API endpoints from the `main.wasp` file.
4. **Run `wasp db migrate-dev`** again to apply these changes and remove the redundant fields from the database.
Migrating a deployed app
After doing the steps above successfully locally and making sure everything is working, it is time to push these changes to the deployed app again.
_Deploy the app again_, either via `wasp deploy` or manually. Check our [Deployment docs](https://wasp-lang.dev/docs/advanced/deployment/overview) for more details.
The database migrations will automatically run on successful deployment of the server and delete the now redundant auth-related `User` columns from the database.
Your app is now fully migrated to the new auth system.
### Next Steps[](#next-steps "Direct link to Next Steps")
If you made it this far, you've completed all the necessary steps to get your Wasp app working with Wasp 0.12.x. Nice work!
Finally, since Wasp no longer requires you to separate your client source files (previously in `src/client`) from server source files (previously in `src/server`), you are now free to reorganize your project however you think is best, as long as you keep all the source files in the `src/` directory.
This section is optional, but if you didn't like the server/client separation, now's the perfect time to change it.
For example, if your `src` dir looked like this:
```
src│├── client│ ├── Dashboard.tsx│ ├── Login.tsx│ ├── MainPage.tsx│ ├── Register.tsx│ ├── Task.css│ ├── TaskLisk.tsx│ ├── Task.tsx│ └── User.tsx├── server│ ├── taskActions.ts│ ├── taskQueries.ts│ ├── userActions.ts│ └── userQueries.ts└── shared └── utils.ts
```
you can now change it to a feature-based structure (which we recommend for any project that is not very small):
```
src│├── task│ ├── actions.ts -- former taskActions.ts│ ├── queries.ts -- former taskQueries.ts│ ├── Task.css│ ├── TaskLisk.tsx│ └── Task.tsx├── user│ ├── actions.ts -- former userActions.ts│ ├── Dashboard.tsx│ ├── Login.tsx│ ├── queries.ts -- former userQueries.ts│ ├── Register.tsx│ └── User.tsx├── MainPage.tsx└── utils.ts
```
## Appendix[](#appendix "Direct link to Appendix")
### Example Data Migration Functions[](#example-data-migration-functions "Direct link to Example Data Migration Functions")
The migration functions provided below are written with the typical use cases in mind and you can use them as-is. If your setup requires additional logic, you can use them as a good starting point and modify them to your needs.
Note that all of the functions below are written to be idempotent, meaning that running a function multiple times can't hurt. This allows executing a function again in case only a part of the previous execution succeeded and also means that accidentally running it one time too much won't have any negative effects. **We recommend you keep your data migration functions idempotent**.
#### Username & Password[](#username--password "Direct link to Username & Password")
To successfully migrate the users using the Username & Password auth method, you will need to do two things:
1. Migrate the user data
Username & Password data migration function
2. Provide a way for users to migrate their password
There is a **breaking change between the old and the new auth in the way the password is hashed**. This means that users will need to migrate their password after the migration, as the old password will no longer work.
Since the only way users using username and password as a login method can verify their identity is by providing both their username and password (there is no email or any other info, unless you asked for it and stored it explicitly), we need to provide them a way to **exchange their old password for a new password**. One way to handle this is to inform them about the need to migrate their password (on the login page) and provide a custom page to migrate the password.
Steps to create a custom page for migrating the password
#### Email[](#email "Direct link to Email")
To successfully migrate the users using the Email auth method, you will need to do two things:
1. Migrate the user data
Email data migration function
2. Ask the users to reset their password
There is a **breaking change between the old and the new auth in the way the password is hashed**. This means that users will need to reset their password after the migration, as the old password will no longer work.
It would be best to notify your users about this change and put a notice on your login page to **request a password reset**.
#### Google & GitHub[](#google--github "Direct link to Google & GitHub")
Google & GitHub data migration functions | null | https://wasp-lang.dev/docs/migrate-from-0-11-to-0-12 | To fully migrate from 0.11.X to the latest version of Wasp, you should first migrate to 0.12.X and then to 0.13.X. | * | 0 | h3=":443"; ma=86400 | max-age=600 | DYNAMIC | 878ec9756afb711c-YYZ | null | br | text/html; charset=utf-8 | Tue, 23 Apr 2024 15:11:35 GMT | Tue, 23 Apr 2024 15:21:35 GMT | Thu, 18 Apr 2024 15:50:26 GMT | {"success_fraction":0, "report_to":"cf-nel", "max_age":604800} | {"endpoints":[{"url":"https:\/\/a.nel.cloudflare.com\/report\/v4?s=OlgO33mJlbn92QyVkI%2Bd1bo3ZUxkBuDZcIHRkvFNYLQWWf2190Vs8%2BD0leT7n3a4RpnE%2BC266W%2FG3RnM7%2BpO1gkOOJehTCfSIf6ysvZhUmxqQFi2AJoyPy6tNEdfYRkt"}], "group":"cf-nel", "max_age":604800} | cloudflare | null | Accept-Encoding | 1.1 varnish | MISS | 0 | e6ffbd438a4d166142b616c9f6ee87c51c849830 | h2 | 6876:FF8F1:395BE21:443AC8E:6627CFA6 | HIT | MISS | cache-yyz4551-YYZ | S1713885095.284924, VS0, VE36 | null | null | en | og:image | https://wasp-lang.dev/docs/migrate-from-0-11-to-0-12 | og:url | Migration from 0.11.X to 0.12.X | Wasp | og:title | To fully migrate from 0.11.X to the latest version of Wasp, you should first migrate to 0.12.X and then to 0.13.X. | og:description | Migration from 0.11.X to 0.12.X | Wasp | null | The latest version of Wasp is 0.13.X
To fully migrate from 0.11.X to the latest version of Wasp, you should first migrate to 0.12.X and then to 0.13.X.
Make sure to read the migration guide from 0.12.X to 0.13.X after you finish this one.
What's new in Wasp 0.12.0?
New project structure
Here's a file tree of a fresh Wasp project created with the previous version of Wasp. More precisely, this is what you'll get if you run wasp new myProject using Wasp 0.11.x:
.
├── .gitignore
├── main.wasp
├── src
│ ├── client
│ │ ├── Main.css
│ │ ├── MainPage.jsx
│ │ ├── react-app-env.d.ts
│ │ ├── tsconfig.json
│ │ └── waspLogo.png
│ ├── server
│ │ └── tsconfig.json
│ ├── shared
│ │ └── tsconfig.json
│ └── .waspignore
└── .wasproot
Compare that with the file tree of a fresh Wasp project created with Wasp 0.12.0. In other words, this is what you will get by running wasp new myProject from this point onwards:
.
├── .gitignore
├── main.wasp
├── package.json
├── public
│ └── .gitkeep
├── src
│ ├── Main.css
│ ├── MainPage.jsx
│ ├── queries.ts
│ ├── vite-env.d.ts
│ ├── .waspignore
│ └── waspLogo.png
├── tsconfig.json
├── vite.config.ts
└── .wasproot
The main differences are:
The server/client code separation is no longer necessary. You can now organize your code however you want, as long as it's inside the src directory.
All external imports in your Wasp file must have paths starting with @src (e.g., import foo from '@src/bar.js') where @src refers to the src directory in your project root. The paths can no longer start with @server or @client.
Your project now features a top-level public dir. Wasp will publicly serve all the files it finds in this directory. Read more about it here.
Our Overview docs explain the new structure in detail, while this page provides a quick guide for migrating existing projects.
New auth
In Wasp 0.11.X, authentication was based on the User model which the developer needed to set up properly and take care of the auth fields like email or password.
main.wasp
app myApp {
wasp: {
version: "^0.11.0"
},
title: "My App",
auth: {
userEntity: User,
externalAuthEntity: SocialLogin,
methods: {
gitHub: {}
},
onAuthFailedRedirectTo: "/login"
},
}
entity User {=psl
id Int @id @default(autoincrement())
username String @unique
password String
externalAuthAssociations SocialLogin[]
psl=}
entity SocialLogin {=psl
id Int @id @default(autoincrement())
provider String
providerId String
user User @relation(fields: [userId], references: [id], onDelete: Cascade)
userId Int
createdAt DateTime @default(now())
@@unique([provider, providerId, userId])
psl=}
From 0.12.X onwards, authentication is based on the auth models which are automatically set up by Wasp. You don't need to take care of the auth fields anymore.
The User model is now just a business logic model and you use it for storing the data that is relevant for your app.
main.wasp
app myApp {
wasp: {
version: "^0.12.0"
},
title: "My App",
auth: {
userEntity: User,
methods: {
gitHub: {}
},
onAuthFailedRedirectTo: "/login"
},
}
entity User {=psl
id Int @id @default(autoincrement())
psl=}
Regression Note: Multiple Auth Identities per User
With our old auth implementation, if you were using both Google and email auth methods, your users could sign up with Google first and then, later on, reset their password and therefore also enable logging in with their email and password. This was the only way in which a single user could have multiple login methods at the same time (Google and email).
This is not possible anymore. The new auth system doesn't support multiple login methods per user at the moment. We do plan to add this soon though, with the introduction of the account merging feature.
If you have any users that have both Google and email login credentials at the same time, you will have to pick only one of those for that user to keep when migrating them.
Regression Note: _waspCustomValidations is deprecated
Auth field customization is no longer possible using the _waspCustomValidations on the User entity. This is a part of auth refactoring that we are doing to make it easier to customize auth. We will be adding more customization options in the future.
You can read more about the new auth system in the Auth Entities section.
How to Migrate?
These instructions are for migrating your app from Wasp 0.11.X to Wasp 0.12.X, meaning they will work for all minor releases that fit this pattern (e.g., the guide applies to 0.12.0, 0.12.1, ...).
The guide consists of two big steps:
Migrating your Wasp project to the new structure.
Migrating to the new auth.
If you get stuck at any point, don't hesitate to ask for help on our Discord server.
Migrating Your Project to the New Structure
You can easily migrate your old Wasp project to the new structure by following a series of steps. Assuming you have a project called foo inside the directory foo, you should:
Install the 0.12.x version of Wasp.
curl -sSL https://get.wasp-lang.dev/installer.sh | sh -s -- -v 0.12.4
Make sure to backup or save your project before starting the procedure (e.g., by committing it to source control or creating a copy).
Position yourself in the terminal in the directory that is a parent of your wasp project directory (so one level above: if you do ls, you should see your wasp project dir listed).
Run the migration script (replace foo at the end with the name of your Wasp project directory) and follow the instructions:
In case the migration script doesn't work well for you, you can do the same steps manually, as described here:
That's it! You now have a properly structured Wasp 0.12.0 project in the foo directory. Your app probably doesn't quite work yet due to some other changes in Wasp 0.12.0, but we'll get to that in the next sections.
Migrating declaration names
Wasp 0.12.0 adds a casing constraints when naming Queries, Actions, Jobs, and Entities in the main.wasp file.
The following casing conventions have now become mandatory:
Operation (i.e., Query and Action) names must begin with a lowercase letter: query getTasks {...}, action createTask {...}.
Job names must begin with a lowercase letter: job sendReport {...}.
Entity names must start with an uppercase letter: entity Task {...}.
Migrating the Tailwind Setup
note
If you don't use Tailwind in your project, you can skip this section.
There is a small change in how the tailwind.config.cjs needs to be defined in Wasp 0.12.0.
You'll need to wrap all your paths in the content field with the resolveProjectPath function. This makes sure that the paths are resolved correctly when generating your CSS.
Here's how you can do it:
Before
After
tailwind.config.cjs
/** @type {import('tailwindcss').Config} */
module.exports = {
content: [
'./src/**/*.{js,jsx,ts,tsx}',
],
theme: {
extend: {},
},
plugins: [],
}
Default Server Dockerfile Changed
note
If you didn't customize your Dockerfile or had a custom build process for the Wasp server, you can skip this section.
Between Wasp 0.11.X and 0.12.X, the Dockerfile that Wasp generates for you for deploying the server has changed. If you defined a custom Dockerfile in your project root dir or in any other way relied on its contents, you'll need to update it to incorporate the changes that Wasp 0.12.X made.
We suggest that you temporarily move your custom Dockerfile to a different location, then run wasp start to generate the new Dockerfile. Check out the .wasp/out/Dockerfile to see the new Dockerfile and what changes you need to make. You'll probably need to copy some of the changes from the new Dockerfile to your custom one to make your app work with Wasp 0.12.X.
Migrating to the New Auth
As shown in the previous section, Wasp significantly changed how authentication works in version 0.12.0. This section leads you through migrating your app from Wasp 0.11.X to Wasp 0.12.X.
Migrating your existing app to the new auth system is a two-step process:
Migrate to the new auth system
Clean up the old auth system
Migrating a deployed app
While going through these steps, we will focus first on doing the changes locally (including your local development database).
Once we confirm everything works well locally, we will apply the same changes to the deployed app (including your production database).
We'll put extra info for migrating a deployed app in a box like this one.
1. Migrate to the New Auth System
You can follow these steps to migrate to the new auth system (assuming you already migrated the project structure to 0.12, as described above):
Migrate getUserFields and/or additionalSignupFields in the main.wasp file to the new userSignupFields field.
If you are not using them, you can skip this step.
In Wasp 0.11.X, you could define a getUserFieldsFn to specify extra fields that would get saved to the User when using Google or GitHub to sign up.
You could also define additionalSignupFields to specify extra fields for the Email or Username & Password signup.
In 0.12.X, we unified these two concepts into the userSignupFields field.
Migration for Email and Username & PasswordMigration for Github and Google
Remove the auth.methods.email.allowUnverifiedLogin field from your main.wasp file.
In Wasp 0.12.X we removed the auth.methods.email.allowUnverifiedLogin field to make our Email auth implementation easier to reason about. If you were using it, you should remove it from your main.wasp file.
Ensure your local development database is running.
Do the schema migration (create the new auth tables in the database) by running:
You should see the new Auth, AuthIdentity and Session tables in your database. You can use the wasp db studio command to open the database in a GUI and verify the tables are there. At the moment, they will be empty.
Do the data migration (move existing users from the old auth system to the new one by filling the new auth tables in the database with their data):
Implement your data migration function(s) in e.g. src/migrateToNewAuth.ts.
Below we prepared examples of migration functions for each of the auth methods, for you to use as a starting point. They should be fine to use as-is, meaning you can just copy them and they are likely to work out of the box for typical use cases, but you can also modify them for your needs.
We recommend you create one function per each auth method that you use in your app.
Define custom API endpoints for each migration function you implemented.
With each data migration function below, we provided a relevant api declaration that you should add to your main.wasp file.
Run the data migration function(s) on the local development database by calling the API endpoints you defined in the previous step.
You can call the endpoint by visiting the URL in your browser, or by using a tool like curl or Postman.
For example, if you defined the API endpoint at /migrate-username-and-password, you can call it by visiting http://localhost:3001/migrate-username-and-password in your browser.
This should be it, you can now run wasp db studio again and verify that there is now relevant data in the new auth tables (Auth and AuthIdentity; Session should still be empty for now).
Verify that the basic auth functionality works by running wasp start and successfully signing up / logging in with each of the auth methods.
Update your JS/TS code to work correctly with the new auth.
You might want to use the new auth helper functions to get the email or username from a user object. For example, user.username might not work anymore for you, since the username obtained by the Username & Password auth method isn't stored on the User entity anymore (unless you are explicitly storing something into user.username, e.g. via userSignupFields for a social auth method like Github). Same goes for email from Email auth method.
Instead, you can now use getUsername(user) to get the username obtained from Username & Password auth method, or getEmail(user) to get the email obtained from Email auth method.
Read more about the helpers in the Auth Entities - Accessing the Auth Fields section.
Finally, check that your app now fully works as it worked before. If all the above steps were done correctly, everything should be working now.
Migrating a deployed app
After successfully performing migration locally so far, and verifying that your app works as expected, it is time to also migrate our deployed app.
Before migrating your production (deployed) app, we advise you to back up your production database in case something goes wrong. Also, besides testing it in development, it's good to test the migration in a staging environment if you have one.
We will perform the production migration in 2 steps:
Deploying the new code to production (client and server).
Migrating the production database data.
Between these two steps, so after successfully deploying the new code to production and before migrating the production database data, your app will not be working completely: new users will be able to sign up, but existing users won't be able to log in, and already logged in users will be logged out. Once you do the second step, migrating the production database data, it will all be back to normal. You will likely want to keep the time between the two steps as short as you can.
First step: deploy the new code (client and server), either via wasp deploy (i.e. wasp deploy fly deploy) or manually.
Check our Deployment docs for more details.
Second step: run the data migration functions on the production database.
You can do this by calling the API endpoints you defined in the previous step, just like you did locally. You can call the endpoint by visiting the URL in your browser, or by using a tool like curl or Postman.
For example, if you defined the API endpoint at /migrate-username-and-password, you can call it by visiting https://your-server-url.com/migrate-username-and-password in your browser.
Your deployed app should be working normally now, with the new auth system.
2. Cleanup the Old Auth System
Your app should be working correctly and using new auth, but to finish the migration, we need to clean up the old auth system:
In main.wasp file, delete auth-related fields from the User entity, since with 0.12 they got moved to the internal Wasp entity AuthIdentity.
This means any fields that were required by Wasp for authentication, like email, password, isEmailVerified, emailVerificationSentAt, passwordResetSentAt, username, etc.
There are situations in which you might want to keep some of them, e.g. email and/or username, if they are still relevant for you due to your custom logic (e.g. you are populating them with userSignupFields upon social signup in order to have this info easily available on the User entity). Note that they won't be used by Wasp Auth anymore, they are here just for your business logic.
In main.wasp file, remove the externalAuthEntity field from the app.auth and also remove the whole SocialLogin entity if you used Google or GitHub auth.
Delete the data migration function(s) you implemented earlier (e.g. in src/migrateToNewAuth.ts) and also the corresponding API endpoints from the main.wasp file.
Run wasp db migrate-dev again to apply these changes and remove the redundant fields from the database.
Migrating a deployed app
After doing the steps above successfully locally and making sure everything is working, it is time to push these changes to the deployed app again.
Deploy the app again, either via wasp deploy or manually. Check our Deployment docs for more details.
The database migrations will automatically run on successful deployment of the server and delete the now redundant auth-related User columns from the database.
Your app is now fully migrated to the new auth system.
Next Steps
If you made it this far, you've completed all the necessary steps to get your Wasp app working with Wasp 0.12.x. Nice work!
Finally, since Wasp no longer requires you to separate your client source files (previously in src/client) from server source files (previously in src/server), you are now free to reorganize your project however you think is best, as long as you keep all the source files in the src/ directory.
This section is optional, but if you didn't like the server/client separation, now's the perfect time to change it.
For example, if your src dir looked like this:
src
│
├── client
│ ├── Dashboard.tsx
│ ├── Login.tsx
│ ├── MainPage.tsx
│ ├── Register.tsx
│ ├── Task.css
│ ├── TaskLisk.tsx
│ ├── Task.tsx
│ └── User.tsx
├── server
│ ├── taskActions.ts
│ ├── taskQueries.ts
│ ├── userActions.ts
│ └── userQueries.ts
└── shared
└── utils.ts
you can now change it to a feature-based structure (which we recommend for any project that is not very small):
src
│
├── task
│ ├── actions.ts -- former taskActions.ts
│ ├── queries.ts -- former taskQueries.ts
│ ├── Task.css
│ ├── TaskLisk.tsx
│ └── Task.tsx
├── user
│ ├── actions.ts -- former userActions.ts
│ ├── Dashboard.tsx
│ ├── Login.tsx
│ ├── queries.ts -- former userQueries.ts
│ ├── Register.tsx
│ └── User.tsx
├── MainPage.tsx
└── utils.ts
Appendix
Example Data Migration Functions
The migration functions provided below are written with the typical use cases in mind and you can use them as-is. If your setup requires additional logic, you can use them as a good starting point and modify them to your needs.
Note that all of the functions below are written to be idempotent, meaning that running a function multiple times can't hurt. This allows executing a function again in case only a part of the previous execution succeeded and also means that accidentally running it one time too much won't have any negative effects. We recommend you keep your data migration functions idempotent.
Username & Password
To successfully migrate the users using the Username & Password auth method, you will need to do two things:
Migrate the user data
Username & Password data migration function
Provide a way for users to migrate their password
There is a breaking change between the old and the new auth in the way the password is hashed. This means that users will need to migrate their password after the migration, as the old password will no longer work.
Since the only way users using username and password as a login method can verify their identity is by providing both their username and password (there is no email or any other info, unless you asked for it and stored it explicitly), we need to provide them a way to exchange their old password for a new password. One way to handle this is to inform them about the need to migrate their password (on the login page) and provide a custom page to migrate the password.
Steps to create a custom page for migrating the password
Email
To successfully migrate the users using the Email auth method, you will need to do two things:
Migrate the user data
Email data migration function
Ask the users to reset their password
There is a breaking change between the old and the new auth in the way the password is hashed. This means that users will need to reset their password after the migration, as the old password will no longer work.
It would be best to notify your users about this change and put a notice on your login page to request a password reset.
Google & GitHub
Google & GitHub data migration functions | https://wasp-lang.dev/docs/migrate-from-0-11-to-0-12 |
|
1 | 200 | 2024-04-23T15:11:50.465Z | https://wasp-lang.dev/docs/migrate-from-0-12-to-0-13 | https://wasp-lang.dev/docs | browser | Are you on 0.11.X or earlier?
This guide only covers the migration from **0.12.X to 0.13.X**. If you are migrating from 0.11.X or earlier, please read the [migration guide from 0.11.X to 0.12.X](https://wasp-lang.dev/docs/migrate-from-0-11-to-0-12) first.
## What's new in 0.13.0?[](#whats-new-in-0130 "Direct link to What's new in 0.13.0?")
### OAuth providers got an overhaul[](#oauth-providers-got-an-overhaul "Direct link to OAuth providers got an overhaul")
Wasp 0.13.0 switches away from using Passport for our OAuth providers in favor of [Arctic](https://arctic.js.org/) from the [Lucia](https://lucia-auth.com/) ecosystem. This change simplifies the codebase and makes it easier to add new OAuth providers in the future.
### We added Keycloak as an OAuth provider[](#we-added-keycloak-as-an-oauth-provider "Direct link to We added Keycloak as an OAuth provider")
Wasp now supports using [Keycloak](https://www.keycloak.org/) as an OAuth provider.
## How to migrate?[](#how-to-migrate "Direct link to How to migrate?")
### Migrate your OAuth setup[](#migrate-your-oauth-setup "Direct link to Migrate your OAuth setup")
We had to make some breaking changes to upgrade the OAuth setup to the new Arctic lib.
Follow the steps below to migrate:
1. **Define the `WASP_SERVER_URL` server env variable**
In 0.13.0 Wasp introduces a new server env variable `WASP_SERVER_URL` that you need to define. This is the URL of your Wasp server and it's used to generate the redirect URL for the OAuth providers.
Server env variables
```
WASP_SERVER_URL=https://your-wasp-server-url.com
```
In development, Wasp sets the `WASP_SERVER_URL` to `http://localhost:3001` by default.
Migrating a deployed app
If you are migrating a deployed app, you will need to define the `WASP_SERVER_URL` server env variable in your deployment environment.
Read more about setting env variables in production [here](https://wasp-lang.dev/docs/project/env-vars#defining-env-vars-in-production).
2. **Update the redirect URLs** for the OAuth providers
The redirect URL for the OAuth providers has changed. You will need to update the redirect URL for the OAuth providers in the provider's dashboard.
* Before
* After
```
{clientUrl}/auth/login/{provider}
```
Check the new redirect URLs for [Google](https://wasp-lang.dev/docs/auth/social-auth/google#3-creating-a-google-oauth-app) and [GitHub](https://wasp-lang.dev/docs/auth/social-auth/github#3-creating-a-github-oauth-app) in Wasp's docs.
3. **Update the `configFn`** for the OAuth providers
If you didn't use the `configFn` option, you can skip this step.
If you used the `configFn` to configure the `scope` for the OAuth providers, you will need to rename the `scope` property to `scopes`.
Also, the object returned from `configFn` no longer needs to include the Client ID and the Client Secret. You can remove them from the object that `configFn` returns.
* Before
* After
google.ts
```
export function getConfig() { return { clientID: process.env.GOOGLE_CLIENT_ID, clientSecret: process.env.GOOGLE_CLIENT_SECRET, scope: ['profile', 'email'], }}
```
4. **Update the `userSignupFields` fields** to use the new `profile` format
If you didn't use the `userSignupFields` option, you can skip this step.
The data format for the `profile` that you receive from the OAuth providers has changed. You will need to update your code to reflect this change.
* Before
* After
google.ts
```
import { defineUserSignupFields } from 'wasp/server/auth'export const userSignupFields = defineUserSignupFields({ displayName: (data: any) => data.profile.displayName,})
```
Wasp now directly forwards what it receives from the OAuth providers. You can check the data format for [Google](https://wasp-lang.dev/docs/auth/social-auth/google#data-received-from-google) and [GitHub](https://wasp-lang.dev/docs/auth/social-auth/github#data-received-from-github) in Wasp's docs.
That's it!
You should now be able to run your app with the new Wasp 0.13.0. | null | https://wasp-lang.dev/docs/migrate-from-0-12-to-0-13 | This guide only covers the migration from 0.12.X to 0.13.X. If you are migrating from 0.11.X or earlier, please read the migration guide from 0.11.X to 0.12.X first. | * | 0 | h3=":443"; ma=86400 | max-age=600 | DYNAMIC | 878ec9a88a9b4bcc-BUF | null | br | text/html; charset=utf-8 | Tue, 23 Apr 2024 15:11:43 GMT | Tue, 23 Apr 2024 15:21:43 GMT | Thu, 18 Apr 2024 15:50:26 GMT | {"success_fraction":0, "report_to":"cf-nel", "max_age":604800} | {"endpoints":[{"url":"https:\/\/a.nel.cloudflare.com\/report\/v4?s=T7KPfv89Z9BAKDeE4ilSYgakTQTXUyLGuLWahZ2efc2IH6qnW9%2FPKGUyo4dTAnPhWHiuH%2F1%2B14an5%2BVO5D98OED8%2Fs9hv%2Bm11WK0IkN39ZWMr4VUR8eN%2B0Ap2DKOIHmO"}], "group":"cf-nel", "max_age":604800} | cloudflare | null | Accept-Encoding | 1.1 varnish | MISS | 0 | f9ac6a7c9b201d98a22f73a447242ba70c03281d | h2 | 5A92:180046:3C24A37:47297FB:6627CFAF | null | MISS | cache-nyc-kteb1890087-NYC | S1713885103.452461, VS0, VE24 | null | null | en | og:image | https://wasp-lang.dev/docs/migrate-from-0-12-to-0-13 | og:url | Migration from 0.12.X to 0.13.X | Wasp | og:title | This guide only covers the migration from 0.12.X to 0.13.X. If you are migrating from 0.11.X or earlier, please read the migration guide from 0.11.X to 0.12.X first. | og:description | Migration from 0.12.X to 0.13.X | Wasp | null | Are you on 0.11.X or earlier?
This guide only covers the migration from 0.12.X to 0.13.X. If you are migrating from 0.11.X or earlier, please read the migration guide from 0.11.X to 0.12.X first.
What's new in 0.13.0?
OAuth providers got an overhaul
Wasp 0.13.0 switches away from using Passport for our OAuth providers in favor of Arctic from the Lucia ecosystem. This change simplifies the codebase and makes it easier to add new OAuth providers in the future.
We added Keycloak as an OAuth provider
Wasp now supports using Keycloak as an OAuth provider.
How to migrate?
Migrate your OAuth setup
We had to make some breaking changes to upgrade the OAuth setup to the new Arctic lib.
Follow the steps below to migrate:
Define the WASP_SERVER_URL server env variable
In 0.13.0 Wasp introduces a new server env variable WASP_SERVER_URL that you need to define. This is the URL of your Wasp server and it's used to generate the redirect URL for the OAuth providers.
Server env variables
WASP_SERVER_URL=https://your-wasp-server-url.com
In development, Wasp sets the WASP_SERVER_URL to http://localhost:3001 by default.
Migrating a deployed app
If you are migrating a deployed app, you will need to define the WASP_SERVER_URL server env variable in your deployment environment.
Read more about setting env variables in production here.
Update the redirect URLs for the OAuth providers
The redirect URL for the OAuth providers has changed. You will need to update the redirect URL for the OAuth providers in the provider's dashboard.
Before
After
{clientUrl}/auth/login/{provider}
Check the new redirect URLs for Google and GitHub in Wasp's docs.
Update the configFn for the OAuth providers
If you didn't use the configFn option, you can skip this step.
If you used the configFn to configure the scope for the OAuth providers, you will need to rename the scope property to scopes.
Also, the object returned from configFn no longer needs to include the Client ID and the Client Secret. You can remove them from the object that configFn returns.
Before
After
google.ts
export function getConfig() {
return {
clientID: process.env.GOOGLE_CLIENT_ID,
clientSecret: process.env.GOOGLE_CLIENT_SECRET,
scope: ['profile', 'email'],
}
}
Update the userSignupFields fields to use the new profile format
If you didn't use the userSignupFields option, you can skip this step.
The data format for the profile that you receive from the OAuth providers has changed. You will need to update your code to reflect this change.
Before
After
google.ts
import { defineUserSignupFields } from 'wasp/server/auth'
export const userSignupFields = defineUserSignupFields({
displayName: (data: any) => data.profile.displayName,
})
Wasp now directly forwards what it receives from the OAuth providers. You can check the data format for Google and GitHub in Wasp's docs.
That's it!
You should now be able to run your app with the new Wasp 0.13.0. | https://wasp-lang.dev/docs/migrate-from-0-12-to-0-13 |
|
1 | 200 | 2024-04-23T15:11:58.965Z | https://wasp-lang.dev/docs/0.12.0 | https://wasp-lang.dev/docs | browser | ## Introduction
note
If you are looking for the installation instructions, check out the [Quick Start](https://wasp-lang.dev/docs/0.12.0/quick-start) section.
We will give a brief overview of what Wasp is, how it works on a high level and when to use it.
It is an opinionated way of building **full-stack web applications**. It takes care of all three major parts of a web application: **client** (front-end), **server** (back-end) and **database**.
### Works well with your existing stack[](#works-well-with-your-existing-stack "Direct link to Works well with your existing stack")
Wasp is not trying to do everything at once but rather focuses on the complexity which arises from connecting all the parts of the stack (client, server, database, deployment) together.
Wasp is using **React**, **Node.js** and **Prisma** under the hood and relies on them to define web components and server queries and actions.
### Wasp's secret sauce[](#wasps-secret-sauce "Direct link to Wasp's secret sauce")
At the core is the Wasp compiler which takes the Wasp config and your Javascript code and outputs the client app, server app and deployment code.

How the magic happens 🌈
The cool thing about having a compiler that understands your code is that it can do a lot of things for you.
Define your app in the Wasp config and get:
* login and signup with Auth UI components,
* full-stack type safety,
* e-mail sending,
* async processing jobs,
* React Query powered data fetching,
* security best practices,
* and more.
You don't need to write any code for these features, Wasp will take care of it for you 🤯 And what's even better, Wasp also maintains the code for you, so you don't have to worry about keeping up with the latest security best practices. As Wasp updates, so does your app.
## So what does the code look like?[](#so-what-does-the-code-look-like "Direct link to So what does the code look like?")
Let's say you want to build a web app that allows users to **create and share their favorite recipes**.
Let's start with the main.wasp file: it is the central file of your app, where you describe the app from the high level.
Let's give our app a title and let's immediately turn on the full-stack authentication via username and password:
main.wasp
```
app RecipeApp { title: "My Recipes", wasp: { version: "^0.12.0" }, auth: { methods: { usernameAndPassword: {} }, onAuthFailedRedirectTo: "/login", userEntity: User }}
```
Let's then add the data models for your recipes. We will want to have Users and Users can own Recipes:
main.wasp
```
...entity User {=psl // Data models are defined using Prisma Schema Language. id Int @id @default(autoincrement()) recipes Recipe[]psl=}entity Recipe {=psl id Int @id @default(autoincrement()) title String description String? userId Int user User @relation(fields: [userId], references: [id])psl=}
```
Next, let's define how to do something with these data models!
We do that by defining Operations, in this case a Query `getRecipes` and Action `addRecipe`, which are in their essence a Node.js functions that execute on server and can, thanks to Wasp, very easily be called from the client.
First, we define these Operations in our main.wasp file, so Wasp knows about them and can "beef them up":
main.wasp
```
// Queries have automatic cache invalidation and are type-safe.query getRecipes { fn: import { getRecipes } from "@src/recipe/operations.ts", entities: [Recipe],}// Actions are type-safe and can be used to perform side-effects.action addRecipe { fn: import { addRecipe } from "@src/recipe/operations.ts", entities: [Recipe],}
```
... and then implement them in our Javascript (or TypeScript) code (we show just the query here, using TypeScript):
src/recipe/operations.ts
```
// Wasp generates the types for you.import { type GetRecipes } from "wasp/server/operations";import { type Recipe } from "wasp/entities";export const getRecipes: GetRecipes<{}, Recipe[]> = async (_args, context) => { return context.entities.Recipe.findMany( // Prisma query { where: { user: { id: context.user.id } } } );};export const addRecipe ...
```
Now we can very easily use these in our React components!
For the end, let's create a home page of our app.
First we define it in main.wasp:
main.wasp
```
...route HomeRoute { path: "/", to: HomePage }page HomePage { component: import { HomePage } from "@src/pages/HomePage", authRequired: true // Will send user to /login if not authenticated.}
```
and then implement it as a React component in JS/TS (that calls the Operations we previously defined):
src/pages/HomePage.tsx
```
import { useQuery, getRecipes } from "wasp/client/operations";import { type User } from "wasp/entities";export function HomePage({ user }: { user: User }) { // Due to full-stack type safety, `recipes` will be of type `Recipe[]` here. const { data: recipes, isLoading } = useQuery(getRecipes); // Calling our query here! if (isLoading) { return <div>Loading...</div>; } return ( <div> <h1>Recipes</h1> <ul> {recipes ? recipes.map((recipe) => ( <li key={recipe.id}> <div>{recipe.title}</div> <div>{recipe.description}</div> </li> )) : 'No recipes defined yet!'} </ul> </div> );}
```
And voila! We are listing all the recipes in our app 🎉
This was just a quick example to give you a taste of what Wasp is. For step by step tour through the most important Wasp features, check out the [Todo app tutorial](https://wasp-lang.dev/docs/0.12.0/tutorial/create).
note
Above we skipped defining `/login` and `/signup` pages to keep the example a bit shorter, but those are very simple to do by using Wasp's Auth UI feature.
## When to use Wasp[](#when-to-use-wasp "Direct link to When to use Wasp")
Wasp is addressing the same core problems that typical web app frameworks are addressing, and it in big part [looks, swims and quacks](https://en.wikipedia.org/wiki/Duck_test) like a web app framework.
### Best used for[](#best-used-for "Direct link to Best used for")
* building full-stack web apps (like e.g. Airbnb or Asana)
* quickly starting a web app with industry best practices
* to be used alongside modern web dev stack (currently supported React and Node)
### Avoid using Wasp for[](#avoid-using-wasp-for "Direct link to Avoid using Wasp for")
* building static/presentational websites
* to be used as a no-code solution
* to be a solve-it-all tool in a single language
## Wasp is a DSL[](#wasp-is-a-dsl "Direct link to Wasp is a DSL")
note
You don't need to know what a DSL is to use Wasp, but if you are curious, you can read more about it below.
Wasp does not match typical expectations of a web app framework: it is not a set of libraries, it is instead a simple programming language that understands your code and can do a lot of things for you.
Wasp is a programming language, but a specific kind: it is specialized for a single purpose: **building modern web applications**. We call such languages _DSL_s (Domain Specific Language).
Other examples of _DSL_s that are often used today are e.g. _SQL_ for databases and _HTML_ for web page layouts. The main advantage and reason why _DSL_s exist is that they need to do only one task (e.g. database queries) so they can do it well and provide the best possible experience for the developer.
The same idea stands behind Wasp - a language that will allow developers to **build modern web applications with 10x less code and less stack-specific knowledge**. | null | https://wasp-lang.dev/docs/0.12.0 | If you are looking for the installation instructions, check out the Quick Start section. | * | 0 | h3=":443"; ma=86400 | max-age=600 | DYNAMIC | 878ec9fb18d34bcc-BUF | null | br | text/html; charset=utf-8 | Tue, 23 Apr 2024 15:11:56 GMT | Tue, 23 Apr 2024 15:21:56 GMT | Thu, 18 Apr 2024 15:50:26 GMT | {"success_fraction":0, "report_to":"cf-nel", "max_age":604800} | {"endpoints":[{"url":"https:\/\/a.nel.cloudflare.com\/report\/v4?s=ZmII97N%2F2588DcOzDv3r8D70KVEZ8lh8pUyE748uqW8qHloUL2S0d2Vrj6c3b8D6BCKce7NQUaoqy%2BZYa9GS5DNMnLXRfORnLa9rPU5Ie3OMFNAfOoIPgoBc9CgJbNcm"}], "group":"cf-nel", "max_age":604800} | cloudflare | null | Accept-Encoding | 1.1 varnish | MISS | 0 | 300a3546a810c9f34ed3e3853614d5732f7184e7 | h2 | 14AC:3F9EB3:3A3188F:4535AA4:6627CFBB | HIT | MISS | cache-nyc-kteb1890087-NYC | S1713885117.667298, VS0, VE16 | null | null | en | og:image | https://wasp-lang.dev/docs/0.12.0 | og:url | Introduction | Wasp | og:title | If you are looking for the installation instructions, check out the Quick Start section. | og:description | Introduction | Wasp | null | Introduction
note
If you are looking for the installation instructions, check out the Quick Start section.
We will give a brief overview of what Wasp is, how it works on a high level and when to use it.
It is an opinionated way of building full-stack web applications. It takes care of all three major parts of a web application: client (front-end), server (back-end) and database.
Works well with your existing stack
Wasp is not trying to do everything at once but rather focuses on the complexity which arises from connecting all the parts of the stack (client, server, database, deployment) together.
Wasp is using React, Node.js and Prisma under the hood and relies on them to define web components and server queries and actions.
Wasp's secret sauce
At the core is the Wasp compiler which takes the Wasp config and your Javascript code and outputs the client app, server app and deployment code.
How the magic happens 🌈
The cool thing about having a compiler that understands your code is that it can do a lot of things for you.
Define your app in the Wasp config and get:
login and signup with Auth UI components,
full-stack type safety,
e-mail sending,
async processing jobs,
React Query powered data fetching,
security best practices,
and more.
You don't need to write any code for these features, Wasp will take care of it for you 🤯 And what's even better, Wasp also maintains the code for you, so you don't have to worry about keeping up with the latest security best practices. As Wasp updates, so does your app.
So what does the code look like?
Let's say you want to build a web app that allows users to create and share their favorite recipes.
Let's start with the main.wasp file: it is the central file of your app, where you describe the app from the high level.
Let's give our app a title and let's immediately turn on the full-stack authentication via username and password:
main.wasp
app RecipeApp {
title: "My Recipes",
wasp: { version: "^0.12.0" },
auth: {
methods: { usernameAndPassword: {} },
onAuthFailedRedirectTo: "/login",
userEntity: User
}
}
Let's then add the data models for your recipes. We will want to have Users and Users can own Recipes:
main.wasp
...
entity User {=psl // Data models are defined using Prisma Schema Language.
id Int @id @default(autoincrement())
recipes Recipe[]
psl=}
entity Recipe {=psl
id Int @id @default(autoincrement())
title String
description String?
userId Int
user User @relation(fields: [userId], references: [id])
psl=}
Next, let's define how to do something with these data models!
We do that by defining Operations, in this case a Query getRecipes and Action addRecipe, which are in their essence a Node.js functions that execute on server and can, thanks to Wasp, very easily be called from the client.
First, we define these Operations in our main.wasp file, so Wasp knows about them and can "beef them up":
main.wasp
// Queries have automatic cache invalidation and are type-safe.
query getRecipes {
fn: import { getRecipes } from "@src/recipe/operations.ts",
entities: [Recipe],
}
// Actions are type-safe and can be used to perform side-effects.
action addRecipe {
fn: import { addRecipe } from "@src/recipe/operations.ts",
entities: [Recipe],
}
... and then implement them in our Javascript (or TypeScript) code (we show just the query here, using TypeScript):
src/recipe/operations.ts
// Wasp generates the types for you.
import { type GetRecipes } from "wasp/server/operations";
import { type Recipe } from "wasp/entities";
export const getRecipes: GetRecipes<{}, Recipe[]> = async (_args, context) => {
return context.entities.Recipe.findMany( // Prisma query
{ where: { user: { id: context.user.id } } }
);
};
export const addRecipe ...
Now we can very easily use these in our React components!
For the end, let's create a home page of our app.
First we define it in main.wasp:
main.wasp
...
route HomeRoute { path: "/", to: HomePage }
page HomePage {
component: import { HomePage } from "@src/pages/HomePage",
authRequired: true // Will send user to /login if not authenticated.
}
and then implement it as a React component in JS/TS (that calls the Operations we previously defined):
src/pages/HomePage.tsx
import { useQuery, getRecipes } from "wasp/client/operations";
import { type User } from "wasp/entities";
export function HomePage({ user }: { user: User }) {
// Due to full-stack type safety, `recipes` will be of type `Recipe[]` here.
const { data: recipes, isLoading } = useQuery(getRecipes); // Calling our query here!
if (isLoading) {
return <div>Loading...</div>;
}
return (
<div>
<h1>Recipes</h1>
<ul>
{recipes ? recipes.map((recipe) => (
<li key={recipe.id}>
<div>{recipe.title}</div>
<div>{recipe.description}</div>
</li>
)) : 'No recipes defined yet!'}
</ul>
</div>
);
}
And voila! We are listing all the recipes in our app 🎉
This was just a quick example to give you a taste of what Wasp is. For step by step tour through the most important Wasp features, check out the Todo app tutorial.
note
Above we skipped defining /login and /signup pages to keep the example a bit shorter, but those are very simple to do by using Wasp's Auth UI feature.
When to use Wasp
Wasp is addressing the same core problems that typical web app frameworks are addressing, and it in big part looks, swims and quacks like a web app framework.
Best used for
building full-stack web apps (like e.g. Airbnb or Asana)
quickly starting a web app with industry best practices
to be used alongside modern web dev stack (currently supported React and Node)
Avoid using Wasp for
building static/presentational websites
to be used as a no-code solution
to be a solve-it-all tool in a single language
Wasp is a DSL
note
You don't need to know what a DSL is to use Wasp, but if you are curious, you can read more about it below.
Wasp does not match typical expectations of a web app framework: it is not a set of libraries, it is instead a simple programming language that understands your code and can do a lot of things for you.
Wasp is a programming language, but a specific kind: it is specialized for a single purpose: building modern web applications. We call such languages DSLs (Domain Specific Language).
Other examples of DSLs that are often used today are e.g. SQL for databases and HTML for web page layouts. The main advantage and reason why DSLs exist is that they need to do only one task (e.g. database queries) so they can do it well and provide the best possible experience for the developer.
The same idea stands behind Wasp - a language that will allow developers to build modern web applications with 10x less code and less stack-specific knowledge. | https://wasp-lang.dev/docs/0.12.0 |
|
1 | 200 | 2024-04-23T15:12:23.531Z | https://wasp-lang.dev/docs/0.11.8 | https://wasp-lang.dev/docs | browser | ## Introduction
note
If you are looking for the installation instructions, check out the [Quick Start](https://wasp-lang.dev/docs/0.11.8/quick-start) section.
We will give a brief overview of what Wasp is, how it works on a high level and when to use it.
It is an opinionated way of building **full-stack web applications**. It takes care of all three major parts of a web application: **client** (front-end), **server** (back-end) and **database**.
### Works well with your existing stack[](#works-well-with-your-existing-stack "Direct link to Works well with your existing stack")
Wasp is not trying to do everything at once but rather focuses on the complexity which arises from connecting all the parts of the stack (client, server, database, deployment) together.
Wasp is using **React**, **Node.js** and **Prisma** under the hood and relies on them to define web components and server queries and actions.
### Wasp's secret sauce[](#wasps-secret-sauce "Direct link to Wasp's secret sauce")
At the core is the Wasp compiler which takes the Wasp config and your Javascript code and outputs the client app, server app and deployment code.

How the magic happens 🌈
The cool thing about having a compiler that understands your code is that it can do a lot of things for you.
Define your app in the Wasp config and get:
* login and signup with Auth UI components,
* full-stack type safety,
* e-mail sending,
* async processing jobs,
* React Query powered data fetching,
* security best practices,
* and more.
You don't need to write any code for these features, Wasp will take care of it for you 🤯 And what's even better, Wasp also maintains the code for you, so you don't have to worry about keeping up with the latest security best practices. As Wasp updates, so does your app.
## So what does the code look like?[](#so-what-does-the-code-look-like "Direct link to So what does the code look like?")
Let's say you want to build a web app that allows users to **create and share their favorite recipes**.
Let's start with the main.wasp file: it is the central file of your app, where you describe the app from the high level.
Let's give our app a title and let's immediately turn on the full-stack authentication via username and password:
main.wasp
```
app RecipeApp { title: "My Recipes", wasp: { version: "^0.11.0" }, auth: { methods: { usernameAndPassword: {} }, onAuthFailedRedirectTo: "/login", userEntity: User }}
```
Let's then add the data models for your recipes. We will want to have Users and Users can own Recipes:
main.wasp
```
...entity User {=psl // Data models are defined using Prisma Schema Language. id Int @id @default(autoincrement()) username String @unique password String recipes Recipe[]psl=}entity Recipe {=psl id Int @id @default(autoincrement()) title String description String? userId Int user User @relation(fields: [userId], references: [id])psl=}
```
Next, let's define how to do something with these data models!
We do that by defining Operations, in this case a Query `getRecipes` and Action `addRecipe`, which are in their essence a Node.js functions that execute on server and can, thanks to Wasp, very easily be called from the client.
First, we define these Operations in our main.wasp file, so Wasp knows about them and can "beef them up":
main.wasp
```
// Queries have automatic cache invalidation and are type-safe.query getRecipes { fn: import { getRecipes } from "@server/recipe.js", entities: [Recipe],}// Actions are type-safe and can be used to perform side-effects.action addRecipe { fn: import { addRecipe } from "@server/recipe.js", entities: [Recipe],}
```
... and then implement them in our Javascript (or TypeScript) code (we show just the query here, using TypeScript):
src/server/recipe.ts
```
// Wasp generates types for you.import type { GetRecipes } from "@wasp/queries/types";import type { Recipe } from "@wasp/entities";export const getRecipes: GetRecipes<{}, Recipe[]> = async (_args, context) => { return context.entities.Recipe.findMany( // Prisma query { where: { user: { id: context.user.id } } } );};export const addRecipe ...
```
Now we can very easily use these in our React components!
For the end, let's create a home page of our app.
First we define it in main.wasp:
main.wasp
```
...route HomeRoute { path: "/", to: HomePage }page HomePage { component: import { HomePage } from "@client/pages/HomePage", authRequired: true // Will send user to /login if not authenticated.}
```
and then implement it as a React component in JS/TS (that calls the Operations we previously defined):
src/client/pages/HomePage.tsx
```
import getRecipes from "@wasp/queries/getRecipes";import { useQuery } from "@wasp/queries";import type { User } from "@wasp/entities";export function HomePage({ user }: { user: User }) { // Due to full-stack type safety, `recipes` will be of type `Recipe[]` here. const { data: recipes, isLoading } = useQuery(getRecipes); // Calling our query here! if (isLoading) { return <div>Loading...</div>; } return ( <div> <h1>Recipes</h1> <ul> {recipes ? recipes.map((recipe) => ( <li key={recipe.id}> <div>{recipe.title}</div> <div>{recipe.description}</div> </li> )) : 'No recipes defined yet!'} </ul> </div> );}
```
And voila! We are listing all the recipes in our app 🎉
This was just a quick example to give you a taste of what Wasp is. For step by step tour through the most important Wasp features, check out the [Todo app tutorial](https://wasp-lang.dev/docs/0.11.8/tutorial/create).
note
Above we skipped defining /login and /signup pages to keep the example a bit shorter, but those are very simple to do by using Wasp's Auth UI feature.
## When to use Wasp[](#when-to-use-wasp "Direct link to When to use Wasp")
Wasp is addressing the same core problems that typical web app frameworks are addressing, and it in big part [looks, swims and quacks](https://en.wikipedia.org/wiki/Duck_test) like a web app framework.
### Best used for[](#best-used-for "Direct link to Best used for")
* building full-stack web apps (like e.g. Airbnb or Asana)
* quickly starting a web app with industry best practices
* to be used alongside modern web dev stack (currently supported React and Node)
### Avoid using Wasp for[](#avoid-using-wasp-for "Direct link to Avoid using Wasp for")
* building static/presentational websites
* to be used as a no-code solution
* to be a solve-it-all tool in a single language
## Wasp is a DSL[](#wasp-is-a-dsl "Direct link to Wasp is a DSL")
note
You don't need to know what a DSL is to use Wasp, but if you are curious, you can read more about it below.
Wasp does not match typical expectations of a web app framework: it is not a set of libraries, it is instead a programming language that understands your code and can do a lot of things for you.
Wasp is a programming language, but a specific kind: it is specialized for a single purpose: **building modern web applications**. We call such languages _DSL_s (Domain Specific Language).
Other examples of _DSL_s that are often used today are e.g. _SQL_ for databases and _HTML_ for web page layouts. The main advantage and reason why _DSL_s exist is that they need to do only one task (e.g. database queries) so they can do it well and provide the best possible experience for the developer.
The same idea stands behind Wasp - a language that will allow developers to **build modern web applications with 10x less code and less stack-specific knowledge**. | null | https://wasp-lang.dev/docs/0.11.8 | If you are looking for the installation instructions, check out the Quick Start section. | * | 0 | h3=":443"; ma=86400 | max-age=600 | DYNAMIC | 878eca945b6c4bcc-BUF | null | br | text/html; charset=utf-8 | Tue, 23 Apr 2024 15:12:21 GMT | Tue, 23 Apr 2024 15:22:21 GMT | Thu, 18 Apr 2024 15:50:26 GMT | {"success_fraction":0, "report_to":"cf-nel", "max_age":604800} | {"endpoints":[{"url":"https:\/\/a.nel.cloudflare.com\/report\/v4?s=I%2BWaqgUoqNTEH2rgf3Xh7Wgx5JpK%2BE3vTvc5TbN4hliC4MlM5AZB3wZNReuNmf3mE8scfpYncrfXwzztJXcWigmdMctVMLdcWdms%2Bn5BBgVHmlRCCBtDxrrUw4GDXYIO"}], "group":"cf-nel", "max_age":604800} | cloudflare | null | Accept-Encoding | 1.1 varnish | MISS | 0 | 57dc0972f9fc602cb2426a11f0b14c4d0ed9f4e9 | h2 | 51FC:173D:D2F35:1019FD:6627CFD5 | null | MISS | cache-nyc-kteb1890087-NYC | S1713885141.187041, VS0, VE19 | null | null | en | og:image | https://wasp-lang.dev/docs/0.11.8 | og:url | Introduction | Wasp | og:title | If you are looking for the installation instructions, check out the Quick Start section. | og:description | Introduction | Wasp | null | Introduction
note
If you are looking for the installation instructions, check out the Quick Start section.
We will give a brief overview of what Wasp is, how it works on a high level and when to use it.
It is an opinionated way of building full-stack web applications. It takes care of all three major parts of a web application: client (front-end), server (back-end) and database.
Works well with your existing stack
Wasp is not trying to do everything at once but rather focuses on the complexity which arises from connecting all the parts of the stack (client, server, database, deployment) together.
Wasp is using React, Node.js and Prisma under the hood and relies on them to define web components and server queries and actions.
Wasp's secret sauce
At the core is the Wasp compiler which takes the Wasp config and your Javascript code and outputs the client app, server app and deployment code.
How the magic happens 🌈
The cool thing about having a compiler that understands your code is that it can do a lot of things for you.
Define your app in the Wasp config and get:
login and signup with Auth UI components,
full-stack type safety,
e-mail sending,
async processing jobs,
React Query powered data fetching,
security best practices,
and more.
You don't need to write any code for these features, Wasp will take care of it for you 🤯 And what's even better, Wasp also maintains the code for you, so you don't have to worry about keeping up with the latest security best practices. As Wasp updates, so does your app.
So what does the code look like?
Let's say you want to build a web app that allows users to create and share their favorite recipes.
Let's start with the main.wasp file: it is the central file of your app, where you describe the app from the high level.
Let's give our app a title and let's immediately turn on the full-stack authentication via username and password:
main.wasp
app RecipeApp {
title: "My Recipes",
wasp: { version: "^0.11.0" },
auth: {
methods: { usernameAndPassword: {} },
onAuthFailedRedirectTo: "/login",
userEntity: User
}
}
Let's then add the data models for your recipes. We will want to have Users and Users can own Recipes:
main.wasp
...
entity User {=psl // Data models are defined using Prisma Schema Language.
id Int @id @default(autoincrement())
username String @unique
password String
recipes Recipe[]
psl=}
entity Recipe {=psl
id Int @id @default(autoincrement())
title String
description String?
userId Int
user User @relation(fields: [userId], references: [id])
psl=}
Next, let's define how to do something with these data models!
We do that by defining Operations, in this case a Query getRecipes and Action addRecipe, which are in their essence a Node.js functions that execute on server and can, thanks to Wasp, very easily be called from the client.
First, we define these Operations in our main.wasp file, so Wasp knows about them and can "beef them up":
main.wasp
// Queries have automatic cache invalidation and are type-safe.
query getRecipes {
fn: import { getRecipes } from "@server/recipe.js",
entities: [Recipe],
}
// Actions are type-safe and can be used to perform side-effects.
action addRecipe {
fn: import { addRecipe } from "@server/recipe.js",
entities: [Recipe],
}
... and then implement them in our Javascript (or TypeScript) code (we show just the query here, using TypeScript):
src/server/recipe.ts
// Wasp generates types for you.
import type { GetRecipes } from "@wasp/queries/types";
import type { Recipe } from "@wasp/entities";
export const getRecipes: GetRecipes<{}, Recipe[]> = async (_args, context) => {
return context.entities.Recipe.findMany( // Prisma query
{ where: { user: { id: context.user.id } } }
);
};
export const addRecipe ...
Now we can very easily use these in our React components!
For the end, let's create a home page of our app.
First we define it in main.wasp:
main.wasp
...
route HomeRoute { path: "/", to: HomePage }
page HomePage {
component: import { HomePage } from "@client/pages/HomePage",
authRequired: true // Will send user to /login if not authenticated.
}
and then implement it as a React component in JS/TS (that calls the Operations we previously defined):
src/client/pages/HomePage.tsx
import getRecipes from "@wasp/queries/getRecipes";
import { useQuery } from "@wasp/queries";
import type { User } from "@wasp/entities";
export function HomePage({ user }: { user: User }) {
// Due to full-stack type safety, `recipes` will be of type `Recipe[]` here.
const { data: recipes, isLoading } = useQuery(getRecipes); // Calling our query here!
if (isLoading) {
return <div>Loading...</div>;
}
return (
<div>
<h1>Recipes</h1>
<ul>
{recipes ? recipes.map((recipe) => (
<li key={recipe.id}>
<div>{recipe.title}</div>
<div>{recipe.description}</div>
</li>
)) : 'No recipes defined yet!'}
</ul>
</div>
);
}
And voila! We are listing all the recipes in our app 🎉
This was just a quick example to give you a taste of what Wasp is. For step by step tour through the most important Wasp features, check out the Todo app tutorial.
note
Above we skipped defining /login and /signup pages to keep the example a bit shorter, but those are very simple to do by using Wasp's Auth UI feature.
When to use Wasp
Wasp is addressing the same core problems that typical web app frameworks are addressing, and it in big part looks, swims and quacks like a web app framework.
Best used for
building full-stack web apps (like e.g. Airbnb or Asana)
quickly starting a web app with industry best practices
to be used alongside modern web dev stack (currently supported React and Node)
Avoid using Wasp for
building static/presentational websites
to be used as a no-code solution
to be a solve-it-all tool in a single language
Wasp is a DSL
note
You don't need to know what a DSL is to use Wasp, but if you are curious, you can read more about it below.
Wasp does not match typical expectations of a web app framework: it is not a set of libraries, it is instead a programming language that understands your code and can do a lot of things for you.
Wasp is a programming language, but a specific kind: it is specialized for a single purpose: building modern web applications. We call such languages DSLs (Domain Specific Language).
Other examples of DSLs that are often used today are e.g. SQL for databases and HTML for web page layouts. The main advantage and reason why DSLs exist is that they need to do only one task (e.g. database queries) so they can do it well and provide the best possible experience for the developer.
The same idea stands behind Wasp - a language that will allow developers to build modern web applications with 10x less code and less stack-specific knowledge. | https://wasp-lang.dev/docs/0.11.8 |
|
1 | 200 | 2024-04-23T15:12:36.917Z | https://wasp-lang.dev/docs/quick-start | https://wasp-lang.dev/docs | browser | ## Quick Start
## Installation[](#installation "Direct link to Installation")
Welcome, new Waspeteer 🐝!
Let's create and run our first Wasp app in 3 short steps:
1. **To install Wasp on Linux / OSX / WSL (Windows), open your terminal and run:**
```
curl -sSL https://get.wasp-lang.dev/installer.sh | sh
```
ℹ️ Wasp requires Node.js and will warn you if it is missing: check below for [more details](#requirements).
2. **Then, create a new app by running:**
3. **Finally, run the app:**
```
cd <my-project-name>wasp start
```
That's it 🎉 You have successfully created and served a new full-stack web app at [http://localhost:3000](http://localhost:3000/) and Wasp is serving both frontend and backend for you.
Something Unclear?
Check [More Details](#more-details) section below if anything went wrong with the installation, or if you have additional questions.
Want an even faster start?
Try out [Wasp AI](https://wasp-lang.dev/docs/wasp-ai/creating-new-app) 🤖 to generate a new Wasp app in minutes just from a title and short description!
Try Wasp Without Installing 🤔?
Give Wasp a spin in the browser without any setup by running our [Wasp Template for Gitpod](https://github.com/wasp-lang/gitpod-template)
### What next?[](#what-next "Direct link to What next?")
* 👉 **Check out the [Todo App tutorial](https://wasp-lang.dev/docs/tutorial/create), which will take you through all the core features of Wasp!** 👈
* [Setup your editor](https://wasp-lang.dev/docs/editor-setup) for working with Wasp.
* Join us on [Discord](https://discord.gg/rzdnErX)! Any feedback or questions you have, we are there for you.
* Follow Wasp development by subscribing to our newsletter: [https://wasp-lang.dev/#signup](https://wasp-lang.dev/#signup) . We usually send 1 per month, and [Matija](https://github.com/matijaSos) does his best to unleash his creativity to make them engaging and fun to read :D!
* * *
## More details[](#more-details "Direct link to More details")
### Requirements[](#requirements "Direct link to Requirements")
You must have Node.js (and NPM) installed on your machine and available in `PATH`. A version of Node.js must be >= 18.
If you need it, we recommend using [nvm](https://github.com/nvm-sh/nvm) for managing your Node.js installation version(s).
A quick guide on installing/using nvm
### Installation[](#installation-1 "Direct link to Installation")
* Linux / macOS
* Windows
* From source
Open your terminal and run:
```
curl -sSL https://get.wasp-lang.dev/installer.sh | sh
```
Running Wasp on Mac with Mx chip (arm64)
**Experiencing the 'Bad CPU type in executable' issue on a device with arm64 (Apple Silicon)?** Given that the wasp binary is built for x86 and not for arm64 (Apple Silicon), you'll need to install [Rosetta on your Mac](https://support.apple.com/en-us/HT211861) if you are using a Mac with Mx (M1, M2, ...). Rosetta is a translation process that enables users to run applications designed for x86 on arm64 (Apple Silicon). To install Rosetta, run the following command in your terminal
```
softwareupdate --install-rosetta
```
Once Rosetta is installed, you should be able to run Wasp without any issues. | null | https://wasp-lang.dev/docs/quick-start | Installation | * | 0 | h3=":443"; ma=86400 | max-age=600 | DYNAMIC | 878ecade7a434bcc-BUF | null | br | text/html; charset=utf-8 | Tue, 23 Apr 2024 15:12:33 GMT | Tue, 23 Apr 2024 15:22:33 GMT | Thu, 18 Apr 2024 15:50:26 GMT | {"success_fraction":0, "report_to":"cf-nel", "max_age":604800} | {"endpoints":[{"url":"https:\/\/a.nel.cloudflare.com\/report\/v4?s=fU2TKVqUoN7j4JOdDJc05TglhAXnu0G93V03pnl7IajFzp2OpN0ftA3xEwmXGdPXCaQjoU%2FRN8R%2FcDSfqbUR%2BQd8peTQRj0%2FmnfWjnYzb21NqJ4hsWcY3zoeBetcpUxh"}], "group":"cf-nel", "max_age":604800} | cloudflare | null | Accept-Encoding | 1.1 varnish | MISS | 0 | c67ce5eb289daca68fa242e185f03023e2301b91 | h2 | DCDE:173D:D35F4:102217:6627CFDB | null | MISS | cache-nyc-kteb1890087-NYC | S1713885153.050156, VS0, VE20 | null | null | en | og:image | https://wasp-lang.dev/docs/quick-start | og:url | Quick Start | Wasp | og:title | Installation | og:description | Quick Start | Wasp | null | Quick Start
Installation
Welcome, new Waspeteer 🐝!
Let's create and run our first Wasp app in 3 short steps:
To install Wasp on Linux / OSX / WSL (Windows), open your terminal and run:
curl -sSL https://get.wasp-lang.dev/installer.sh | sh
ℹ️ Wasp requires Node.js and will warn you if it is missing: check below for more details.
Then, create a new app by running:
Finally, run the app:
cd <my-project-name>
wasp start
That's it 🎉 You have successfully created and served a new full-stack web app at http://localhost:3000 and Wasp is serving both frontend and backend for you.
Something Unclear?
Check More Details section below if anything went wrong with the installation, or if you have additional questions.
Want an even faster start?
Try out Wasp AI 🤖 to generate a new Wasp app in minutes just from a title and short description!
Try Wasp Without Installing 🤔?
Give Wasp a spin in the browser without any setup by running our Wasp Template for Gitpod
What next?
👉 Check out the Todo App tutorial, which will take you through all the core features of Wasp! 👈
Setup your editor for working with Wasp.
Join us on Discord! Any feedback or questions you have, we are there for you.
Follow Wasp development by subscribing to our newsletter: https://wasp-lang.dev/#signup . We usually send 1 per month, and Matija does his best to unleash his creativity to make them engaging and fun to read :D!
More details
Requirements
You must have Node.js (and NPM) installed on your machine and available in PATH. A version of Node.js must be >= 18.
If you need it, we recommend using nvm for managing your Node.js installation version(s).
A quick guide on installing/using nvm
Installation
Linux / macOS
Windows
From source
Open your terminal and run:
curl -sSL https://get.wasp-lang.dev/installer.sh | sh
Running Wasp on Mac with Mx chip (arm64)
Experiencing the 'Bad CPU type in executable' issue on a device with arm64 (Apple Silicon)? Given that the wasp binary is built for x86 and not for arm64 (Apple Silicon), you'll need to install Rosetta on your Mac if you are using a Mac with Mx (M1, M2, ...). Rosetta is a translation process that enables users to run applications designed for x86 on arm64 (Apple Silicon). To install Rosetta, run the following command in your terminal
softwareupdate --install-rosetta
Once Rosetta is installed, you should be able to run Wasp without any issues. | https://wasp-lang.dev/docs/quick-start |
|
1 | 200 | 2024-04-23T15:12:37.057Z | https://wasp-lang.dev/docs/editor-setup | https://wasp-lang.dev/docs | browser | ## Editor Setup
note
This page assumes you have already installed Wasp. If you do not have Wasp installed yet, check out the [Quick Start](https://wasp-lang.dev/docs/quick-start) guide.
Wasp comes with the Wasp language server, which gives supported editors powerful support and integration with the language.
## VSCode[](#vscode "Direct link to VSCode")
Currently, Wasp only supports integration with VSCode. Install the [Wasp language extension](https://marketplace.visualstudio.com/items?itemName=wasp-lang.wasp) to get syntax highlighting and integration with the Wasp language server.
The extension enables:
* syntax highlighting for `.wasp` files
* scaffolding of new project files
* code completion
* diagnostics (errors and warnings)
* go to definition
and more! | null | https://wasp-lang.dev/docs/editor-setup | This page assumes you have already installed Wasp. If you do not have Wasp installed yet, check out the Quick Start guide. | * | 0 | h3=":443"; ma=86400 | max-age=600 | DYNAMIC | 878ecae2df654bcc-BUF | null | br | text/html; charset=utf-8 | Tue, 23 Apr 2024 15:12:33 GMT | Tue, 23 Apr 2024 15:22:33 GMT | Thu, 18 Apr 2024 15:50:26 GMT | {"success_fraction":0, "report_to":"cf-nel", "max_age":604800} | {"endpoints":[{"url":"https:\/\/a.nel.cloudflare.com\/report\/v4?s=QZHPrb5EJWuJiGVKAISO9W8V6ZPjAbKMwzlWWXkiHxvMN6cgKL28APlb2gTSy1Fm4sOzaBaPBv1v6S1Ki8QGHAE1jyKCdGB%2BUvbiIDbp7HSkI8lg9CRovG6vb%2F6%2FFsbf"}], "group":"cf-nel", "max_age":604800} | cloudflare | null | Accept-Encoding | 1.1 varnish | MISS | 0 | 47c5be94623d8bc35b5afe59687bebc6127674f7 | h2 | AC82:1736:587160:6A3728:6627CFDC | null | MISS | cache-nyc-kteb1890087-NYC | S1713885154.747935, VS0, VE17 | null | null | en | og:image | https://wasp-lang.dev/docs/editor-setup | og:url | Editor Setup | Wasp | og:title | This page assumes you have already installed Wasp. If you do not have Wasp installed yet, check out the Quick Start guide. | og:description | Editor Setup | Wasp | null | Editor Setup
note
This page assumes you have already installed Wasp. If you do not have Wasp installed yet, check out the Quick Start guide.
Wasp comes with the Wasp language server, which gives supported editors powerful support and integration with the language.
VSCode
Currently, Wasp only supports integration with VSCode. Install the Wasp language extension to get syntax highlighting and integration with the Wasp language server.
The extension enables:
syntax highlighting for .wasp files
scaffolding of new project files
code completion
diagnostics (errors and warnings)
go to definition
and more! | https://wasp-lang.dev/docs/editor-setup |
|
1 | 200 | 2024-04-23T15:12:47.712Z | https://wasp-lang.dev/docs/tutorial/create | https://wasp-lang.dev/docs | browser | info
You'll need to have the latest version of Wasp installed locally to follow this tutorial. If you haven't installed it yet, check out the [QuickStart](https://wasp-lang.dev/docs/quick-start) guide!
In this section, we'll guide you through the process of creating a simple Todo app with Wasp. In the process, we'll take you through the most important and useful features of Wasp.

If you get stuck at any point (or just want to chat), reach out to us on [Discord](https://discord.gg/rzdnErX) and we will help you!
You can find the complete code of the app we're about to build [here](https://github.com/wasp-lang/wasp/tree/release/examples/tutorials/TodoApp).
## Creating a Project[](#creating-a-project "Direct link to Creating a Project")
To setup a new Wasp project, run the following command in your terminal
Enter the newly created directory and start the development server:
note
`wasp start` will take a bit of time to start the server the first time you run it in a new project.
You will see log messages from the client, server, and database setting themselves up. When everything is ready, a new tab should open in your browser at `http://localhost:3000` with a simple placeholder page:

Wasp has generated for you the full front-end and back-end code the app! Next, we'll take a closer look at how the project is structured. | null | https://wasp-lang.dev/docs/tutorial/create | You'll need to have the latest version of Wasp installed locally to follow this tutorial. If you haven't installed it yet, check out the QuickStart guide! | * | 0 | h3=":443"; ma=86400 | max-age=600 | DYNAMIC | 878ecb1c5a4c4bcc-BUF | null | br | text/html; charset=utf-8 | Tue, 23 Apr 2024 15:12:42 GMT | Tue, 23 Apr 2024 15:22:42 GMT | Thu, 18 Apr 2024 15:50:27 GMT | {"success_fraction":0, "report_to":"cf-nel", "max_age":604800} | {"endpoints":[{"url":"https:\/\/a.nel.cloudflare.com\/report\/v4?s=eyTMcZt%2BGH%2BWupEu6N4Ads7TMIFR3L50qp1wa55mYWE75EKg7dncdJ%2BqytXpmUTrTk0MgjEAN9aTQLO1VORNv%2FtJwAkIevqZ6aP0lETuFYTj5Cm1xX9NS9Y9Jf3eiEiM"}], "group":"cf-nel", "max_age":604800} | cloudflare | null | Accept-Encoding | 1.1 varnish | MISS | 0 | 1da3cdaf9bd3ef0f9eb33730b71574a562b06d83 | h2 | DCDE:173D:D3CEC:102A2D:6627CFE6 | null | MISS | cache-nyc-kteb1890087-NYC | S1713885163.945071, VS0, VE15 | null | null | en | og:image | https://wasp-lang.dev/docs/tutorial/create | og:url | 1. Creating a New Project | Wasp | og:title | You'll need to have the latest version of Wasp installed locally to follow this tutorial. If you haven't installed it yet, check out the QuickStart guide! | og:description | 1. Creating a New Project | Wasp | null | info
You'll need to have the latest version of Wasp installed locally to follow this tutorial. If you haven't installed it yet, check out the QuickStart guide!
In this section, we'll guide you through the process of creating a simple Todo app with Wasp. In the process, we'll take you through the most important and useful features of Wasp.
If you get stuck at any point (or just want to chat), reach out to us on Discord and we will help you!
You can find the complete code of the app we're about to build here.
Creating a Project
To setup a new Wasp project, run the following command in your terminal
Enter the newly created directory and start the development server:
note
wasp start will take a bit of time to start the server the first time you run it in a new project.
You will see log messages from the client, server, and database setting themselves up. When everything is ready, a new tab should open in your browser at http://localhost:3000 with a simple placeholder page:
Wasp has generated for you the full front-end and back-end code the app! Next, we'll take a closer look at how the project is structured. | https://wasp-lang.dev/docs/tutorial/create |
|
1 | 200 | 2024-04-23T15:12:49.312Z | https://wasp-lang.dev/docs/tutorial/project-structure | https://wasp-lang.dev/docs | browser | ## 2\. Project Structure
After creating a new Wasp project, you'll get a file structure that looks like this:
```
.├── .gitignore├── main.wasp # Your Wasp code goes here.├── package.json # Your dependencies and project info go here.├── package-lock.json├── public # Your static files (e.g., images, favicon) go here.├── src # Your source code (TS/JS/CSS/HTML) goes here.│ ├── Main.css│ ├── MainPage.jsx│ ├── vite-env.d.ts│ └── waspLogo.png├── tsconfig.json├── vite.config.ts├── .waspignore└── .wasproot
```
By _your code_, we mean the _"the code you write"_, as opposed to the code generated by Wasp. Wasp allows you to organize and structure your code however you think is best - there's no need to separate client files and server files into different directories.
note
We'd normally recommend organizing code by features (i.e., vertically).
However, since this tutorial contains only a handful of files, there's no need for fancy organization. We'll keep it simple by placing everything in the root `src` directory.
Many other files (e.g., `tsconfig.json`, `vite-env.d.ts`, `.wasproot`, etc.) help Wasp and the IDE improve your development experience with autocompletion, IntelliSense, and error reporting.
The `vite.config.ts` file is used to configure [Vite](https://vitejs.dev/guide/), Wasp's build tool of choice. We won't be configuring Vite in this tutorial, so you can safely ignore the file. Still, if you ever end up wanting more control over Vite, you'll find everything you need to know in [custom Vite config docs](https://wasp-lang.dev/docs/project/custom-vite-config).
There's no need to spend more time discussing all the helper files. They'll silently do their job in the background and let you focus on building your app.
TypeScript Support
Wasp supports TypeScript out of the box, but you are free to choose between or mix JavaScript and TypeScript as you see fit.
We'll provide you with both JavaScript and TypeScript code in this tutorial. Code blocks will have a toggle to switch between vanilla JavaScript and TypeScript.
The most important file in the project is `main.wasp`. Wasp uses the configuration within it to perform its magic. Based on what you write, it generates a bunch of code for your database, server-client communication, React routing, and more.
Let's take a closer look at `main.wasp`
## `main.wasp`[](#mainwasp "Direct link to mainwasp")
`main.wasp` is your app's definition file. It defines the app's central components and helps Wasp to do a lot of the legwork for you.
The file is a list of _declarations_. Each declaration defines a part of your app.
The default `main.wasp` file generated with `wasp new` on the previous page looks like this:
* JavaScript
* TypeScript
main.wasp
```
app TodoApp { wasp: { version: "^0.13.0" // Pins the version of Wasp to use. }, title: "TodoApp" // Used as the browser tab title. Note that all strings in Wasp are double quoted!}route RootRoute { path: "/", to: MainPage }page MainPage { // We specify that the React implementation of the page is exported from // `src/MainPage.jsx`. This statement uses standard JS import syntax. // Use `@src` to reference files inside the `src` folder. component: import { MainPage } from "@src/MainPage"}
```
This file uses three declaration types:
* **app**: Top-level configuration information about your app.
* **route**: Describes which path each page should be accessible from.
* **page**: Defines a web page and the React component that gets rendered when the page is loaded.
In the next section, we'll explore how **route** and **page** work together to build your web app. | null | https://wasp-lang.dev/docs/tutorial/project-structure | After creating a new Wasp project, you'll get a file structure that looks like this: | * | 0 | h3=":443"; ma=86400 | max-age=600 | DYNAMIC | 878ecb265c924bcc-BUF | null | br | text/html; charset=utf-8 | Tue, 23 Apr 2024 15:12:44 GMT | Tue, 23 Apr 2024 15:22:44 GMT | Thu, 18 Apr 2024 15:50:26 GMT | {"success_fraction":0, "report_to":"cf-nel", "max_age":604800} | {"endpoints":[{"url":"https:\/\/a.nel.cloudflare.com\/report\/v4?s=sPACfgkhL04Y7xVtOQqbA%2B2fXlJox2u%2Fcn7aVr0oa1GemihAJ4tCAXt1VOeuK6i%2BkbEkLxS0BYNwKjRC%2Bd0OIRDyML0SkUZ0Ii%2BYcOMgZ4OVSddBZrNFkr5FcNAtvymH"}], "group":"cf-nel", "max_age":604800} | cloudflare | null | Accept-Encoding | 1.1 varnish | MISS | 0 | 49ac15133e7cbea9c897b42d2006d185269be735 | h2 | D382:180046:3C276BC:472CB83:6627CFEC | HIT | MISS | cache-nyc-kteb1890087-NYC | S1713885165.543913, VS0, VE13 | null | null | en | og:image | https://wasp-lang.dev/docs/tutorial/project-structure | og:url | 2. Project Structure | Wasp | og:title | After creating a new Wasp project, you'll get a file structure that looks like this: | og:description | 2. Project Structure | Wasp | null | 2. Project Structure
After creating a new Wasp project, you'll get a file structure that looks like this:
.
├── .gitignore
├── main.wasp # Your Wasp code goes here.
├── package.json # Your dependencies and project info go here.
├── package-lock.json
├── public # Your static files (e.g., images, favicon) go here.
├── src # Your source code (TS/JS/CSS/HTML) goes here.
│ ├── Main.css
│ ├── MainPage.jsx
│ ├── vite-env.d.ts
│ └── waspLogo.png
├── tsconfig.json
├── vite.config.ts
├── .waspignore
└── .wasproot
By your code, we mean the "the code you write", as opposed to the code generated by Wasp. Wasp allows you to organize and structure your code however you think is best - there's no need to separate client files and server files into different directories.
note
We'd normally recommend organizing code by features (i.e., vertically).
However, since this tutorial contains only a handful of files, there's no need for fancy organization. We'll keep it simple by placing everything in the root src directory.
Many other files (e.g., tsconfig.json, vite-env.d.ts, .wasproot, etc.) help Wasp and the IDE improve your development experience with autocompletion, IntelliSense, and error reporting.
The vite.config.ts file is used to configure Vite, Wasp's build tool of choice. We won't be configuring Vite in this tutorial, so you can safely ignore the file. Still, if you ever end up wanting more control over Vite, you'll find everything you need to know in custom Vite config docs.
There's no need to spend more time discussing all the helper files. They'll silently do their job in the background and let you focus on building your app.
TypeScript Support
Wasp supports TypeScript out of the box, but you are free to choose between or mix JavaScript and TypeScript as you see fit.
We'll provide you with both JavaScript and TypeScript code in this tutorial. Code blocks will have a toggle to switch between vanilla JavaScript and TypeScript.
The most important file in the project is main.wasp. Wasp uses the configuration within it to perform its magic. Based on what you write, it generates a bunch of code for your database, server-client communication, React routing, and more.
Let's take a closer look at main.wasp
main.wasp
main.wasp is your app's definition file. It defines the app's central components and helps Wasp to do a lot of the legwork for you.
The file is a list of declarations. Each declaration defines a part of your app.
The default main.wasp file generated with wasp new on the previous page looks like this:
JavaScript
TypeScript
main.wasp
app TodoApp {
wasp: {
version: "^0.13.0" // Pins the version of Wasp to use.
},
title: "TodoApp" // Used as the browser tab title. Note that all strings in Wasp are double quoted!
}
route RootRoute { path: "/", to: MainPage }
page MainPage {
// We specify that the React implementation of the page is exported from
// `src/MainPage.jsx`. This statement uses standard JS import syntax.
// Use `@src` to reference files inside the `src` folder.
component: import { MainPage } from "@src/MainPage"
}
This file uses three declaration types:
app: Top-level configuration information about your app.
route: Describes which path each page should be accessible from.
page: Defines a web page and the React component that gets rendered when the page is loaded.
In the next section, we'll explore how route and page work together to build your web app. | https://wasp-lang.dev/docs/tutorial/project-structure |
|
1 | 200 | 2024-04-23T15:13:00.817Z | https://wasp-lang.dev/docs/tutorial/pages | https://wasp-lang.dev/docs | browser | ## 3\. Pages & Routes
In the default `main.wasp` file created by `wasp new`, there is a **page** and a **route** declaration:
* JavaScript
* TypeScript
main.wasp
```
route RootRoute { path: "/", to: MainPage }page MainPage { // We specify that the React implementation of the page is exported from // `src/MainPage.jsx`. This statement uses standard JS import syntax. // Use `@src` to reference files inside the `src` folder. component: import { MainPage } from "@src/MainPage"}
```
Together, these declarations tell Wasp that when a user navigates to `/`, it should render the named export from `src/MainPage.tsx`.
## The MainPage Component[](#the-mainpage-component "Direct link to The MainPage Component")
Let's take a look at the React component referenced by the page declaration:
* JavaScript
* TypeScript
src/MainPage.jsx
```
import waspLogo from './waspLogo.png'import './Main.css'export const MainPage = () => { // ...}
```
This is a regular functional React component. It also uses the CSS file and a logo image that sit next to it in the `src` folder.
That is all the code you need! Wasp takes care of everything else necessary to define, build, and run the web app.
tip
`wasp start` automatically picks up the changes you make and restarts the app, so keep it running in the background.
## Adding a Second Page[](#adding-a-second-page "Direct link to Adding a Second Page")
To add more pages, you can create another set of **page** and **route** declarations. You can even add parameters to the URL path, using the same syntax as [React Router](https://reactrouter.com/web/). Let's test this out by adding a new page:
* JavaScript
* TypeScript
main.wasp
```
route HelloRoute { path: "/hello/:name", to: HelloPage }page HelloPage { component: import { HelloPage } from "@src/HelloPage"}
```
When a user visits `/hello/their-name`, Wasp will render the component exported from `src/HelloPage.tsx` and pass the URL parameter the same way as in React Router:
* JavaScript
* TypeScript
src/HelloPage.jsx
```
export const HelloPage = (props) => { return <div>Here's {props.match.params.name}!</div>}
```
Now you can visit `/hello/johnny` and see "Here's johnny!"
## Cleaning Up[](#cleaning-up "Direct link to Cleaning Up")
Now that you've seen how Wasp deals with Routes and Pages, it's finally time to build the Todo app.
Start by cleaning up the starter project and removing unnecessary code and files.
First, remove most of the code from the `MainPage` component:
* JavaScript
* TypeScript
src/MainPage.jsx
```
export const MainPage = () => { return <div>Hello world!</div>}
```
At this point, the main page should look like this:
You can now delete redundant files: `src/Main.css`, `src/waspLogo.png`, and `src/HelloPage.tsx` (we won't need this page for the rest of the tutorial).
Since `src/HelloPage.tsx` no longer exists, remove its `route` and `page` declarations from the `main.wasp` file.
Your Wasp file should now look like this:
* JavaScript
* TypeScript
main.wasp
```
app TodoApp { wasp: { version: "^0.13.0" }, title: "TodoApp"}route RootRoute { path: "/", to: MainPage }page MainPage { component: import { MainPage } from "@src/MainPage"}
```
Excellent work!
You now have a basic understanding of Wasp and are ready to start building your TodoApp. We'll implement the app's core features in the following sections. | null | https://wasp-lang.dev/docs/tutorial/pages | In the default main.wasp file created by wasp new, there is a page and a route declaration: | * | 0 | h3=":443"; ma=86400 | max-age=600 | DYNAMIC | 878ecb6d9cb04bcc-BUF | null | br | text/html; charset=utf-8 | Tue, 23 Apr 2024 15:12:55 GMT | Tue, 23 Apr 2024 15:22:55 GMT | Thu, 18 Apr 2024 15:50:27 GMT | {"success_fraction":0, "report_to":"cf-nel", "max_age":604800} | {"endpoints":[{"url":"https:\/\/a.nel.cloudflare.com\/report\/v4?s=hleH5jjx%2BmjSDRX1YXkd0%2FHDCs1snqLRdRLaPD3F7ez2luqbtDRU2UKxYxbvh0S0fGIeNMeGa%2B7MbpI0RgOtkdRPJfqwbXA8%2BMEgr%2BxcG2l9XDVpOva8OdJAYb35qQRT"}], "group":"cf-nel", "max_age":604800} | cloudflare | null | Accept-Encoding | 1.1 varnish | MISS | 0 | 28ba51b678b151877f02911abb924070ac4c9ffb | h2 | D65C:39E569:39EF43E:44CED7B:6627CFF7 | null | MISS | cache-nyc-kteb1890087-NYC | S1713885176.951885, VS0, VE15 | null | null | en | og:image | https://wasp-lang.dev/docs/tutorial/pages | og:url | 3. Pages & Routes | Wasp | og:title | In the default main.wasp file created by wasp new, there is a page and a route declaration: | og:description | 3. Pages & Routes | Wasp | null | 3. Pages & Routes
In the default main.wasp file created by wasp new, there is a page and a route declaration:
JavaScript
TypeScript
main.wasp
route RootRoute { path: "/", to: MainPage }
page MainPage {
// We specify that the React implementation of the page is exported from
// `src/MainPage.jsx`. This statement uses standard JS import syntax.
// Use `@src` to reference files inside the `src` folder.
component: import { MainPage } from "@src/MainPage"
}
Together, these declarations tell Wasp that when a user navigates to /, it should render the named export from src/MainPage.tsx.
The MainPage Component
Let's take a look at the React component referenced by the page declaration:
JavaScript
TypeScript
src/MainPage.jsx
import waspLogo from './waspLogo.png'
import './Main.css'
export const MainPage = () => {
// ...
}
This is a regular functional React component. It also uses the CSS file and a logo image that sit next to it in the src folder.
That is all the code you need! Wasp takes care of everything else necessary to define, build, and run the web app.
tip
wasp start automatically picks up the changes you make and restarts the app, so keep it running in the background.
Adding a Second Page
To add more pages, you can create another set of page and route declarations. You can even add parameters to the URL path, using the same syntax as React Router. Let's test this out by adding a new page:
JavaScript
TypeScript
main.wasp
route HelloRoute { path: "/hello/:name", to: HelloPage }
page HelloPage {
component: import { HelloPage } from "@src/HelloPage"
}
When a user visits /hello/their-name, Wasp will render the component exported from src/HelloPage.tsx and pass the URL parameter the same way as in React Router:
JavaScript
TypeScript
src/HelloPage.jsx
export const HelloPage = (props) => {
return <div>Here's {props.match.params.name}!</div>
}
Now you can visit /hello/johnny and see "Here's johnny!"
Cleaning Up
Now that you've seen how Wasp deals with Routes and Pages, it's finally time to build the Todo app.
Start by cleaning up the starter project and removing unnecessary code and files.
First, remove most of the code from the MainPage component:
JavaScript
TypeScript
src/MainPage.jsx
export const MainPage = () => {
return <div>Hello world!</div>
}
At this point, the main page should look like this:
You can now delete redundant files: src/Main.css, src/waspLogo.png, and src/HelloPage.tsx (we won't need this page for the rest of the tutorial).
Since src/HelloPage.tsx no longer exists, remove its route and page declarations from the main.wasp file.
Your Wasp file should now look like this:
JavaScript
TypeScript
main.wasp
app TodoApp {
wasp: {
version: "^0.13.0"
},
title: "TodoApp"
}
route RootRoute { path: "/", to: MainPage }
page MainPage {
component: import { MainPage } from "@src/MainPage"
}
Excellent work!
You now have a basic understanding of Wasp and are ready to start building your TodoApp. We'll implement the app's core features in the following sections. | https://wasp-lang.dev/docs/tutorial/pages |
|
1 | 200 | 2024-04-23T15:13:03.445Z | https://wasp-lang.dev/docs/tutorial/entities | https://wasp-lang.dev/docs | browser | ```
// ...entity Task {=psl id Int @id @default(autoincrement()) description String isDone Boolean @default(false)psl=}
``` | null | https://wasp-lang.dev/docs/tutorial/entities | Entities are one of the most important concepts in Wasp and are how you define what gets stored in the database. | * | 0 | h3=":443"; ma=86400 | max-age=600 | DYNAMIC | 878ecb84bddf4bcc-BUF | null | br | text/html; charset=utf-8 | Tue, 23 Apr 2024 15:12:59 GMT | Tue, 23 Apr 2024 15:22:59 GMT | Thu, 18 Apr 2024 15:50:26 GMT | {"success_fraction":0, "report_to":"cf-nel", "max_age":604800} | {"endpoints":[{"url":"https:\/\/a.nel.cloudflare.com\/report\/v4?s=4IqQ3HCNK7lGV%2FlPYh9a58UJt6LT1U%2BQYjpdiEU3MVMjhSH8OawIUbknsjwmjX30jk6pkB%2FGeYZPFmFIuCozS7OOFgc7zQtSi58NXNTXWLiQ3o6jWiPn6x0toSa3Kx5k"}], "group":"cf-nel", "max_age":604800} | cloudflare | null | Accept-Encoding | 1.1 varnish | MISS | 0 | 4b5f54d0c4d67ec6e5a4c17132510dd6be2fd795 | h2 | 2E70:2405A0:3CC8093:47A7A2A:6627CFFA | null | MISS | cache-nyc-kteb1890099-NYC | S1713885180.662911, VS0, VE21 | null | null | en | og:image | https://wasp-lang.dev/docs/tutorial/entities | og:url | 4. Database Entities | Wasp | og:title | Entities are one of the most important concepts in Wasp and are how you define what gets stored in the database. | og:description | 4. Database Entities | Wasp | null | // ...
entity Task {=psl
id Int @id @default(autoincrement())
description String
isDone Boolean @default(false)
psl=} | https://wasp-lang.dev/docs/tutorial/entities |
|
1 | 200 | 2024-04-23T15:13:03.628Z | https://wasp-lang.dev/docs/tutorial/queries | https://wasp-lang.dev/docs | browser | ## 5\. Querying the Database
We want to know which tasks we need to do, so let's list them!
The primary way of working with Entities in Wasp is with [Queries and Actions](https://wasp-lang.dev/docs/data-model/operations/overview), collectively known as **_Operations_**.
Queries are used to read an entity, while Actions are used to create, modify, and delete entities. Since we want to list the tasks, we'll want to use a Query.
To list the tasks, you must:
1. Create a Query that fetches the tasks from the database.
2. Update the `MainPage.tsx` to use that Query and display the results.
## Defining the Query[](#defining-the-query "Direct link to Defining the Query")
We'll create a new Query called `getTasks`. We'll need to declare the Query in the Wasp file and write its implementation in .
### Declaring a Query[](#declaring-a-query "Direct link to Declaring a Query")
We need to add a **query** declaration to `main.wasp` so that Wasp knows it exists:
* JavaScript
* TypeScript
main.wasp
```
// ...query getTasks { // Specifies where the implementation for the query function is. // The path `@src/queries` resolves to `src/queries.js`. // No need to specify an extension. fn: import { getTasks } from "@src/queries", // Tell Wasp that this query reads from the `Task` entity. Wasp will // automatically update the results of this query when tasks are modified. entities: [Task]}
```
### Implementing a Query[](#implementing-a-query "Direct link to Implementing a Query")
* JavaScript
* TypeScript
src/queries.js
```
export const getTasks = async (args, context) => { return context.entities.Task.findMany({ orderBy: { id: 'asc' }, })}
```
Query function parameters:
* `args: object`
The arguments the caller passes to the Query.
* `context`
An object with extra information injected by Wasp. Its type depends on the Query declaration.
Since the Query declaration in `main.wasp` says that the `getTasks` Query uses `Task` entity, Wasp injected a [Prisma client](https://www.prisma.io/docs/reference/tools-and-interfaces/prisma-client/crud) for the `Task` entity as `context.entities.Task` - we used it above to fetch all the tasks from the database.
info
Queries and Actions are NodeJS functions executed on the server.
## Invoking the Query On the Frontend[](#invoking-the-query-on-the-frontend "Direct link to Invoking the Query On the Frontend")
While we implement Queries on the server, Wasp generates client-side functions that automatically take care of serialization, network calls, and cache invalidation, allowing you to call the server code like it's a regular function.
This makes it easy for us to use the `getTasks` Query we just created in our React component:
* JavaScript
* TypeScript
src/MainPage.jsx
```
import { getTasks, useQuery } from 'wasp/client/operations'export const MainPage = () => { const { data: tasks, isLoading, error } = useQuery(getTasks) return ( <div> {tasks && <TasksList tasks={tasks} />} {isLoading && 'Loading...'} {error && 'Error: ' + error} </div> )}const TaskView = ({ task }) => { return ( <div> <input type="checkbox" id={String(task.id)} checked={task.isDone} /> {task.description} </div> )}const TasksList = ({ tasks }) => { if (!tasks?.length) return <div>No tasks</div> return ( <div> {tasks.map((task, idx) => ( <TaskView task={task} key={idx} /> ))} </div> )}
```
Most of this code is regular React, the only exception being the special `wasp` imports:
We could have called the Query directly using `getTasks()`, but the `useQuery` hook makes it reactive: React will re-render the component every time the Query changes. Remember that Wasp automatically refreshes Queries whenever the data is modified.
With these changes, you should be seeing the text "No tasks" on the screen:
We'll create a form to add tasks in the next step 🪄 | null | https://wasp-lang.dev/docs/tutorial/queries | We want to know which tasks we need to do, so let's list them! | * | 0 | h3=":443"; ma=86400 | max-age=600 | DYNAMIC | 878ecb73e8ec4bcc-BUF | null | br | text/html; charset=utf-8 | Tue, 23 Apr 2024 15:12:57 GMT | Tue, 23 Apr 2024 15:22:56 GMT | Thu, 18 Apr 2024 15:50:26 GMT | {"success_fraction":0, "report_to":"cf-nel", "max_age":604800} | {"endpoints":[{"url":"https:\/\/a.nel.cloudflare.com\/report\/v4?s=qLvNkVdaAVxanCN2FIMN8vnWpfBkK2t1Uk0gZqcVWuEOc6XZ3TGYxOloH6PIVnkZ5CUk5b7o5RnYKYD%2BH2iTX1bM9H65yPgq4Z17TCEWLRg5KtPiTz4AY8Vk%2FYxLo%2F4c"}], "group":"cf-nel", "max_age":604800} | cloudflare | null | Accept-Encoding | 1.1 varnish | MISS | 0 | 597d5a4eb44bb131305963a05405d34c5416bb81 | h2 | 5FBE:171D:735E53:88D80E:6627CFF8 | null | MISS | cache-nyc-kteb1890087-NYC | S1713885177.954366, VS0, VE48 | null | null | en | og:image | https://wasp-lang.dev/docs/tutorial/queries | og:url | 5. Querying the Database | Wasp | og:title | We want to know which tasks we need to do, so let's list them! | og:description | 5. Querying the Database | Wasp | null | 5. Querying the Database
We want to know which tasks we need to do, so let's list them!
The primary way of working with Entities in Wasp is with Queries and Actions, collectively known as Operations.
Queries are used to read an entity, while Actions are used to create, modify, and delete entities. Since we want to list the tasks, we'll want to use a Query.
To list the tasks, you must:
Create a Query that fetches the tasks from the database.
Update the MainPage.tsx to use that Query and display the results.
Defining the Query
We'll create a new Query called getTasks. We'll need to declare the Query in the Wasp file and write its implementation in .
Declaring a Query
We need to add a query declaration to main.wasp so that Wasp knows it exists:
JavaScript
TypeScript
main.wasp
// ...
query getTasks {
// Specifies where the implementation for the query function is.
// The path `@src/queries` resolves to `src/queries.js`.
// No need to specify an extension.
fn: import { getTasks } from "@src/queries",
// Tell Wasp that this query reads from the `Task` entity. Wasp will
// automatically update the results of this query when tasks are modified.
entities: [Task]
}
Implementing a Query
JavaScript
TypeScript
src/queries.js
export const getTasks = async (args, context) => {
return context.entities.Task.findMany({
orderBy: { id: 'asc' },
})
}
Query function parameters:
args: object
The arguments the caller passes to the Query.
context
An object with extra information injected by Wasp. Its type depends on the Query declaration.
Since the Query declaration in main.wasp says that the getTasks Query uses Task entity, Wasp injected a Prisma client for the Task entity as context.entities.Task - we used it above to fetch all the tasks from the database.
info
Queries and Actions are NodeJS functions executed on the server.
Invoking the Query On the Frontend
While we implement Queries on the server, Wasp generates client-side functions that automatically take care of serialization, network calls, and cache invalidation, allowing you to call the server code like it's a regular function.
This makes it easy for us to use the getTasks Query we just created in our React component:
JavaScript
TypeScript
src/MainPage.jsx
import { getTasks, useQuery } from 'wasp/client/operations'
export const MainPage = () => {
const { data: tasks, isLoading, error } = useQuery(getTasks)
return (
<div>
{tasks && <TasksList tasks={tasks} />}
{isLoading && 'Loading...'}
{error && 'Error: ' + error}
</div>
)
}
const TaskView = ({ task }) => {
return (
<div>
<input type="checkbox" id={String(task.id)} checked={task.isDone} />
{task.description}
</div>
)
}
const TasksList = ({ tasks }) => {
if (!tasks?.length) return <div>No tasks</div>
return (
<div>
{tasks.map((task, idx) => (
<TaskView task={task} key={idx} />
))}
</div>
)
}
Most of this code is regular React, the only exception being the special wasp imports:
We could have called the Query directly using getTasks(), but the useQuery hook makes it reactive: React will re-render the component every time the Query changes. Remember that Wasp automatically refreshes Queries whenever the data is modified.
With these changes, you should be seeing the text "No tasks" on the screen:
We'll create a form to add tasks in the next step 🪄 | https://wasp-lang.dev/docs/tutorial/queries |
End of preview. Expand
in Data Studio
README.md exists but content is empty.
- Downloads last month
- 42
Size of downloaded dataset files:
2.27 MB
Size of the auto-converted Parquet files:
921 kB
Number of rows:
156
Data Sourcing report
powered
by
Spawning.aiNo elements in this dataset have been identified as either opted-out, or opted-in, by their creator.