Stable Diffusion XL on Mac with Advanced Core ML Quantization


Stable Diffusion XL was released yesterday and it’s awesome. It can generate large (1024x1024) high quality images; adherence to prompts has been improved with some new tricks; it can effortlessly produce very dark or very bright images thanks to the latest research on noise schedulers; and it’s open source!
The downside is that the model is much bigger, and therefore slower and more difficult to run on consumer hardware. Using the latest release of the Hugging Face diffusers library, you can run Stable Diffusion XL on CUDA hardware in 16 GB of GPU RAM, making it possible to use it on Colab’s free tier.
The past few months have shown that people are very clearly interested in running ML models locally for a variety of reasons, including privacy, convenience, easier experimentation, or unmetered use. We’ve been working hard at both Apple and Hugging Face to explore this space. We’ve shown how to run Stable Diffusion on Apple Silicon, or how to leverage the latest advancements in Core ML to improve size and performance with 6-bit palettization.
For Stable Diffusion XL we’ve done a few things:
- Ported the base model to Core ML so you can use it in your native Swift apps.
- Updated Apple’s conversion and inference repo so you can convert the models yourself, including any fine-tunes you’re interested in.
- Updated Hugging Face’s demo app to show how to use the new Core ML Stable Diffusion XL models downloaded from the Hub.
- Explored mixed-bit palettization, an advanced compression technique that achieves important size reductions while minimizing and controlling the quality loss you incur. You can apply the same technique to your own models too!
Everything is open source and available today, let’s get on with it.
Contents
- Using SD XL Models from the Hugging Face Hub
- What is Mixed-Bit Palettization?
- How are Mixed-Bit Recipes Created?
- Converting Fine-Tuned Models
- Published Resources
Using SD XL Models from the Hugging Face Hub
As part of this release, we published two different versions of Stable Diffusion XL in Core ML.
apple/coreml-stable-diffusion-xl-baseis a complete pipeline, without any quantization.apple/coreml-stable-diffusion-mixed-bit-palettizationcontains (among other artifacts) a complete pipeline where the UNet has been replaced with a mixed-bit palettization recipe that achieves a compression equivalent to 4.5 bits per parameter. Size went down from 4.8 to 1.4 GB, a 71% reduction, and in our opinion quality is still great.
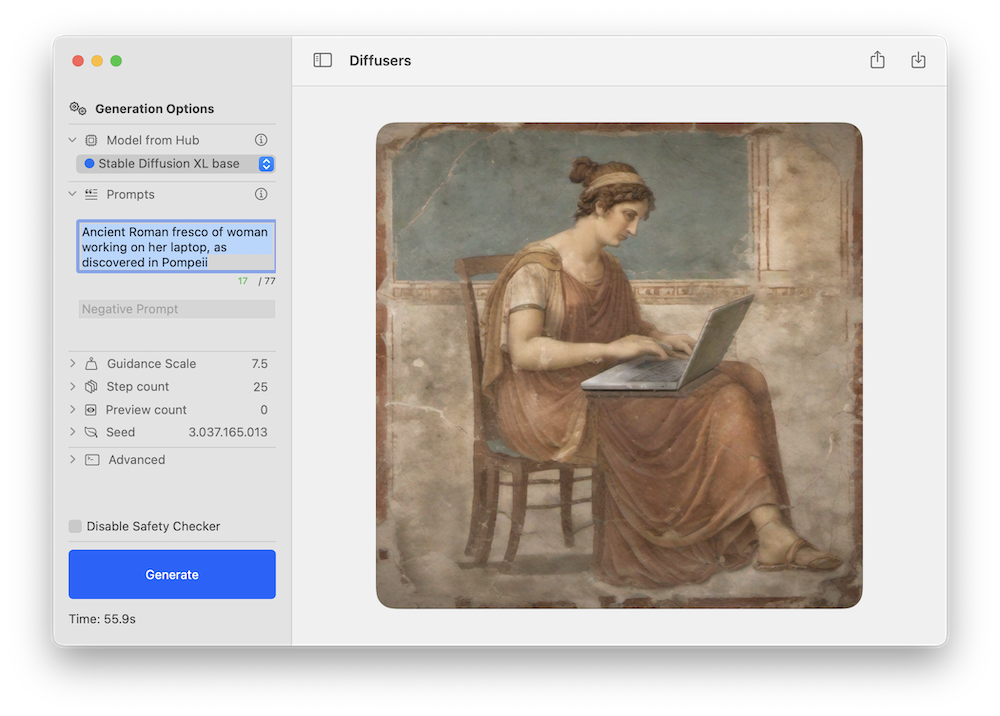
Either model can be tested using Apple’s Swift command-line inference app, or Hugging Face’s demo app. This is an example of the latter using the new Stable Diffusion XL pipeline:
As with previous Stable Diffusion releases, we expect the community to come up with novel fine-tuned versions for different domains, and many of them will be converted to Core ML. You can keep an eye on this filter in the Hub to explore!
Stable Diffusion XL works on Apple Silicon Macs running the public beta of macOS 14. It currently uses the ORIGINAL attention implementation, which is intended for CPU + GPU compute units. Note that the refiner stage has not been ported yet.
For reference, these are the performance figures we achieved on different devices:
| Device | --compute-unit |
--attention-implementation |
End-to-End Latency (s) | Diffusion Speed (iter/s) |
|---|---|---|---|---|
| MacBook Pro (M1 Max) | CPU_AND_GPU |
ORIGINAL |
46 | 0.46 |
| MacBook Pro (M2 Max) | CPU_AND_GPU |
ORIGINAL |
37 | 0.57 |
| Mac Studio (M1 Ultra) | CPU_AND_GPU |
ORIGINAL |
25 | 0.89 |
| Mac Studio (M2 Ultra) | CPU_AND_GPU |
ORIGINAL |
20 | 1.11 |
What is Mixed-Bit Palettization?
Last month we discussed 6-bit palettization, a post-training quantization method that converts 16-bit weights to just 6-bit per parameter. This achieves an important reduction in model size, but going beyond that is tricky because model quality becomes more and more impacted as the number of bits is decreased.
One option to decrease model size further is to use training time quantization, which consists of learning the quantization tables while we fine-tune the model. This works great, but you need to run a fine-tuning phase for every model you want to convert.
We explored a different alternative instead: mixed-bit palettization. Instead of using 6 bits per parameter, we examine the model and decide how many quantization bits to use per layer. We make the decision based on how much each layer contributes to the overall quality degradation, which we measure by comparing the PSNR between the quantized model and the original model in float16 mode, for a set of a few inputs. We explore several bit depths, per layer: 1 (!), 2, 4 and 8. If a layer degrades significantly when using, say, 2 bits, we move to 4 and so on. Some layers might be kept in 16-bit mode if they are critical to preserving quality.
Using this method, we can achieve effective quantizations of, for example, 2.8 bits on average, and we measure the impact on degradation for every combination we try. This allows us to be better informed about the best quantization to use for our target quality and size budgets.
To illustrate the method, let’s consider the following quantization “recipes” that we got from one of our analysis runs (we’ll explain later how they were generated):
{
  "model_version": "stabilityai/stable-diffusion-xl-base-1.0",
  "baselines": {
    "original": 82.2,
    "linear_8bit": 66.025,
    "recipe_6.55_bit_mixedpalette": 79.9,
    "recipe_4.50_bit_mixedpalette": 75.8,
    "recipe_3.41_bit_mixedpalette": 71.7,
  },
}
What this tells us is that the original model quality, as measured by PSNR in float16, is about 82 dB. Performing a naïve 8-bit linear quantization drops it to 66 dB. But then we have a recipe that compresses to 6.55 bits per parameter, on average, while keeping PSNR at 80 dB. The second and third recipes further reduce the model size, while still sustaining a PSNR larger than that of the 8-bit linear quantization.
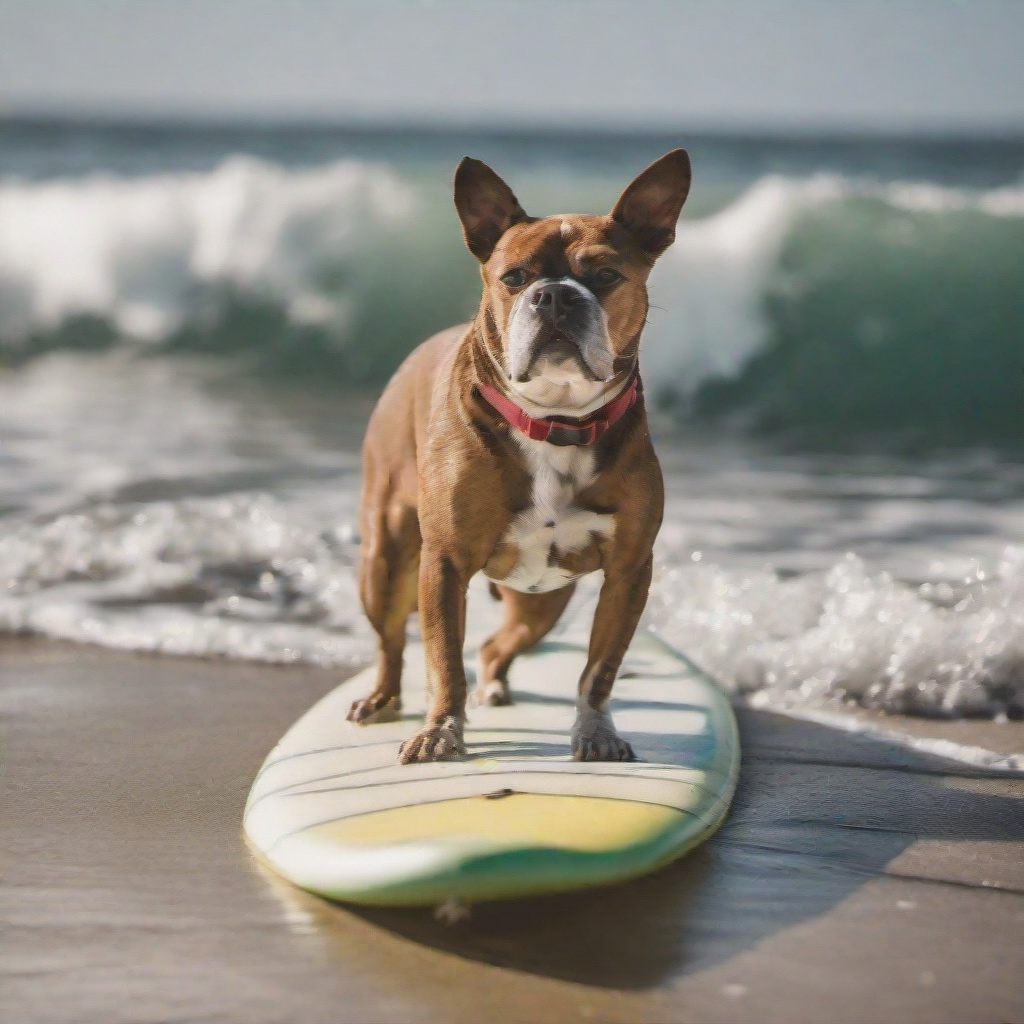
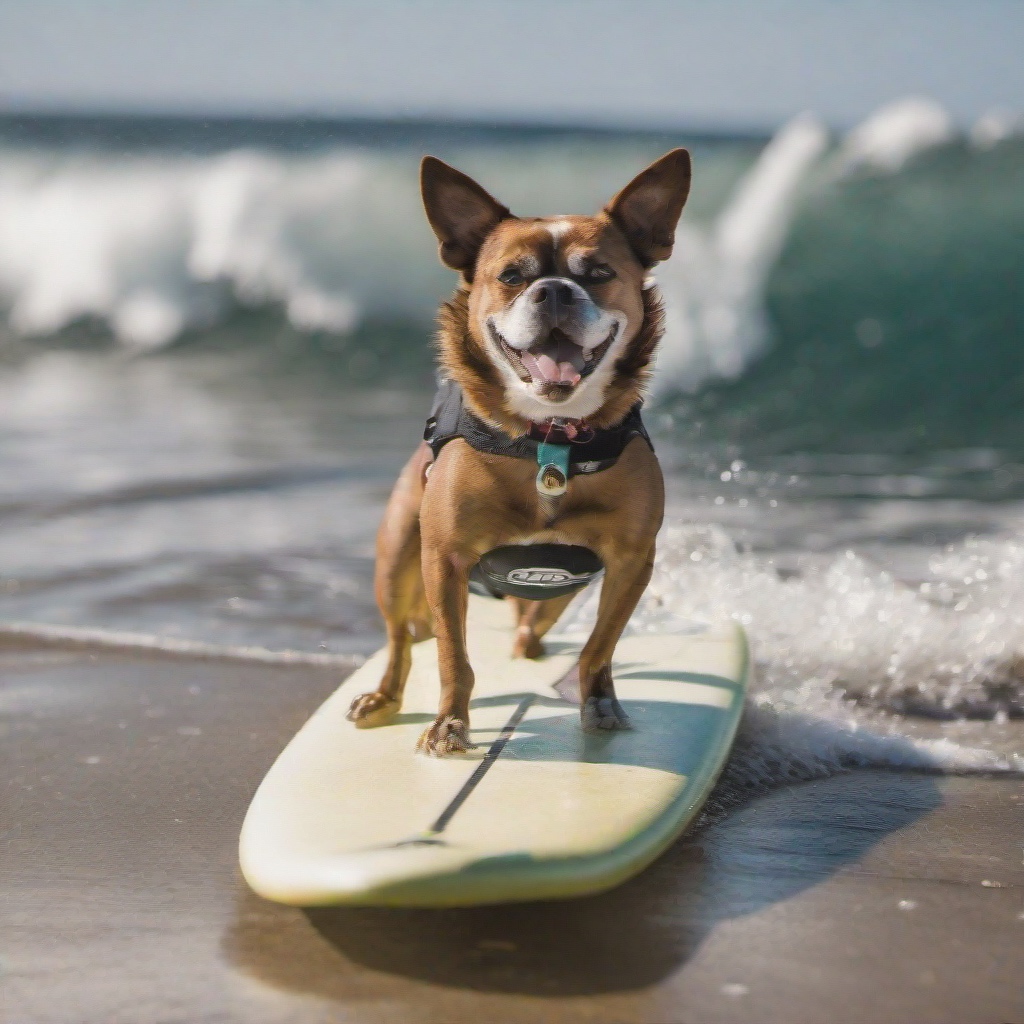
For visual examples, these are the results on prompt a high quality photo of a surfing dog running each one of the three recipes with the same seed:
| 3.41-bit | 4.50-bit | 6.55-bit | 16-bit (original) |
|---|---|---|---|
 |
 |
 |
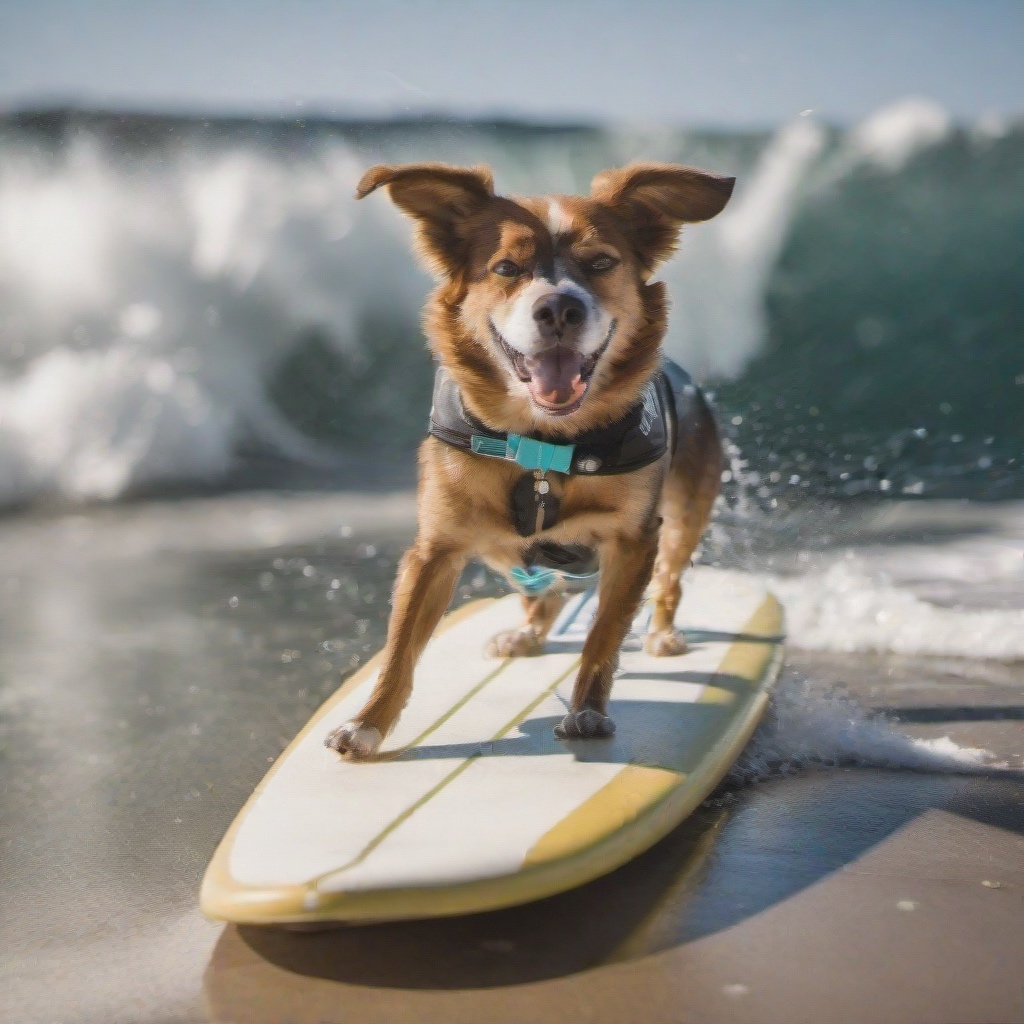 |
Some initial conclusions:
- In our opinion, all the images have good quality in terms of how realistic they look. The 6.55 and 4.50 versions are close to the 16-bit version in this aspect.
- The same seed produces an equivalent composition, but will not preserve the same details. Dog breeds may be different, for example.
- Adherence to the prompt may degrade as we increase compression. In this example, the aggressive 3.41 version loses the board. PSNR only compares how much pixels differ overall, but does not care about the subjects in the images. You need to examine results and assess them for your use case.
This technique is great for Stable Diffusion XL because we can keep about the same UNet size even though the number of parameters tripled with respect to the previous version. But it's not exclusive to it! You can apply the method to any Stable Diffusion Core ML model.
How are Mixed-Bit Recipes Created?
The following plot shows the signal strength (PSNR in dB) versus model size reduction (% of float16 size) for stabilityai/stable-diffusion-xl-base-1.0. The {1,2,4,6,8}-bit curves are generated by progressively palettizing more layers using a palette with a fixed number of bits. The layers were ordered in ascending order of their isolated impact to end-to-end signal strength, so the cumulative compression's impact is delayed as much as possible. The mixed-bit curve is based on falling back to a higher number of bits as soon as a layer's isolated impact to end-to-end signal integrity drops below a threshold. Note that all curves based on palettization outperform linear 8-bit quantization at the same model size except for 1-bit.
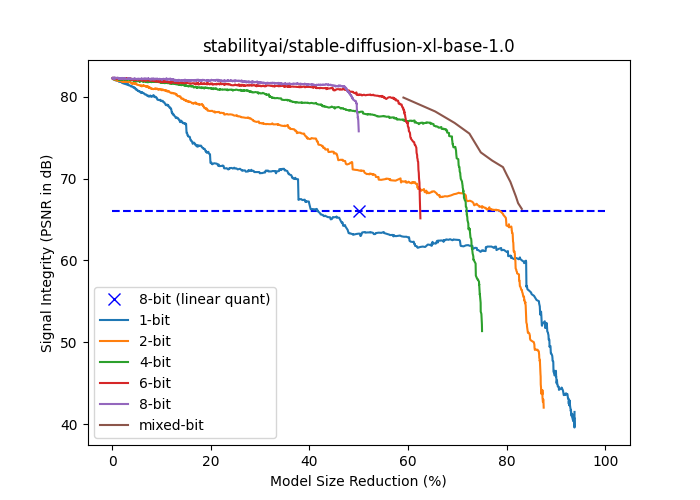
Mixed-bit palettization runs in two phases: analysis and application.
The goal of the analysis phase is to find points in the mixed-bit curve (the brown one above all the others in the figure) so we can choose our desired quality-vs-size tradeoff. As mentioned in the previous section, we iterate through the layers and select the lowest bit depths that yield results above a given PSNR threshold. We repeat the process for various thresholds to get different quantization strategies. The result of the process is thus a set of quantization recipes, where each recipe is just a JSON dictionary detailing the number of bits to use for each layer in the model. Layers with few parameters are ignored and kept in float16 for simplicity.
The application phase simply goes over the recipe and applies palettization with the number of bits specified in the JSON structure.
Analysis is a lengthy process and requires a GPU (mps or cuda), as we have to run inference multiple times. Once it’s done, recipe application can be performed in a few minutes.
We provide scripts for each one of these phases:
Converting Fine-Tuned Models
If you’ve previously converted Stable Diffusion models to Core ML, the process for XL using the command line converter is very similar. There’s a new flag to indicate whether the model belongs to the XL family, and you have to use --attention-implementation ORIGINAL if that’s the case.
For an introduction to the process, check the instructions in the repo or one of our previous blog posts, and make sure you use the flags above.
Running Mixed-Bit Palettization
After converting Stable Diffusion or Stable Diffusion XL models to Core ML, you can optionally apply mixed-bit palettization using the scripts mentioned above.
Because the analysis process is slow, we have prepared recipes for the most popular models:
- Recipes for Stable Diffusion 1.5
- Recipes for Stable Diffusion 2.1
- Recipes for Stable Diffusion XL 1.0 base
You can download and apply them locally to experiment.
In addition, we also applied the three best recipes from the Stable Diffusion XL analysis to the Core ML version of the UNet, and published them here. Feel free to play with them and see how they work for you!
Finally, as mentioned in the introduction, we created a complete Stable Diffusion XL Core ML pipeline that uses a 4.5-bit recipe.
Published Resources
apple/ml-stable-diffusion, by Apple. Conversion and inference library for Swift (and Python).huggingface/swift-coreml-diffusers. Hugging Face demo app, built on top of Apple's package.- Stable Diffusion XL 1.0 base (Core ML version). Model ready to run using the repos above and other third-party apps.
- Stable Diffusion XL 1.0 base, with mixed-bit palettization (Core ML). Same model as above, with UNet quantized with an effective palettization of 4.5 bits (on average).
- Additional UNets with mixed-bit palettizaton.
- Mixed-bit palettization recipes, pre-computed for popular models and ready to use.
mixed_bit_compression_pre_analysis.py. Script to run mixed-bit analysis and recipe generation.mixed_bit_compression_apply.py. Script to apply recipes computed during the analysis phase.