Spaces:
Running

Hinweis
Bei der Installation von Abhängigkeiten sollten nur die in requirements.txt angegebenen Versionen streng ausgewählt werden.
pip install -r requirements.txt -i https://mirrors.aliyun.com/pypi/simple/
 GPT Akademisch optimiert (GPT Academic)
Wenn Ihnen dieses Projekt gefällt, geben Sie ihm bitte einen Stern; wenn Sie bessere Tastenkombinationen oder Funktions-Plugins entwickelt haben, können Sie gerne einen Pull Request eröffnen.
Wenn Sie dieses Projekt mögen, geben Sie ihm bitte einen Stern. Wenn Sie weitere nützliche wissenschaftliche Abkürzungen oder funktionale Plugins entwickelt haben, können Sie gerne ein Problem oder eine Pull-Anforderung öffnen. Wir haben auch ein README in Englisch|日本語|한국어|Русский|Français, das von diesem Projekt selbst übersetzt wurde.
Um dieses Projekt in eine beliebige Sprache mit GPT zu übersetzen, lesen Sie multi_language.py (experimentell).
Hinweis
Beachten Sie bitte, dass nur Funktionserweiterungen (Schaltflächen) mit roter Farbe Dateien lesen können und einige Erweiterungen im Dropdown-Menü des Erweiterungsbereichs zu finden sind. Außerdem begrüßen wir jede neue Funktionserweiterung mit höchster Priorität und bearbeiten sie.
Die Funktionalität jeder Datei in diesem Projekt wird in der Selbstanalyse
self_analysis.mddetailliert beschrieben. Mit der Weiterentwicklung der Versionen können Sie jederzeit die zugehörigen Funktions-Erweiterungen aufrufen, um durch Aufruf von GPT einen Selbstanalysebericht des Projekts zu erstellen. Häufig gestellte Fragen finden Sie in derWiki. Installationsanweisungen.
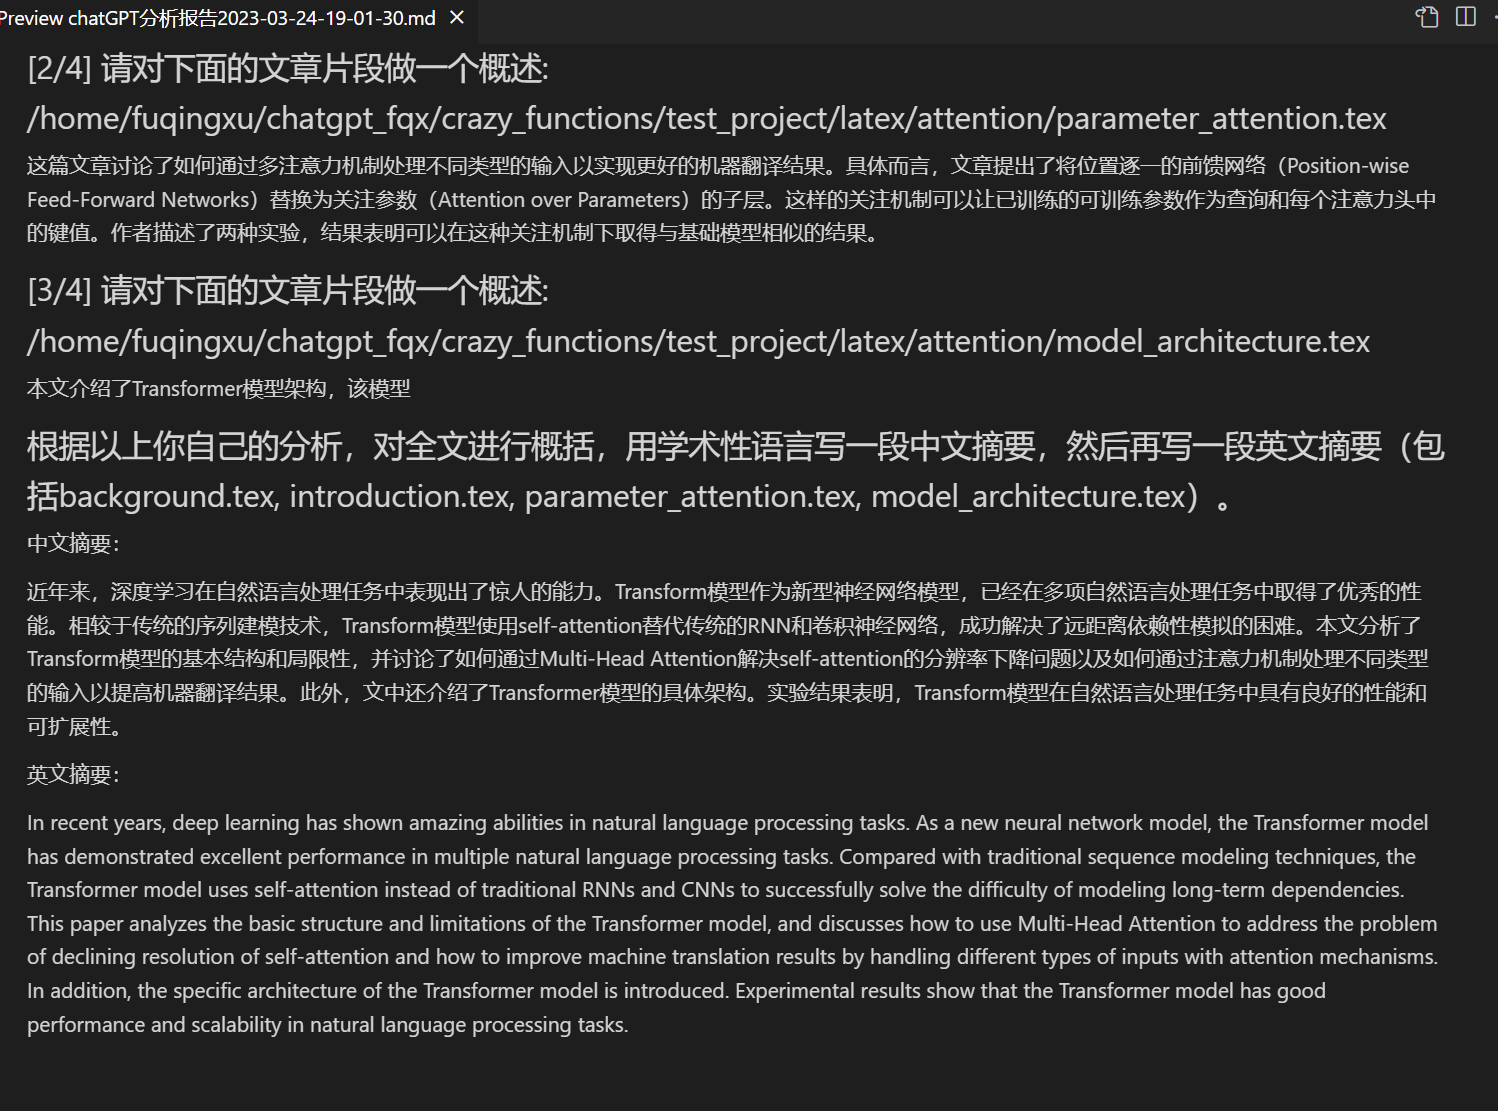
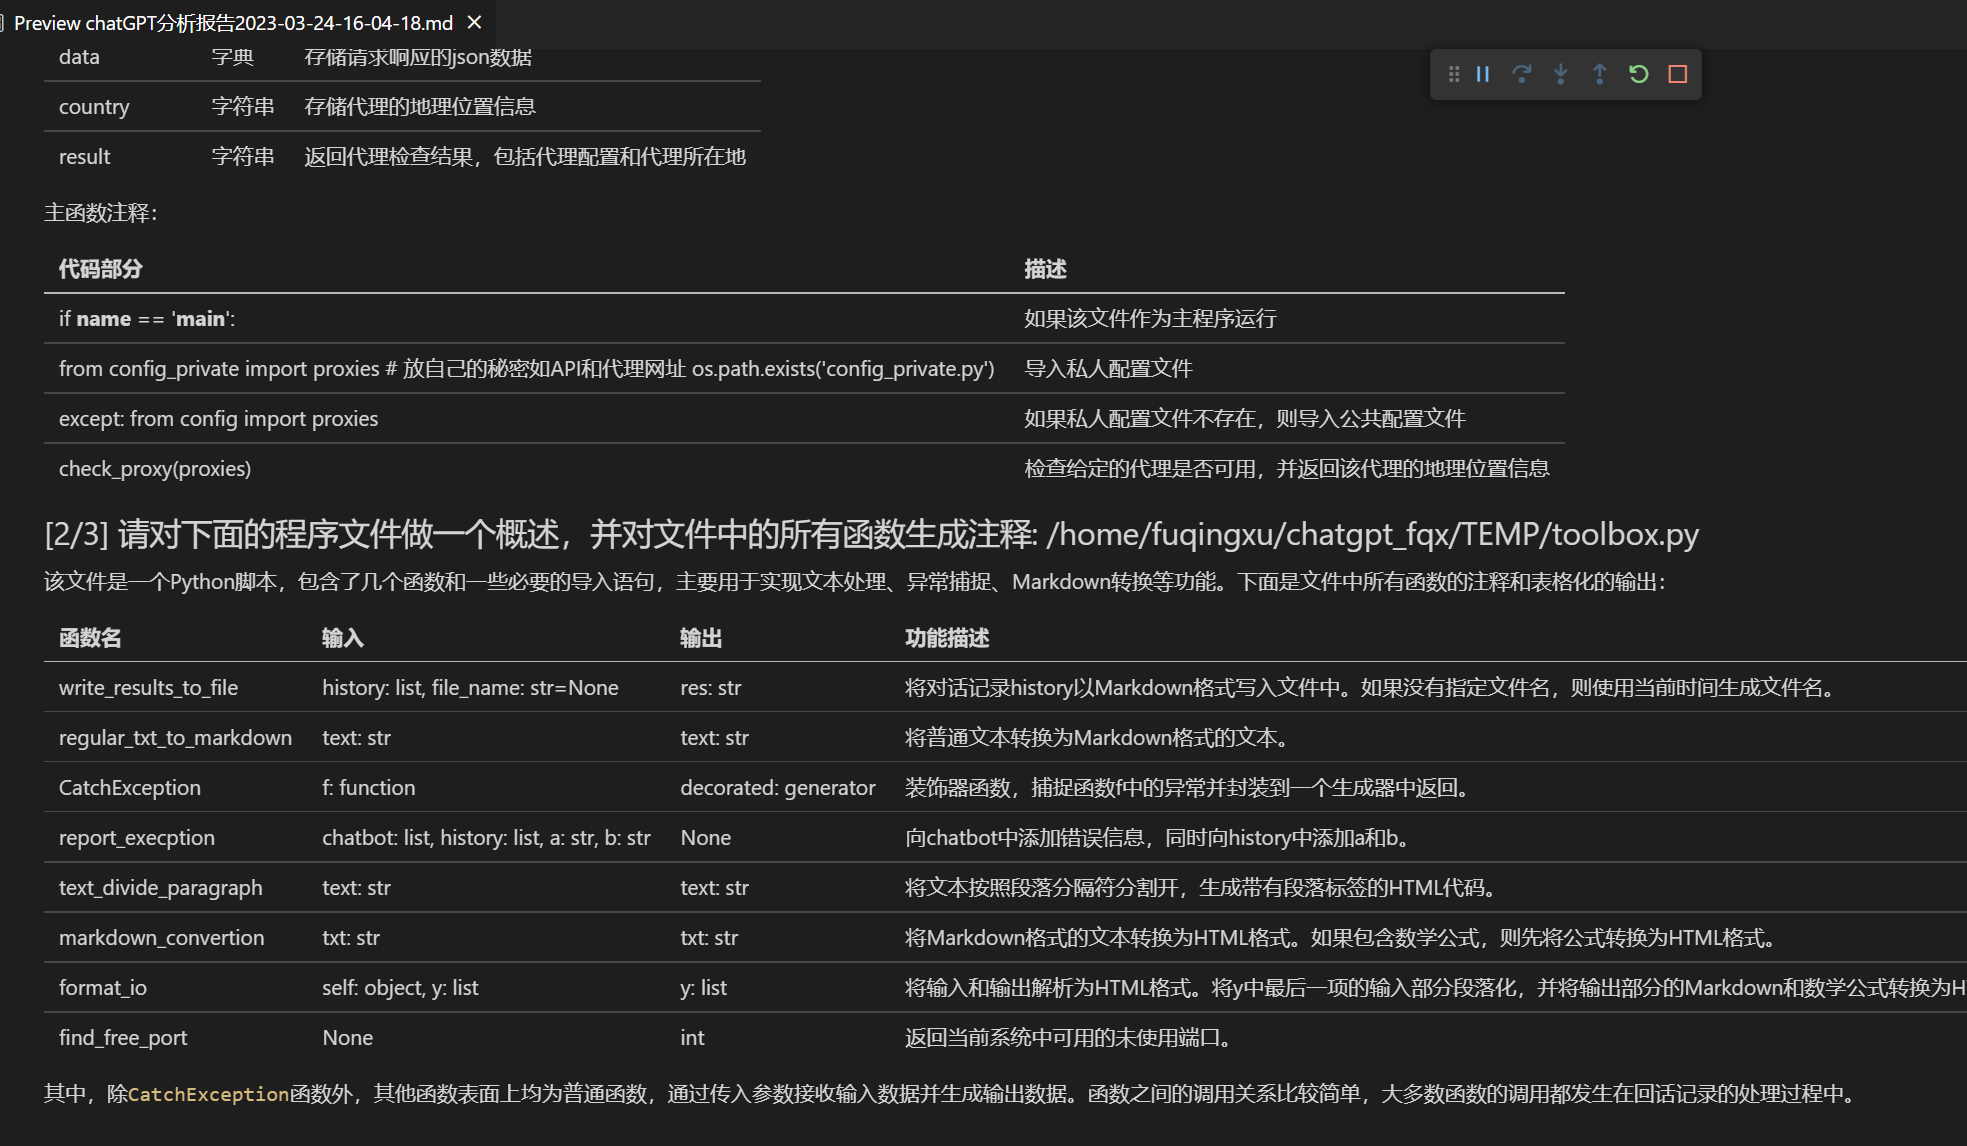
Dieses Projekt ist kompatibel und fördert die Verwendung von inländischen Sprachmodellen wie ChatGLM und RWKV, Pangu, etc. Es unterstützt das Vorhandensein mehrerer api-keys, die in der Konfigurationsdatei wie folgt angegeben werden können: API_KEY="openai-key1,openai-key2,api2d-key3". Wenn einAPI_KEYtemporär geändert werden muss, geben Sie den temporärenAPI_KEYim Eingabebereich ein und drücken Sie dann die Eingabetaste, um ihn zu übernehmen.FunktionBeschreibung Ein-Klick-Polieren Unterstützt ein-Klick-Polieren und ein-Klick-Suche nach grammatikalischen Fehlern in wissenschaftlichen Arbeiten Ein-Klick Chinesisch-Englisch Übersetzung Ein-Klick Chinesisch-Englisch Übersetzung Ein-Klick-Code-Erklärung Zeigt Code, erklärt Code, erzeugt Code und fügt Kommentare zum Code hinzu Benutzerdefinierte Tastenkombinationen Unterstützt benutzerdefinierte Tastenkombinationen Modulare Gestaltung Unterstützt leistungsstarke individuelle Funktions-Plugins. Plugins unterstützen Hot-Updates Selbstprogramm-Analyse [Funktions-Plugin] Ein-Klick Verstehen der Quellcode dieses Projekts Programmanalyse [Funktions-Plugin] Ein-Klick-Analyse des Projektbaums anderer Python/C/C++/Java/Lua/...-Projekte Lesen von Papieren, Übersetzen von Papieren [Funktions-Plugin] Ein-Klick Erklärung des gesamten LaTeX/PDF-Artikels und Erstellung einer Zusammenfassung LaTeX-Volltext-Übersetzung und Polieren [Funktions-Plugin] Ein-Klick-Übersetzung oder-Polieren des LaTeX-Artikels Bulk-Kommentargenerierung [Funktions-Plugin] Ein-Klick Massenerstellung von Funktionskommentaren Markdown Chinesisch-Englisch Übersetzung [Funktions-Plugin] Haben Sie die README in den oben genannten 5 Sprachen gesehen? Analyse-Berichtserstellung von chat [Funktions-Plugin] Automatische Zusammenfassung nach der Ausführung Funktion zur vollständigen Übersetzung von PDF-Artikeln [Funktions-Plugin] Extrahiert Titel und Zusammenfassung der PDF-Artikel und übersetzt den gesamten Text (mehrere Threads) Arxiv-Assistent [Funktions-Plugin] Geben Sie die Arxiv-Artikel-URL ein und klicken Sie auf Eine-Klick-Übersetzung-Zusammenfassung + PDF-Download Google Scholar Integrations-Assistent [Funktions-Plugin] Geben Sie eine beliebige Google Scholar Such-URL ein und lassen Sie gpt Ihnen bei der Erstellung von relatedworks helfen Internet-Informationen Aggregation + GPT [Funktions-Plugin] Lassen Sie GPT eine Frage beantworten, indem es zuerst Informationen aus dem Internet sammelt und so die Informationen nie veralten Anzeige von Formeln / Bildern / Tabellen Zeigt Formeln in beiden Formen, TeX-Format und gerendeter Form, unterstützt Formeln und Code-Highlights Unterstützung von PlugIns mit mehreren Threads Unterstützt den Aufruf mehrerer Threads in Chatgpt, um Text oder Programme Batch zu verarbeiten Starten Sie das dunkle Gradio-Thema Fügen Sie /?__theme=darkan das Ende der Browser-URL an, um das dunkle Thema zu aktivierenUnterstützung für mehrere LLM-Modelle, API2D Interface-Unterstützung Das Gefühl, gleichzeitig von GPT3.5, GPT4, Tshinghua ChatGLM, Fudan MOSS bedient zu werden, muss toll sein, oder? Zugriff auf weitere LLM-Modelle, Unterstützung von huggingface deployment Hinzufügen der Newbing-Schnittstelle (neues Bing), Einführung der Unterstützung von Jittorllms der Tsinghua-Universität, LLaMA, RWKV und Pangu alpha Weitere neue Funktionen (wie Bildgenerierung) …… Siehe Ende dieses Dokuments ……
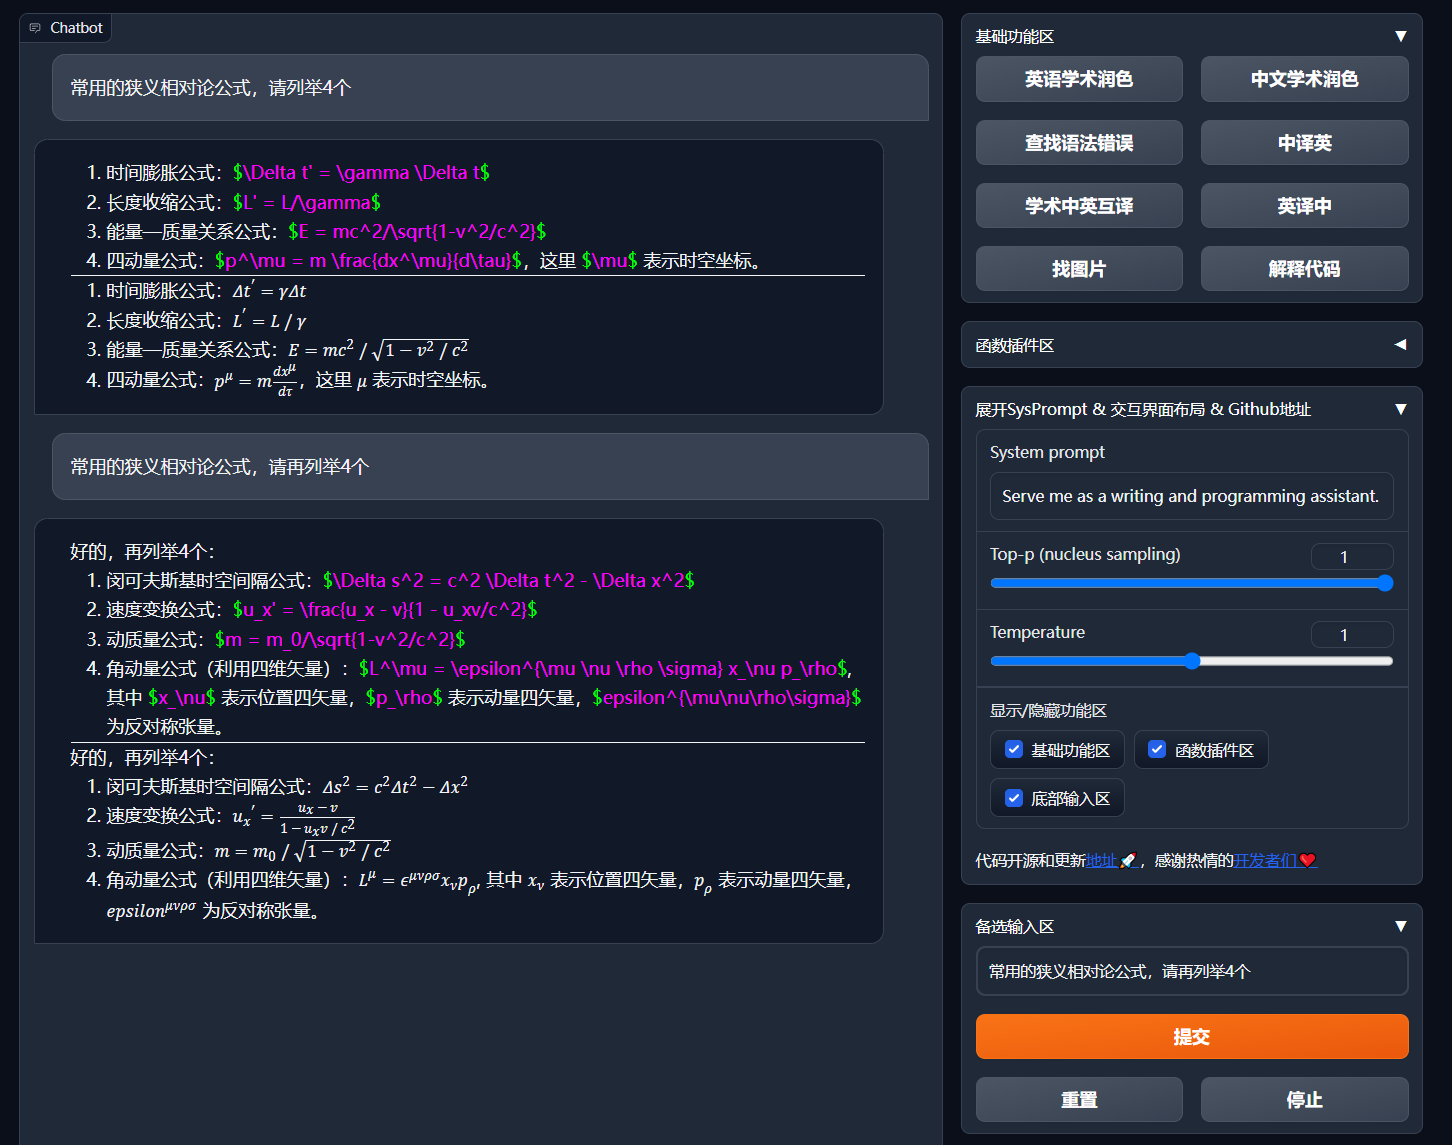
Neue Oberfläche (Ändern Sie die LAYOUT-Option in
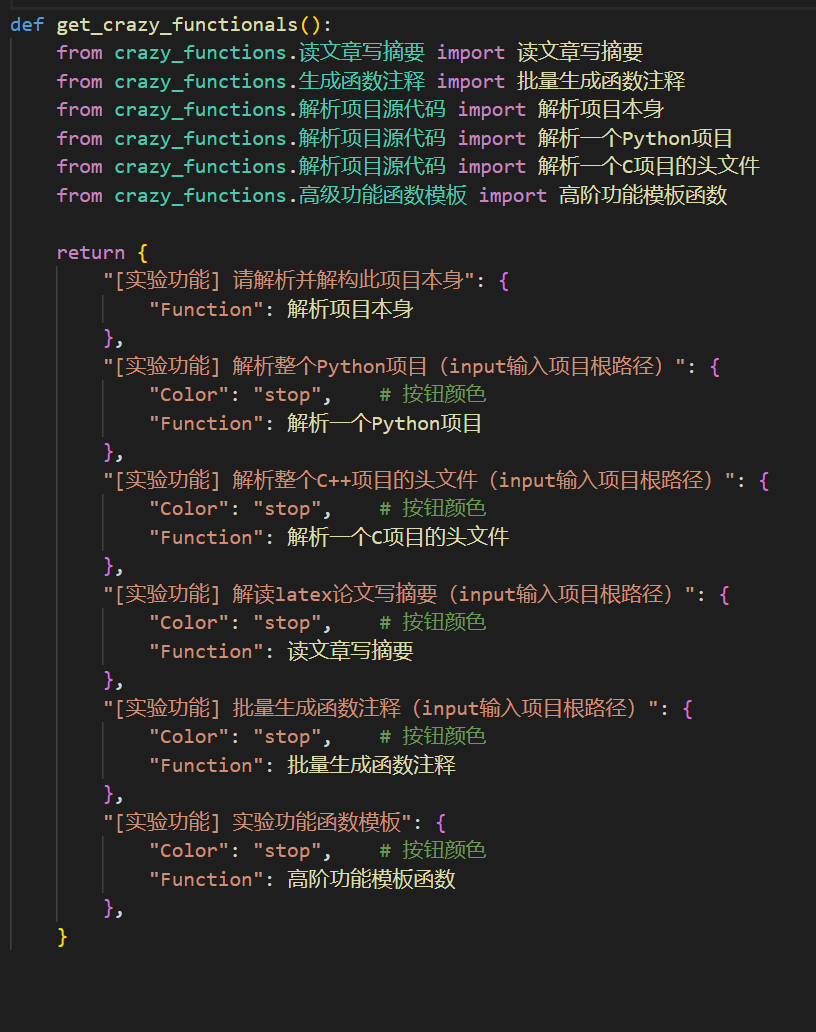
config.py, um zwischen "Seitenlayout" und "Oben-unten-Layout" zu wechseln)- All buttons are dynamically generated by reading `functional.py`, and custom functions can be easily added, freeing up the clipboard.
Proofreading/Correcting
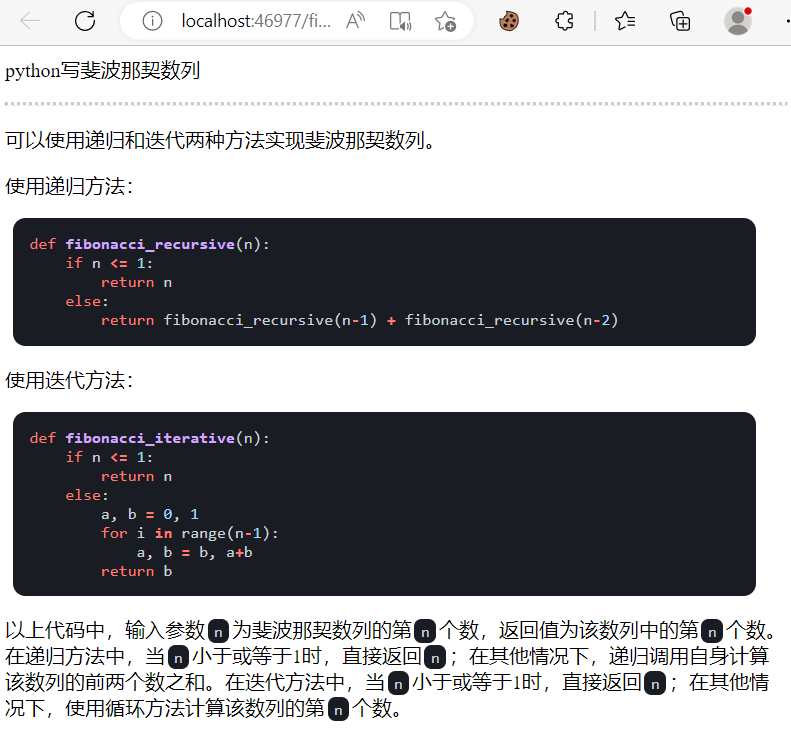
If the output contains formulas, they will be displayed in both tex format and rendered format for easy copying and reading.
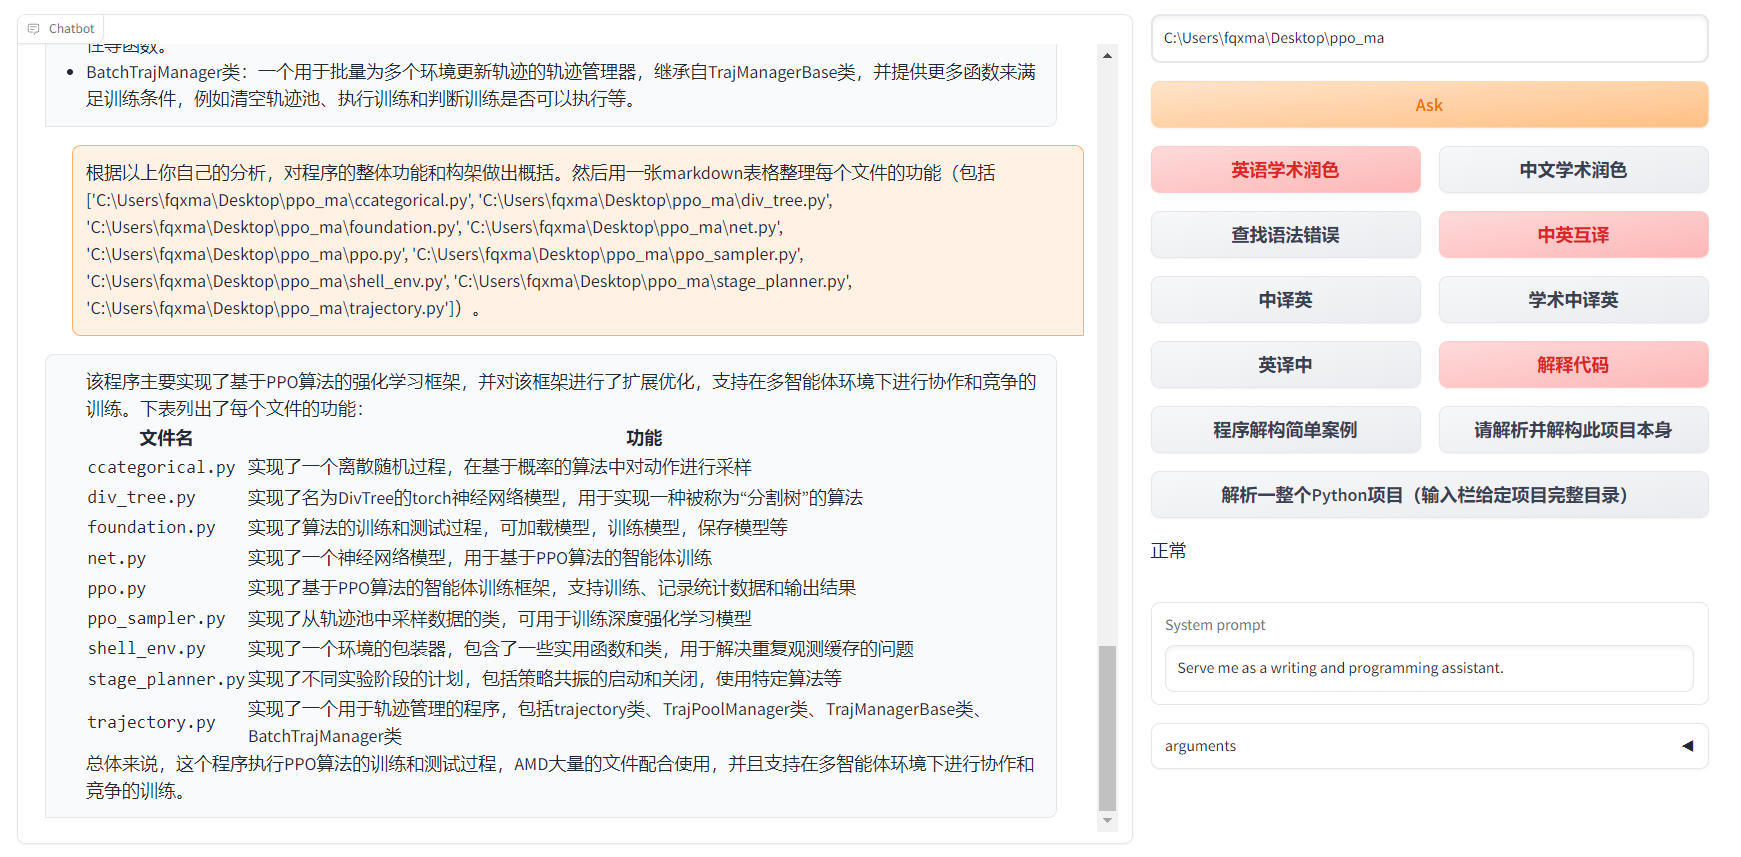
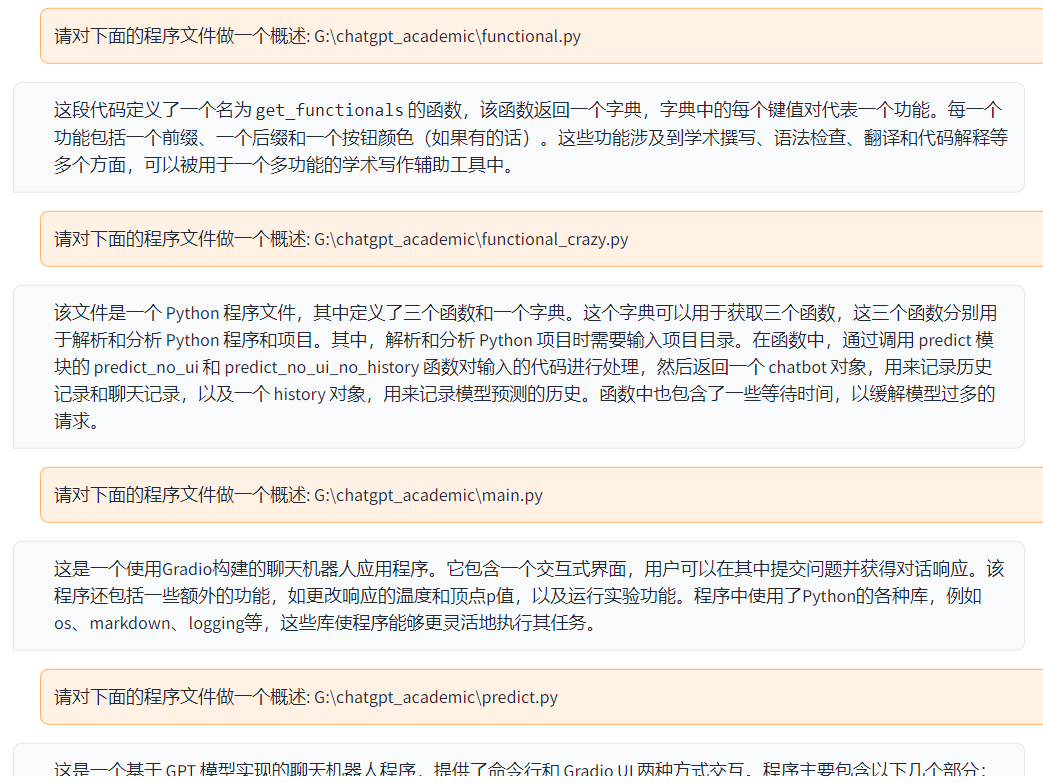
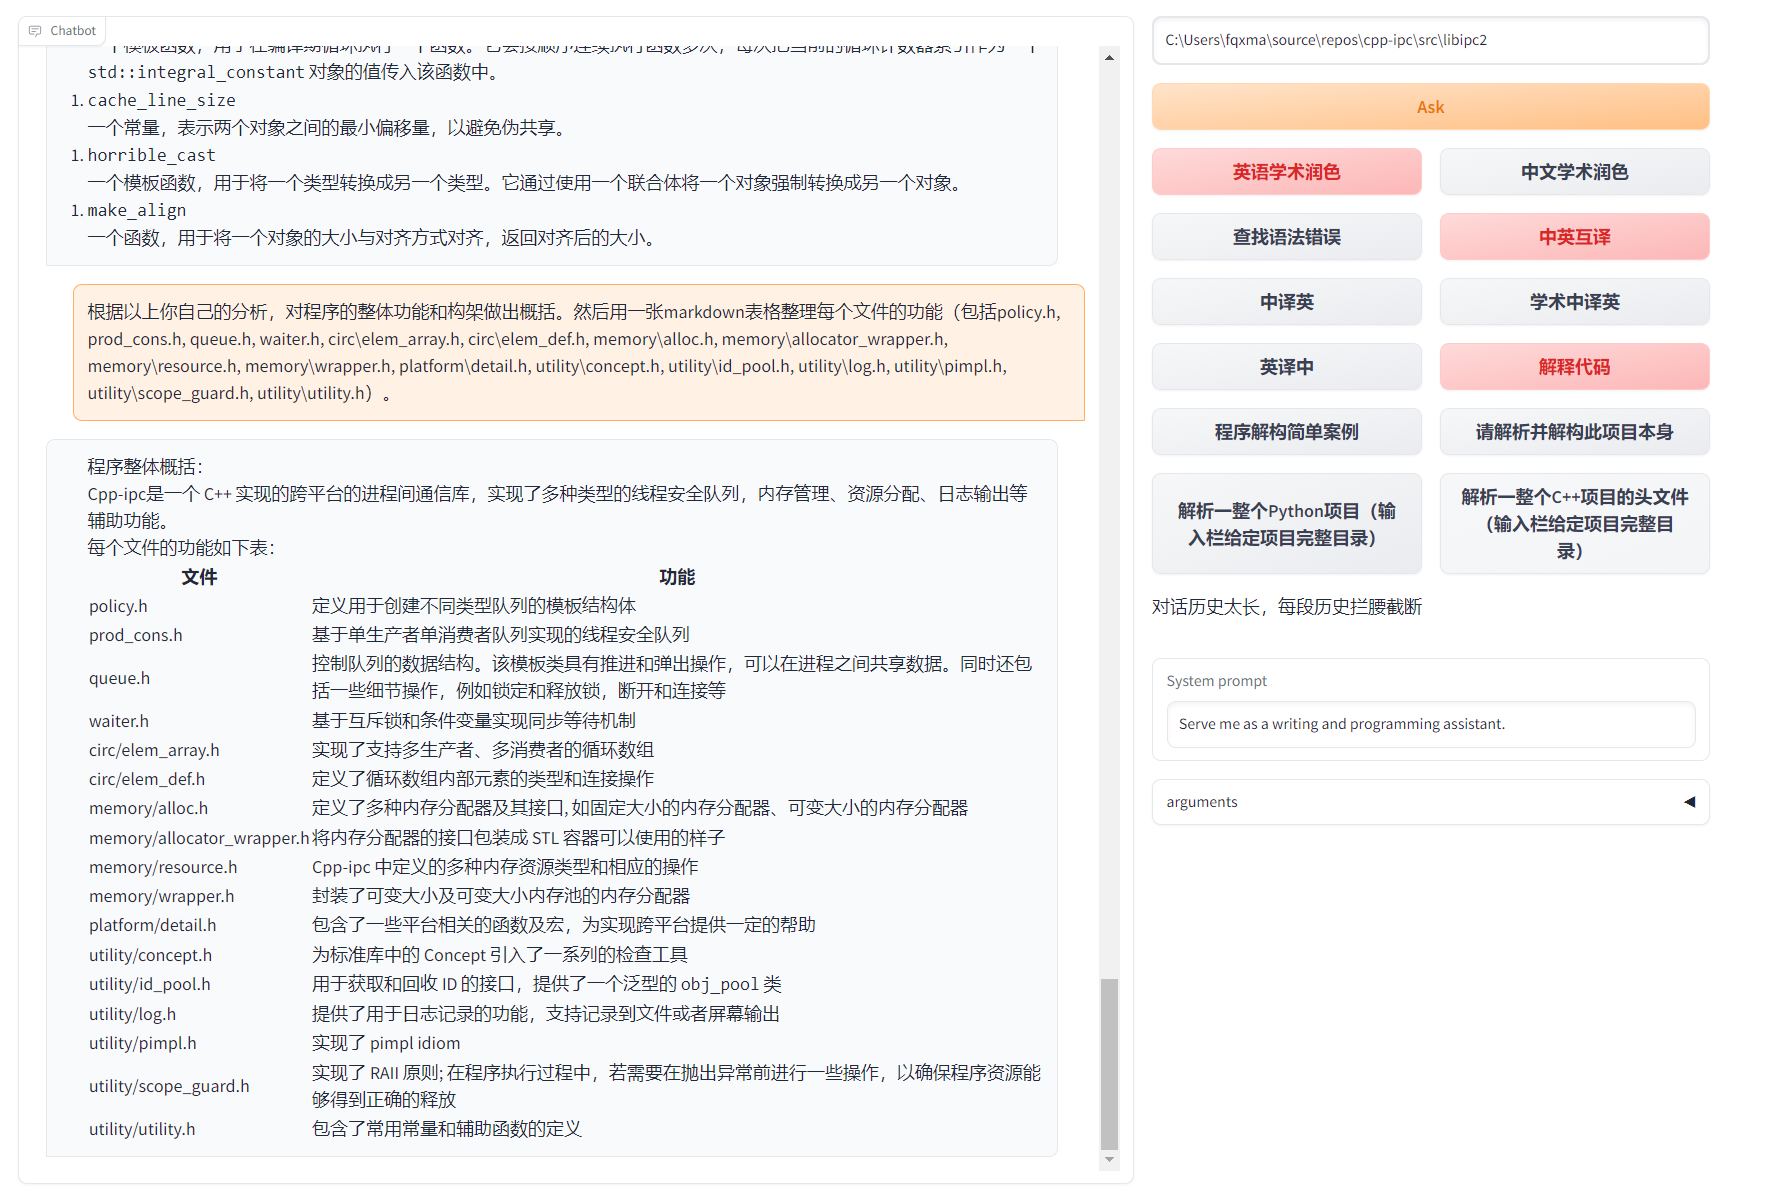
Don't feel like reading the project code? Show off the entire project to chatgpt.
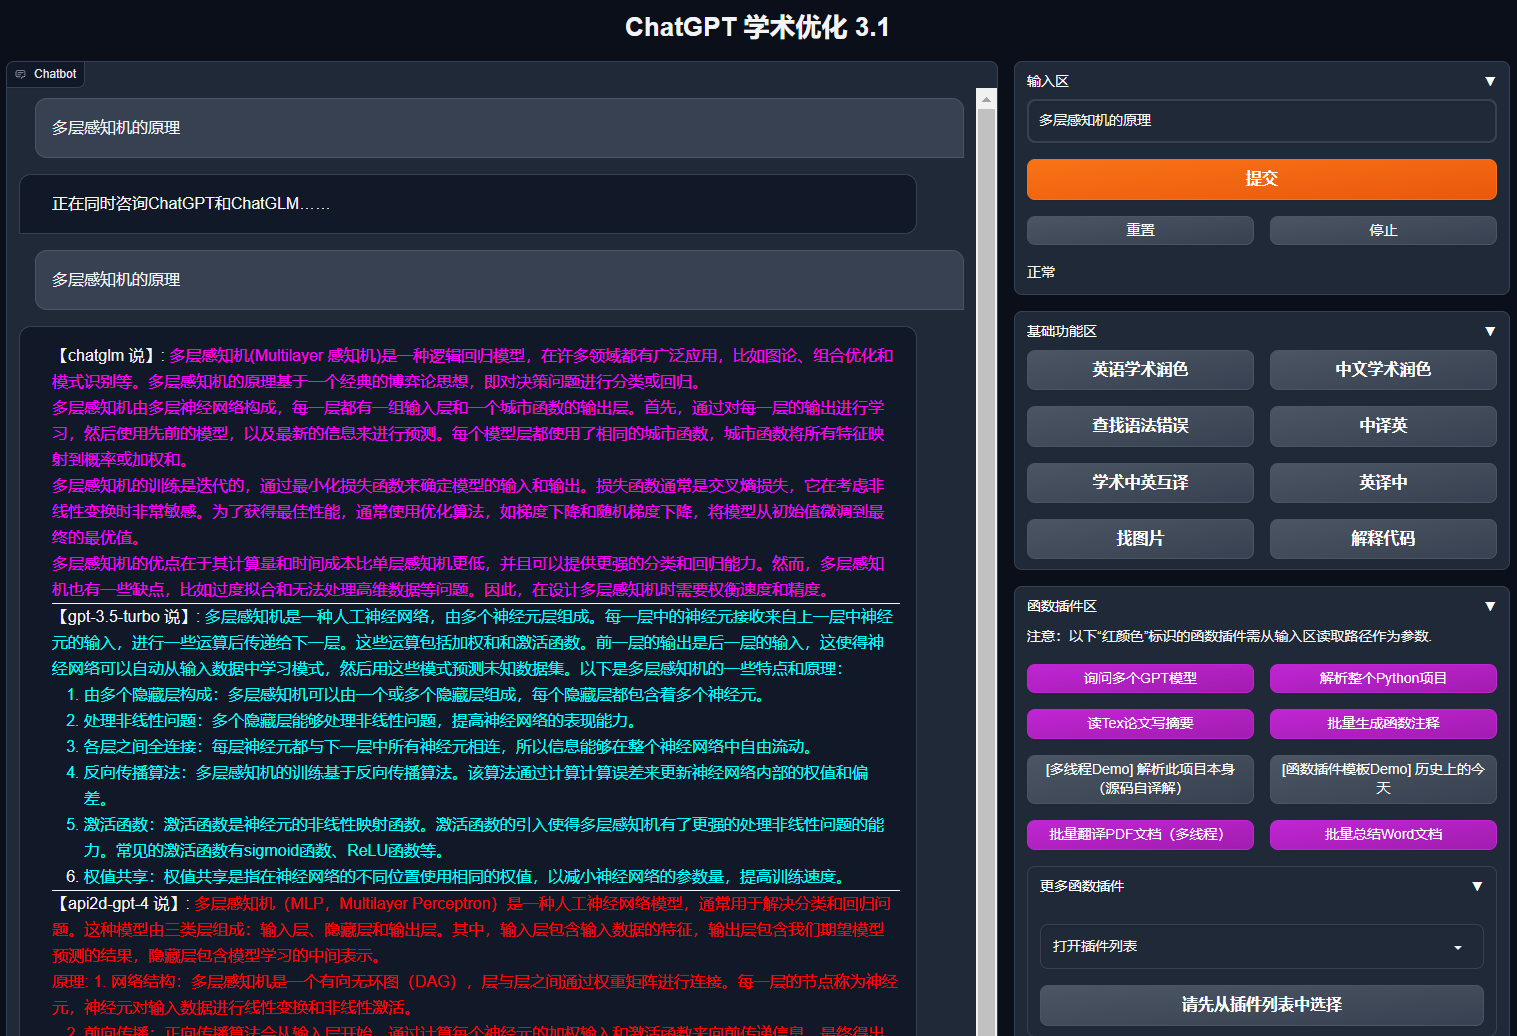
Multiple large language models are mixed and called together (ChatGLM + OpenAI-GPT3.5 + API2D-GPT4).
Installation
Installation-Method 1: Run directly (Windows, Linux or MacOS)
- Download the project
git clone https://github.com/binary-husky/gpt_academic.git
cd gpt_academic
- Configure API_KEY
Configure API KEY and other settings in config.py. Special Network Environment Settings.
(P.S. When the program is running, it will first check whether there is a "config_private.py" private configuration file, and use the configuration defined in it to override the configuration of "config.py". Therefore, if you understand our configuration reading logic, we strongly recommend that you create a new configuration file named "config_private.py" next to "config.py" and transfer (copy) the configurations in "config.py" to "config_private.py". "config_private.py" is not controlled by git, which can make your privacy information more secure. P.S. The project also supports configuring most options through environment variables, and the writing format of environment variables refers to the docker-compose file. Reading priority: environment variable > config_private.py >config.py)
- Install dependencies
# (Option I: If familar with Python) (Python version 3.9 or above, the newer the better), Note: Use the official pip source or Ali pip source, temporary switching method: python -m pip install -r requirements.txt -i https://mirrors.aliyun.com/pypi/simple/
python -m pip install -r requirements.txt

# (Option II: If not familiar with Python) Use anaconda with similar steps (https://www.bilibili.com/video/BV1rc411W7Dr):
conda create -n gptac_venv python=3.11    # Create an anaconda environment
conda activate gptac_venv                 # Activate the anaconda environment
python -m pip install -r requirements.txt # Same step as pip installation
Click to expand if supporting Tsinghua ChatGLM/Fudan MOSS as backend
[Optional Step] If supporting Tsinghua ChatGLM/Fudan MOSS as backend, additional dependencies need to be installed (Prerequisites: Familiar with Python + Used Pytorch + Sufficient computer configuration):
# [Optional Step I] Support Tsinghua ChatGLM. Remark: If encountering "Call ChatGLM fail Cannot load ChatGLM parameters", please refer to the following: 1: The above default installation is torch+cpu version. To use cuda, uninstall torch and reinstall torch+cuda; 2: If the model cannot be loaded due to insufficient machine configuration, you can modify the model precision in `request_llm/bridge_chatglm.py`, and modify all AutoTokenizer.from_pretrained("THUDM/chatglm-6b", trust_remote_code=True) to AutoTokenizer.from_pretrained("THUDM/chatglm-6b-int4", trust_remote_code=True)
python -m pip install -r request_llm/requirements_chatglm.txt

# [Optional Step II] Support Fudan MOSS
python -m pip install -r request_llm/requirements_moss.txt
git clone https://github.com/OpenLMLab/MOSS.git request_llm/moss # When executing this line of code, you must be in the project root path

# [Optional Step III] Make sure the AVAIL_LLM_MODELS in the config.py configuration file contains the expected models. Currently supported models are as follows (jittorllms series currently only supports docker solutions):
AVAIL_LLM_MODELS = ["gpt-3.5-turbo", "api2d-gpt-3.5-turbo", "gpt-4", "api2d-gpt-4", "chatglm", "newbing", "moss"] # + ["jittorllms_rwkv", "jittorllms_pangualpha", "jittorllms_llama"]
- Run
python main.py
```5. Testing Function Plugin
- Test function plugin template function (requires gpt to answer what happened today in history), you can use this function as a template to implement more complex functions Click "[Function Plugin Template Demo] Today in History"
## Installation-Method 2: Using Docker

1. Only ChatGPT (Recommended for most people)

``` sh
git clone https://github.com/binary-husky/gpt_academic.git  # Download the project
cd gpt_academic                                 # Enter the path
nano config.py                                      # Edit config.py with any text editor, Configure "Proxy","API_KEY"and"WEB_PORT" (e.g 50923) etc.
docker build -t gpt-academic .                      # Install

# (Last step-option 1) Under Linux environment, use `--net=host` is more convenient and quick
docker run --rm -it --net=host gpt-academic
# (Last step-option 2) Under macOS/windows environment, can only use the -p option to expose the container's port(eg.50923) to the port on the host.
docker run --rm -it -e WEB_PORT=50923 -p 50923:50923 gpt-academic
- ChatGPT + ChatGLM + MOSS (Requires familiarity with Docker)
# Modify docker-compose.yml, delete solution 1 and solution 3, and retain solution 2. Modify the configuration of solution 2 in docker-compose.yml, referring to the comments in it.
docker-compose up
- ChatGPT+LLAMA+Pangu+RWKV(Requires familiarity with Docker)
# Modify docker-compose.yml, delete solution 1 and solution 2, and retain solution 3. Modify the configuration of solution 3 in docker-compose.yml, referring to the comments in it.
docker-compose up
Installation-Method 3: Other Deployment Options
How to use reverse proxy URL/Microsoft Azure API Configure API_URL_REDIRECT according to the instructions in
config.py.Remote cloud server deployment (requires cloud server knowledge and experience) Please visit Deployment wiki-1
Using WSL 2 (Windows subsystem for Linux) Please visit Deployment wiki-2
How to run at a secondary URL (such as
http://localhost/subpath) Please visit FastAPI operating instructionsUse docker-compose to run Please read docker-compose.yml and follow the prompts to operate.
Advanced Usage
Customize new convenience buttons / custom function plugins.
- Customize new convenience buttons (Academic Shortcut Keys)
Open
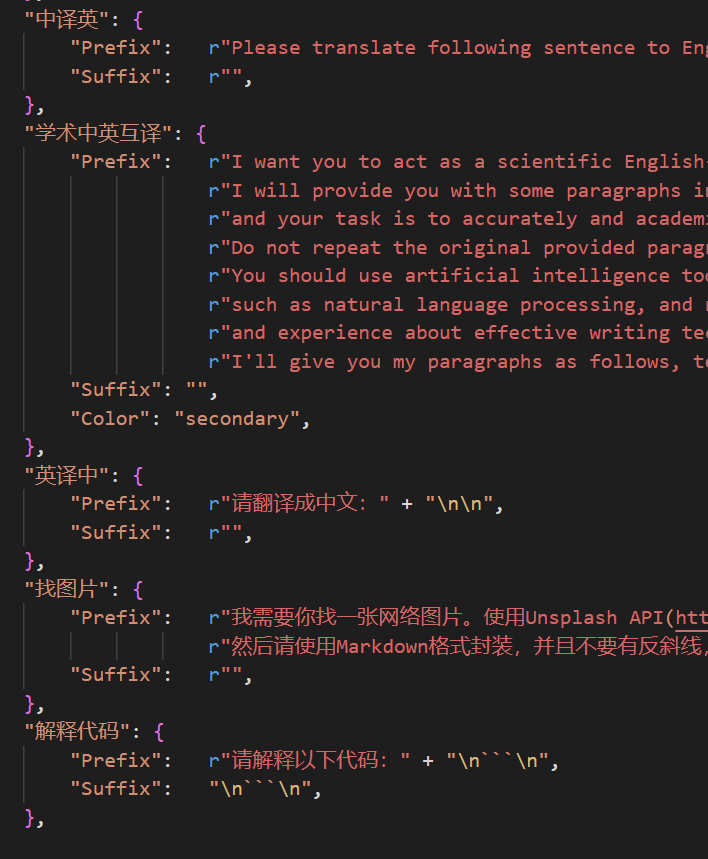
core_functional.pywith any text editor, add an entry as follows, and then restart the program. (If the button has been added successfully and is visible, then the prefix and suffix can be hot-modified, and it will take effect without restarting the program.) For example
"Super English to Chinese": {
# Prefix, will be added before your input. For example, used to describe your requirements, such as translation, explaining code, polishing, etc.
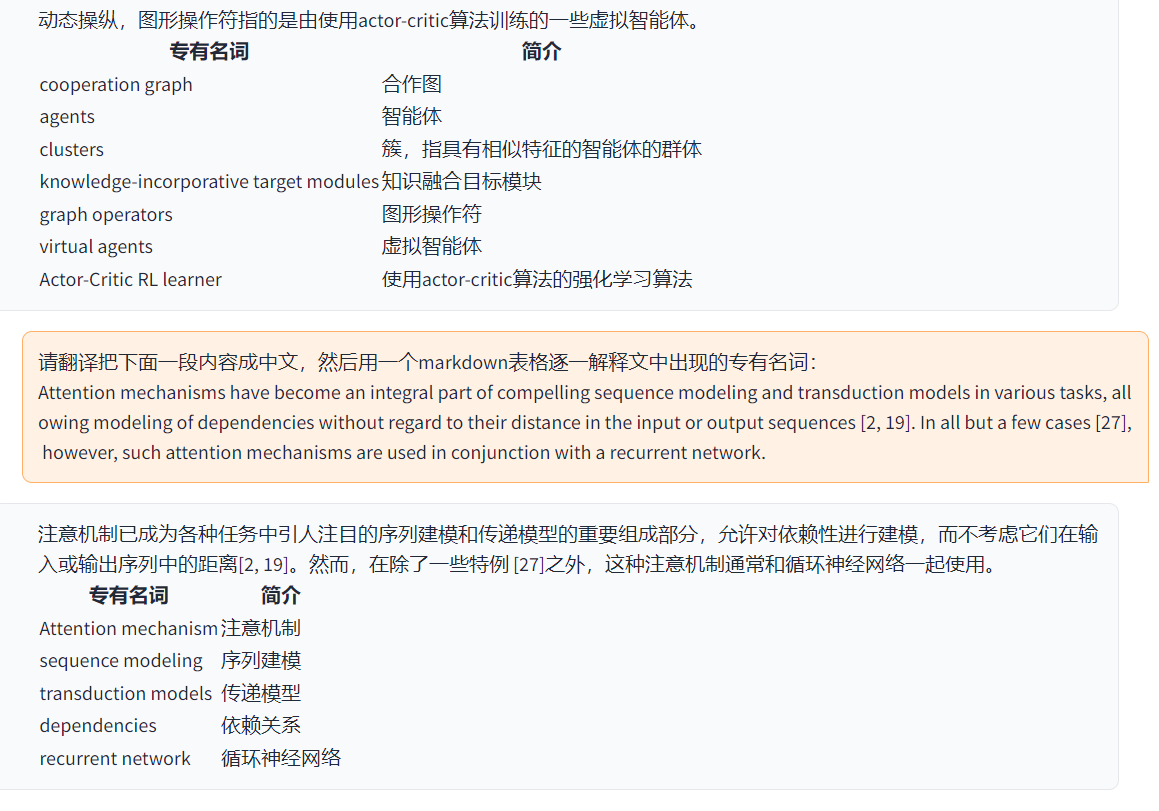
"Prefix": "Please translate the following content into Chinese, and then use a markdown table to explain the proper nouns that appear in the text one by one:\n\n",
# Suffix, will be added after your input. For example, combined with prefix, you can enclose your input content in quotes.
"Suffix": "",
},
- Custom function plugins
Write powerful function plugins to perform any task you want and can't think of. The difficulty of plugin writing and debugging is very low in this project. As long as you have a certain knowledge of Python, you can implement your own plugin functions by imitating the template we provided. For more information, please refer to the Function Plugin Guide.
Latest Update
New feature dynamics1. Funktion zur Speicherung von Dialogen. Rufen Sie im Bereich der Funktions-Plugins "Aktuellen Dialog speichern" auf, um den aktuellen Dialog als lesbares und wiederherstellbares HTML-Datei zu speichern. Darüber hinaus können Sie im Funktions-Plugin-Bereich (Dropdown-Menü) "Laden von Dialogverlauf" aufrufen, um den vorherigen Dialog wiederherzustellen. Tipp: Wenn Sie keine Datei angeben und stattdessen direkt auf "Laden des Dialogverlaufs" klicken, können Sie das HTML-Cache-Archiv anzeigen. Durch Klicken auf "Löschen aller lokalen Dialogverlaufsdatensätze" können alle HTML-Archiv-Caches gelöscht werden.
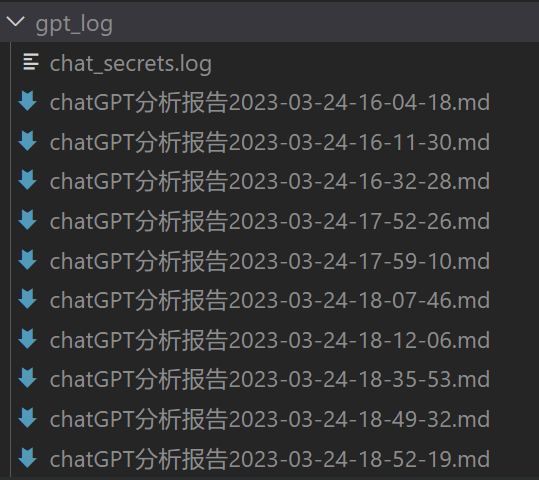
Berichterstellung. Die meisten Plugins generieren nach Abschluss der Ausführung einen Arbeitsbericht.
Modularisierte Funktionsgestaltung, einfache Schnittstellen mit leistungsstarken Funktionen.
Dies ist ein Open-Source-Projekt, das sich "selbst übersetzen" kann.
Die Übersetzung anderer Open-Source-Projekte ist kein Problem.
Dekorieren Sie
live2dmit kleinen Funktionen (standardmäßig deaktiviert, Änderungen anconfig.pyerforderlich).
Neue MOSS-Sprachmodellunterstützung.

OpenAI-Bildgenerierung.
OpenAI-Audio-Analyse und Zusammenfassung.
Latex-Proofreading des gesamten Textes.
Version:
Version 3.5 (Todo): Rufen Sie alle Funktionserweiterungen dieses Projekts mit natürlicher Sprache auf (hohe Priorität).
Version 3.4 (Todo): Verbesserte Unterstützung mehrerer Threads für Local Large Model (LLM).
Version 3.3: + Internet-Informationssynthese-Funktion
Version 3.2: Funktionserweiterungen unterstützen mehr Parameter-Schnittstellen (Speicherung von Dialogen, Interpretation beliebigen Sprachcodes + gleichzeitige Abfrage jeder LLM-Kombination)
Version 3.1: Unterstützung mehrerer GPT-Modelle gleichzeitig! Unterstützung für API2D, Unterstützung für Lastenausgleich von mehreren API-Schlüsseln.
Version 3.0: Unterstützung von Chatglm und anderen kleinen LLMs
Version 2.6: Umstrukturierung der Plugin-Struktur zur Verbesserung der Interaktivität, Einführung weiterer Plugins
Version 2.5: Automatische Aktualisierung, Problembehebung bei Quelltexten großer Projekte, wenn der Text zu lang ist oder Token überlaufen.
Version 2.4: (1) Neue Funktion zur Übersetzung des gesamten PDF-Texts; (2) Neue Funktion zum Wechseln der Position des Eingabebereichs; (3) Neue Option für vertikales Layout; (4) Optimierung von Multithread-Funktions-Plugins.
Version 2.3: Verbesserte Interaktivität mit mehreren Threads
Version 2.2: Funktionserweiterungen unterstützen "Hot-Reload"
Version 2.1: Faltbares Layout
Version 2.0: Einführung von modularisierten Funktionserweiterungen
Version 1.0: Grundlegende Funktionengpt_academic Entwickler QQ-Gruppe-2: 610599535
Bekannte Probleme
- Einige Browser-Übersetzungs-Plugins können die Frontend-Ausführung dieser Software stören.
- Sowohl eine zu hohe als auch eine zu niedrige Version von Gradio führt zu verschiedenen Ausnahmen.
Referenz und Lernen
Der Code bezieht sich auf viele Designs von anderen herausragenden Projekten, insbesondere:

# Projekt 1: ChatGLM-6B der Tsinghua Universität:
https://github.com/THUDM/ChatGLM-6B

# Projekt 2: JittorLLMs der Tsinghua Universität:
https://github.com/Jittor/JittorLLMs

# Projekt 3: Edge-GPT:
https://github.com/acheong08/EdgeGPT

# Projekt 4: ChuanhuChatGPT:
https://github.com/GaiZhenbiao/ChuanhuChatGPT

# Projekt 5: ChatPaper:
https://github.com/kaixindelele/ChatPaper

# Mehr:
https://github.com/gradio-app/gradio
https://github.com/fghrsh/live2d_demo