Image tasks with IDEFICS
個別のタスクは特殊なモデルを微調整することで対処できますが、別のアプローチも可能です。 最近登場して人気を博しているのは、微調整を行わずにさまざまなタスクに大規模なモデルを使用することです。 たとえば、大規模な言語モデルは、要約、翻訳、分類などの NLP タスクを処理できます。 このアプローチは、テキストなどの単一のモダリティに限定されなくなりました。このガイドでは、次のような方法を説明します。 IDEFICS と呼ばれる大規模なマルチモーダル モデルを使用して、画像とテキストのタスクを解決します。
IDEFICS は、Flamingo に基づくオープンアクセスのビジョンおよび言語モデルです。 DeepMind によって最初に開発された最先端の視覚言語モデル。モデルは任意の画像シーケンスを受け入れます テキストを入力し、出力として一貫したテキストを生成します。画像に関する質問に答えたり、視覚的なコンテンツについて説明したり、 複数のイメージに基づいたストーリーを作成するなど。 IDEFICS には 2 つのバリエーションがあります - 800 億パラメータ および 90 億のパラメータ、どちらも 🤗 Hub で入手できます。各バリエーションについて、細かく調整された指示も見つけることができます。 会話のユースケースに適応したモデルのバージョン。
このモデルは非常に多用途で、幅広い画像タスクやマルチモーダル タスクに使用できます。しかし、 大規模なモデルであるということは、大量の計算リソースとインフラストラクチャが必要であることを意味します。それはあなた次第です このアプローチは、個別のタスクごとに特化したモデルを微調整するよりも、ユースケースに適しています。
このガイドでは、次の方法を学習します。
- IDEFICS をロード および モデルの量子化バージョンをロード
- IDEFICS を次の目的で使用します。
- バッチモードで推論を実行する
- 会話用に IDEFICS 命令を実行
始める前に、必要なライブラリがすべてインストールされていることを確認してください。
pip install -q bitsandbytes sentencepiece accelerate transformers
Loading the model
まずはモデルの 90 億個のパラメーターのチェックポイントをロードしましょう。
>>> checkpoint = "HuggingFaceM4/idefics-9b"他の Transformers モデルと同様に、プロセッサとモデル自体をチェックポイントからロードする必要があります。
IDEFICS プロセッサは、LlamaTokenizer と IDEFICS 画像プロセッサを単一のプロセッサにラップして処理します。
モデルのテキストと画像の入力を準備します。
>>> import torch

>>> from transformers import IdeficsForVisionText2Text, AutoProcessor

>>> processor = AutoProcessor.from_pretrained(checkpoint)

>>> model = IdeficsForVisionText2Text.from_pretrained(checkpoint, torch_dtype=torch.bfloat16, device_map="auto")device_mapをautoに設定すると、モデルの重みを最も最適化された状態でロードおよび保存する方法が自動的に決定されます。
既存のデバイスを考慮した方法。
Quantized model
ハイメモリ GPU の可用性が問題となる場合は、モデルの量子化されたバージョンをロードできます。モデルと
プロセッサを 4 ビット精度で使用する場合、BitsAndBytesConfigをfrom_pretrainedメソッドに渡すと、モデルが圧縮されます。
ロード中にその場で。
>>> import torch
>>> from transformers import IdeficsForVisionText2Text, AutoProcessor, BitsAndBytesConfig

>>> quantization_config = BitsAndBytesConfig(
...     load_in_4bit=True,
...     bnb_4bit_compute_dtype=torch.float16,
... )

>>> processor = AutoProcessor.from_pretrained(checkpoint)

>>> model = IdeficsForVisionText2Text.from_pretrained(
...     checkpoint,
...     quantization_config=quantization_config,
...     device_map="auto"
... )
提案された方法のいずれかでモデルをロードしたので、IDEFICS を使用できるタスクの探索に進みましょう。
Image captioning
画像のキャプション付けは、特定の画像のキャプションを予測するタスクです。一般的な用途は視覚障害者を支援することです 人々はさまざまな状況をナビゲートします。たとえば、オンラインで画像コンテンツを探索します。
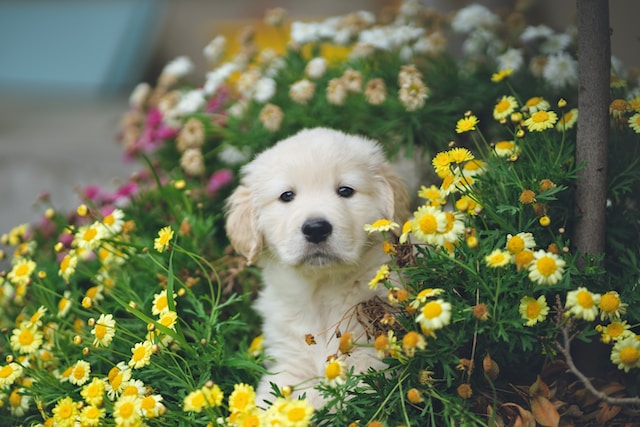
タスクを説明するには、キャプションを付ける画像を取得します。例:

写真提供:Hendo Wang
IDEFICS はテキストと画像のプロンプトを受け入れます。ただし、画像にキャプションを付けるには、テキスト プロンプトをユーザーに提供する必要はありません。 モデル、前処理された入力画像のみ。テキスト プロンプトがない場合、モデルはテキストの生成を開始します。 BOS (Beginning-of-sequence) トークンによりキャプションが作成されます。
モデルへの画像入力として、画像オブジェクト (PIL.Image) または画像を取得できる URL のいずれかを使用できます。
>>> prompt = [
...     "https://images.unsplash.com/photo-1583160247711-2191776b4b91?ixlib=rb-4.0.3&ixid=M3wxMjA3fDB8MHxwaG90by1wYWdlfHx8fGVufDB8fHx8fA%3D%3D&auto=format&fit=crop&w=3542&q=80",
... ]

>>> inputs = processor(prompt, return_tensors="pt").to("cuda")
>>> bad_words_ids = processor.tokenizer(["<image>", "<fake_token_around_image>"], add_special_tokens=False).input_ids

>>> generated_ids = model.generate(**inputs, max_new_tokens=10, bad_words_ids=bad_words_ids)
>>> generated_text = processor.batch_decode(generated_ids, skip_special_tokens=True)
>>> print(generated_text[0])
A puppy in a flower bed増加時に発生するエラーを避けるために、generateの呼び出しにbad_words_idsを含めることをお勧めします。
max_new_tokens: モデルは、新しい <image> または <fake_token_around_image> トークンを生成する必要があります。
モデルによって画像が生成されていません。
このガイドのようにオンザフライで設定することも、テキスト生成戦略 ガイドで説明されているように GenerationConfig に保存することもできます。
Prompted image captioning
テキスト プロンプトを提供することで画像キャプションを拡張でき、モデルは画像を指定して続行します。持っていきましょう 別の図で説明します。

写真提供:Denys Nevozhai。
テキストおよび画像のプロンプトを単一のリストとしてモデルのプロセッサに渡し、適切な入力を作成できます。
>>> prompt = [
...     "https://images.unsplash.com/photo-1543349689-9a4d426bee8e?ixlib=rb-4.0.3&ixid=M3wxMjA3fDB8MHxwaG90by1wYWdlfHx8fGVufDB8fHx8fA%3D%3D&auto=format&fit=crop&w=3501&q=80",
...     "This is an image of ",
... ]

>>> inputs = processor(prompt, return_tensors="pt").to("cuda")
>>> bad_words_ids = processor.tokenizer(["<image>", "<fake_token_around_image>"], add_special_tokens=False).input_ids

>>> generated_ids = model.generate(**inputs, max_new_tokens=10, bad_words_ids=bad_words_ids)
>>> generated_text = processor.batch_decode(generated_ids, skip_special_tokens=True)
>>> print(generated_text[0])
This is an image of the Eiffel Tower in Paris, France.
Few-shot prompting
IDEFICS はゼロショットで優れた結果を示しますが、タスクによっては特定の形式のキャプションが必要になる場合や、キャプションが付属する場合があります。 タスクの複雑さを増大させるその他の制限または要件。少数のショットのプロンプトを使用して、コンテキスト内の学習を有効にすることができます。 プロンプトに例を指定することで、指定された例の形式を模倣した結果を生成するようにモデルを操作できます。
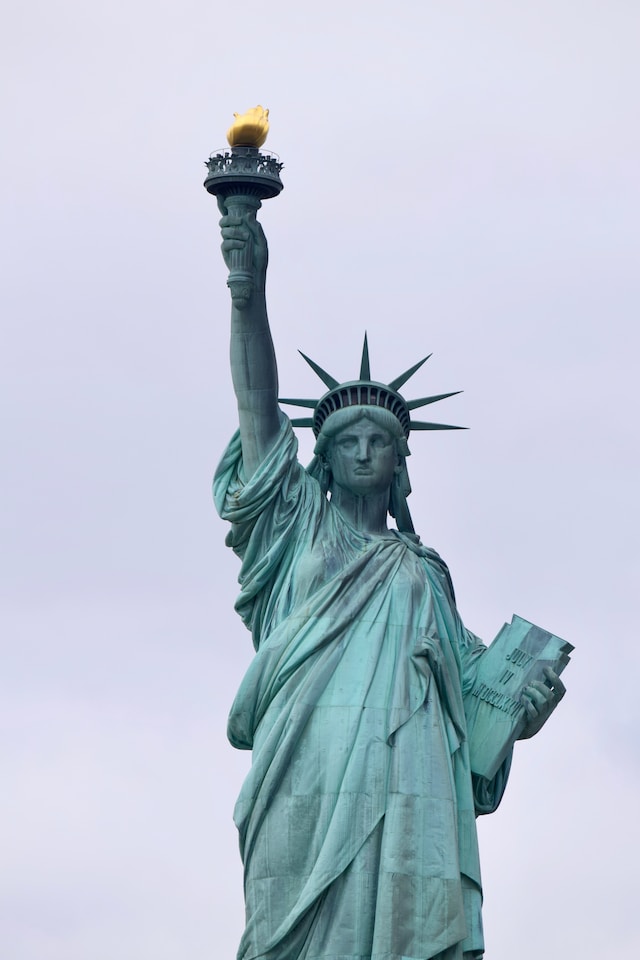
前のエッフェル塔の画像をモデルの例として使用し、モデルにデモンストレーションするプロンプトを作成してみましょう。 画像内のオブジェクトが何であるかを知ることに加えて、それに関する興味深い情報も取得したいと考えています。 次に、自由の女神の画像に対して同じ応答形式を取得できるかどうかを見てみましょう。

写真提供:Juan Mayobre。
>>> prompt = ["User:",
...            "https://images.unsplash.com/photo-1543349689-9a4d426bee8e?ixlib=rb-4.0.3&ixid=M3wxMjA3fDB8MHxwaG90by1wYWdlfHx8fGVufDB8fHx8fA%3D%3D&auto=format&fit=crop&w=3501&q=80",
...            "Describe this image.\nAssistant: An image of the Eiffel Tower at night. Fun fact: the Eiffel Tower is the same height as an 81-storey building.\n",
...            "User:",
...            "https://images.unsplash.com/photo-1524099163253-32b7f0256868?ixlib=rb-4.0.3&ixid=M3wxMjA3fDB8MHxwaG90by1wYWdlfHx8fGVufDB8fHx8fA%3D%3D&auto=format&fit=crop&w=3387&q=80",
...            "Describe this image.\nAssistant:"
...            ]

>>> inputs = processor(prompt, return_tensors="pt").to("cuda")
>>> bad_words_ids = processor.tokenizer(["<image>", "<fake_token_around_image>"], add_special_tokens=False).input_ids

>>> generated_ids = model.generate(**inputs, max_new_tokens=30, bad_words_ids=bad_words_ids)
>>> generated_text = processor.batch_decode(generated_ids, skip_special_tokens=True)
>>> print(generated_text[0])
User: Describe this image.
Assistant: An image of the Eiffel Tower at night. Fun fact: the Eiffel Tower is the same height as an 81-storey building.
User: Describe this image.
Assistant: An image of the Statue of Liberty. Fun fact: the Statue of Liberty is 151 feet tall.
モデルは 1 つの例 (つまり、1 ショット) だけからタスクの実行方法を学習していることに注目してください。より複雑なタスクの場合は、 より多くの例 (3 ショット、5 ショットなど) を自由に試してみてください。
Visual question answering
Visual Question Answering (VQA) は、画像に基づいて自由形式の質問に答えるタスクです。画像に似ている キャプションは、アクセシビリティ アプリケーションだけでなく、教育 (視覚資料についての推論) にも使用できます。 サービス(画像を基にした商品に関する質問)、画像検索など。
このタスク用に新しい画像を取得しましょう。

写真提供 Jarritos Mexican Soda.
適切な指示をプロンプトすることで、モデルを画像キャプションから視覚的な質問への応答に導くことができます。
>>> prompt = [
...     "Instruction: Provide an answer to the question. Use the image to answer.\n",
...     "https://images.unsplash.com/photo-1623944889288-cd147dbb517c?ixlib=rb-4.0.3&ixid=M3wxMjA3fDB8MHxwaG90by1wYWdlfHx8fGVufDB8fHx8fA%3D%3D&auto=format&fit=crop&w=3540&q=80",
...     "Question: Where are these people and what's the weather like? Answer:"
... ]

>>> inputs = processor(prompt, return_tensors="pt").to("cuda")
>>> bad_words_ids = processor.tokenizer(["<image>", "<fake_token_around_image>"], add_special_tokens=False).input_ids

>>> generated_ids = model.generate(**inputs, max_new_tokens=20, bad_words_ids=bad_words_ids)
>>> generated_text = processor.batch_decode(generated_ids, skip_special_tokens=True)
>>> print(generated_text[0])
Instruction: Provide an answer to the question. Use the image to answer.
 Question: Where are these people and what's the weather like? Answer: They're in a park in New York City, and it's a beautiful day.
Image classification
IDEFICS は、次のデータを含むデータについて明示的にトレーニングしなくても、画像をさまざまなカテゴリに分類できます。 これらの特定のカテゴリからのラベル付きの例。カテゴリのリストを指定し、その画像とテキストを使用して理解する 機能を利用すると、モデルは画像がどのカテゴリに属する可能性が高いかを推測できます。
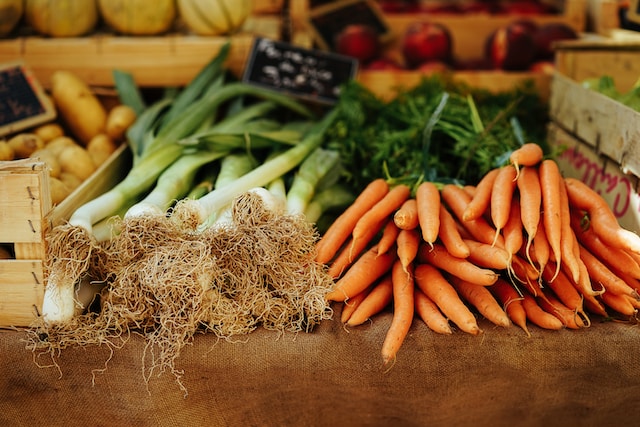
たとえば、次のような野菜スタンドの画像があるとします。

写真提供:Peter Wendt。
画像を次のいずれかのカテゴリに分類するようにモデルに指示できます。
>>> categories = ['animals','vegetables', 'city landscape', 'cars', 'office']
>>> prompt = [f"Instruction: Classify the following image into a single category from the following list: {categories}.\n",
...     "https://images.unsplash.com/photo-1471193945509-9ad0617afabf?ixlib=rb-4.0.3&ixid=M3wxMjA3fDB8MHxwaG90by1wYWdlfHx8fGVufDB8fHx8fA%3D%3D&auto=format&fit=crop&w=3540&q=80",
...     "Category: "
... ]

>>> inputs = processor(prompt, return_tensors="pt").to("cuda")
>>> bad_words_ids = processor.tokenizer(["<image>", "<fake_token_around_image>"], add_special_tokens=False).input_ids

>>> generated_ids = model.generate(**inputs, max_new_tokens=6, bad_words_ids=bad_words_ids)
>>> generated_text = processor.batch_decode(generated_ids, skip_special_tokens=True)
>>> print(generated_text[0])
Instruction: Classify the following image into a single category from the following list: ['animals', 'vegetables', 'city landscape', 'cars', 'office'].
Category: Vegetables
上の例では、画像を 1 つのカテゴリに分類するようにモデルに指示していますが、ランク分類を行うようにモデルに指示することもできます。
Image-guided text generation
よりクリエイティブなアプリケーションの場合は、画像ガイド付きテキスト生成を使用して、画像に基づいてテキストを生成できます。これは可能です 製品、広告、シーンの説明などを作成するのに役立ちます。
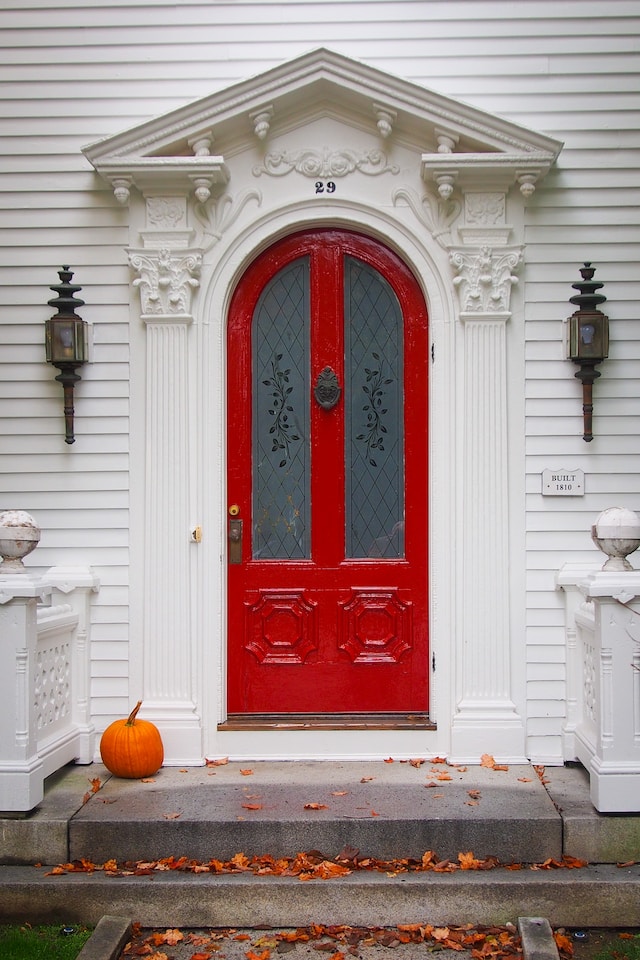
IDEFICS に、赤いドアの単純な画像に基づいてストーリーを書くように促してみましょう。

写真提供:Craig Tidball。
>>> prompt = ["Instruction: Use the image to write a story. \n",
...     "https://images.unsplash.com/photo-1517086822157-2b0358e7684a?ixlib=rb-4.0.3&ixid=M3wxMjA3fDB8MHxwaG90by1wYWdlfHx8fGVufDB8fHx8fA%3D%3D&auto=format&fit=crop&w=2203&q=80",
...     "Story: \n"]

>>> inputs = processor(prompt, return_tensors="pt").to("cuda")
>>> bad_words_ids = processor.tokenizer(["<image>", "<fake_token_around_image>"], add_special_tokens=False).input_ids

>>> generated_ids = model.generate(**inputs, num_beams=2, max_new_tokens=200, bad_words_ids=bad_words_ids)
>>> generated_text = processor.batch_decode(generated_ids, skip_special_tokens=True)
>>> print(generated_text[0])
Instruction: Use the image to write a story.
 Story:
Once upon a time, there was a little girl who lived in a house with a red door.  She loved her red door.  It was the prettiest door in the whole world.

One day, the little girl was playing in her yard when she noticed a man standing on her doorstep.  He was wearing a long black coat and a top hat.

The little girl ran inside and told her mother about the man.

Her mother said, “Don’t worry, honey.  He’s just a friendly ghost.”

The little girl wasn’t sure if she believed her mother, but she went outside anyway.

When she got to the door, the man was gone.

The next day, the little girl was playing in her yard again when she noticed the man standing on her doorstep.

He was wearing a long black coat and a top hat.

The little girl ran
IDEFICS は玄関先にあるカボチャに気づき、幽霊に関する不気味なハロウィーンの話をしたようです。
このような長い出力の場合、テキスト生成戦略を微調整すると大きなメリットが得られます。これは役に立ちます 生成される出力の品質が大幅に向上します。 テキスト生成戦略 を確認してください。 詳しく知ることができ。
Running inference in batch mode
これまでのすべてのセクションでは、IDEFICS を 1 つの例として説明しました。非常に似た方法で、推論を実行できます。 プロンプトのリストを渡すことにより、サンプルのバッチを取得します。
>>> prompts = [
...     [   "https://images.unsplash.com/photo-1543349689-9a4d426bee8e?ixlib=rb-4.0.3&ixid=M3wxMjA3fDB8MHxwaG90by1wYWdlfHx8fGVufDB8fHx8fA%3D%3D&auto=format&fit=crop&w=3501&q=80",
...         "This is an image of ",
...     ],
...     [   "https://images.unsplash.com/photo-1623944889288-cd147dbb517c?ixlib=rb-4.0.3&ixid=M3wxMjA3fDB8MHxwaG90by1wYWdlfHx8fGVufDB8fHx8fA%3D%3D&auto=format&fit=crop&w=3540&q=80",
...         "This is an image of ",
...     ],
...     [   "https://images.unsplash.com/photo-1471193945509-9ad0617afabf?ixlib=rb-4.0.3&ixid=M3wxMjA3fDB8MHxwaG90by1wYWdlfHx8fGVufDB8fHx8fA%3D%3D&auto=format&fit=crop&w=3540&q=80",
...         "This is an image of ",
...     ],
... ]

>>> inputs = processor(prompts, return_tensors="pt").to("cuda")
>>> bad_words_ids = processor.tokenizer(["<image>", "<fake_token_around_image>"], add_special_tokens=False).input_ids

>>> generated_ids = model.generate(**inputs, max_new_tokens=10, bad_words_ids=bad_words_ids)
>>> generated_text = processor.batch_decode(generated_ids, skip_special_tokens=True)
>>> for i,t in enumerate(generated_text):
...     print(f"{i}:\n{t}\n")
0:
This is an image of the Eiffel Tower in Paris, France.

1:
This is an image of a couple on a picnic blanket.

2:
This is an image of a vegetable stand.
IDEFICS instruct for conversational use
会話型のユースケースの場合は、🤗 ハブでモデルの微調整された指示されたバージョンを見つけることができます。
HuggingFaceM4/idefics-80b-instruct および HuggingFaceM4/idefics-9b-instruct。
これらのチェックポイントは、教師ありモデルと命令モデルを組み合わせたそれぞれの基本モデルを微調整した結果です。 データセットを微調整することで、ダウンストリームのパフォーマンスを向上させながら、会話設定でモデルをより使いやすくします。
会話での使用とプロンプトは、基本モデルの使用と非常に似ています。
>>> import torch
>>> from transformers import IdeficsForVisionText2Text, AutoProcessor

>>> device = "cuda" if torch.cuda.is_available() else "cpu"

>>> checkpoint = "HuggingFaceM4/idefics-9b-instruct"
>>> model = IdeficsForVisionText2Text.from_pretrained(checkpoint, torch_dtype=torch.bfloat16).to(device)
>>> processor = AutoProcessor.from_pretrained(checkpoint)

>>> prompts = [
...     [
...         "User: What is in this image?",
...         "https://upload.wikimedia.org/wikipedia/commons/8/86/Id%C3%A9fix.JPG",
...         "<end_of_utterance>",

...         "\nAssistant: This picture depicts Idefix, the dog of Obelix in Asterix and Obelix. Idefix is running on the ground.<end_of_utterance>",

...         "\nUser:",
...         "https://static.wikia.nocookie.net/asterix/images/2/25/R22b.gif/revision/latest?cb=20110815073052",
...         "And who is that?<end_of_utterance>",

...         "\nAssistant:",
...     ],
... ]

>>> # --batched mode
>>> inputs = processor(prompts, add_end_of_utterance_token=False, return_tensors="pt").to(device)
>>> # --single sample mode
>>> # inputs = processor(prompts[0], return_tensors="pt").to(device)

>>> # Generation args
>>> exit_condition = processor.tokenizer("<end_of_utterance>", add_special_tokens=False).input_ids
>>> bad_words_ids = processor.tokenizer(["<image>", "<fake_token_around_image>"], add_special_tokens=False).input_ids

>>> generated_ids = model.generate(**inputs, eos_token_id=exit_condition, bad_words_ids=bad_words_ids, max_length=100)
>>> generated_text = processor.batch_decode(generated_ids, skip_special_tokens=True)
>>> for i, t in enumerate(generated_text):
...     print(f"{i}:\n{t}\n")