Transformers documentation
이미지 캡셔닝
이미지 캡셔닝
이미지 캡셔닝(Image captioning)은 주어진 이미지에 대한 캡션을 예측하는 작업입니다. 이미지 캡셔닝은 시각 장애인이 다양한 상황을 탐색하는 데 도움을 줄 수 있도록 시각 장애인을 보조하는 등 실생활에서 흔히 활용됩니다. 따라서 이미지 캡셔닝은 이미지를 설명함으로써 사람들의 콘텐츠 접근성을 개선하는 데 도움이 됩니다.
이 가이드에서는 소개할 내용은 아래와 같습니다:
- 이미지 캡셔닝 모델을 파인튜닝합니다.
- 파인튜닝된 모델을 추론에 사용합니다.
시작하기 전에 필요한 모든 라이브러리가 설치되어 있는지 확인하세요:
pip install transformers datasets evaluate -q
pip install jiwer -q
Hugging Face 계정에 로그인하면 모델을 업로드하고 커뮤니티에 공유할 수 있습니다. 토큰을 입력하여 로그인하세요.
from huggingface_hub import notebook_login

notebook_login()
포켓몬 BLIP 캡션 데이터세트 가져오기
{이미지-캡션} 쌍으로 구성된 데이터세트를 가져오려면 🤗 Dataset 라이브러리를 사용합니다. PyTorch에서 자신만의 이미지 캡션 데이터세트를 만들려면 이 노트북을 참조하세요.
from datasets import load_dataset

ds = load_dataset("lambdalabs/pokemon-blip-captions")
dsDatasetDict({
train: Dataset({
features: ['image', 'text'],
num_rows: 833
})
})이 데이터세트는 image와 text라는 두 특성을 가지고 있습니다.
많은 이미지 캡션 데이터세트에는 이미지당 여러 개의 캡션이 포함되어 있습니다. 이러한 경우, 일반적으로 학습 중에 사용 가능한 캡션 중에서 무작위로 샘플을 추출합니다.
train_test_split 메소드를 사용하여 데이터세트의 학습 분할을 학습 및 테스트 세트로 나눕니다:
ds = ds["train"].train_test_split(test_size=0.1)
train_ds = ds["train"]
test_ds = ds["test"]
학습 세트의 샘플 몇 개를 시각화해 봅시다. Let’s visualize a couple of samples from the training set.
from textwrap import wrap
import matplotlib.pyplot as plt
import numpy as np


def plot_images(images, captions):
    plt.figure(figsize=(20, 20))
    for i in range(len(images)):
        ax = plt.subplot(1, len(images), i + 1)
        caption = captions[i]
        caption = "\n".join(wrap(caption, 12))
        plt.title(caption)
        plt.imshow(images[i])
        plt.axis("off")


sample_images_to_visualize = [np.array(train_ds[i]["image"]) for i in range(5)]
sample_captions = [train_ds[i]["text"] for i in range(5)]
plot_images(sample_images_to_visualize, sample_captions)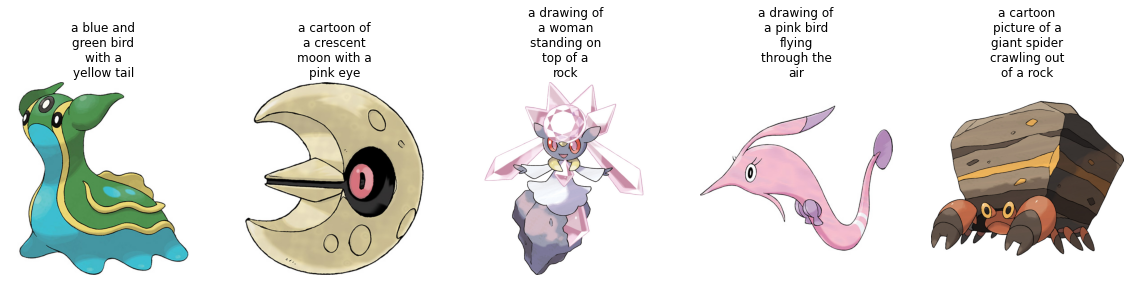
데이터세트 전처리
데이터세트에는 이미지와 텍스트라는 두 가지 양식이 있기 때문에, 전처리 파이프라인에서 이미지와 캡션을 모두 전처리합니다.
전처리 작업을 위해, 파인튜닝하려는 모델에 연결된 프로세서 클래스를 가져옵니다.
from transformers import AutoProcessor

checkpoint = "microsoft/git-base"
processor = AutoProcessor.from_pretrained(checkpoint)
프로세서는 내부적으로 크기 조정 및 픽셀 크기 조정을 포함한 이미지 전처리를 수행하고 캡션을 토큰화합니다.
def transforms(example_batch):
    images = [x for x in example_batch["image"]]
    captions = [x for x in example_batch["text"]]
    inputs = processor(images=images, text=captions, padding="max_length")
    inputs.update({"labels": inputs["input_ids"]})
    return inputs


train_ds.set_transform(transforms)
test_ds.set_transform(transforms)
데이터세트가 준비되었으니 이제 파인튜닝을 위해 모델을 설정할 수 있습니다.
기본 모델 가져오기
“microsoft/git-base”를 AutoModelForCausalLM 객체로 가져옵니다.
from transformers import AutoModelForCausalLM

model = AutoModelForCausalLM.from_pretrained(checkpoint)
평가
이미지 캡션 모델은 일반적으로 Rouge 점수 또는 단어 오류율(Word Error Rate)로 평가합니다. 이 가이드에서는 단어 오류율(WER)을 사용합니다.
이를 위해 🤗 Evaluate 라이브러리를 사용합니다. WER의 잠재적 제한 사항 및 기타 문제점은 이 가이드를 참조하세요.
from evaluate import load
import torch

wer = load("wer")


def compute_metrics(eval_pred):
    logits, labels = eval_pred
    predicted = logits.argmax(-1)
    decoded_labels = processor.batch_decode(labels, skip_special_tokens=True)
    decoded_predictions = processor.batch_decode(predicted, skip_special_tokens=True)
    wer_score = wer.compute(predictions=decoded_predictions, references=decoded_labels)
    return {"wer_score": wer_score}
학습!
이제 모델 파인튜닝을 시작할 준비가 되었습니다. 이를 위해 🤗 Trainer를 사용합니다.
먼저, TrainingArguments를 사용하여 학습 인수를 정의합니다.
from transformers import TrainingArguments, Trainer

model_name = checkpoint.split("/")[1]

training_args = TrainingArguments(
    output_dir=f"{model_name}-pokemon",
    learning_rate=5e-5,
    num_train_epochs=50,
    fp16=True,
    per_device_train_batch_size=32,
    per_device_eval_batch_size=32,
    gradient_accumulation_steps=2,
    save_total_limit=3,
    eval_strategy="steps",
    eval_steps=50,
    save_strategy="steps",
    save_steps=50,
    logging_steps=50,
    remove_unused_columns=False,
    push_to_hub=True,
    label_names=["labels"],
    load_best_model_at_end=True,
)
학습 인수를 데이터세트, 모델과 함께 🤗 Trainer에 전달합니다.
trainer = Trainer(
    model=model,
    args=training_args,
    train_dataset=train_ds,
    eval_dataset=test_ds,
    compute_metrics=compute_metrics,
)
학습을 시작하려면 Trainer 객체에서 train()을 호출하기만 하면 됩니다.
trainer.train()
학습이 진행되면서 학습 손실이 원활하게 감소하는 것을 볼 수 있습니다.
학습이 완료되면 모든 사람이 모델을 사용할 수 있도록 push_to_hub() 메소드를 사용하여 모델을 허브에 공유하세요:
trainer.push_to_hub()
추론
test_ds에서 샘플 이미지를 가져와 모델을 테스트합니다.
from PIL import Image
import requests

url = "https://huggingface.co/datasets/sayakpaul/sample-datasets/resolve/main/pokemon.png"
image = Image.open(requests.get(url, stream=True).raw)
image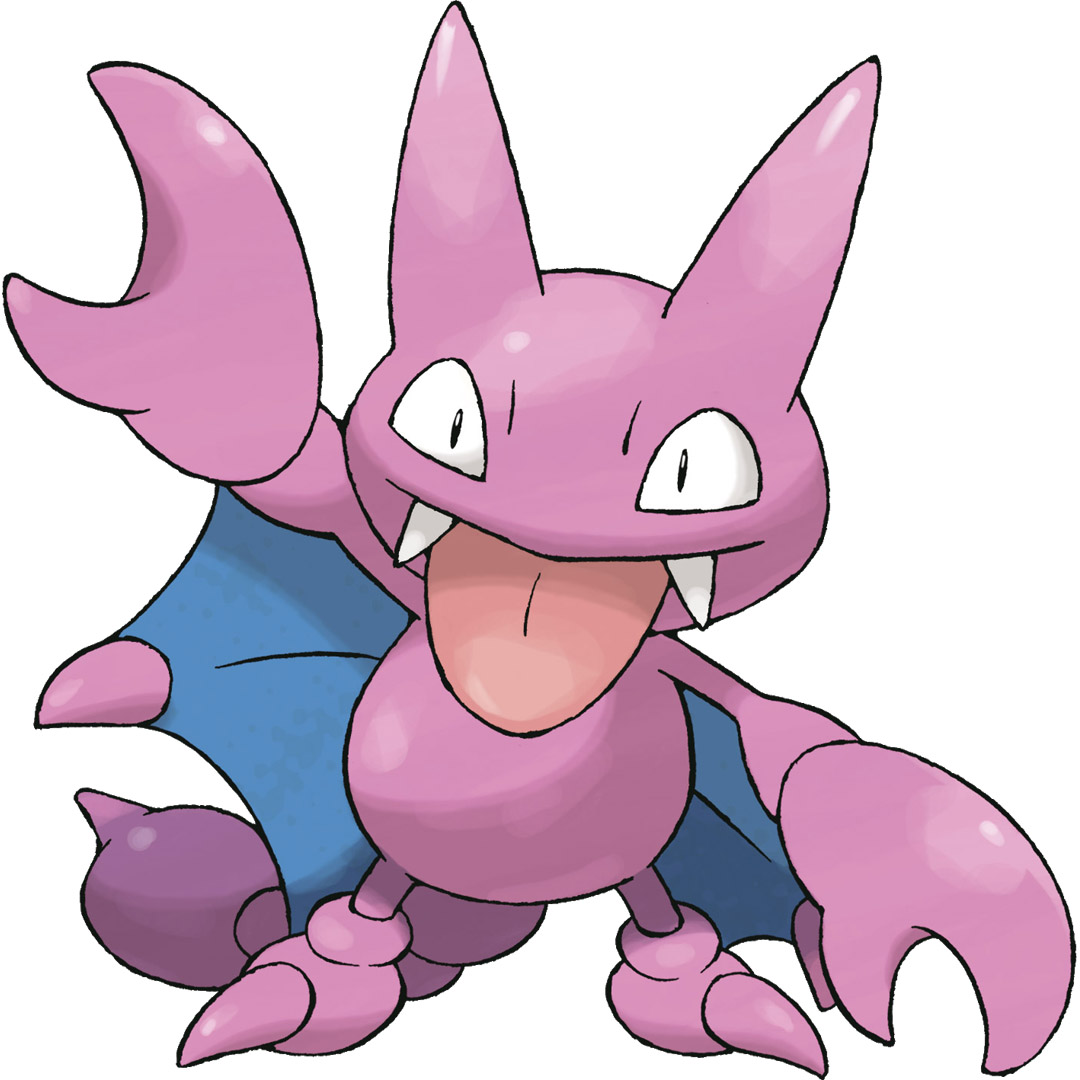
device = "cuda" if torch.cuda.is_available() else "cpu"

inputs = processor(images=image, return_tensors="pt").to(device)
pixel_values = inputs.pixel_valuesgenerate를 호출하고 예측을 디코딩합니다.
generated_ids = model.generate(pixel_values=pixel_values, max_length=50)
generated_caption = processor.batch_decode(generated_ids, skip_special_tokens=True)[0]
print(generated_caption)a drawing of a pink and blue pokemon
파인튜닝된 모델이 꽤 괜찮은 캡션을 생성한 것 같습니다!
< > Update on GitHub