Transformers documentation
문서 질의 응답(Document Question Answering)
문서 질의 응답(Document Question Answering)
문서 시각적 질의 응답(Document Visual Question Answering)이라고도 하는 문서 질의 응답(Document Question Answering)은 문서 이미지에 대한 질문에 답변을 주는 태스크입니다. 이 태스크를 지원하는 모델의 입력은 일반적으로 이미지와 질문의 조합이고, 출력은 자연어로 된 답변입니다. 이러한 모델은 텍스트, 단어의 위치(바운딩 박스), 이미지 등 다양한 모달리티를 활용합니다.
이 가이드는 다음 내용을 설명합니다:
- DocVQA dataset을 사용해 LayoutLMv2 미세 조정하기
- 추론을 위해 미세 조정된 모델을 사용하기
이 작업과 호환되는 모든 아키텍처와 체크포인트를 보려면 작업 페이지를 확인하는 것이 좋습니다.
LayoutLMv2는 토큰의 마지막 은닉층 위에 질의 응답 헤드를 추가해 답변의 시작 토큰과 끝 토큰의 위치를 예측함으로써 문서 질의 응답 태스크를 해결합니다. 즉, 문맥이 주어졌을 때 질문에 답하는 정보를 추출하는 추출형 질의 응답(Extractive question answering)으로 문제를 처리합니다. 문맥은 OCR 엔진의 출력에서 가져오며, 여기서는 Google의 Tesseract를 사용합니다.
시작하기 전에 필요한 라이브러리가 모두 설치되어 있는지 확인하세요. LayoutLMv2는 detectron2, torchvision 및 테서랙트를 필요로 합니다.
pip install -q transformers datasets
pip install 'git+https://github.com/facebookresearch/detectron2.git'
pip install torchvisionsudo apt install tesseract-ocr pip install -q pytesseract
필요한 라이브러리들을 모두 설치한 후 런타임을 다시 시작합니다.
커뮤니티에 당신의 모델을 공유하는 것을 권장합니다. Hugging Face 계정에 로그인해서 모델을 🤗 Hub에 업로드하세요. 프롬프트가 실행되면, 로그인을 위해 토큰을 입력하세요:
>>> from huggingface_hub import notebook_login

>>> notebook_login()
몇 가지 전역 변수를 정의해 보겠습니다.
>>> model_checkpoint = "microsoft/layoutlmv2-base-uncased"
>>> batch_size = 4
데이터 불러오기
이 가이드에서는 🤗 Hub에서 찾을 수 있는 전처리된 DocVQA의 작은 샘플을 사용합니다. DocVQA의 전체 데이터 세트를 사용하고 싶다면, DocVQA homepage에 가입 후 다운로드 할 수 있습니다. 전체 데이터 세트를 다운로드 했다면, 이 가이드를 계속 진행하기 위해 🤗 dataset에 파일을 가져오는 방법을 확인하세요.
>>> from datasets import load_dataset

>>> dataset = load_dataset("nielsr/docvqa_1200_examples")
>>> dataset
DatasetDict({
    train: Dataset({
        features: ['id', 'image', 'query', 'answers', 'words', 'bounding_boxes', 'answer'],
        num_rows: 1000
    })
    test: Dataset({
        features: ['id', 'image', 'query', 'answers', 'words', 'bounding_boxes', 'answer'],
        num_rows: 200
    })
})
보시다시피, 데이터 세트는 이미 훈련 세트와 테스트 세트로 나누어져 있습니다. 무작위로 예제를 살펴보면서 특성을 확인해보세요.
>>> dataset["train"].features각 필드가 나타내는 내용은 다음과 같습니다:
id: 예제의 idimage: 문서 이미지를 포함하는 PIL.Image.Image 객체query: 질문 문자열 - 여러 언어의 자연어로 된 질문answers: 사람이 주석을 단 정답 리스트wordsandbounding_boxes: OCR의 결과값들이며 이 가이드에서는 사용하지 않을 예정answer: 다른 모델과 일치하는 답변이며 이 가이드에서는 사용하지 않을 예정
영어로 된 질문만 남기고 다른 모델에 대한 예측을 포함하는 answer 특성을 삭제하겠습니다.
그리고 주석 작성자가 제공한 데이터 세트에서 첫 번째 답변을 가져옵니다. 또는 무작위로 샘플을 추출할 수도 있습니다.
>>> updated_dataset = dataset.map(lambda example: {"question": example["query"]["en"]}, remove_columns=["query"])
>>> updated_dataset = updated_dataset.map(
...     lambda example: {"answer": example["answers"][0]}, remove_columns=["answer", "answers"]
... )
이 가이드에서 사용하는 LayoutLMv2 체크포인트는 max_position_embeddings = 512로 훈련되었습니다(이 정보는 체크포인트의 config.json 파일에서 확인할 수 있습니다).
바로 예제를 잘라낼 수도 있지만, 긴 문서의 끝에 답변이 있어 잘리는 상황을 피하기 위해 여기서는 임베딩이 512보다 길어질 가능성이 있는 몇 가지 예제를 제거하겠습니다.
데이터 세트에 있는 대부분의 문서가 긴 경우 슬라이딩 윈도우 방법을 사용할 수 있습니다 - 자세한 내용을 확인하고 싶으면 이 노트북을 확인하세요.
>>> updated_dataset = updated_dataset.filter(lambda x: len(x["words"]) + len(x["question"].split()) < 512)이 시점에서 이 데이터 세트의 OCR 특성도 제거해 보겠습니다. OCR 특성은 다른 모델을 미세 조정하기 위한 것으로, 이 가이드에서 사용하는 모델의 입력 요구 사항과 일치하지 않기 때문에 이 특성을 사용하기 위해서는 일부 처리가 필요합니다.
대신, 원본 데이터에 LayoutLMv2Processor를 사용하여 OCR 및 토큰화를 모두 수행할 수 있습니다.
이렇게 하면 모델이 요구하는 입력을 얻을 수 있습니다.
이미지를 수동으로 처리하려면, LayoutLMv2 model documentation에서 모델이 요구하는 입력 포맷을 확인해보세요.
>>> updated_dataset = updated_dataset.remove_columns("words")
>>> updated_dataset = updated_dataset.remove_columns("bounding_boxes")
마지막으로, 데이터 탐색을 완료하기 위해 이미지 예시를 살펴봅시다.
>>> updated_dataset["train"][11]["image"]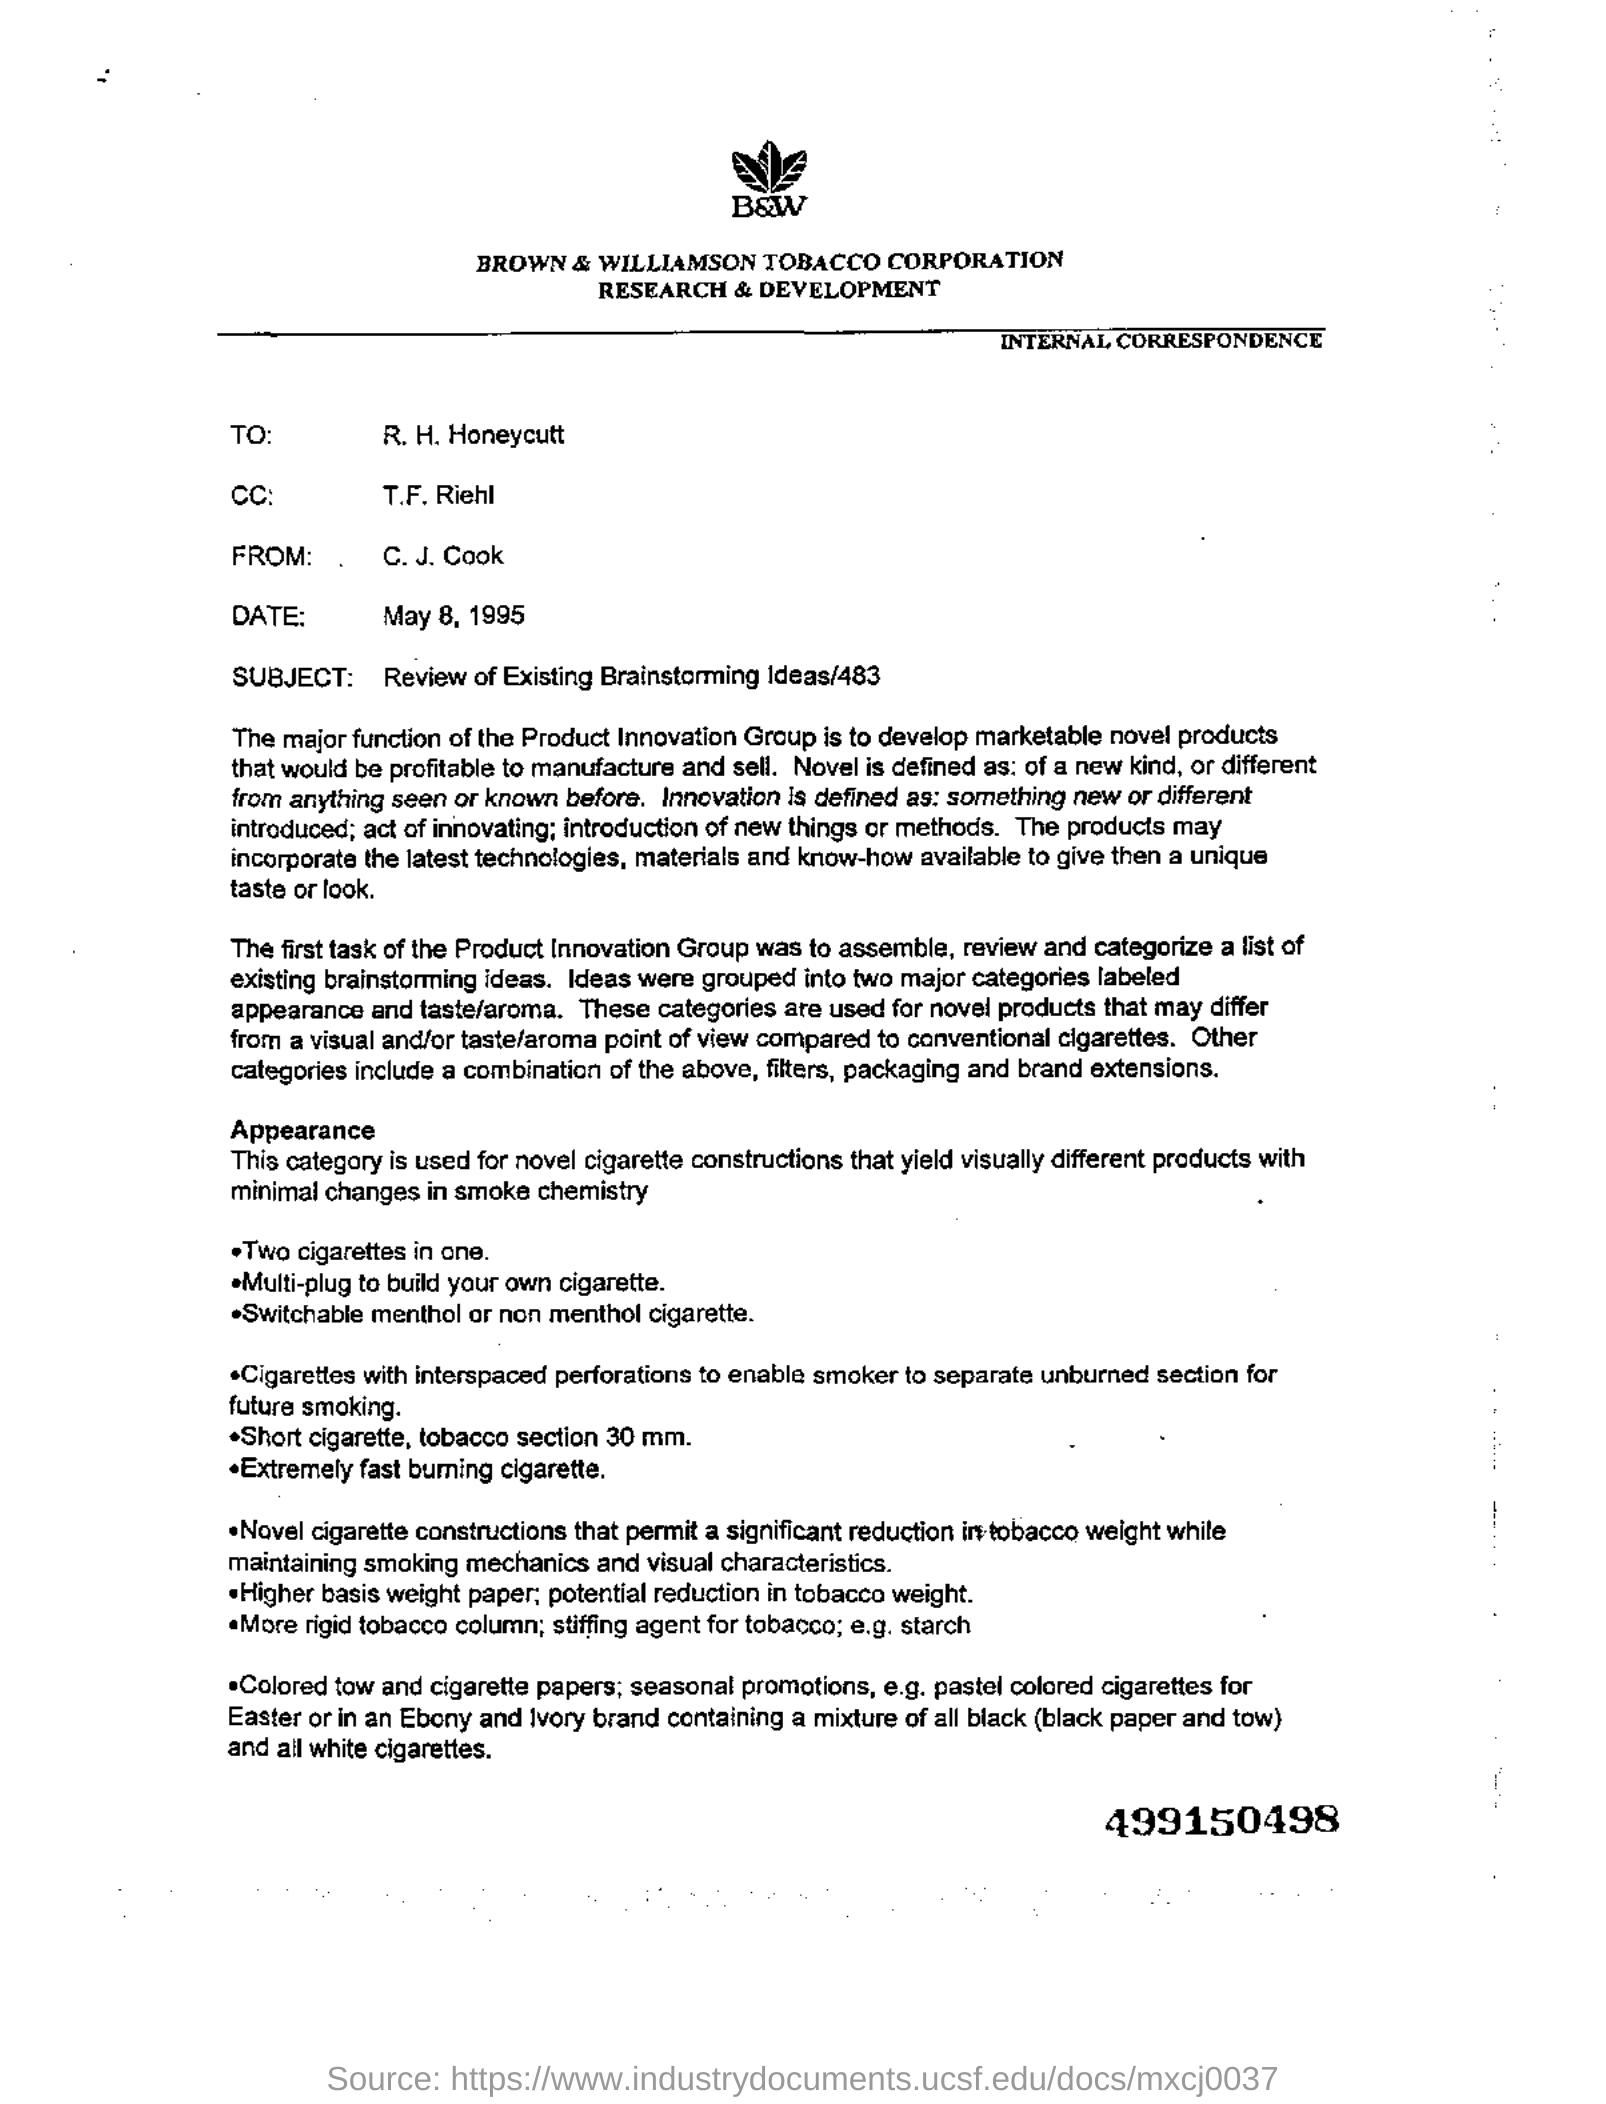
데이터 전처리
문서 질의 응답 태스크는 멀티모달 태스크이며, 각 모달리티의 입력이 모델의 요구에 맞게 전처리 되었는지 확인해야 합니다.
이미지 데이터를 처리할 수 있는 이미지 프로세서와 텍스트 데이터를 인코딩할 수 있는 토크나이저를 결합한 LayoutLMv2Processor를 가져오는 것부터 시작해 보겠습니다.
>>> from transformers import AutoProcessor

>>> processor = AutoProcessor.from_pretrained(model_checkpoint)
문서 이미지 전처리
먼저, 프로세서의 image_processor를 사용해 모델에 대한 문서 이미지를 준비해 보겠습니다.
기본값으로, 이미지 프로세서는 이미지 크기를 224x224로 조정하고 색상 채널의 순서가 올바른지 확인한 후 단어와 정규화된 바운딩 박스를 얻기 위해 테서랙트를 사용해 OCR를 적용합니다.
이 튜토리얼에서 우리가 필요한 것과 기본값은 완전히 동일합니다. 이미지 배치에 기본 이미지 처리를 적용하고 OCR의 결과를 변환하는 함수를 작성합니다.
>>> image_processor = processor.image_processor


>>> def get_ocr_words_and_boxes(examples):
...     images = [image.convert("RGB") for image in examples["image"]]
...     encoded_inputs = image_processor(images)

...     examples["image"] = encoded_inputs.pixel_values
...     examples["words"] = encoded_inputs.words
...     examples["boxes"] = encoded_inputs.boxes

...     return examples
이 전처리를 데이터 세트 전체에 빠르게 적용하려면 map를 사용하세요.
>>> dataset_with_ocr = updated_dataset.map(get_ocr_words_and_boxes, batched=True, batch_size=2)텍스트 데이터 전처리
이미지에 OCR을 적용했으면 데이터 세트의 텍스트 부분을 모델에 맞게 인코딩해야 합니다.
이 인코딩에는 이전 단계에서 가져온 단어와 박스를 토큰 수준의 input_ids, attention_mask, token_type_ids 및 bbox로 변환하는 작업이 포함됩니다.
텍스트를 전처리하려면 프로세서의 tokenizer가 필요합니다.
>>> tokenizer = processor.tokenizer위에서 언급한 전처리 외에도 모델을 위해 레이블을 추가해야 합니다. 🤗 Transformers의 xxxForQuestionAnswering 모델의 경우, 레이블은 start_positions와 end_positions로 구성되며 어떤 토큰이 답변의 시작과 끝에 있는지를 나타냅니다.
레이블 추가를 위해서, 먼저 더 큰 리스트(단어 리스트)에서 하위 리스트(단어로 분할된 답변)을 찾을 수 있는 헬퍼 함수를 정의합니다.
이 함수는 words_list와 answer_list, 이렇게 두 리스트를 입력으로 받습니다.
그런 다음 words_list를 반복하여 words_list의 현재 단어(words_list[i])가 answer_list의 첫 번째 단어(answer_list[0])와 같은지,
현재 단어에서 시작해 answer_list와 같은 길이만큼의 words_list의 하위 리스트가 answer_list와 일치하는지 확인합니다.
이 조건이 참이라면 일치하는 항목을 발견했음을 의미하며, 함수는 일치 항목, 시작 인덱스(idx) 및 종료 인덱스(idx + len(answer_list) - 1)를 기록합니다. 일치하는 항목이 두 개 이상 발견되면 함수는 첫 번째 항목만 반환합니다. 일치하는 항목이 없다면 함수는 (None, 0, 0)을 반환합니다.
>>> def subfinder(words_list, answer_list):
...     matches = []
...     start_indices = []
...     end_indices = []
...     for idx, i in enumerate(range(len(words_list))):
...         if words_list[i] == answer_list[0] and words_list[i : i + len(answer_list)] == answer_list:
...             matches.append(answer_list)
...             start_indices.append(idx)
...             end_indices.append(idx + len(answer_list) - 1)
...     if matches:
...         return matches[0], start_indices[0], end_indices[0]
...     else:
...         return None, 0, 0
이 함수가 어떻게 정답의 위치를 찾는지 설명하기 위해 다음 예제에서 함수를 사용해 보겠습니다:
>>> example = dataset_with_ocr["train"][1]
>>> words = [word.lower() for word in example["words"]]
>>> match, word_idx_start, word_idx_end = subfinder(words, example["answer"].lower().split())
>>> print("Question: ", example["question"])
>>> print("Words:", words)
>>> print("Answer: ", example["answer"])
>>> print("start_index", word_idx_start)
>>> print("end_index", word_idx_end)
Question:  Who is in  cc in this letter?
Words: ['wie', 'baw', 'brown', '&', 'williamson', 'tobacco', 'corporation', 'research', '&', 'development', 'internal', 'correspondence', 'to:', 'r.', 'h.', 'honeycutt', 'ce:', 't.f.', 'riehl', 'from:', '.', 'c.j.', 'cook', 'date:', 'may', '8,', '1995', 'subject:', 'review', 'of', 'existing', 'brainstorming', 'ideas/483', 'the', 'major', 'function', 'of', 'the', 'product', 'innovation', 'graup', 'is', 'to', 'develop', 'marketable', 'nove!', 'products', 'that', 'would', 'be', 'profitable', 'to', 'manufacture', 'and', 'sell.', 'novel', 'is', 'defined', 'as:', 'of', 'a', 'new', 'kind,', 'or', 'different', 'from', 'anything', 'seen', 'or', 'known', 'before.', 'innovation', 'is', 'defined', 'as:', 'something', 'new', 'or', 'different', 'introduced;', 'act', 'of', 'innovating;', 'introduction', 'of', 'new', 'things', 'or', 'methods.', 'the', 'products', 'may', 'incorporate', 'the', 'latest', 'technologies,', 'materials', 'and', 'know-how', 'available', 'to', 'give', 'then', 'a', 'unique', 'taste', 'or', 'look.', 'the', 'first', 'task', 'of', 'the', 'product', 'innovation', 'group', 'was', 'to', 'assemble,', 'review', 'and', 'categorize', 'a', 'list', 'of', 'existing', 'brainstorming', 'ideas.', 'ideas', 'were', 'grouped', 'into', 'two', 'major', 'categories', 'labeled', 'appearance', 'and', 'taste/aroma.', 'these', 'categories', 'are', 'used', 'for', 'novel', 'products', 'that', 'may', 'differ', 'from', 'a', 'visual', 'and/or', 'taste/aroma', 'point', 'of', 'view', 'compared', 'to', 'canventional', 'cigarettes.', 'other', 'categories', 'include', 'a', 'combination', 'of', 'the', 'above,', 'filters,', 'packaging', 'and', 'brand', 'extensions.', 'appearance', 'this', 'category', 'is', 'used', 'for', 'novel', 'cigarette', 'constructions', 'that', 'yield', 'visually', 'different', 'products', 'with', 'minimal', 'changes', 'in', 'smoke', 'chemistry', 'two', 'cigarettes', 'in', 'cne.', 'emulti-plug', 'te', 'build', 'yaur', 'awn', 'cigarette.', 'eswitchable', 'menthol', 'or', 'non', 'menthol', 'cigarette.', '*cigarettes', 'with', 'interspaced', 'perforations', 'to', 'enable', 'smoker', 'to', 'separate', 'unburned', 'section', 'for', 'future', 'smoking.', '«short', 'cigarette,', 'tobacco', 'section', '30', 'mm.', '«extremely', 'fast', 'buming', 'cigarette.', '«novel', 'cigarette', 'constructions', 'that', 'permit', 'a', 'significant', 'reduction', 'iretobacco', 'weight', 'while', 'maintaining', 'smoking', 'mechanics', 'and', 'visual', 'characteristics.', 'higher', 'basis', 'weight', 'paper:', 'potential', 'reduction', 'in', 'tobacco', 'weight.', '«more', 'rigid', 'tobacco', 'column;', 'stiffing', 'agent', 'for', 'tobacco;', 'e.g.', 'starch', '*colored', 'tow', 'and', 'cigarette', 'papers;', 'seasonal', 'promotions,', 'e.g.', 'pastel', 'colored', 'cigarettes', 'for', 'easter', 'or', 'in', 'an', 'ebony', 'and', 'ivory', 'brand', 'containing', 'a', 'mixture', 'of', 'all', 'black', '(black', 'paper', 'and', 'tow)', 'and', 'ail', 'white', 'cigarettes.', '499150498']
Answer:  T.F. Riehl
start_index 17
end_index 18
한편, 위 예제가 인코딩되면 다음과 같이 표시됩니다:
>>> encoding = tokenizer(example["question"], example["words"], example["boxes"])
>>> tokenizer.decode(encoding["input_ids"])
[CLS] who is in cc in this letter? [SEP] wie baw brown & williamson tobacco corporation research & development ...
이제 인코딩된 입력에서 정답의 위치를 찾아야 합니다.
token_type_ids는 어떤 토큰이 질문에 속하는지, 그리고 어떤 토큰이 문서의 단어에 포함되는지를 알려줍니다.tokenizer.cls_token_id입력의 시작 부분에 있는 특수 토큰을 찾는 데 도움을 줍니다.word_ids는 원본words에서 찾은 답변을 전체 인코딩된 입력의 동일한 답과 일치시키고 인코딩된 입력에서 답변의 시작/끝 위치를 결정합니다.
위 내용들을 염두에 두고 데이터 세트 예제의 배치를 인코딩하는 함수를 만들어 보겠습니다:
>>> def encode_dataset(examples, max_length=512):
...     questions = examples["question"]
...     words = examples["words"]
...     boxes = examples["boxes"]
...     answers = examples["answer"]

...     # 예제 배치를 인코딩하고 start_positions와 end_positions를 초기화합니다
...     encoding = tokenizer(questions, words, boxes, max_length=max_length, padding="max_length", truncation=True)
...     start_positions = []
...     end_positions = []

...     # 배치의 예제를 반복합니다
...     for i in range(len(questions)):
...         cls_index = encoding["input_ids"][i].index(tokenizer.cls_token_id)

...         # 예제의 words에서 답변의 위치를 찾습니다
...         words_example = [word.lower() for word in words[i]]
...         answer = answers[i]
...         match, word_idx_start, word_idx_end = subfinder(words_example, answer.lower().split())

...         if match:
...             # 일치하는 항목을 발견하면, `token_type_ids`를 사용해 인코딩에서 단어가 시작하는 위치를 찾습니다
...             token_type_ids = encoding["token_type_ids"][i]
...             token_start_index = 0
...             while token_type_ids[token_start_index] != 1:
...                 token_start_index += 1

...             token_end_index = len(encoding["input_ids"][i]) - 1
...             while token_type_ids[token_end_index] != 1:
...                 token_end_index -= 1

...             word_ids = encoding.word_ids(i)[token_start_index : token_end_index + 1]
...             start_position = cls_index
...             end_position = cls_index

...             # words의 답변 위치와 일치할 때까지 word_ids를 반복하고 `token_start_index`를 늘립니다
...             # 일치하면 `token_start_index`를 인코딩에서 답변의 `start_position`으로 저장합니다
...             for id in word_ids:
...                 if id == word_idx_start:
...                     start_position = token_start_index
...                 else:
...                     token_start_index += 1

...             # 비슷하게, 끝에서 시작해 `word_ids`를 반복하며 답변의 `end_position`을 찾습니다
...             for id in word_ids[::-1]:
...                 if id == word_idx_end:
...                     end_position = token_end_index
...                 else:
...                     token_end_index -= 1

...             start_positions.append(start_position)
...             end_positions.append(end_position)

...         else:
...             start_positions.append(cls_index)
...             end_positions.append(cls_index)

...     encoding["image"] = examples["image"]
...     encoding["start_positions"] = start_positions
...     encoding["end_positions"] = end_positions

...     return encoding
이제 이 전처리 함수가 있으니 전체 데이터 세트를 인코딩할 수 있습니다:
>>> encoded_train_dataset = dataset_with_ocr["train"].map(
...     encode_dataset, batched=True, batch_size=2, remove_columns=dataset_with_ocr["train"].column_names
... )
>>> encoded_test_dataset = dataset_with_ocr["test"].map(
...     encode_dataset, batched=True, batch_size=2, remove_columns=dataset_with_ocr["test"].column_names
... )
인코딩된 데이터 세트의 특성이 어떻게 생겼는지 확인해 보겠습니다:
>>> encoded_train_dataset.features
{'image': Sequence(feature=Sequence(feature=Sequence(feature=Value(dtype='uint8', id=None), length=-1, id=None), length=-1, id=None), length=-1, id=None),
 'input_ids': Sequence(feature=Value(dtype='int32', id=None), length=-1, id=None),
 'token_type_ids': Sequence(feature=Value(dtype='int8', id=None), length=-1, id=None),
 'attention_mask': Sequence(feature=Value(dtype='int8', id=None), length=-1, id=None),
 'bbox': Sequence(feature=Sequence(feature=Value(dtype='int64', id=None), length=-1, id=None), length=-1, id=None),
 'start_positions': Value(dtype='int64', id=None),
 'end_positions': Value(dtype='int64', id=None)}
평가
문서 질의 응답을 평가하려면 상당한 양의 후처리가 필요합니다. 시간이 너무 많이 걸리지 않도록 이 가이드에서는 평가 단계를 생략합니다. Trainer가 훈련 과정에서 평가 손실(evaluation loss)을 계속 계산하기 때문에 모델의 성능을 대략적으로 알 수 있습니다. 추출적(Extractive) 질의 응답은 보통 F1/exact match 방법을 사용해 평가됩니다. 직접 구현해보고 싶으시다면, Hugging Face course의 Question Answering chapter을 참고하세요.
훈련
축하합니다! 이 가이드의 가장 어려운 부분을 성공적으로 처리했으니 이제 나만의 모델을 훈련할 준비가 되었습니다. 훈련은 다음과 같은 단계로 이루어져 있습니다:
- 전처리에서의 동일한 체크포인트를 사용하기 위해 AutoModelForDocumentQuestionAnswering으로 모델을 가져옵니다.
- TrainingArguments로 훈련 하이퍼파라미터를 정합니다.
- 예제를 배치 처리하는 함수를 정의합니다. 여기서는 DefaultDataCollator가 적당합니다.
- 모델, 데이터 세트, 데이터 콜레이터(Data collator)와 함께 Trainer에 훈련 인수들을 전달합니다.
- train()을 호출해서 모델을 미세 조정합니다.
>>> from transformers import AutoModelForDocumentQuestionAnswering

>>> model = AutoModelForDocumentQuestionAnswering.from_pretrained(model_checkpoint)TrainingArguments에서 output_dir을 사용하여 모델을 저장할 위치를 지정하고, 적절한 하이퍼파라미터를 설정합니다.
모델을 커뮤니티와 공유하려면 push_to_hub를 True로 설정하세요 (모델을 업로드하려면 Hugging Face에 로그인해야 합니다).
이 경우 output_dir은 모델의 체크포인트를 푸시할 레포지토리의 이름이 됩니다.
>>> from transformers import TrainingArguments

>>> # 본인의 레포지토리 ID로 바꾸세요
>>> repo_id = "MariaK/layoutlmv2-base-uncased_finetuned_docvqa"

>>> training_args = TrainingArguments(
...     output_dir=repo_id,
...     per_device_train_batch_size=4,
...     num_train_epochs=20,
...     save_steps=200,
...     logging_steps=50,
...     eval_strategy="steps",
...     learning_rate=5e-5,
...     save_total_limit=2,
...     remove_unused_columns=False,
...     push_to_hub=True,
... )
간단한 데이터 콜레이터를 정의하여 예제를 함께 배치합니다.
>>> from transformers import DefaultDataCollator

>>> data_collator = DefaultDataCollator()
마지막으로, 모든 것을 한 곳에 모아 train()을 호출합니다:
>>> from transformers import Trainer

>>> trainer = Trainer(
...     model=model,
...     args=training_args,
...     data_collator=data_collator,
...     train_dataset=encoded_train_dataset,
...     eval_dataset=encoded_test_dataset,
...     processing_class=processor,
... )

>>> trainer.train()
최종 모델을 🤗 Hub에 추가하려면, 모델 카드를 생성하고 push_to_hub를 호출합니다:
>>> trainer.create_model_card()
>>> trainer.push_to_hub()
추론
이제 LayoutLMv2 모델을 미세 조정하고 🤗 Hub에 업로드했으니 추론에도 사용할 수 있습니다. 추론을 위해 미세 조정된 모델을 사용해 보는 가장 간단한 방법은 Pipeline을 사용하는 것 입니다.
예를 들어 보겠습니다:
>>> example = dataset["test"][2]
>>> question = example["query"]["en"]
>>> image = example["image"]
>>> print(question)
>>> print(example["answers"])
'Who is ‘presiding’ TRRF GENERAL SESSION (PART 1)?'
['TRRF Vice President', 'lee a. waller']
그 다음, 모델로 문서 질의 응답을 하기 위해 파이프라인을 인스턴스화하고 이미지 + 질문 조합을 전달합니다.
>>> from transformers import pipeline

>>> qa_pipeline = pipeline("document-question-answering", model="MariaK/layoutlmv2-base-uncased_finetuned_docvqa")
>>> qa_pipeline(image, question)
[{'score': 0.9949808120727539,
  'answer': 'Lee A. Waller',
  'start': 55,
  'end': 57}]
원한다면 파이프라인의 결과를 수동으로 복제할 수도 있습니다:
- 이미지와 질문을 가져와 모델의 프로세서를 사용해 모델에 맞게 준비합니다.
- 모델을 통해 결과 또는 전처리를 전달합니다.
- 모델은 어떤 토큰이 답변의 시작에 있는지, 어떤 토큰이 답변이 끝에 있는지를 나타내는
start_logits와end_logits를 반환합니다. 둘 다 (batch_size, sequence_length) 형태를 갖습니다. start_logits와end_logits의 마지막 차원을 최대로 만드는 값을 찾아 예상start_idx와end_idx를 얻습니다.- 토크나이저로 답변을 디코딩합니다.
>>> import torch
>>> from transformers import AutoProcessor
>>> from transformers import AutoModelForDocumentQuestionAnswering

>>> processor = AutoProcessor.from_pretrained("MariaK/layoutlmv2-base-uncased_finetuned_docvqa")
>>> model = AutoModelForDocumentQuestionAnswering.from_pretrained("MariaK/layoutlmv2-base-uncased_finetuned_docvqa")

>>> with torch.no_grad():
...     encoding = processor(image.convert("RGB"), question, return_tensors="pt")
...     outputs = model(**encoding)
...     start_logits = outputs.start_logits
...     end_logits = outputs.end_logits
...     predicted_start_idx = start_logits.argmax(-1).item()
...     predicted_end_idx = end_logits.argmax(-1).item()

>>> processor.tokenizer.decode(encoding.input_ids.squeeze()[predicted_start_idx : predicted_end_idx + 1])
'lee a. waller'