Diffusers documentation
Shap-E
Shap-E
Shap-E는 비디오 게임 개발, 인테리어 디자인, 건축에 사용할 수 있는 3D 에셋을 생성하기 위한 conditional 모델입니다. 대규모 3D 에셋 데이터셋을 학습되었고, 각 오브젝트의 더 많은 뷰를 렌더링하고 4K point cloud 대신 16K를 생성하도록 후처리합니다. Shap-E 모델은 두 단계로 학습됩니다:
- 인코더가 3D 에셋의 포인트 클라우드와 렌더링된 뷰를 받아들이고 에셋을 나타내는 implicit functions의 파라미터를 출력합니다.
- 인코더가 생성한 latents를 바탕으로 diffusion 모델을 훈련하여 neural radiance fields(NeRF) 또는 textured 3D 메시를 생성하여 다운스트림 애플리케이션에서 3D 에셋을 더 쉽게 렌더링하고 사용할 수 있도록 합니다.
이 가이드에서는 Shap-E를 사용하여 나만의 3D 에셋을 생성하는 방법을 보입니다!
시작하기 전에 다음 라이브러리가 설치되어 있는지 확인하세요:
# Colab에서 필요한 라이브러리를 설치하기 위해 주석을 제외하세요
#!pip install -q diffusers transformers accelerate trimesh
Text-to-3D
3D 객체의 gif를 생성하려면 텍스트 프롬프트를 ShapEPipeline에 전달합니다. 파이프라인은 3D 객체를 생성하는 데 사용되는 이미지 프레임 리스트를 생성합니다.
import torch
from diffusers import ShapEPipeline

device = torch.device("cuda" if torch.cuda.is_available() else "cpu")

pipe = ShapEPipeline.from_pretrained("openai/shap-e", torch_dtype=torch.float16, variant="fp16")
pipe = pipe.to(device)

guidance_scale = 15.0
prompt = ["A firecracker", "A birthday cupcake"]

images = pipe(
    prompt,
    guidance_scale=guidance_scale,
    num_inference_steps=64,
    frame_size=256,
).images
이제 export_to_gif() 함수를 사용하여 이미지 프레임 리스트를 3D 객체의 gif로 변환합니다.
from diffusers.utils import export_to_gif

export_to_gif(images[0], "firecracker_3d.gif")
export_to_gif(images[1], "cake_3d.gif")
Image-to-3D
다른 이미지로부터 3D 개체를 생성하려면 ShapEImg2ImgPipeline을 사용합니다. 기존 이미지를 사용하거나 완전히 새로운 이미지를 생성할 수 있습니다. Kandinsky 2.1 모델을 사용하여 새 이미지를 생성해 보겠습니다.
from diffusers import DiffusionPipeline
import torch

prior_pipeline = DiffusionPipeline.from_pretrained("kandinsky-community/kandinsky-2-1-prior", torch_dtype=torch.float16, use_safetensors=True).to("cuda")
pipeline = DiffusionPipeline.from_pretrained("kandinsky-community/kandinsky-2-1", torch_dtype=torch.float16, use_safetensors=True).to("cuda")

prompt = "A cheeseburger, white background"

image_embeds, negative_image_embeds = prior_pipeline(prompt, guidance_scale=1.0).to_tuple()
image = pipeline(
    prompt,
    image_embeds=image_embeds,
    negative_image_embeds=negative_image_embeds,
).images[0]

image.save("burger.png")
치즈버거를 ShapEImg2ImgPipeline에 전달하여 3D representation을 생성합니다.
from PIL import Image
from diffusers import ShapEImg2ImgPipeline
from diffusers.utils import export_to_gif

pipe = ShapEImg2ImgPipeline.from_pretrained("openai/shap-e-img2img", torch_dtype=torch.float16, variant="fp16").to("cuda")

guidance_scale = 3.0
image = Image.open("burger.png").resize((256, 256))

images = pipe(
    image,
    guidance_scale=guidance_scale,
    num_inference_steps=64,
    frame_size=256,
).images

gif_path = export_to_gif(images[0], "burger_3d.gif")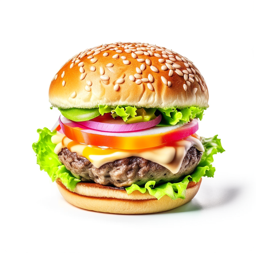
메시 생성하기
Shap-E는 다운스트림 애플리케이션에 렌더링할 textured 메시 출력을 생성할 수도 있는 유연한 모델입니다. 이 예제에서는 🤗 Datasets 라이브러리에서 Dataset viewer를 사용해 메시 시각화를 지원하는 glb 파일로 변환합니다.
output_type 매개변수를 "mesh"로 지정함으로써 ShapEPipeline과 ShapEImg2ImgPipeline 모두에 대한 메시 출력을 생성할 수 있습니다:
import torch
from diffusers import ShapEPipeline

device = torch.device("cuda" if torch.cuda.is_available() else "cpu")

pipe = ShapEPipeline.from_pretrained("openai/shap-e", torch_dtype=torch.float16, variant="fp16")
pipe = pipe.to(device)

guidance_scale = 15.0
prompt = "A birthday cupcake"

images = pipe(prompt, guidance_scale=guidance_scale, num_inference_steps=64, frame_size=256, output_type="mesh").images
메시 출력을 ply 파일로 저장하려면 export_to_ply() 함수를 사용합니다:
선택적으로 export_to_obj() 함수를 사용하여 메시 출력을 obj 파일로 저장할 수 있습니다. 다양한 형식으로 메시 출력을 저장할 수 있어 다운스트림에서 더욱 유연하게 사용할 수 있습니다!
from diffusers.utils import export_to_ply

ply_path = export_to_ply(images[0], "3d_cake.ply")
print(f"Saved to folder: {ply_path}")
그 다음 trimesh 라이브러리를 사용하여 ply 파일을 glb 파일로 변환할 수 있습니다:
import trimesh

mesh = trimesh.load("3d_cake.ply")
mesh_export = mesh.export("3d_cake.glb", file_type="glb")
기본적으로 메시 출력은 아래쪽 시점에 초점이 맞춰져 있지만 회전 변환을 적용하여 기본 시점을 변경할 수 있습니다:
import trimesh
import numpy as np

mesh = trimesh.load("3d_cake.ply")
rot = trimesh.transformations.rotation_matrix(-np.pi / 2, [1, 0, 0])
mesh = mesh.apply_transform(rot)
mesh_export = mesh.export("3d_cake.glb", file_type="glb")
메시 파일을 데이터셋 레포지토리에 업로드해 Dataset viewer로 시각화하세요!
