
(必读) 准备工作
- 点击右上角,Fork 这个 Notebook
- 鼠标悬停在运行按钮,或者点击右上角齿轮图标进入高级选项,确保「挂载 work 目录」为选中状态
- 运行 Fork 过的 Notebook
再次确认「挂载 work 目录」已经勾选
# 请确保 work 目录存在,不存在的话以下命令会报错。请关闭实例再重新创建。
! ls /home/mw/work
Hugging Face DreamBooth 编程马拉松大赛 🏆
基于 HF diffusion class 创作。
原文 https://github.com/huggingface/diffusion-models-class/tree/main/hackathon 译者 SuSung-boy@ 苏桑,经常倒腾图像的工业视觉算法工程师。
欢迎来到 DreamBooth 编程马拉松!在这场比赛中,您将通过 在少量自己的图像上进行微调来得到具有个性化的 Stable Diffusion 模型。为此,您将使用一项名为 DreamBooth 的技术,用户可以将主体(例如,您的宠物或喜爱的美食)植入模型的输出域,以便可以在提示中使用 唯一标识符 进行合成。
让我们开始吧!
🚨 进阶用户提示
本 Notebook 提供的代码是 🤗 Diffusers 中官方训练脚本 的简化版本,运行本 Notebook 中的代码需要至少 14GB GPU vRAM。该代码已经可以为大多数应用程序生成不错的模型,但如果您有超过 24GB vRAM 可用,我们建议您尝试高级功能,例如 class preservation 损失和微调文本编码器。 查看 🤗 Diffusers 文档 了解详情。
DreamBooth 是什么?
DreamBooth 是一项使用特定形式的微调来将新引入的概念传授给 Stable Diffusion 的技术。
Hugging Face 的这篇 博客文章 说明了使用 DreamBooth 微调 Stable Diffusion 的一些最佳实践。
DreamBooth 的工作方式如下:
- 收集大约 10-20 张特定主体(例如您的狗狗)的输入图像,并定义一个唯一标识符 [V],它代指的即是您输入的主体。该标识符通常是一些像
flffydog这样的虚构词,在推理时它会被植入不同的文本提示中来将主体置于不同的上下文中。 - 通过提供图像和文本提示来微调扩散模型,例如给定文本提示 "A photo of a [V] dog",其中需包含唯一标识符 [V] 和类名(本例中为 "dog")
- (可选)采用特殊的 class-specific prior preservation loss, 它利用了模型在类上的语义先验,并通过在文本提示中注入类名来促使它生成属于同一主体类的多种实例。实际使用过程中,只有人脸做为主体才真正需要此步骤,而对于此次编程马拉松中要探索的主题,则可跳过此步骤。
DreamBooth 的技术概述如下图所示:

DreamBooth 能做什么?
除了将您的主体放在感兴趣的位置之外,DreamBooth 还可用于 文本引导视图合成, 您可以从不同的视角查看主体,如下例所示:

DreamBooth 还可用于修改主体的属性,例如颜色改变和动物混合!

以上就是使用 DreamBooth 做的一些很酷的事!既然我们已经大致了解了,让我们开始训练自己的模型吧!
第 1 步:设置
文生图的模型一般都很大,因为网络的原因从 HuggingFace 主站直接下载速度比较慢。为了方便同学们使用,我们将模型文件做成了可以直接在本地挂载的 HeyWhale 数据集。
挂载数据集只需点击左边栏第三个数据集按钮,打开挂载数据面板。然后点击“修改” 按钮,选中“他人共享”里面的 Hackathon 数据集,确定即可。
最终结果如图所示:
*注意:如果你成功挂载了 work 目录,这些数据集就默认挂载完成,通常这里无需额外操作。

让我们来看一下挂载的数据集有哪些文件,执行下面的代码:
%ls /home/mw/input/Hackathon6769/
[0m[01;34mclip-vit-base-patch32[0m/ [01;34mstable-diffusion-v1-4[0m/
[01;34mstable-diffusion-safety-checker[0m/
然后安装我们需要的依赖:
%pip install -qqU diffusers transformers bitsandbytes accelerate ftfy datasets -i https://mirrors.cloud.tencent.com/pypi/simple
Note: you may need to restart the kernel to use updated packages.
然后因为兼容性的问题降级 ipywidgets 到某一个特定版本。如果你使用的是自己的机器可能无需这一步操作。
!pip install -qqU ipywidgets==7.6.3 -i https://mirrors.cloud.tencent.com/pypi/simple
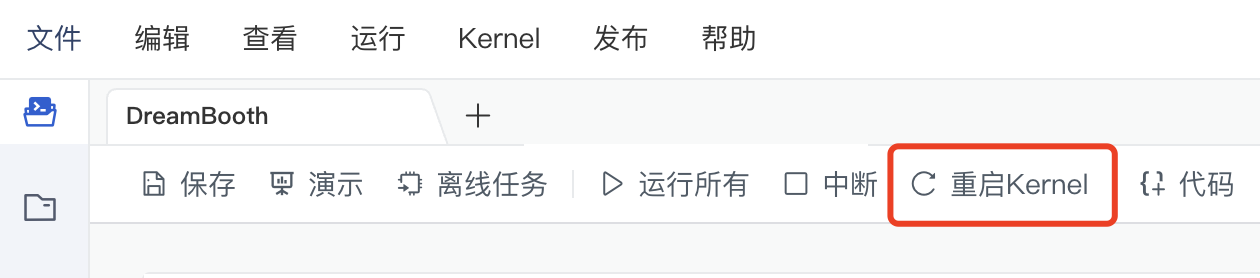
安装完成后重新启动 Kernel,点击本 Notebook 菜单栏上的重启 Kernel 即可:
接下来让我们登录 Hugging Face:
%%capture
!sudo apt -qq install git-lfs
!git config --global credential.helper store
from huggingface_hub import notebook_login
notebook_login()
Token is valid.
Your token has been saved in your configured git credential helpers (store).
Your token has been saved to /home/mw/.huggingface/token
Login successful
这一步需要大家访问 Hugging Face 的 Token 设置 页面,并创建一个有可写 (WRITE) 权限的 token ,然后点击右边按钮把内容复制进来。

最后让我们定义一些后面会用到的常量。
MODEL_SD_PATH = '/home/mw/input/Hackathon6769/stable-diffusion-v1-4'
MODEL_CLIP_VIT_PATH = '/home/mw/input/Hackathon6769/clip-vit-base-patch32'
MODEL_SD_SAFETY_PATH = '/home/mw/input/Hackathon6769/stable-diffusion-safety-checker'
第 2 步:选择主题
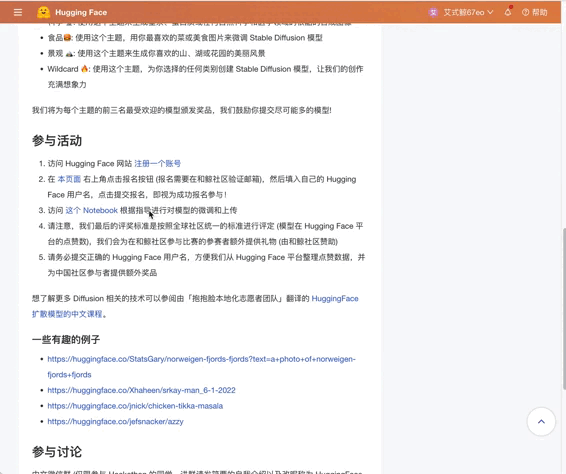
本次大赛包含5个 主题 (theme),每个主题将征集属于以下类别的模型:
- 动物 🐨 (
animal): 使用此主题生成您的宠物或喜爱的动物在雅典卫城游玩、在游泳或在太空中飞行的图像。 - 科学 🔬 (
science): 使用此主题生成星系、蛋白质或任何自然科学和医学领域的酷毙的合成图像。 - 食物 🍔 (
food): 使用此主题在您最喜欢的美味佳肴图像上微调您自己的 Stable Diffusion。 - 风景 🏔 (
landscape): 使用此主题生成您最喜欢的山脉、湖泊或花园的美丽风景图像。 - 通用 🔥 (
wildcard): 此主题无限定的类别,您可以为选择的任何类别创建 Stable Diffusion 模型!
我们将为每个主题的前 3 名喜爱度最高的模型颁发奖品,我们鼓励您提交尽可能多的模型!请从以下几个类别中选一个吧。
# options=["animal", "science", "food", "landscape", "wildcard"],
options = "wildcard"
theme = options
第 3 步:创建图像数据集并上传到 work 目录下
选定主题后,下一步是 为该主题创建图像数据集 并将其上传到 work 目录:
- 在 work 目录下创建一个子文件夹,用于存放照片,名称随意。
- 确定您希望植入模型的主体,然后需要准备大约 10-20 张主体图像。这些图像可以是您拍摄的照片或从 Unsplash 等平台下载的图片。更或者,您可以查看 Hugging Face Hub 上的任何 图像数据集 来获取灵感。
- 为获得最佳效果,我们建议使用 不同角度和视角 拍摄的主体图像
到左侧边栏找到「文件树」,在 work 目录下新建一个文件夹,上传自己的主体图像用于微调:

本 demo 里训练的是 Flutter 的吉祥物 Dash,因此我在 work 目录下创建了一个 dashdash 的文件夹。
# 让我们来看一下这些照片,dashdash 是我的 dart 玩偶的名字
! ls /home/mw/work/dashdash
DATA_DIR = "/home/mw/work/dashdash"
from datasets import load_dataset

dataset = load_dataset("imagefolder", data_dir=DATA_DIR)
dataset = dataset['train']
Using custom data configuration default-ab024aecf581f3e7
Found cached dataset imagefolder (/home/mw/.cache/huggingface/datasets/imagefolder/default-ab024aecf581f3e7/0.0.0/37fbb85cc714a338bea574ac6c7d0b5be5aff46c1862c1989b20e0771199e93f)


  0%|          | 0/1 [00:00<?, ?it/s]
# 让我们来看一下照片数据是否已经载入。
dataset['image'][0]

现在我们有了自己的数据集,让我们定义一个辅助函数来可视化查看一些图像:
from PIL import Image

def image_grid(imgs, rows, cols):
    assert len(imgs) == rows * cols
    w, h = imgs[0].size
    grid = Image.new("RGB", size=(cols * w, rows * h))
    grid_w, grid_h = grid.size
    for i, img in enumerate(imgs):
        grid.paste(img, box=(i % cols * w, i // cols * h))
    return grid

num_samples = 4
image_grid(dataset["image"][:num_samples], rows=1, cols=num_samples)
这些图像如果看起来不错,您可以继续下一步 —— 创建 PyTorch 数据集以使用 DreamBooth 进行训练。
创建训练数据集
要为我们的图像创建训练集,需要一些组件:
- 实例提示 : 用于在训练开始时预热模型。大多数情况下,使用一张「标识符 + 类别名词」的照片效果已足够好,例如为我们可爱的柯基图片写上提示: "一张柯柯基狗的照片"。
- 注意: 建议您选择一个独特的/虚构词来描述您的主体,如
柯柯基。以此确保模型词汇表中的常用词不会被覆盖。
- 注意: 建议您选择一个独特的/虚构词来描述您的主体,如
- 分词器 : 用于将实例提示转换为输入 ID,并且可以将其提供给 Stable Diffusion 的文本编码器。
- 一组 图像变换 : 尤其是将图像缩放至通用形状,以及将像素值归一化至通用均值和标准分布。
根据以上描述,让我们从定义实例提示开始:
name_of_your_concept = "dashdash"  # 根据您的主体修改,我这里把 dash 称之为 dashdash
type_of_thing = "toy"  # 根据您的主体修改
instance_prompt = f"a photo of {name_of_your_concept} {type_of_thing}"
print(f"Instance prompt: {instance_prompt}")
Instance prompt: a photo of dashdash toy
接下来,我们需要创建一个 PyTorch Dataset 类, 并实现 __len__ 和 __getitem__ 方法:
from torch.utils.data import Dataset
from torchvision import transforms


class DreamBoothDataset(Dataset):
    def __init__(self, dataset, instance_prompt, tokenizer, size=512):
        self.dataset = dataset
        self.instance_prompt = instance_prompt
        self.tokenizer = tokenizer
        self.size = size
        self.transforms = transforms.Compose(
            [
                transforms.Resize(size),
                transforms.CenterCrop(size),
                transforms.ToTensor(),
                transforms.Normalize([0.5], [0.5]),
            ]
        )

    def __len__(self):
        return len(self.dataset)

    def __getitem__(self, index):
        example = {}
        image = self.dataset[index]["image"]
        example["instance_images"] = self.transforms(image)
        example["instance_prompt_ids"] = self.tokenizer(
            self.instance_prompt,
            padding="do_not_pad",
            truncation=True,
            max_length=self.tokenizer.model_max_length,
        ).input_ids
        return example
很好,现在让我们加载与原始 Stable Diffusion 模型的文本编码器关联的 CLIP 分词器,然后检查上一步是否生效,然后创建训练数据集:
from transformers import CLIPTokenizer

# 用来微调的 Stable Diffusion 检查点
model_id = MODEL_SD_PATH
tokenizer = CLIPTokenizer.from_pretrained(
    model_id,
    subfolder="tokenizer",
)

train_dataset = DreamBoothDataset(dataset, instance_prompt, tokenizer)
train_dataset[0]
{'instance_images': tensor([[[ 0.6941,  0.6941,  0.6941,  ...,  0.3647,  0.3647,  0.3647],
          [ 0.6941,  0.7020,  0.6941,  ...,  0.3647,  0.3647,  0.3647],
          [ 0.6863,  0.6863,  0.6863,  ...,  0.3647,  0.3647,  0.3569],
          ...,
          [ 0.5216,  0.5294,  0.5216,  ...,  0.5529,  0.5451,  0.5451],
          [ 0.5216,  0.5216,  0.5294,  ...,  0.5529,  0.5451,  0.5529],
          [ 0.5216,  0.5373,  0.5373,  ...,  0.5451,  0.5529,  0.5608]],

         [[ 0.5529,  0.5529,  0.5529,  ..., -0.0275, -0.0275, -0.0275],
          [ 0.5529,  0.5608,  0.5529,  ..., -0.0275, -0.0275, -0.0275],
          [ 0.5451,  0.5451,  0.5451,  ..., -0.0275, -0.0275, -0.0353],
          ...,
          [ 0.5216,  0.5294,  0.5216,  ...,  0.5608,  0.5529,  0.5529],
          [ 0.5216,  0.5216,  0.5294,  ...,  0.5608,  0.5529,  0.5608],
          [ 0.5216,  0.5373,  0.5373,  ...,  0.5529,  0.5608,  0.5686]],

         [[ 0.6784,  0.6784,  0.6784,  ..., -0.6000, -0.6000, -0.6000],
          [ 0.6784,  0.6863,  0.6784,  ..., -0.5922, -0.5922, -0.5922],
          [ 0.6706,  0.6706,  0.6706,  ..., -0.5843, -0.5843, -0.5922],
          ...,
          [ 0.5843,  0.5922,  0.5843,  ...,  0.5765,  0.5686,  0.5686],
          [ 0.5843,  0.5843,  0.5922,  ...,  0.5765,  0.5686,  0.5765],
          [ 0.5843,  0.6000,  0.6000,  ...,  0.5686,  0.5765,  0.5843]]]),
 'instance_prompt_ids': [49406, 320, 1125, 539, 13858, 10206, 5988, 49407]}
第 4 步:定义数据整理器
现在我们有了一个训练数据集,接下来我们需要定义一个数据整理器。数据整理器是一个函数,它实现的功能是:收集一个批次数据中的元素、应用一些逻辑来构成单个张量、提供给模型训练等。如果您想了解更多信息,可以观看 Hugging Face 的视频课程。
对于 DreamBooth,我们定义的数据整理器需要为模型提供两个部分:分词器的输入 ID、图像的像素值堆叠张量。具体函数代码如下所示:
import torch

def collate_fn(examples):
    input_ids = [example["instance_prompt_ids"] for example in examples]
    pixel_values = [example["instance_images"] for example in examples]
    pixel_values = torch.stack(pixel_values)
    pixel_values = pixel_values.to(memory_format=torch.contiguous_format).float()

    input_ids = tokenizer.pad(
        {"input_ids": input_ids}, padding=True, return_tensors="pt"
    ).input_ids

    batch = {
        "input_ids": input_ids,
        "pixel_values": pixel_values,
    }
    return batch
第 5 步:加载 Stable Diffusion 管道组件
到此我们已经准备好训练所需的大部分组件了!如 Stable Diffusion 第 3 单元 Notebook 中所示,一个管道包含多个模型:
- 文本编码器: 用于将文本提示转换为嵌入矩阵。这里我们使用 CLIP,因为它是用于训练 Stable Diffusion v1-4 的编码器
- VAE (变分自动编码器, variational autoencoder): 用于将图像转换为压缩表征(隐式表征),并在推理时解压缩
- UNet: 用于在隐式 VAE 中去噪
我们可以使用 🤗 Diffusers 和 🤗 Transformers 库加载上述所有组件,如下代码所示:
from diffusers import AutoencoderKL, UNet2DConditionModel
from transformers import CLIPFeatureExtractor, CLIPTextModel

text_encoder = CLIPTextModel.from_pretrained(model_id, subfolder="text_encoder")
vae = AutoencoderKL.from_pretrained(model_id, subfolder="vae")
unet = UNet2DConditionModel.from_pretrained(model_id, subfolder="unet")
feature_extractor = CLIPFeatureExtractor.from_pretrained(MODEL_CLIP_VIT_PATH)
第 6 步:微调模型
有趣的一步来了!使用 DreamBooth 训练自己的模型!如 Hugging Face 的博客文章 所描述的那样,需要手动调整的最重要的超参数是学习率和训练次数。
通常,较低的学习率和较长的训练次数可以获得更好的结果。下面设置的初始值是一个不错的训练起点,但您可能仍然需要根据您的数据集调整它们:
learning_rate = 2e-06
max_train_steps = 400
接下来,将训练需要的其他超参数包装在 Namespace 对象中,来使配置和训练更简单:
from argparse import Namespace

OUTPUT_DIR = "/home/mw/work/my-dreambooth"
args = Namespace(
    pretrained_model_name_or_path=model_id,
    resolution=512, # Reduce this if you want to save some memory
    train_dataset=train_dataset,
    instance_prompt=instance_prompt,
    learning_rate=learning_rate,
    max_train_steps=max_train_steps,
    train_batch_size=1,
    gradient_accumulation_steps=1, # Increase this if you want to lower memory usage
    max_grad_norm=1.0,
    gradient_checkpointing=True,  # set this to True to lower the memory usage.
    use_8bit_adam=True,  # use 8bit optimizer from bitsandbytes
    seed=3434554,
    sample_batch_size=2,
    output_dir=OUTPUT_DIR,  # where to save the pipeline
)
最后要定义一个 training_function() 函数,它包装了一些训练逻辑,并且可以传递给 🤗 Accelerate 库来处理 1 个或多个 GPU 上的训练。如果这是您第一次使用 🤗 Accelerate,请观看我们官方的 Bilibili 频道视频以快速了解它的功能:Supercharge your PyTorch training loop with Accelerate (带中英文字幕)。
当我们从头开始训练自己的扩散模型时,这些细节与我们在第 1 和第 2 单元中看到的类似:
import math

import torch.nn.functional as F
from accelerate import Accelerator
from accelerate.utils import set_seed
from diffusers import DDPMScheduler, PNDMScheduler, StableDiffusionPipeline
from diffusers.pipelines.stable_diffusion import StableDiffusionSafetyChecker
from torch.utils.data import DataLoader
from tqdm.auto import tqdm


def training_function(text_encoder, vae, unet):

    accelerator = Accelerator(
        gradient_accumulation_steps=args.gradient_accumulation_steps,
    )

    set_seed(args.seed)

    if args.gradient_checkpointing:
        unet.enable_gradient_checkpointing()

    # 使用 8 位 Adam 优化器以降低内存占用,或者在 16GB GPU 微调模型
    if args.use_8bit_adam:
        import bitsandbytes as bnb
        optimizer_class = bnb.optim.AdamW8bit
    else:
        optimizer_class = torch.optim.AdamW

    optimizer = optimizer_class(
        unet.parameters(),  # 仅优化 UNet
        lr=args.learning_rate,
    )

    noise_scheduler = DDPMScheduler(
        beta_start=0.00085,
        beta_end=0.012,
        beta_schedule="scaled_linear",
        num_train_timesteps=1000,
    )

    train_dataloader = DataLoader(
        args.train_dataset,
        batch_size=args.train_batch_size,
        shuffle=True,
        collate_fn=collate_fn,
    )

    unet, optimizer, train_dataloader = accelerator.prepare(
        unet, optimizer, train_dataloader
    )

    # 将 text_encode 和 VAE 转移到 gpu
    text_encoder.to(accelerator.device)
    vae.to(accelerator.device)

    # 我们需要重新计算我们的总训练次数,因为数据加载器的大小可能发生改变。
    num_update_steps_per_epoch = math.ceil(
        len(train_dataloader) / args.gradient_accumulation_steps
    )
    num_train_epochs = math.ceil(args.max_train_steps / num_update_steps_per_epoch)

    # 训练!
    total_batch_size = (
        args.train_batch_size
        * accelerator.num_processes
        * args.gradient_accumulation_steps
    )
    # 每台机器仅显示一次进度条
    progress_bar = tqdm(
        range(args.max_train_steps), disable=not accelerator.is_local_main_process
    )
    progress_bar.set_description("Steps")
    global_step = 0

    for epoch in range(num_train_epochs):
        unet.train()
        for step, batch in enumerate(train_dataloader):
            with accelerator.accumulate(unet):
                # 转换图像至隐式空间
                with torch.no_grad():
                    latents = vae.encode(batch["pixel_values"]).latent_dist.sample()
                    latents = latents * 0.18215

                # 采样要添加到隐式空间的噪声样本
                noise = torch.randn(latents.shape).to(latents.device)
                bsz = latents.shape[0]
                # 为每张图像采样随机时间步
                timesteps = torch.randint(
                    0,
                    noise_scheduler.config.num_train_timesteps,
                    (bsz,),
                    device=latents.device,
                ).long()

                # 根据每个时间步的噪声幅度,将噪声添加到隐式空间
                # (即前向扩散过程)
                noisy_latents = noise_scheduler.add_noise(latents, noise, timesteps)

                # 获取用于条件调节的文本嵌入
                with torch.no_grad():
                    encoder_hidden_states = text_encoder(batch["input_ids"])[0]

                # 预测噪声残差
                noise_pred = unet(
                    noisy_latents, timesteps, encoder_hidden_states
                ).sample
                loss = (
                    F.mse_loss(noise_pred, noise, reduction="none")
                    .mean([1, 2, 3])
                    .mean()
                )

                accelerator.backward(loss)
                if accelerator.sync_gradients:
                    accelerator.clip_grad_norm_(unet.parameters(), args.max_grad_norm)
                optimizer.step()
                optimizer.zero_grad()

            # 检查加速器是否在幕后执行了优化
            if accelerator.sync_gradients:
                progress_bar.update(1)
                global_step += 1

            logs = {"loss": loss.detach().item()}
            progress_bar.set_postfix(**logs)

            if global_step >= args.max_train_steps:
                break

        accelerator.wait_for_everyone()

    # 使用经训练的模块,创建管道并保存。
    if accelerator.is_main_process:
        print(f"Loading pipeline and saving to {args.output_dir}...")
        scheduler = PNDMScheduler(
            beta_start=0.00085,
            beta_end=0.012,
            beta_schedule="scaled_linear",
            skip_prk_steps=True,
            steps_offset=1,
        )
        pipeline = StableDiffusionPipeline(
            text_encoder=text_encoder,
            vae=vae,
            unet=accelerator.unwrap_model(unet),
            tokenizer=tokenizer,
            scheduler=scheduler,
            safety_checker=StableDiffusionSafetyChecker.from_pretrained(
                MODEL_SD_SAFETY_PATH
            ),
            feature_extractor=feature_extractor,
        )
        pipeline.save_pretrained(args.output_dir)
现在我们已经定义了训练所需的所有函数,开始训练吧!根据您的数据集的大小和 GPU 的类型,可能需要 5 分钟到 1 小时不等的时间才能运行:
from accelerate import notebook_launcher

num_of_gpus = 1  # 以及您拥有的 GPU 数量修改此项
notebook_launcher(
    training_function, args=(text_encoder, vae, unet), num_processes=num_of_gpus
)
Launching training on one GPU.

===================================BUG REPORT===================================
Welcome to bitsandbytes. For bug reports, please submit your error trace to: https://github.com/TimDettmers/bitsandbytes/issues
For effortless bug reporting copy-paste your error into this form: https://docs.google.com/forms/d/e/1FAIpQLScPB8emS3Thkp66nvqwmjTEgxp8Y9ufuWTzFyr9kJ5AoI47dQ/viewform?usp=sf_link
================================================================================
CUDA_SETUP: WARNING! libcudart.so not found in any environmental path. Searching /usr/local/cuda/lib64...
CUDA SETUP: CUDA runtime path found: /usr/local/cuda/lib64/libcudart.so
CUDA SETUP: Highest compute capability among GPUs detected: 7.5
CUDA SETUP: Detected CUDA version 116
CUDA SETUP: Loading binary /opt/conda/lib/python3.9/site-packages/bitsandbytes/libbitsandbytes_cuda116.so...


/opt/conda/lib/python3.9/site-packages/bitsandbytes/cuda_setup/main.py:134: UserWarning: WARNING: The following directories listed in your path were found to be non-existent: {PosixPath('/usr/local/nvidia/lib'), PosixPath('/usr/local/nvidia/lib64')}
  warn(msg)
/opt/conda/lib/python3.9/site-packages/bitsandbytes/cuda_setup/main.py:134: UserWarning: /usr/local/nvidia/lib:/usr/local/nvidia/lib64 did not contain libcudart.so as expected! Searching further paths...
  warn(msg)
/opt/conda/lib/python3.9/site-packages/bitsandbytes/cuda_setup/main.py:134: UserWarning: WARNING: The following directories listed in your path were found to be non-existent: {PosixPath('//172.16.252.1'), PosixPath('tcp'), PosixPath('443')}
  warn(msg)
/opt/conda/lib/python3.9/site-packages/bitsandbytes/cuda_setup/main.py:134: UserWarning: WARNING: The following directories listed in your path were found to be non-existent: {PosixPath('//matplotlib_inline.backend_inline'), PosixPath('module')}
  warn(msg)


  0%|          | 0/400 [00:00<?, ?it/s]
如果您在单个 GPU 上运行,您可以将下面的代码复制到一个新的单元格并运行来为下一部分释放一些内存。对于多 GPU 机器,🤗 Accelerate 不允许 任何 单元格直接使用 torch.cuda 访问 GPU,因此我们不建议在这些情况下使用此技巧:
with torch.no_grad():
    torch.cuda.empty_cache()
第 7 步:运行推理并检查生成
现在我们的模型已经训练完毕,让我们用它生成一些图像,看看它的表现如何!首先,我们要从模型保存目录加载管道:
pipe = StableDiffusionPipeline.from_pretrained(
    args.output_dir,
    torch_dtype=torch.float16,
).to("cuda")
接下来让我们尝试生成一些图像。在抱抱脸 Hub 小部件上为 prompt 变量设置默认值,可以稍微试验几次来找到一个较好的值。如果您还想尝试使用 CLIP Interrogator 创建更详细的提示,请参考下文:
# Pick a funny prompt here and it will be used as the widget's default
# when we push to the Hub in the next section
prompt = f"illustration of a dashdash toy sitting on top of the deck of a battle ship traveling through the open sea with a lot of ships surrounding it"

# Tune the guidance to control how closely the generations follow the prompt.
# Values between 7-11 usually work best
guidance_scale = 7

num_cols = 2
all_images = []
for _ in range(num_cols):
    images = pipe(prompt, guidance_scale=guidance_scale).images
    all_images.extend(images)

image_grid(all_images, 1, num_cols)
第 8 步:将您的模型推送到 Hub
如果您觉得自己的模型非常棒,最后一步是将其推送到 Hub 并在 DreamBooth 排行榜上查看!
⚠️ 由于网络原因,这一步可能会花费几分钟。如果失败,请重试。
首先,您需要为模型库起一个名字。默认情况下,我们使用唯一标识符和类名来命名,但如果您愿意,可以随时更改:
# 在 Hub 上为您的模型起一个名字。不允许包含空格。
model_name = f"{name_of_your_concept}-{type_of_thing}-heywhale"
接下来,添加一个简短描述,介绍一下您训练的模型类型或者想要分享的任何其他信息:
# 描述一下您选择的主题以及训练好的模型
description = f"""
This is a Stable Diffusion model fine-tuned on `{type_of_thing}` images for the {theme} theme,
for the Hugging Face DreamBooth Hackathon, from the HF CN Community,
corporated with the HeyWhale.
"""

print(description)
This is a Stable Diffusion model fine-tuned on `toy` images for the wildcard theme,
for the Hugging Face DreamBooth Hackathon, from the HF CN Community,
corporated with the HeyWhale.
最后,运行下面的单元格在 Hub 上创建一个 repo,并使用一个精美的模型卡,同时将所有的文件推送到引导:
# 将本地保存的管道上传到 Hub 的代码
from huggingface_hub import HfApi, ModelCard, create_repo, get_full_repo_name

# 创建库
hub_model_id = get_full_repo_name(model_name)
create_repo(hub_model_id)
# 上传文件
api = HfApi()
api.upload_folder(folder_path=args.output_dir, path_in_repo="", repo_id=hub_model_id)
# 添加 metadata
content = f"""
---
license: creativeml-openrail-m
tags:
- pytorch
- diffusers
- stable-diffusion
- text-to-image
- diffusion-models-class
- dreambooth-hackathon
- {theme}
widget:
- text: {prompt}
---

# DreamBooth model for the {name_of_your_concept} concept trained by {api.whoami()["name"]}.

This is a Stable Diffusion model fine-tuned on the {name_of_your_concept} concept with DreamBooth. It can be used by modifying the `instance_prompt`: **{instance_prompt}**

This model was created as part of the DreamBooth Hackathon 🔥. Visit the [organisation page](https://huggingface.co/dreambooth-hackathon) for instructions on how to take part!

## Description

{description}

## Usage

```python
from diffusers import StableDiffusionPipeline

pipeline = StableDiffusionPipeline.from_pretrained('{hub_model_id}')
image = pipeline().images[0]
image
"""
card = ModelCard(content) hub_url = card.push_to_hub(hub_model_id) print(f"Upload successful! Model can be found here: {hub_url}") print( f"View your submission on the public leaderboard here: https://huggingface.co/spaces/dreambooth-hackathon/leaderboard" )
恭喜恭喜 🎉 你已经训练了一个自己的文生图模型,并且成功上传到了 HuggingFace!快去跟朋友们分享,请他们使用和点赞吧~

## 下一步

提交参赛作品,请在 [这里](https://www.heywhale.com/org/HuggingFace/competition/area/63bbfb98de6c0e9cdb0d9dd5/submit) 提交已经上传到 Hugging Face 上的模型 URL。