Goodbye Python, Hello Rust: Building a RAG CLI Application with Orca


Imagine running powerful large language models right on your laptop without the need for hefty cloud subscriptions or complex setups. In this post, we’ll dive into how this is not only possible but also more accessible than you might think. While LLMs are typically associated with costly GPUs and cloud-based inference, I’ll demonstrate how to run inference directly on your local machine. We're going to develop a streamlined RAG CLI application that generates Bert sentence embeddings and executes Mistral Instruct 7B text completions, all without the need for an internet connection. This feat is achievable thanks to Orca. For those unfamiliar, Orca is my most recent project — an LLM orchestration framework written in Rust. Its aim is to empower developers to effortlessly create fast LLM applications for local use, with an eventual goal of enabling these applications to be compiled into WebAssembly for truly server-less inference. To make this possible, Orca utilizes Hugging Face’s Candle framework under the hood to run the models. Candle is a new minimalist Rust ML Framework. With the help of Candle, we are close to realizing this server-less vision.
 Generated with DALLE-3
Before diving in, let's clarify what RAG stands for. It's an acronym for Retrieval-Augmented Generation, which is a powerful technique that merges the retrieval of relevant text with answer generation by weaving the retrieved information into the generation process. This method essentially allows for a specialized form of fine-tuning that can yield more precise answers than what might be possible with a large language model’s sole reliance on pre-training. Consider the scenario where you're dealing with a large book and you wish to search it for specific information. The size of the book far exceeds the processing capacity of a standard LLM context window. RAG tackles this issue head-on by dissecting the book into manageable segments, creating embeddings for each piece, and then matching the embeddings of your query with those of the relevant sections. The vector database then serves up the closest matches, enabling accurate and efficient information retrieval that can now be fed into the LLM’s context window.
So how do we make this into a CLI application? For simplicity’s sake, we’ll design our program to accept two command line arguments: the name of a file and a prompt. The final response is simply printed out for the user. This streamlined approach hides the underlying complexity from the end user, who only needs to provide a prompt to search a PDF file. Here is a visual design of the completed application.
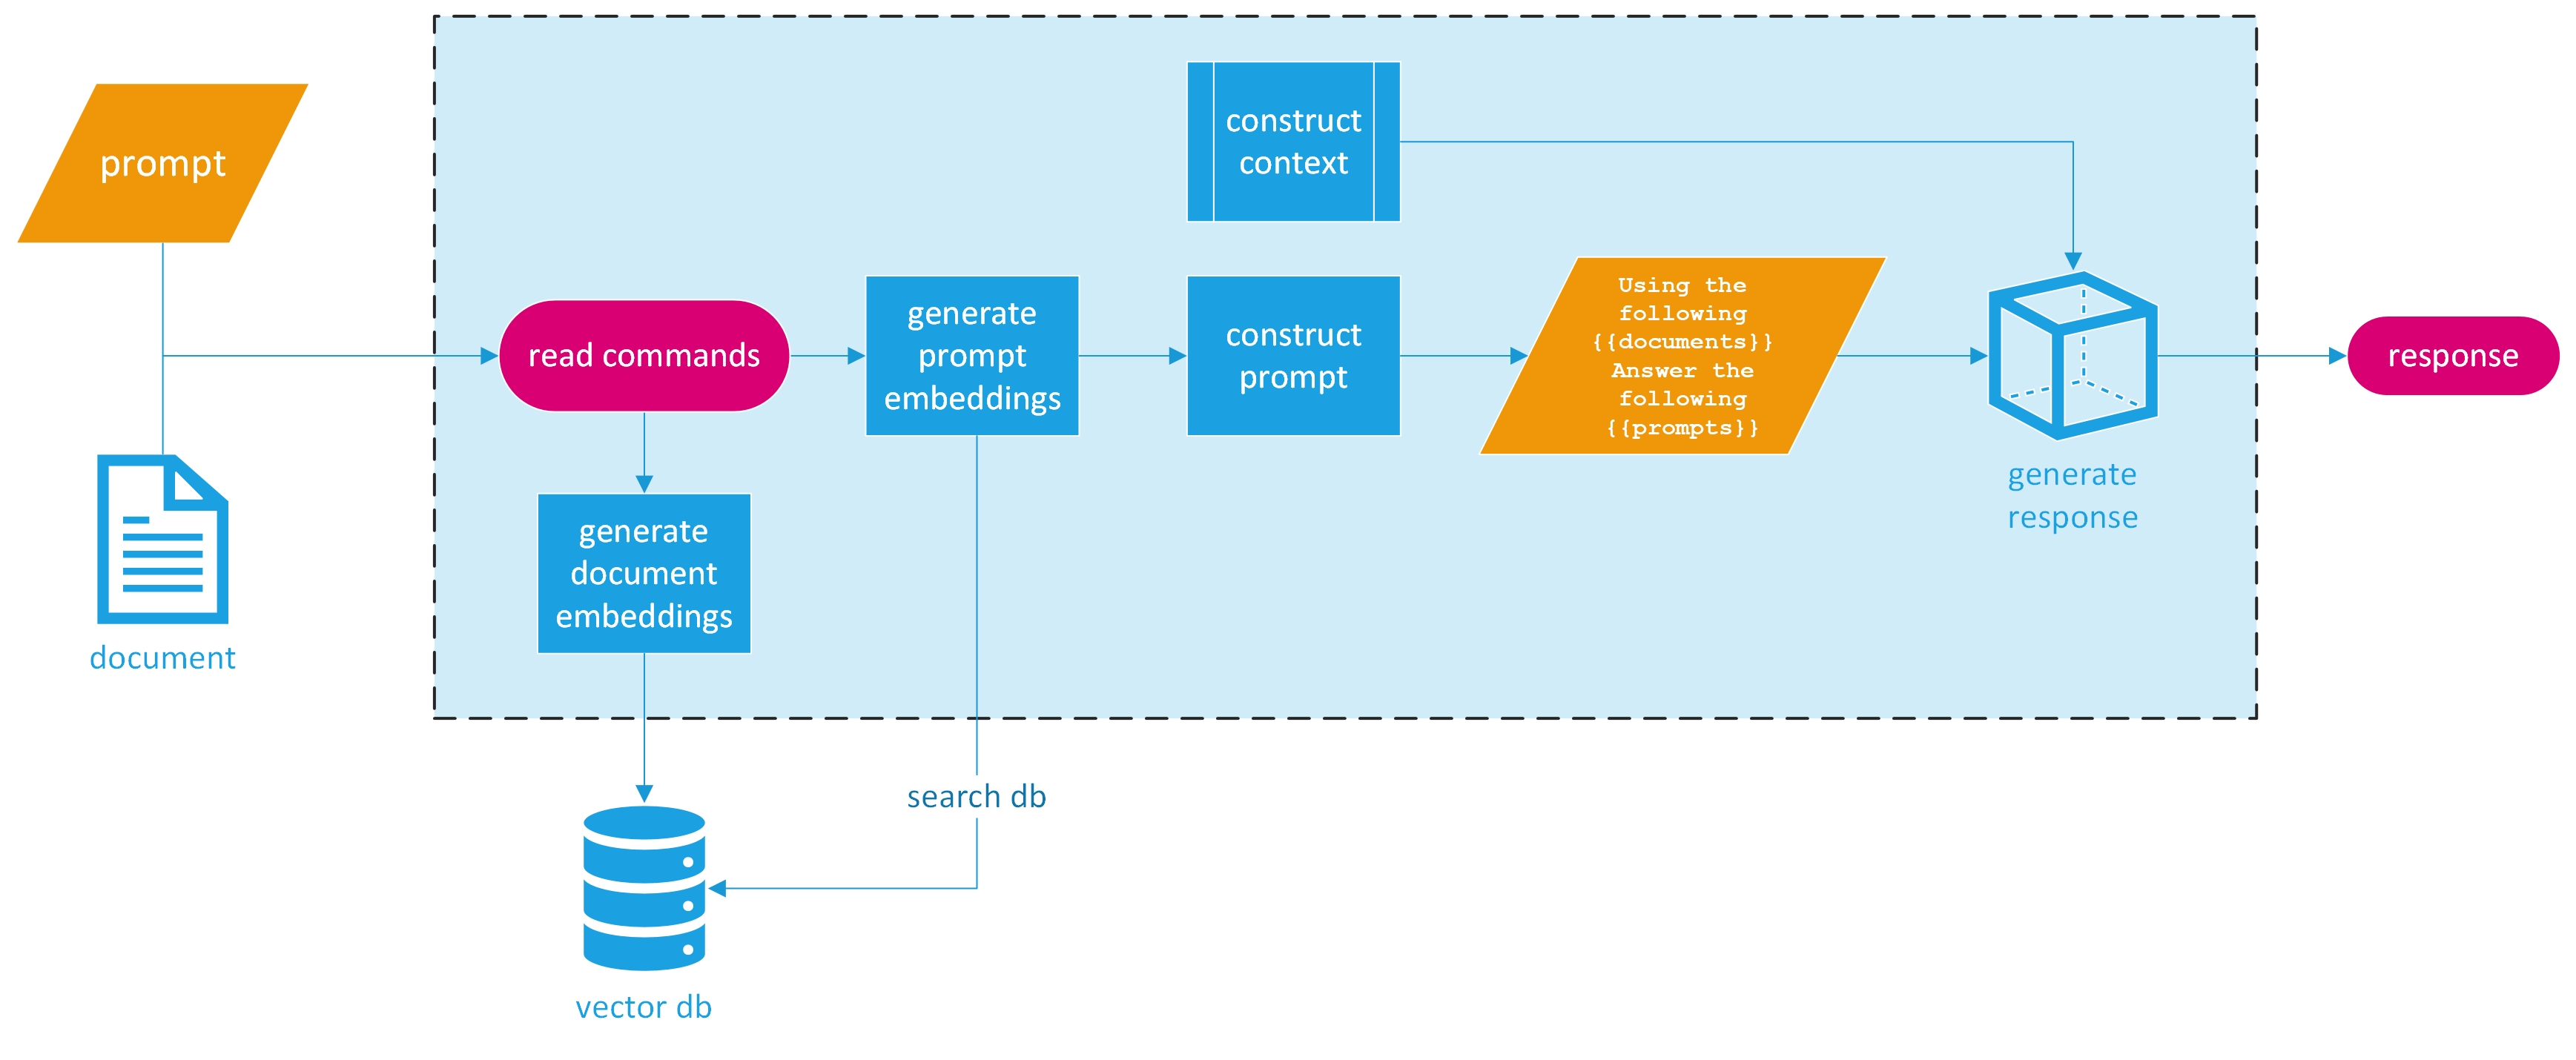 RAG CLI Application Design
The provided image breaks down the process of our RAG CLI application into distinct, easy-to-follow steps. Let’s break this down into three main sections.
Set up
To initialize our RAG CLI application, we begin by setting up command-line argument parsing. For this task, we'll use the clap library — a robust tool in the Rust ecosystem renowned for its ability to simplify handling command-line inputs while enhancing the user experience.
The code snippet provided outlines the primary elements:
use clap::Parser;
use orca::{
    llm::{bert::Bert, quantized::Quantized, Embedding},
    pipeline::simple::LLMPipeline,
    pipeline::Pipeline,
    prompt,
    prompt::context::Context,
    prompts,
    qdrant::Qdrant,
    record::{pdf::Pdf, Spin},
};
use serde_json::json;

#[derive(Parser, Debug)]
#[command(author, version, about, long_about = None)]
struct Args {
    #[clap(long)]
    /// The path to the PDF file to index
    file: String,

    #[clap(long)]
    /// The prompt to use to query the index
    prompt: String,
}
We define a struct Args that derives Clap's Parser trait. Within Args, we specify two command-line arguments:
file: Represents the path to the PDF file that the user wishes to index. It's tagged with a long identifier to be used as--filein the command line.prompt: Represents the user's query or question that will be passed to the LLM. It's tagged with a long identifier to be used as --prompt in the command line.
By setting up the command-line argument parsing in this manner, we lay the foundation for a user-friendly interface. Users can effortlessly provide the necessary input, making the process of indexing and querying a PDF file a breeze. The next steps will involve wiring up these inputs to the core functionality of our application, enabling efficient information retrieval and response generation.
Continuing with the setup, we incorporate the parsed arguments into the main functionality of our application:
let args = Args::parse();
The file name and the prompt can now be accessed through args.file and args.prompt, respectively.
Embeddings
To generate embeddings for our PDF we first have to read it and split it. Fortunately, Orca’s Record handling makes this very easy. We already imported orca::record::pdf::Pdf so now we just have to use this to read our file. Once we read it, we can call the Spin trait to generate our Record (you spin a Record 😃) and then split it by specifying the number of tokens per fragment. We’ll use 399 tokens just as a default value. Additionally, we can initialize and build our Bert embedding model.
let pdf_records: Vec<Record> = Pdf::from_file(&args.file, false).spin().unwrap().split(399);
let bert = Bert::new().build_model_and_tokenizer().await.unwrap();
The build_model_and_tokenizer() function uses the Hugging Face APIs and the Candle framework to retrieve the model weights and the tokenizer file, and create a BertModel, which is the Candle transformer model provided by the candle-transformers crate.
Now we can set up Qdrant, our vector database. Orca has a built-in Qdrant wrapper. This minimizes the setup required for the user by providing a simple API. To get started make sure you have Docker installed and Docker Desktop open. This will easily allow us to spin up a Qdrant instance in our local machine. The Rust Qdrant client communicates via gRPC so you have to run the following specific commands to pull the image and run it:
$ docker pull qdrant/qdrant
$ docker run -d --name qdrant_test_instance -p 6333:6333 -p 6334:6334 -e QDRANT__SERVICE__GRPC_PORT=6334 qdrant/qdrant
With a Qdrant instance up and running in Docker, we can now create a collection, generate our embeddings, and insert them into the database.
let collection = std::path::Path::new(&args.file)
    .file_stem()
    .and_then(|name| name.to_str())
    .unwrap_or("default_collection")
    .to_string();

let qdrant = Qdrant::new("http://localhost:6334");

if qdrant.create_collection(&collection, 384).await.is_ok() {
    let embeddings = bert.generate_embeddings(prompts!(&pdf_records)).await.unwrap();
    qdrant.insert_many(&collection, embeddings.to_vec2().unwrap(), pdf_records).await.unwrap();
}

let query_embedding = bert.generate_embedding(prompt!(args.prompt)).await.unwrap();
let result = qdrant.search(&collection, query_embedding.to_vec().unwrap().clone(), 5, None).await.unwrap();
In this snippet, we set the collection name from the stem of the PDF file path. Then we create a new Qdrant client pointing to the local Qdrant instance. After that, we create a collection in Qdrant using the collection name, set up the dimensions to 384 (as is typical for BERT embeddings), generate embeddings for all the records using our Bert model, and insert them into the database along with their associated records.
Fun fact: Orca generates multiple embeddings in parallel, making it faster than generating embeddings in a synchronous manner.
With our embeddings safely stored in Qdrant, we can proceed to generate an embedding for the user’s query and perform a search. We ask Qdrant to find the top 5 closest records to our query embedding.
If you look closely, we have two prompt macros to pass prompts to the model. The prompt macro allows us to pass any type that implements the Prompt trait and the prompts macro allows us to pass multiple prompt types that implement the Prompt trait, be it a vector or a series of strings passed as parameters, for example.
Generating our Response
This is where most of the magic happens. Orca has a very cool templating feature. This allows us to use Handlebars-like syntax to create a prompt template. Since we want a chat-like prompt for this application, we can format our template as follows:
let prompt_for_model = r#"
{{#chat}}
    {{#system}}
    You are a highly advanced assistant. You receive a prompt from a user and relevant excerpts extracted from a PDF. You then answer truthfully to the best of your ability. If you do not know the answer, your response is I don't know.
    {{/system}}
    {{#user}}
    {{user_prompt}}
    {{/user}}
    {{#system}}
    Based on the retrieved information from the PDF, here are the relevant excerpts:
    {{#each payloads}}
    {{this}}
    {{/each}}
    Please provide a comprehensive answer to the user's question, integrating insights from these excerpts and your general knowledge.
    {{/system}}
{{/chat}}
"#;
In this Orca template, we’re effectively instructing the model to play the role of a sophisticated assistant. It is designed to integrate the user's question ({{user_prompt}}) with the information extracted from the PDF (denoted as {{#each payloads}} to iterate over the relevant excerpts). The {{#chat}} structure helps us define the flow of conversation, guiding the model to respond based on the roles we've designated—be it as the system or the user.
Once the template is set, we can prepare the data that will be fed into it. This data includes the user’s prompt and the relevant excerpts from the PDF that the Qdrant search yielded:
let context = serde_json::json!({
    "user_prompt": args.prompt,
    "payloads": result
        .iter()
        .filter_map(|found_point| {
            found_point.payload.as_ref().map(|payload| {
                // Assuming you want to convert the whole payload to a JSON string
                serde_json::to_string(payload).unwrap_or_else(|_| "{}".to_string())
            })
        })
        .collect::<Vec<String>>()
});
We utilize the serde_json::json! macro here to deftly create our context object. This macro is advantageous because it allows for a more natural JSON-like syntax and ensures the data is structured correctly for serialization. The filter_map in the chain serves a dual purpose: it filters out any non-existent payloads (ensuring we only deal with valid data) and maps each payload to a JSON string. This step is crucial as it transforms complex data structures into a format that is amenable to our templating system. In case serialization fails, we gracefully default to an empty JSON object, avoiding the potential for a crash due to data inconsistency.
It's worth noting that while we're using serde_json::json! for its convenience and readability, Orca allows for any type that implements the Serialize trait to be used in this context. This means developers have the freedom to serialize more complex or custom data structures as needed, making the system highly adaptable to a wide range of applications.
To initialize and execute the Mistral Instruct 7B on a local setup, Orca calls upon Hugging Face's Candle framework under the hood. This is further facilitated by building the model with a .gguf file which Orca can help download or load locally, providing a seamless setup experience for the user.
let mistral = Quantized::new()
    .with_model(orca::llm::quantized::Model::Mistral7bInstruct)
    .with_sample_len(7500)
    .load_model_from_path("../../models/mistral-7b-instruct-v0.1.Q4_K_S.gguf")
    .unwrap()
    .build_model()
    .unwrap();
The code snippet shows how we can load a quantized version of Mistral Instruct 7B using Orca. Mistral is a distilled version of OpenAI’s GPT-3, optimized for running with lower resources without a significant loss in performance. Quantized models require less memory and computing resources, which makes them ideal for running on local machines, like laptops.
Once we’ve built the Mistral model, we can then run the actual inference. Given the prompt we’ve constructed and the context of the relevant excerpts from the PDF, we can tie it all together using Orca’s simple LLMPipeline:
let mut pipe = LLMPipeline::new(&mistral).with_template("query", prompt_for_model);
pipe.load_context(&Context::new(context).unwrap()).await;

let response = pipe.execute("query").await.unwrap();

println!("Response: {}", response.content());
Using an LLMPipeline in Orca is very easy. To do it, you only have to create a new instance of LLMPipeline with your model, which in this case is mistral. Then, you can load your templates and context into the pipeline.
The with_template method is used to associate a handle, here "query", with the template we've defined. This handle is then used to execute the template with the given context. The context is loaded into the pipeline with the load_context method, which takes an instance of Context constructed from our previously defined JSON context.
When calling execute, you pass the handle of the template you want to run. The pipeline processes the provided information, generates a response, and prints it out.
This whole process is asynchronous, as seen by the await keyword, which means it runs without blocking the main thread, allowing other tasks to run in parallel or the system to remain responsive.
Running the CLI LLM Application
Let’s give it a go! I’m going to query The Almanack of Naval Ravikant, a book I have downloaded on my laptop, an M1 Max Macbook Pro.
$ cargo run --release -- --file './naval-book.pdf' --prompt 'investing the rest of your life in what has meaning to you'
[2023-11-03T04:18:15Z INFO  orca::llm::bert] Computing embeddings
[2023-11-03T04:18:25Z INFO  orca::llm::bert] Done computing embeddings
[2023-11-03T04:18:25Z INFO  orca::llm::bert] Embeddings took 10.411869958s to generate
[2023-11-03T04:18:26Z INFO  orca::llm::bert] token_ids shape: [1, 14]
[2023-11-03T04:18:26Z INFO  orca::llm::bert] running inference [1, 14]
[2023-11-03T04:18:26Z INFO  orca::llm::bert] embedding shape: [1, 14, 384]
[2023-11-03T04:18:26Z INFO  orca::llm::bert] Embedding took 15.420958ms to generate
[2023-11-03T04:18:26Z INFO  orca::llm::quantized] loaded 291 tensors (4.14GB) in 0.07s
[2023-11-03T04:18:28Z INFO  orca::llm::quantized] model built

"The question is about investing the rest of one's life in what has meaning to them.
According to the relevant excerpts, there are a few things to consider when it comes
to investing one's life in something that has meaning. One is to focus on building wealth
that comes from activities that align with one's interests and passions. For example, if
you are passionate about venture investing, then it may be worth pursuing a career in that
area. However, it's important to potentially diversify your investments and explore
different opportunities to maximize your returns.
Another consideration is to focus on activities that are timeless and have the potential
for long-term growth. Warren Buffett's famous quote about earning with your mind, not your
time, highlights the importance of compound interest and building wealth through investments
that will continue to grow over time. Additionally, it may be beneficial to focus on
relationships that will also provide long-term benefits, whether it's in wealth or personal
fulfillment.
It's also worth noting that pursuing your passions can lead to not just financial reward, but
also personal fulfillment and satisfaction in life. Therefore, it's important to invest in
activities that bring meaning and purpose to your life.
Overall, it seems that the best way to invest the rest of your life in something that has meaning
is to pursue activities that align with your passions and interests, focus on building wealth
through compound interest and long-term growth, and nurture relationships and activities that
will bring personal fulfillment in life.</s>"
And there you have it — a CLI application that wields the power of a Retrieval-Augmented Generation model, right on your local machine. We’ve journeyed through setting up a Rust application that takes a PDF file and a user’s query to generate an informed response using a combination of Orca, BERT embeddings, and Mistral Instruct 7B. From splitting a document into digestible records to embedding them in a searchable vector space with Qdrant, and finally crafting a nuanced answer through a conversational AI template, this CLI tool embodies the innovative spirit of today’s AI landscape.
Conclusion
What we’ve built is not just a demonstration of technical possibility; it’s a testament to the evolving accessibility of AI technologies. No longer confined to the realm of cloud services and high-powered servers, AI’s potential is being democratized. Developers and hobbyists alike can now bring to life applications that leverage the prowess of language models in their own environments, on their own terms.
This RAG CLI application is a stepping stone towards a future where AI is interwoven into our daily computing tasks without the latency or privacy concerns of cloud-based systems. Whether for personal use or embedding within larger software ecosystems, the implications are expansive.
Moreover, this foray into local LLM deployment is a glimpse into the future where WebAssembly could potentially allow these models to run in even more constrained environments — think browsers and mobile devices — opening up a new frontier for application development.
As we wrap up this exploration, remember that Orca, Candle, and the whole stack that makes this application possible are part of a larger, community-driven effort to open-source the power of AI. This journey wouldn’t be possible without the countless contributors to the open-source libraries we’ve used. Their dedication to advancing the field while keeping it open and accessible deserves our collective gratitude.
Now it’s over to you. Take this application, tweak it, expand upon it, and integrate it into your projects. The ocean of AI is vast and largely uncharted; tools like Orca are your vessels. Set sail and see where these currents take you. The possibilities are as boundless as they are thrilling.
Thank you for diving into the depths of AI with me. Until our next tech adventure, happy coding!
To see the completed code, check out Orca. I would love to hear your thoughts and ideas on it. Additionally, contributors are more than welcome!
Link to Orca: https://github.com/scrippt-tech/orca
Link to Candle: https://github.com/huggingface/candle