Deploying 🤗 Hub models in Vertex AI


TL; DR Vertex AI is a Google Cloud service to build and deploy ML models faster, with pre-trained APIs within a unified AI platform. The Hugging Face Hub is a platform with over 500k models, 100k datasets, and 150k demo apps (Spaces), all open source and publicly available, in an online platform where people can easily collaborate and build ML together. This post showcases how to run online predictions with almost any model on the Hub in Vertex AI, running the model as an endpoint in an easy, scalable, and flexible way.
Along this post, we will cover how to use Google Cloud Vertex AI service and how to easily deploy models from the HuggingFace Hub for online prediction. We will start with the definition of a Custom Prediction Routine (CPR), building one for HuggingFace models powered by 🤗 transformers.pipeline, and showcasing how to registry and deploy those models in Vertex AI, to run online predictions.
Requirements
gcloud CLI needs to be installed and logged in the project that will be used. See the installation notes at https://cloud.google.com/sdk/docs/install
docker needs to be installed locally, and up and running, since it will be used to build the CPR images before pushing those to the container registry. See the installation notes at https://docs.docker.com/engine/install/
google-cloud-aiplatform Python SDK is required to programatically build the CPR image, to define the custom prediction code via a custom Predictor, to register and deploy the model to an endpoint in Vertex AI, and to run the online prediction on it.
pip install google-cloud-aiplatform --upgradegit lfs needs to be installed for pulling / cloning models from the HuggingFace Hub. See the installation notes at https://git-lfs.com/.
Custom Prediction Routine (CPR)
Custom prediction routines (CPR) lets you build custom containers with pre/post processing code easily, without dealing with the details of setting up an HTTP server or building a container from scratch. You can use preprocessing to normalize/transform the inputs or make calls to external services to get additional data, and use post processing to format the model prediction or run business logic.

More information at Google Cloud Vertex AI - Custom prediction routines.
Custom prediction code
In order to successfully run the inference over a HuggingFace model, we will need to define a custom class inheriting from the Predictor class from google-cloud-aiplatform.
To run the inference we will use the pipeline method from 🤗 transformers, which will be loaded as part of the Predictor.load method, controlled by the environment variable HF_TASK; then the pipeline will run within the predict method and will generate the output as a Python dict.
So on, the predictor.py file with the custom prediction code will be the following:
import os
import logging
import tarfile
from typing import Any, Dict

from transformers import pipeline

from google.cloud.aiplatform.prediction.predictor import Predictor
from google.cloud.aiplatform.utils import prediction_utils

logger = logging.getLogger(__name__)
logger.setLevel(logging.INFO)


class HuggingFacePredictor(Predictor):
    def __init__(self) -> None:
        pass

    def load(self, artifacts_uri: str) -> None:
        """Loads the preprocessor and model artifacts."""
        logger.info(f"Downloading artifacts from {artifacts_uri}")
        prediction_utils.download_model_artifacts(artifacts_uri)
        logger.info("Artifacts successfully downloaded!")
        os.makedirs("./model", exist_ok=True)
        with tarfile.open("model.tar.gz", "r:gz") as tar:
            tar.extractall(path="./model")
        logger.info(f"HF_TASK value is {os.getenv('HF_TASK')}")
        self._pipeline = pipeline(os.getenv("HF_TASK", ""), model="./model", device_map="auto")
        logger.info("`pipeline` successfully loaded!")
        logger.info(f"`pipeline` is using device={self._pipeline.device}")

    def predict(self, instances: Dict[str, Any]) -> Dict[str, Any]:
        return self._pipeline(**instances)
Besides the code of the custom Predictor we will need to also include the requirements in a requirements.txt file within the same directory as the predictor.py file.
torch==2.2.0
transformers==4.38.1
accelerate==0.27.0
Note: that both predictor.py and requirements.txt files need to be within the same directory, as it will be copied into the Dockerfile when building the Docker image in the follow up step.
Custom Docker image
Before building the custom Docker image, we will need to create a Docker repository in Google Artifact Registry, and configure our Docker to be authorized to push images to that repository.
So on, docker should be installed, and up and running in order to run the following commands and build the Docker image.
gcloud artifacts repositories create <REPOSITORY> --repository-format docker --location <REGION>
gcloud auth configure-docker <REGION>-docker.pkg.dev
Then, we will use LocalModel.build_cpr_model method from google-cloud-aiplatform to create and build the Docker image that will include the custom prediction code and will install the requirements in the base_image provided.
Since in this case we need to ensure that the image comes with the required CUDA libraries, we'll be using alvarobartt/torch-gpu from the Docker Hub, which is an image that comes with torch 2.2.0 installed and CUDA 12.3. Alternatively, one could also build and upload their own Docker image, or use any from authorized container registries such as Docker Hub, or NVIDIA Container Registry, among others.
import os
from google.cloud.aiplatform.prediction import LocalModel
from <PATH>.predictor import HuggingFacePredictor

local_model = LocalModel.build_cpr_model(
    "<PATH>",
    "<REGION>-docker.pkg.dev/<PROJECT_ID>/<REPOSITORY>/<IMAGE>:<TAG>",
    predictor=HuggingFacePredictor,
    requirements_path="<PATH>/requirements.txt",
    base_image="--platform=linux/amd64 alvarobartt/torch-gpu:py310-cu12.3-torch-2.2.0 AS build",
)
local_model.push_image()
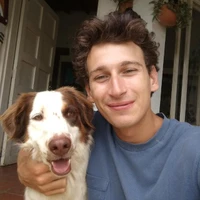
So on, the Docker image above will be pushed to REGION-docker.pkg.dev/PROJECT_ID/REPOSITORY/IMAGE:TAG.
Model upload
First we need to decide which model from the HuggingFace Hub we want to use, in this case, we will be using facebook/bart-large-mnli which is a zero-shot classification model.
In order to do so, we will pull the model from the HuggingFace Hub using git pull, which requires git lfs to be installed in advance, in order to also pull the large files from the repository.
git lfs install
git clone https://huggingface.co/facebook/bart-large-mnli
Then we compress all the required files for both the tokenizer and the model within a model.tar.gz file:
cd bart-large-mnli/
tar zcvf model.tar.gz --exclude flax_model.msgpack --exclude pytorch_model.bin --exclude rust_model.ot *
And finally we upload it to Google Cloud Storage (GCS):
gcloud config set storage/parallel_composite_upload_enabled True
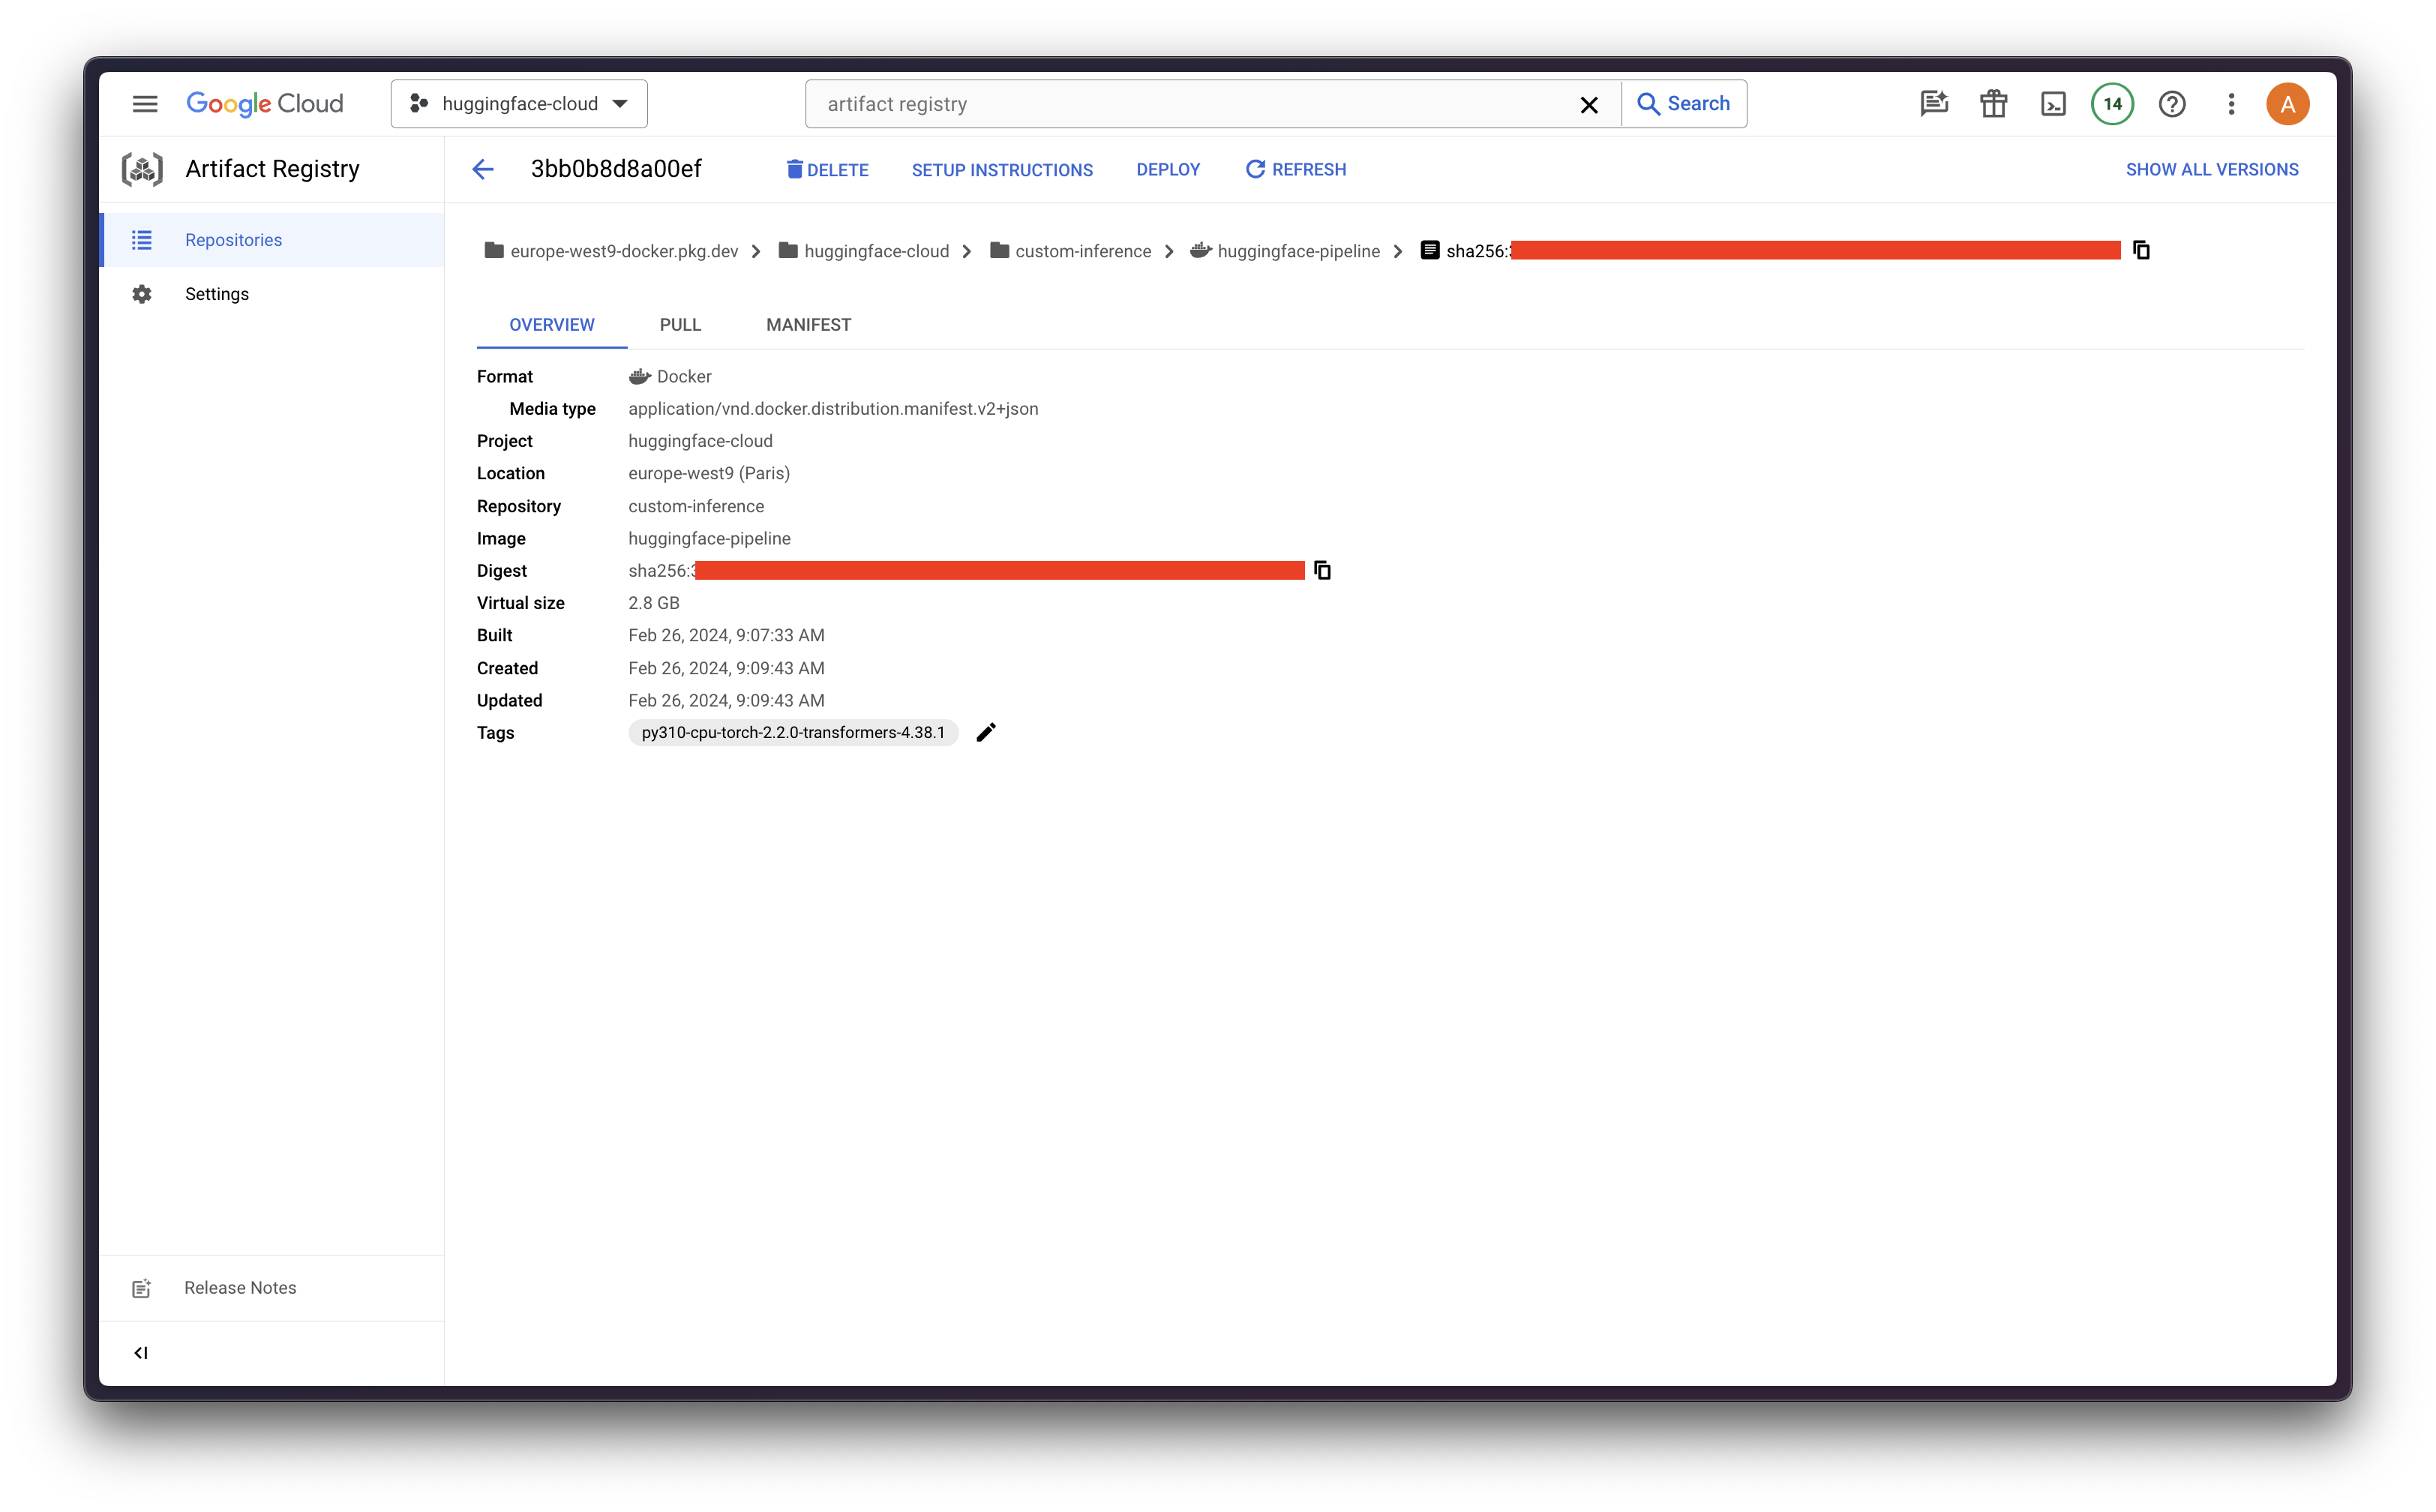
gcloud storage cp model.tar.gz gs://<BUCKET_NAME>
Model registry
Once the model is uploaded to GCS and that the CPR image has been pushed to Google's Docker Artifact Registry, we can already register the model in Vertex AI.
Make sure that you are logged in via gcloud in advance:
gcloud auth login
gcloud auth application-default login
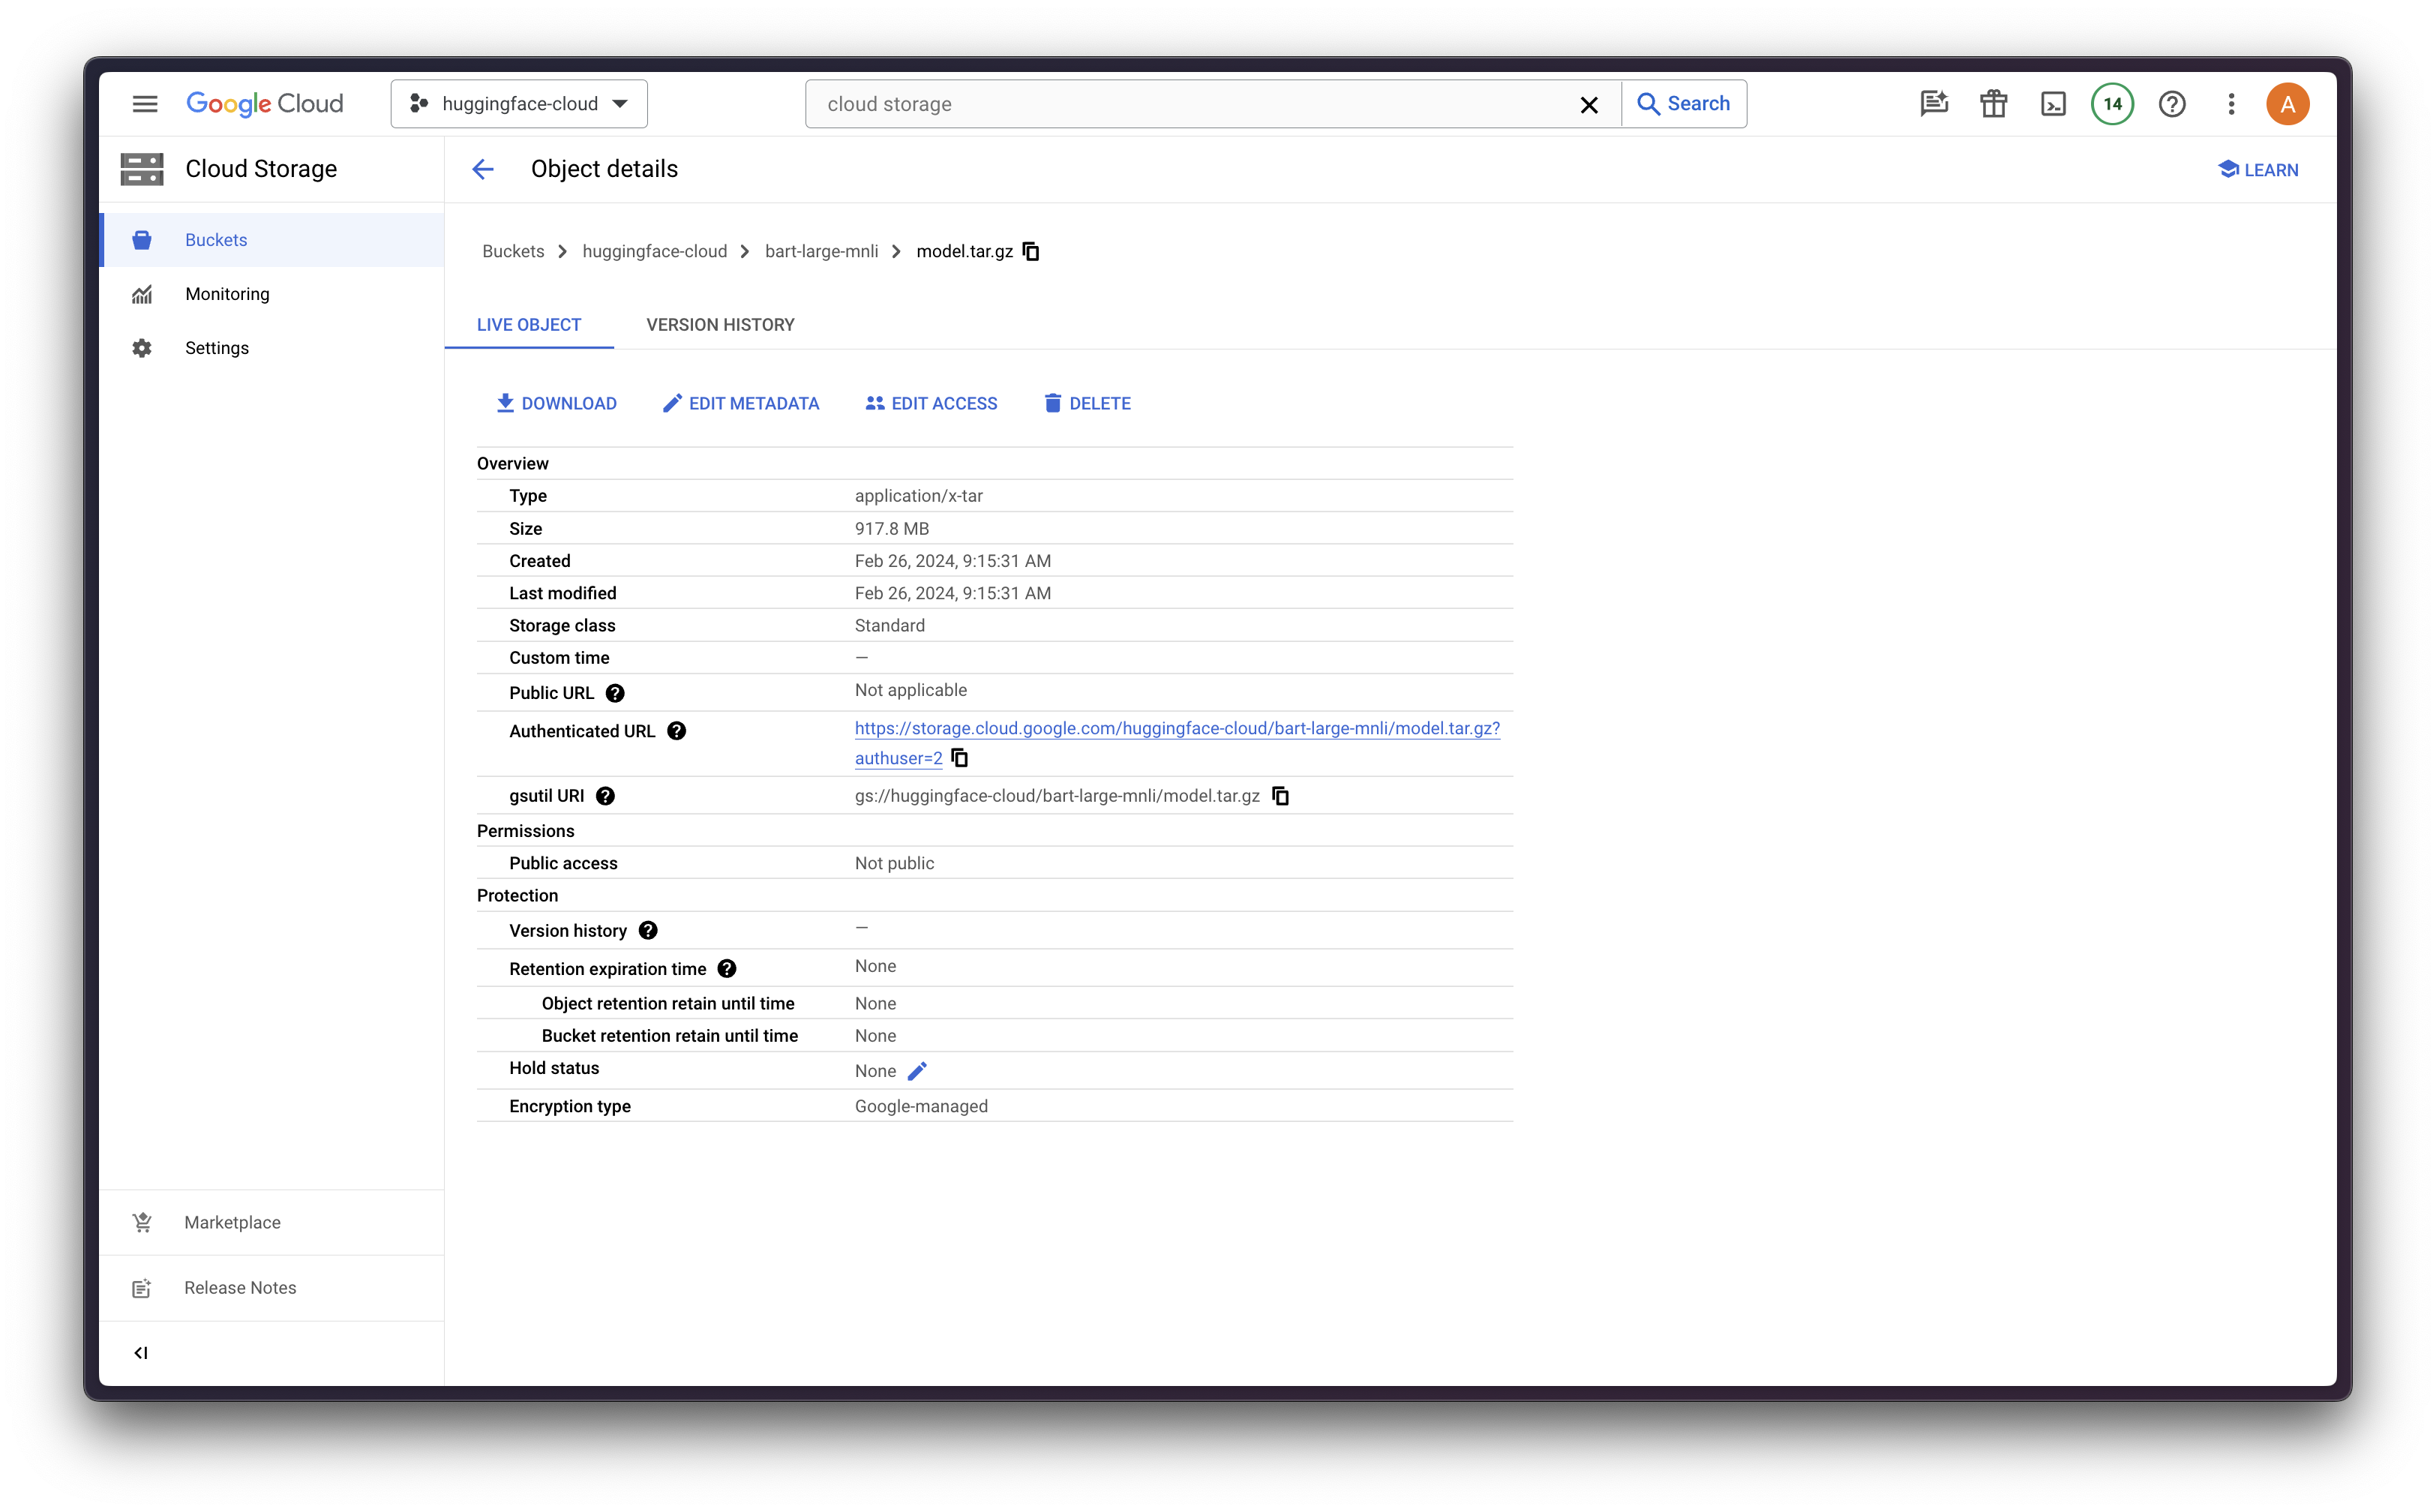
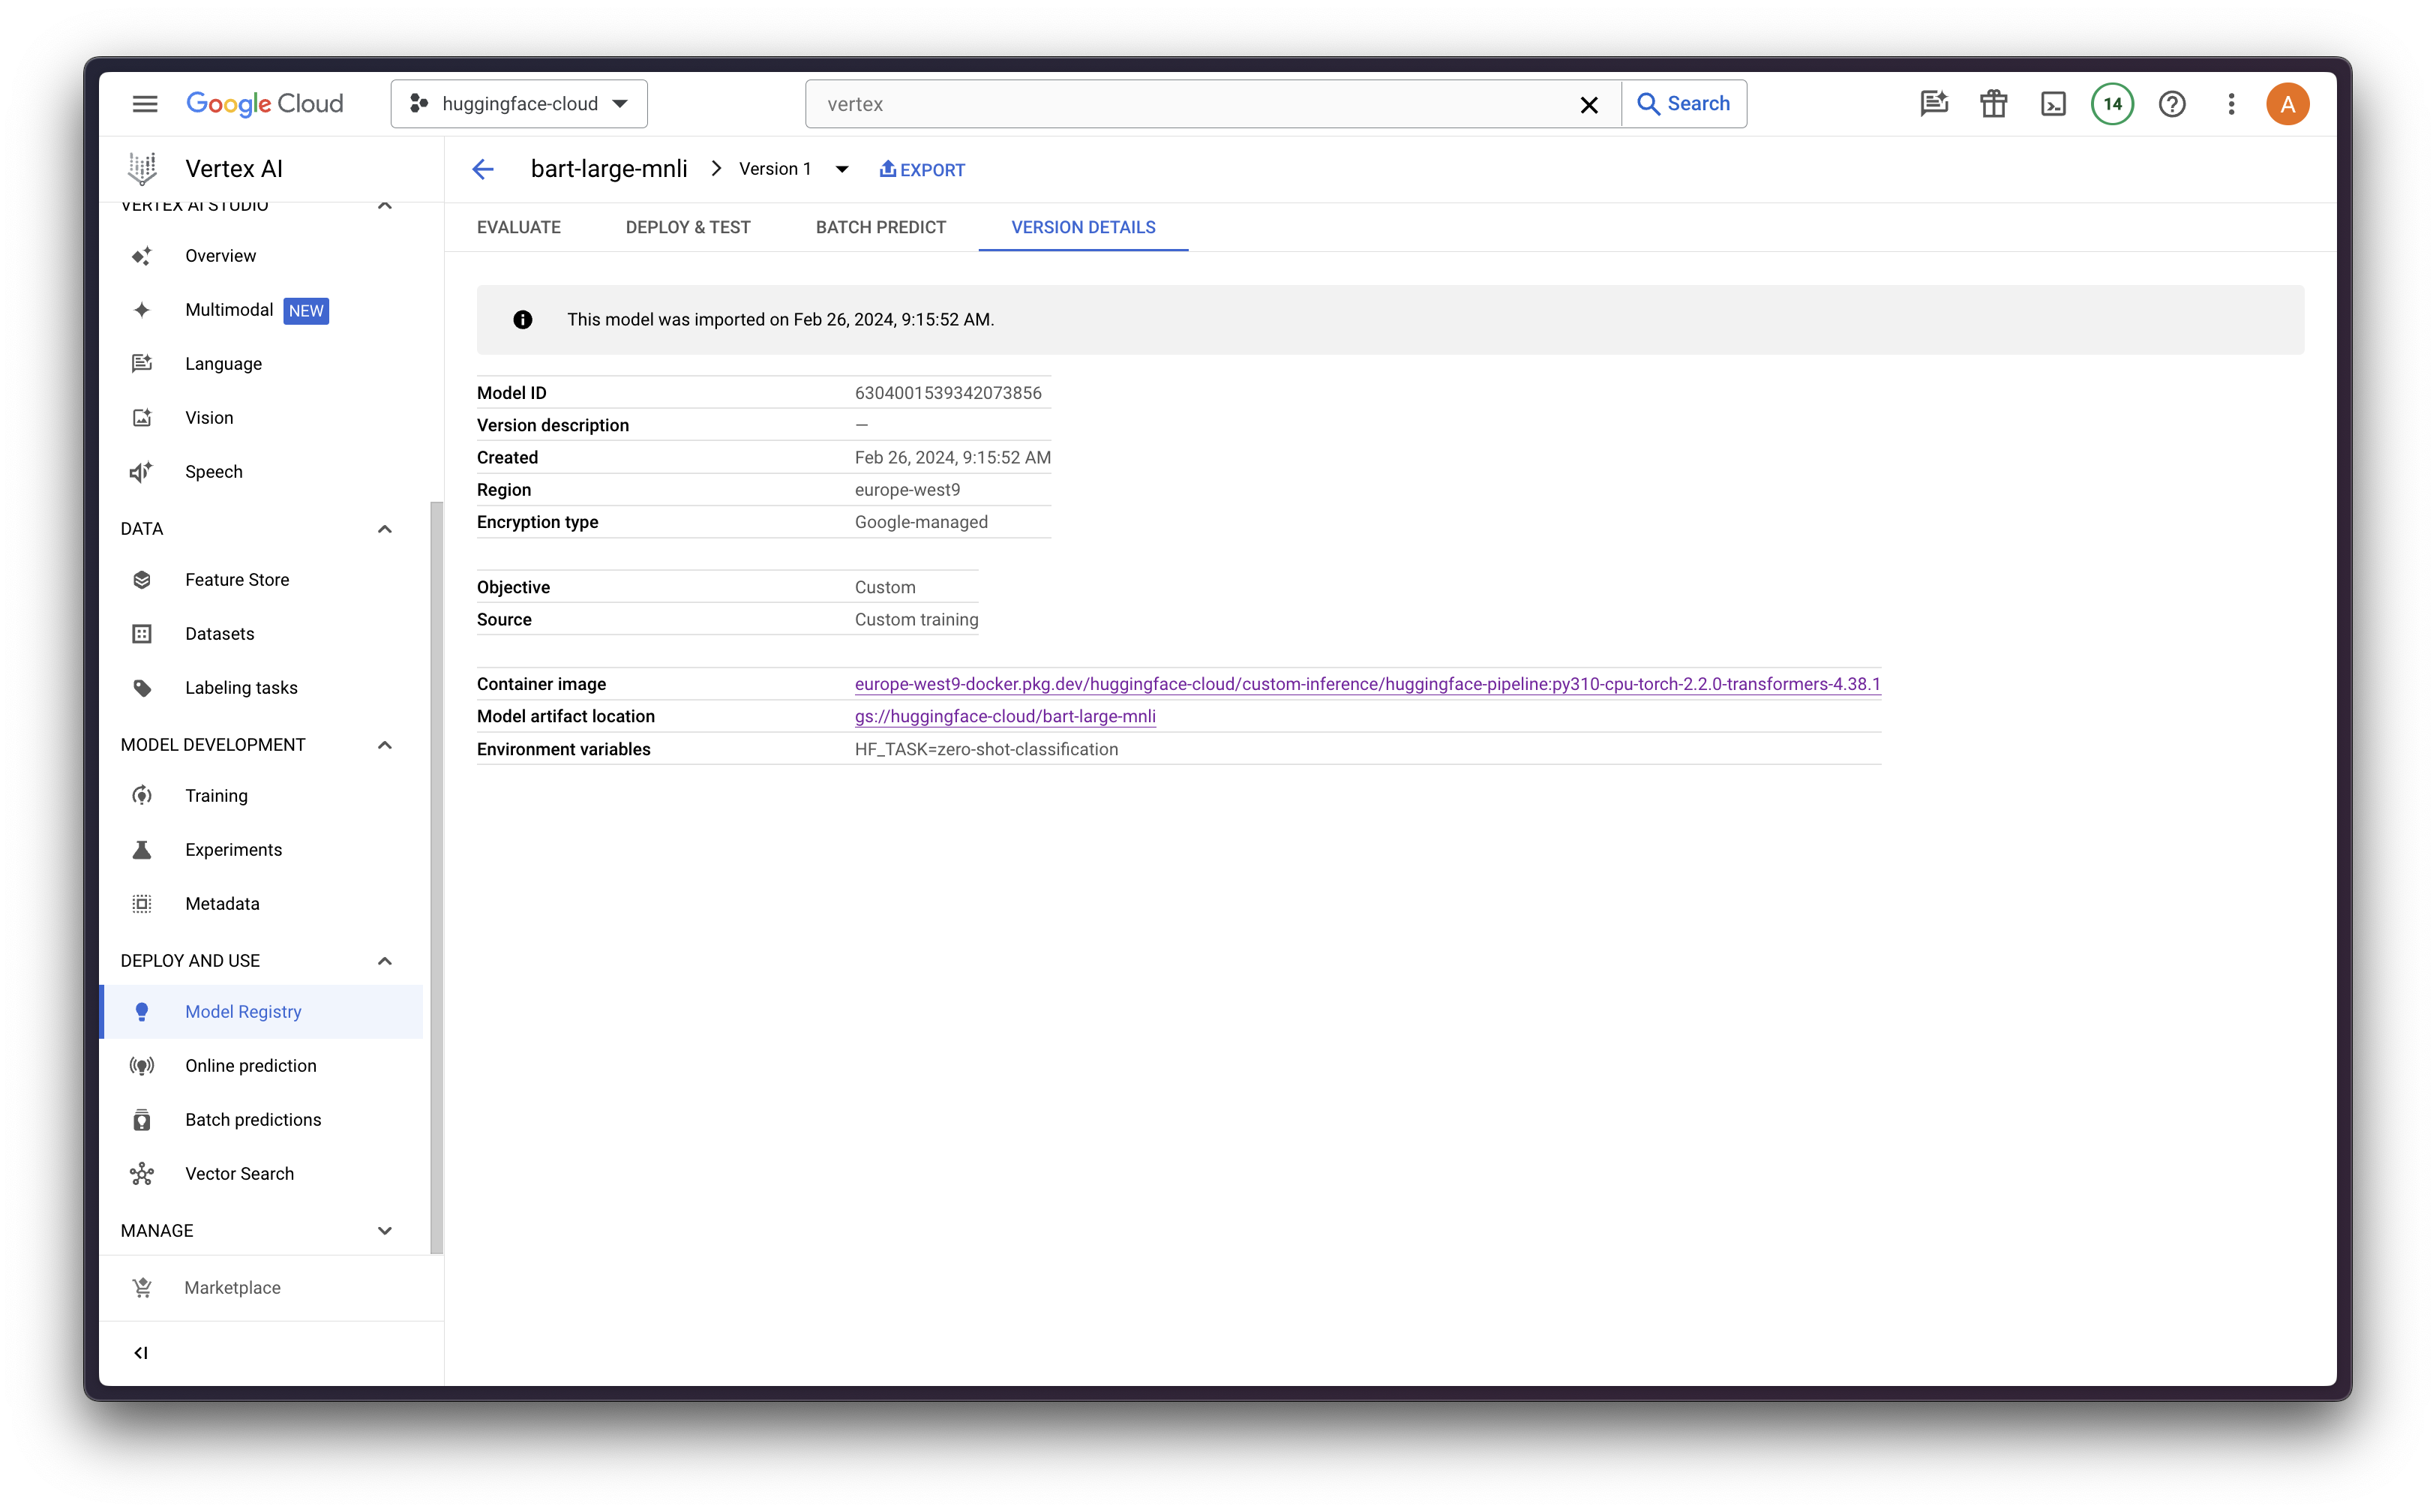
Then run the following code to register (upload) the model to Vertex AI:
from google.cloud import aiplatform

aiplatform.init(project="<PROJECT_ID>", location="<REGION>")

model = aiplatform.Model.upload(
    display_name="bart-large-mnli",
    artifact_uri="gs://<BUCKET_NAME>",
    serving_container_image_uri="<REGION>-docker.pkg.dev/<PROJECT_ID>/<REPOSITORY>/<IMAGE>:<TAG>",
    serving_container_environment_variables={
        "HF_TASK": "zero-shot-classification",
        "VERTEX_CPR_WEB_CONCURRENCY": 1,
    },
)
Model deployment
Finally, we can use the aiplatform.Model object returned by the upload method to call the deploy method, that will deploy an endpoint using FastAPI (unless the handler in the CPR was overwritten) running in a machine matching the machine_type argument.
In this case, we will use the n1-standard-4 from the N1-Series that comes with GPU acceleration with an NVIDIA Tesla T4, 4 vCPUs and 15 GB of RAM memory. More information at Google Cloud Compute Engine - GPU platforms.
endpoint = model.deploy(
    machine_type="n1-standard-4",
    accelerator_type="NVIDIA_TESLA_T4",
    accelerator_count=1,
)
Note: the deploy method will take a while ~15-20 minutes in order to deploy the model in Vertex AI as an endpoint.

Online predictions
Finally, we can proceed to run the online predictions on Vertex AI using their Python client, which will basically send the requests to the running endpoint, and we will also be able to closely monitor it via Google Cloud Logging service.
import json
from google.api import httpbody_pb2
from google.cloud import aiplatform_v1

prediction_client = aiplatform_v1.PredictionServiceClient(
    client_options={"api_endpoint": "<REGION>-aiplatform.googleapis.com"}
)

data = {
    "sequences": "Last week I upgraded my iOS version and ever since then my phone has been overheating whenever I use your app.",
    "candidate_labels": ["mobile", "website", "billing", "account access"],
}

json_data = json.dumps(data)

http_body = httpbody_pb2.HttpBody(
    data=json_data.encode("utf-8"),
    content_type="application/json",
)

request = aiplatform_v1.RawPredictRequest(
    endpoint=endpoint.resource_name,
    http_body=http_body,
)

response = prediction_client.raw_predict(request)
json.loads(response.data)
References
Find all the code and references at alvarobartt/vertex-ai-huggingface/online-prediction/04-from-hub-to-vertex-ai-gpu.ipynb.
If you're interested in more examples on how to use Vertex AI services for training, deploying, and monitoring HuggingFace models, check the repository at alvarobartt/vertex-ai-huggingface.