Hands-on: advanced Deep Reinforcement Learning. Using Sample Factory to play Doom from pixels
The colab notebook:
![]()
Unit 8 Part 2: Advanced Deep Reinforcement Learning. Using Sample Factory to play Doom from pixels
In this notebook, we will learn how to train a Deep Neural Network to collect objects in a 3D environment based on the game of Doom, a video of the resulting policy is shown below. We train this policy using Sample Factory, an asynchronous implementation of the PPO algorithm.
Please note the following points:
Sample Factory is an advanced RL framework and only functions on Linux and Mac (not Windows).
The framework performs best on a GPU machine with many CPU cores, where it can achieve speeds of 100k interactions per second. The resources available on a standard Colab notebook limit the performance of this library. So the speed in this setting does not reflect the real-world performance.
Benchmarks for Sample Factory are available in a number of settings, check out the examples if you want to find out more.
from IPython.display import HTML

HTML(
    """<video width="640" height="480" controls>
  <source src="https://huggingface.co/edbeeching/doom_health_gathering_supreme_3333/resolve/main/replay.mp4"
  type="video/mp4">Your browser does not support the video tag.</video>"""
)
To validate this hands-on for the certification process, you need to push one model:
doom_health_gathering_supremeget a result of >= 5.
To find your result, go to the leaderboard and find your model, the result = mean_reward - std of reward
If you don’t find your model, go to the bottom of the page and click on the refresh button
For more information about the certification process, check this section 👉 https://huggingface.co/deep-rl-course/en/unit0/introduction#certification-process
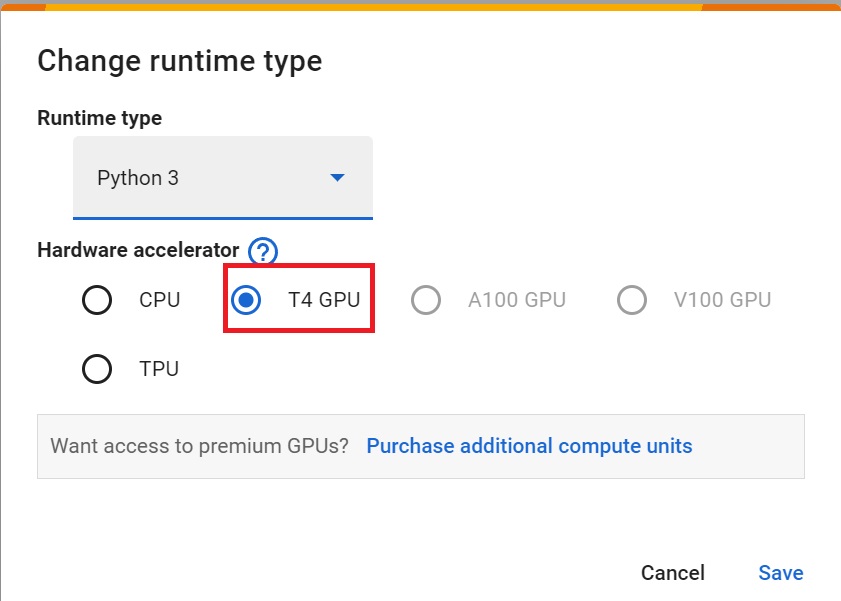
Set the GPU 💪
- To accelerate the agent’s training, we’ll use a GPU. To do that, go to
Runtime > Change Runtime type
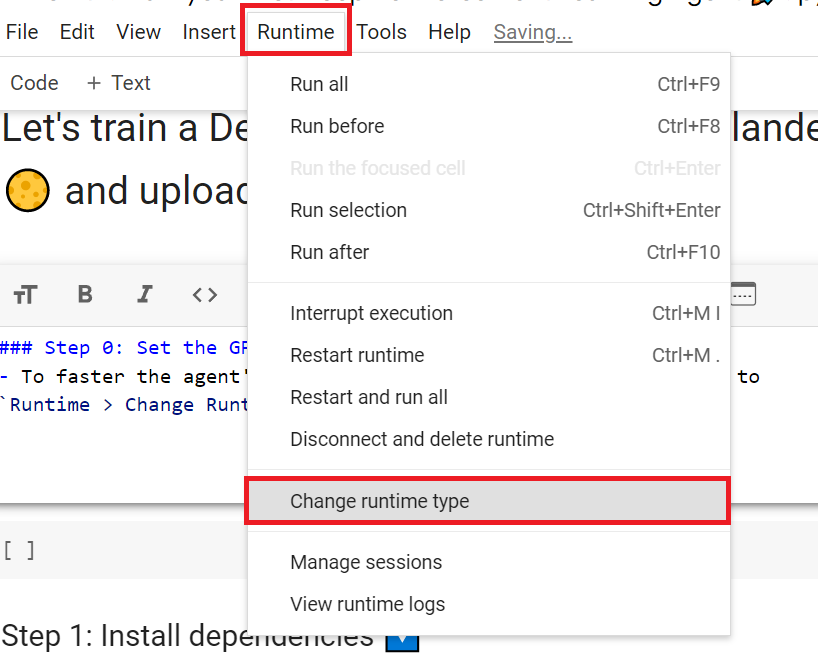
Hardware Accelerator > GPU
Before starting to train our agent, let’s study the library and environments we’re going to use.
Sample Factory
Sample Factory is one of the fastest RL libraries focused on very efficient synchronous and asynchronous implementations of policy gradients (PPO).
Sample Factory is thoroughly tested, used by many researchers and practitioners, and is actively maintained. Our implementation is known to reach SOTA performance in a variety of domains while minimizing RL experiment training time and hardware requirements.
Key features
- Highly optimized algorithm architecture for maximum learning throughput
- Synchronous and asynchronous training regimes
- Serial (single-process) mode for easy debugging
- Optimal performance in both CPU-based and GPU-accelerated environments
- Single- & multi-agent training, self-play, supports training multiple policies at once on one or many GPUs
- Population-Based Training (PBT)
- Discrete, continuous, hybrid action spaces
- Vector-based, image-based, dictionary observation spaces
- Automatically creates a model architecture by parsing action/observation space specification. Supports custom model architectures
- Designed to be imported into other projects, custom environments are first-class citizens
- Detailed WandB and Tensorboard summaries, custom metrics
- HuggingFace 🤗 integration (upload trained models and metrics to the Hub)
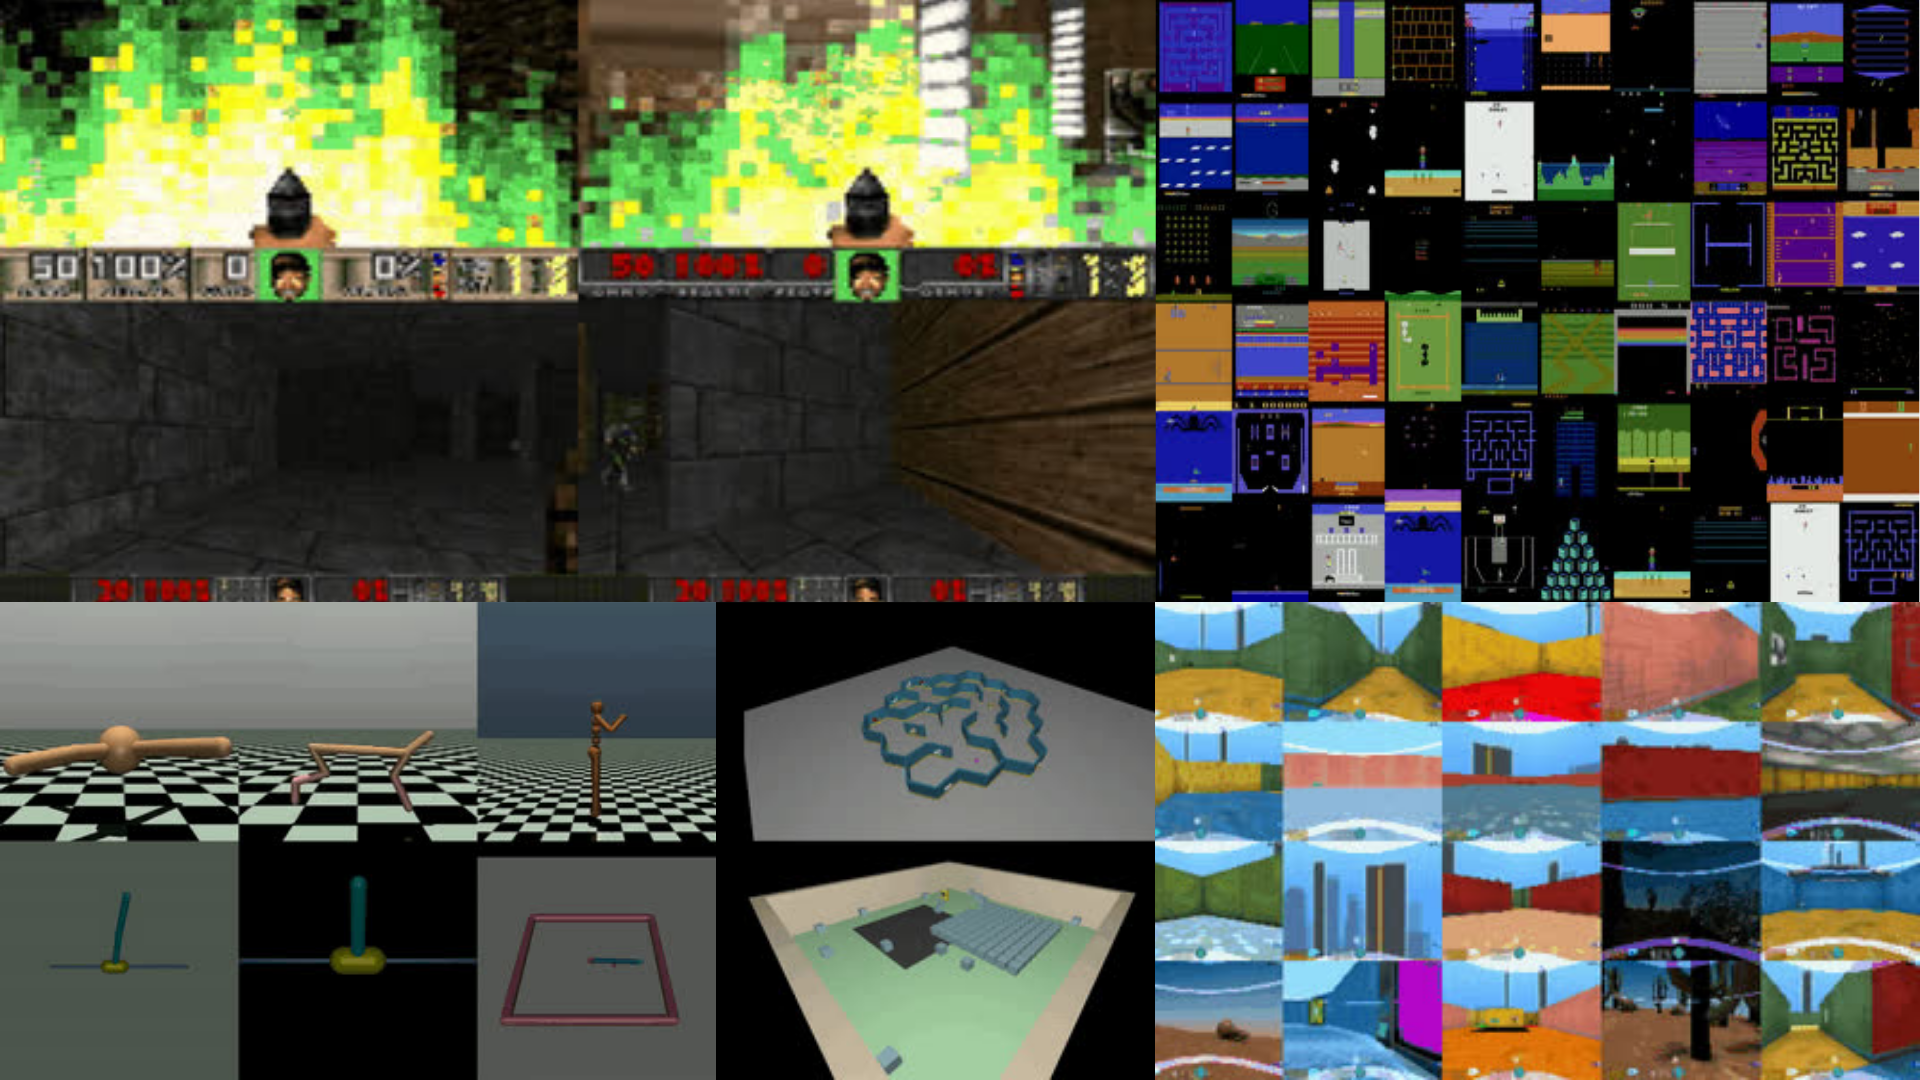
- Multiple example environment integrations with tuned parameters and trained models
All of the above policies are available on the 🤗 hub. Search for the tag sample-factory
How sample-factory works
Sample-factory is one of the most highly optimized RL implementations available to the community.
It works by spawning multiple processes that run rollout workers, inference workers and a learner worker.
The workers communicate through shared memory, which lowers the communication cost between processes.
The rollout workers interact with the environment and send observations to the inference workers.
The inferences workers query a fixed version of the policy and send actions back to the rollout worker.
After k steps the rollout works send a trajectory of experience to the learner worker, which it uses to update the agent’s policy network.
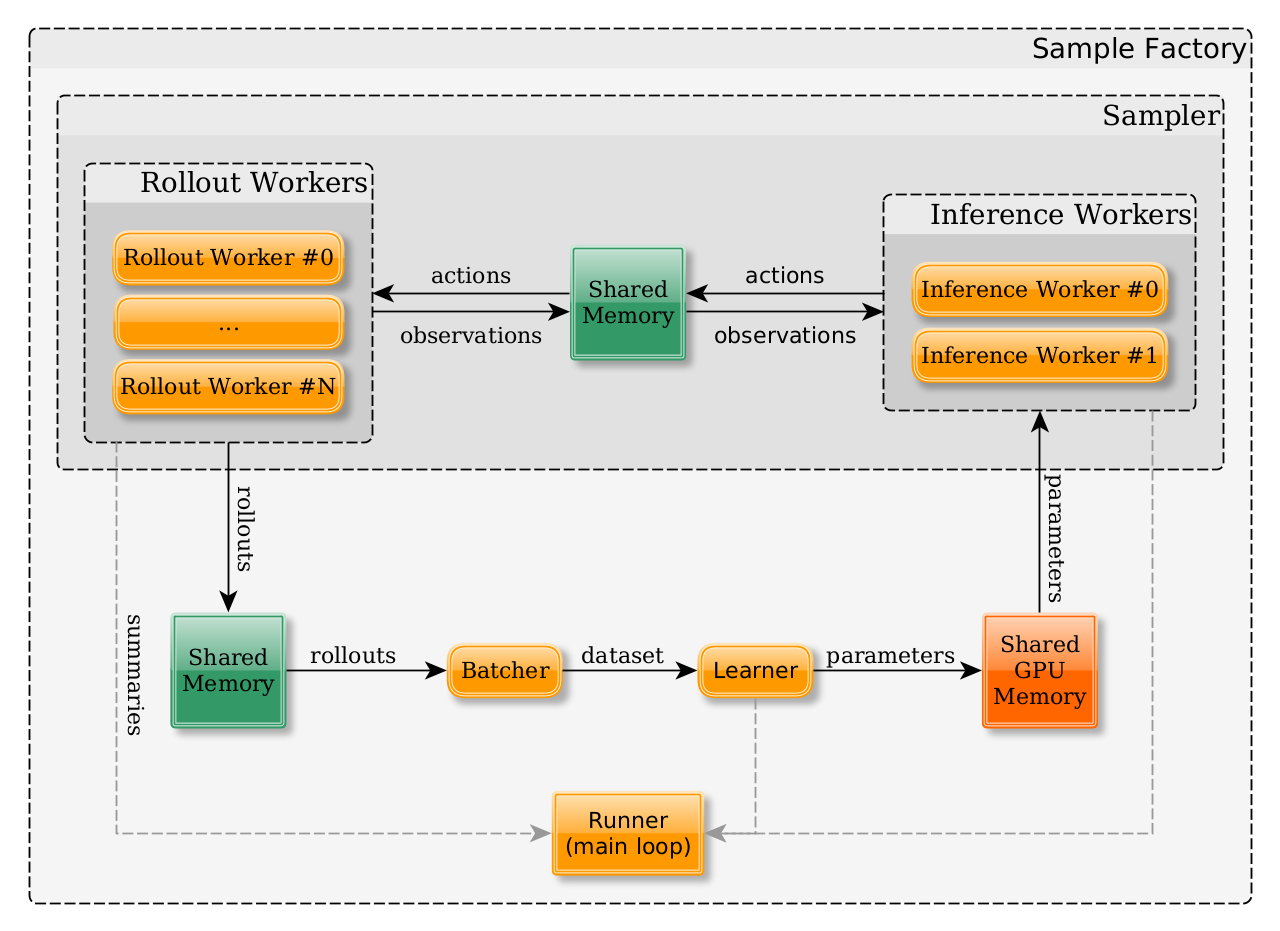
Actor Critic models in Sample-factory
Actor Critic models in Sample Factory are composed of three components:
- Encoder - Process input observations (images, vectors) and map them to a vector. This is the part of the model you will most likely want to customize.
- Core - Intergrate vectors from one or more encoders, can optionally include a single- or multi-layer LSTM/GRU in a memory-based agent.
- Decoder - Apply additional layers to the output of the model core before computing the policy and value outputs.
The library has been designed to automatically support any observation and action spaces. Users can easily add their custom models. You can find out more in the documentation.
ViZDoom
ViZDoom is an open-source python interface for the Doom Engine.
The library was created in 2016 by Marek Wydmuch, Michal Kempka at the Institute of Computing Science, Poznan University of Technology, Poland.
The library enables the training of agents directly from the screen pixels in a number of scenarios, including team deathmatch, shown in the video below. Because the ViZDoom environment is based on a game the was created in the 90s, it can be run on modern hardware at accelerated speeds, allowing us to learn complex AI behaviors fairly quickly.
The library includes feature such as:
- Multi-platform (Linux, macOS, Windows),
- API for Python and C++,
- OpenAI Gym environment wrappers
- Easy-to-create custom scenarios (visual editors, scripting language, and examples available),
- Async and sync single-player and multiplayer modes,
- Lightweight (few MBs) and fast (up to 7000 fps in sync mode, single-threaded),
- Customizable resolution and rendering parameters,
- Access to the depth buffer (3D vision),
- Automatic labeling of game objects visible in the frame,
- Access to the audio buffer
- Access to the list of actors/objects and map geometry,
- Off-screen rendering and episode recording,
- Time scaling in async mode.
We first need to install some dependencies that are required for the ViZDoom environment
Now that our Colab runtime is set up, we can start by installing the dependencies required to run ViZDoom on linux.
If you are following on your machine on Mac, you will want to follow the installation instructions on the github page.
# Install ViZDoom deps from
# https://github.com/mwydmuch/ViZDoom/blob/master/doc/Building.md#-linux

apt-get install build-essential zlib1g-dev libsdl2-dev libjpeg-dev \
nasm tar libbz2-dev libgtk2.0-dev cmake git libfluidsynth-dev libgme-dev \
libopenal-dev timidity libwildmidi-dev unzip ffmpeg

# Boost libraries
apt-get install libboost-all-dev

# Lua binding dependencies
apt-get install liblua5.1-dev
Then we can install Sample Factory and ViZDoom
- This can take 7min
pip install sample-factory
pip install vizdoom
Setting up the Doom Environment in sample-factory
import functools

from sample_factory.algo.utils.context import global_model_factory
from sample_factory.cfg.arguments import parse_full_cfg, parse_sf_args
from sample_factory.envs.env_utils import register_env
from sample_factory.train import run_rl

from sf_examples.vizdoom.doom.doom_model import make_vizdoom_encoder
from sf_examples.vizdoom.doom.doom_params import add_doom_env_args, doom_override_defaults
from sf_examples.vizdoom.doom.doom_utils import DOOM_ENVS, make_doom_env_from_spec


# Registers all the ViZDoom environments
def register_vizdoom_envs():
    for env_spec in DOOM_ENVS:
        make_env_func = functools.partial(make_doom_env_from_spec, env_spec)
        register_env(env_spec.name, make_env_func)


# Sample Factory allows the registration of a custom Neural Network architecture
# See https://github.com/alex-petrenko/sample-factory/blob/master/sf_examples/vizdoom/doom/doom_model.py for more details
def register_vizdoom_models():
    global_model_factory().register_encoder_factory(make_vizdoom_encoder)


def register_vizdoom_components():
    register_vizdoom_envs()
    register_vizdoom_models()


# parse the command line args and create a config
def parse_vizdoom_cfg(argv=None, evaluation=False):
    parser, _ = parse_sf_args(argv=argv, evaluation=evaluation)
    # parameters specific to Doom envs
    add_doom_env_args(parser)
    # override Doom default values for algo parameters
    doom_override_defaults(parser)
    # second parsing pass yields the final configuration
    final_cfg = parse_full_cfg(parser, argv)
    return final_cfg
Now that the setup if complete, we can train the agent. We have chosen here to learn a ViZDoom task called Health Gathering Supreme.
The scenario: Health Gathering Supreme
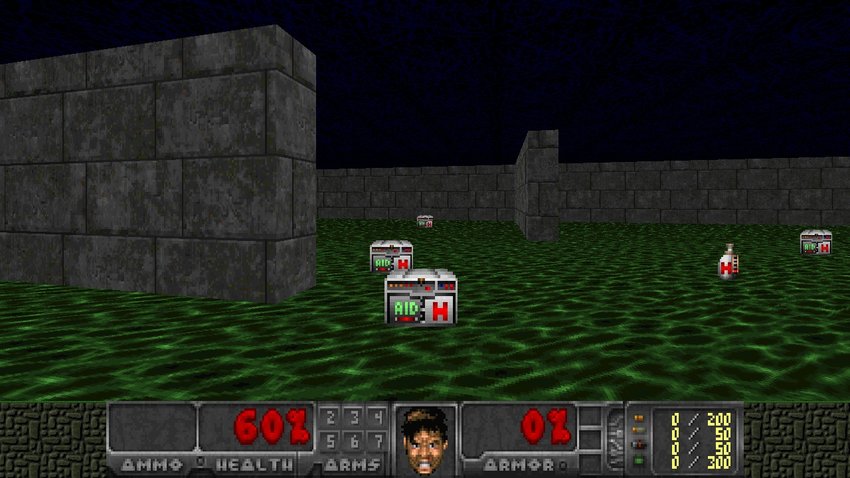
The objective of this scenario is to teach the agent how to survive without knowing what makes it survive. The Agent know only that life is precious and death is bad so it must learn what prolongs its existence and that its health is connected with survival.
The map is a rectangle containing walls and with a green, acidic floor which hurts the player periodically. Initially there are some medkits spread uniformly over the map. A new medkit falls from the skies every now and then. Medkits heal some portions of player’s health - to survive, the agent needs to pick them up. The episode finishes after the player’s death or on timeout.
Further configuration:
- Living_reward = 1
- 3 available buttons: turn left, turn right, move forward
- 1 available game variable: HEALTH
- death penalty = 100
You can find out more about the scenarios available in ViZDoom here.
There are also a number of more complex scenarios that have been create for ViZDoom, such as the ones detailed on this github page.
Training the agent
- We’re going to train the agent for 4000000 steps. It will take approximately 20min
## Start the training, this should take around 15 minutes
register_vizdoom_components()

# The scenario we train on today is health gathering
# other scenarios include "doom_basic", "doom_two_colors_easy", "doom_dm", "doom_dwango5", "doom_my_way_home", "doom_deadly_corridor", "doom_defend_the_center", "doom_defend_the_line"
env = "doom_health_gathering_supreme"
cfg = parse_vizdoom_cfg(
    argv=[f"--env={env}", "--num_workers=8", "--num_envs_per_worker=4", "--train_for_env_steps=4000000"]
)

status = run_rl(cfg)
Let’s take a look at the performance of the trained policy and output a video of the agent.
from sample_factory.enjoy import enjoy

cfg = parse_vizdoom_cfg(
    argv=[f"--env={env}", "--num_workers=1", "--save_video", "--no_render", "--max_num_episodes=10"], evaluation=True
)
status = enjoy(cfg)
Now lets visualize the performance of the agent
from base64 import b64encode
from IPython.display import HTML

mp4 = open("/content/train_dir/default_experiment/replay.mp4", "rb").read()
data_url = "data:video/mp4;base64," + b64encode(mp4).decode()
HTML(
    """
<video width=640 controls>
      <source src="%s" type="video/mp4">
</video>
"""
    % data_url
)
The agent has learned something, but its performance could be better. We would clearly need to train for longer. But let’s upload this model to the Hub.
Now lets upload your checkpoint and video to the Hugging Face Hub
To be able to share your model with the community there are three more steps to follow:
1️⃣ (If it’s not already done) create an account to HF ➡ https://huggingface.co/join
2️⃣ Sign in and get your authentication token from the Hugging Face website.
- Create a new token (https://huggingface.co/settings/tokens) with write role
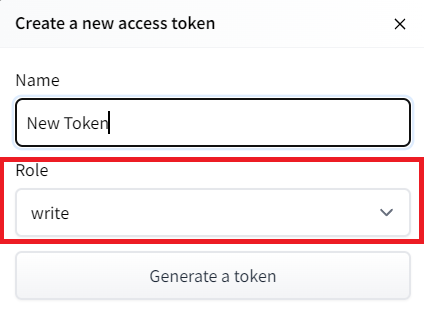
- Copy the token
- Run the cell below and paste the token
If you don’t want to use Google Colab or a Jupyter Notebook, you need to use this command instead: huggingface-cli login
from huggingface_hub import notebook_login
notebook_login()
!git config --global credential.helper storefrom sample_factory.enjoy import enjoy
hf_username = "ThomasSimonini" # insert your HuggingFace username here
cfg = parse_vizdoom_cfg(
argv=[
f"--env={env}",
"--num_workers=1",
"--save_video",
"--no_render",
"--max_num_episodes=10",
"--max_num_frames=100000",
"--push_to_hub",
f"--hf_repository={hf_username}/rl_course_vizdoom_health_gathering_supreme",
],
evaluation=True,
)
status = enjoy(cfg)Let’s load another model
This agent’s performance was good, but we can do better! Let’s download and visualize an agent trained for 10B timesteps from the hub.
#download the agent from the hub
python -m sample_factory.huggingface.load_from_hub -r edbeeching/doom_health_gathering_supreme_2222 -d ./train_dirls train_dir/doom_health_gathering_supreme_2222env = "doom_health_gathering_supreme"
cfg = parse_vizdoom_cfg(
argv=[
f"--env={env}",
"--num_workers=1",
"--save_video",
"--no_render",
"--max_num_episodes=10",
"--experiment=doom_health_gathering_supreme_2222",
"--train_dir=train_dir",
],
evaluation=True,
)
status = enjoy(cfg)mp4 = open("/content/train_dir/doom_health_gathering_supreme_2222/replay.mp4", "rb").read()
data_url = "data:video/mp4;base64," + b64encode(mp4).decode()
HTML(
"""
<video width=640 controls>
<source src="%s" type="video/mp4">
</video>
"""
% data_url
)Some additional challenges 🏆: Doom Deathmatch
Training an agent to play a Doom deathmatch takes many hours on a more beefy machine than is available in Colab.
Fortunately, we have have already trained an agent in this scenario and it is available in the 🤗 Hub! Let’s download the model and visualize the agent’s performance.
# Download the agent from the hub
python -m sample_factory.huggingface.load_from_hub -r edbeeching/doom_deathmatch_bots_2222 -d ./train_dir
Given the agent plays for a long time the video generation can take 10 minutes.
from sample_factory.enjoy import enjoy

register_vizdoom_components()
env = "doom_deathmatch_bots"
cfg = parse_vizdoom_cfg(
    argv=[
        f"--env={env}",
        "--num_workers=1",
        "--save_video",
        "--no_render",
        "--max_num_episodes=1",
        "--experiment=doom_deathmatch_bots_2222",
        "--train_dir=train_dir",
    ],
    evaluation=True,
)
status = enjoy(cfg)
mp4 = open("/content/train_dir/doom_deathmatch_bots_2222/replay.mp4", "rb").read()
data_url = "data:video/mp4;base64," + b64encode(mp4).decode()
HTML(
    """
<video width=640 controls>
      <source src="%s" type="video/mp4">
</video>
"""
    % data_url
)
You can try to train your agent in this environment using the code above, but not on colab. Good luck 🤞
If you prefer an easier scenario, why not try training in another ViZDoom scenario such as doom_deadly_corridor or doom_defend_the_center.
This concludes the last unit. But we are not finished yet! 🤗 The following bonus section include some of the most interesting, advanced, and cutting edge work in Deep Reinforcement Learning.