Hands-on
Now that you’ve studied the theory behind Deep Q-Learning, you’re ready to train your Deep Q-Learning agent to play Atari Games. We’ll start with Space Invaders, but you’ll be able to use any Atari game you want 🔥
We’re using the RL-Baselines-3 Zoo integration, a vanilla version of Deep Q-Learning with no extensions such as Double-DQN, Dueling-DQN, or Prioritized Experience Replay.
Also, if you want to learn to implement Deep Q-Learning by yourself after this hands-on, you definitely should look at the CleanRL implementation: https://github.com/vwxyzjn/cleanrl/blob/master/cleanrl/dqn_atari.py
To validate this hands-on for the certification process, you need to push your trained model to the Hub and get a result of >= 200.
To find your result, go to the leaderboard and find your model, the result = mean_reward - std of reward
If you don’t find your model, go to the bottom of the page and click on the refresh button.
For more information about the certification process, check this section 👉 https://huggingface.co/deep-rl-course/en/unit0/introduction#certification-process
And you can check your progress here 👉 https://huggingface.co/spaces/ThomasSimonini/Check-my-progress-Deep-RL-Course
To start the hands-on click on Open In Colab button 👇 :
![]()
Unit 3: Deep Q-Learning with Atari Games 👾 using RL Baselines3 Zoo

In this hands-on, you’ll train a Deep Q-Learning agent playing Space Invaders using RL Baselines3 Zoo, a training framework based on Stable-Baselines3 that provides scripts for training, evaluating agents, tuning hyperparameters, plotting results and recording videos.
We’re using the RL-Baselines-3 Zoo integration, a vanilla version of Deep Q-Learning with no extensions such as Double-DQN, Dueling-DQN, and Prioritized Experience Replay.
🎮 Environments:
You can see the difference between Space Invaders versions here 👉 https://gymnasium.farama.org/environments/atari/space_invaders/#variants
📚 RL-Library:
Objectives of this hands-on 🏆
At the end of the hands-on, you will:
- Be able to understand deeper how RL Baselines3 Zoo works.
- Be able to push your trained agent and the code to the Hub with a nice video replay and an evaluation score 🔥.
Prerequisites 🏗️
Before diving into the hands-on, you need to:
🔲 📚 Study Deep Q-Learning by reading Unit 3 🤗
We’re constantly trying to improve our tutorials, so if you find some issues in this hands-on, please open an issue on the Github Repo.
Let’s train a Deep Q-Learning agent playing Atari’ Space Invaders 👾 and upload it to the Hub.
We strongly recommend students to use Google Colab for the hands-on exercises instead of running them on their personal computers.
By using Google Colab, you can focus on learning and experimenting without worrying about the technical aspects of setting up your environments.
To validate this hands-on for the certification process, you need to push your trained model to the Hub and get a result of >= 200.
To find your result, go to the leaderboard and find your model, the result = mean_reward - std of reward
For more information about the certification process, check this section 👉 https://huggingface.co/deep-rl-course/en/unit0/introduction#certification-process
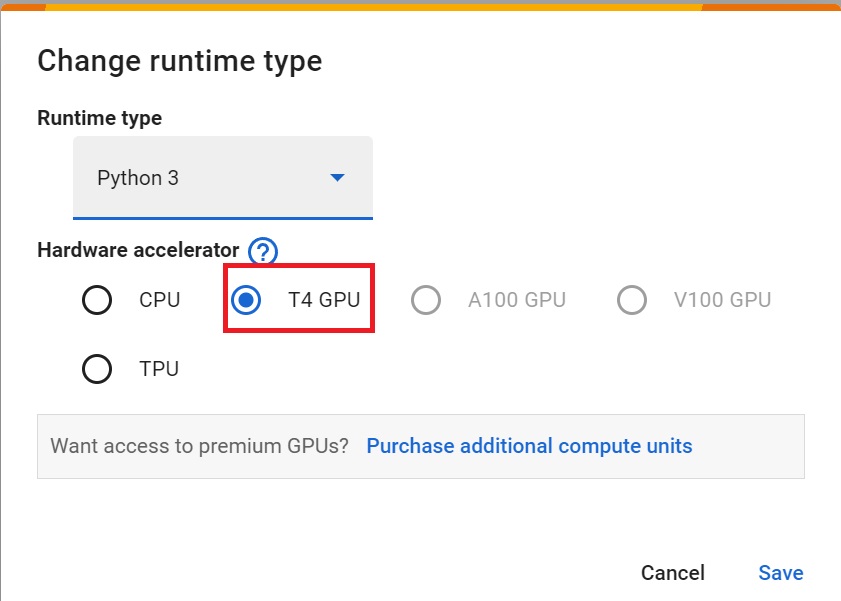
Set the GPU 💪
- To accelerate the agent’s training, we’ll use a GPU. To do that, go to
Runtime > Change Runtime type
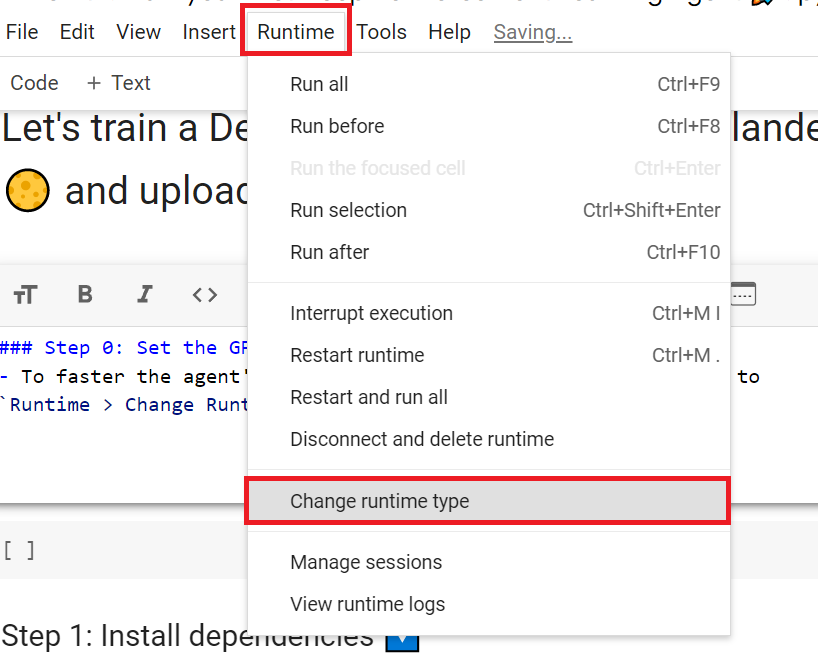
Hardware Accelerator > GPU
Install RL-Baselines3 Zoo and its dependencies 📚
If you see ERROR: pip's dependency resolver does not currently take into account all the packages that are installed. this is normal and it’s not a critical error there’s a conflict of version. But the packages we need are installed.
# For now we install this update of RL-Baselines3 Zoo
pip install git+https://github.com/DLR-RM/rl-baselines3-zoo@update/hf
IF AND ONLY IF THE VERSION ABOVE DOES NOT EXIST ANYMORE. UNCOMMENT AND INSTALL THE ONE BELOW
#pip install rl_zoo3==2.0.0a9apt-get install swig cmake ffmpeg
To be able to use Atari games in Gymnasium we need to install atari package. And accept-rom-license to download the rom files (games files).
!pip install gymnasium[atari]
!pip install gymnasium[accept-rom-license]
Create a virtual display 🔽
During the hands-on, we’ll need to generate a replay video. To do so, if you train it on a headless machine, we need to have a virtual screen to be able to render the environment (and thus record the frames).
Hence the following cell will install the librairies and create and run a virtual screen 🖥
apt install python-opengl
apt install ffmpeg
apt install xvfb
pip3 install pyvirtualdisplay
# Virtual display
from pyvirtualdisplay import Display

virtual_display = Display(visible=0, size=(1400, 900))
virtual_display.start()
Train our Deep Q-Learning Agent to Play Space Invaders 👾
To train an agent with RL-Baselines3-Zoo, we just need to do two things:
- Create a hyperparameter config file that will contain our training hyperparameters called
dqn.yml.
This is a template example:
SpaceInvadersNoFrameskip-v4:
  env_wrapper:
    - stable_baselines3.common.atari_wrappers.AtariWrapper
  frame_stack: 4
  policy: 'CnnPolicy'
  n_timesteps: !!float 1e7
  buffer_size: 100000
  learning_rate: !!float 1e-4
  batch_size: 32
  learning_starts: 100000
  target_update_interval: 1000
  train_freq: 4
  gradient_steps: 1
  exploration_fraction: 0.1
  exploration_final_eps: 0.01
  # If True, you need to deactivate handle_timeout_termination
  # in the replay_buffer_kwargs
  optimize_memory_usage: False
Here we see that:
- We use the
Atari Wrapperthat preprocess the input (Frame reduction ,grayscale, stack 4 frames) - We use
CnnPolicy, since we use Convolutional layers to process the frames - We train it for 10 million
n_timesteps - Memory (Experience Replay) size is 100000, aka the amount of experience steps you saved to train again your agent with.
💡 My advice is to reduce the training timesteps to 1M, which will take about 90 minutes on a P100. !nvidia-smi will tell you what GPU you’re using. At 10 million steps, this will take about 9 hours. I recommend running this on your local computer (or somewhere else). Just click on: File>Download.
In terms of hyperparameters optimization, my advice is to focus on these 3 hyperparameters:
learning_ratebuffer_size (Experience Memory size)batch_size
As a good practice, you need to check the documentation to understand what each hyperparameters does: https://stable-baselines3.readthedocs.io/en/master/modules/dqn.html#parameters
- We start the training and save the models on
logsfolder 📁
- Define the algorithm after
--algo, where we save the model after-fand where the hyperparameter config is after-c.
python -m rl_zoo3.train --algo ________ --env SpaceInvadersNoFrameskip-v4 -f _________ -c _________Solution
python -m rl_zoo3.train --algo dqn --env SpaceInvadersNoFrameskip-v4 -f logs/ -c dqn.ymlLet’s evaluate our agent 👀
- RL-Baselines3-Zoo provides
enjoy.py, a python script to evaluate our agent. In most RL libraries, we call the evaluation scriptenjoy.py. - Let’s evaluate it for 5000 timesteps 🔥
python -m rl_zoo3.enjoy --algo dqn --env SpaceInvadersNoFrameskip-v4 --no-render --n-timesteps _________ --folder logs/Solution
python -m rl_zoo3.enjoy --algo dqn --env SpaceInvadersNoFrameskip-v4 --no-render --n-timesteps 5000 --folder logs/Publish our trained model on the Hub 🚀
Now that we saw we got good results after the training, we can publish our trained model on the hub 🤗 with one line of code.
By using rl_zoo3.push_to_hub you evaluate, record a replay, generate a model card of your agent and push it to the hub.
This way:
- You can showcase our work 🔥
- You can visualize your agent playing 👀
- You can share with the community an agent that others can use 💾
- You can access a leaderboard 🏆 to see how well your agent is performing compared to your classmates 👉 https://huggingface.co/spaces/huggingface-projects/Deep-Reinforcement-Learning-Leaderboard
To be able to share your model with the community there are three more steps to follow:
1️⃣ (If it’s not already done) create an account to HF ➡ https://huggingface.co/join
2️⃣ Sign in and then, you need to store your authentication token from the Hugging Face website.
- Create a new token (https://huggingface.co/settings/tokens) with write role
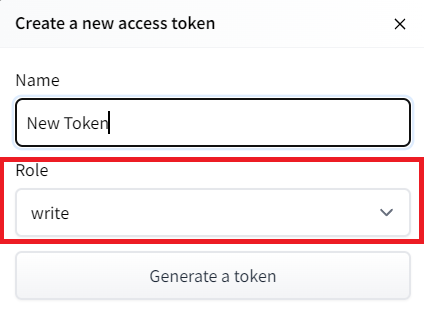
- Copy the token
- Run the cell below and past the token
from huggingface_hub import notebook_login # To log to our Hugging Face account to be able to upload models to the Hub.
notebook_login()
!git config --global credential.helper store
If you don’t want to use a Google Colab or a Jupyter Notebook, you need to use this command instead: huggingface-cli login
3️⃣ We’re now ready to push our trained agent to the 🤗 Hub 🔥
Let’s run push_to_hub.py file to upload our trained agent to the Hub.
--repo-name : The name of the repo
-orga: Your Hugging Face username
-f: Where the trained model folder is (in our case logs)
python -m rl_zoo3.push_to_hub --algo dqn --env SpaceInvadersNoFrameskip-v4 --repo-name _____________________ -orga _____________________ -f logs/Solution
python -m rl_zoo3.push_to_hub --algo dqn --env SpaceInvadersNoFrameskip-v4 --repo-name dqn-SpaceInvadersNoFrameskip-v4 -orga ThomasSimonini -f logs/###.
Congrats 🥳 you’ve just trained and uploaded your first Deep Q-Learning agent using RL-Baselines-3 Zoo. The script above should have displayed a link to a model repository such as https://huggingface.co/ThomasSimonini/dqn-SpaceInvadersNoFrameskip-v4. When you go to this link, you can:
- See a video preview of your agent at the right.
- Click “Files and versions” to see all the files in the repository.
- Click “Use in stable-baselines3” to get a code snippet that shows how to load the model.
- A model card (
README.mdfile) which gives a description of the model and the hyperparameters you used.
Under the hood, the Hub uses git-based repositories (don’t worry if you don’t know what git is), which means you can update the model with new versions as you experiment and improve your agent.
Compare the results of your agents with your classmates using the leaderboard 🏆
Load a powerful trained model 🔥
- The Stable-Baselines3 team uploaded more than 150 trained Deep Reinforcement Learning agents on the Hub.
You can find them here: 👉 https://huggingface.co/sb3
Some examples:
- Asteroids: https://huggingface.co/sb3/dqn-AsteroidsNoFrameskip-v4
- Beam Rider: https://huggingface.co/sb3/dqn-BeamRiderNoFrameskip-v4
- Breakout: https://huggingface.co/sb3/dqn-BreakoutNoFrameskip-v4
- Road Runner: https://huggingface.co/sb3/dqn-RoadRunnerNoFrameskip-v4
Let’s load an agent playing Beam Rider: https://huggingface.co/sb3/dqn-BeamRiderNoFrameskip-v4
- We download the model using
rl_zoo3.load_from_hub, and place it in a new folder that we can callrl_trained
# Download model and save it into the logs/ folder
python -m rl_zoo3.load_from_hub --algo dqn --env BeamRiderNoFrameskip-v4 -orga sb3 -f rl_trained/- Let’s evaluate if for 5000 timesteps
python -m rl_zoo3.enjoy --algo dqn --env BeamRiderNoFrameskip-v4 -n 5000 -f rl_trained/ --no-renderWhy not trying to train your own Deep Q-Learning Agent playing BeamRiderNoFrameskip-v4? 🏆.
If you want to try, check https://huggingface.co/sb3/dqn-BeamRiderNoFrameskip-v4#hyperparameters in the model card, you have the hyperparameters of the trained agent.
But finding hyperparameters can be a daunting task. Fortunately, we’ll see in the next Unit, how we can use Optuna for optimizing the Hyperparameters 🔥.
Some additional challenges 🏆
The best way to learn is to try things by your own!
In the Leaderboard you will find your agents. Can you get to the top?
Here’s a list of environments you can try to train your agent with:
- BeamRiderNoFrameskip-v4
- BreakoutNoFrameskip-v4
- EnduroNoFrameskip-v4
- PongNoFrameskip-v4
Also, if you want to learn to implement Deep Q-Learning by yourself, you definitely should look at CleanRL implementation: https://github.com/vwxyzjn/cleanrl/blob/master/cleanrl/dqn_atari.py
Congrats on finishing this chapter!
If you’re still feel confused with all these elements…it’s totally normal! This was the same for me and for all people who studied RL.
Take time to really grasp the material before continuing and try the additional challenges. It’s important to master these elements and having a solid foundations.
In the next unit, we’re going to learn about Optuna. One of the most critical task in Deep Reinforcement Learning is to find a good set of training hyperparameters. And Optuna is a library that helps you to automate the search.
This is a course built with you 👷🏿♀️
Finally, we want to improve and update the course iteratively with your feedback. If you have some, please fill this form 👉 https://forms.gle/3HgA7bEHwAmmLfwh9
We’re constantly trying to improve our tutorials, so if you find some issues in this notebook, please open an issue on the Github Repo.
See you on Bonus unit 2! 🔥