TRL documentation
Training customization
Training customization
At trl we provide the possibility to give enough modularity to users to be able to efficiently customize the training loop for their needs. Below are some examples on how you can apply and test different techniques.
Run on multiple GPUs / nodes
We leverage accelerate to enable users to run their training on multiple GPUs or nodes. You should first create your accelerate config by simply running:
accelerate config
Then make sure you have selected multi-gpu / multi-node setup. You can then run your training by simply running:
accelerate launch your_script.py
Refer to the examples page for more details
Use different optimizers
By default, the PPOTrainer creates a torch.optim.Adam optimizer. You can create and define a different optimizer and pass it to PPOTrainer:
import torch
from transformers import GPT2Tokenizer
from trl import PPOTrainer, PPOConfig, AutoModelForCausalLMWithValueHead

# 1. load a pretrained model
model = AutoModelForCausalLMWithValueHead.from_pretrained('gpt2')
model_ref = AutoModelForCausalLMWithValueHead.from_pretrained('gpt2')
tokenizer = GPT2Tokenizer.from_pretrained('gpt2')

# 2. define config
ppo_config = {'batch_size': 1, 'learning_rate':1e-5}
config = PPOConfig(**ppo_config)


# 2. Create optimizer
optimizer = torch.optim.SGD(model.parameters(), lr=config.learning_rate)


# 3. initialize trainer
ppo_trainer = PPOTrainer(config, model, model_ref, tokenizer, optimizer=optimizer)
For memory efficient fine-tuning, you can also pass Adam8bit optimizer from bitsandbytes:
import torch
import bitsandbytes as bnb

from transformers import GPT2Tokenizer
from trl import PPOTrainer, PPOConfig, AutoModelForCausalLMWithValueHead

# 1. load a pretrained model
model = AutoModelForCausalLMWithValueHead.from_pretrained('gpt2')
model_ref = AutoModelForCausalLMWithValueHead.from_pretrained('gpt2')
tokenizer = GPT2Tokenizer.from_pretrained('gpt2')

# 2. define config
ppo_config = {'batch_size': 1, 'learning_rate':1e-5}
config = PPOConfig(**ppo_config)


# 2. Create optimizer
optimizer = bnb.optim.Adam8bit(model.parameters(), lr=config.learning_rate)

# 3. initialize trainer
ppo_trainer = PPOTrainer(config, model, model_ref, tokenizer, optimizer=optimizer)
Use LION optimizer
You can use the new LION optimizer from Google as well, first take the source code of the optimizer definition here, and copy it so that you can import the optimizer. Make sure to initialize the optimizer by considering the trainable parameters only for a more memory efficient training:
optimizer = Lion(filter(lambda p: p.requires_grad, self.model.parameters()), lr=self.config.learning_rate)

...
ppo_trainer = PPOTrainer(config, model, model_ref, tokenizer, optimizer=optimizer)
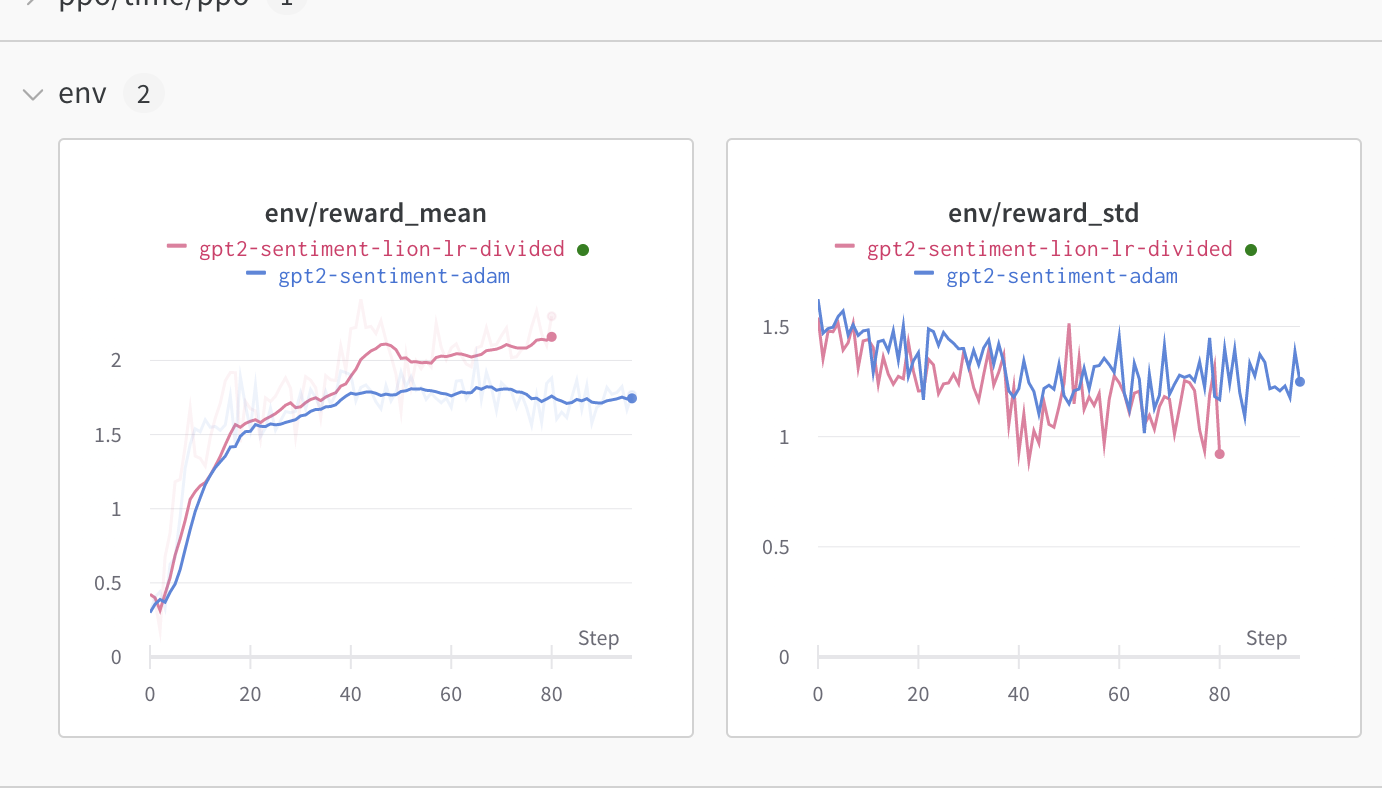
We advise you to use the learning rate that you would use for Adam divided by 3 as pointed out here. We observed an improvement when using this optimizer compared to classic Adam (check the full logs here):

Add a learning rate scheduler
You can also play with your training by adding learning rate schedulers!
import torch
from transformers import GPT2Tokenizer
from trl import PPOTrainer, PPOConfig, AutoModelForCausalLMWithValueHead

# 1. load a pretrained model
model = AutoModelForCausalLMWithValueHead.from_pretrained('gpt2')
model_ref = AutoModelForCausalLMWithValueHead.from_pretrained('gpt2')
tokenizer = GPT2Tokenizer.from_pretrained('gpt2')

# 2. define config
ppo_config = {'batch_size': 1, 'learning_rate':1e-5}
config = PPOConfig(**ppo_config)


# 2. Create optimizer
optimizer = torch.optim.SGD(model.parameters(), lr=config.learning_rate)
lr_scheduler = torch.optim.lr_scheduler.ExponentialLR(optimizer, gamma=0.9)

# 3. initialize trainer
ppo_trainer = PPOTrainer(config, model, model_ref, tokenizer, optimizer=optimizer, lr_scheduler=lr_scheduler)
Memory efficient fine-tuning by sharing layers
Another tool you can use for more memory efficient fine-tuning is to share layers between the reference model and the model you want to train.
import torch
from transformers import AutoTokenizer
from trl import PPOTrainer, PPOConfig, AutoModelForCausalLMWithValueHead, create_reference_model

# 1. load a pretrained model
model = AutoModelForCausalLMWithValueHead.from_pretrained('bigscience/bloom-560m')
model_ref = create_reference_model(model, num_shared_layers=6)
tokenizer = AutoTokenizer.from_pretrained('bigscience/bloom-560m')

# 2. initialize trainer
ppo_config = {'batch_size': 1}
config = PPOConfig(**ppo_config)
ppo_trainer = PPOTrainer(config, model, model_ref, tokenizer)
Pass 8-bit reference models
Since trl supports all key word arguments when loading a model from transformers using from_pretrained, you can also leverage load_in_8bit from transformers for more memory efficient fine-tuning.
Read more about 8-bit model loading in transformers here.
# 0. imports
# pip install bitsandbytes
import torch
from transformers import AutoTokenizer
from trl import PPOTrainer, PPOConfig, AutoModelForCausalLMWithValueHead

# 1. load a pretrained model
model = AutoModelForCausalLMWithValueHead.from_pretrained('bigscience/bloom-560m')
model_ref = AutoModelForCausalLMWithValueHead.from_pretrained('bigscience/bloom-560m', device_map="auto", load_in_8bit=True)
tokenizer = AutoTokenizer.from_pretrained('bigscience/bloom-560m')

# 2. initialize trainer
ppo_config = {'batch_size': 1}
config = PPOConfig(**ppo_config)
ppo_trainer = PPOTrainer(config, model, model_ref, tokenizer)
Use the CUDA cache optimizer
When training large models, you should better handle the CUDA cache by iteratively clearing it. Do do so, simply pass optimize_cuda_cache=True to PPOConfig:
config = PPOConfig(..., optimize_cuda_cache=True)Use correctly DeepSpeed stage 3:
A small tweak need to be added to your training script to use DeepSpeed stage 3 correctly. You need to properly initialize your reward model on the correct device using the zero3_init_context_manager context manager. Here is an example adapted for the gpt2-sentiment script:
ds_plugin = ppo_trainer.accelerator.state.deepspeed_plugin
if ds_plugin is not None and ds_plugin.is_zero3_init_enabled():
    with ds_plugin.zero3_init_context_manager(enable=False):
        sentiment_pipe = pipeline("sentiment-analysis", model="lvwerra/distilbert-imdb", device=device)
else:
    sentiment_pipe = pipeline("sentiment-analysis", model="lvwerra/distilbert-imdb", device=device)
Use torch distributed
torch.distributed package provides PyTorch natives method to distribute a network over several machines (mostly useful if there are several GPU nodes). It copies the model on each GPU, runs the forward and backward on each and then applies the mean of gradient of all GPUs for each one. If running torch 1.XX, you can call `torch.distributed.launch`, likepython -m torch.distributed.launch --nproc_per_node=1 reward_summarization.py --bf16
For torch 2.+ torch.distributed.launch is deprecated and one needs to run:
torchrun --nproc_per_node=1 reward_summarization.py --bf16
or
python -m torch.distributed.run --nproc_per_node=1 reward_summarization.py --bf16
Note that using python -m torch.distributed.launch --nproc_per_node=1 reward_summarization.py --bf16 with torch 2.0 ends in
ValueError: Some specified arguments are not used by the HfArgumentParser: ['--local-rank=0']
ERROR:torch.distributed.elastic.multiprocessing.api:failed (exitcode: 1) local_rank: 0 (pid: 194889) of binary: /home/ubuntu/miniconda3/envs/trl/bin/python