Transformers documentation
제로샷(zero-shot) 이미지 분류
제로샷(zero-shot) 이미지 분류
제로샷(zero-shot) 이미지 분류는 특정 카테고리의 예시가 포함된 데이터를 학습되지 않은 모델을 사용해 이미지 분류를 수행하는 작업입니다.
일반적으로 이미지 분류를 위해서는 레이블이 달린 특정 이미지 데이터로 모델 학습이 필요하며, 이 모델은 특정 이미지의 특징을 레이블에 “매핑”하는 방법을 학습합니다. 새로운 레이블이 있는 분류 작업에 이러한 모델을 사용해야 하는 경우에는, 모델을 “재보정”하기 위해 미세 조정이 필요합니다.
이와 대조적으로, 제로샷 또는 개방형 어휘(open vocabulary) 이미지 분류 모델은 일반적으로 대규모 이미지 데이터와 해당 설명에 대해 학습된 멀티모달(multimodal) 모델입니다. 이러한 모델은 제로샷 이미지 분류를 포함한 많은 다운스트림 작업에 사용할 수 있는 정렬된(aligned) 비전 언어 표현을 학습합니다.
이는 이미지 분류에 대한 보다 유연한 접근 방식으로, 추가 학습 데이터 없이 새로운 레이블이나 학습하지 못한 카테고리에 대해 모델을 일반화할 수 있습니다. 또한, 사용자가 대상 개체에 대한 자유 형식의 텍스트 설명으로 이미지를 검색할 수 있습니다.
이번 가이드에서 배울 내용은 다음과 같습니다:
- 제로샷 이미지 분류 파이프라인 만들기
- 직접 제로샷 이미지 분류 모델 추론 실행하기
시작하기 전에 필요한 라이브러리가 모두 설치되어 있는지 확인하세요:
pip install -q transformers
제로샷(zero-shot) 이미지 분류 파이프라인
pipeline()을 활용하면 가장 간단하게 제로샷 이미지 분류를 지원하는 모델로 추론해볼 수 있습니다.
Hugging Face Hub에 업로드된 체크포인트에서 파이프라인을 인스턴스화합니다.
>>> from transformers import pipeline

>>> checkpoint = "openai/clip-vit-large-patch14"
>>> detector = pipeline(model=checkpoint, task="zero-shot-image-classification")
다음으로, 분류하고 싶은 이미지를 선택하세요.
>>> from PIL import Image
>>> import requests

>>> url = "https://unsplash.com/photos/g8oS8-82DxI/download?ixid=MnwxMjA3fDB8MXx0b3BpY3x8SnBnNktpZGwtSGt8fHx8fDJ8fDE2NzgxMDYwODc&force=true&w=640"
>>> image = Image.open(requests.get(url, stream=True).raw)

>>> image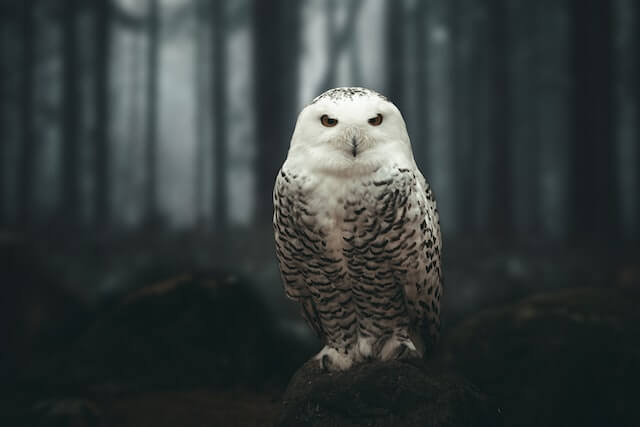
이미지와 해당 이미지의 후보 레이블인 candidate_labels를 파이프라인으로 전달합니다.
여기서는 이미지를 직접 전달하지만, 컴퓨터에 저장된 이미지의 경로나 url로 전달할 수도 있습니다.
candidate_labels는 이 예시처럼 간단한 단어일 수도 있고 좀 더 설명적인 단어일 수도 있습니다.
>>> predictions = classifier(image, candidate_labels=["fox", "bear", "seagull", "owl"])
>>> predictions
[{'score': 0.9996670484542847, 'label': 'owl'},
 {'score': 0.000199399160919711, 'label': 'seagull'},
 {'score': 7.392891711788252e-05, 'label': 'fox'},
 {'score': 5.96074532950297e-05, 'label': 'bear'}]
직접 제로샷(zero-shot) 이미지 분류하기
이제 제로샷 이미지 분류 파이프라인 사용 방법을 살펴보았으니, 실행하는 방법을 살펴보겠습니다.
Hugging Face Hub에 업로드된 체크포인트에서 모델과 프로세서를 가져오는 것으로 시작합니다. 여기서는 이전과 동일한 체크포인트를 사용하겠습니다:
>>> from transformers import AutoProcessor, AutoModelForZeroShotImageClassification

>>> model = AutoModelForZeroShotImageClassification.from_pretrained(checkpoint)
>>> processor = AutoProcessor.from_pretrained(checkpoint)
다른 이미지를 사용해 보겠습니다.
>>> from PIL import Image
>>> import requests

>>> url = "https://unsplash.com/photos/xBRQfR2bqNI/download?ixid=MnwxMjA3fDB8MXxhbGx8fHx8fHx8fHwxNjc4Mzg4ODEx&force=true&w=640"
>>> image = Image.open(requests.get(url, stream=True).raw)

>>> image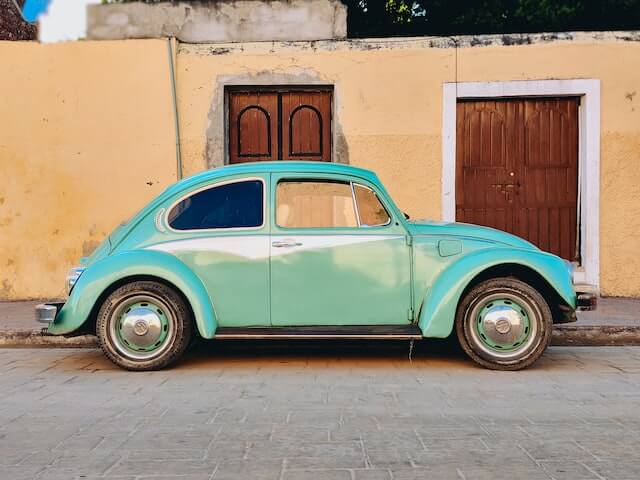
프로세서를 사용해 모델의 입력을 준비합니다. 프로세서는 모델의 입력으로 사용하기 위해 이미지 크기를 변환하고 정규화하는 이미지 프로세서와 텍스트 입력을 처리하는 토크나이저로 구성됩니다.
>>> candidate_labels = ["tree", "car", "bike", "cat"]
>>> inputs = processor(images=image, text=candidate_labels, return_tensors="pt", padding=True)
모델에 입력을 전달하고, 결과를 후처리합니다:
>>> import torch

>>> with torch.no_grad():
...     outputs = model(**inputs)

>>> logits = outputs.logits_per_image[0]
>>> probs = logits.softmax(dim=-1).numpy()
>>> scores = probs.tolist()

>>> result = [
...     {"score": score, "label": candidate_label}
...     for score, candidate_label in sorted(zip(probs, candidate_labels), key=lambda x: -x[0])
... ]

>>> result
[{'score': 0.998572, 'label': 'car'},
 {'score': 0.0010570387, 'label': 'bike'},
 {'score': 0.0003393686, 'label': 'tree'},
 {'score': 3.1572064e-05, 'label': 'cat'}]