Transformers documentation
추론을 위한 Pipeline
추론을 위한 Pipeline
pipeline()을 사용하면 언어, 컴퓨터 비전, 오디오 및 멀티모달 태스크에 대한 추론을 위해 Hub의 어떤 모델이든 쉽게 사용할 수 있습니다. 특정 분야에 대한 경험이 없거나, 모델을 이루는 코드가 익숙하지 않은 경우에도 pipeline()을 사용해서 추론할 수 있어요! 이 튜토리얼에서는 다음을 배워보겠습니다.
- 추론을 위해
pipeline()을 사용하는 방법 - 특정 토크나이저 또는 모델을 사용하는 방법
- 언어, 컴퓨터 비전, 오디오 및 멀티모달 태스크에서
pipeline()을 사용하는 방법
지원하는 모든 태스크와 쓸 수 있는 매개변수를 담은 목록은
pipeline()설명서를 참고해주세요.
Pipeline 사용하기
각 태스크마다 고유의 pipeline()이 있지만, 개별 파이프라인을 담고있는 추상화된 pipeline()를 사용하는 것이 일반적으로 더 간단합니다. pipeline()은 태스크에 알맞게 추론이 가능한 기본 모델과 전처리 클래스를 자동으로 로드합니다.
- 먼저
pipeline()을 생성하고 태스크를 지정하세요.
>>> from transformers import pipeline

>>> generator = pipeline(task="automatic-speech-recognition")- 그리고
pipeline()에 입력을 넣어주세요.
>>> generator("https://huggingface.co/datasets/Narsil/asr_dummy/resolve/main/mlk.flac")
{'text': 'I HAVE A DREAM BUT ONE DAY THIS NATION WILL RISE UP LIVE UP THE TRUE MEANING OF ITS TREES'}
기대했던 결과가 아닌가요? Hub에서 가장 많이 다운로드된 자동 음성 인식 모델로 더 나은 결과를 얻을 수 있는지 확인해보세요. 다음은 openai/whisper-large로 시도해보겠습니다.
>>> generator = pipeline(model="openai/whisper-large")
>>> generator("https://huggingface.co/datasets/Narsil/asr_dummy/resolve/main/mlk.flac")
{'text': ' I have a dream that one day this nation will rise up and live out the true meaning of its creed.'}
훨씬 더 나아졌군요! Hub의 모델들은 여러 다양한 언어와 전문분야를 아우르기 때문에 꼭 자신의 언어나 분야에 특화된 모델을 찾아보시기 바랍니다. 브라우저를 벗어날 필요없이 Hub에서 직접 모델의 출력을 확인하고 다른 모델과 비교해서 자신의 상황에 더 적합한지, 애매한 입력을 더 잘 처리하는지도 확인할 수 있습니다. 만약 상황에 알맞는 모델을 없다면 언제나 직접 훈련시킬 수 있습니다!
입력이 여러 개 있는 경우, 리스트 형태로 전달할 수 있습니다.
generator(
    [
        "https://huggingface.co/datasets/Narsil/asr_dummy/resolve/main/mlk.flac",
        "https://huggingface.co/datasets/Narsil/asr_dummy/resolve/main/1.flac",
    ]
)
전체 데이터세트을 순회하거나 웹서버에 올려두어 추론에 사용하고 싶다면, 각 상세 페이지를 참조하세요.
매개변수
pipeline()은 많은 매개변수를 지원합니다. 특정 태스크용인 것도 있고, 범용인 것도 있습니다.
일반적으로 원하는 위치에 어디든 매개변수를 넣을 수 있습니다.
generator(model="openai/whisper-large", my_parameter=1)
out = generate(...)  # This will use `my_parameter=1`.
out = generate(..., my_parameter=2)  # This will override and use `my_parameter=2`.
out = generate(...)  # This will go back to using `my_parameter=1`.
중요한 3가지 매개변수를 살펴보겠습니다.
기기(device)
device=n처럼 기기를 지정하면 파이프라인이 자동으로 해당 기기에 모델을 배치합니다.
파이토치에서나 텐서플로우에서도 모두 작동합니다.
generator(model="openai/whisper-large", device=0)모델이 GPU 하나에 돌아가기 버겁다면, device_map="auto"를 지정해서 🤗 Accelerate가 모델 가중치를 어떻게 로드하고 저장할지 자동으로 결정하도록 할 수 있습니다.
#!pip install accelerate
generator(model="openai/whisper-large", device_map="auto")
배치 사이즈
기본적으로 파이프라인은 여기에 나온 이유로 추론을 일괄 처리하지 않습니다. 간단히 설명하자면 일괄 처리가 반드시 더 빠르지 않고 오히려 더 느려질 수도 있기 때문입니다.
하지만 자신의 상황에 적합하다면, 이렇게 사용하세요.
generator(model="openai/whisper-large", device=0, batch_size=2)
audio_filenames = [f"audio_{i}.flac" for i in range(10)]
texts = generator(audio_filenames)
파이프라인 위 제공된 10개의 오디오 파일을 추가로 처리하는 코드 없이 (일괄 처리에 보다 효과적인 GPU 위) 모델에 2개씩 전달합니다. 출력은 일괄 처리하지 않았을 때와 똑같아야 합니다. 파이프라인에서 속도를 더 낼 수도 있는 방법 중 하나일 뿐입니다.
파이프라인은 일괄 처리의 복잡한 부분을 줄여주기도 합니다. (예를 들어 긴 오디오 파일처럼) 여러 부분으로 나눠야 모델이 처리할 수 있는 것을 chunk batching이라고 하는데, 파이프라인을 사용하면 자동으로 나눠줍니다.
특정 태스크용 매개변수
각 태스크마다 구현할 때 유연성과 옵션을 제공하기 위해 태스크용 매개변수가 있습니다.
예를 들어 transformers.AutomaticSpeechRecognitionPipeline.call() 메서드에는 동영상의 자막을 넣을 때 유용할 것 같은 return_timestamps 매개변수가 있습니다.
>>> # Not using whisper, as it cannot provide timestamps.
>>> generator = pipeline(model="facebook/wav2vec2-large-960h-lv60-self", return_timestamps="word")
>>> generator("https://huggingface.co/datasets/Narsil/asr_dummy/resolve/main/mlk.flac")
{'text': 'I HAVE A DREAM BUT ONE DAY THIS NATION WILL RISE UP AND LIVE OUT THE TRUE MEANING OF ITS CREED', 'chunks': [{'text': 'I', 'timestamp': (1.22, 1.24)}, {'text': 'HAVE', 'timestamp': (1.42, 1.58)}, {'text': 'A', 'timestamp': (1.66, 1.68)}, {'text': 'DREAM', 'timestamp': (1.76, 2.14)}, {'text': 'BUT', 'timestamp': (3.68, 3.8)}, {'text': 'ONE', 'timestamp': (3.94, 4.06)}, {'text': 'DAY', 'timestamp': (4.16, 4.3)}, {'text': 'THIS', 'timestamp': (6.36, 6.54)}, {'text': 'NATION', 'timestamp': (6.68, 7.1)}, {'text': 'WILL', 'timestamp': (7.32, 7.56)}, {'text': 'RISE', 'timestamp': (7.8, 8.26)}, {'text': 'UP', 'timestamp': (8.38, 8.48)}, {'text': 'AND', 'timestamp': (10.08, 10.18)}, {'text': 'LIVE', 'timestamp': (10.26, 10.48)}, {'text': 'OUT', 'timestamp': (10.58, 10.7)}, {'text': 'THE', 'timestamp': (10.82, 10.9)}, {'text': 'TRUE', 'timestamp': (10.98, 11.18)}, {'text': 'MEANING', 'timestamp': (11.26, 11.58)}, {'text': 'OF', 'timestamp': (11.66, 11.7)}, {'text': 'ITS', 'timestamp': (11.76, 11.88)}, {'text': 'CREED', 'timestamp': (12.0, 12.38)}]}
보시다시피 모델이 텍스트를 추론할 뿐만 아니라 각 단어를 말한 시점까지도 출력했습니다.
태스크마다 다양한 매개변수를 가지고 있는데요. 원하는 태스크의 API를 참조해서 바꿔볼 수 있는 여러 매개변수를 살펴보세요!
지금까지 다뤄본 AutomaticSpeechRecognitionPipeline에는 chunk_length_s 매개변수가 있습니다. 영화나 1시간 분량의 동영상의 자막 작업을 할 때처럼, 일반적으로 모델이 자체적으로 처리할 수 없는 매우 긴 오디오 파일을 처리할 때 유용하죠.
도움이 될 만한 매개변수를 찾지 못했다면 언제든지 요청해주세요!
데이터세트에서 Pipeline 사용하기
파이프라인은 대규모 데이터세트에서도 추론 작업을 할 수 있습니다. 이때 이터레이터를 사용하는 걸 추천드립니다.
def data():
    for i in range(1000):
        yield f"My example {i}"


pipe = pipe(model="openai-community/gpt2", device=0)
generated_characters = 0
for out in pipe(data()):
    generated_characters += len(out["generated_text"])
이터레이터 data()는 각 결과를 호출마다 생성하고, 파이프라인은 입력이 순회할 수 있는 자료구조임을 자동으로 인식하여 GPU에서 기존 데이터가 처리되는 동안 새로운 데이터를 가져오기 시작합니다.(이때 내부적으로 DataLoader를 사용해요.) 이 과정은 전체 데이터세트를 메모리에 적재하지 않고도 GPU에 최대한 빠르게 새로운 작업을 공급할 수 있기 때문에 중요합니다.
그리고 일괄 처리가 더 빠를 수 있기 때문에, batch_size 매개변수를 조정해봐도 좋아요.
데이터세트를 순회하는 가장 간단한 방법은 🤗 Datasets를 활용하는 것인데요.
# KeyDataset is a util that will just output the item we're interested in.
from transformers.pipelines.pt_utils import KeyDataset

pipe = pipeline(model="hf-internal-testing/tiny-random-wav2vec2", device=0)
dataset = load_dataset("hf-internal-testing/librispeech_asr_dummy", "clean", split="validation[:10]")

for out in pipe(KeyDataset(dataset["audio"])):
    print(out)
웹서버에서 Pipeline 사용하기
추론 엔진을 만드는 과정은 따로 페이지를 작성할만한 복잡한 주제입니다.
비전 Pipeline
비전 태스크를 위해 pipeline()을 사용하는 일은 거의 동일합니다.
태스크를 지정하고 이미지를 분류기에 전달하면 됩니다. 이미지는 인터넷 링크 또는 로컬 경로의 형태로 전달해주세요. 예를 들어 아래에 표시된 고양이는 어떤 종인가요?

>>> from transformers import pipeline

>>> vision_classifier = pipeline(model="google/vit-base-patch16-224")
>>> preds = vision_classifier(
...     images="https://huggingface.co/datasets/huggingface/documentation-images/resolve/main/pipeline-cat-chonk.jpeg"
... )
>>> preds = [{"score": round(pred["score"], 4), "label": pred["label"]} for pred in preds]
>>> preds
[{'score': 0.4335, 'label': 'lynx, catamount'}, {'score': 0.0348, 'label': 'cougar, puma, catamount, mountain lion, painter, panther, Felis concolor'}, {'score': 0.0324, 'label': 'snow leopard, ounce, Panthera uncia'}, {'score': 0.0239, 'label': 'Egyptian cat'}, {'score': 0.0229, 'label': 'tiger cat'}]
텍스트 Pipeline
NLP 태스크를 위해 pipeline()을 사용하는 일도 거의 동일합니다.
>>> from transformers import pipeline

>>> # This model is a `zero-shot-classification` model.
>>> # It will classify text, except you are free to choose any label you might imagine
>>> classifier = pipeline(model="facebook/bart-large-mnli")
>>> classifier(
...     "I have a problem with my iphone that needs to be resolved asap!!",
...     candidate_labels=["urgent", "not urgent", "phone", "tablet", "computer"],
... )
{'sequence': 'I have a problem with my iphone that needs to be resolved asap!!', 'labels': ['urgent', 'phone', 'computer', 'not urgent', 'tablet'], 'scores': [0.504, 0.479, 0.013, 0.003, 0.002]}
멀티모달 Pipeline
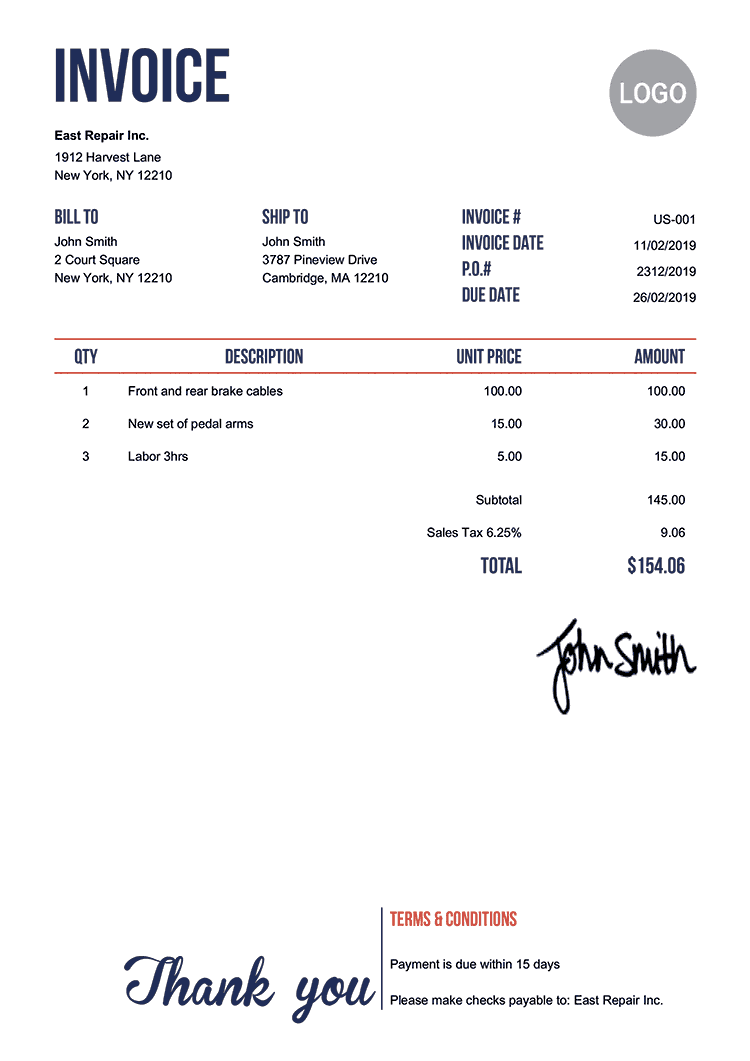
pipeline()은 여러 모달리티(역주: 오디오, 비디오, 텍스트와 같은 데이터 형태)를 지원합니다. 예시로 시각적 질의응답(VQA; Visual Question Answering) 태스크는 텍스트와 이미지를 모두 사용합니다. 그 어떤 이미지 링크나 묻고 싶은 질문도 자유롭게 전달할 수 있습니다. 이미지는 URL 또는 로컬 경로의 형태로 전달해주세요.
예를 들어 이 거래명세서 사진에서 거래명세서 번호를 묻고 싶다면,
>>> from transformers import pipeline

>>> vqa = pipeline(model="impira/layoutlm-document-qa")
>>> vqa(
...     image="https://huggingface.co/spaces/impira/docquery/resolve/2359223c1837a7587402bda0f2643382a6eefeab/invoice.png",
...     question="What is the invoice number?",
... )
[{'score': 0.42514941096305847, 'answer': 'us-001', 'start': 16, 'end': 16}]