Transformers documentation
Document Question Answering
Document Question Answering
文書による質問応答は、文書による視覚的な質問応答とも呼ばれ、以下を提供するタスクです。 ドキュメント画像に関する質問への回答。このタスクをサポートするモデルへの入力は通常、画像と画像の組み合わせです。 質問があり、出力は自然言語で表現された回答です。これらのモデルは、以下を含む複数のモダリティを利用します。 テキスト、単語の位置 (境界ボックス)、および画像自体。
このガイドでは、次の方法を説明します。
- DocVQA データセット の LayoutLMv2 を微調整します。
- 微調整されたモデルを推論に使用します。
このタスクと互換性のあるすべてのアーキテクチャとチェックポイントを確認するには、タスクページ を確認することをお勧めします。
LayoutLMv2 は、最後の非表示のヘッダーの上に質問応答ヘッドを追加することで、ドキュメントの質問応答タスクを解決します。 トークンの状態を調べて、トークンの開始トークンと終了トークンの位置を予測します。 答え。言い換えれば、問題は抽出的質問応答として扱われます。つまり、コンテキストを考慮して、どの部分を抽出するかということです。 の情報が質問に答えます。コンテキストは OCR エンジンの出力から取得されます。ここでは Google の Tesseract です。
始める前に、必要なライブラリがすべてインストールされていることを確認してください。 LayoutLMv2 は detectron2、torchvision、tesseract に依存します。
pip install -q transformers datasets
pip install 'git+https://github.com/facebookresearch/detectron2.git'
pip install torchvisionsudo apt install tesseract-ocr pip install -q pytesseract
すべての依存関係をインストールしたら、ランタイムを再起動します。
モデルをコミュニティと共有することをお勧めします。 Hugging Face アカウントにログインして、🤗 ハブにアップロードします。 プロンプトが表示されたら、トークンを入力してログインします。
>>> from huggingface_hub import notebook_login

>>> notebook_login()
いくつかのグローバル変数を定義しましょう。
>>> model_checkpoint = "microsoft/layoutlmv2-base-uncased"
>>> batch_size = 4
Load the data
このガイドでは、🤗 Hub にある前処理された DocVQA の小さなサンプルを使用します。フルに使いたい場合は、 DocVQA データセットは、DocVQA ホームページ で登録してダウンロードできます。そうすれば、 このガイドを進めて、🤗 データセットにファイルをロードする方法 を確認してください。
>>> from datasets import load_dataset

>>> dataset = load_dataset("nielsr/docvqa_1200_examples")
>>> dataset
DatasetDict({
    train: Dataset({
        features: ['id', 'image', 'query', 'answers', 'words', 'bounding_boxes', 'answer'],
        num_rows: 1000
    })
    test: Dataset({
        features: ['id', 'image', 'query', 'answers', 'words', 'bounding_boxes', 'answer'],
        num_rows: 200
    })
})
ご覧のとおり、データセットはすでにトレーニング セットとテスト セットに分割されています。理解するためにランダムな例を見てみましょう 機能を備えた自分自身。
>>> dataset["train"].features個々のフィールドが表す内容は次のとおりです。
id: サンプルのIDimage: ドキュメント画像を含む PIL.Image.Image オブジェクトquery: 質問文字列 - いくつかの言語での自然言語による質問answers: ヒューマン アノテーターによって提供された正解のリストwordsとbounding_boxes: OCR の結果。ここでは使用しません。answer: 別のモデルと一致する答え。ここでは使用しません。
英語の質問だけを残し、別のモデルによる予測が含まれていると思われるanswer機能を削除しましょう。
また、アノテーターによって提供されたセットから最初の回答を取得します。あるいは、ランダムにサンプリングすることもできます。
>>> updated_dataset = dataset.map(lambda example: {"question": example["query"]["en"]}, remove_columns=["query"])
>>> updated_dataset = updated_dataset.map(
...     lambda example: {"answer": example["answers"][0]}, remove_columns=["answer", "answers"]
... )
このガイドで使用する LayoutLMv2 チェックポイントは、max_position_embeddings = 512 でトレーニングされていることに注意してください (
この情報は、チェックポイントの config.json ファイル) で見つけてください。
例を省略することもできますが、答えが大きな文書の最後にあり、結局省略されてしまうという状況を避けるために、
ここでは、埋め込みが 512 を超える可能性があるいくつかの例を削除します。
データセット内のほとんどのドキュメントが長い場合は、スライディング ウィンドウ戦略を実装できます。詳細については、このノートブック を確認してください。 。
>>> updated_dataset = updated_dataset.filter(lambda x: len(x["words"]) + len(x["question"].split()) < 512)この時点で、このデータセットから OCR 機能も削除しましょう。これらは、異なるデータを微調整するための OCR の結果です。
モデル。これらは入力要件と一致しないため、使用したい場合はさらに処理が必要になります。
このガイドで使用するモデルの。代わりに、OCR と OCR の両方の元のデータに対して LayoutLMv2Processor を使用できます。
トークン化。このようにして、モデルの予想される入力と一致する入力を取得します。画像を手動で加工したい場合は、
モデルがどのような入力形式を想定しているかを知るには、LayoutLMv2 モデルのドキュメント を確認してください。
>>> updated_dataset = updated_dataset.remove_columns("words")
>>> updated_dataset = updated_dataset.remove_columns("bounding_boxes")
最後に、画像サンプルを確認しないとデータ探索は完了しません。
>>> updated_dataset["train"][11]["image"]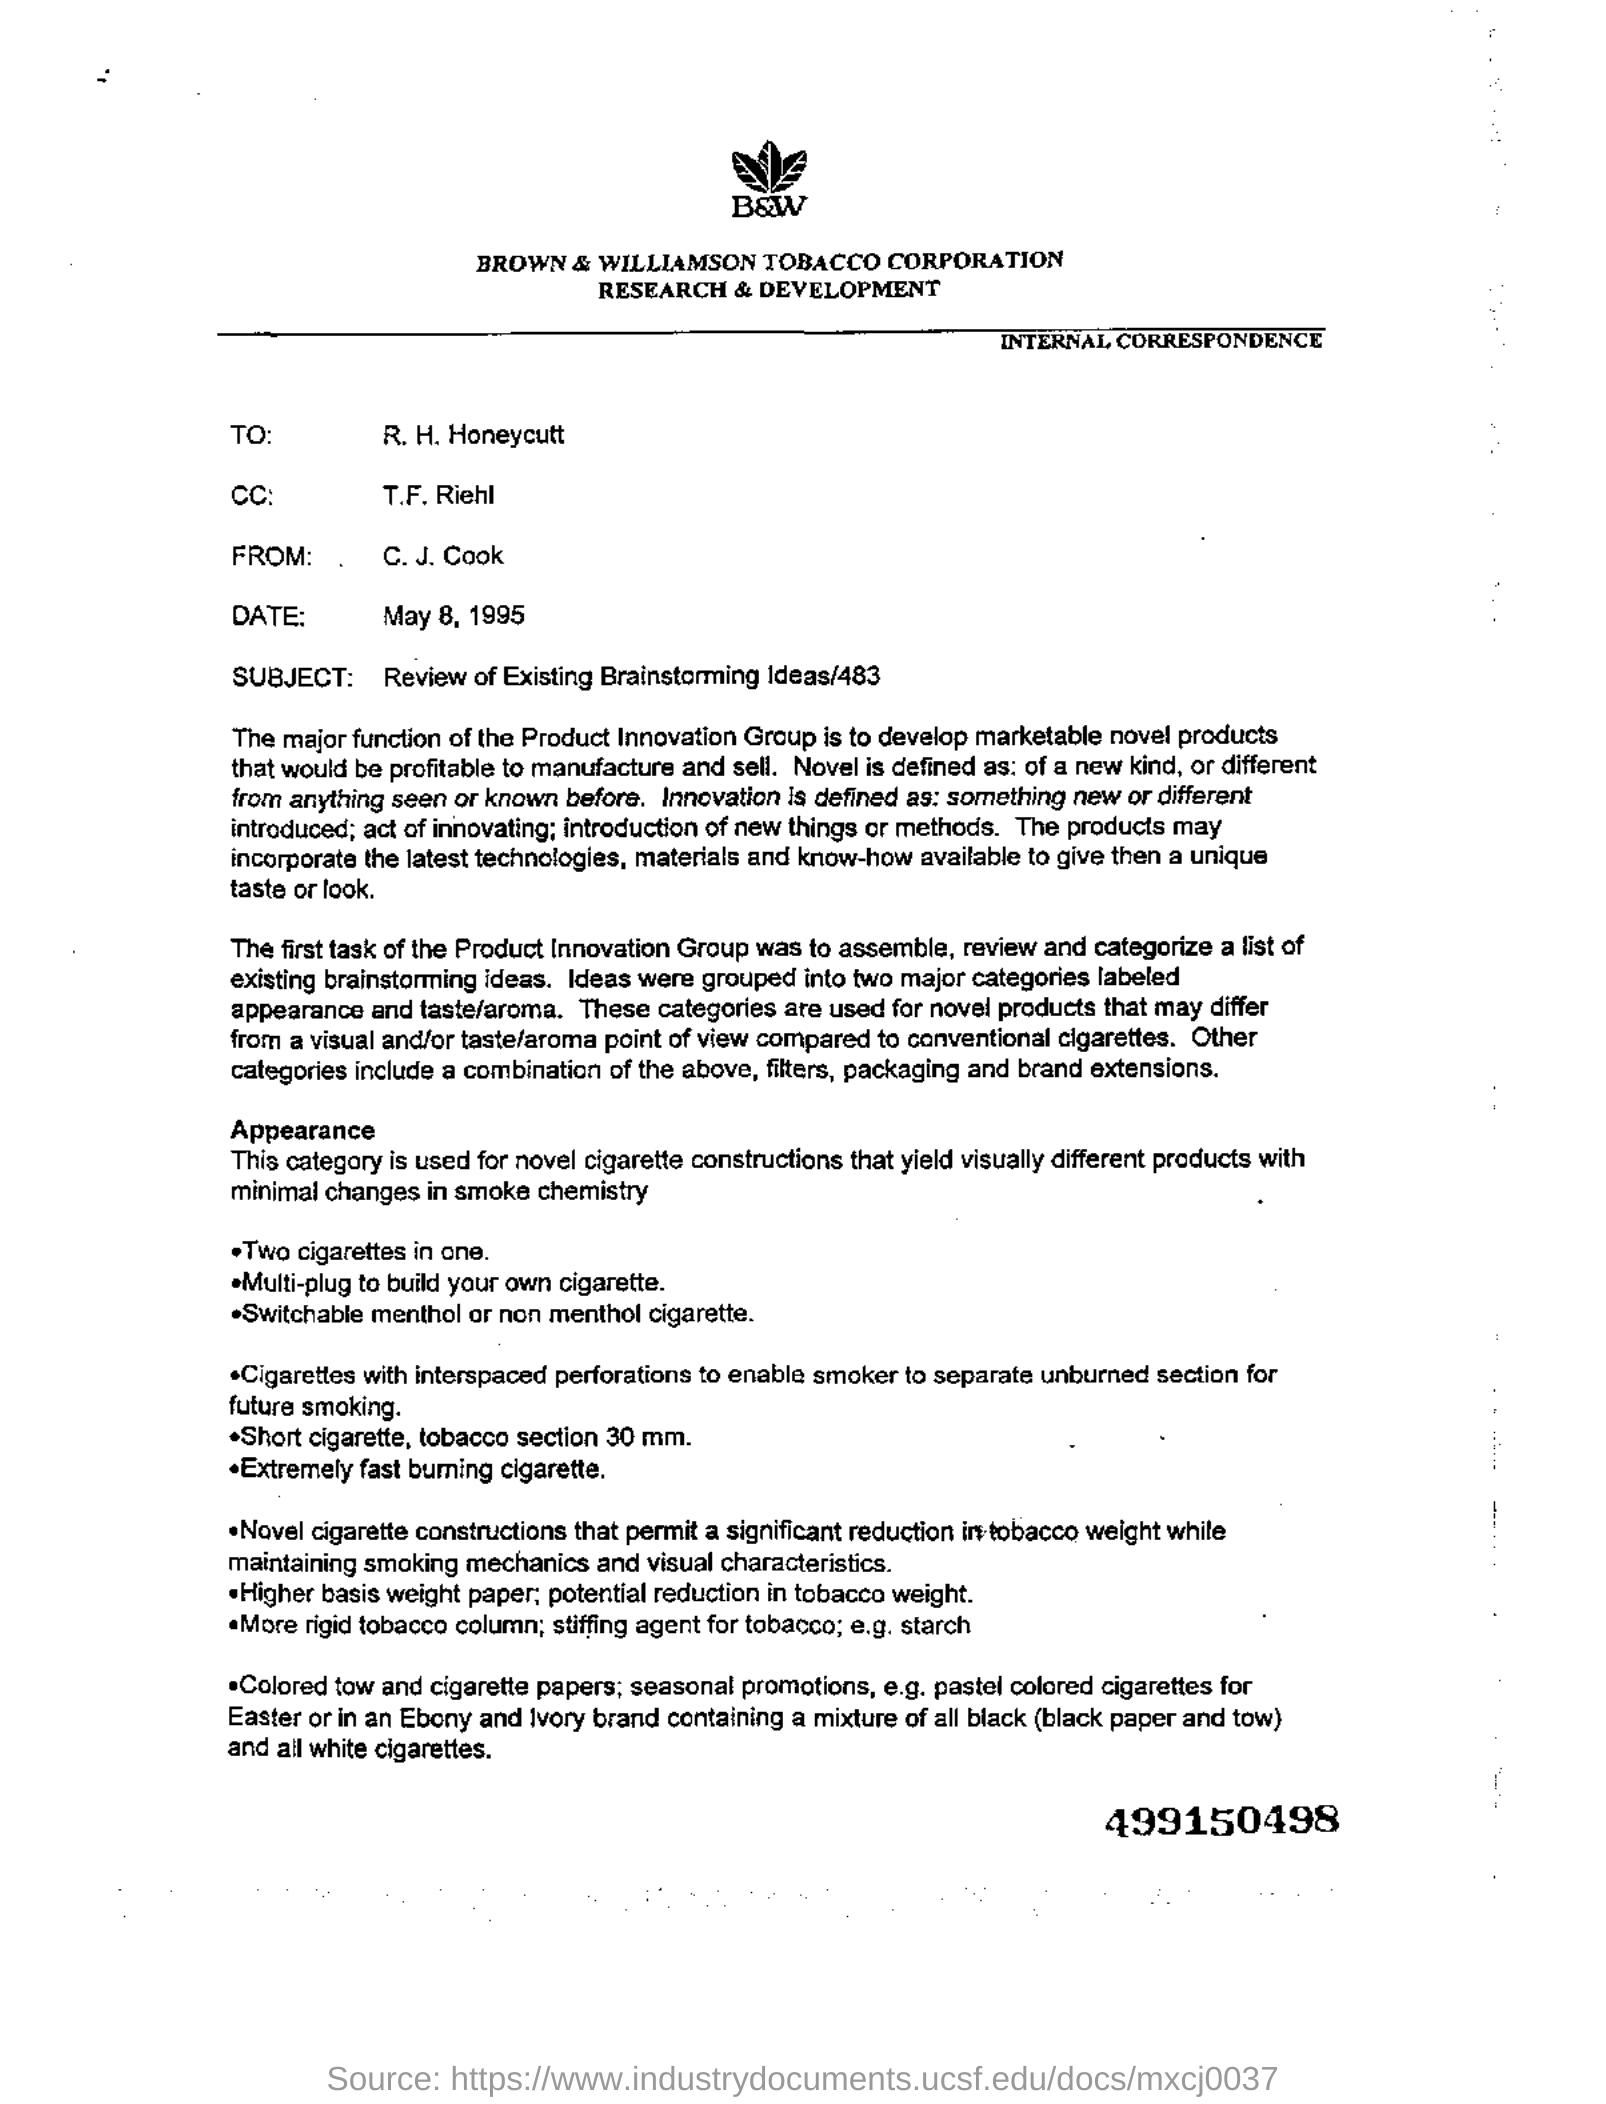
Preprocess the data
文書の質問に答えるタスクはマルチモーダル タスクであるため、各モダリティからの入力が確実に行われるようにする必要があります。
モデルの期待に従って前処理されます。まず、LayoutLMv2Processor をロードします。これは、画像データを処理できる画像プロセッサとテキスト データをエンコードできるトークナイザーを内部で組み合わせています。
>>> from transformers import AutoProcessor

>>> processor = AutoProcessor.from_pretrained(model_checkpoint)
Preprocessing document images
まず、プロセッサからの image_processor を利用して、モデルのドキュメント画像を準備しましょう。
デフォルトでは、画像プロセッサは画像のサイズを 224x224 に変更し、カラー チャネルの順序が正しいことを確認します。
tesseract を使用して OCR を適用し、単語と正規化された境界ボックスを取得します。このチュートリアルでは、これらのデフォルトはすべて、まさに必要なものです。
デフォルトの画像処理を画像のバッチに適用し、OCR の結果を返す関数を作成します。
>>> image_processor = processor.image_processor


>>> def get_ocr_words_and_boxes(examples):
...     images = [image.convert("RGB") for image in examples["image"]]
...     encoded_inputs = image_processor(images)

...     examples["image"] = encoded_inputs.pixel_values
...     examples["words"] = encoded_inputs.words
...     examples["boxes"] = encoded_inputs.boxes

... return examplesこの前処理をデータセット全体に高速に適用するには、map を使用します。
>>> dataset_with_ocr = updated_dataset.map(get_ocr_words_and_boxes, batched=True, batch_size=2)Preprocessing text data
画像に OCR を適用したら、データセットのテキスト部分をエンコードしてモデル用に準備する必要があります。
これには、前のステップで取得した単語とボックスをトークンレベルの input_ids、attention_mask、
token_type_idsとbbox。テキストを前処理するには、プロセッサからのTokenizerが必要になります。
>>> tokenizer = processor.tokenizer前述の前処理に加えて、モデルのラベルを追加する必要もあります。 xxxForQuestionAnswering モデルの場合
🤗 Transformers では、ラベルは start_positions と end_positions で構成され、どのトークンがその位置にあるかを示します。
開始点と、どのトークンが回答の最後にあるか。
それから始めましょう。より大きなリスト (単語リスト) 内のサブリスト (単語に分割された回答) を検索できるヘルパー関数を定義します。
この関数は、words_list と answer_list という 2 つのリストを入力として受け取ります。次に、words_listを反復処理してチェックします。
words_list (words_list[i]) 内の現在の単語が、answer_list (answer_list[0]) の最初の単語と等しいかどうか、および
現在の単語から始まり、answer_list と同じ長さの words_list のサブリストは、to answer_list と等しくなります。
この条件が true の場合、一致が見つかったことを意味し、関数は一致とその開始インデックス (idx) を記録します。
とその終了インデックス (idx + len(answer_list) - 1)。複数の一致が見つかった場合、関数は最初のもののみを返します。
一致するものが見つからない場合、関数は (None、0、および 0) を返します。
>>> def subfinder(words_list, answer_list):
...     matches = []
...     start_indices = []
...     end_indices = []
...     for idx, i in enumerate(range(len(words_list))):
...         if words_list[i] == answer_list[0] and words_list[i : i + len(answer_list)] == answer_list:
...             matches.append(answer_list)
...             start_indices.append(idx)
...             end_indices.append(idx + len(answer_list) - 1)
...     if matches:
...         return matches[0], start_indices[0], end_indices[0]
...     else:
...         return None, 0, 0
この関数が答えの位置を見つける方法を説明するために、例で使用してみましょう。
>>> example = dataset_with_ocr["train"][1]
>>> words = [word.lower() for word in example["words"]]
>>> match, word_idx_start, word_idx_end = subfinder(words, example["answer"].lower().split())
>>> print("Question: ", example["question"])
>>> print("Words:", words)
>>> print("Answer: ", example["answer"])
>>> print("start_index", word_idx_start)
>>> print("end_index", word_idx_end)
Question:  Who is in  cc in this letter?
Words: ['wie', 'baw', 'brown', '&', 'williamson', 'tobacco', 'corporation', 'research', '&', 'development', 'internal', 'correspondence', 'to:', 'r.', 'h.', 'honeycutt', 'ce:', 't.f.', 'riehl', 'from:', '.', 'c.j.', 'cook', 'date:', 'may', '8,', '1995', 'subject:', 'review', 'of', 'existing', 'brainstorming', 'ideas/483', 'the', 'major', 'function', 'of', 'the', 'product', 'innovation', 'graup', 'is', 'to', 'develop', 'marketable', 'nove!', 'products', 'that', 'would', 'be', 'profitable', 'to', 'manufacture', 'and', 'sell.', 'novel', 'is', 'defined', 'as:', 'of', 'a', 'new', 'kind,', 'or', 'different', 'from', 'anything', 'seen', 'or', 'known', 'before.', 'innovation', 'is', 'defined', 'as:', 'something', 'new', 'or', 'different', 'introduced;', 'act', 'of', 'innovating;', 'introduction', 'of', 'new', 'things', 'or', 'methods.', 'the', 'products', 'may', 'incorporate', 'the', 'latest', 'technologies,', 'materials', 'and', 'know-how', 'available', 'to', 'give', 'then', 'a', 'unique', 'taste', 'or', 'look.', 'the', 'first', 'task', 'of', 'the', 'product', 'innovation', 'group', 'was', 'to', 'assemble,', 'review', 'and', 'categorize', 'a', 'list', 'of', 'existing', 'brainstorming', 'ideas.', 'ideas', 'were', 'grouped', 'into', 'two', 'major', 'categories', 'labeled', 'appearance', 'and', 'taste/aroma.', 'these', 'categories', 'are', 'used', 'for', 'novel', 'products', 'that', 'may', 'differ', 'from', 'a', 'visual', 'and/or', 'taste/aroma', 'point', 'of', 'view', 'compared', 'to', 'canventional', 'cigarettes.', 'other', 'categories', 'include', 'a', 'combination', 'of', 'the', 'above,', 'filters,', 'packaging', 'and', 'brand', 'extensions.', 'appearance', 'this', 'category', 'is', 'used', 'for', 'novel', 'cigarette', 'constructions', 'that', 'yield', 'visually', 'different', 'products', 'with', 'minimal', 'changes', 'in', 'smoke', 'chemistry', 'two', 'cigarettes', 'in', 'cne.', 'emulti-plug', 'te', 'build', 'yaur', 'awn', 'cigarette.', 'eswitchable', 'menthol', 'or', 'non', 'menthol', 'cigarette.', '*cigarettes', 'with', 'interspaced', 'perforations', 'to', 'enable', 'smoker', 'to', 'separate', 'unburned', 'section', 'for', 'future', 'smoking.', '«short', 'cigarette,', 'tobacco', 'section', '30', 'mm.', '«extremely', 'fast', 'buming', 'cigarette.', '«novel', 'cigarette', 'constructions', 'that', 'permit', 'a', 'significant', 'reduction', 'iretobacco', 'weight', 'while', 'maintaining', 'smoking', 'mechanics', 'and', 'visual', 'characteristics.', 'higher', 'basis', 'weight', 'paper:', 'potential', 'reduction', 'in', 'tobacco', 'weight.', '«more', 'rigid', 'tobacco', 'column;', 'stiffing', 'agent', 'for', 'tobacco;', 'e.g.', 'starch', '*colored', 'tow', 'and', 'cigarette', 'papers;', 'seasonal', 'promotions,', 'e.g.', 'pastel', 'colored', 'cigarettes', 'for', 'easter', 'or', 'in', 'an', 'ebony', 'and', 'ivory', 'brand', 'containing', 'a', 'mixture', 'of', 'all', 'black', '(black', 'paper', 'and', 'tow)', 'and', 'ail', 'white', 'cigarettes.', '499150498']
Answer:  T.F. Riehl
start_index 17
end_index 18
ただし、サンプルがエンコードされると、次のようになります。
>>> encoding = tokenizer(example["question"], example["words"], example["boxes"])
>>> tokenizer.decode(encoding["input_ids"])
[CLS] who is in cc in this letter? [SEP] wie baw brown & williamson tobacco corporation research & development ...
エンコードされた入力内で答えの位置を見つける必要があります。
token_type_idsは、どのトークンが質問の一部であり、どのトークンが文書の単語の一部であるかを示します。tokenizer.cls_token_idは、入力の先頭で特別なトークンを見つけるのに役立ちます。word_idsは、元のwordsで見つかった回答を、完全にエンコードされた入力内の同じ回答と照合して判断するのに役立ちます。 エンコードされた入力内の応答の開始/終了位置。
これを念頭に置いて、データセット内のサンプルのバッチをエンコードする関数を作成しましょう。
>>> def encode_dataset(examples, max_length=512):
...     questions = examples["question"]
...     words = examples["words"]
...     boxes = examples["boxes"]
...     answers = examples["answer"]

...     # encode the batch of examples and initialize the start_positions and end_positions
...     encoding = tokenizer(questions, words, boxes, max_length=max_length, padding="max_length", truncation=True)
...     start_positions = []
...     end_positions = []

...     # loop through the examples in the batch
...     for i in range(len(questions)):
...         cls_index = encoding["input_ids"][i].index(tokenizer.cls_token_id)

...         # find the position of the answer in example's words
...         words_example = [word.lower() for word in words[i]]
...         answer = answers[i]
...         match, word_idx_start, word_idx_end = subfinder(words_example, answer.lower().split())

...         if match:
...             # if match is found, use `token_type_ids` to find where words start in the encoding
...             token_type_ids = encoding["token_type_ids"][i]
...             token_start_index = 0
...             while token_type_ids[token_start_index] != 1:
...                 token_start_index += 1

...             token_end_index = len(encoding["input_ids"][i]) - 1
...             while token_type_ids[token_end_index] != 1:
...                 token_end_index -= 1

...             word_ids = encoding.word_ids(i)[token_start_index : token_end_index + 1]
...             start_position = cls_index
...             end_position = cls_index

...             # loop over word_ids and increase `token_start_index` until it matches the answer position in words
...             # once it matches, save the `token_start_index` as the `start_position` of the answer in the encoding
...             for id in word_ids:
...                 if id == word_idx_start:
...                     start_position = token_start_index
...                 else:
...                     token_start_index += 1

...             # similarly loop over `word_ids` starting from the end to find the `end_position` of the answer
...             for id in word_ids[::-1]:
...                 if id == word_idx_end:
...                     end_position = token_end_index
...                 else:
...                     token_end_index -= 1

...             start_positions.append(start_position)
...             end_positions.append(end_position)

...         else:
...             start_positions.append(cls_index)
...             end_positions.append(cls_index)

...     encoding["image"] = examples["image"]
...     encoding["start_positions"] = start_positions
...     encoding["end_positions"] = end_positions

...     return encoding
この前処理関数が完成したので、データセット全体をエンコードできます。
>>> encoded_train_dataset = dataset_with_ocr["train"].map(
...     encode_dataset, batched=True, batch_size=2, remove_columns=dataset_with_ocr["train"].column_names
... )
>>> encoded_test_dataset = dataset_with_ocr["test"].map(
...     encode_dataset, batched=True, batch_size=2, remove_columns=dataset_with_ocr["test"].column_names
... )
エンコードされたデータセットの特徴がどのようなものかを確認してみましょう。
>>> encoded_train_dataset.features
{'image': Sequence(feature=Sequence(feature=Sequence(feature=Value(dtype='uint8', id=None), length=-1, id=None), length=-1, id=None), length=-1, id=None),
 'input_ids': Sequence(feature=Value(dtype='int32', id=None), length=-1, id=None),
 'token_type_ids': Sequence(feature=Value(dtype='int8', id=None), length=-1, id=None),
 'attention_mask': Sequence(feature=Value(dtype='int8', id=None), length=-1, id=None),
 'bbox': Sequence(feature=Sequence(feature=Value(dtype='int64', id=None), length=-1, id=None), length=-1, id=None),
 'start_positions': Value(dtype='int64', id=None),
 'end_positions': Value(dtype='int64', id=None)}
Evaluation
文書の質問回答の評価には、大量の後処理が必要です。過剰摂取を避けるために 現時点では、このガイドでは評価ステップを省略しています。 Trainer はトレーニング中に評価損失を計算するため、 モデルのパフォーマンスについてまったくわからないわけではありません。抽出的質問応答は通常、F1/完全一致を使用して評価されます。 自分で実装したい場合は、質問応答の章 を確認してください。 インスピレーションを得るためにハグフェイスコースの。
Train
おめでとう!このガイドの最も難しい部分を無事にナビゲートできたので、独自のモデルをトレーニングする準備が整いました。 トレーニングには次の手順が含まれます。
- 前処理と同じチェックポイントを使用して、AutoModelForDocumentQuestionAnswering でモデルを読み込みます。
- TrainingArguments でトレーニング ハイパーパラメータを定義します。
- サンプルをバッチ処理する関数を定義します。ここでは
DefaultDataCollatorが適切に機能します。 - モデル、データセット、データ照合器とともにトレーニング引数を Trainer に渡します。
- train() を呼び出してモデルを微調整します。
>>> from transformers import AutoModelForDocumentQuestionAnswering

>>> model = AutoModelForDocumentQuestionAnswering.from_pretrained(model_checkpoint)
TrainingArguments で、output_dir を使用してモデルの保存場所を指定し、必要に応じてハイパーパラメーターを構成します。
モデルをコミュニティと共有したい場合は、push_to_hubをTrueに設定します (モデルをアップロードするには、Hugging Face にサインインする必要があります)。
この場合、output_dirはモデルのチェックポイントがプッシュされるリポジトリの名前にもなります。
>>> from transformers import TrainingArguments

>>> # REPLACE THIS WITH YOUR REPO ID
>>> repo_id = "MariaK/layoutlmv2-base-uncased_finetuned_docvqa"

>>> training_args = TrainingArguments(
...     output_dir=repo_id,
...     per_device_train_batch_size=4,
...     num_train_epochs=20,
...     save_steps=200,
...     logging_steps=50,
...     eval_strategy="steps",
...     learning_rate=5e-5,
...     save_total_limit=2,
...     remove_unused_columns=False,
...     push_to_hub=True,
... )
サンプルをまとめてバッチ処理するための単純なデータ照合器を定義します。
>>> from transformers import DefaultDataCollator

>>> data_collator = DefaultDataCollator()最後に、すべてをまとめて、train() を呼び出します。
>>> from transformers import Trainer

>>> trainer = Trainer(
...     model=model,
...     args=training_args,
...     data_collator=data_collator,
...     train_dataset=encoded_train_dataset,
...     eval_dataset=encoded_test_dataset,
...     processing_class=processor,
... )

>>> trainer.train()
最終モデルを 🤗 Hub に追加するには、モデル カードを作成し、push_to_hub を呼び出します。
>>> trainer.create_model_card()
>>> trainer.push_to_hub()
Inference
LayoutLMv2 モデルを微調整し、🤗 ハブにアップロードしたので、それを推論に使用できます。もっとも単純な 推論用に微調整されたモデルを試す方法は、それを Pipeline で使用することです。
例を挙げてみましょう:
>>> example = dataset["test"][2]
>>> question = example["query"]["en"]
>>> image = example["image"]
>>> print(question)
>>> print(example["answers"])
'Who is ‘presiding’ TRRF GENERAL SESSION (PART 1)?'
['TRRF Vice President', 'lee a. waller']
次に、パイプラインをインスタンス化します。 モデルを使用して質問への回答を文書化し、画像と質問の組み合わせをモデルに渡します。
>>> from transformers import pipeline

>>> qa_pipeline = pipeline("document-question-answering", model="MariaK/layoutlmv2-base-uncased_finetuned_docvqa")
>>> qa_pipeline(image, question)
[{'score': 0.9949808120727539,
  'answer': 'Lee A. Waller',
  'start': 55,
  'end': 57}]
必要に応じて、パイプラインの結果を手動で複製することもできます。
- 画像と質問を取得し、モデルのプロセッサを使用してモデル用に準備します。
- モデルを通じて結果または前処理を転送します。
- モデルは
start_logitsとend_logitsを返します。これらは、どのトークンが応答の先頭にあるのかを示し、 どのトークンが回答の最後にありますか。どちらも形状 (batch_size、sequence_length) を持ちます。 start_logitsとend_logitsの両方の最後の次元で argmax を取得し、予測されるstart_idxとend_idxを取得します。- トークナイザーを使用して回答をデコードします。
>>> import torch
>>> from transformers import AutoProcessor
>>> from transformers import AutoModelForDocumentQuestionAnswering

>>> processor = AutoProcessor.from_pretrained("MariaK/layoutlmv2-base-uncased_finetuned_docvqa")
>>> model = AutoModelForDocumentQuestionAnswering.from_pretrained("MariaK/layoutlmv2-base-uncased_finetuned_docvqa")

>>> with torch.no_grad():
...     encoding = processor(image.convert("RGB"), question, return_tensors="pt")
...     outputs = model(**encoding)
...     start_logits = outputs.start_logits
...     end_logits = outputs.end_logits
...     predicted_start_idx = start_logits.argmax(-1).item()
...     predicted_end_idx = end_logits.argmax(-1).item()

>>> processor.tokenizer.decode(encoding.input_ids.squeeze()[predicted_start_idx : predicted_end_idx + 1])
'lee a. waller'