Hub Python Library documentation
Webhooks
Webhooks
Webhooks are a foundation for MLOps-related features. They allow you to listen for new changes on specific repos or to all repos belonging to particular users/organizations you’re interested in following. This guide will first explain how to manage webhooks programmatically. Then we’ll see how to leverage huggingface_hub to create a server listening to webhooks and deploy it to a Space.
This guide assumes you are familiar with the concept of webhooks on the Huggingface Hub. To learn more about webhooks themselves, you should read this guide first.
Managing Webhooks
huggingface_hub allows you to manage your webhooks programmatically. You can list your existing webhooks, create new ones, and update, enable, disable or delete them. This section guides you through the procedures using the Hugging Face Hub’s API functions.
Creating a Webhook
To create a new webhook, use create_webhook() and specify the URL where payloads should be sent, what events should be watched, and optionally set a domain and a secret for security.
from huggingface_hub import create_webhook

# Example: Creating a webhook
webhook = create_webhook(
    url="https://webhook.site/your-custom-url",
    watched=[{"type": "user", "name": "your-username"}, {"type": "org", "name": "your-org-name"}],
    domains=["repo", "discussion"],
    secret="your-secret"
)
Listing Webhooks
To see all the webhooks you have configured, you can list them with list_webhooks(). This is useful to review their IDs, URLs, and statuses.
from huggingface_hub import list_webhooks

# Example: Listing all webhooks
webhooks = list_webhooks()
for webhook in webhooks:
    print(webhook)
Updating a Webhook
If you need to change the configuration of an existing webhook, such as the URL or the events it watches, you can update it using update_webhook().
from huggingface_hub import update_webhook

# Example: Updating a webhook
updated_webhook = update_webhook(
    webhook_id="your-webhook-id",
    url="https://new.webhook.site/url",
    watched=[{"type": "user", "name": "new-username"}],
    domains=["repo"]
)
Enabling and Disabling Webhooks
You might want to temporarily disable a webhook without deleting it. This can be done using disable_webhook(), and the webhook can be re-enabled later with enable_webhook().
from huggingface_hub import enable_webhook, disable_webhook

# Example: Enabling a webhook
enabled_webhook = enable_webhook("your-webhook-id")
print("Enabled:", enabled_webhook)

# Example: Disabling a webhook
disabled_webhook = disable_webhook("your-webhook-id")
print("Disabled:", disabled_webhook)
Deleting a Webhook
When a webhook is no longer needed, it can be permanently deleted using delete_webhook().
from huggingface_hub import delete_webhook

# Example: Deleting a webhook
delete_webhook("your-webhook-id")
Webhooks Server
The base class that we will use in this guides section is WebhooksServer(). It is a class for easily configuring a server that can receive webhooks from the Huggingface Hub. The server is based on a Gradio app. It has a UI to display instructions for you or your users and an API to listen to webhooks.
To see a running example of a webhook server, check out the Spaces CI Bot one. It is a Space that launches ephemeral environments when a PR is opened on a Space.
This is an experimental feature. This
means that we are still working on improving the API. Breaking changes might be introduced in the future without prior
notice. Make sure to pin the version of huggingface_hub in your requirements.
Create an endpoint
Implementing a webhook endpoint is as simple as decorating a function. Let’s see a first example to explain the main concepts:
# app.py
from huggingface_hub import webhook_endpoint, WebhookPayload

@webhook_endpoint
async def trigger_training(payload: WebhookPayload) -> None:
    if payload.repo.type == "dataset" and payload.event.action == "update":
        # Trigger a training job if a dataset is updated
        ...
Save this snippet in a file called 'app.py' and run it with 'python app.py'. You should see a message like this:
Webhook secret is not defined. This means your webhook endpoints will be open to everyone.
To add a secret, set `WEBHOOK_SECRET` as environment variable or pass it at initialization:
        `app = WebhooksServer(webhook_secret='my_secret', ...)`
For more details about webhook secrets, please refer to https://huggingface.co/docs/hub/webhooks#webhook-secret.
Running on local URL:  http://127.0.0.1:7860
Running on public URL: https://1fadb0f52d8bf825fc.gradio.live

This share link expires in 72 hours. For free permanent hosting and GPU upgrades (NEW!), check out Spaces: https://huggingface.co/spaces

Webhooks are correctly setup and ready to use:
  - POST https://1fadb0f52d8bf825fc.gradio.live/webhooks/trigger_training
Go to https://huggingface.co/settings/webhooks to setup your webhooks.
Good job! You just launched a webhook server! Let’s break down what happened exactly:
- By decorating a function with webhook_endpoint(), a WebhooksServer() object has been created in the background. As you can see, this server is a Gradio app running on http://127.0.0.1:7860. If you open this URL in your browser, you will see a landing page with instructions about the registered webhooks.
- A Gradio app is a FastAPI server under the hood. A new POST route
/webhooks/trigger_traininghas been added to it. This is the route that will listen to webhooks and run thetrigger_trainingfunction when triggered. FastAPI will automatically parse the payload and pass it to the function as a WebhookPayload object. This is apydanticobject that contains all the information about the event that triggered the webhook. - The Gradio app also opened a tunnel to receive requests from the internet. This is the interesting part: you can configure a Webhook on https://huggingface.co/settings/webhooks pointing to your local machine. This is useful for debugging your webhook server and quickly iterating before deploying it to a Space.
- Finally, the logs also tell you that your server is currently not secured by a secret. This is not problematic for local debugging but is to keep in mind for later.
By default, the server is started at the end of your script. If you are running it in a notebook, you can start the
server manually by calling decorated_function.run(). Since a unique server is used, you only have to start the server
once even if you have multiple endpoints.
Configure a Webhook
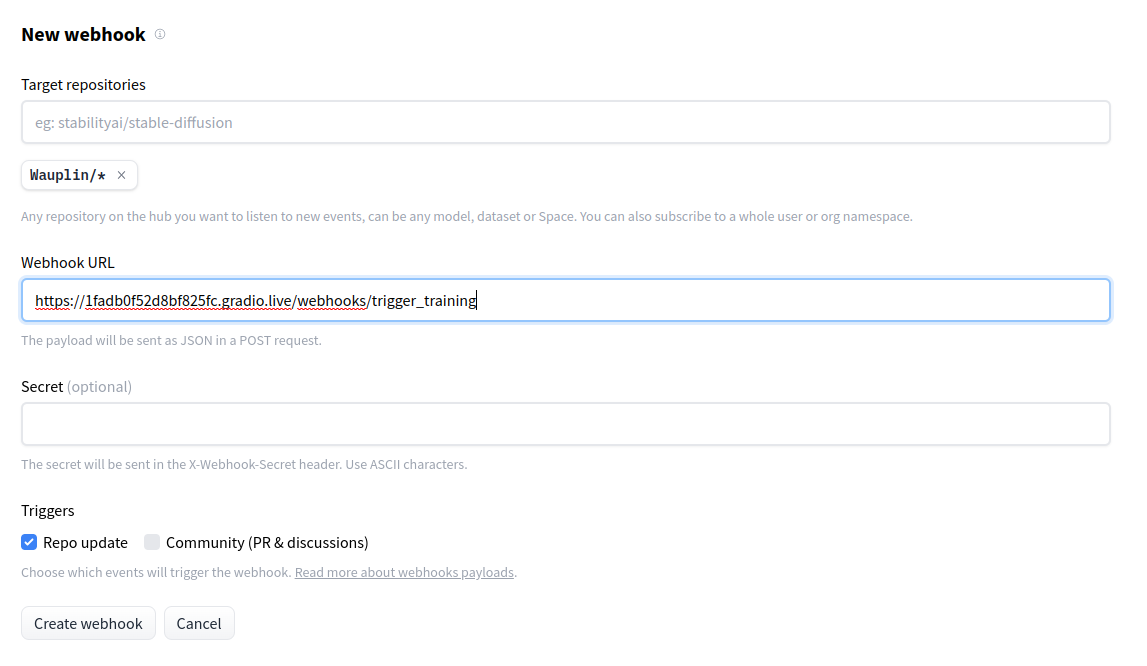
Now that you have a webhook server running, you want to configure a Webhook to start receiving messages.
Go to https://huggingface.co/settings/webhooks, click on “Add a new webhook” and configure your Webhook. Set the target
repositories you want to watch and the Webhook URL, here https://1fadb0f52d8bf825fc.gradio.live/webhooks/trigger_training.
And that’s it! You can now trigger that webhook by updating the target repository (e.g. push a commit). Check the Activity tab of your Webhook to see the events that have been triggered. Now that you have a working setup, you can test it and quickly iterate. If you modify your code and restart the server, your public URL might change. Make sure to update the webhook configuration on the Hub if needed.
Deploy to a Space
Now that you have a working webhook server, the goal is to deploy it to a Space. Go to https://huggingface.co/new-space
to create a Space. Give it a name, select the Gradio SDK and click on “Create Space”. Upload your code to the Space
in a file called app.py. Your Space will start automatically! For more details about Spaces, please refer to this
guide.
Your webhook server is now running on a public Space. If most cases, you will want to secure it with a secret. Go to
your Space settings > Section “Repository secrets” > “Add a secret”. Set the WEBHOOK_SECRET environment variable to
the value of your choice. Go back to the Webhooks settings and set the
secret in the webhook configuration. Now, only requests with the correct secret will be accepted by your server.
And this is it! Your Space is now ready to receive webhooks from the Hub. Please keep in mind that if you run the Space on a free ‘cpu-basic’ hardware, it will be shut down after 48 hours of inactivity. If you need a permanent Space, you should consider setting to an upgraded hardware.
Advanced usage
The guide above explained the quickest way to setup a WebhooksServer(). In this section, we will see how to customize it further.
Multiple endpoints
You can register multiple endpoints on the same server. For example, you might want to have one endpoint to trigger
a training job and another one to trigger a model evaluation. You can do this by adding multiple @webhook_endpoint
decorators:
# app.py
from huggingface_hub import webhook_endpoint, WebhookPayload

@webhook_endpoint
async def trigger_training(payload: WebhookPayload) -> None:
    if payload.repo.type == "dataset" and payload.event.action == "update":
        # Trigger a training job if a dataset is updated
        ...

@webhook_endpoint
async def trigger_evaluation(payload: WebhookPayload) -> None:
    if payload.repo.type == "model" and payload.event.action == "update":
        # Trigger an evaluation job if a model is updated
        ...
Which will create two endpoints:
(...)
Webhooks are correctly setup and ready to use:
  - POST https://1fadb0f52d8bf825fc.gradio.live/webhooks/trigger_training
  - POST https://1fadb0f52d8bf825fc.gradio.live/webhooks/trigger_evaluation
Custom server
To get more flexibility, you can also create a WebhooksServer() object directly. This is useful if you want to
customize the landing page of your server. You can do this by passing a Gradio UI
that will overwrite the default one. For example, you can add instructions for your users or add a form to manually
trigger the webhooks. When creating a WebhooksServer(), you can register new webhooks using the
add_webhook() decorator.
Here is a complete example:
import gradio as gr
from fastapi import Request
from huggingface_hub import WebhooksServer, WebhookPayload

# 1. Define  UI
with gr.Blocks() as ui:
    ...

# 2. Create WebhooksServer with custom UI and secret
app = WebhooksServer(ui=ui, webhook_secret="my_secret_key")

# 3. Register webhook with explicit name
@app.add_webhook("/say_hello")
async def hello(payload: WebhookPayload):
    return {"message": "hello"}

# 4. Register webhook with implicit name
@app.add_webhook
async def goodbye(payload: WebhookPayload):
    return {"message": "goodbye"}

# 5. Start server (optional)
app.run()- We define a custom UI using Gradio blocks. This UI will be displayed on the landing page of the server.
- We create a WebhooksServer() object with a custom UI and a secret. The secret is optional and can be set with
the
WEBHOOK_SECRETenvironment variable. - We register a webhook with an explicit name. This will create an endpoint at
/webhooks/say_hello. - We register a webhook with an implicit name. This will create an endpoint at
/webhooks/goodbye. - We start the server. This is optional as your server will automatically be started at the end of the script.