Evaluate documentation
A quick tour
A quick tour
🤗 Evaluate provides access to a wide range of evaluation tools. It covers a range of modalities such as text, computer vision, audio, etc. as well as tools to evaluate models or datasets. These tools are split into three categories.
Types of evaluations
There are different aspects of a typical machine learning pipeline that can be evaluated and for each aspect 🤗 Evaluate provides a tool:
- Metric: A metric is used to evaluate a model’s performance and usually involves the model’s predictions as well as some ground truth labels. You can find all integrated metrics at evaluate-metric.
- Comparison: A comparison is used to compare two models. This can for example be done by comparing their predictions to ground truth labels and computing their agreement. You can find all integrated comparisons at evaluate-comparison.
- Measurement: The dataset is as important as the model trained on it. With measurements one can investigate a dataset’s properties. You can find all integrated measurements at evaluate-measurement.
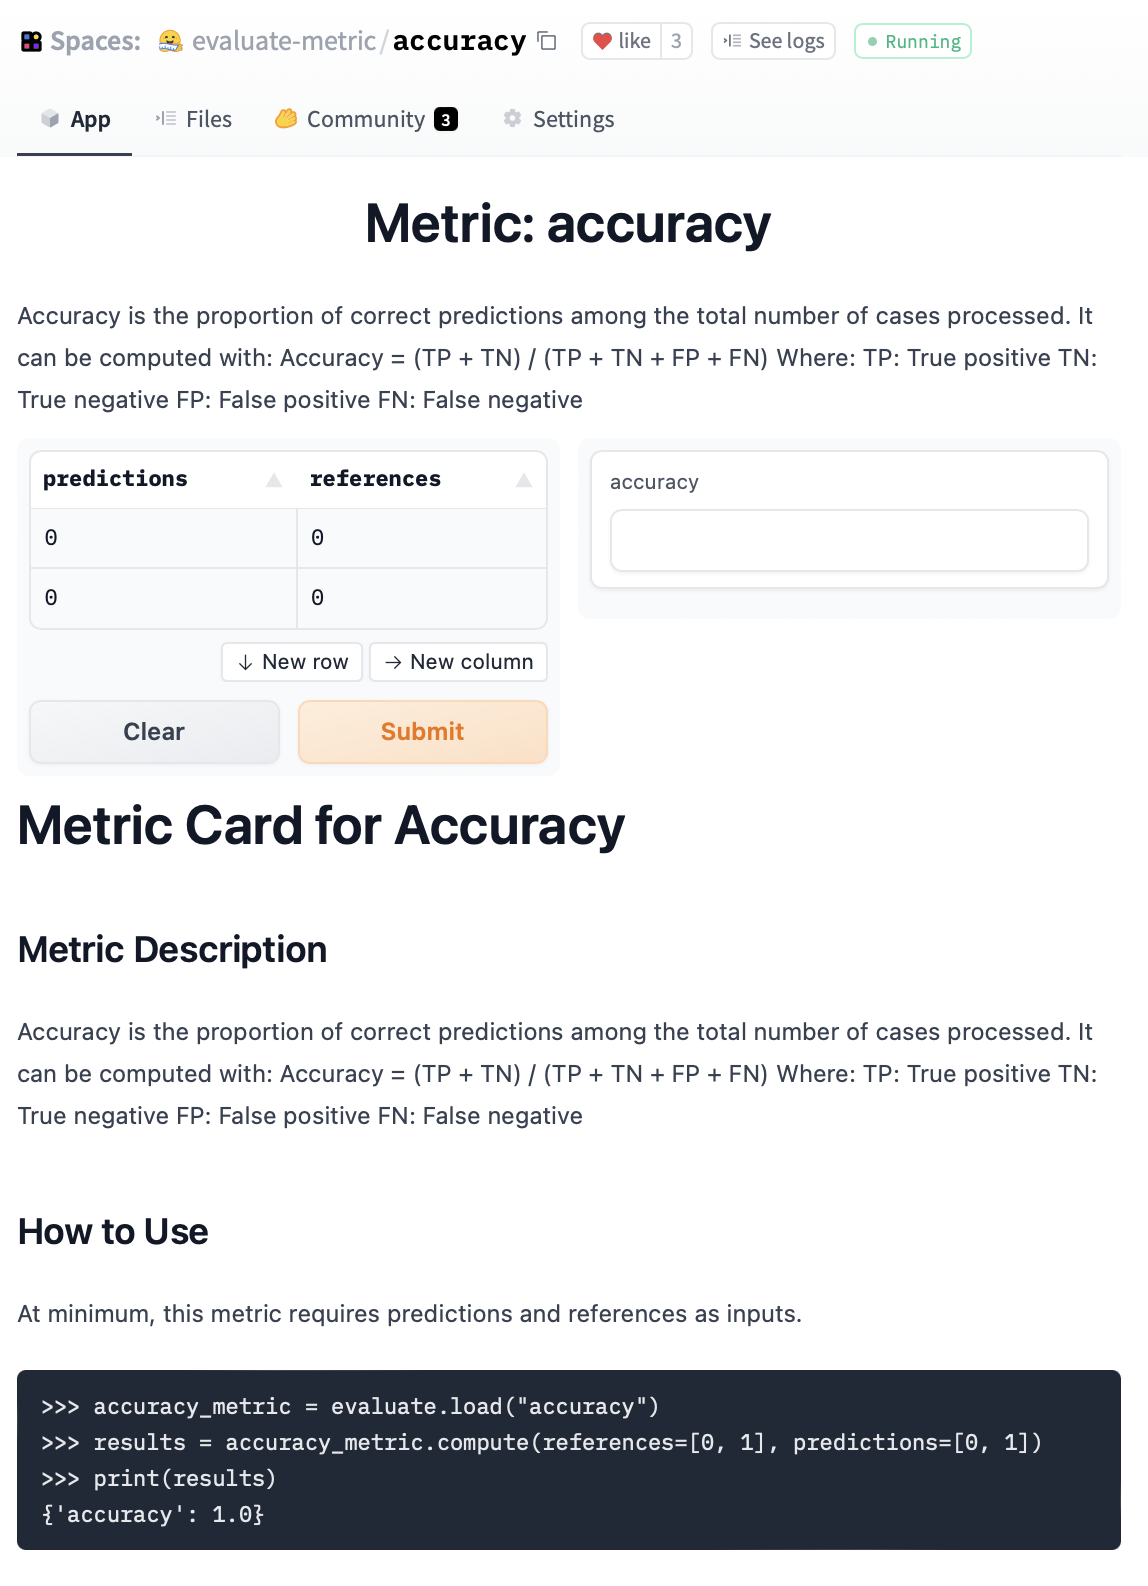
Each of these evaluation modules live on Hugging Face Hub as a Space. They come with an interactive widget and a documentation card documenting its use and limitations. For example accuracy:
Each metric, comparison, and measurement is a separate Python module, but for using any of them, there is a single entry point: evaluate.load()!
Load
Any metric, comparison, or measurement is loaded with the evaluate.load function:
>>> import evaluate
>>> accuracy = evaluate.load("accuracy")
If you want to make sure you are loading the right type of evaluation (especially if there are name clashes) you can explicitly pass the type:
>>> word_length = evaluate.load("word_length", module_type="measurement")Community modules
Besides the modules implemented in 🤗 Evaluate you can also load any community module by specifying the repository ID of the metric implementation:
>>> element_count = evaluate.load("lvwerra/element_count", module_type="measurement")See the Creating and Sharing Guide for information about uploading custom metrics.
List available modules
With list_evaluation_modules() you can check what modules are available on the hub. You can also filter for a specific modules and skip community metrics if you want. You can also see additional information such as likes:
>>> evaluate.list_evaluation_modules(
...   module_type="comparison",
...   include_community=False,
...   with_details=True)

[{'name': 'mcnemar', 'type': 'comparison', 'community': False, 'likes': 1},
 {'name': 'exact_match', 'type': 'comparison', 'community': False, 'likes': 0}]
Module attributes
All evalution modules come with a range of useful attributes that help to use a module stored in a EvaluationModuleInfo object.
| Attribute | Description |
|---|---|
description |
A short description of the evaluation module. |
citation |
A BibTex string for citation when available. |
features |
A Features object defining the input format. |
inputs_description |
This is equivalent to the modules docstring. |
homepage |
The homepage of the module. |
license |
The license of the module. |
codebase_urls |
Link to the code behind the module. |
reference_urls |
Additional reference URLs. |
Let’s have a look at a few examples. First, let’s look at the description attribute of the accuracy metric:
>>> accuracy = evaluate.load("accuracy")
>>> accuracy.description
Accuracy is the proportion of correct predictions among the total number of cases processed. It can be computed with:
Accuracy = (TP + TN) / (TP + TN + FP + FN)
 Where:
TP: True positive
TN: True negative
FP: False positive
FN: False negative
You can see that it describes how the metric works in theory. If you use this metric for your work, especially if it is an academic publication you want to reference it properly. For that you can look at the citation attribute:
>>> accuracy.citation
@article{scikit-learn,
  title={Scikit-learn: Machine Learning in {P}ython},
  author={Pedregosa, F. and Varoquaux, G. and Gramfort, A. and Michel, V.
         and Thirion, B. and Grisel, O. and Blondel, M. and Prettenhofer, P.
         and Weiss, R. and Dubourg, V. and Vanderplas, J. and Passos, A. and
         Cournapeau, D. and Brucher, M. and Perrot, M. and Duchesnay, E.},
  journal={Journal of Machine Learning Research},
  volume={12},
  pages={2825--2830},
  year={2011}
}
Before we can apply a metric or other evaluation module to a use-case, we need to know what the input format of the metric is:
>>> accuracy.features
{
    'predictions': Value(dtype='int32', id=None),
    'references': Value(dtype='int32', id=None)
}
Note that features always describe the type of a single input element. In general we will add lists of elements so you can always think of a list around the types in features. Evaluate accepts various input formats (Python lists, NumPy arrays, PyTorch tensors, etc.) and converts them to an appropriate format for storage and computation.
Compute
Now that we know how the evaluation module works and what should go in there we want to actually use it! When it comes to computing the actual score there are two main ways to do it:
- All-in-one
- Incremental
In the incremental approach the necessary inputs are added to the module with EvaluationModule.add() or EvaluationModule.add_batch() and the score is calculated at the end with EvaluationModule.compute(). Alternatively, one can pass all the inputs at once to compute(). Let’s have a look at the two approaches.
How to compute
The simplest way to calculate the score of an evaluation module is by calling compute() directly with the necessary inputs. Simply pass the inputs as seen in features to the compute() method.
>>> accuracy.compute(references=[0,1,0,1], predictions=[1,0,0,1])
{'accuracy': 0.5}
Evaluation modules return the results in a dictionary. However, in some instances you build up the predictions iteratively or in a distributed fashion in which case add() or add_batch() are useful.
Calculate a single metric or a batch of metrics
In many evaluation pipelines you build the predictions iteratively such as in a for-loop. In that case you could store the predictions in a list and at the end pass them to compute(). With add() and add_batch() you can circumvent the step of storing the predictions separately. If you are only creating single predictions at a time you can use add():
>>> for ref, pred in zip([0,1,0,1], [1,0,0,1]):
>>>     accuracy.add(references=ref, predictions=pred)
>>> accuracy.compute()
{'accuracy': 0.5}
Once you have gathered all predictions you can call compute() to compute the score based on all stored values. When getting predictions and references in batches you can use add_batch() which adds a list elements for later processing. The rest works as with add():
>>> for refs, preds in zip([[0,1],[0,1]], [[1,0],[0,1]]):
>>>     accuracy.add_batch(references=refs, predictions=preds)
>>> accuracy.compute()
{'accuracy': 0.5}
This is especially useful when you need to get the predictions from your model in batches:
>>> for model_inputs, gold_standards in evaluation_dataset:
>>>     predictions = model(model_inputs)
>>>     metric.add_batch(references=gold_standards, predictions=predictions)
>>> metric.compute()
Distributed evaluation
Computing metrics in a distributed environment can be tricky. Metric evaluation is executed in separate Python processes, or nodes, on different subsets of a dataset. Typically, when a metric score is additive (f(AuB) = f(A) + f(B)), you can use distributed reduce operations to gather the scores for each subset of the dataset. But when a metric is non-additive (f(AuB) ≠ f(A) + f(B)), it’s not that simple. For example, you can’t take the sum of the F1 scores of each data subset as your final metric.
A common way to overcome this issue is to fallback on single process evaluation. The metrics are evaluated on a single GPU, which becomes inefficient.
🤗 Evaluate solves this issue by only computing the final metric on the first node. The predictions and references are computed and provided to the metric separately for each node. These are temporarily stored in an Apache Arrow table, avoiding cluttering the GPU or CPU memory. When you are ready to compute() the final metric, the first node is able to access the predictions and references stored on all the other nodes. Once it has gathered all the predictions and references, compute() will perform the final metric evaluation.
This solution allows 🤗 Evaluate to perform distributed predictions, which is important for evaluation speed in distributed settings. At the same time, you can also use complex non-additive metrics without wasting valuable GPU or CPU memory.
Combining several evaluations
Often one wants to not only evaluate a single metric but a range of different metrics capturing different aspects of a model. E.g. for classification it is usually a good idea to compute F1-score, recall, and precision in addition to accuracy to get a better picture of model performance. Naturally, you can load a bunch of metrics and call them sequentially. However, a more convenient way is to use the combine() function to bundle them together:
>>> clf_metrics = evaluate.combine(["accuracy", "f1", "precision", "recall"])The combine function accepts both the list of names of the metrics as well as an instantiated modules. The compute call then computes each metric:
>>> clf_metrics.compute(predictions=[0, 1, 0], references=[0, 1, 1])

{
  'accuracy': 0.667,
  'f1': 0.667,
  'precision': 1.0,
  'recall': 0.5
}
Save and push to the Hub
Saving and sharing evaluation results is an important step. We provide the evaluate.save() function to easily save metrics results. You can either pass a specific filename or a directory. In the latter case, the results are saved in a file with an automatically created file name. Besides the directory or file name, the function takes any key-value pairs as inputs and stores them in a JSON file.
>>> result = accuracy.compute(references=[0,1,0,1], predictions=[1,0,0,1])

>>> hyperparams = {"model": "bert-base-uncased"}
>>> evaluate.save("./results/"experiment="run 42", **result, **hyperparams)
PosixPath('results/result-2022_05_30-22_09_11.json')
The content of the JSON file look like the following:
{
    "experiment": "run 42",
    "accuracy": 0.5,
    "model": "bert-base-uncased",
    "_timestamp": "2022-05-30T22:09:11.959469",
    "_git_commit_hash": "123456789abcdefghijkl",
    "_evaluate_version": "0.1.0",
    "_python_version": "3.9.12 (main, Mar 26 2022, 15:51:15) \n[Clang 13.1.6 (clang-1316.0.21.2)]",
    "_interpreter_path": "/Users/leandro/git/evaluate/env/bin/python"
}
In addition to the specified fields, it also contains useful system information for reproducing the results.
Besides storing the results locally, you should report them on the model’s repository on the Hub. With the evaluate.push_to_hub() function, you can easily report evaluation results to the model’s repository:
evaluate.push_to_hub(
  model_id="huggingface/gpt2-wikitext2",  # model repository on hub
  metric_value=0.5,                       # metric value
  metric_type="bleu",                     # metric name, e.g. accuracy.name
  metric_name="BLEU",                     # pretty name which is displayed
  dataset_type="wikitext",                # dataset name on the hub
  dataset_name="WikiText",                # pretty name
  dataset_split="test",                   # dataset split used
  task_type="text-generation",            # task id, see https://github.com/huggingface/datasets/blob/master/src/datasets/utils/resources/tasks.json
  task_name="Text Generation"             # pretty name for task
)
Evaluator
The evaluate.evaluator() provides automated evaluation and only requires a model, dataset, metric in contrast to the metrics in EvaluationModules that require the model’s predictions. As such it is easier to evaluate a model on a dataset with a given metric as the inference is handled internally. To make that possible it uses the pipeline abstraction from transformers. However, you can use your own framework as long as it follows the pipeline interface.
To make an evaluation with the evaluator let’s load a transformers pipeline (but you can pass your own custom inference class for any framework as long as it follows the pipeline call API) with an model trained on IMDb, the IMDb test split and the accuracy metric.
from transformers import pipeline
from datasets import load_dataset
from evaluate import evaluator
import evaluate

pipe = pipeline("text-classification", model="lvwerra/distilbert-imdb", device=0)
data = load_dataset("imdb", split="test").shuffle().select(range(1000))
metric = evaluate.load("accuracy")
Then you can create an evaluator for text classification and pass the three objects to the compute() method. With the label mapping evaluate provides a method to align the pipeline outputs with the label column in the dataset:
>>> task_evaluator = evaluator("text-classification")

>>> results = task_evaluator.compute(model_or_pipeline=pipe, data=data, metric=metric,
...                        label_mapping={"NEGATIVE": 0, "POSITIVE": 1},)

>>> print(results)
{'accuracy': 0.934}
Calculating the value of the metric alone is often not enough to know if a model performs significantly better than another one. With bootstrapping evaluate computes confidence intervals and the standard error which helps estimate how stable a score is:
>>> results = eval.compute(model_or_pipeline=pipe, data=data, metric=metric,
...                        label_mapping={"NEGATIVE": 0, "POSITIVE": 1},
...                        strategy="bootstrap", n_resamples=200)

>>> print(results)
{'accuracy':
    {
      'confidence_interval': (0.906, 0.9406749892841922),
      'standard_error': 0.00865213251082787,
      'score': 0.923
    }
}
The evaluator expects a "text" and "label" column for the data input. If your dataset differs you can provide the columns with the keywords input_column="text" and label_column="label". Currently only "text-classification" is supported with more tasks being added in the future.
Visualization
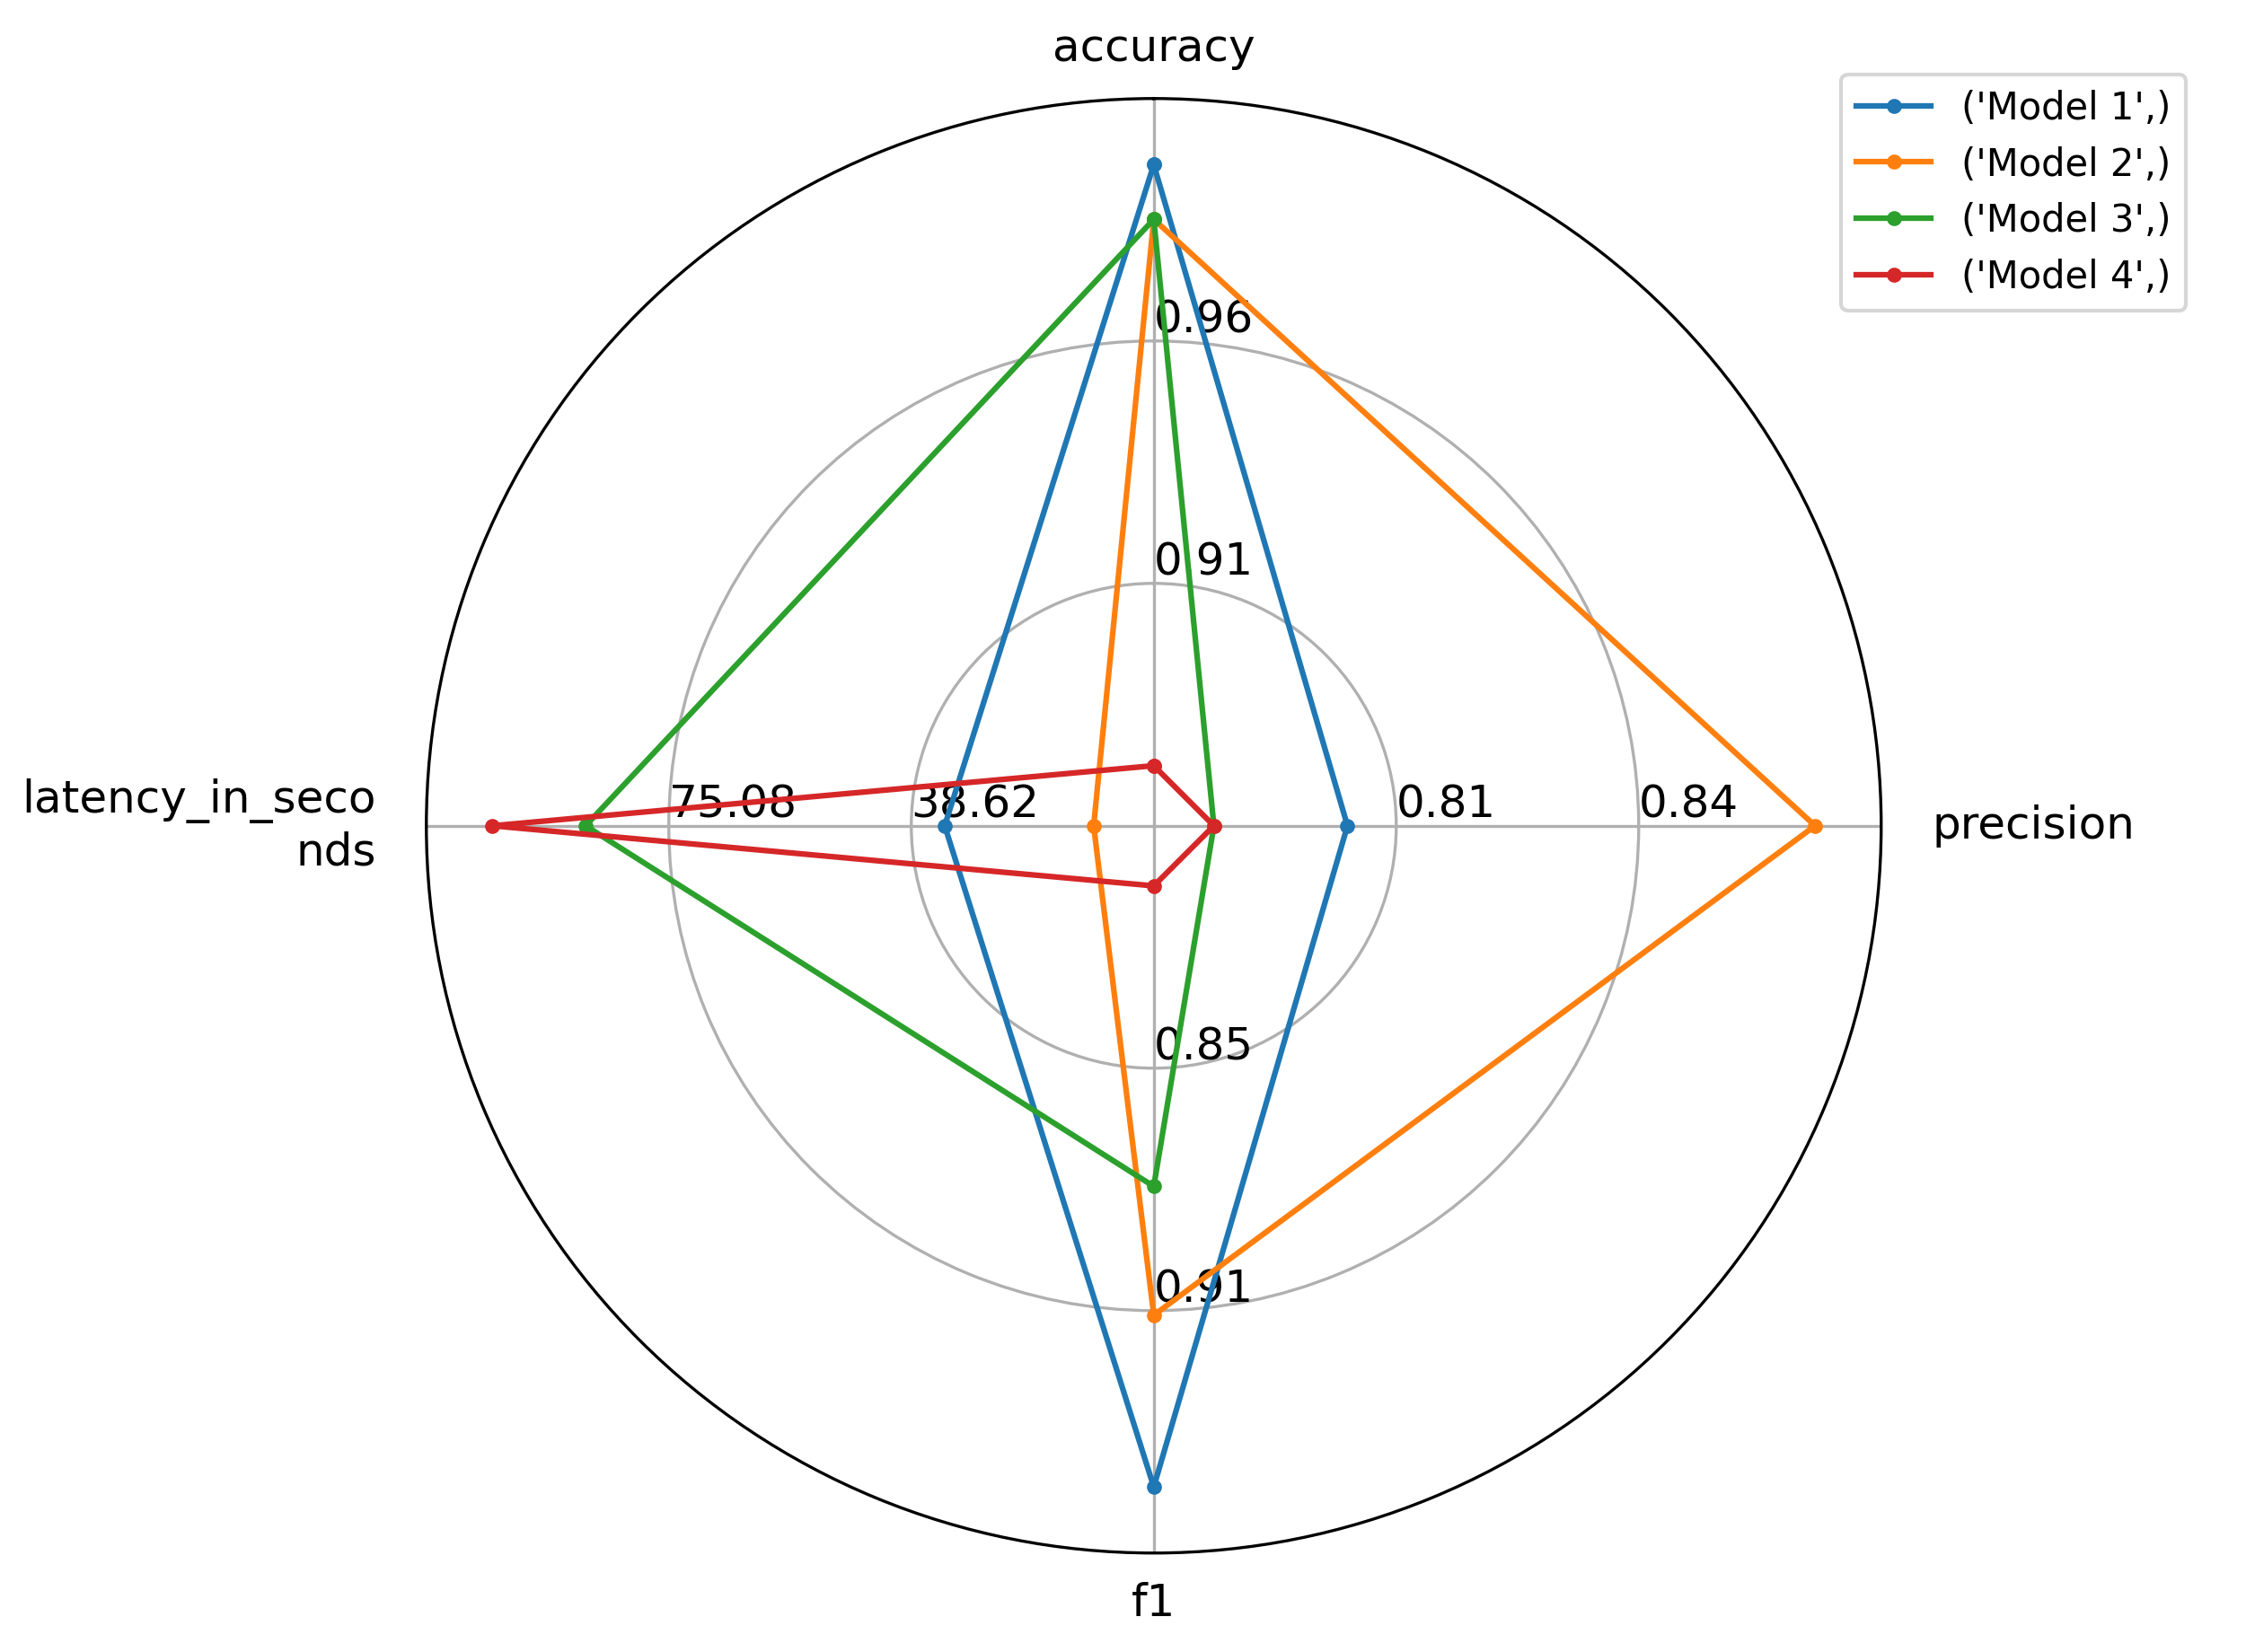
When comparing several models, sometimes it’s hard to spot the differences in their performance simply by looking at their scores. Also often there is not a single best model but there are trade-offs between e.g. latency and accuracy as larger models might have better performance but are also slower. We are gradually adding different visualization approaches, such as plots, to make choosing the best model for a use-case easier.
For instance, if you have a list of results from multiple models (as dictionaries), you can feed them into the radar_plot() function:
import evaluate
from evaluate.visualization import radar_plot

>>> data = [
   {"accuracy": 0.99, "precision": 0.8, "f1": 0.95, "latency_in_seconds": 33.6},
   {"accuracy": 0.98, "precision": 0.87, "f1": 0.91, "latency_in_seconds": 11.2},
   {"accuracy": 0.98, "precision": 0.78, "f1": 0.88, "latency_in_seconds": 87.6},
   {"accuracy": 0.88, "precision": 0.78, "f1": 0.81, "latency_in_seconds": 101.6}
   ]
>>> model_names = ["Model 1", "Model 2", "Model 3", "Model 4"]
>>> plot = radar_plot(data=data, model_names=model_names)
>>> plot.show()
Which lets you visually compare the 4 models and choose the optimal one for you, based on one or several metrics:
Running evaluation on a suite of tasks
It can be useful to evaluate models on a variety of different tasks to understand their downstream performance. The EvaluationSuite enables evaluation of models on a collection of tasks. Tasks can be constructed as (evaluator, dataset, metric) tuples and passed to an EvaluationSuite stored on the Hugging Face Hub as a Space, or locally as a Python script. See the evaluator documentation for a list of currently supported tasks.
EvaluationSuite scripts can be defined as follows, and supports Python code for data preprocessing.
import evaluate
from evaluate.evaluation_suite import SubTask

class Suite(evaluate.EvaluationSuite):

    def __init__(self, name):
        super().__init__(name)

        self.suite = [
            SubTask(
                task_type="text-classification",
                data="imdb",
                split="test[:1]",
                args_for_task={
                    "metric": "accuracy",
                    "input_column": "text",
                    "label_column": "label",
                    "label_mapping": {
                        "LABEL_0": 0.0,
                        "LABEL_1": 1.0
                    }
                }
            ),
            SubTask(
                task_type="text-classification",
                data="sst2",
                split="test[:1]",
                args_for_task={
                    "metric": "accuracy",
                    "input_column": "sentence",
                    "label_column": "label",
                    "label_mapping": {
                        "LABEL_0": 0.0,
                        "LABEL_1": 1.0
                    }
                }
            )
        ]
Evaluation can be run by loading the EvaluationSuite and calling run() method with a model or pipeline.
>>> from evaluate import EvaluationSuite
>>> suite = EvaluationSuite.load('mathemakitten/sentiment-evaluation-suite')
>>> results = suite.run("huggingface/prunebert-base-uncased-6-finepruned-w-distil-mnli")| accuracy | total_time_in_seconds | samples_per_second | latency_in_seconds | task_name |
|---|---|---|---|---|
| 0.3 | 4.62804 | 2.16074 | 0.462804 | imdb |
| 0 | 0.686388 | 14.569 | 0.0686388 | sst2 |