Diffusers documentation
Kandinsky
Kandinsky
Kandinsky 모델은 일련의 다국어 text-to-image 생성 모델입니다. Kandinsky 2.0 모델은 두 개의 다국어 텍스트 인코더를 사용하고 그 결과를 연결해 UNet에 사용됩니다.
Kandinsky 2.1은 텍스트와 이미지 임베딩 간의 매핑을 생성하는 image prior 모델(CLIP)을 포함하도록 아키텍처를 변경했습니다. 이 매핑은 더 나은 text-image alignment를 제공하며, 학습 중에 텍스트 임베딩과 함께 사용되어 더 높은 품질의 결과를 가져옵니다. 마지막으로, Kandinsky 2.1은 spatial conditional 정규화 레이어를 추가하여 사실감을 높여주는 Modulating Quantized Vectors (MoVQ) 디코더를 사용하여 latents를 이미지로 디코딩합니다.
Kandinsky 2.2는 image prior 모델의 이미지 인코더를 더 큰 CLIP-ViT-G 모델로 교체하여 품질을 개선함으로써 이전 모델을 개선했습니다. 또한 image prior 모델은 해상도와 종횡비가 다른 이미지로 재훈련되어 더 높은 해상도의 이미지와 다양한 이미지 크기를 생성합니다.
Kandinsky 3는 아키텍처를 단순화하고 prior 모델과 diffusion 모델을 포함하는 2단계 생성 프로세스에서 벗어나고 있습니다. 대신, Kandinsky 3는 Flan-UL2를 사용하여 텍스트를 인코딩하고, BigGan-deep 블록이 포함된 UNet을 사용하며, Sber-MoVQGAN을 사용하여 latents를 이미지로 디코딩합니다. 텍스트 이해와 생성된 이미지 품질은 주로 더 큰 텍스트 인코더와 UNet을 사용함으로써 달성됩니다.
이 가이드에서는 text-to-image, image-to-image, 인페인팅, 보간 등을 위해 Kandinsky 모델을 사용하는 방법을 설명합니다.
시작하기 전에 다음 라이브러리가 설치되어 있는지 확인하세요:
# Colab에서 필요한 라이브러리를 설치하기 위해 주석을 제외하세요
#!pip install -q diffusers transformers accelerate
Kandinsky 2.1과 2.2의 사용법은 매우 유사합니다! 유일한 차이점은 Kandinsky 2.2는 latents를 디코딩할 때 프롬프트를 입력으로 받지 않는다는 것입니다. 대신, Kandinsky 2.2는 디코딩 중에는 image_embeds만 받아들입니다.
Kandinsky 3는 더 간결한 아키텍처를 가지고 있으며 prior 모델이 필요하지 않습니다. 즉, Stable Diffusion XL과 같은 다른 diffusion 모델과 사용법이 동일합니다.
Text-to-image
모든 작업에 Kandinsky 모델을 사용하려면 항상 프롬프트를 인코딩하고 이미지 임베딩을 생성하는 prior 파이프라인을 설정하는 것부터 시작해야 합니다. 이전 파이프라인은 negative 프롬프트 ""에 해당하는 negative_image_embeds도 생성합니다. 더 나은 결과를 얻으려면 이전 파이프라인에 실제 negative_prompt를 전달할 수 있지만, 이렇게 하면 prior 파이프라인의 유효 배치 크기가 2배로 증가합니다.
from diffusers import KandinskyPriorPipeline, KandinskyPipeline
import torch

prior_pipeline = KandinskyPriorPipeline.from_pretrained("kandinsky-community/kandinsky-2-1-prior", torch_dtype=torch.float16).to("cuda")
pipeline = KandinskyPipeline.from_pretrained("kandinsky-community/kandinsky-2-1", torch_dtype=torch.float16).to("cuda")

prompt = "A alien cheeseburger creature eating itself, claymation, cinematic, moody lighting"
negative_prompt = "low quality, bad quality" # negative 프롬프트 포함은 선택적이지만, 보통 결과는 더 좋습니다
image_embeds, negative_image_embeds = prior_pipeline(prompt, negative_prompt, guidance_scale=1.0).to_tuple()
이제 모든 프롬프트와 임베딩을 KandinskyPipeline에 전달하여 이미지를 생성합니다:
image = pipeline(prompt, image_embeds=image_embeds, negative_prompt=negative_prompt, negative_image_embeds=negative_image_embeds, height=768, width=768).images[0]
image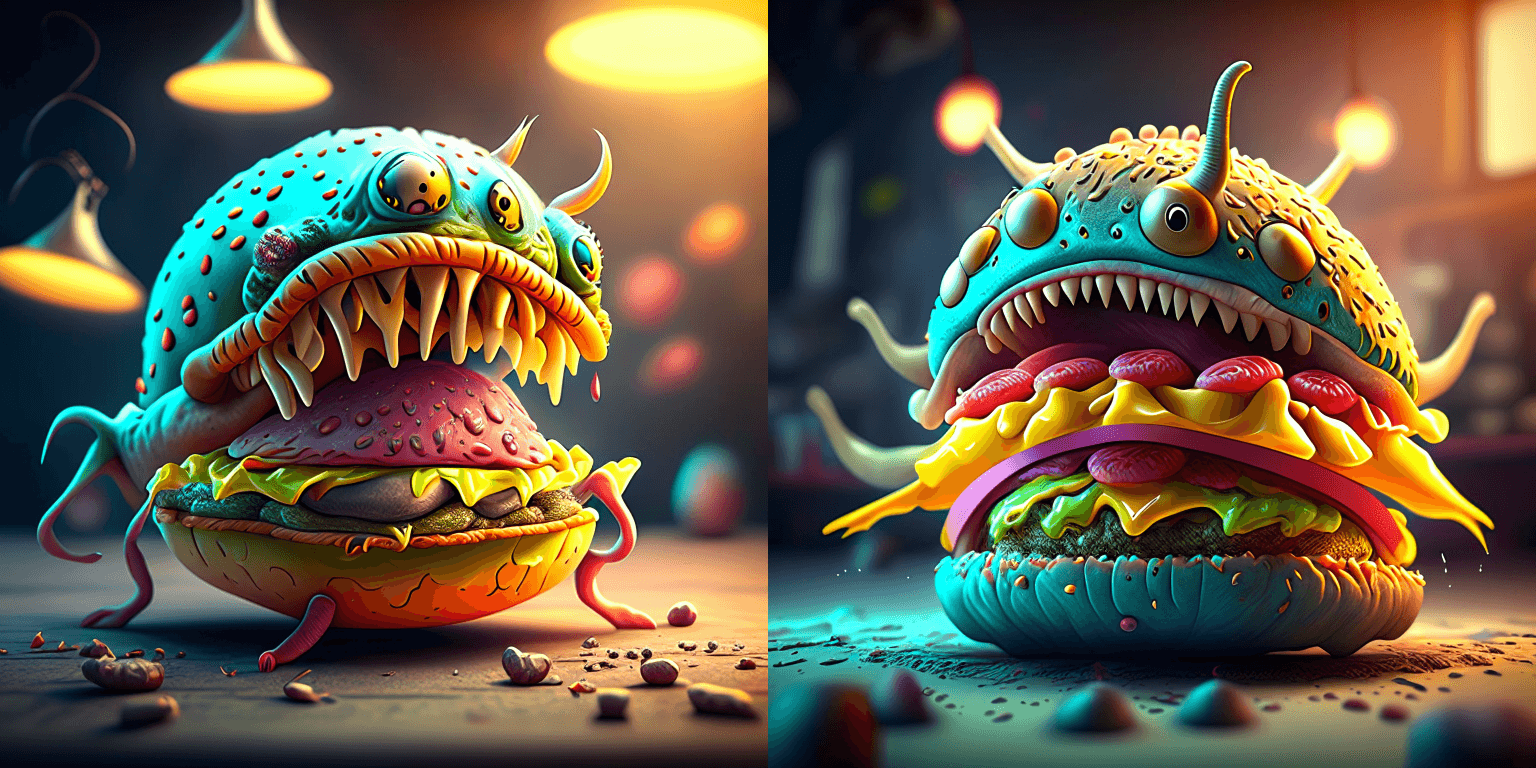
🤗 Diffusers는 또한 KandinskyCombinedPipeline 및 KandinskyV22CombinedPipeline이 포함된 end-to-end API를 제공하므로 prior 파이프라인과 text-to-image 변환 파이프라인을 별도로 불러올 필요가 없습니다. 결합된 파이프라인은 prior 모델과 디코더를 모두 자동으로 불러옵니다. 원하는 경우 prior_guidance_scale 및 prior_num_inference_steps 매개 변수를 사용하여 prior 파이프라인에 대해 다른 값을 설정할 수 있습니다.
내부에서 결합된 파이프라인을 자동으로 호출하려면 AutoPipelineForText2Image를 사용합니다:
from diffusers import AutoPipelineForText2Image
import torch

pipeline = AutoPipelineForText2Image.from_pretrained("kandinsky-community/kandinsky-2-1", torch_dtype=torch.float16)
pipeline.enable_model_cpu_offload()

prompt = "A alien cheeseburger creature eating itself, claymation, cinematic, moody lighting"
negative_prompt = "low quality, bad quality"

image = pipeline(prompt=prompt, negative_prompt=negative_prompt, prior_guidance_scale=1.0, guidance_scale=4.0, height=768, width=768).images[0]
image
Image-to-image
Image-to-image 경우, 초기 이미지와 텍스트 프롬프트를 전달하여 파이프라인에 이미지를 conditioning합니다. Prior 파이프라인을 불러오는 것으로 시작합니다:
import torch
from diffusers import KandinskyImg2ImgPipeline, KandinskyPriorPipeline

prior_pipeline = KandinskyPriorPipeline.from_pretrained("kandinsky-community/kandinsky-2-1-prior", torch_dtype=torch.float16, use_safetensors=True).to("cuda")
pipeline = KandinskyImg2ImgPipeline.from_pretrained("kandinsky-community/kandinsky-2-1", torch_dtype=torch.float16, use_safetensors=True).to("cuda")
Conditioning할 이미지를 다운로드합니다:
from diffusers.utils import load_image

# 이미지 다운로드
url = "https://raw.githubusercontent.com/CompVis/stable-diffusion/main/assets/stable-samples/img2img/sketch-mountains-input.jpg"
original_image = load_image(url)
original_image = original_image.resize((768, 512))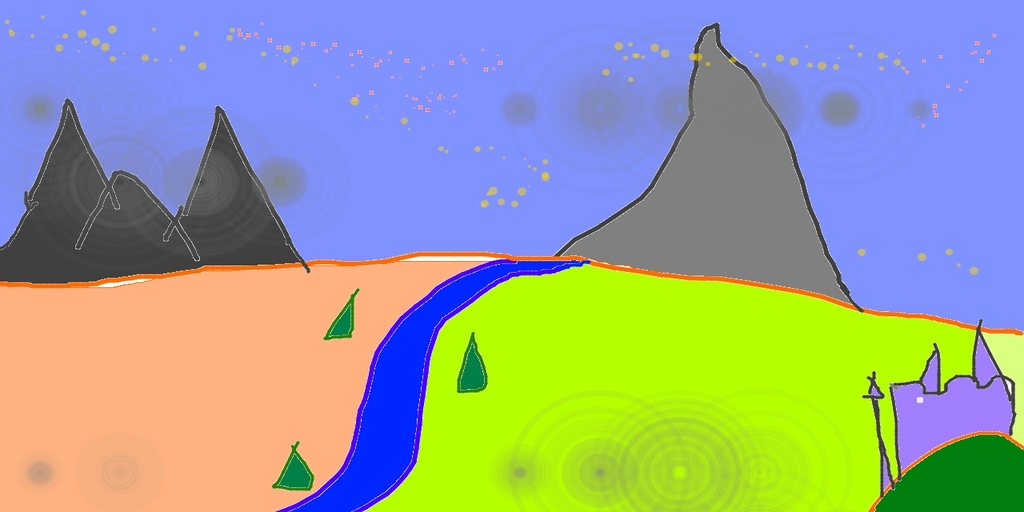
Prior 파이프라인으로 image_embeds와 negative_image_embeds를 생성합니다:
prompt = "A fantasy landscape, Cinematic lighting"
negative_prompt = "low quality, bad quality"

image_embeds, negative_image_embeds = prior_pipeline(prompt, negative_prompt).to_tuple()
이제 원본 이미지와 모든 프롬프트 및 임베딩을 파이프라인으로 전달하여 이미지를 생성합니다:
from diffusers.utils import make_image_grid

image = pipeline(prompt, negative_prompt=negative_prompt, image=original_image, image_embeds=image_embeds, negative_image_embeds=negative_image_embeds, height=768, width=768, strength=0.3).images[0]
make_image_grid([original_image.resize((512, 512)), image.resize((512, 512))], rows=1, cols=2)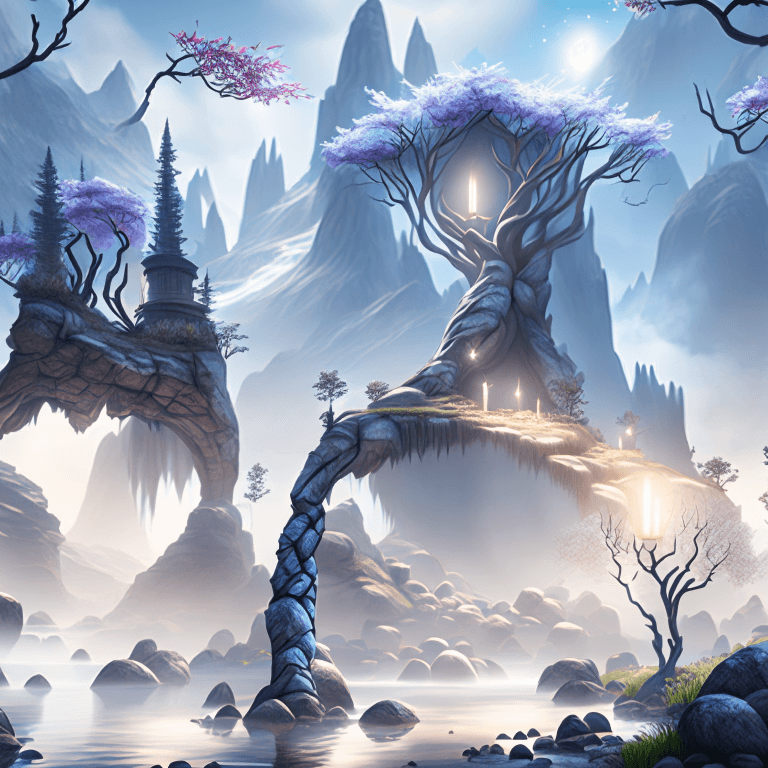
또한 🤗 Diffusers에서는 KandinskyImg2ImgCombinedPipeline 및 KandinskyV22Img2ImgCombinedPipeline이 포함된 end-to-end API를 제공하므로 prior 파이프라인과 image-to-image 파이프라인을 별도로 불러올 필요가 없습니다. 결합된 파이프라인은 prior 모델과 디코더를 모두 자동으로 불러옵니다. 원하는 경우 prior_guidance_scale 및 prior_num_inference_steps 매개 변수를 사용하여 이전 파이프라인에 대해 다른 값을 설정할 수 있습니다.
내부에서 결합된 파이프라인을 자동으로 호출하려면 AutoPipelineForImage2Image를 사용합니다:
from diffusers import AutoPipelineForImage2Image
from diffusers.utils import make_image_grid, load_image
import torch

pipeline = AutoPipelineForImage2Image.from_pretrained("kandinsky-community/kandinsky-2-1", torch_dtype=torch.float16, use_safetensors=True)
pipeline.enable_model_cpu_offload()

prompt = "A fantasy landscape, Cinematic lighting"
negative_prompt = "low quality, bad quality"

url = "https://raw.githubusercontent.com/CompVis/stable-diffusion/main/assets/stable-samples/img2img/sketch-mountains-input.jpg"
original_image = load_image(url)

original_image.thumbnail((768, 768))

image = pipeline(prompt=prompt, negative_prompt=negative_prompt, image=original_image, strength=0.3).images[0]
make_image_grid([original_image.resize((512, 512)), image.resize((512, 512))], rows=1, cols=2)
Inpainting
⚠️ Kandinsky 모델은 이제 검은색 픽셀 대신 ⬜️ 흰색 픽셀을 사용하여 마스크 영역을 표현합니다. 프로덕션에서 KandinskyInpaintPipeline을 사용하는 경우 흰색 픽셀을 사용하도록 마스크를 변경해야 합니다:
# PIL 입력에 대해
import PIL.ImageOps
mask = PIL.ImageOps.invert(mask)

# PyTorch와 NumPy 입력에 대해
mask = 1 - mask
인페인팅에서는 원본 이미지, 원본 이미지에서 대체할 영역의 마스크, 인페인팅할 내용에 대한 텍스트 프롬프트가 필요합니다. Prior 파이프라인을 불러옵니다:
from diffusers import KandinskyInpaintPipeline, KandinskyPriorPipeline
from diffusers.utils import load_image, make_image_grid
import torch
import numpy as np
from PIL import Image

prior_pipeline = KandinskyPriorPipeline.from_pretrained("kandinsky-community/kandinsky-2-1-prior", torch_dtype=torch.float16, use_safetensors=True).to("cuda")
pipeline = KandinskyInpaintPipeline.from_pretrained("kandinsky-community/kandinsky-2-1-inpaint", torch_dtype=torch.float16, use_safetensors=True).to("cuda")
초기 이미지를 불러오고 마스크를 생성합니다:
init_image = load_image("https://huggingface.co/datasets/hf-internal-testing/diffusers-images/resolve/main/kandinsky/cat.png")
mask = np.zeros((768, 768), dtype=np.float32)
# mask area above cat's head
mask[:250, 250:-250] = 1
Prior 파이프라인으로 임베딩을 생성합니다:
prompt = "a hat"
prior_output = prior_pipeline(prompt)
이제 이미지 생성을 위해 초기 이미지, 마스크, 프롬프트와 임베딩을 파이프라인에 전달합니다:
output_image = pipeline(prompt, image=init_image, mask_image=mask, **prior_output, height=768, width=768, num_inference_steps=150).images[0]
mask = Image.fromarray((mask*255).astype('uint8'), 'L')
make_image_grid([init_image, mask, output_image], rows=1, cols=3)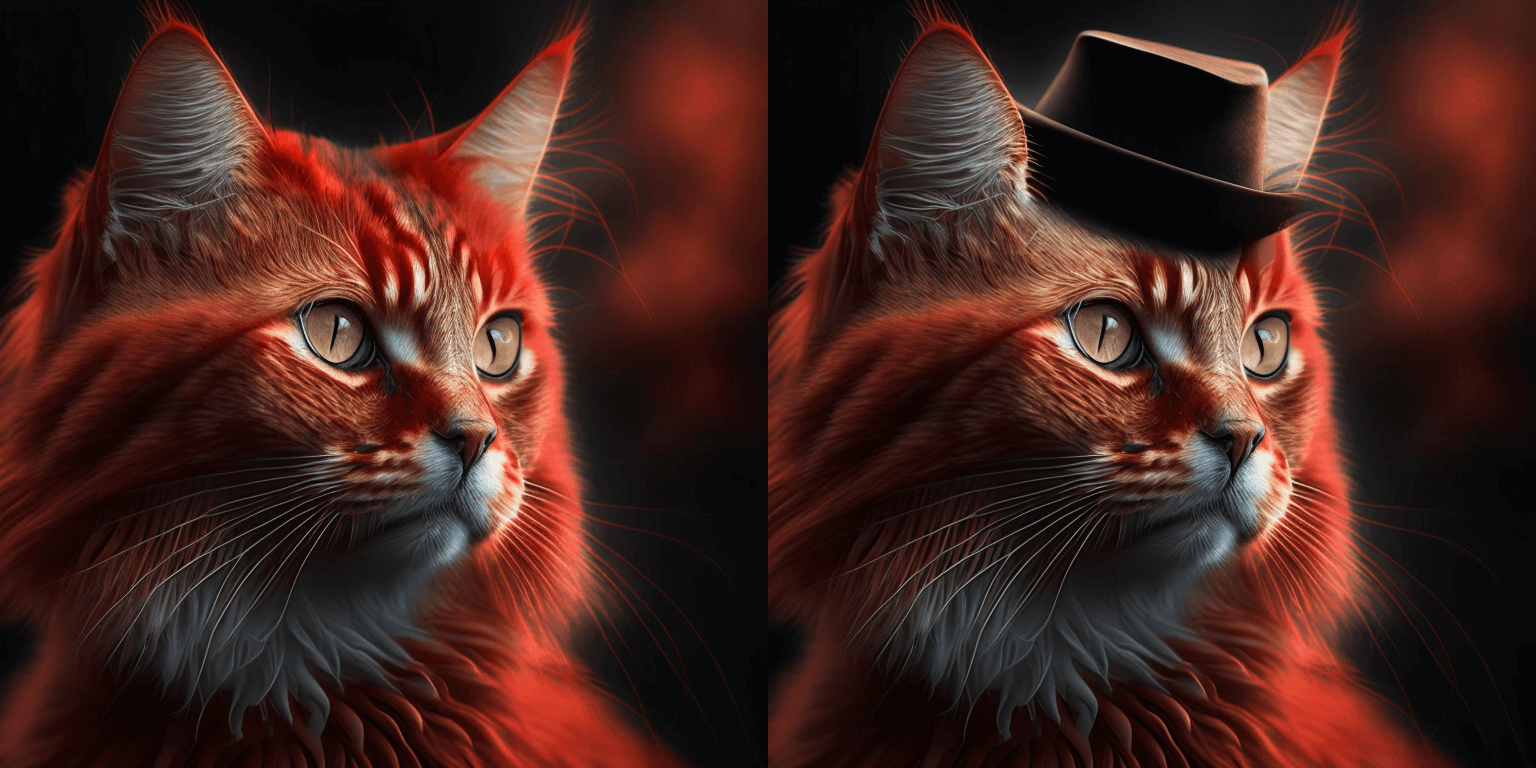
KandinskyInpaintCombinedPipeline 및 KandinskyV22InpaintCombinedPipeline을 사용하여 내부에서 prior 및 디코더 파이프라인을 함께 호출할 수 있습니다. 이를 위해 AutoPipelineForInpainting을 사용합니다:
import torch
import numpy as np
from PIL import Image
from diffusers import AutoPipelineForInpainting
from diffusers.utils import load_image, make_image_grid

pipe = AutoPipelineForInpainting.from_pretrained("kandinsky-community/kandinsky-2-1-inpaint", torch_dtype=torch.float16)
pipe.enable_model_cpu_offload()

init_image = load_image("https://huggingface.co/datasets/hf-internal-testing/diffusers-images/resolve/main/kandinsky/cat.png")
mask = np.zeros((768, 768), dtype=np.float32)
# 고양이 머리 위 마스크 지역
mask[:250, 250:-250] = 1
prompt = "a hat"

output_image = pipe(prompt=prompt, image=init_image, mask_image=mask).images[0]
mask = Image.fromarray((mask*255).astype('uint8'), 'L')
make_image_grid([init_image, mask, output_image], rows=1, cols=3)
Interpolation (보간)
Interpolation(보간)을 사용하면 이미지와 텍스트 임베딩 사이의 latent space를 탐색할 수 있어 prior 모델의 중간 결과물을 볼 수 있는 멋진 방법입니다. Prior 파이프라인과 보간하려는 두 개의 이미지를 불러옵니다:
from diffusers import KandinskyPriorPipeline, KandinskyPipeline
from diffusers.utils import load_image, make_image_grid
import torch

prior_pipeline = KandinskyPriorPipeline.from_pretrained("kandinsky-community/kandinsky-2-1-prior", torch_dtype=torch.float16, use_safetensors=True).to("cuda")
img_1 = load_image("https://huggingface.co/datasets/hf-internal-testing/diffusers-images/resolve/main/kandinsky/cat.png")
img_2 = load_image("https://huggingface.co/datasets/hf-internal-testing/diffusers-images/resolve/main/kandinsky/starry_night.jpeg")
make_image_grid([img_1.resize((512,512)), img_2.resize((512,512))], rows=1, cols=2)
보간할 텍스트 또는 이미지를 지정하고 각 텍스트 또는 이미지에 대한 가중치를 설정합니다. 가중치를 실험하여 보간에 어떤 영향을 미치는지 확인하세요!
images_texts = ["a cat", img_1, img_2]
weights = [0.3, 0.3, 0.4]
interpolate 함수를 호출하여 임베딩을 생성한 다음, 파이프라인으로 전달하여 이미지를 생성합니다:
# 프롬프트는 빈칸으로 남겨도 됩니다
prompt = ""
prior_out = prior_pipeline.interpolate(images_texts, weights)

pipeline = KandinskyPipeline.from_pretrained("kandinsky-community/kandinsky-2-1", torch_dtype=torch.float16, use_safetensors=True).to("cuda")

image = pipeline(prompt, **prior_out, height=768, width=768).images[0]
image
ControlNet
⚠️ ControlNet은 Kandinsky 2.2에서만 지원됩니다!
ControlNet을 사용하면 depth map이나 edge detection와 같은 추가 입력을 통해 사전학습된 large diffusion 모델을 conditioning할 수 있습니다. 예를 들어, 모델이 depth map의 구조를 이해하고 보존할 수 있도록 깊이 맵으로 Kandinsky 2.2를 conditioning할 수 있습니다.
이미지를 불러오고 depth map을 추출해 보겠습니다:
from diffusers.utils import load_image

img = load_image(
    "https://huggingface.co/datasets/hf-internal-testing/diffusers-images/resolve/main/kandinskyv22/cat.png"
).resize((768, 768))
img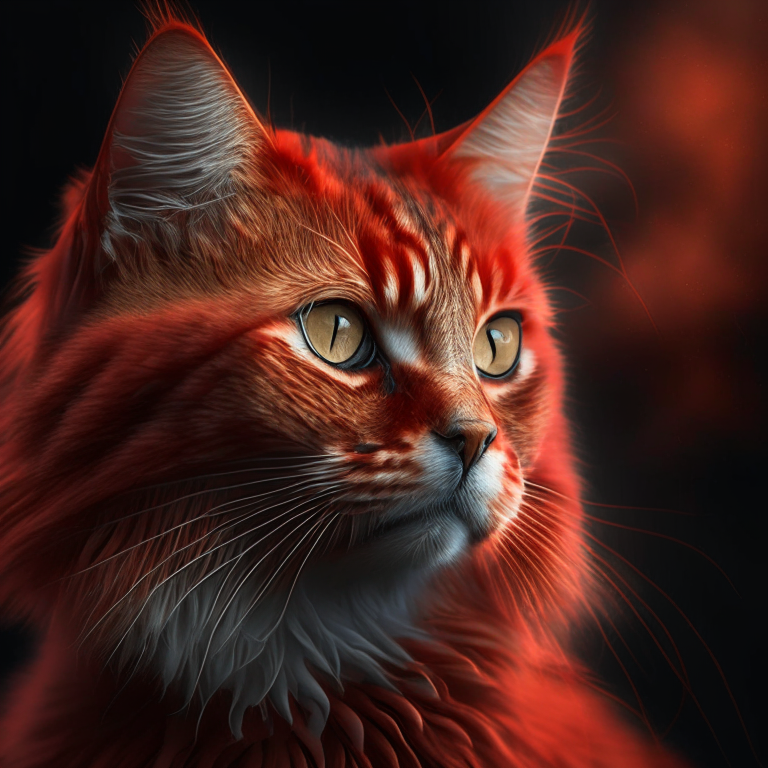
그런 다음 🤗 Transformers의 depth-estimation Pipeline을 사용하여 이미지를 처리해 depth map을 구할 수 있습니다:
import torch
import numpy as np

from transformers import pipeline

def make_hint(image, depth_estimator):
    image = depth_estimator(image)["depth"]
    image = np.array(image)
    image = image[:, :, None]
    image = np.concatenate([image, image, image], axis=2)
    detected_map = torch.from_numpy(image).float() / 255.0
    hint = detected_map.permute(2, 0, 1)
    return hint

depth_estimator = pipeline("depth-estimation")
hint = make_hint(img, depth_estimator).unsqueeze(0).half().to("cuda")
Text-to-image
Prior 파이프라인과 KandinskyV22ControlnetPipeline를 불러옵니다:
from diffusers import KandinskyV22PriorPipeline, KandinskyV22ControlnetPipeline

prior_pipeline = KandinskyV22PriorPipeline.from_pretrained(
    "kandinsky-community/kandinsky-2-2-prior", torch_dtype=torch.float16, use_safetensors=True
).to("cuda")

pipeline = KandinskyV22ControlnetPipeline.from_pretrained(
    "kandinsky-community/kandinsky-2-2-controlnet-depth", torch_dtype=torch.float16
).to("cuda")
프롬프트와 negative 프롬프트로 이미지 임베딩을 생성합니다:
prompt = "A robot, 4k photo"
negative_prior_prompt = "lowres, text, error, cropped, worst quality, low quality, jpeg artifacts, ugly, duplicate, morbid, mutilated, out of frame, extra fingers, mutated hands, poorly drawn hands, poorly drawn face, mutation, deformed, blurry, dehydrated, bad anatomy, bad proportions, extra limbs, cloned face, disfigured, gross proportions, malformed limbs, missing arms, missing legs, extra arms, extra legs, fused fingers, too many fingers, long neck, username, watermark, signature"

generator = torch.Generator(device="cuda").manual_seed(43)

image_emb, zero_image_emb = prior_pipeline(
    prompt=prompt, negative_prompt=negative_prior_prompt, generator=generator
).to_tuple()
마지막으로 이미지 임베딩과 depth 이미지를 KandinskyV22ControlnetPipeline에 전달하여 이미지를 생성합니다:
image = pipeline(image_embeds=image_emb, negative_image_embeds=zero_image_emb, hint=hint, num_inference_steps=50, generator=generator, height=768, width=768).images[0]
image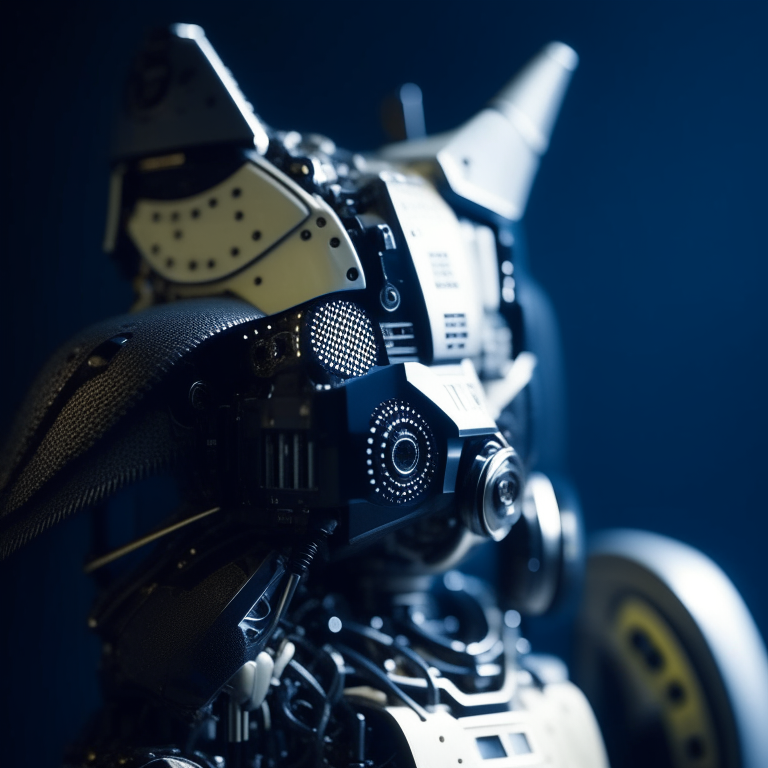
Image-to-image
ControlNet을 사용한 image-to-image의 경우, 다음을 사용할 필요가 있습니다:
KandinskyV22PriorEmb2EmbPipeline로 텍스트 프롬프트와 이미지에서 이미지 임베딩을 생성합니다.KandinskyV22ControlnetImg2ImgPipeline로 초기 이미지와 이미지 임베딩에서 이미지를 생성합니다.
🤗 Transformers에서 depth-estimation Pipeline을 사용하여 고양이의 초기 이미지의 depth map을 처리해 추출합니다:
import torch
import numpy as np

from diffusers import KandinskyV22PriorEmb2EmbPipeline, KandinskyV22ControlnetImg2ImgPipeline
from diffusers.utils import load_image
from transformers import pipeline

img = load_image(
    "https://huggingface.co/datasets/hf-internal-testing/diffusers-images/resolve/main/kandinskyv22/cat.png"
).resize((768, 768))

def make_hint(image, depth_estimator):
    image = depth_estimator(image)["depth"]
    image = np.array(image)
    image = image[:, :, None]
    image = np.concatenate([image, image, image], axis=2)
    detected_map = torch.from_numpy(image).float() / 255.0
    hint = detected_map.permute(2, 0, 1)
    return hint

depth_estimator = pipeline("depth-estimation")
hint = make_hint(img, depth_estimator).unsqueeze(0).half().to("cuda")
Prior 파이프라인과 KandinskyV22ControlnetImg2ImgPipeline을 불러옵니다:
prior_pipeline = KandinskyV22PriorEmb2EmbPipeline.from_pretrained(
    "kandinsky-community/kandinsky-2-2-prior", torch_dtype=torch.float16, use_safetensors=True
).to("cuda")

pipeline = KandinskyV22ControlnetImg2ImgPipeline.from_pretrained(
    "kandinsky-community/kandinsky-2-2-controlnet-depth", torch_dtype=torch.float16
).to("cuda")
텍스트 프롬프트와 초기 이미지를 이전 파이프라인에 전달하여 이미지 임베딩을 생성합니다:
prompt = "A robot, 4k photo"
negative_prior_prompt = "lowres, text, error, cropped, worst quality, low quality, jpeg artifacts, ugly, duplicate, morbid, mutilated, out of frame, extra fingers, mutated hands, poorly drawn hands, poorly drawn face, mutation, deformed, blurry, dehydrated, bad anatomy, bad proportions, extra limbs, cloned face, disfigured, gross proportions, malformed limbs, missing arms, missing legs, extra arms, extra legs, fused fingers, too many fingers, long neck, username, watermark, signature"

generator = torch.Generator(device="cuda").manual_seed(43)

img_emb = prior_pipeline(prompt=prompt, image=img, strength=0.85, generator=generator)
negative_emb = prior_pipeline(prompt=negative_prior_prompt, image=img, strength=1, generator=generator)
이제 KandinskyV22ControlnetImg2ImgPipeline을 실행하여 초기 이미지와 이미지 임베딩으로부터 이미지를 생성할 수 있습니다:
image = pipeline(image=img, strength=0.5, image_embeds=img_emb.image_embeds, negative_image_embeds=negative_emb.image_embeds, hint=hint, num_inference_steps=50, generator=generator, height=768, width=768).images[0]
make_image_grid([img.resize((512, 512)), image.resize((512, 512))], rows=1, cols=2)
최적화
Kandinsky는 mapping을 생성하기 위한 prior 파이프라인과 latents를 이미지로 디코딩하기 위한 두 번째 파이프라인이 필요하다는 점에서 독특합니다. 대부분의 계산이 두 번째 파이프라인에서 이루어지므로 최적화의 노력은 두 번째 파이프라인에 집중되어야 합니다. 다음은 추론 중 Kandinsky키를 개선하기 위한 몇 가지 팁입니다.
- PyTorch < 2.0을 사용할 경우 xFormers을 활성화합니다.
  from diffusers import DiffusionPipeline
  import torch

  pipe = DiffusionPipeline.from_pretrained("kandinsky-community/kandinsky-2-1", torch_dtype=torch.float16)
+ pipe.enable_xformers_memory_efficient_attention()- PyTorch >= 2.0을 사용할 경우
torch.compile을 활성화하여 scaled dot-product attention (SDPA)를 자동으로 사용하도록 합니다:
  pipe.unet.to(memory_format=torch.channels_last)
+ pipe.unet = torch.compile(pipe.unet, mode="reduce-overhead", fullgraph=True)
이는 attention processor를 명시적으로 AttnAddedKVProcessor2_0을 사용하도록 설정하는 것과 동일합니다:
from diffusers.models.attention_processor import AttnAddedKVProcessor2_0

pipe.unet.set_attn_processor(AttnAddedKVProcessor2_0())- 메모리 부족 오류를 방지하기 위해
enable_model_cpu_offload()를 사용하여 모델을 CPU로 오프로드합니다:
  from diffusers import DiffusionPipeline
  import torch

  pipe = DiffusionPipeline.from_pretrained("kandinsky-community/kandinsky-2-1", torch_dtype=torch.float16)
+ pipe.enable_model_cpu_offload()- 기본적으로 text-to-image 파이프라인은
DDIMScheduler를 사용하지만,DDPMScheduler와 같은 다른 스케줄러로 대체하여 추론 속도와 이미지 품질 간의 균형에 어떤 영향을 미치는지 확인할 수 있습니다:
from diffusers import DDPMScheduler
from diffusers import DiffusionPipeline

scheduler = DDPMScheduler.from_pretrained("kandinsky-community/kandinsky-2-1", subfolder="ddpm_scheduler")
pipe = DiffusionPipeline.from_pretrained("kandinsky-community/kandinsky-2-1", scheduler=scheduler, torch_dtype=torch.float16, use_safetensors=True).to("cuda")