Diffusers documentation
DreamBooth
DreamBooth
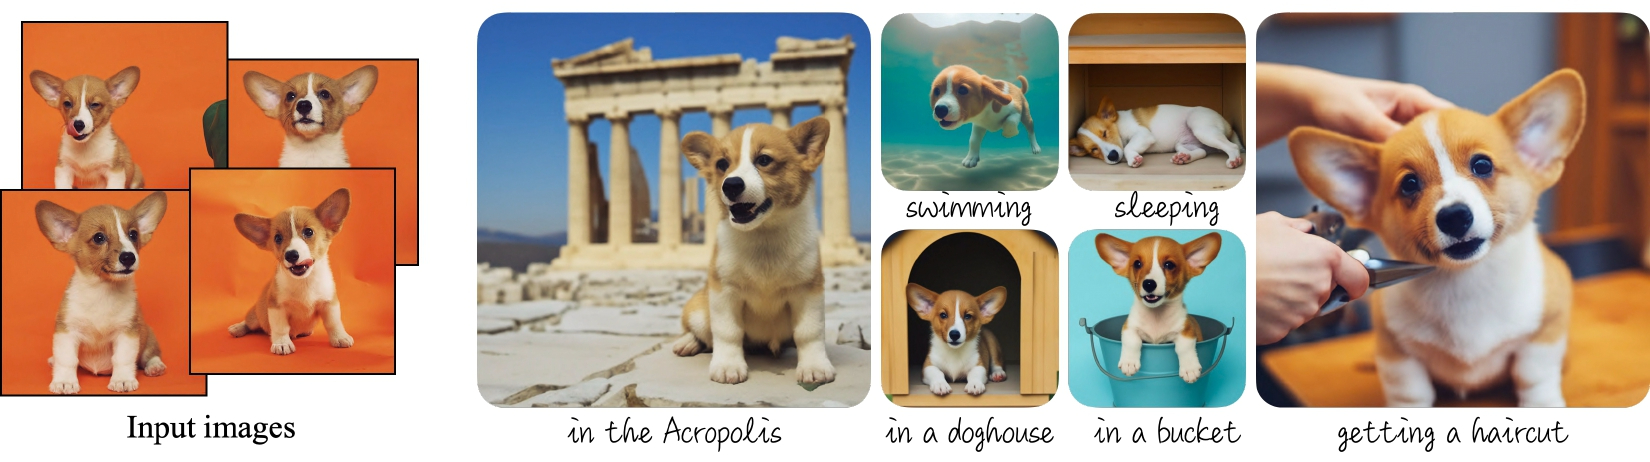
DreamBooth is a method to personalize text-to-image models like Stable Diffusion given just a few (3-5) images of a subject. It allows the model to generate contextualized images of the subject in different scenes, poses, and views.
This guide will show you how to finetune DreamBooth with the CompVis/stable-diffusion-v1-4 model for various GPU sizes, and with Flax. All the training scripts for DreamBooth used in this guide can be found here if you’re interested in digging deeper and seeing how things work.
Before running the scripts, make sure you install the library’s training dependencies. We also recommend installing 🧨 Diffusers from the main GitHub branch:
pip install git+https://github.com/huggingface/diffusers
pip install -U -r diffusers/examples/dreambooth/requirements.txt
xFormers is not part of the training requirements, but we recommend you install it if you can because it could make your training faster and less memory intensive.
After all the dependencies have been set up, initialize a 🤗 Accelerate environment with:
accelerate config
To setup a default 🤗 Accelerate environment without choosing any configurations:
accelerate config default
Or if your environment doesn’t support an interactive shell like a notebook, you can use:
from accelerate.utils import write_basic_config

write_basic_config()
Finally, download a few images of a dog to DreamBooth with:
from huggingface_hub import snapshot_download

local_dir = "./dog"
snapshot_download(
    "diffusers/dog-example",
    local_dir=local_dir,
    repo_type="dataset",
    ignore_patterns=".gitattributes",
)
To use your own dataset, take a look at the Create a dataset for training guide.
Finetuning
DreamBooth finetuning is very sensitive to hyperparameters and easy to overfit. We recommend you take a look at our in-depth analysis with recommended settings for different subjects to help you choose the appropriate hyperparameters.
Set the INSTANCE_DIR environment variable to the path of the directory containing the dog images.
Specify the MODEL_NAME environment variable (either a Hub model repository id or a path to the directory containing the model weights) and pass it to the pretrained_model_name_or_path argument. The instance_prompt argument is a text prompt that contains a unique identifier, such as sks, and the class the image belongs to, which in this example is a photo of a sks dog.
export MODEL_NAME="CompVis/stable-diffusion-v1-4"
export INSTANCE_DIR="./dog"
export OUTPUT_DIR="path_to_saved_model"
Then you can launch the training script (you can find the full training script here) with the following command:
accelerate launch train_dreambooth.py \
  --pretrained_model_name_or_path=$MODEL_NAME  \
  --instance_data_dir=$INSTANCE_DIR \
  --output_dir=$OUTPUT_DIR \
  --instance_prompt="a photo of sks dog" \
  --resolution=512 \
  --train_batch_size=1 \
  --gradient_accumulation_steps=1 \
  --learning_rate=5e-6 \
  --lr_scheduler="constant" \
  --lr_warmup_steps=0 \
  --max_train_steps=400 \
--push_to_hubIf you have access to TPUs or want to train even faster, you can try out the Flax training script. The Flax training script doesn’t support gradient checkpointing or gradient accumulation, so you’ll need a GPU with at least 30GB of memory.
Before running the script, make sure you have the requirements installed:
pip install -U -r requirements.txt
Specify the MODEL_NAME environment variable (either a Hub model repository id or a path to the directory containing the model weights) and pass it to the pretrained_model_name_or_path argument. The instance_prompt argument is a text prompt that contains a unique identifier, such as sks, and the class the image belongs to, which in this example is a photo of a sks dog.
Now you can launch the training script with the following command:
export MODEL_NAME="duongna/stable-diffusion-v1-4-flax"
export INSTANCE_DIR="./dog"
export OUTPUT_DIR="path-to-save-model"

python train_dreambooth_flax.py \
  --pretrained_model_name_or_path=$MODEL_NAME  \
  --instance_data_dir=$INSTANCE_DIR \
  --output_dir=$OUTPUT_DIR \
  --instance_prompt="a photo of sks dog" \
  --resolution=512 \
  --train_batch_size=1 \
  --learning_rate=5e-6 \
  --max_train_steps=400 \
  --push_to_hub
Finetuning with prior-preserving loss
Prior preservation is used to avoid overfitting and language-drift (check out the paper to learn more if you’re interested). For prior preservation, you use other images of the same class as part of the training process. The nice thing is that you can generate those images using the Stable Diffusion model itself! The training script will save the generated images to a local path you specify.
The authors recommend generating num_epochs * num_samples images for prior preservation. In most cases, 200-300 images work well.
export MODEL_NAME="CompVis/stable-diffusion-v1-4"
export INSTANCE_DIR="./dog"
export CLASS_DIR="path_to_class_images"
export OUTPUT_DIR="path_to_saved_model"

accelerate launch train_dreambooth.py \
  --pretrained_model_name_or_path=$MODEL_NAME  \
  --instance_data_dir=$INSTANCE_DIR \
  --class_data_dir=$CLASS_DIR \
  --output_dir=$OUTPUT_DIR \
  --with_prior_preservation --prior_loss_weight=1.0 \
  --instance_prompt="a photo of sks dog" \
  --class_prompt="a photo of dog" \
  --resolution=512 \
  --train_batch_size=1 \
  --gradient_accumulation_steps=1 \
  --learning_rate=5e-6 \
  --lr_scheduler="constant" \
  --lr_warmup_steps=0 \
  --num_class_images=200 \
  --max_train_steps=800 \
--push_to_hubexport MODEL_NAME="duongna/stable-diffusion-v1-4-flax"
export INSTANCE_DIR="./dog"
export CLASS_DIR="path-to-class-images"
export OUTPUT_DIR="path-to-save-model"
python train_dreambooth_flax.py \
--pretrained_model_name_or_path=$MODEL_NAME \
--instance_data_dir=$INSTANCE_DIR \
--class_data_dir=$CLASS_DIR \
--output_dir=$OUTPUT_DIR \
--with_prior_preservation --prior_loss_weight=1.0 \
--instance_prompt="a photo of sks dog" \
--class_prompt="a photo of dog" \
--resolution=512 \
--train_batch_size=1 \
--learning_rate=5e-6 \
--num_class_images=200 \
--max_train_steps=800 \
--push_to_hubFinetuning the text encoder and UNet
The script also allows you to finetune the text_encoder along with the unet. In our experiments (check out the Training Stable Diffusion with DreamBooth using 🧨 Diffusers post for more details), this yields much better results, especially when generating images of faces.
Training the text encoder requires additional memory and it won’t fit on a 16GB GPU. You’ll need at least 24GB VRAM to use this option.
Pass the --train_text_encoder argument to the training script to enable finetuning the text_encoder and unet:
export MODEL_NAME="CompVis/stable-diffusion-v1-4"
export INSTANCE_DIR="./dog"
export CLASS_DIR="path_to_class_images"
export OUTPUT_DIR="path_to_saved_model"

accelerate launch train_dreambooth.py \
  --pretrained_model_name_or_path=$MODEL_NAME  \
  --train_text_encoder \
  --instance_data_dir=$INSTANCE_DIR \
  --class_data_dir=$CLASS_DIR \
  --output_dir=$OUTPUT_DIR \
  --with_prior_preservation --prior_loss_weight=1.0 \
  --instance_prompt="a photo of sks dog" \
  --class_prompt="a photo of dog" \
  --resolution=512 \
  --train_batch_size=1 \
  --use_8bit_adam \
  --gradient_checkpointing \
  --learning_rate=2e-6 \
  --lr_scheduler="constant" \
  --lr_warmup_steps=0 \
  --num_class_images=200 \
  --max_train_steps=800 \
--push_to_hubexport MODEL_NAME="duongna/stable-diffusion-v1-4-flax"
export INSTANCE_DIR="./dog"
export CLASS_DIR="path-to-class-images"
export OUTPUT_DIR="path-to-save-model"
python train_dreambooth_flax.py \
--pretrained_model_name_or_path=$MODEL_NAME \
--train_text_encoder \
--instance_data_dir=$INSTANCE_DIR \
--class_data_dir=$CLASS_DIR \
--output_dir=$OUTPUT_DIR \
--with_prior_preservation --prior_loss_weight=1.0 \
--instance_prompt="a photo of sks dog" \
--class_prompt="a photo of dog" \
--resolution=512 \
--train_batch_size=1 \
--learning_rate=2e-6 \
--num_class_images=200 \
--max_train_steps=800 \
--push_to_hubFinetuning with LoRA
You can also use Low-Rank Adaptation of Large Language Models (LoRA), a fine-tuning technique for accelerating training large models, on DreamBooth. For more details, take a look at the LoRA training guide.
Saving checkpoints while training
It’s easy to overfit while training with Dreambooth, so sometimes it’s useful to save regular checkpoints during the training process. One of the intermediate checkpoints might actually work better than the final model! Pass the following argument to the training script to enable saving checkpoints:
--checkpointing_steps=500
This saves the full training state in subfolders of your output_dir. Subfolder names begin with the prefix checkpoint-, followed by the number of steps performed so far; for example, checkpoint-1500 would be a checkpoint saved after 1500 training steps.
Resume training from a saved checkpoint
If you want to resume training from any of the saved checkpoints, you can pass the argument --resume_from_checkpoint to the script and specify the name of the checkpoint you want to use. You can also use the special string "latest" to resume from the last saved checkpoint (the one with the largest number of steps). For example, the following would resume training from the checkpoint saved after 1500 steps:
--resume_from_checkpoint="checkpoint-1500"This is a good opportunity to tweak some of your hyperparameters if you wish.
Inference from a saved checkpoint
Saved checkpoints are stored in a format suitable for resuming training. They not only include the model weights, but also the state of the optimizer, data loaders, and learning rate.
If you have "accelerate>=0.16.0" installed, use the following code to run
inference from an intermediate checkpoint.
from diffusers import DiffusionPipeline, UNet2DConditionModel
from transformers import CLIPTextModel
import torch

# Load the pipeline with the same arguments (model, revision) that were used for training
model_id = "CompVis/stable-diffusion-v1-4"

unet = UNet2DConditionModel.from_pretrained("/sddata/dreambooth/daruma-v2-1/checkpoint-100/unet")

# if you have trained with `--args.train_text_encoder` make sure to also load the text encoder
text_encoder = CLIPTextModel.from_pretrained("/sddata/dreambooth/daruma-v2-1/checkpoint-100/text_encoder")

pipeline = DiffusionPipeline.from_pretrained(
    model_id, unet=unet, text_encoder=text_encoder, dtype=torch.float16, use_safetensors=True
)
pipeline.to("cuda")

# Perform inference, or save, or push to the hub
pipeline.save_pretrained("dreambooth-pipeline")
If you have "accelerate<0.16.0" installed, you need to convert it to an inference pipeline first:
from accelerate import Accelerator
from diffusers import DiffusionPipeline

# Load the pipeline with the same arguments (model, revision) that were used for training
model_id = "CompVis/stable-diffusion-v1-4"
pipeline = DiffusionPipeline.from_pretrained(model_id, use_safetensors=True)

accelerator = Accelerator()

# Use text_encoder if `--train_text_encoder` was used for the initial training
unet, text_encoder = accelerator.prepare(pipeline.unet, pipeline.text_encoder)

# Restore state from a checkpoint path. You have to use the absolute path here.
accelerator.load_state("/sddata/dreambooth/daruma-v2-1/checkpoint-100")

# Rebuild the pipeline with the unwrapped models (assignment to .unet and .text_encoder should work too)
pipeline = DiffusionPipeline.from_pretrained(
    model_id,
    unet=accelerator.unwrap_model(unet),
    text_encoder=accelerator.unwrap_model(text_encoder),
    use_safetensors=True,
)

# Perform inference, or save, or push to the hub
pipeline.save_pretrained("dreambooth-pipeline")
Optimizations for different GPU sizes
Depending on your hardware, there are a few different ways to optimize DreamBooth on GPUs from 16GB to just 8GB!
xFormers
xFormers is a toolbox for optimizing Transformers, and it includes a memory-efficient attention mechanism that is used in 🧨 Diffusers. You’ll need to install xFormers and then add the following argument to your training script:
--enable_xformers_memory_efficient_attention
xFormers is not available in Flax.
Set gradients to none
Another way you can lower your memory footprint is to set the gradients to None instead of zero. However, this may change certain behaviors, so if you run into any issues, try removing this argument. Add the following argument to your training script to set the gradients to None:
--set_grads_to_none
16GB GPU
With the help of gradient checkpointing and bitsandbytes 8-bit optimizer, it’s possible to train DreamBooth on a 16GB GPU. Make sure you have bitsandbytes installed:
pip install bitsandbytes
Then pass the --use_8bit_adam option to the training script:
export MODEL_NAME="CompVis/stable-diffusion-v1-4"
export INSTANCE_DIR="./dog"
export CLASS_DIR="path_to_class_images"
export OUTPUT_DIR="path_to_saved_model"

accelerate launch train_dreambooth.py \
  --pretrained_model_name_or_path=$MODEL_NAME  \
  --instance_data_dir=$INSTANCE_DIR \
  --class_data_dir=$CLASS_DIR \
  --output_dir=$OUTPUT_DIR \
  --with_prior_preservation --prior_loss_weight=1.0 \
  --instance_prompt="a photo of sks dog" \
  --class_prompt="a photo of dog" \
  --resolution=512 \
  --train_batch_size=1 \
  --gradient_accumulation_steps=2 --gradient_checkpointing \
  --use_8bit_adam \
  --learning_rate=5e-6 \
  --lr_scheduler="constant" \
  --lr_warmup_steps=0 \
  --num_class_images=200 \
  --max_train_steps=800 \
  --push_to_hub
12GB GPU
To run DreamBooth on a 12GB GPU, you’ll need to enable gradient checkpointing, the 8-bit optimizer, xFormers, and set the gradients to None:
export MODEL_NAME="CompVis/stable-diffusion-v1-4"
export INSTANCE_DIR="./dog"
export CLASS_DIR="path-to-class-images"
export OUTPUT_DIR="path-to-save-model"

accelerate launch train_dreambooth.py \
  --pretrained_model_name_or_path=$MODEL_NAME  \
  --instance_data_dir=$INSTANCE_DIR \
  --class_data_dir=$CLASS_DIR \
  --output_dir=$OUTPUT_DIR \
  --with_prior_preservation --prior_loss_weight=1.0 \
  --instance_prompt="a photo of sks dog" \
  --class_prompt="a photo of dog" \
  --resolution=512 \
  --train_batch_size=1 \
  --gradient_accumulation_steps=1 --gradient_checkpointing \
  --use_8bit_adam \
  --enable_xformers_memory_efficient_attention \
  --set_grads_to_none \
  --learning_rate=2e-6 \
  --lr_scheduler="constant" \
  --lr_warmup_steps=0 \
  --num_class_images=200 \
  --max_train_steps=800 \
  --push_to_hub
8 GB GPU
For 8GB GPUs, you’ll need the help of DeepSpeed to offload some tensors from the VRAM to either the CPU or NVME, enabling training with less GPU memory.
Run the following command to configure your 🤗 Accelerate environment:
accelerate config
During configuration, confirm that you want to use DeepSpeed. Now it’s possible to train on under 8GB VRAM by combining DeepSpeed stage 2, fp16 mixed precision, and offloading the model parameters and the optimizer state to the CPU. The drawback is that this requires more system RAM, about 25 GB. See the DeepSpeed documentation for more configuration options.
You should also change the default Adam optimizer to DeepSpeed’s optimized version of Adam
deepspeed.ops.adam.DeepSpeedCPUAdam for a substantial speedup. Enabling DeepSpeedCPUAdam requires your system’s CUDA toolchain version to be the same as the one installed with PyTorch.
8-bit optimizers don’t seem to be compatible with DeepSpeed at the moment.
Launch training with the following command:
export MODEL_NAME="CompVis/stable-diffusion-v1-4"
export INSTANCE_DIR="./dog"
export CLASS_DIR="path_to_class_images"
export OUTPUT_DIR="path_to_saved_model"

accelerate launch train_dreambooth.py \
  --pretrained_model_name_or_path=$MODEL_NAME \
  --instance_data_dir=$INSTANCE_DIR \
  --class_data_dir=$CLASS_DIR \
  --output_dir=$OUTPUT_DIR \
  --with_prior_preservation --prior_loss_weight=1.0 \
  --instance_prompt="a photo of sks dog" \
  --class_prompt="a photo of dog" \
  --resolution=512 \
  --train_batch_size=1 \
  --sample_batch_size=1 \
  --gradient_accumulation_steps=1 --gradient_checkpointing \
  --learning_rate=5e-6 \
  --lr_scheduler="constant" \
  --lr_warmup_steps=0 \
  --num_class_images=200 \
  --max_train_steps=800 \
  --mixed_precision=fp16 \
  --push_to_hub
Inference
Once you have trained a model, specify the path to where the model is saved, and use it for inference in the StableDiffusionPipeline. Make sure your prompts include the special identifier used during training (sks in the previous examples).
If you have "accelerate>=0.16.0" installed, you can use the following code to run
inference from an intermediate checkpoint:
from diffusers import DiffusionPipeline
import torch

model_id = "path_to_saved_model"
pipe = DiffusionPipeline.from_pretrained(model_id, torch_dtype=torch.float16, use_safetensors=True).to("cuda")

prompt = "A photo of sks dog in a bucket"
image = pipe(prompt, num_inference_steps=50, guidance_scale=7.5).images[0]

image.save("dog-bucket.png")
You may also run inference from any of the saved training checkpoints.
IF
You can use the lora and full dreambooth scripts to train the text to image IF model and the stage II upscaler IF model.
Note that IF has a predicted variance, and our finetuning scripts only train the models predicted error, so for finetuned IF models we switch to a fixed variance schedule. The full finetuning scripts will update the scheduler config for the full saved model. However, when loading saved LoRA weights, you must also update the pipeline’s scheduler config.
from diffusers import DiffusionPipeline

pipe = DiffusionPipeline.from_pretrained("DeepFloyd/IF-I-XL-v1.0", use_safetensors=True)

pipe.load_lora_weights("<lora weights path>")

# Update scheduler config to fixed variance schedule
pipe.scheduler = pipe.scheduler.__class__.from_config(pipe.scheduler.config, variance_type="fixed_small")
Additionally, a few alternative cli flags are needed for IF.
--resolution=64: IF is a pixel space diffusion model. In order to operate on un-compressed pixels, the input images are of a much smaller resolution.
--pre_compute_text_embeddings: IF uses T5 for its text encoder. In order to save GPU memory, we pre compute all text embeddings and then de-allocate
T5.
--tokenizer_max_length=77: T5 has a longer default text length, but the default IF encoding procedure uses a smaller number.
--text_encoder_use_attention_mask: T5 passes the attention mask to the text encoder.
Tips and Tricks
We find LoRA to be sufficient for finetuning the stage I model as the low resolution of the model makes representing finegrained detail hard regardless.
For common and/or not-visually complex object concepts, you can get away with not-finetuning the upscaler. Just be sure to adjust the prompt passed to the upscaler to remove the new token from the instance prompt. I.e. if your stage I prompt is “a sks dog”, use “a dog” for your stage II prompt.
For finegrained detail like faces that aren’t present in the original training set, we find that full finetuning of the stage II upscaler is better than LoRA finetuning stage II.
For finegrained detail like faces, we find that lower learning rates along with larger batch sizes work best.
For stage II, we find that lower learning rates are also needed.
We found experimentally that the DDPM scheduler with the default larger number of denoising steps to sometimes work better than the DPM Solver scheduler used in the training scripts.
Stage II additional validation images
The stage II validation requires images to upscale, we can download a downsized version of the training set:
from huggingface_hub import snapshot_download

local_dir = "./dog_downsized"
snapshot_download(
    "diffusers/dog-example-downsized",
    local_dir=local_dir,
    repo_type="dataset",
    ignore_patterns=".gitattributes",
)
IF stage I LoRA Dreambooth
This training configuration requires ~28 GB VRAM.
export MODEL_NAME="DeepFloyd/IF-I-XL-v1.0"
export INSTANCE_DIR="dog"
export OUTPUT_DIR="dreambooth_dog_lora"

accelerate launch train_dreambooth_lora.py \
  --report_to wandb \
  --pretrained_model_name_or_path=$MODEL_NAME  \
  --instance_data_dir=$INSTANCE_DIR \
  --output_dir=$OUTPUT_DIR \
  --instance_prompt="a sks dog" \
  --resolution=64 \
  --train_batch_size=4 \
  --gradient_accumulation_steps=1 \
  --learning_rate=5e-6 \
  --scale_lr \
  --max_train_steps=1200 \
  --validation_prompt="a sks dog" \
  --validation_epochs=25 \
  --checkpointing_steps=100 \
  --pre_compute_text_embeddings \
  --tokenizer_max_length=77 \
  --text_encoder_use_attention_mask
IF stage II LoRA Dreambooth
--validation_images: These images are upscaled during validation steps.
--class_labels_conditioning=timesteps: Pass additional conditioning to the UNet needed for stage II.
--learning_rate=1e-6: Lower learning rate than stage I.
--resolution=256: The upscaler expects higher resolution inputs
export MODEL_NAME="DeepFloyd/IF-II-L-v1.0"
export INSTANCE_DIR="dog"
export OUTPUT_DIR="dreambooth_dog_upscale"
export VALIDATION_IMAGES="dog_downsized/image_1.png dog_downsized/image_2.png dog_downsized/image_3.png dog_downsized/image_4.png"

python train_dreambooth_lora.py \
    --report_to wandb \
    --pretrained_model_name_or_path=$MODEL_NAME \
    --instance_data_dir=$INSTANCE_DIR \
    --output_dir=$OUTPUT_DIR \
    --instance_prompt="a sks dog" \
    --resolution=256 \
    --train_batch_size=4 \
    --gradient_accumulation_steps=1 \
    --learning_rate=1e-6 \
    --max_train_steps=2000 \
    --validation_prompt="a sks dog" \
    --validation_epochs=100 \
    --checkpointing_steps=500 \
    --pre_compute_text_embeddings \
    --tokenizer_max_length=77 \
    --text_encoder_use_attention_mask \
    --validation_images $VALIDATION_IMAGES \
    --class_labels_conditioning=timesteps
IF Stage I Full Dreambooth
--skip_save_text_encoder: When training the full model, this will skip saving the entire T5 with the finetuned model. You can still load the pipeline
with a T5 loaded from the original model.
use_8bit_adam: Due to the size of the optimizer states, we recommend training the full XL IF model with 8bit adam.
--learning_rate=1e-7: For full dreambooth, IF requires very low learning rates. With higher learning rates model quality will degrade. Note that it is
likely the learning rate can be increased with larger batch sizes.
Using 8bit adam and a batch size of 4, the model can be trained in ~48 GB VRAM.
export MODEL_NAME="DeepFloyd/IF-I-XL-v1.0"

export INSTANCE_DIR="dog"
export OUTPUT_DIR="dreambooth_if"

accelerate launch train_dreambooth.py \
  --pretrained_model_name_or_path=$MODEL_NAME  \
  --instance_data_dir=$INSTANCE_DIR \
  --output_dir=$OUTPUT_DIR \
  --instance_prompt="a photo of sks dog" \
  --resolution=64 \
  --train_batch_size=4 \
  --gradient_accumulation_steps=1 \
  --learning_rate=1e-7 \
  --max_train_steps=150 \
  --validation_prompt "a photo of sks dog" \
  --validation_steps 25 \
  --text_encoder_use_attention_mask \
  --tokenizer_max_length 77 \
  --pre_compute_text_embeddings \
  --use_8bit_adam \
  --set_grads_to_none \
  --skip_save_text_encoder \
  --push_to_hub
IF Stage II Full Dreambooth
--learning_rate=5e-6: With a smaller effective batch size of 4, we found that we required learning rates as low as
1e-8.
--resolution=256: The upscaler expects higher resolution inputs
--train_batch_size=2 and --gradient_accumulation_steps=6: We found that full training of stage II particularly with
faces required large effective batch sizes.
export MODEL_NAME="DeepFloyd/IF-II-L-v1.0"
export INSTANCE_DIR="dog"
export OUTPUT_DIR="dreambooth_dog_upscale"
export VALIDATION_IMAGES="dog_downsized/image_1.png dog_downsized/image_2.png dog_downsized/image_3.png dog_downsized/image_4.png"

accelerate launch train_dreambooth.py \
  --report_to wandb \
  --pretrained_model_name_or_path=$MODEL_NAME \
  --instance_data_dir=$INSTANCE_DIR \
  --output_dir=$OUTPUT_DIR \
  --instance_prompt="a sks dog" \
  --resolution=256 \
  --train_batch_size=2 \
  --gradient_accumulation_steps=6 \
  --learning_rate=5e-6 \
  --max_train_steps=2000 \
  --validation_prompt="a sks dog" \
  --validation_steps=150 \
  --checkpointing_steps=500 \
  --pre_compute_text_embeddings \
  --tokenizer_max_length=77 \
  --text_encoder_use_attention_mask \
  --validation_images $VALIDATION_IMAGES \
  --class_labels_conditioning timesteps \
  --push_to_hub
Stable Diffusion XL
We support fine-tuning of the UNet and text encoders shipped in Stable Diffusion XL with DreamBooth and LoRA via the train_dreambooth_lora_sdxl.py script. Please refer to the docs here.