|
<! |
|
|
|
Licensed under the Apache License, Version 2.0 (the "License"); you may not use this file except in compliance with |
|
the License. You may obtain a copy of the License at |
|
|
|
http://www.apache.org/licenses/LICENSE-2.0 |
|
|
|
Unless required by applicable law or agreed to in writing, software distributed under the License is distributed on |
|
an "AS IS" BASIS, WITHOUT WARRANTIES OR CONDITIONS OF ANY KIND, either express or implied. See the License for the |
|
specific language governing permissions and limitations under the License. |
|
|
|
|
|
# DreamBooth fine-tuning example |
|
|
|
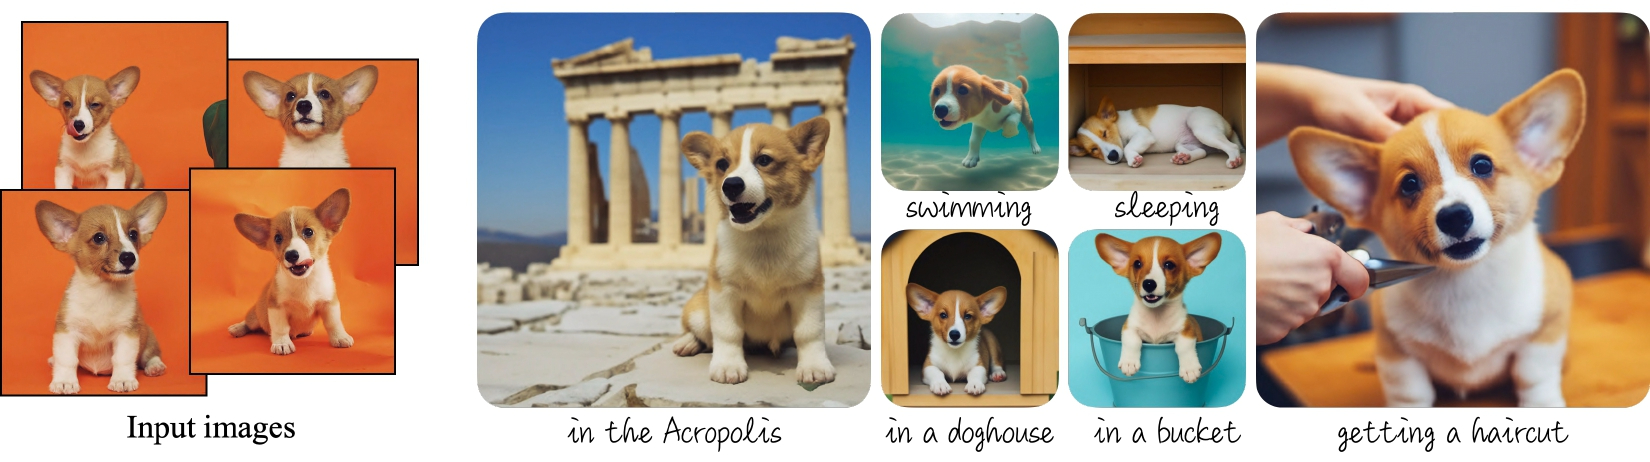
[DreamBooth](https://arxiv.org/abs/2208.12242) is a method to personalize text-to-image models like stable diffusion given just a few (3~5) images of a subject. |
|
|
|
 |
|
_Dreambooth examples from the [project's blog](https://dreambooth.github.io)._ |
|
|
|
The [Dreambooth training script](https://github.com/huggingface/diffusers/tree/main/examples/dreambooth) shows how to implement this training procedure on a pre-trained Stable Diffusion model. |
|
|
|
<Tip warning={true}> |
|
|
|
<! |
|
|
|
Dreambooth fine-tuning is very sensitive to hyperparameters and easy to overfit. We recommend you take a look at our [in-depth analysis](https://huggingface.co/blog/dreambooth) with recommended settings for different subjects, and go from there. |
|
|
|
</Tip> |
|
|
|
## Training locally |
|
|
|
### Installing the dependencies |
|
|
|
Before running the scripts, make sure to install the library's training dependencies. We also recommend to install `diffusers` from the `main` github branch. |
|
|
|
```bash |
|
pip install git+https://github.com/huggingface/diffusers |
|
pip install -U -r diffusers/examples/dreambooth/requirements.txt |
|
``` |
|
|
|
Then initialize and configure a [🤗 Accelerate](https://github.com/huggingface/accelerate/) environment with: |
|
|
|
```bash |
|
accelerate config |
|
``` |
|
|
|
You need to accept the model license before downloading or using the weights. In this example we'll use model version `v1-4`, so you'll need to visit [its card](https://huggingface.co/CompVis/stable-diffusion-v1-4), read the license and tick the checkbox if you agree. |
|
|
|
You have to be a registered user in 🤗 Hugging Face Hub, and you'll also need to use an access token for the code to work. For more information on access tokens, please refer to [this section of the documentation](https://huggingface.co/docs/hub/security-tokens). |
|
|
|
Run the following command to authenticate your token |
|
|
|
```bash |
|
huggingface-cli login |
|
``` |
|
|
|
If you have already cloned the repo, then you won't need to go through these steps. Instead, you can pass the path to your local checkout to the training script and it will be loaded from there. |
|
|
|
### Dog toy example |
|
|
|
In this example we'll use [these images](https://drive.google.com/drive/folders/1BO_dyz-p65qhBRRMRA4TbZ8qW4rB99JZ) to add a new concept to Stable Diffusion using the Dreambooth process. They will be our training data. Please, download them and place them somewhere in your system. |
|
|
|
Then you can launch the training script using: |
|
|
|
```bash |
|
export MODEL_NAME="CompVis/stable-diffusion-v1-4" |
|
export INSTANCE_DIR="path_to_training_images" |
|
export OUTPUT_DIR="path_to_saved_model" |
|
|
|
accelerate launch train_dreambooth.py \ |
|
|
|
|
|
|
|
|
|
|
|
|
|
|
|
|
|
|
|
|
|
|
|
``` |
|
|
|
### Training with a prior-preserving loss |
|
|
|
Prior preservation is used to avoid overfitting and language-drift. Please, refer to the paper to learn more about it if you are interested. For prior preservation, we use other images of the same class as part of the training process. The nice thing is that we can generate those images using the Stable Diffusion model itself! The training script will save the generated images to a local path we specify. |
|
|
|
According to the paper, it's recommended to generate `num_epochs * num_samples` images for prior preservation. 200-300 works well for most cases. |
|
|
|
```bash |
|
export MODEL_NAME="CompVis/stable-diffusion-v1-4" |
|
export INSTANCE_DIR="path_to_training_images" |
|
export CLASS_DIR="path_to_class_images" |
|
export OUTPUT_DIR="path_to_saved_model" |
|
|
|
accelerate launch train_dreambooth.py \ |
|
--pretrained_model_name_or_path=$MODEL_NAME \ |
|
--instance_data_dir=$INSTANCE_DIR \ |
|
--class_data_dir=$CLASS_DIR \ |
|
--output_dir=$OUTPUT_DIR \ |
|
--with_prior_preservation --prior_loss_weight=1.0 \ |
|
--instance_prompt="a photo of sks dog" \ |
|
--class_prompt="a photo of dog" \ |
|
--resolution=512 \ |
|
--train_batch_size=1 \ |
|
--gradient_accumulation_steps=1 \ |
|
--learning_rate=5e-6 \ |
|
--lr_scheduler="constant" \ |
|
--lr_warmup_steps=0 \ |
|
--num_class_images=200 \ |
|
--max_train_steps=800 |
|
``` |
|
|
|
### Training on a 16GB GPU |
|
|
|
With the help of gradient checkpointing and the 8-bit optimizer from [bitsandbytes](https://github.com/TimDettmers/bitsandbytes), it's possible to train dreambooth on a 16GB GPU. |
|
|
|
```bash |
|
pip install bitsandbytes |
|
``` |
|
|
|
Then pass the ` |
|
|
|
```bash |
|
export MODEL_NAME="CompVis/stable-diffusion-v1-4" |
|
export INSTANCE_DIR="path_to_training_images" |
|
export CLASS_DIR="path_to_class_images" |
|
export OUTPUT_DIR="path_to_saved_model" |
|
|
|
accelerate launch train_dreambooth.py \ |
|
|
|
|
|
|
|
|
|
|
|
|
|
|
|
|
|
|
|
|
|
|
|
|
|
|
|
|
|
|
|
|
|
``` |
|
|
|
### Fine-tune the text encoder in addition to the UNet |
|
|
|
The script also allows to fine-tune the `text_encoder` along with the `unet`. It has been observed experimentally that this gives much better results, especially on faces. Please, refer to [our blog](https://huggingface.co/blog/dreambooth) for more details. |
|
|
|
To enable this option, pass the ` |
|
|
|
<Tip> |
|
Training the text encoder requires additional memory, so training won't fit on a 16GB GPU. You'll need at least 24GB VRAM to use this option. |
|
</Tip> |
|
|
|
```bash |
|
export MODEL_NAME="CompVis/stable-diffusion-v1-4" |
|
export INSTANCE_DIR="path_to_training_images" |
|
export CLASS_DIR="path_to_class_images" |
|
export OUTPUT_DIR="path_to_saved_model" |
|
|
|
accelerate launch train_dreambooth.py \ |
|
|
|
|
|
|
|
|
|
|
|
|
|
|
|
|
|
|
|
|
|
|
|
|
|
|
|
|
|
|
|
|
|
|
|
``` |
|
|
|
### Training on a 8 GB GPU: |
|
|
|
Using [DeepSpeed](https://www.deepspeed.ai/) it's even possible to offload some |
|
tensors from VRAM to either CPU or NVME, allowing training to proceed with less GPU memory. |
|
|
|
DeepSpeed needs to be enabled with `accelerate config`. During configuration, |
|
answer yes to "Do you want to use DeepSpeed?". Combining DeepSpeed stage 2, fp16 |
|
mixed precision, and offloading both the model parameters and the optimizer state to CPU, it's |
|
possible to train on under 8 GB VRAM. The drawback is that this requires more system RAM (about 25 GB). See [the DeepSpeed documentation](https://huggingface.co/docs/accelerate/usage_guides/deepspeed) for more configuration options. |
|
|
|
Changing the default Adam optimizer to DeepSpeed's special version of Adam |
|
`deepspeed.ops.adam.DeepSpeedCPUAdam` gives a substantial speedup, but enabling |
|
it requires the system's CUDA toolchain version to be the same as the one installed with PyTorch. 8-bit optimizers don't seem to be compatible with DeepSpeed at the moment. |
|
|
|
```bash |
|
export MODEL_NAME="CompVis/stable-diffusion-v1-4" |
|
export INSTANCE_DIR="path_to_training_images" |
|
export CLASS_DIR="path_to_class_images" |
|
export OUTPUT_DIR="path_to_saved_model" |
|
|
|
accelerate launch train_dreambooth.py \ |
|
--pretrained_model_name_or_path=$MODEL_NAME \ |
|
--instance_data_dir=$INSTANCE_DIR \ |
|
--class_data_dir=$CLASS_DIR \ |
|
--output_dir=$OUTPUT_DIR \ |
|
--with_prior_preservation --prior_loss_weight=1.0 \ |
|
--instance_prompt="a photo of sks dog" \ |
|
--class_prompt="a photo of dog" \ |
|
--resolution=512 \ |
|
--train_batch_size=1 \ |
|
--sample_batch_size=1 \ |
|
--gradient_accumulation_steps=1 --gradient_checkpointing \ |
|
--learning_rate=5e-6 \ |
|
--lr_scheduler="constant" \ |
|
--lr_warmup_steps=0 \ |
|
--num_class_images=200 \ |
|
--max_train_steps=800 \ |
|
--mixed_precision=fp16 |
|
``` |
|
|
|
## Inference |
|
|
|
Once you have trained a model, inference can be done using the `StableDiffusionPipeline`, by simply indicating the path where the model was saved. Make sure that your prompts include the special `identifier` used during training (`sks` in the previous examples). |
|
|
|
```python |
|
from diffusers import StableDiffusionPipeline |
|
import torch |
|
|
|
model_id = "path_to_saved_model" |
|
pipe = StableDiffusionPipeline.from_pretrained(model_id, torch_dtype=torch.float16).to("cuda") |
|
|
|
prompt = "A photo of sks dog in a bucket" |
|
image = pipe(prompt, num_inference_steps=50, guidance_scale=7.5).images[0] |
|
|
|
image.save("dog-bucket.png") |
|
``` |
|
|