Quantization
Quantization techniques focus on representing data with less information while also trying to not lose too much accuracy. This often means converting a data type to represent the same information with fewer bits. For example, if your model weights are stored as 32-bit floating points and they’re quantized to 16-bit floating points, this halves the model size which makes it easier to store and reduces memory-usage. Lower precision can also speedup inference because it takes less time to perform calculations with fewer bits.
Transformers supports several quantization schemes to help you run inference with large language models (LLMs) and finetune adapters on quantized models. This guide will show you how to use Activation-aware Weight Quantization (AWQ), AutoGPTQ, and bitsandbytes.
Interested in adding a new quantization method to Transformers? Read the HfQuantizer guide to learn how!
Quanto
Try Quanto + transformers with this notebook!
🤗 Quanto library is a versatile pytorch quantization toolkit. The quantization method used is the linear quantization. Quanto provides several unique features such as:
- weights quantization (
float8,int8,int4,int2) - activation quantization (
float8,int8) - modality agnostic (e.g CV,LLM)
- device agnostic (e.g CUDA,MPS,CPU)
- compatibility with
torch.compile - easy to add custom kernel for specific device
- supports quantization aware training
Before you begin, make sure the following libraries are installed:
pip install quanto
pip install git+https://github.com/huggingface/accelerate.git
pip install git+https://github.com/huggingface/transformers.git
Now you can quantize a model by passing QuantoConfig object in the from_pretrained() method. This works for any model in any modality, as long as it contains torch.nn.Linear layers.
The integration with transformers only supports weights quantization. For the more complex use case such as activation quantization, calibration and quantization aware training, you should use quanto library instead.
from transformers import AutoModelForCausalLM, AutoTokenizer, QuantoConfig

model_id = "facebook/opt-125m"
tokenizer = AutoTokenizer.from_pretrained(model_id)
quantization_config = QuantoConfig(weights="int8")
quantized_model = AutoModelForCausalLM.from_pretrained(model_id, device_map="cuda:0", quantization_config=quantization_config)
Note that serialization is not supported yet with transformers but it is coming soon! If you want to save the model, you can use quanto library instead.
Quanto library uses linear quantization algorithm for quantization. Even though this is a basic quantization technique, we get very good results! Have a look at the following becnhmark (llama-2-7b on perplexity metric). You can find more benchamarks here
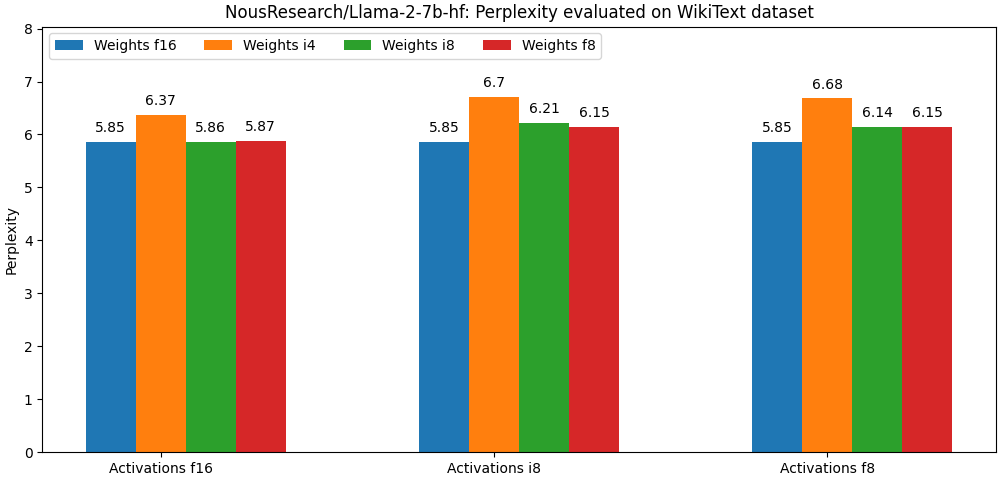
The library is versatible enough to be compatible with most PTQ optimization algorithms. The plan in the future is to integrate the most popular algorithms in the most seamless possible way (AWQ, Smoothquant).
AQLM
Try AQLM on Google Colab!
Additive Quantization of Language Models (AQLM) is a Large Language Models compression method. It quantizes multiple weights together and take advantage of interdependencies between them. AQLM represents groups of 8-16 weights as a sum of multiple vector codes.
Inference support for AQLM is realised in the aqlm library. Make sure to install it to run the models (note aqlm works only with python>=3.10):
pip install aqlm[gpu,cpu]
The library provides efficient kernels for both GPU and CPU inference and training.
The instructions on how to quantize models yourself, as well as all the relevant code can be found in the corresponding GitHub repository.
PEFT
Starting with version aqlm 1.0.2, AQLM supports Parameter-Efficient Fine-Tuning in a form of LoRA integrated into the PEFT library.
AQLM configurations
AQLM quantization setups vary mainly on the number of codebooks used as well as codebook sizes in bits. The most popular setups, as well as inference kernels they support are:
| Kernel | Number of codebooks | Codebook size, bits | Notation | Accuracy | Speedup | Fast GPU inference | Fast CPU inference |
|---|---|---|---|---|---|---|---|
| Triton | K | N | KxN | - | Up to ~0.7x | ✅ | ❌ |
| CUDA | 1 | 16 | 1x16 | Best | Up to ~1.3x | ✅ | ❌ |
| CUDA | 2 | 8 | 2x8 | OK | Up to ~3.0x | ✅ | ❌ |
| Numba | K | 8 | Kx8 | Good | Up to ~4.0x | ❌ | ✅ |
AWQ
Try AWQ quantization with this notebook!
Activation-aware Weight Quantization (AWQ) doesn’t quantize all the weights in a model, and instead, it preserves a small percentage of weights that are important for LLM performance. This significantly reduces quantization loss such that you can run models in 4-bit precision without experiencing any performance degradation.
There are several libraries for quantizing models with the AWQ algorithm, such as llm-awq, autoawq or optimum-intel. Transformers supports loading models quantized with the llm-awq and autoawq libraries. This guide will show you how to load models quantized with autoawq, but the process is similar for llm-awq quantized models.
Make sure you have autoawq installed:
pip install autoawq
AWQ-quantized models can be identified by checking the quantization_config attribute in the model’s config.json file:
{
  "_name_or_path": "/workspace/process/huggingfaceh4_zephyr-7b-alpha/source",
  "architectures": [
    "MistralForCausalLM"
  ],
  ...
  ...
  ...
  "quantization_config": {
    "quant_method": "awq",
    "zero_point": true,
    "group_size": 128,
    "bits": 4,
    "version": "gemm"
  }
}
A quantized model is loaded with the from_pretrained() method. If you loaded your model on the CPU, make sure to move it to a GPU device first. Use the device_map parameter to specify where to place the model:
from transformers import AutoModelForCausalLM, AutoTokenizer

model_id = "TheBloke/zephyr-7B-alpha-AWQ"
model = AutoModelForCausalLM.from_pretrained(model_id, device_map="cuda:0")
Loading an AWQ-quantized model automatically sets other weights to fp16 by default for performance reasons. If you want to load these other weights in a different format, use the torch_dtype parameter:
from transformers import AutoModelForCausalLM, AutoTokenizer

model_id = "TheBloke/zephyr-7B-alpha-AWQ"
model = AutoModelForCausalLM.from_pretrained(model_id, torch_dtype=torch.float32)
AWQ quantization can also be combined with FlashAttention-2 to further accelerate inference:
from transformers import AutoModelForCausalLM, AutoTokenizer

model = AutoModelForCausalLM.from_pretrained("TheBloke/zephyr-7B-alpha-AWQ", attn_implementation="flash_attention_2", device_map="cuda:0")
Fused modules
Fused modules offers improved accuracy and performance and it is supported out-of-the-box for AWQ modules for Llama and Mistral architectures, but you can also fuse AWQ modules for unsupported architectures.
Fused modules cannot be combined with other optimization techniques such as FlashAttention-2.
To enable fused modules for supported architectures, create an AwqConfig and set the parameters fuse_max_seq_len and do_fuse=True. The fuse_max_seq_len parameter is the total sequence length and it should include the context length and the expected generation length. You can set it to a larger value to be safe.
For example, to fuse the AWQ modules of the TheBloke/Mistral-7B-OpenOrca-AWQ model.
import torch
from transformers import AwqConfig, AutoModelForCausalLM

model_id = "TheBloke/Mistral-7B-OpenOrca-AWQ"

quantization_config = AwqConfig(
    bits=4,
    fuse_max_seq_len=512,
    do_fuse=True,
)

model = AutoModelForCausalLM.from_pretrained(model_id, quantization_config=quantization_config).to(0)
Exllama-v2 support
Recent versions of autoawq supports exllama-v2 kernels for faster prefill and decoding. To get started, first install the latest version of autoawq by running:
pip install git+https://github.com/casper-hansen/AutoAWQ.git
Get started by passing an AwqConfig() with version="exllama".
import torch
from transformers import AutoModelForCausalLM, AutoTokenizer, AwqConfig

quantization_config = AwqConfig(version="exllama")

model = AutoModelForCausalLM.from_pretrained(
    "TheBloke/Mistral-7B-Instruct-v0.1-AWQ",
    quantization_config=quantization_config,
    device_map="auto",
)

input_ids = torch.randint(0, 100, (1, 128), dtype=torch.long, device="cuda")
output = model(input_ids)
print(output.logits)

tokenizer = AutoTokenizer.from_pretrained("TheBloke/Mistral-7B-Instruct-v0.1-AWQ")
input_ids = tokenizer.encode("How to make a cake", return_tensors="pt").to(model.device)
output = model.generate(input_ids, do_sample=True, max_length=50, pad_token_id=50256)
print(tokenizer.decode(output[0], skip_special_tokens=True))
Note this feature is supported on AMD GPUs.
AutoGPTQ
Try GPTQ quantization with PEFT in this notebook and learn more about it’s details in this blog post!
The AutoGPTQ library implements the GPTQ algorithm, a post-training quantization technique where each row of the weight matrix is quantized independently to find a version of the weights that minimizes the error. These weights are quantized to int4, but they’re restored to fp16 on the fly during inference. This can save your memory-usage by 4x because the int4 weights are dequantized in a fused kernel rather than a GPU’s global memory, and you can also expect a speedup in inference because using a lower bitwidth takes less time to communicate.
Before you begin, make sure the following libraries are installed:
pip install auto-gptq
pip install git+https://github.com/huggingface/optimum.git
pip install git+https://github.com/huggingface/transformers.git
pip install --upgrade accelerate
To quantize a model (currently only supported for text models), you need to create a GPTQConfig class and set the number of bits to quantize to, a dataset to calibrate the weights for quantization, and a tokenizer to prepare the dataset.
from transformers import AutoModelForCausalLM, AutoTokenizer, GPTQConfig

model_id = "facebook/opt-125m"
tokenizer = AutoTokenizer.from_pretrained(model_id)
gptq_config = GPTQConfig(bits=4, dataset="c4", tokenizer=tokenizer)
You could also pass your own dataset as a list of strings, but it is highly recommended to use the same dataset from the GPTQ paper.
dataset = ["auto-gptq is an easy-to-use model quantization library with user-friendly apis, based on GPTQ algorithm."]
gptq_config = GPTQConfig(bits=4, dataset=dataset, tokenizer=tokenizer)
Load a model to quantize and pass the gptq_config to the from_pretrained() method. Set device_map="auto" to automatically offload the model to a CPU to help fit the model in memory, and allow the model modules to be moved between the CPU and GPU for quantization.
quantized_model = AutoModelForCausalLM.from_pretrained(model_id, device_map="auto", quantization_config=gptq_config)If you’re running out of memory because a dataset is too large, disk offloading is not supported. If this is the case, try passing the max_memory parameter to allocate the amount of memory to use on your device (GPU and CPU):
quantized_model = AutoModelForCausalLM.from_pretrained(model_id, device_map="auto", max_memory={0: "30GiB", 1: "46GiB", "cpu": "30GiB"}, quantization_config=gptq_config)Depending on your hardware, it can take some time to quantize a model from scratch. It can take ~5 minutes to quantize the facebook/opt-350m model on a free-tier Google Colab GPU, but it’ll take ~4 hours to quantize a 175B parameter model on a NVIDIA A100. Before you quantize a model, it is a good idea to check the Hub if a GPTQ-quantized version of the model already exists.
Once your model is quantized, you can push the model and tokenizer to the Hub where it can be easily shared and accessed. Use the push_to_hub() method to save the GPTQConfig:
quantized_model.push_to_hub("opt-125m-gptq")
tokenizer.push_to_hub("opt-125m-gptq")
You could also save your quantized model locally with the save_pretrained() method. If the model was quantized with the device_map parameter, make sure to move the entire model to a GPU or CPU before saving it. For example, to save the model on a CPU:
quantized_model.save_pretrained("opt-125m-gptq")
tokenizer.save_pretrained("opt-125m-gptq")

# if quantized with device_map set
quantized_model.to("cpu")
quantized_model.save_pretrained("opt-125m-gptq")
Reload a quantized model with the from_pretrained() method, and set device_map="auto" to automatically distribute the model on all available GPUs to load the model faster without using more memory than needed.
from transformers import AutoModelForCausalLM

model = AutoModelForCausalLM.from_pretrained("{your_username}/opt-125m-gptq", device_map="auto")
ExLlama
ExLlama is a Python/C++/CUDA implementation of the Llama model that is designed for faster inference with 4-bit GPTQ weights (check out these benchmarks). The ExLlama kernel is activated by default when you create a GPTQConfig object. To boost inference speed even further, use the ExLlamaV2 kernels by configuring the exllama_config parameter:
import torch
from transformers import AutoModelForCausalLM, GPTQConfig

gptq_config = GPTQConfig(bits=4, exllama_config={"version":2})
model = AutoModelForCausalLM.from_pretrained("{your_username}/opt-125m-gptq", device_map="auto", quantization_config=gptq_config)
Only 4-bit models are supported, and we recommend deactivating the ExLlama kernels if you’re finetuning a quantized model with PEFT.
The ExLlama kernels are only supported when the entire model is on the GPU. If you’re doing inference on a CPU with AutoGPTQ (version > 0.4.2), then you’ll need to disable the ExLlama kernel. This overwrites the attributes related to the ExLlama kernels in the quantization config of the config.json file.
import torch
from transformers import AutoModelForCausalLM, GPTQConfig
gptq_config = GPTQConfig(bits=4, use_exllama=False)
model = AutoModelForCausalLM.from_pretrained("{your_username}/opt-125m-gptq", device_map="cpu", quantization_config=gptq_config)
bitsandbytes
bitsandbytes is the easiest option for quantizing a model to 8 and 4-bit. 8-bit quantization multiplies outliers in fp16 with non-outliers in int8, converts the non-outlier values back to fp16, and then adds them together to return the weights in fp16. This reduces the degradative effect outlier values have on a model’s performance. 4-bit quantization compresses a model even further, and it is commonly used with QLoRA to finetune quantized LLMs.
To use bitsandbytes, make sure you have the following libraries installed:
pip install transformers accelerate bitsandbytes>0.37.0
Now you can quantize a model with the load_in_8bit or load_in_4bit parameters in the from_pretrained() method. This works for any model in any modality, as long as it supports loading with Accelerate and contains torch.nn.Linear layers.
Quantizing a model in 8-bit halves the memory-usage, and for large models, set device_map="auto" to efficiently use the GPUs available:
from transformers import AutoModelForCausalLM

model_8bit = AutoModelForCausalLM.from_pretrained("bigscience/bloom-1b7", device_map="auto", load_in_8bit=True)
By default, all the other modules such as torch.nn.LayerNorm are converted to torch.float16. You can change the data type of these modules with the torch_dtype parameter if you want:
import torch
from transformers import AutoModelForCausalLM

model_8bit = AutoModelForCausalLM.from_pretrained("facebook/opt-350m", load_in_8bit=True, torch_dtype=torch.float32)
model_8bit.model.decoder.layers[-1].final_layer_norm.weight.dtype
Once a model is quantized to 8-bit, you can’t push the quantized weights to the Hub unless you’re using the latest version of Transformers and bitsandbytes. If you have the latest versions, then you can push the 8-bit model to the Hub with the push_to_hub() method. The quantization config.json file is pushed first, followed by the quantized model weights.
from transformers import AutoModelForCausalLM, AutoTokenizer

model = AutoModelForCausalLM.from_pretrained("bigscience/bloom-560m", device_map="auto", load_in_8bit=True)
tokenizer = AutoTokenizer.from_pretrained("bigscience/bloom-560m")

model.push_to_hub("bloom-560m-8bit")
Training with 8-bit and 4-bit weights are only supported for training extra parameters.
You can check your memory footprint with the get_memory_footprint method:
print(model.get_memory_footprint())Quantized models can be loaded from the from_pretrained() method without needing to specify the load_in_8bit or load_in_4bit parameters:
from transformers import AutoModelForCausalLM, AutoTokenizer

model = AutoModelForCausalLM.from_pretrained("{your_username}/bloom-560m-8bit", device_map="auto")
8-bit
Learn more about the details of 8-bit quantization in this blog post!
This section explores some of the specific features of 8-bit models, such as offloading, outlier thresholds, skipping module conversion, and finetuning.
Offloading
8-bit models can offload weights between the CPU and GPU to support fitting very large models into memory. The weights dispatched to the CPU are actually stored in float32, and aren’t converted to 8-bit. For example, to enable offloading for the bigscience/bloom-1b7 model, start by creating a BitsAndBytesConfig:
from transformers import AutoModelForCausalLM, BitsAndBytesConfig

quantization_config = BitsAndBytesConfig(llm_int8_enable_fp32_cpu_offload=True)
Design a custom device map to fit everything on your GPU except for the lm_head, which you’ll dispatch to the CPU:
device_map = {
    "transformer.word_embeddings": 0,
    "transformer.word_embeddings_layernorm": 0,
    "lm_head": "cpu",
    "transformer.h": 0,
    "transformer.ln_f": 0,
}
Now load your model with the custom device_map and quantization_config:
model_8bit = AutoModelForCausalLM.from_pretrained(
    "bigscience/bloom-1b7",
    device_map=device_map,
    quantization_config=quantization_config,
)
Outlier threshold
An “outlier” is a hidden state value greater than a certain threshold, and these values are computed in fp16. While the values are usually normally distributed ([-3.5, 3.5]), this distribution can be very different for large models ([-60, 6] or [6, 60]). 8-bit quantization works well for values ~5, but beyond that, there is a significant performance penalty. A good default threshold value is 6, but a lower threshold may be needed for more unstable models (small models or finetuning).
To find the best threshold for your model, we recommend experimenting with the llm_int8_threshold parameter in BitsAndBytesConfig:
from transformers import AutoModelForCausalLM, BitsAndBytesConfig

model_id = "bigscience/bloom-1b7"

quantization_config = BitsAndBytesConfig(
    llm_int8_threshold=10,
)

model_8bit = AutoModelForCausalLM.from_pretrained(
    model_id,
    device_map=device_map,
    quantization_config=quantization_config,
)
Skip module conversion
For some models, like Jukebox, you don’t need to quantize every module to 8-bit which can actually cause instability. With Jukebox, there are several lm_head modules that should be skipped using the llm_int8_skip_modules parameter in BitsAndBytesConfig:
from transformers import AutoModelForCausalLM, AutoTokenizer, BitsAndBytesConfig

model_id = "bigscience/bloom-1b7"

quantization_config = BitsAndBytesConfig(
    llm_int8_skip_modules=["lm_head"],
)

model_8bit = AutoModelForCausalLM.from_pretrained(
    model_id,
    device_map="auto",
    quantization_config=quantization_config,
)
Finetuning
With the PEFT library, you can finetune large models like flan-t5-large and facebook/opt-6.7b with 8-bit quantization. You don’t need to pass the device_map parameter for training because it’ll automatically load your model on a GPU. However, you can still customize the device map with the device_map parameter if you want to (device_map="auto" should only be used for inference).
4-bit
This section explores some of the specific features of 4-bit models, such as changing the compute data type, using the Normal Float 4 (NF4) data type, and using nested quantization.
Compute data type
To speedup computation, you can change the data type from float32 (the default value) to bf16 using the bnb_4bit_compute_dtype parameter in BitsAndBytesConfig:
import torch
from transformers import BitsAndBytesConfig

quantization_config = BitsAndBytesConfig(load_in_4bit=True, bnb_4bit_compute_dtype=torch.bfloat16)
Normal Float 4 (NF4)
NF4 is a 4-bit data type from the QLoRA paper, adapted for weights initialized from a normal distribution. You should use NF4 for training 4-bit base models. This can be configured with the bnb_4bit_quant_type parameter in the BitsAndBytesConfig:
from transformers import BitsAndBytesConfig

nf4_config = BitsAndBytesConfig(
    load_in_4bit=True,
    bnb_4bit_quant_type="nf4",
)

model_nf4 = AutoModelForCausalLM.from_pretrained(model_id, quantization_config=nf4_config)
For inference, the bnb_4bit_quant_type does not have a huge impact on performance. However, to remain consistent with the model weights, you should use the bnb_4bit_compute_dtype and torch_dtype values.
Nested quantization
Nested quantization is a technique that can save additional memory at no additional performance cost. This feature performs a second quantization of the already quantized weights to save an addition 0.4 bits/parameter. For example, with nested quantization, you can finetune a Llama-13b model on a 16GB NVIDIA T4 GPU with a sequence length of 1024, a batch size of 1, and enabling gradient accumulation with 4 steps.
from transformers import BitsAndBytesConfig

double_quant_config = BitsAndBytesConfig(
    load_in_4bit=True,
    bnb_4bit_use_double_quant=True,
)

model_double_quant = AutoModelForCausalLM.from_pretrained("meta-llama/Llama-2-13b", quantization_config=double_quant_config)
EETQ
The EETQ library supports int8 per-channel weight-only quantization for NVIDIA GPUS. The high-performance GEMM and GEMV kernels are from FasterTransformer and TensorRT-LLM. It requires no calibration dataset and does not need to pre-quantize your model. Moreover, the accuracy degradation is negligible owing to the per-channel quantization.
Make sure you have eetq installed from the relase page
pip install --no-cache-dir https://github.com/NetEase-FuXi/EETQ/releases/download/v1.0.0/EETQ-1.0.0+cu121+torch2.1.2-cp310-cp310-linux_x86_64.whlor via the source code https://github.com/NetEase-FuXi/EETQ. EETQ requires CUDA capability <= 8.9 and >= 7.0
git clone https://github.com/NetEase-FuXi/EETQ.git
cd EETQ/
git submodule update --init --recursive
pip install .
An unquantized model can be quantized via “from_pretrained”.
from transformers import AutoModelForCausalLM, EetqConfig
path = "/path/to/model"
quantization_config = EetqConfig("int8")
model = AutoModelForCausalLM.from_pretrained(path, device_map="auto", quantization_config=quantization_config)
A quantized model can be saved via “saved_pretrained” and be reused again via the “from_pretrained”.
quant_path = "/path/to/save/quantized/model"
model.save_pretrained(quant_path)
model = AutoModelForCausalLM.from_pretrained(quant_path, device_map="auto")
Optimum
The Optimum library supports quantization for Intel, Furiosa, ONNX Runtime, GPTQ, and lower-level PyTorch quantization functions. Consider using Optimum for quantization if you’re using specific and optimized hardware like Intel CPUs, Furiosa NPUs or a model accelerator like ONNX Runtime.
Benchmarks
To compare the speed, throughput, and latency of each quantization scheme, check the following benchmarks obtained from the optimum-benchmark library. The benchmark was run on a NVIDIA A1000 for the TheBloke/Mistral-7B-v0.1-AWQ and TheBloke/Mistral-7B-v0.1-GPTQ models. These were also tested against the bitsandbytes quantization methods as well as a native fp16 model.
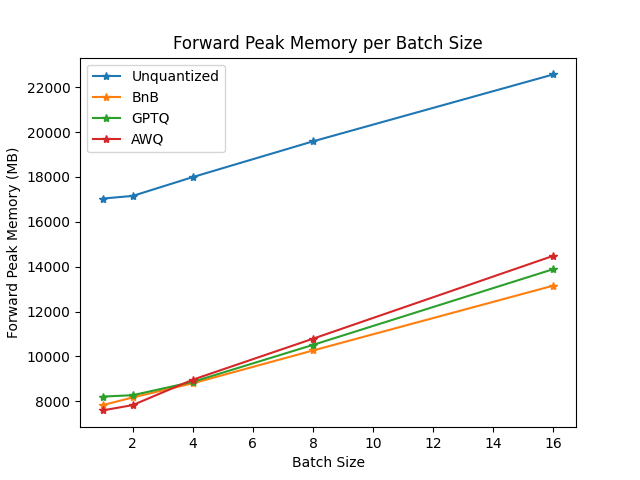
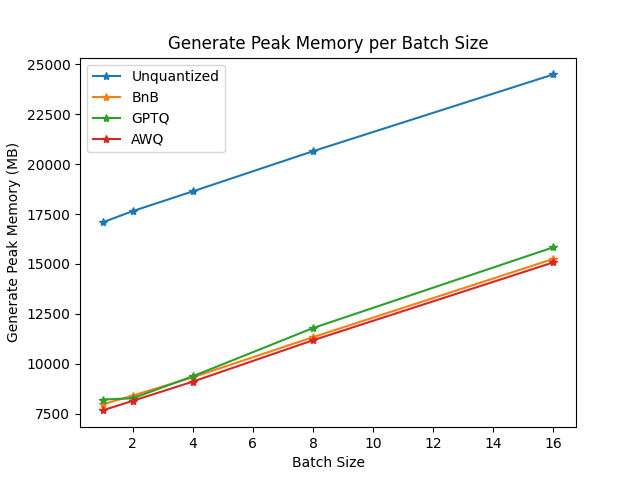
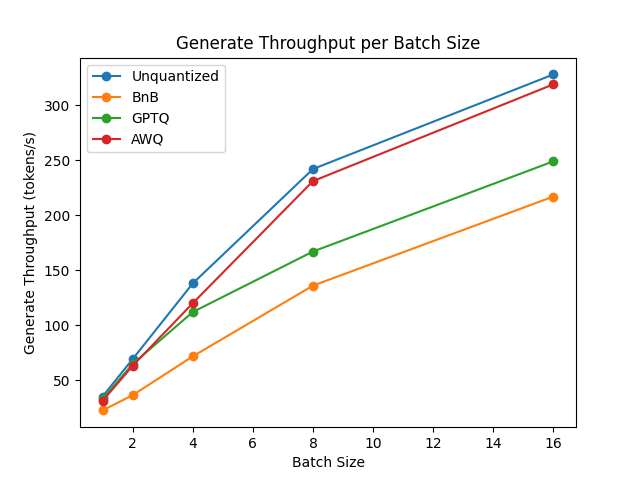
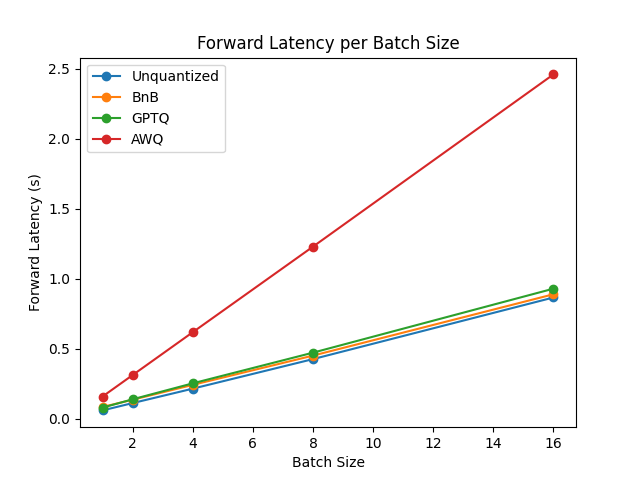
The benchmarks indicate AWQ quantization is the fastest for inference, text generation, and has the lowest peak memory for text generation. However, AWQ has the largest forward latency per batch size. For a more detailed discussion about the pros and cons of each quantization method, read the Overview of natively supported quantization schemes in 🤗 Transformers blog post.
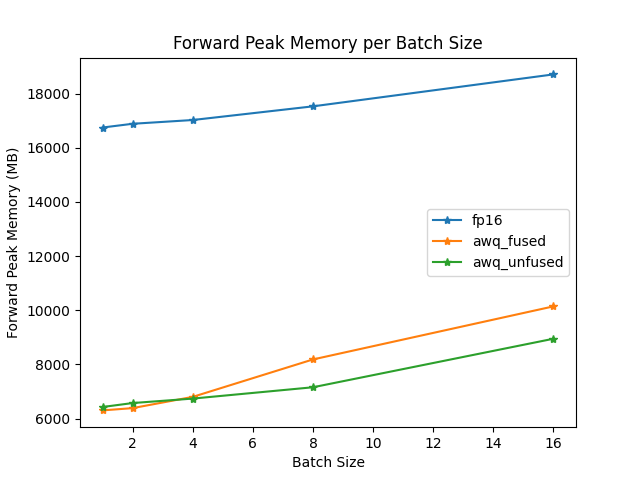
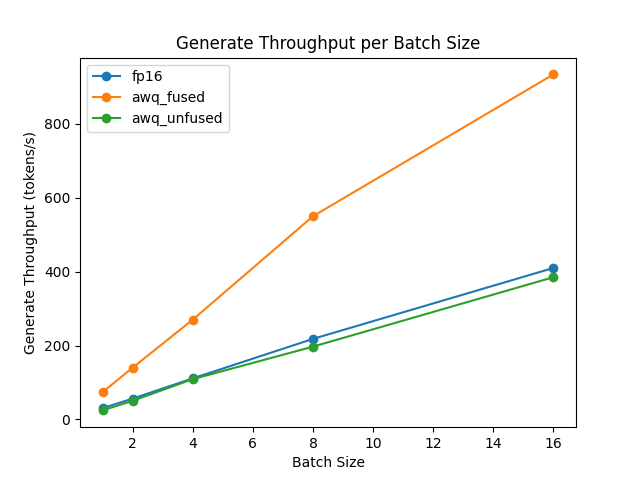
Fused AWQ modules
The TheBloke/Mistral-7B-OpenOrca-AWQ model was benchmarked with batch_size=1 with and without fused modules.
| Batch Size | Prefill Length | Decode Length | Prefill tokens/s | Decode tokens/s | Memory (VRAM) |
|---|---|---|---|---|---|
| 1 | 32 | 32 | 60.0984 | 38.4537 | 4.50 GB (5.68%) |
| 1 | 64 | 64 | 1333.67 | 31.6604 | 4.50 GB (5.68%) |
| 1 | 128 | 128 | 2434.06 | 31.6272 | 4.50 GB (5.68%) |
| 1 | 256 | 256 | 3072.26 | 38.1731 | 4.50 GB (5.68%) |
| 1 | 512 | 512 | 3184.74 | 31.6819 | 4.59 GB (5.80%) |
| 1 | 1024 | 1024 | 3148.18 | 36.8031 | 4.81 GB (6.07%) |
| 1 | 2048 | 2048 | 2927.33 | 35.2676 | 5.73 GB (7.23%) |
| Batch Size | Prefill Length | Decode Length | Prefill tokens/s | Decode tokens/s | Memory (VRAM) |
|---|---|---|---|---|---|
| 1 | 32 | 32 | 81.4899 | 80.2569 | 4.00 GB (5.05%) |
| 1 | 64 | 64 | 1756.1 | 106.26 | 4.00 GB (5.05%) |
| 1 | 128 | 128 | 2479.32 | 105.631 | 4.00 GB (5.06%) |
| 1 | 256 | 256 | 1813.6 | 85.7485 | 4.01 GB (5.06%) |
| 1 | 512 | 512 | 2848.9 | 97.701 | 4.11 GB (5.19%) |
| 1 | 1024 | 1024 | 3044.35 | 87.7323 | 4.41 GB (5.57%) |
| 1 | 2048 | 2048 | 2715.11 | 89.4709 | 5.57 GB (7.04%) |
The speed and throughput of fused and unfused modules were also tested with the optimum-benchmark library.