# -*- coding: utf-8 -*-
"""Oim Stable Diffusion
Automatically generated by Colaboratory.
Original file is located at
https://colab.research.google.com/drive/1pv_fIHCx5wvEBRmSKv-kIysjC4I7GXvS
# **Stable Diffusion** 🎨
*...using `🧨diffusers`*
Stable Diffusion is a text-to-image latent diffusion model created by the researchers and engineers from [CompVis](https://github.com/CompVis), [Stability AI](https://stability.ai/) and [LAION](https://laion.ai/). It's trained on 512x512 images from a subset of the [LAION-5B](https://laion.ai/blog/laion-5b/) database. This model uses a frozen CLIP ViT-L/14 text encoder to condition the model on text prompts. With its 860M UNet and 123M text encoder, the model is relatively lightweight and runs on a GPU with at least 10GB VRAM.
See the [model card](https://huggingface.co/CompVis/stable-diffusion) for more information.
This Colab notebook shows how to use Stable Diffusion with the 🤗 Hugging Face [🧨 Diffusers library](https://github.com/huggingface/diffusers).
Let's get started!
## 1. How to use `StableDiffusionPipeline`
Before diving into the theoretical aspects of how Stable Diffusion functions,
let's try it out a bit 🤗.
In this section, we show how you can run text to image inference in just a few lines of code!
### Setup
First, please make sure you are using a GPU runtime to run this notebook, so inference is much faster. If the following command fails, use the `Runtime` menu above and select `Change runtime type`.
"""
!nvidia-smi
"""Next, you should install `diffusers==0.2.4` as well `scipy`, `ftfy` and `transformers`."""
!pip install diffusers==0.2.4
!pip install transformers scipy ftfy
!pip install "ipywidgets>=7,<8"
"""You also need to accept the model license before downloading or using the weights. In this post we'll use model version `v1-4`, so you'll need to visit [its card](https://huggingface.co/CompVis/stable-diffusion-v1-4), read the license and tick the checkbox if you agree.
You have to be a registered user in 🤗 Hugging Face Hub, and you'll also need to use an access token for the code to work. For more information on access tokens, please refer to [this section of the documentation](https://huggingface.co/docs/hub/security-tokens).
As google colab has disabled external widgtes, we need to enable it explicitly. Run the following cell to be able to use `notebook_login`
"""
from google.colab import output
output.enable_custom_widget_manager()
"""Now you can login with your user token."""
from huggingface_hub import notebook_login
notebook_login()
"""### Stable Diffusion Pipeline
`StableDiffusionPipeline` is an end-to-end inference pipeline that you can use to generate images from text with just a few lines of code.
First, we load the pre-trained weights of all components of the model.
In addition to the model id [CompVis/stable-diffusion-v1-4](https://huggingface.co/CompVis/stable-diffusion-v1-4), we're also passing a specific `revision`, `torch_dtype` and `use_auth_token` to the `from_pretrained` method.
`use_auth_token` is necessary to verify that you have indeed accepted the model's license.
We want to ensure that every free Google Colab can run Stable Diffusion, hence we're loading the weights from the half-precision branch [`fp16`](https://huggingface.co/CompVis/stable-diffusion-v1-4/tree/fp16) and also tell `diffusers` to expect the weights in float16 precision by passing `torch_dtype=torch.float16`.
If you want to ensure the highest possible precision, please make sure to remove `revision="fp16"` and `torch_dtype=torch.float16` at the cost of a higher memory usage.
"""
import torch
from diffusers import StableDiffusionPipeline
# make sure you're logged in with `huggingface-cli login`
pipe = StableDiffusionPipeline.from_pretrained("CompVis/stable-diffusion-v1-4", revision="fp16", torch_dtype=torch.float16, use_auth_token=True)
"""Next, let's move the pipeline to GPU to have faster inference."""
pipe = pipe.to("cuda")
"""Using `autocast` will run inference faster because it uses half-precision."""
#@title Текст заголовка по умолчанию
from torch import autocast
prompt = "winter forest in russia"
with autocast("cuda"):
image = pipe(prompt)["sample"][0] # image here is in [PIL format](https://pillow.readthedocs.io/en/stable/)
# Now to display an image you can do either save it such as:
image.save(f"astronaut_rides_horse.png")
# or if you're in a google colab you can directly display it with
image
"""Running the above cell multiple times will give you a different image every time. If you want deterministic output you can pass a random seed to the pipeline. Every time you use the same seed you'll have the same image result."""
import torch
generator = torch.Generator("cuda").manual_seed(1024)
with autocast("cuda"):
image = pipe(prompt, generator=generator)["sample"][0]
image
"""You can change the number of inference steps using the `num_inference_steps` argument. In general, results are better the more steps you use. Stable Diffusion, being one of the latest models, works great with a relatively small number of steps, so we recommend to use the default of `50`. If you want faster results you can use a smaller number.
The following cell uses the same seed as before, but with fewer steps. Note how some details, such as the horse's head or the helmet, are less defin realistic and less defined than in the previous image:
"""
import torch
generator = torch.Generator("cuda").manual_seed(1024)
with autocast("cuda"):
image = pipe(prompt, num_inference_steps=15, generator=generator)["sample"][0]
image
"""The other parameter in the pipeline call is `guidance_scale`. It is a way to increase the adherence to the conditional signal which in this case is text as well as overall sample quality. In simple terms classifier free guidance forces the generation to better match with the prompt. Numbers like `7` or `8.5` give good results, if you use a very large number the images might look good, but will be less diverse.
You can learn about the technical details of this parameter in [the last section](https://colab.research.google.com/drive/1ALXuCM5iNnJDNW5vqBm5lCtUQtZJHN2f?authuser=1#scrollTo=UZp-ynZLrS-S) of this notebook.
To generate multiple images for the same prompt, we simply use a list with the same prompt repeated several times. We'll send the list to the pipeline instead of the string we used before.
Let's first write a helper function to display a grid of images. Just run the following cell to create the `image_grid` function, or disclose the code if you are interested in how it's done.
"""
from PIL import Image
def image_grid(imgs, rows, cols):
assert len(imgs) == rows*cols
w, h = imgs[0].size
grid = Image.new('RGB', size=(cols*w, rows*h))
grid_w, grid_h = grid.size
for i, img in enumerate(imgs):
grid.paste(img, box=(i%cols*w, i//cols*h))
return grid
"""Now, we can generate a grid image once having run the pipeline with a list of 3 prompts."""
num_images = 3
prompt = ["a photograph of an astronaut riding a horse"] * num_images
with autocast("cuda"):
images = pipe(prompt)["sample"]
grid = image_grid(images, rows=1, cols=3)
grid
"""And here's how to generate a grid of `n × m` images."""
num_cols = 3
num_rows = 4
prompt = ["a protoss cityscape with advanced technology, inspired by the game starcraft, making heavy use of light and shadow to create a sense of mystery and foreboding. the city sprawling below is a mix of organic and inorganic, with swirling energy currents and strange crystalline structures, illustrated in a realistic and detailed style by wei wang, artstation"] * num_cols
all_images = []
for i in range(num_rows):
with autocast("cuda"):
images = pipe(prompt)["sample"]
all_images.extend(images)
grid = image_grid(all_images, rows=num_rows, cols=num_cols)
grid
"""### Generate non-square images
Stable Diffusion produces images of `512 × 512` pixels by default. But it's very easy to override the default using the `height` and `width` arguments, so you can create rectangular images in portrait or landscape ratios.
These are some recommendations to choose good image sizes:
- Make sure `height` and `width` are both multiples of `8`.
- Going below 512 might result in lower quality images.
- Going over 512 in both directions will repeat image areas (global coherence is lost).
- The best way to create non-square images is to use `512` in one dimension, and a value larger than that in the other one.
"""
prompt = "a photograph of an astronaut riding a horse"
with autocast("cuda"):
image = pipe(prompt, height=1080, width=768)["sample"][0]
image
"""## 2. What is Stable Diffusion
Now, let's go into the theoretical part of Stable Diffusion 👩🎓.
Stable Diffusion is based on a particular type of diffusion model called **Latent Diffusion**, proposed in [High-Resolution Image Synthesis with Latent Diffusion Models](https://arxiv.org/abs/2112.10752).
General diffusion models are machine learning systems that are trained to *denoise* random gaussian noise step by step, to get to a sample of interest, such as an *image*. For a more detailed overview of how they work, check [this colab](https://colab.research.google.com/github/huggingface/notebooks/blob/main/diffusers/diffusers_intro.ipynb).
Diffusion models have shown to achieve state-of-the-art results for generating image data. But one downside of diffusion models is that the reverse denoising process is slow. In addition, these models consume a lot of memory because they operate in pixel space, which becomes unreasobly expensive when generating high-resolution images. Therefore, it is challenging to train these models and also use them for inference.
Latent diffusion can reduce the memory and compute complexity by applying the diffusion process over a lower dimensional _latent_ space, instead of using the actual pixel space. This is the key difference between standard diffusion and latent diffusion models: **in latent diffusion the model is trained to generate latent (compressed) representations of the images.**
There are three main components in latent diffusion.
1. An autoencoder (VAE).
2. A [U-Net](https://colab.research.google.com/github/huggingface/notebooks/blob/main/diffusers/diffusers_intro.ipynb#scrollTo=wW8o1Wp0zRkq).
3. A text-encoder, *e.g.* [CLIP's Text Encoder](https://huggingface.co/docs/transformers/model_doc/clip#transformers.CLIPTextModel).
**1. The autoencoder (VAE)**
The VAE model has two parts, an encoder and a decoder. The encoder is used to convert the image into a low dimensional latent representation, which will serve as the input to the *U-Net* model.
The decoder, conversely, transforms the latent representation back into an image.
During latent diffusion _training_, the encoder is used to get the latent representations (_latents_) of the images for the forward diffusion process, which applies more and more noise at each step. During _inference_, the denoised latents generated by the reverse diffusion process are converted back into images using the VAE decoder. As we will see during inference we **only need the VAE decoder**.
**2. The U-Net**
The U-Net has an encoder part and a decoder part both comprised of ResNet blocks.
The encoder compresses an image representation into a lower resolution image representation and the decoder decodes the lower resolution image representation back to the original higher resolution image representation that is supposedly less noisy.
More specifically, the U-Net output predicts the noise residual which can be used to compute the predicted denoised image representation.
To prevent the U-Net from loosing important information while downsampling, short-cut connections are usually added between the downsampling ResNets of the encoder to the upsampling ResNets of the decoder.
Additionally, the stable diffusion U-Net is able to condition it's output on text-embeddings via cross-attention layers. The cross-attention layers are added to both the encodre and decoder part of the U-Net usually between ResNet blocks.
**3. The Text-encoder**
The text-encoder is responsible for transforming the input prompt, *e.g.* "An astronout riding a horse" into an embedding space that can be understood by the U-Net. It is usually a simple *transformer-based* encoder that maps a sequence of input tokens to a sequence of latent text-embeddings.
Inspired by [Imagen](https://imagen.research.google/), Stable Diffusion does **not** train the text-encoder during training and simply uses an CLIP's already trained text encoder, [CLIPTextModel](https://huggingface.co/docs/transformers/model_doc/clip#transformers.CLIPTextModel).
**Why is latent diffusion fast and efficient?**
Since the U-Net of latent diffusion models operates on a low dimensional space, it greatly reduces the memory and compute requirements compared to pixel-space diffusion models. For example, the autoencoder used in Stable Diffusion has a reduction factor of 8. This means that an image of shape `(3, 512, 512)` becomes `(3, 64, 64)` in latent space, which requires `8 × 8 = 64` times less memory.
This is why it's possible to generate `512 × 512` images so quickly, even on 16GB Colab GPUs!
**Stable Diffusion during inference**
Putting it all together, let's now take a closer look at how the model works in inference by illustrating the logical flow.
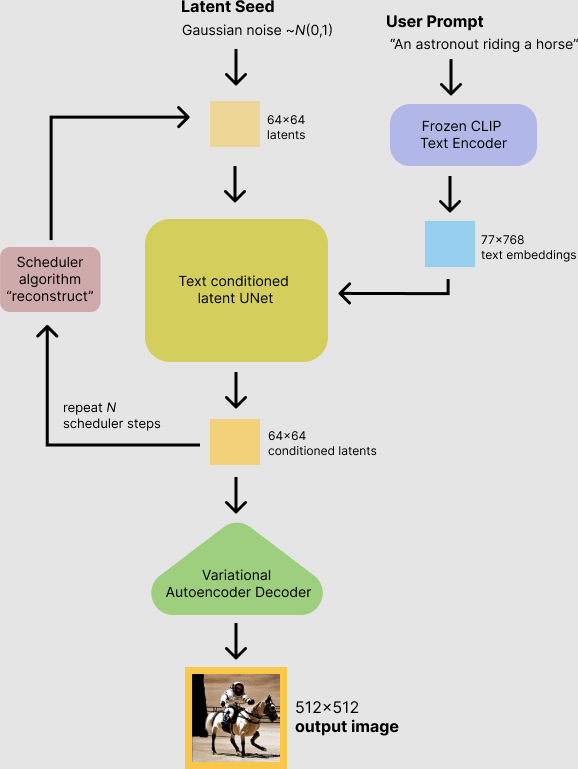
The stable diffusion model takes both a latent seed and a text prompt as an input. The latent seed is then used to generate random latent image representations of size $64 \times 64$ where as the text prompt is transformed to text embeddings of size $77 \times 768$ via CLIP's text encoder.
Next the U-Net iteratively *denoises* the random latent image representations while being conditioned on the text embeddings. The output of the U-Net, being the noise residual, is used to computed a denoised latent image representation via a scheduler algorithm. Many different scheduler algorithms can be used for this computation, each having its pro- and cons. For Stable Diffusion, we recommend using one of:
- [PNDM scheduler](https://github.com/huggingface/diffusers/blob/main/src/diffusers/schedulers/scheduling_pndm.py) (used by default)
- [DDIM scheduler](https://github.com/huggingface/diffusers/blob/main/src/diffusers/schedulers/scheduling_ddim.py)
- [K-LMS scheduler](https://github.com/huggingface/diffusers/blob/main/src/diffusers/schedulers/scheduling_lms_discrete.py)
Theory on how the scheduler algorithm function is out-of-scope for this notebook, but in short one should remember that they compute the predicted denoised image representation from the previous noise representation and the predicted noise residual.
For more information, we recommend looking into [Elucidating the Design Space of Diffusion-Based Generative Models](https://arxiv.org/abs/2206.00364)
The *denoising* process is repeated *ca.* 50 times to step-by-step retrieve better latent image representations.
Once complete, the latent image representation is decoded by the decoder part of the variational auto encoder.
After this brief introduction to Latent and Stable Diffusion, let's see how to make advanced use of 🤗 Hugging Face Diffusers!
## 3. How to write your own inference pipeline with `diffusers`
Finally, we show how you can create custom diffusion pipelines with `diffusers`.
This is often very useful to dig a bit deeper into certain functionalities of the system and to potentially switch out certain components.
In this section, we will demonstrate how to use Stable Diffusion with a different scheduler, namely [Katherine Crowson's](https://github.com/crowsonkb) K-LMS scheduler that was added in [this PR](https://github.com/huggingface/diffusers/pull/185#pullrequestreview-1074247365).
Let's go through the `StableDiffusionPipeline` step by step to see how we could have written it ourselves.
We will start by loading the individual models involved.
"""
import torch
torch_device = "cuda" if torch.cuda.is_available() else "cpu"
"""The [pre-trained model](https://huggingface.co/CompVis/stable-diffusion-v1-3-diffusers/tree/main) includes all the components required to setup a complete diffusion pipeline. They are stored in the following folders:
- `text_encoder`: Stable Diffusion uses CLIP, but other diffusion models may use other encoders such as `BERT`.
- `tokenizer`. It must match the one used by the `text_encoder` model.
- `scheduler`: The scheduling algorithm used to progressively add noise to the image during training.
- `unet`: The model used to generate the latent representation of the input.
- `vae`: Autoencoder module that we'll use to decode latent representations into real images.
We can load the components by referring to the folder they were saved, using the `subfolder` argument to `from_pretrained`.
"""
from transformers import CLIPTextModel, CLIPTokenizer
from diffusers import AutoencoderKL, UNet2DConditionModel, PNDMScheduler
# 1. Load the autoencoder model which will be used to decode the latents into image space.
vae = AutoencoderKL.from_pretrained("CompVis/stable-diffusion-v1-4", subfolder="vae", use_auth_token=True)
# 2. Load the tokenizer and text encoder to tokenize and encode the text.
tokenizer = CLIPTokenizer.from_pretrained("openai/clip-vit-large-patch14")
text_encoder = CLIPTextModel.from_pretrained("openai/clip-vit-large-patch14")
# 3. The UNet model for generating the latents.
unet = UNet2DConditionModel.from_pretrained("CompVis/stable-diffusion-v1-4", subfolder="unet", use_auth_token=True)
"""Now instead of loading the pre-defined scheduler, we load a K-LMS scheduler instead."""
from diffusers import LMSDiscreteScheduler
scheduler = LMSDiscreteScheduler(beta_start=0.00085, beta_end=0.012, beta_schedule="scaled_linear", num_train_timesteps=1000)
"""Next we move the models to the GPU."""
from torch import autocast
vae = vae.to(torch_device)
text_encoder = text_encoder.to(torch_device)
unet = unet.to(torch_device)
"""We now define the parameters we'll use to generate images.
Note that `guidance_scale` is defined analog to the guidance weight `w` of equation (2) in the [Imagen paper](https://arxiv.org/pdf/2205.11487.pdf). `guidance_scale == 1` corresponds to doing no classifier-free guidance. Here we set it to 7.5 as also done previously.
In contrast to the previous examples, we set `num_inference_steps` to 100 to get an even more defined image.
"""
prompt = ["a photograph of an astronaut riding a horse"]
height = 512 # default height of Stable Diffusion
width = 512 # default width of Stable Diffusion
num_inference_steps = 100 # Number of denoising steps
guidance_scale = 7.5 # Scale for classifier-free guidance
generator = torch.manual_seed(32) # Seed generator to create the inital latent noise
batch_size = 1
"""First, we get the text_embeddings for the prompt. These embeddings will be used to condition the UNet model."""
text_input = tokenizer(prompt, padding="max_length", max_length=tokenizer.model_max_length, truncation=True, return_tensors="pt")
with torch.no_grad():
text_embeddings = text_encoder(text_input.input_ids.to(torch_device))[0]
"""We'll also get the unconditional text embeddings for classifier-free guidance, which are just the embeddings for the padding token (empty text). They need to have the same shape as the conditional `text_embeddings` (`batch_size` and `seq_length`)"""
max_length = text_input.input_ids.shape[-1]
uncond_input = tokenizer(
[""] * batch_size, padding="max_length", max_length=max_length, return_tensors="pt"
)
with torch.no_grad():
uncond_embeddings = text_encoder(uncond_input.input_ids.to(torch_device))[0]
"""For classifier-free guidance, we need to do two forward passes. One with the conditioned input (`text_embeddings`), and another with the unconditional embeddings (`uncond_embeddings`). In practice, we can concatenate both into a single batch to avoid doing two forward passes."""
text_embeddings = torch.cat([uncond_embeddings, text_embeddings])
"""Generate the intial random noise."""
latents = torch.randn(
(batch_size, unet.in_channels, height // 8, width // 8),
generator=generator,
)
latents = latents.to(torch_device)
latents.shape
"""Cool $64 \times 64$ is expected. The model will transform this latent representation (pure noise) into a `512 × 512` image later on.
Next, we initialize the scheduler with our chosen `num_inference_steps`.
This will compute the `sigmas` and exact time step values to be used during the denoising process.
"""
scheduler.set_timesteps(num_inference_steps)
"""The K-LMS scheduler needs to multiple the `latents` by its `sigma` values. Let's do this here"""
latents = latents * scheduler.sigmas[0]
"""We are ready to write the denoising loop."""
from tqdm.auto import tqdm
from torch import autocast
with autocast("cuda"):
for i, t in tqdm(enumerate(scheduler.timesteps)):
# expand the latents if we are doing classifier-free guidance to avoid doing two forward passes.
latent_model_input = torch.cat([latents] * 2)
sigma = scheduler.sigmas[i]
latent_model_input = latent_model_input / ((sigma**2 + 1) ** 0.5)
# predict the noise residual
with torch.no_grad():
noise_pred = unet(latent_model_input, t, encoder_hidden_states=text_embeddings)["sample"]
# perform guidance
noise_pred_uncond, noise_pred_text = noise_pred.chunk(2)
noise_pred = noise_pred_uncond + guidance_scale * (noise_pred_text - noise_pred_uncond)
# compute the previous noisy sample x_t -> x_t-1
latents = scheduler.step(noise_pred, i, latents)["prev_sample"]
"""We now use the `vae` to decode the generated `latents` back into the image."""
# scale and decode the image latents with vae
latents = 1 / 0.18215 * latents
with torch.no_grad():
image = vae.decode(latents)
"""And finally, let's convert the image to PIL so we can display or save it."""
image = (image / 2 + 0.5).clamp(0, 1)
image = image.detach().cpu().permute(0, 2, 3, 1).numpy()
images = (image * 255).round().astype("uint8")
pil_images = [Image.fromarray(image) for image in images]
pil_images[0]
"""Nice, as we can see the photo has quite a definition 🔥."""