---
license: wtfpl
tags:
- guide
- stable diffusion
- webui
- automatic1111
- stable-diffusion-webui
- lora
language:
- en
---
**[⭐ CLICK HERE TO OPEN THIS DOCUMENT IN FULL WIDTH](README.md#index)**
**(The index won't work otherwise).**
# Index
* [Introduction](#intro)
* [Local Installation (Windows + Nvidia)](#install)
* [Getting Started](#start)
1. [Models](#model)
1. [VAEs](#vae)
1. [Prompts](#prompt)
1. [Generation parameters](#gen)
* [Extensions](#extensions)
* [Loras](#lora)
* [Lycoris](#lycoris)
* [Upscaling](#upscale)
* [Scripts](#imgscripts)
* [X/Y/Z Plot](#plot)
* [Prompt Matrix](#matrix)
* [Ultimate Upscaler](#ultimate)
* [ControlNet](#controlnet)
* [Lora Training for beginners](#train)
* [...vtubers?](#vtubers)
# Introduction [▲](#index)
Stable Diffusion is a very powerful AI image generation software you can run on your own home computer. It uses "models" which function like the brain of the AI, and can make almost anything, given that someone has trained it to do it. The biggest uses are anime art, photorealism, and NSFW content.
The images you create may be used for any purpose, depending on the used model's license. Whether they are "yours" in a legal sense varies by local laws and is often inconclusive. Neither I or any of the people involved in Stable Diffusion or its models are responsible for anything you make, and you are expressively forbidden from creating illegal or harmful content.
This guide was finished in March 2023 and was last revised in March 2024. One month is like a year in AI time, so hopefully it is still useful by the time you read it.
# Local Installation (Windows + Nvidia) [▲](#index)
To run Stable Diffusion on your own computer you'll need a graphics card. An old one with 2 GB of VRAM might just be enough for slow small images, while 4 GB of VRAM is enough for slow XL generations, and 6 and 8 GB of VRAM being even better. I will only cover the case where you are running Windows 10/11 and using an NVIDIA graphics card series 16XX, 20XX, 30XX, or 40XX (though 10XX also work). My apologies to AMD, Linux, and Mac users, but their cases are harder to cover. If you don't meet the hardware requirements, you may look for online alternatives, which I won't cover anymore.
1. Get the latest Stable Diffusion Webui Forge installer from [here](https://github.com/lllyasviel/stable-diffusion-webui-forge/releases/download/latest/webui_forge_cu121_torch21.7z).
1. Unzip the installer in an easy and accessible location, and run `update.bat`.
1. After it is done, run `run.bat`. It will continue to install and it will also download a decent AI model for you to use.
1. After everything is finished, it will open a window in your browser. If it doesn't automatically do this, you can type `localhost:7860` in your browser window.
1. The page is now open. It's your own private website. The starting page is where you can make your images. But first, we'll go to the **Settings** tab. There will be sections of settings on the left.
* In the *Stable Diffusion* section, scroll down and increase **Clip Skip** from 1 to 2. This is said to produce better images, specially for anime.
* In the *User Interface* section, scroll down to **Quicksettings list** and change it to `sd_model_checkpoint, sd_vae`
* Scroll back up, click the big orange **Apply settings** button, then **Reload UI** next to it.
1. You are more than ready to generate some images, but you only have one AI model available, which might not be able to generate what you want. Also, what are all of these options? See [below ▼](#start) to get started.
# Getting Started [▲](#index)
Before or after generating your first few images, you will want to take a look at the information below to improve your experience and results.
If you followed the instructions above, the top of your page should look similar to this:

Here you can select your checkpoint and VAE. We will go over what these are and how you can get some.
1. **Models** [▲](#index)
The **model**, also called **checkpoint**, is the brain of your AI, designed for the purpose of producing certain types of images. There are many options, most of which are on [civitai](https://civitai.com). But which to choose? These are my recommendations:
* For anime, [MeinaMix](https://civitai.com/models/7240/meinamix) and its family of models should serve most purposes very well. I also personally enjoy [Based66](https://civitai.com/models/61643/based66).
* For general art go with [DreamShaper](https://civitai.com/models/4384/dreamshaper), there are few options quite like it in terms of creativity. An honorable mention goes to [Pastel Mix](https://civitai.com/models/5414/pastel-mix-stylized-anime-model), which has a beautiful and unique aesthetic with the addition of anime.
* For photorealism go with [Deliberate](https://civitai.com/models/4823/deliberate). It can do almost anything, but specially photographs. Very intricate results.
* The [Uber Realistic Porn Merge](https://civitai.com/models/2661/uber-realistic-porn-merge-urpm) is self-explanatory.
Nowadays there are also XL models. They are larger and slower and use more memory, but they can often create better images.
* For XL anime, as of March 2024 we use [AutismMix](https://civitai.com/models/288584?modelVersionId=324524).
* I have not tried realism in XL yet, so I can't recommend models for those. See what you can find!
The models normally go into the `webui/models/Stable-diffusion` folder.
Please note that checkpoints in the format `.safetensors` are safe to use while `.ckpt` **may** contain viruses, so be careful. Additionally, when choosing models you may have a choice between fp32, fp16 and pruned. They all produce the same images within a tiny margin of error, so just go with the smallest file (pruned-fp16).
**Tip:** Whenever you place a new file manually you can either restart the UI at the bottom of the page or press the small 🔃 button next to its dropdown.
1. **VAEs** [▲](#index)
Most checkpoints don't come with a VAE built in. The VAE is a small separate model, which "converts your image into human format". Without it, you'll get faded colors and ugly eyes, among other things.
Most people use one of 3 different VAEs:
* [anything vae](https://huggingface.co/WarriorMama777/OrangeMixs/resolve/main/VAEs/orangemix.vae.pt), also known as the orangemix vae. Used to be the most popular for anime, but it's the least vibrant of all vaes.
* [vae-ft-mse](https://huggingface.co/stabilityai/sd-vae-ft-mse-original/blob/main/vae-ft-mse-840000-ema-pruned.safetensors), the latest from Stable Diffusion itself. Used by photorealism models and such.
* [kl-f8-anime2](https://huggingface.co/hakurei/waifu-diffusion-v1-4/resolve/main/vae/kl-f8-anime2.ckpt), also known as the Waifu Diffusion VAE, it is older and produces more saturated results.
And for SDXL you should use the [sdxl-vae](https://huggingface.co/stabilityai/sdxl-vae/resolve/main/sdxl_vae.safetensors).
The VAEs normally go into the `webui/models/VAE` folder.
If you did not follow this guide up to this point, you will have to go into the **Settings** tab, then the **Stable Difussion** section, to select your VAE.
**Tip:** Whenever you place a new file manually you can either restart the UI at the bottom of the page or press the small 🔃 button next to its dropdown.
1. **Prompts** [▲](#index)
On the first tab, **txt2img**, you'll be making most of your images. This is where you'll find your *prompt* and *negative prompt*.
Stable Diffusion is not like Midjourney or other popular image generation software, you can't just ask it what you want. You have to be specific. *Very* specific.
Most people have found a prompt that works for them and they swear by it, often recommended by other people. I will show you my own personal example of a prompt and negative prompt:
**Revision:** These generic prompts have become less and less useful, as modern models don't really need them to work nicely. A simple negative prompt is often all you need.
* Anime
* `2d, masterpiece, best quality, anime, highly detailed face, highly detailed background, perfect lighting`
* `EasyNegative, worst quality, low quality, 3d, realistic, photorealistic, (loli, child, teen, baby face), zombie, animal, multiple views, text, watermark, signature, artist name, artist logo, censored`
* Photorealism
* `best quality, 4k, 8k, ultra highres, raw photo in hdr, sharp focus, intricate texture, skin imperfections, photograph of`
* `EasyNegative, worst quality, low quality, normal quality, child, painting, drawing, sketch, cartoon, anime, render, 3d, blurry, deformed, disfigured, morbid, mutated, bad anatomy, bad art`
* **EasyNegative:** The negative prompts above use EasyNegative, which is an *embedding* or "magic word" that encodes many bad things to make your images better. Otherwise you'd have to use a huge negative prompt.
* You will have to [download this tiny file](https://huggingface.co/datasets/gsdf/EasyNegative/resolve/main/EasyNegative.safetensors), put it in your `webui/embeddings` folder, then go to the bottom of your WebUI page and click *Reload UI*. It will then work when you type that word.
A comparison with and without these negative prompts including EasyNegative can be seen [further down ▼](#matrixneg).

After a "base prompt" like the above, you may then start typing what you want. For example `young woman in a bikini in the beach, full body shot`. Feel free to add other terms you don't like to your negatives such as `old, ugly, futanari, furry`, etc.
One important technique when writing prompts are emphasis and de-emphasis. When you surround something in `(parentheses)`, it will get more emphasis or **weight** in your resulting image, basically telling the AI that part is more important. The normal weight for every word is 1, and each parentheses will multiply by 1.1 (you can use multiple). You can also specify the weight yourself, like this: `(full body:1.4)`. You can also go below 1 to de-emphasize a word: `[brackets]` will multiply by 0.9, but you'll still need parentheses to go lower, like `(this:0.5)`.
Also note that hands and feet are famously difficult for AI to generate. Models have become better at them over time, but you may need to do photoshopping, inpainting, or advanced techniques with [ControlNet ▼](#controlnet) to get it right.
1. **Generation parameters** [▲](#index)
The rest of the parameters in the starting page will look something like this:
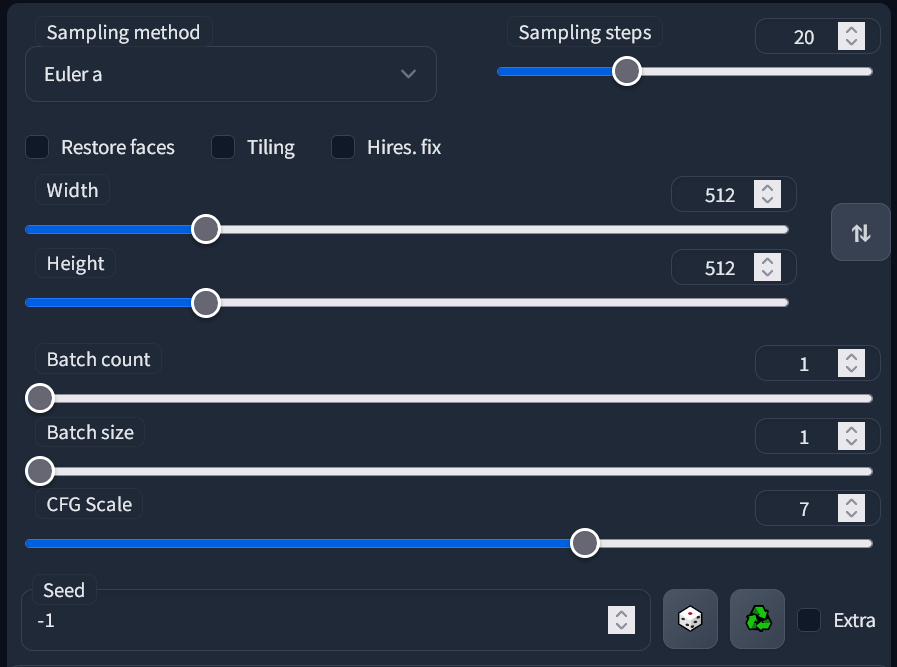
* **Sampling method:** This is the algorithm that formulates your image, and each produce different results. The default of `Euler a` is often the best. There are also very good results for `DPM++ 2M Karras` and `DPM++ SDE Karras`. See below for a comparison.
* **Sampling steps:** These are "calculated" beforehand, and so more steps doesn't always mean more detail. I always go with 30, you may go from 20-50 and find consistently good results. See below for a comparison.
* **Width and Height:** 512x512 is the default, and you should almost never go above 768 in either direction as it may distort and deform your image. To produce bigger images see `Hires fix`.
* **Batch Count and Batch Size:** Batch *size* is how many images your graphics card will generate at the same time, which is limited by its VRAM. Batch *count* is how many times to repeat that batch size. Batches have consecutive seeds, more on seeds below.
* **CFG Scale:** "Lower values produce more creative results". You should almost always stick to 7, but 4 to 10 is an acceptable range.
* **Seed:** A number that guides the creation of your image. The same seed with the same prompt and parameters produces the same image every time, except for small details and under some circumstances.
**Hires fix:** Lets you create larger images (specially in non-XL models) without distortion. Often used at 2x scale. When selected, more options appear:
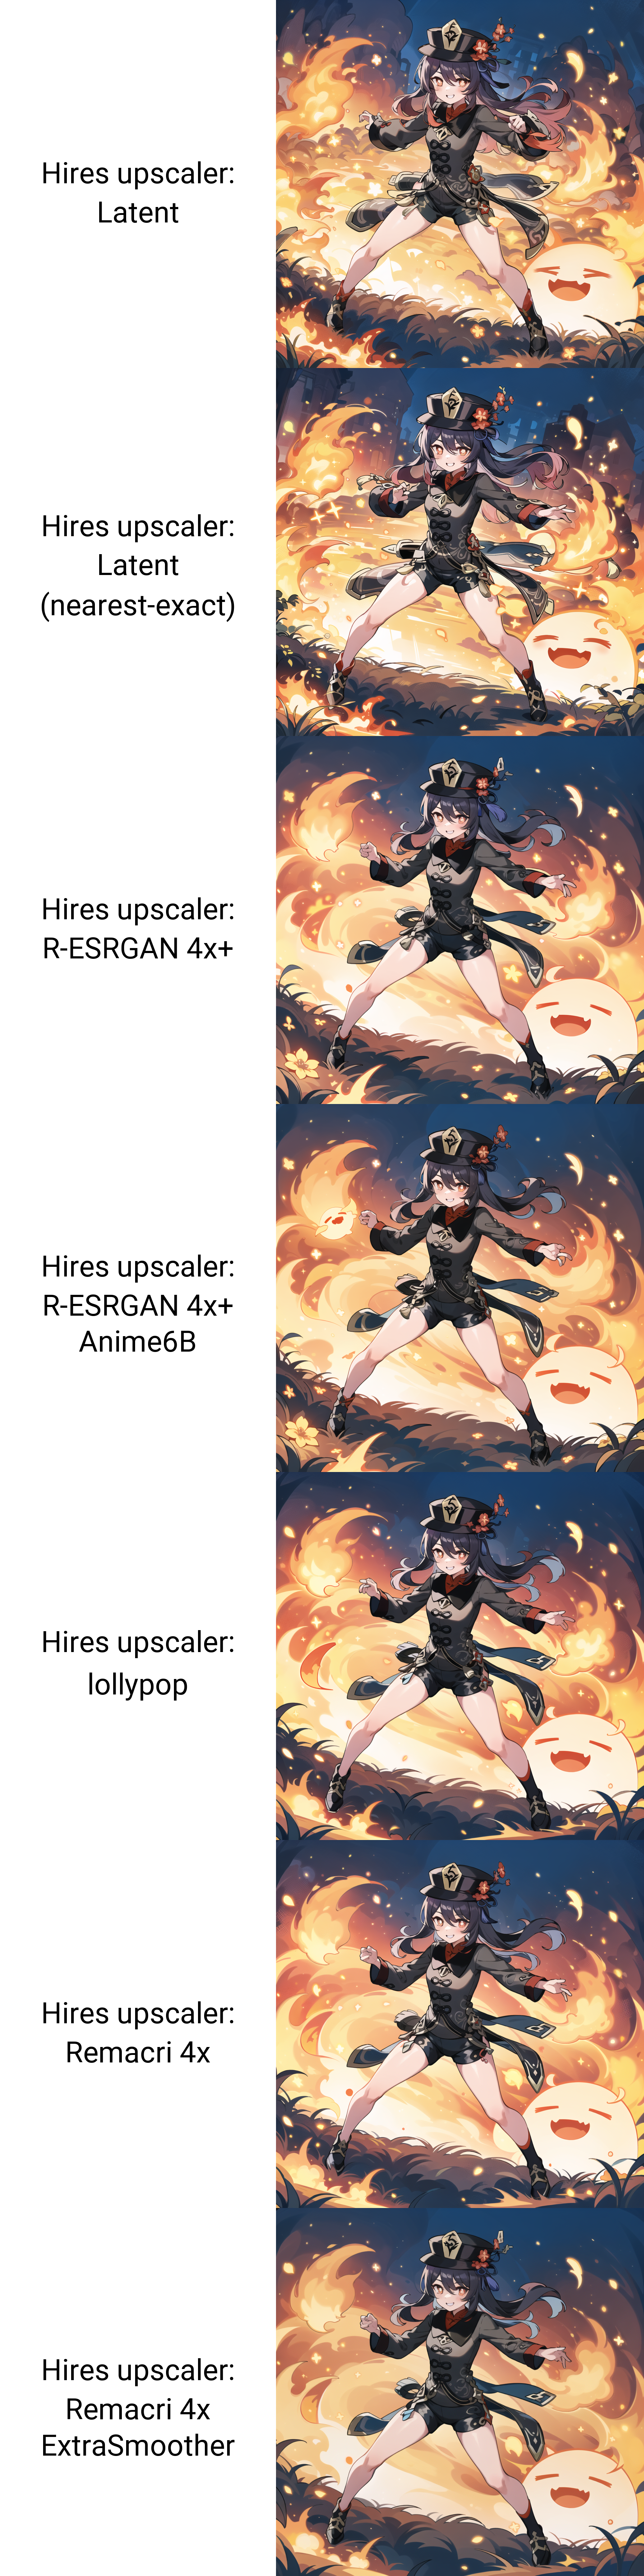
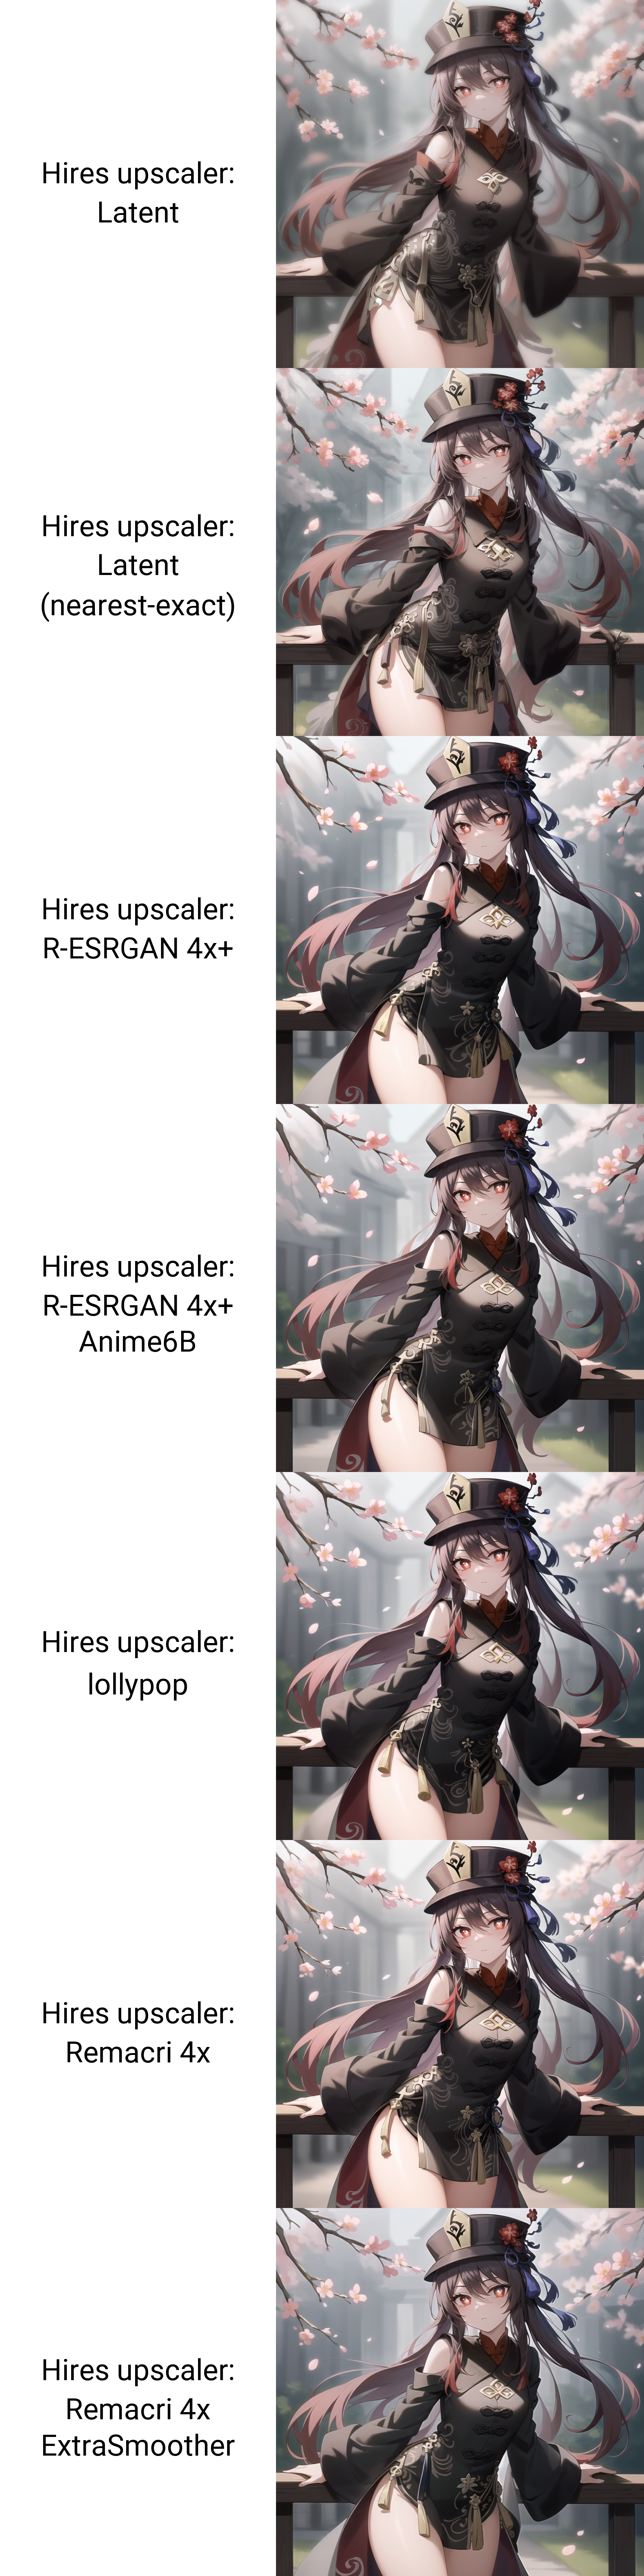
* **Upscaler:** The algorithm to upscale with. `Latent` and its variations produce creative and detailed results, but you may also like `R-ESRGAN 4x+` and its anime version. [More explanation and some comparisons further down ▼](#upscale).
* **Hires steps:** I recommend at least half as many as your sampling steps. Higher values aren't always better, and they take a long time, so be conservative here.
* **Denoising strength:** The most important parameter. Near 0.0, no detail will be added to the image. Near 1.0, the image will be changed completely. I recommend something between 0.2 and 0.6 depending on the image, to add enough detail as the image gets larger, without *destroying* any original details you like.
**Script:** Lets you access useful features and extensions, such as [X/Y/Z Plot ▼](#plot) which lets you compare images with varying parameters on a grid. Very powerful.
Here is a comparison of a few popular samplers and various sampling steps:
(Click) Sampler comparison - Photography
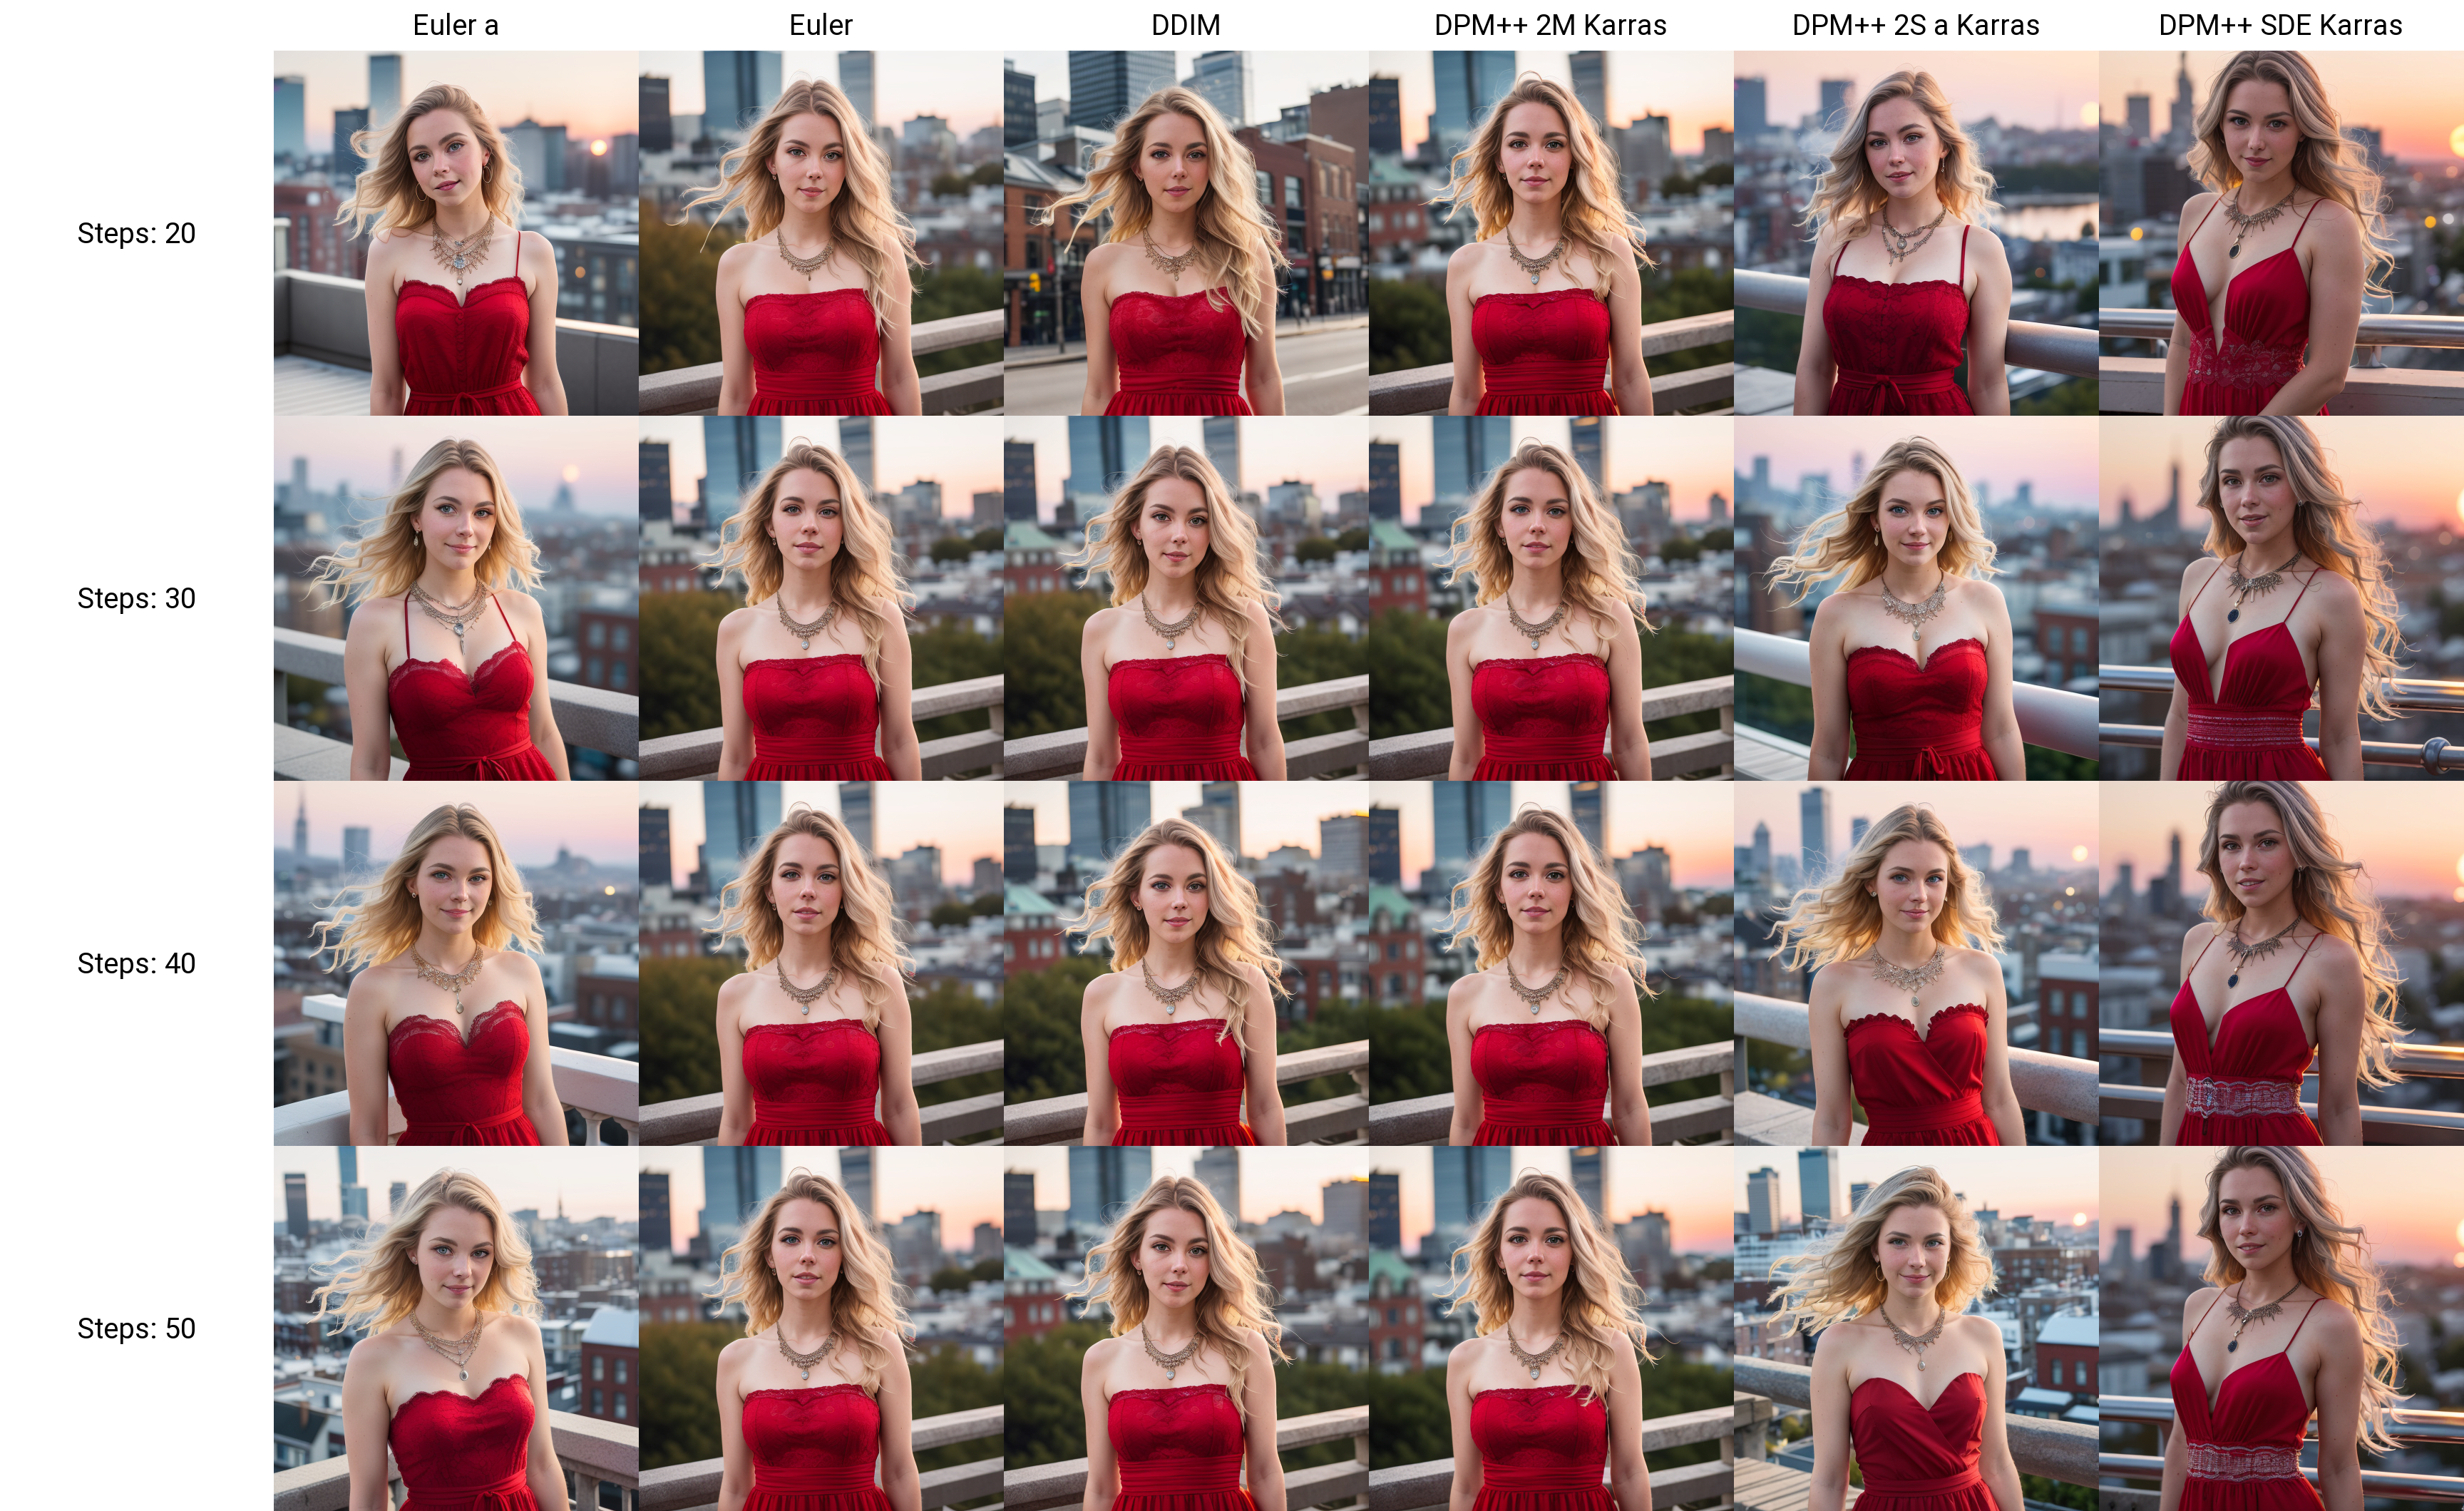
(Click) Sampler comparison - Anime

An explanation of the samplers used above: `Euler` is a basic sampler. `DDIM` is a faster version, while `DPM++ 2M Karras` is an improved version. Meanwhile we have `Euler a` or "ancestral" which produces more creative results, and `DPM++ 2S a Karras` which is also ancestral and thus similar. Finally `DPM++ SDE Karras` is the slowest and quite unique. There are many other samplers not shown here but most of them are related.
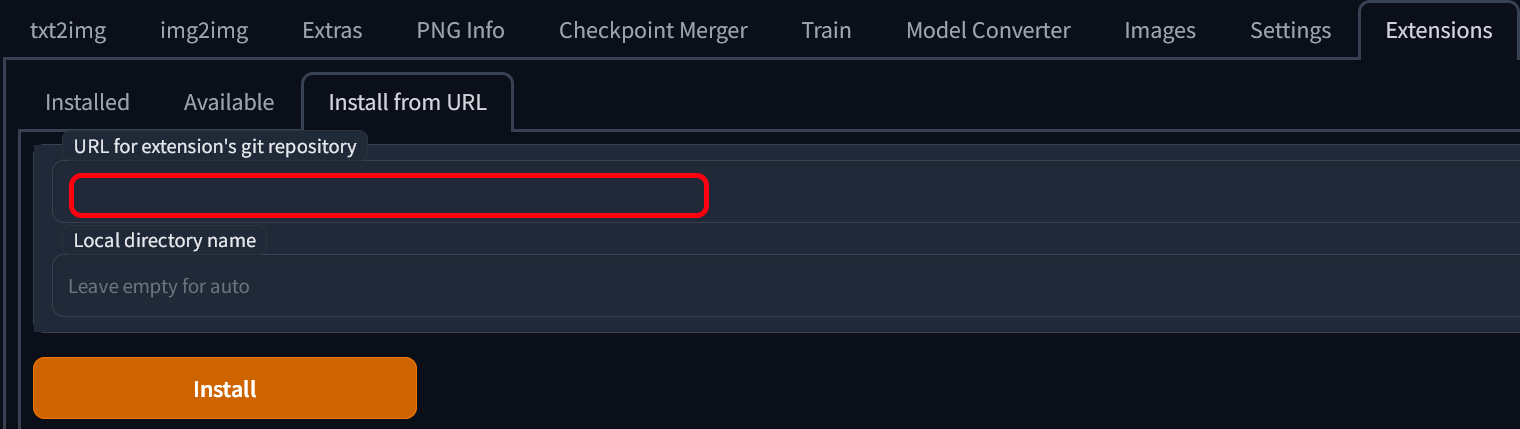
# Extensions [▲](#index)
*Stable Diffusion WebUI* supports extensions to add additional functionality and quality of life. These can be added by going into the **Extensions** tab, then **Install from URL**, and pasting the links found here or elsewhere. Then, click *Install* and wait for it to finish. Then, go to **Installed** and click *Apply and restart UI*.
Here are some useful extensions.
* [ADetailer](https://github.com/Bing-su/adetailer) - Improves the faces or other features of your generated images by refining those details.
* [Infinite image browser](https://github.com/zanllp/sd-webui-infinite-image-browsing) - This will let you browse your past generated images very efficiently, as well as directly sending their prompts and parameters back to txt2img, img2img, etc.
* [TagComplete](https://github.com/DominikDoom/a1111-sd-webui-tagcomplete) - Absolutely essential for anime art. It will show you the matching booru tags as you type. Anime models work via booru tags, and prompts without them usually don't work, so knowing them is godmode. Not all tags will work well in all models though, specially if they're rare.
* [Dynamic Prompts](https://github.com/adieyal/sd-dynamic-prompts) - A script to let you generate randomly chosen elements in your image, among other things.
* [Model Converter](https://github.com/Akegarasu/sd-webui-model-converter) - Lets you convert most 7GB/4GB models down to 2GB, by choosing `safetensors`, `fp16`, and `no-ema`. These pruned models work "almost the same" as the full models, which is to say, there is no appreciable difference due to math reasons. Most models come in 2 GB form nowadays regardless.
* [ControlNet](#controlnet) and other useful extensions now come preinstalled in Stable Diffusion Webui Forge.
# Loras [▲](#index)
LoRA or *Low-Rank Adaptation* is a form of **Extra Network** and the latest technology that lets you append a sort of smaller model to any of your full models. They are similar to embeddings, one of which you might've seen [earlier ▲](#promptneg), but Loras are larger and often more capable. Technical details omitted.
Loras can represent a character, an artstyle, poses, clothes, or even a human face (though I do not endorse this). Checkpoints are usually capable enough for general work, but when it comes to specific details with little existing examples, you'll need a Lora. They can be downloaded from [civitai](https://civitai.com) or [elsewhere (NSFW)](https://gitgud.io/gayshit/makesomefuckingporn#lora-list) and are usually between 9 MB and 144 MB. Note that bigger Loras are not necessarily better. They come in `.safetensors` format, same as most checkpoints.
Place your Lora files in the `webui/models/Lora` folder. Then, look for the 🎴 *Show extra networks* button below the big orange Generate button. It will open a new section either directly below or at the very bottom. Click on the Lora tab and press the **Refresh** button to scan for new Loras. When you click a Lora in that menu it will get added to your prompt, looking like this: ``. The start is always the same. The filename will be the exact filename in your system without the `.safetensors` extension. Finally, the number is the weight, like we saw [earlier ▲](#promptweight). Most Loras work between 0.5 and 1 weight, and too high values might "fry" your image, specially if using multiple Loras at the same time.

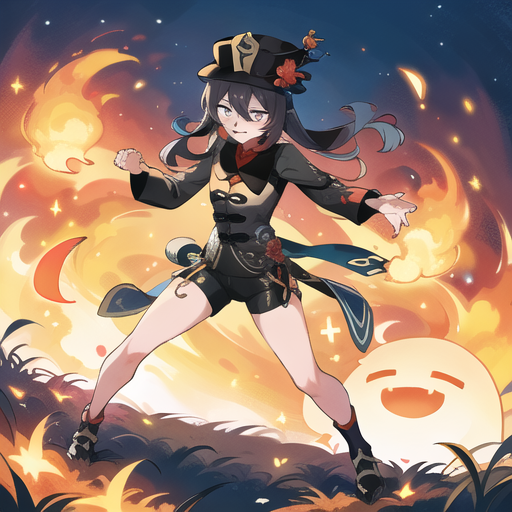
An example of a Lora is [Thicker Lines Anime Style](https://civitai.com/models/13910/thicker-lines-anime-style-lora-mix), which is perfect if you want your images to look more like traditional anime.
There are other types of Lora under the umbrella term **Lycoris**, but webui treats them the same now, and you don't need to know much about it as the end user.
# Upscaling [▲](#index)
As mentioned in [Generation Parameters ▲](#gen), normally you shouldn't go above 768 width or height when generating an image. Instead you should use `Hires fix` with your choice of upscaler and an appropiate denoising level. Hires fix is limited by your VRAM however, so you may be interested in [Ultimate Upscaler ▼](#ultimate) to go even larger.
You can download additional upscalers and put them in your `stable-diffusion-webui/models/ESRGAN` folder. They will then be available in Hires fix, Ultimate Upscaler, and Extras.
* A few notable ones can be [found here](https://huggingface.co/hollowstrawberry/upscalers-backup/tree/main/ESRGAN).
* LDSR is an advanced yet slow upscaler, its model and config can be [found here](https://huggingface.co/hollowstrawberry/upscalers-backup/tree/main/LDSR) and both must be placed in `stable-diffusion-webui/models/LDSR`.
* This [upscaler model database](https://openmodeldb.info/) contains a ton of possible choices.
Here are some comparisons. All of them were done at 0.4 denoising strength. Note that some of the differences may be completely up to random chance.
(Click) Comparison 1: Anime, stylized, fantasy
(Click) Comparison 2: Anime, detailed, soft lighting
(Click) Comparison 3: Photography, human, nature
# Scripts [▲](#index)
Scripts can be found at the bottom of your generation parameters in txt2img or img2img.
* **X/Y/Z Plot** [▲](#index)
Capable of generating a series of images, usually with the exact same seed, but varying parameters of your choice. Can compare almost anything you want, including different models, parts of your prompt, sampler, upscaler and much more. You can have 1, 2, or 3 variable parameters, hence the X, Y and Z.
Your parameters in X/Y/Z Plot are separated by commas, but anything else can go inbetween. The most common parameter to compare is **S/R Prompt**, where the first term is a phrase in your prompt and each term afterwards will replace the original. Knowing this, you can compare, say, Lora intensity, like this:
`, , , `
Here I made a comparison between different **models** (columns) and faces of different ethnicities via **S/R Prompt** (rows):
(Click) X/Y/Z Plot example
**Tip:** It appears possible to do S/R with commas by using quotes like this (note no spaces between the commas and quotes): `"term 1, term 2","term 3, term 4","term 5, term 6"`
* **Prompt Matrix** [▲](#index)
Similar conceptually to S/R from before, but more in-depth. It works by showing each possible combination of terms listed between the `|` symbol in your prompt, for example: `young man|tree|city` will always contain "young man", but we'll see what happens when we add or remove "tree" and "city". You can use commas and spaces just fine between the `|`.
Inside the script, you will choose either your prompt or your negative prompt to make a matrix of, and whether the variable terms should be put at the start or the end.
Here is a comparison using the negative prompts I showed you in [Prompts ▲](#prompt). We can see how EasyNegative affects the image, as well as how the rest of the prompt affects the image, then both together:
(Click) Prompt matrix examples

**Tip:** When using prompt matrix, the Batch Size will let you generate multiple images or the whole grid all at once.
* **Ultimate Upscaler** [▲](#index)
An improved version of a builtin script, it can be added as an [extension ▲](#extensions) and used from within **img2img**. Its purpose is to resize an image and add more detail way past the normal limits of your VRAM by splitting it into chunks, although slower. Here are the steps:
1. Generate your image normally up to 768 width and height, you can then apply hires fix if you are able to.
1. From txt2img or the Image Browser extension send it directly into img2img, carrying its prompt and parameters.
1. Set the **Denoising** somewhere between 0.1 and 0.4. If you go higher you most likely will experience mutations.
1. Go down to **Scripts** and choose **Ultimate SD Upscale**. Then, set your parameters like this, with your desired size and upscaler, and the **"Chess" Type**:
* If you have enough VRAM, you may increase the **Tile width** as well as the **Padding**. For example, doubling both of them. **Tile height** can remain at 0 and it'll match the width.
* It is not necessary to set the **Seams fix** unless you encounter visible seams between regions in the final image.
1. Generate your image and wait. You can watch the squares get sharper if you have image previews enabled.
# ControlNet [▲](#index)
ControlNet is an extremely powerful technology for Stable Diffusion. It lets you analyze information about any previously existing image and use it to guide the generation of your AI images. We'll see what this means in a moment.
If you're using the Webui Forge recommended in this guide, you should already have ControlNet installed. You may need ControlNet models; go [here](https://huggingface.co/comfyanonymous/ControlNet-v1-1_fp16_safetensors/tree/main) to download some models which you'll need to place in `webui/extensions/sd-webui-controlnet/models`. I recommend at least Canny, Depth, Openpose and Scribble, which I will show here.
I will demonstrate how ControlNet may be used. For this I chose a popular image online as our "sample image". It's not necessary for you to follow along, but you can download the images and put them in the **PNG Info** tab to view their generation data.
First, you must scroll down in the txt2img page and click on ControlNet to open the menu. Then, click *Enable*, and pick a matching *preprocessor* and *model*. To start with, I chose Canny for both. Finally I upload my sample image. Make sure not to click over the sample image or it will start drawing. We can ignore the other settings.
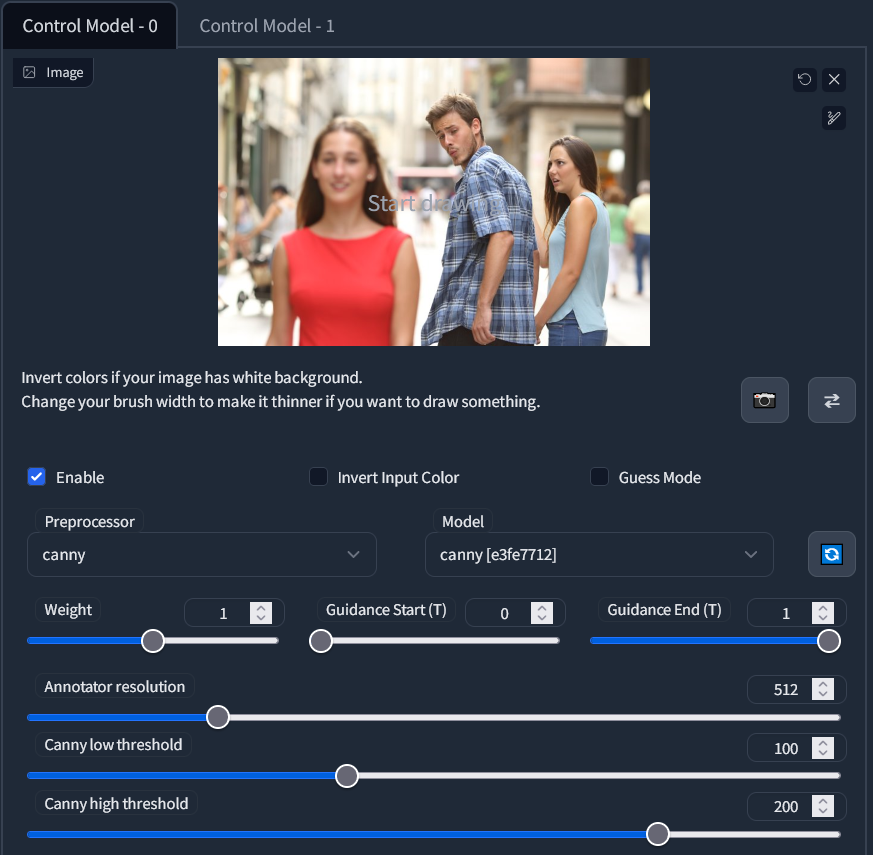
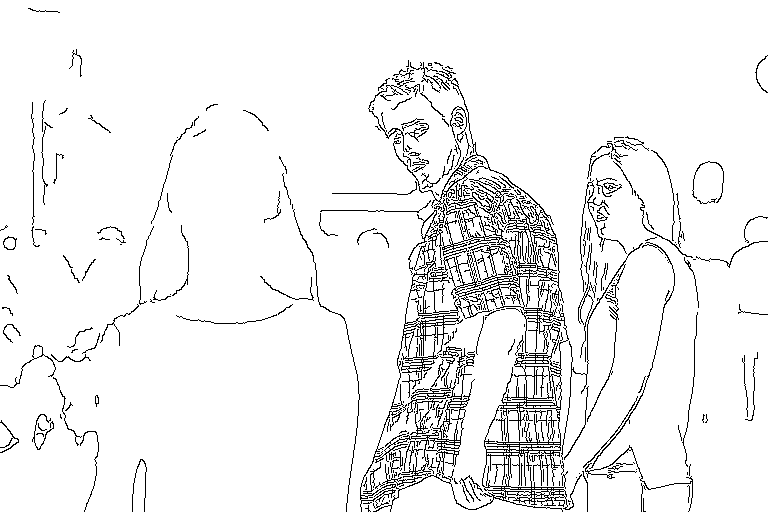
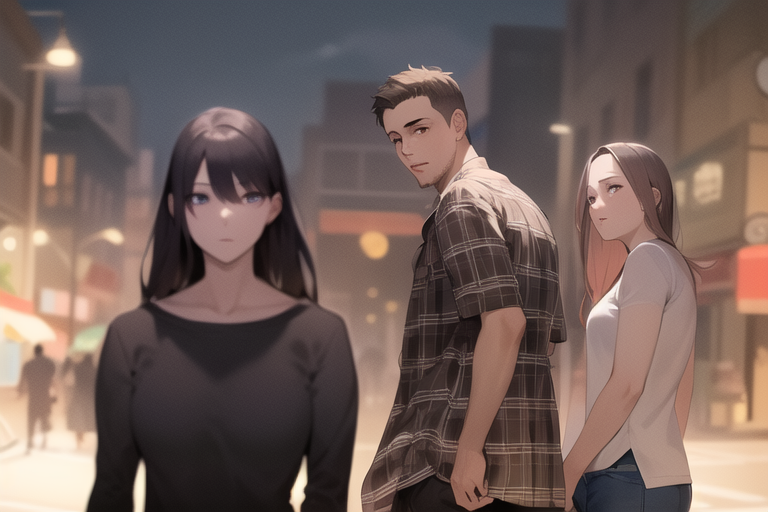
* **Canny**
The Canny method extracts the hard edges of the sample image. It is useful for many different types of images, specially where you want to preserve small details and the general look of an image. Observe:
(Click) Canny example
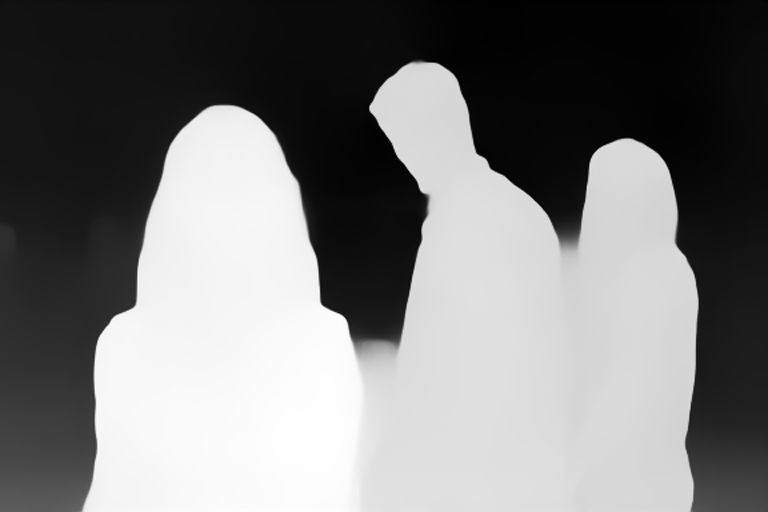
* **Depth**
The Depth method extracts the 3D elements of the sample image. It is best suited for complex environments and general composition. Observe:
(Click) Depth example
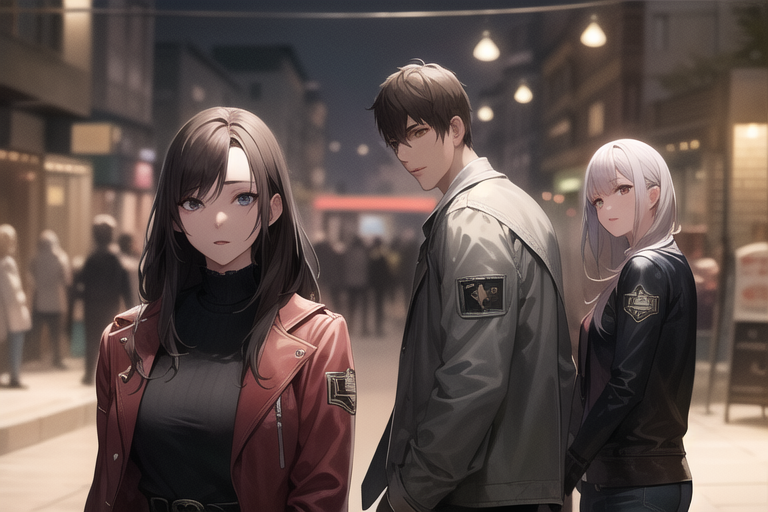
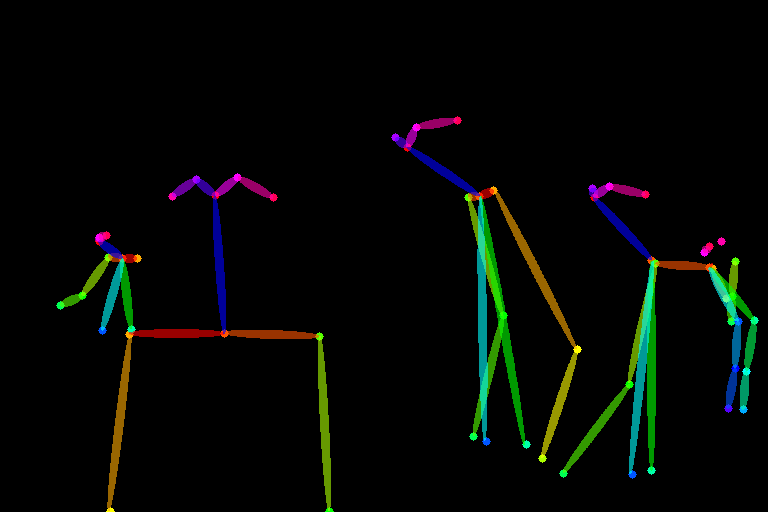
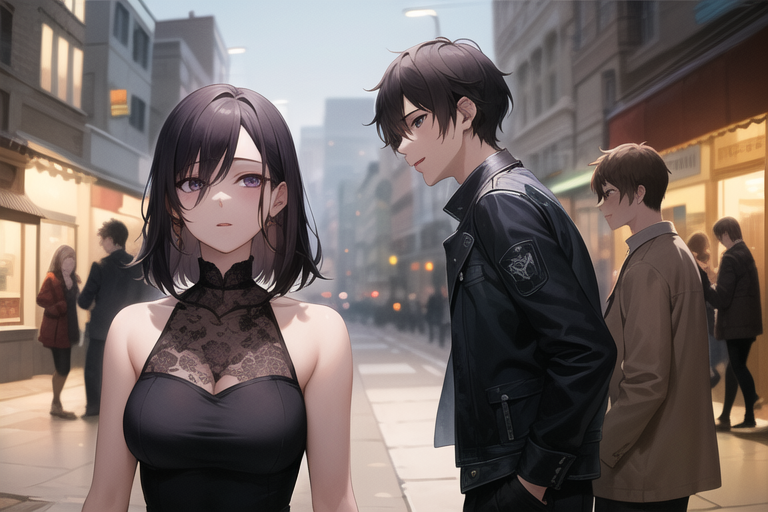
* **Openpose**
The Openpose method extracts the human poses of the sample image. It helps tremendously to get the desired shot and composition of your generated characters. Observe:
(Click) Openpose example
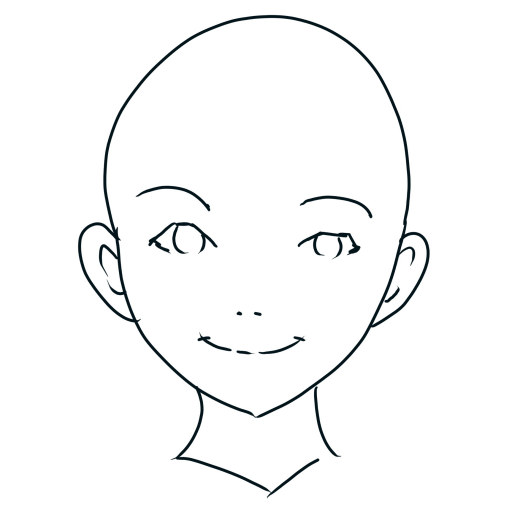
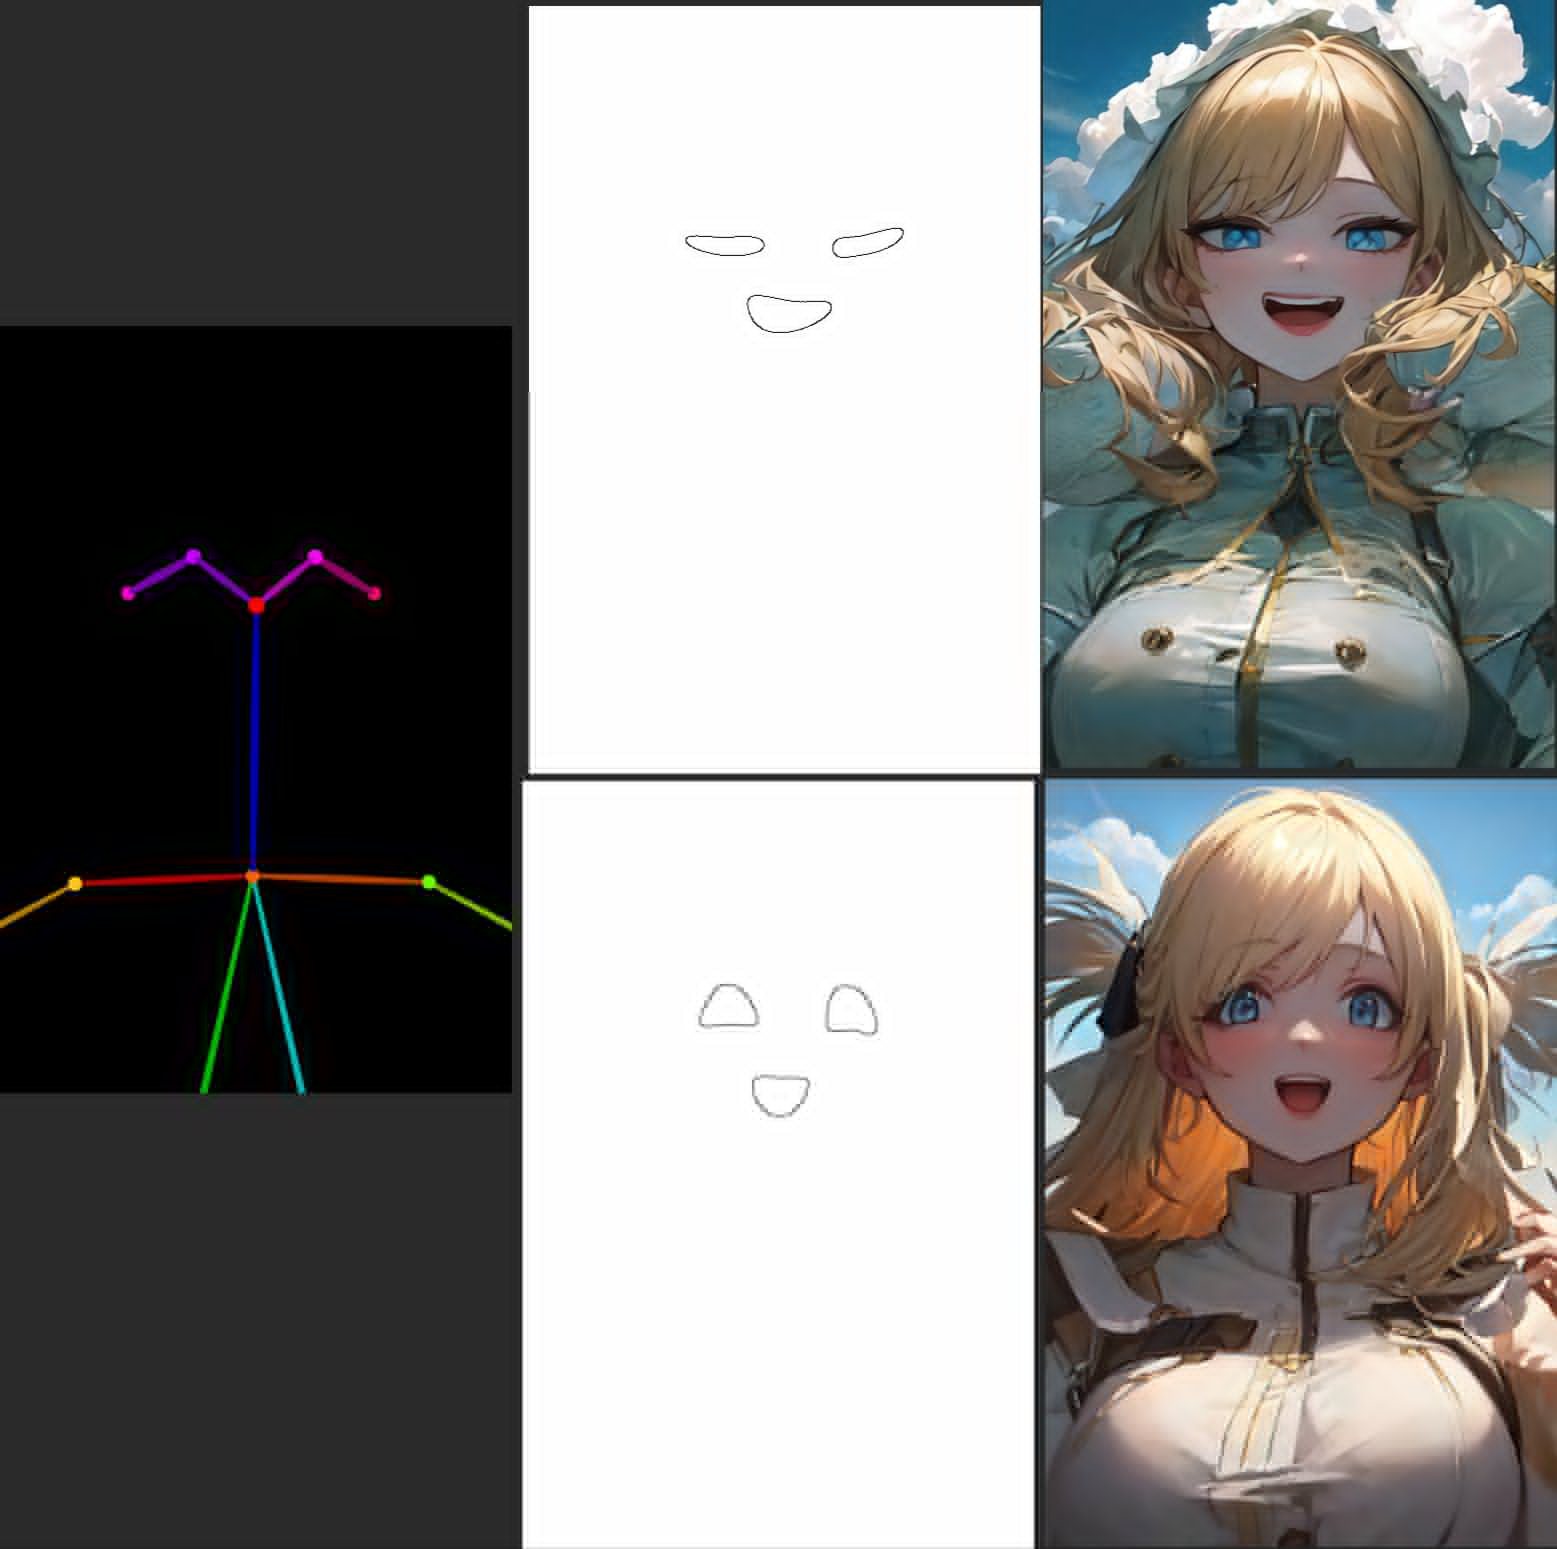
* **Scribble**
Lets you make a simple sketch and convert it into a finished piece with the help of your prompt. This is the only example not using the sample image above.
(Click) Scribble example
You will notice that there are 2 results for each method except Scribble. The first is an intermediate step called the *preprocessed image*, which is then used to produce the final image. You can supply the preprocessed image yourself, in which case you should set the preprocessor to *None*. This is extremely powerful with external tools such as Blender and Photoshop.
In the Settings tab there is a ControlNet section where you can enable *multiple controlnets at once*. One particularly good use is when one of them is Openpose, to get a specific character pose in a specific environment, or with specific hand gestures or details. Observe:
(Click) Openpose+Canny example
You can also use ControlNet in img2img, in which the input image and sample image both will have a certain effect on the result. I do not have much experience with this method.
There are also alternative **diff** versions of each ControlNet model, which produce slightly different results. You can [try them](https://civitai.com/models/9868/controlnet-pre-trained-difference-models) if you want, but I personally haven't.
# Lora Training for beginners [▲](#index)
To train a [Lora ▲](#lora) is regarded as a difficult task. However, my new guide covers everything you need to know to get started for free, thanks to Google Colab:
**[🎴 Read my Lora making guide here](https://civitai.com/models/22530)**
You can also train a Lora on your own computer if you have at least 6 GB of VRAM (or 12 GB of VRAM for XL). For that, I will list a few resources below:
* For training, use [Derrian's Easy Lora trainer](https://github.com/derrian-distro/LoRA_Easy_Training_Scripts). It has all the same settings as my trainer colab and more, so you can follow my guide too.
* Also, here's an [angry Lora training guide by ao](https://rentry.org/tohoaifaq#opinionated-lora-guide-for-colab)
* To collect your images from Gelbooru like in my guide, install [Grabber](https://github.com/Bionus/imgbrd-grabber/releases).
* To tag your dataset use the [WD1.4 Tagger extension](https://github.com/toriato/stable-diffusion-webui-wd14-tagger) for webui. First add and enable the extension, and restart your entire webui. Then go to the new **Tagger** tab, then **Batch from directory**, and select the folder with your images. Set the output name to `[name].txt` and the threshold at or above 0.35 (this is how closely each tag must match an image to be included). Then **Interrogate** and it will start generating your text files.
* To curate your tags like in my guide use the [Tag Editor extension](https://github.com/toshiaki1729/stable-diffusion-webui-dataset-tag-editor) for webui. It has all the features you need like sorting, pruning, replacing and merging tags. To add an activation tag it's as follows: After adding the extension and restarting your webui, go to the new **Dataset Tag Editor** tab then **Batch Edit Captions**. Turn off "*Show only the tags...*", turn on "*Prepend additional tags*", then add your activation tag inside the **Edit Tags** text box. Then apply your changes, scroll up and save your changes. Only then will it modify your files and add a new tag at the beginning of every text file.
# ...vtubers? [▲](#index)
That's it, that's the end of this guide for now. I'd be grateful if you want to contribute on missing topics like:
* img2img
* Inpainting
Thank you for reading!
I have [a separate repo that aggregates vtuber Loras, specially Hololive](https://huggingface.co/hollowstrawberry/holotard). If you're interested in that.
Cheers.